OAuth2 and our little buddies have talked a lot. Let's practice with a practical case.
Here I use GitHub for third-party login.
Why GitHub?There are two considerations:
-
Programmers basically have GitHub accounts for easy testing.
-
In China, no matter QQ, WeChat, Weibo, etc., registration and auditing are required, which takes a lot of time.
-
The process is the same, will do GitHub third-party login, will do QQ third-party login.
Of course, the first few articles in this series suggest that your little buddies look at them first to get a better understanding of this article.
1. Preparations
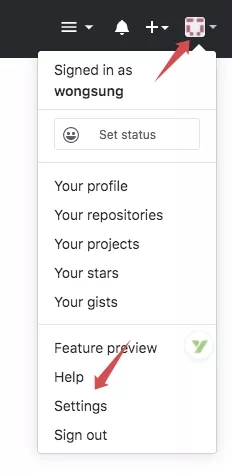
First log in to your GitHub account, click on the Personal panel in the upper right corner, and select Settings:
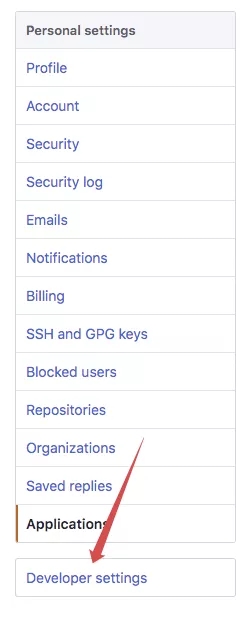
Then click Developer settings at the bottom of the left menu:
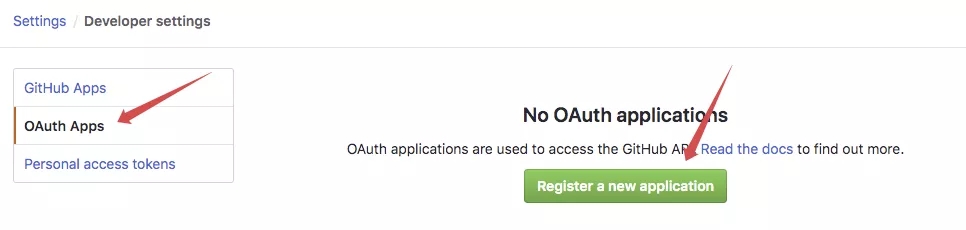
Then select OAuth Apps and click the Register a new application button:
Next, register your application information
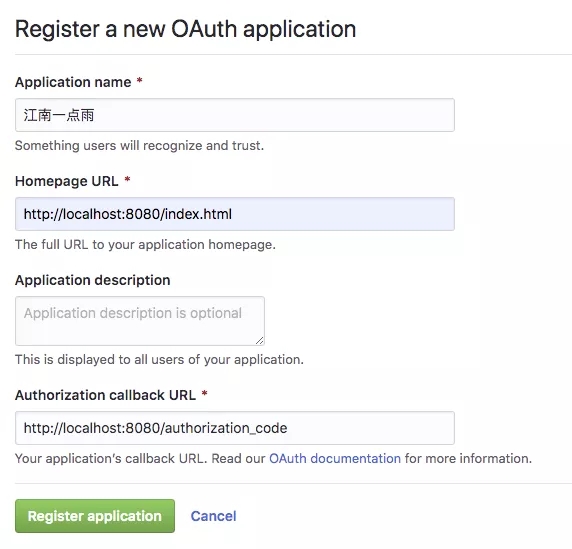
From top to bottom, this is your project name, home address, project description, and authorization success callback address.After filling out the information, click the Register application button below to complete the registration.
Once the registration is complete, we can get a Client ID and a Client Secret, which are the credentials of the client when we log in.
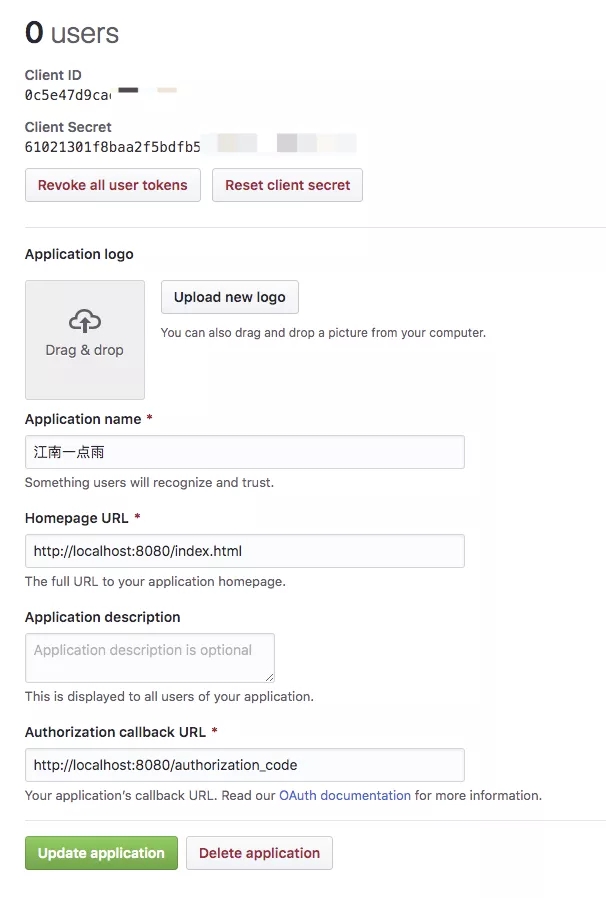
Keep these two messages in place.
When I write here, Songge cannot help but exclamate that it is still a foreign application fragrance. It takes less than a minute for GitHub to make a third-party login, and the preparation is completed. My data has been submitted for two days with QQ. The current status is still under review.But I also understand the regulatory issues Tencent is facing.
2. Create an application
Next, let's simply create a website of our own, and we'll still use the Spring Boot project to add the following dependencies:
	<parent>
		<groupId>org.springframework.boot</groupId>
		<artifactId>spring-boot-starter-parent</artifactId>
		<version>2.1.4.RELEASE</version>
		<relativePath /> <!-- lookup parent from repository -->
	</parent>

    <properties>
		<project.build.sourceEncoding>UTF-8</project.build.sourceEncoding>
		<java.version>1.8</java.version>
		<maven-jar-plugin.version>3.1.1</maven-jar-plugin.version>
	</properties>

	<dependencies>
		<dependency>
			<groupId>org.springframework.boot</groupId>
			<artifactId>spring-boot-starter-test</artifactId>
			<scope>test</scope>
		</dependency>
		<dependency>
			<groupId>org.springframework.boot</groupId>
			<artifactId>spring-boot-starter-web</artifactId>
		</dependency>

		<dependency>
			<groupId>org.springframework.boot</groupId>
			<artifactId>spring-boot-starter-thymeleaf</artifactId>
		</dependency>
		<dependency>
			<groupId>org.springframework.boot</groupId>
			<artifactId>spring-boot-devtools</artifactId>
			<optional>true</optional>
			<!-- optional=true,Dependencies will not be passed, this project depends on devtools;Later dependencies myboot Project if you want to use devtools,Need to be reintroduced -->
			<scope>true</scope>
		</dependency>


	</dependencies>
GithubLoginApplication.java
package com.imddysc.github_login;

import org.springframework.boot.SpringApplication;
import org.springframework.boot.autoconfigure.SpringBootApplication;
import org.springframework.context.annotation.Bean;
import org.springframework.web.client.RestTemplate;

@SpringBootApplication
public class GithubLoginApplication {

    public static void main(String[] args) {
        SpringApplication.run(GithubLoginApplication.class, args);
    }

    @Bean
    RestTemplate restTemplate() {
        return new RestTemplate();
    }
}
package com.imddysc.github_login.controller;

import java.util.HashMap;
import java.util.Map;

import org.springframework.beans.factory.annotation.Autowired;
import org.springframework.http.HttpEntity;
import org.springframework.http.HttpHeaders;
import org.springframework.http.HttpMethod;
import org.springframework.http.ResponseEntity;
import org.springframework.stereotype.Controller;
import org.springframework.web.bind.annotation.GetMapping;
import org.springframework.web.client.RestTemplate;
import org.springframework.web.servlet.ModelAndView;

import com.fasterxml.jackson.core.JsonProcessingException;
import com.fasterxml.jackson.databind.ObjectMapper;

@Controller
public class IndexController {

	@Autowired
    RestTemplate restTemplate;

    @GetMapping("/index.html")
    public String index() {
        return "index";
    }

    @GetMapping("/index2.html")
    public String index2() {


        return "index2";
    }

    @GetMapping("/authorization_code")
    public ModelAndView authorization_code(String code) throws JsonProcessingException {
        Map<String, String> map = new HashMap<>();
        map.put("client_id", "d1a8bb0343700xxxxxxx");
        map.put("client_secret", "60921e0d49a53d4c7bxxxxxxxxx");
        map.put("state", "randomState");
        map.put("code", code);
        map.put("redirect_uri", "http://localhost:8080/authorization_code");
        Map<String,String> resp = restTemplate.postForObject("https://github.com/login/oauth/access_token", map, Map.class);
        System.out.println(resp);
        HttpHeaders httpheaders = new HttpHeaders();
        httpheaders.add("Authorization", "token " + resp.get("access_token"));
        HttpEntity<?> httpEntity = new HttpEntity<>(httpheaders);
        ResponseEntity<Map> exchange = restTemplate.exchange("https://api.github.com/user", HttpMethod.GET, httpEntity, Map.class);
        System.out.println("exchange.getBody() = " + new ObjectMapper().writeValueAsString(exchange.getBody()));
        // request.setAttribute("exchange", exchange);
        ModelAndView  mav = new ModelAndView("forward:/index2.html");
        mav.addObject("exchange", exchange.getBody());
        return mav;
    }

}
Then we create a simple one in the resources/templates directoryIndex.htmlAnd index2.html
index.html
<!DOCTYPE html>
<html lang="en">
<head>
    <meta charset="UTF-8">
    <title>Title</title>
</head>
<body>
<p>hello Welcome to a little rain station in the south of the Yangtze River!</p>
<div>
    Social Account Login:<a href="https://github.com/login/oauth/authorize?client_id=d1a8bb034370xxxxx&state=randomState">
        <svg t="1587352912571" class="icon" viewBox="0 0 1024 1024" version="1.1" xmlns="http://www.w3.org/2000/svg"
             p-id="2196" width="32" height="32">
            <path d="M512 42.666667A464.64 464.64 0 0 0 42.666667 502.186667 460.373333 460.373333 0 0 0 363.52 938.666667c23.466667 4.266667 32-9.813333 32-22.186667v-78.08c-130.56 27.733333-158.293333-61.44-158.293333-61.44a122.026667 122.026667 0 0 0-52.053334-67.413333c-42.666667-28.16 3.413333-27.733333 3.413334-27.733334a98.56 98.56 0 0 1 71.68 47.36 101.12 101.12 0 0 0 136.533333 37.973334 99.413333 99.413333 0 0 1 29.866667-61.44c-104.106667-11.52-213.333333-50.773333-213.333334-226.986667a177.066667 177.066667 0 0 1 47.36-124.16 161.28 161.28 0 0 1 4.693334-121.173333s39.68-12.373333 128 46.933333a455.68 455.68 0 0 1 234.666666 0c89.6-59.306667 128-46.933333 128-46.933333a161.28 161.28 0 0 1 4.693334 121.173333A177.066667 177.066667 0 0 1 810.666667 477.866667c0 176.64-110.08 215.466667-213.333334 226.986666a106.666667 106.666667 0 0 1 32 85.333334v125.866666c0 14.933333 8.533333 26.88 32 22.186667A460.8 460.8 0 0 0 981.333333 502.186667 464.64 464.64 0 0 0 512 42.666667"
                  fill="#2c2c2c" p-id="2197"></path>
        </svg>
    </a>
</div>
<div>International Station:<a href="http://www.javaboy.org">javaboy.org</a></div>
<div>Domestic Station:<a href="http://www.itboyhub.com">itboyhub.com</a></div>
</body>
</html>
index2.html
<!DOCTYPE HTML>
<html xmlns:th="http://www.thymeleaf.org">
<head>
	 <title>SpringBoot Template Rendering</title>
    <meta http-equiv="Content-Type" content="text/html;charset=UTF-8"/>
    <meta charset="UTF-8">
</head>
<body>
<p>hello Welcome to the fishing website!</p>
<hr>
<div>

    <span>User name:</span><p th:text="${exchange.name}"/>
    <span>user ID: </span><p th:text="${exchange.id}"/>
    <span>Head portrait:</span><img th:src="@{exchange.avatar_url}"/>

</div>
<div>International Station:<a href="http://www.javaboy.org">javaboy.org</a></div>
<div>Domestic Station:<a href="http://www.itboyhub.com">itboyhub.com</a></div>
</body>
</html>
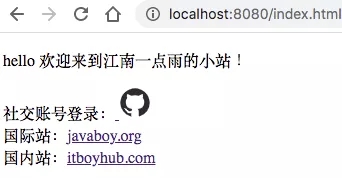
This is a simple HTML page with a GitHub icon on it. Click on this icon to go to GitHub to complete the authorization operation. Note that the link for authorization is as follows:
-
https://github.com/login/oauth/authorize
This authorization requires carrying a client_id parameter, this client_id is the client_obtained in preparationId, the other state is used to prevent cross-site scripting attacks, and the value of the state parameter can be filled in at will.
Let's look at the effect map of the page:
When we click on the GitHub icon and complete the authorization operation, we automatically jump to the callback address we filled in in the preparation work, and take a code parameter with us to get access_token, with access_token and we'll get user information.
So let's add another/authorization_code interface as follows:
@GetMapping("/authorization_code")
public String authorization_code(String code) {
    Map<String, String> map = new HashMap<>();
    map.put("client_id", "xxx");
    map.put("client_secret", "xxxx");
    map.put("state", "javaboy");
    map.put("code", code);
    map.put("redirect_uri", "http://localhost:8080/authorization_code");
    Map<String,String> resp = restTemplate.postForObject("https://github.com/login/oauth/access_token", map, Map.class);
    System.out.println(resp);
    HttpHeaders httpheaders = new HttpHeaders();
    httpheaders.add("Authorization", "token " + resp.get("access_token"));
    HttpEntity<?> httpEntity = new HttpEntity<>(httpheaders);
    ResponseEntity<Map> exchange = restTemplate.exchange("https://api.github.com/user", HttpMethod.GET, httpEntity, Map.class);
    System.out.println("exchange.getBody() = " + exchange.getBody());
    return "forward:/index.html";
}
In authorization_In the code interface, we start withHttp://localhost: 8080/authorization_code makes a request to get access_token, note the parameter we need, client_id and client_secret makes it our first step to get ready to apply for it.Get access_The data format for token is as follows:
{access_token=9f33730ef09b74943a1cf7d8f9c0e567b9286829, token_type=bearer, scope=}
As you can see, there is access_token, with token_type, there are also scope s.
Next, hold access_token, access_token is in the request header and we can call itHttps://api.github.com/userThe interface obtains user information in the following format:
{
    "login":"lenve",
    "id":35444368,
    "node_id":"MDQ6VXNlcjM1NDQ0MzY4",
    "avatar_url":"https://avatars3.githubusercontent.com/u/35444368?v=4",
    "gravatar_id":"",
    "url":"https://api.github.com/users/lenve",
    "html_url":"https://github.com/lenve",
    "followers_url":"https://api.github.com/users/lenve/followers",
    "following_url":"https://api.github.com/users/lenve/following{/other_user}",
    "gists_url":"https://api.github.com/users/lenve/gists{/gist_id}",
    "starred_url":"https://api.github.com/users/lenve/starred{/owner}{/repo}",
    "subscriptions_url":"https://api.github.com/users/lenve/subscriptions",
    "organizations_url":"https://api.github.com/users/lenve/orgs",
    "repos_url":"https://api.github.com/users/lenve/repos",
    "events_url":"https://api.github.com/users/lenve/events{/privacy}",
    "received_events_url":"https://api.github.com/users/lenve/received_events",
    "type":"User",
    "site_admin":false,
    "name":null,
    "company":null,
    "blog":"",
    "location":null,
    "email":null,
    "hireable":null,
    "bio":null,
    "public_repos":2,
    "public_gists":0,
    "followers":1,
    "following":1,
    "created_at":"2018-01-15T06:05:04Z",
    "updated_at":"2020-04-20T03:00:49Z"
}
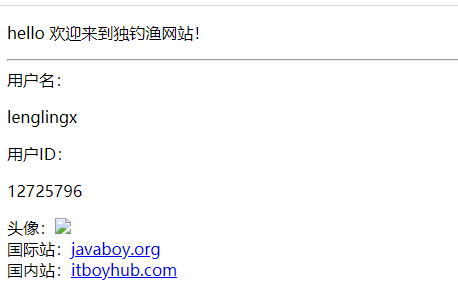
Okay, the user's GitHub information is now available, and the next step is to save the database, which is accessed by the login process.
After that, we have completed the third-party login function, which is actually very Easy. As long as you get through this process, it will be very easy for you to access WeChat login and QQ login in the future.