minio high performance Kubernetes native object storage
-
minio high performance Kubernetes native
Object storage
- characteristic
- install
- stand-alone
- Distributed
- Client mc installation and use
- Optimization Practice of minio in K8S
MinIO is an object storage service based on Apache License v2.0 open source protocol. It is compatible with Amazon S3 cloud storage service interface and is very suitable for storing large-capacity unstructured data, such as pictures, videos, log files, backup data and container / virtual machine images. An object file can be of any size, ranging from a few kb to a maximum of 5T. MinIO is a very lightweight service that can be easily combined with other applications, similar to NodeJS, Redis Or MySQL.
characteristic
- High performance minio is the fastest object storage in the world (the official website says: https://min.io/)
- Elastic capacity expansion is very convenient for cluster elastic capacity expansion
- Native cloud services
- Open source and free, most suitable for enterprise customization
- S3 factual standard
- Simple and powerful
- Storage mechanism (Minio uses erasure code and checksum to protect data from hardware failure and silent data damage. Even if half of the number (N/2) of hard disks are lost, the data can still be recovered)
install
minio is divided into server and client. The server is deployed through minio. The client is only a binary command (mc). Object storage (addition, deletion, query, etc.) can be operated through mc. Of course, minio also provides SDK s in various languages. For details, please refer to Official website
The installation of the server is divided into independent stand-alone mode and Distributed installation. The installation method of the following stand-alone mode is similar to that of the stand-alone mode, but different according to the transmission parameters
stand-alone
- Docker container installation docker pull Mini / mini docker run - P 9000:9000 Mini / mini server / data
- macOS brew install minio/stable/minio minio server /data
- Linux wget https://dl.min.io/server/minio/release/linux-amd64/minio chmod +x minio ./minio server /data
- Windows wget https://dl.min.io/server/minio/release/windows-amd64/minio.exe minio.exe server D:\Photos
Distributed
Distributed benefits distributed Minio allows you to form multiple hard disks (even on different machines) into an object storage service. Because the hard disks are distributed on different nodes, distributed Minio avoids a single point of failure
Data protection distributed Minio adopts erasure code to prevent multiple node downtime and bit attenuation bit rot. distributed Minio requires at least four hard disks, and the erasure code function is automatically introduced by using distributed Minio.
The highly available stand-alone Minio service has a single point of failure. On the contrary, if it is a distributed Minio with n hard disks, your data is safe as long as N/2 hard disks are online. However, you need at least N/2+1 hard disks to create new objects. For example, a 16 node Minio cluster with 16 hard disks per node is still readable even if 8 servers are down However, you need 9 servers to write data. Note that as long as you comply with the restrictions of distributed Minio, you can combine different nodes and several hard disks per node. For example, you can use 2 nodes with 4 hard disks per node, or 4 nodes with 2 hard disks per node, and so on.
Consistency Minio in distributed and stand-alone modes, all read and write operations strictly follow the read after write consistency model.
Erasure code Minio uses erasure code and checksum to protect data from hardware failure and silent data damage. Even if you lose half (N/2) of your hard disk, you can still recover data.
What is erasure code? Erasure code is a mathematical algorithm to recover lost and damaged data. Minio uses Reed Solomon code to split objects into N/2 data and N/2 parity blocks. This means that if there are 12 disks, an object will be divided into 6 data blocks and 6 parity blocks, and you can lose any 6 disks (whether it is a stored data block or parity block), you can still recover the data from the remaining disk. Is it very NB? Please google if you are interested.
Why is erasure code useful? The working principle of erasure code is different from RAID or replication. For example, RAID6 can not lose data when two disks are lost, while Minio erasure code can still ensure that half of the disks are lost data security Moreover, the Minio erasure code is used at the object level to recover one object at a time, while RAID is used at the volume level, and the data recovery time is very long. Minio encodes each object separately. Once the storage service is deployed, it usually does not need to replace the hard disk or repair. The design goal of the Minio erasure code is to improve performance and use hardware as much as possible.
What is bit rot protection? Bit rot, also known as data corruption, Silent Data Corruption and Silent Data Corruption, is a serious data loss problem of hard disk data at present. The data on the hard disk may be damaged unknowingly, and there is no error log. As the saying goes, open guns are easy to hide and hidden arrows are difficult to prevent. This kind of mistake made behind the scenes is better than the hard disk But don't be afraid. The Minio erasure code uses a high-speed HighwayHash hash based checksum to prevent bit attenuation.
Distributed deployment: GNU/Linux and macOS example 1: start the distributed Minio instance with 8 nodes and 1 disk for each node. You need to run the following commands on all 8 nodes.
export MINIO_ACCESS_KEY=<ACCESS_KEY>
export MINIO_SECRET_KEY=<SECRET_KEY>
minio server http://192.168.1.11/export1 http://192.168.1.12/export2 \
               http://192.168.1.13/export3 http://192.168.1.14/export4 \
               http://192.168.1.15/export5 http://192.168.1.16/export6 \
               http://192.168.1.17/export7 http://192.168.1.18/export8

#helm installs google itself
helm install minio --set mode=distributed,numberOfNodes=4,imagePullPolicy=IfNotPresent,accessKey=v9rwqYzXXim6KJKeyPm344,secretKey=0aIRBu9KU7gAN0luoX8uBE1eKWNPDgMnkVqbPC,service.type=NodePort,service.nodePort=25557 googleapis/minio -n velero
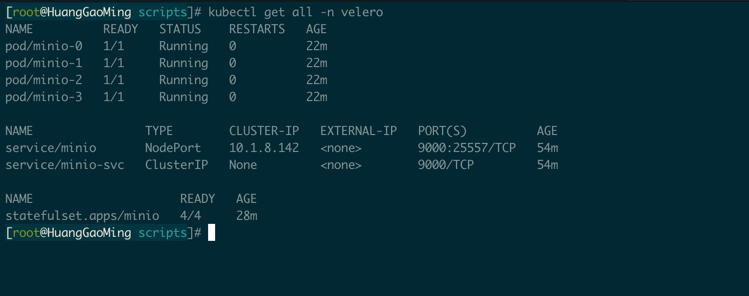
#After the installation, query the status of pods. If the READY status of pods is normal, the installation is successful, as shown in the figure below
kubectl get pods -n velero -o wide
#If the READY status of pods is not always the status, check logs
kubectl logs minio-0 -n velero
#If you are prompted that the disk s are waiting, you can restart pods to check
kubectl delete pods -n velero minio-{0,1,2,3}
#The default is cluster access. For convenience, I use nodeport

As shown in the figure above, when I use four nodes to create distributed minio, I will use the default pvc to create storage. By default, one 10G storage is created for each node (which can be customized and modified)
Client mc installation and use
install
wget https://dl.min.io/client/mc/release/linux-amd64/mc
chmod +x mc
./mc --help
mc command Guide
ls       Lists files and folders.
mb       Create a bucket or folder.
cat      Displays the contents of files and objects.
pipe     Will one STDIN Redirect to an object or file STDOUT.
share    Generate for sharing URL.
cp       Copy files and objects.
mirror   Mirror buckets and folders.
find     Find files based on parameters.
diff     Compare the difference between two folders or buckets.
rm       Delete files and objects.
events   Manage object notifications.
watch    Listen for events on files and objects.
policy   Manage access policies.
session  by cp Command to manage saved sessions.
config   Administration mc Configuration file.
update   Check for software updates.
version  Output version information.
mc command practice
#View the minio server configuration
mc config host ls

#Add minio server configuration
mc config host add minio  http://minio.vaicheche.com:25555  v9rwqYzXXim6KJKeyPm344 0aIRBu9KU7gAN0luoX8uBE1eKWNPDgMnkVqbPC --api s3v4

#View Mini bucket
mc ls minio

#Create bucket
mc mb minio/backup

#Upload local directory (file without r)
mc cp -r  ingress minio/backup/

#Download remote directory (file without r)
mc cp -r  minio/backup .

#Mirror a local folder to Minio (similar to rsync)
mc mirror localdir/ minio/backup/

#Continuously listen for local folder mirroring to Minio (similar to rsync)
mc mirror -w localdir/ minio/backup/

#Continuously find all jpeg images from the minio bucket and copy them to the minio "play/bucket" bucket
mc find minio/bucket --name "*.jpg" --watch --exec "mc cp {} play/bucket"

#Delete directory
mc rm minio/backup/ingress  --recursive --force

#Delete file
mc rm minio/backup/service_minio.yaml

#Delete all incomplete uploaded objects from mybucket
mc rm  --incomplete --recursive --force play/mybucket

#Delete objects 7 days ago
mc rm --force --older-than=7 play/mybucket/oldsongs

#Output MySQL database dump file to minio
mysqldump -u root -p ******* db | mc pipe minio/backups/backup.sql

#mongodb backup
mongodump -h mongo-server1 -p 27017 -d blog-data --archive | mc pipe minio1/mongobkp/backups/mongo-blog-data-`date +%Y-%m-%d`.archive
Optimization Practice of minio in K8S
As mentioned above, minio's practice in k8s is in my practice environment. After I install distributed through helm, I use nfs as storeageclasses by default. There are four nodes in total and four pvc are automatically created. After I delete the data of one pvc, minio can still read and write normally, and the data can still exist. Refer to the following figure
But there is one biggest problem. If you use self built shared storage such as nfs, even if minio has four nodes, it can ensure data security. However, you do have only one nfs disk. In case your nfs goes down and the disk is damaged, all your data will be gone. Therefore, in order to ensure data security, it is recommended to use hostPath, Save the corresponding data in each node. In this way, even if the node goes down and the disk is damaged, your data will not be lost. Moreover, the speed of reading and writing data through the local node will be faster. Of course, you need to manage the local storage of the node
Deployment practice of minio in K8S hostPath
Environment Description: five node k8s environments, four of which are used as Minos, and all use node host networks
#1. Label four nodes because I want to deploy minio by selecting the node labeled minio server = true
kubectl get node --show-labels=true
kubectl label nodes node-hostname1  minio-server=true
kubectl label nodes node-hostname2  minio-server=true
kubectl label nodes node-hostname3  minio-server=true
kubectl label nodes node-hostname3  minio-server=true

#2. Add hosts to the corresponding host. If your hostname can be resolved automatically, it does not need to be modified. Add all 4 hosts
echo "host1 [IP1] >> /etc/hosts"
echo "host2 [IP2] >> /etc/hosts"
echo "host3 [IP3] >> /etc/hosts"
echo "host4 [IP4] >> /etc/hosts"

#3. Create a namespace
#You can also use other customized namespace s, but you need to modify the yaml file below
kubectl create ns velero

#4. Download headless, daemon and service
wget https://download.osichina.net/tools/k8s/yaml/minio/minio-distributed-headless-service.yaml
wget https://download.osichina.net/tools/k8s/yaml/minio/minio-distributed-daemonset.yaml
wget https://download.osichina.net/tools/k8s/yaml/minio/minio-distributed-service.yaml

#5. Modify and create the corresponding service and daemon
The main modification is`minio-distributed-daemonset.yaml`
hostPath: Define the local path of the node you need to use
MINIO_ACCESS_KEY,MINIO_SECRET_KEY: Define your secret key,Timely modification for safety
args: After starting parameters url Change to hostname mode: http://host{1...4}/data/minio

`minio-distributed-service.yaml`Serving the outside world,Default to ClusterIP,Can combine ingress perhaps nodePort To visit,You can modify it yourself

kubectl create -f minio-distributed-statefulset.yaml
kubectl create -f minio-distributed-daemonset.yaml
kubectl create -f minio-distributed-service.yaml
Original text: https://cloud.tencent.com/developer/article/1627473