Pre thinking and understanding
Thoughts on what is micro service
There is a word often seen in the field of software development called divide and conquer. At the beginning, when the program is relatively simple, the extraction of methods, the isolation of the files where the methods are located, and the emergence of object-oriented classes. Then, after the software gradually needs to do more and more complex things, there is the separation of front and rear ends, the separation of back-end code by maven or Gradle and other technologies The separation of SOA thinking from services and the front-end separation of micro front-end thinking recently emerged. Software technology has been inseparable from division and rule throughout the iteration process, and micro services are no exception. The micro service I understand is a natural extension of the division and rule idea in the software architecture system, The purpose is to divide the whole project into the smallest unit according to the business field, and then design, develop, test and deploy independently. Through the communication between these divided small projects, the business functions of the whole project are completed. The advantage of this is to accurately control the scalability of business requirements within a small range, And it is more suitable for rapid iteration in the whole software life cycle (small granularity is more suitable for DevOps). Because there are many new problems after the service is completely componentized, such as service governance, poor management and maintenance caused by the same or overlapping configuration of different services after segmentation and components providing the same service, avalanche and fan out caused by service invocation, complex front and back-end interaction after segmentation, etc, The resulting registration center, configuration center, circuit breaker, gateway and other technologies common in the microservice technology system are just to better realize componentization, improve software availability and make software easier to maintain. They are only additional ideas or technologies of microservice thought, and the most essential and pure thought of microservice is still just divide and rule.
The difference between SOA and microservices
Comparing each service of SOA to each component of microservice and enterprise service bus to gateway, it seems that they do the same thing in form, but microservices have more things than SOA. After the emergence of cloud alibaba, the boundary between the two is more difficult to distinguish Someone His analysis is quite reasonable. He describes the characteristics of SOA architecture and microservice architecture.
SOA architecture features
- Service governance: from the perspective of system, solve the communication problems between enterprise systems, and sort out the original scattered and unplanned network structure into a regular and manageable star structure between systems. This step often requires the introduction of some products, such as ESB, technical specifications and service management specifications; The core problem to be solved in this step is [order]
- **Service oriented of the system: * * from the perspective of function, abstract the business logic into reusable and assembleable services, and realize the rapid regeneration of business through the arrangement of services. The purpose is to transform the original inherent business functions into general business services and realize the rapid reuse of business logic; The core problem to be solved in this step is [reuse]
- **Service oriented business: * * from the perspective of enterprises, abstract enterprise functions into reusable and composable services; Transform the original functional enterprise structure into a service-oriented enterprise structure to further improve the external service ability of the enterprise; "The first two steps are to solve the problems of system call and system function reuse from the technical level". The third step is to encapsulate a business unit into a service driven by business. The core problem to be solved in this step is [high efficiency]
Microservice architecture features
- By realizing componentization through services, developers no longer need to coordinate the impact of other service deployment on the service.
- Services and development teams are divided according to business capabilities. Developers can freely choose development technologies and provide API services
- Decentralization. Each microservice has its own private database to persist business data. Microservices can only access their own database,
- Infrastructure automation (devops, Automated Deployment)
Main differences
I didn't completely CTRL + C him, because I felt that the original author didn't express clearly in some details. I wanted to know his clicks Someone , the following are listed in combination with the original author's and my personal understanding.
| Distinguishing points | SOA | Microservices |
|---|---|---|
| Particle size | Can not be small | The goal is small |
| Coupling degree | loose coupling | The expectation is looser coupling |
| organizational structure | Any type | It is more suitable for decentralized maintenance for small teams |
| Focus | Service governance, heterogeneous system communication | Thorough componentization, DevOps |
The difference in granularity is due to different concerns, and the difference in coupling degree and suitable organizational structure is due to different granularity. Therefore, I feel that the core difference between the two architectural ideas is still due to different concerns.
Advantages of microservices
- The application achieves maximum decoupling.
- Components have their own independent scalability.
- The complexity of a single component is low, and the maintenance of a single component will be easier
- Independent components make the system more convenient to iterate, which is suitable for DevOps.
- After application decoupling and independent deployment, the whole system has higher fault tolerance.
- The reusability of components becomes higher.
Microservice disadvantages
- Log troubleshooting, call chain becomes longer, and troubleshooting becomes more difficult
- Although each component of microservice is simple, the overall structure is complex
- Higher requirements for designers and developers (involving the ability to divide the boundaries of higher requirements)
- The cost of personnel transfer is even higher
- The required teamwork ability is higher
- The cost of system deployment, operation and maintenance and monitoring is higher
Zookeeper
Zookeeper node (Znode) type
- Persistent node: the node's data will be persisted to disk
- Temporary node: the node life cycle is consistent with the client life cycle of the node
- Ordered node: an incremental sequence is added after the created node. This sequence is unique to the same parent node and can be combined with persistent and temporary nodes
- Container node: if there is no child node under the container node, the container node will be automatically cleared by Zookeeper in the future. The scheduled task checks once every 60s by default
- TTL node: for persistent nodes, a lifetime can be set
[note] container nodes and TTL nodes only exist after version 3.5.3
Watcher mechanism
ZooKeeper provides a subscription / notification mechanism for Znode, that is, event notification will be triggered when the state of Znode node changes or the client connection changes.
- getData() is used to obtain the value information of the node. The corresponding time notification will be triggered when the monitored node is created, modified or deleted.
- getChildren() is used to obtain the child nodes of the specified node. When the child nodes of the listening node are created, modified or deleted, an event notification will be triggered.
- exists(), judge whether the node exists, and the event type monitored is the same as getData().
[note] the Watcher event monitoring mechanism is one-time. After the first trigger, the event needs to be registered in the callback again
Zookeeper application scenario
Distributed lock
Using the uniqueness of Zookeeper temporary nodes and peer nodes, you can use Zookeeper to implement a distributed lock
-
Acquire lock
When acquiring an exclusive lock, the client creates a temporary node under a fixed node. Because the uniqueness of the peer node can ensure that only one client is created successfully, and the exclusive lock is obtained if the creation is successful. Other clients who do not obtain the lock subscribe to the changes of the created node. When receiving the notification that the node is deleted, the node is re created to compete for the lock
-
Release lock
- The client is disconnected from Zookeeper because of an exception. Based on the characteristics of the temporary node, Zookeeper will delete the node and release the lock
- After the client that obtains the lock executes the business logic, it actively deletes the node and releases the lock
Master election
- Using the uniqueness of temporary nodes, multiple machines can create a master node in Zookeeper at the same time. The one who can create a master node successfully is the master. Others who fail to create a master node listen to the node. If the master is disconnected from Zookeeper due to exceptions, other clients will be notified to re create a master node to compete for the master.
- Using temporary ordered nodes, multiple machines can create ordered nodes in Zookeeper at the same time. The node with the smallest (or largest) number is the Master node, while other non Master nodes subscribe to the previous node of the node. When the subscribed node hangs up, the latter will receive a notification to find the previous node of other nodes. If there is a previous node, subscribe to the previous node, If not, it is the Master node itself.
Registration Center
As a registry, first of all, we need to be able to register services in the registry. In addition, we also need to pay attention to two important points: one is the dynamic perception of service uplink and offline, and the other is load balancing.
-
Service registration
For example, a service named HelloService needs to be registered. During service initialization, a persistence node named com.xsl.service.HelloService is created. Under this node, the provider creates a providers persistence node under the persistence node, and creates a temporary node under the providers with its own url and port, This completes the registration of the service.
-
Service online and offline dynamic perception
This is easier because the client creates a temporary node when registering itself. Therefore, when the client goes offline, Zookeeper deletes the node. Now, only the client needs to subscribe to the change status of the child nodes of the providers node. When the node is updated, Zookeeper notifies the client to update the url list
-
load balancing
Load balancing is carried out through the load balancing algorithm of the client. I thought about why most of the load balancing seen now is client load balancing rather than load balancing in the registry? I think the possible reasons are as follows. If the registry performs load balancing, it means that the client needs to go to the registry to pull the list every time. Will this put too much pressure on the registry?
Dubbo
Support for communication mode
-
Support the publishing of multiple protocols:
dubbo service supports publishing of multiple protocols. The default is dubbo: / /. It can also support rest: / /, webservice: / /, thrift: / /, etc.
-
Supports multiple registries:
Dubbo supports Nacos, Zookeeper and Redis, and plans to support Consul, Eureka and Etcd in the future.
-
Supports a variety of serialization technologies:
Support avro, fst, fastjson, hessian2, kryo, etc.
Dubbo cluster fault tolerance mode
dubbo provides six fault-tolerant modes. The default mode is Failover Cluster. If none of the six modes meet the actual requirements, they can be expanded by themselves.
- Failover Cluster: fail to automatically switch. After the service call fails, it will switch to other machines in the cluster for retry. The default retry count is 2. This parameter can be modified by modifying retries=2
- Failfast Cluster: fast failure. That is, an error will be reported immediately after the failure and will not be handled.
- Failsafe Cluster: fail safe. That is, ignore the exception after the error.
- Failback Cluster: automatically reply after failure. After failure, save this record in the background and resend it regularly.
- Forking Cluster: call multiple services in the cluster in parallel. If one is successful, it will return. Modify forks=2 to set the maximum number of parallels.
- Broadcast Cluster: the provider that broadcasts all service calls. If any provider fails, the call fails.
Suggestions on fault-tolerant mode setting: for services that can guarantee idempotency, Failover mode can be adopted, while for other services that cannot guarantee idempotency, fault-tolerant mode can be set to fast failure mode, or use
The Failover mode modifies the number of retries to 0.
Load balancing strategy
Dubbo provides four load balancing strategies. The default load balancing strategy is random. If these four strategies do not meet the requirements, they can be extended according to the SPI mechanism in Bubbo.
- Random LoadBalance: random. In this mode, you can set the weight value for the service. The higher the weight, the greater the probability of random arrival.
- RoundRobin LoadBalance: polling. Similarly, you can set the weight value.
- Leadactive loadbalance: the minimum number of active nodes. Slower processing nodes will receive fewer requests.
- Consistent Hash loadbalance: consistent Hash, that is, requests for the same ip are always sent to the same server.
SPI extension point
SPI, fully known as Service Provider Interface, is a service discovery mechanism. When the program calls the interface, it will load the corresponding implementation class according to the configuration file or default rule information. Therefore, the program does not directly specify which implementation of the interface to use, but is assembled externally. In Dubbo, a large number of functions are decoupled based on Dubbo SPI.
Java SPI
Here, we use the JDK native SPI to simulate the design of the database driver, create a Maven project, create a sub project driver, and define an interface inside the project
/**
 * Simulate the driver of Java EE and test the SPI extension point
 *
 * @author xsl
 */
public interface Driver {

    /**
     * Establish connection
     */
    String connect();

}
Then create another sub project mysql, rely on the driver project, and internally define a MysqlDriver to implement the driver interface
/**
 * Mysql drive
 *
 * @author xsl
 */
public class MysqlDriver implements Driver{
    @Override
    public String connect() {
        return "connection to Mysql";
    }
}
Create a file with the fully qualified class name of the Driver interface under the mysql resources/META-INF/services directory, and fill in the fully qualified class name of our implementation of MysqlDriver
[external chain picture transfer failed. The source station may have anti-theft chain mechanism. It is recommended to save the picture and upload it directly (IMG akvxpnar-163340976036)( https://gitee.com/yiming_1/pic/raw/master/pic/1627444491 (1)].png)
Create a test class, load the extension point, and try to call the method
/**
 * Test extension point
 *
 * @author xsl
 */
public class SpiTest {
    public static void main(String[] args) {

        ServiceLoader<Driver> load = ServiceLoader.load(Driver.class);
        load.forEach(driver -> System.out.println(driver.connect()));

    }
}
Dubbo SPI
Dubbo does not directly use Jdk's SPI mechanism. They have implemented their own SPI mechanism. Dubbo's SPI extension mechanism is slightly different from Java SPI. Dubbo SPI needs to create a file named after the fully qualified class name of the interface in the META-INF/dubbo, META-INF/dubbo/internal and META-INF/services directories, and its internal content is filled in the form of key=value.
The steps to test a Dubbo extension point are as follows:
In a project that relies on Dubbo, create an extension point and an implementation. In Dubbo, the extension point needs to declare @ SPI annotation
@SPI
public interface Driver {

    /**
     * Establish connection
     */
    String connect();

}


/**
 * Mysql drive
 *
 * @author xsl
 */
public class MysqlDriver implements Driver{
    @Override
    public String connect() {
        return "connection to Mysql";
    }
}
Create a file with the fully qualified class name of the Driver interface in the resources/META-INF/dubbo directory, and fill in MysqlDriver = the fully qualified class name of our implementation of MysqlDriver, as shown below:
mysqlDriver=com.xsl.spi.MysqlDriver
Create a test class and load extension points to realize test use
@Test
public void connectTest(){
	ExtensionLoader<Driver> extensionLoader = ExtensionLoader.getExtensionLoader(Driver.class);
	Driver driver = extensionLoader.getExtension("mysqlDriver");
	System.out.println(driver.connect());
}
Dubbo integrates the principle of SpringBoot
The most convenient way for any framework to integrate into SpringBoot is to use SpringBoot starter technology. Let's start with @ DubboComponentScan, the entry point for integrating SpringBoot
@Target(ElementType.TYPE)
@Retention(RetentionPolicy.RUNTIME)
@Documented
@Import(DubboComponentScanRegistrar.class)
public @interface DubboComponentScan {

    String[] value() default {};

    String[] basePackages() default {};

    Class<?>[] basePackageClasses() default {};

}
The above is the definition of this annotation. The focus here is @ Import (dubbocomponentscanregister. Class). If the class with the parameter of @ Import annotation in parentheses is the implementation class of ImportBeanDefinitionRegistrar, the interface method registerBeanDefinitions() will be called.
public class DubboComponentScanRegistrar implements ImportBeanDefinitionRegistrar {

    @Override
    public void registerBeanDefinitions(AnnotationMetadata importingClassMetadata, BeanDefinitionRegistry registry) {
		// Gets the name of the scanned package
        Set<String> packagesToScan = getPackagesToScan(importingClassMetadata);
		// The class marked by the @ Service annotation is registered into the Ioc container of Spring
        registerServiceAnnotationBeanPostProcessor(packagesToScan, registry);
		// Register the class marked by @ reference
        registerReferenceAnnotationBeanPostProcessor(registry);

    }


    private void registerServiceAnnotationBeanPostProcessor(Set<String> packagesToScan, BeanDefinitionRegistry registry) {
		// This import is a static method. It is rare that it is imported in this way
        // import static org.springframework.beans.factory.support.BeanDefinitionBuilder.rootBeanDefinition;
        // Here, a BeanDefinition constructor is obtained through ServiceAnnotationBeanPostProcessor.class, which is familiar with Spring source code
        BeanDefinitionBuilder builder = rootBeanDefinition(ServiceAnnotationBeanPostProcessor.class);
        builder.addConstructorArgValue(packagesToScan);
        builder.setRole(BeanDefinition.ROLE_INFRASTRUCTURE);
        // Get beanDefinition
        AbstractBeanDefinition beanDefinition = builder.getBeanDefinition();
        // Register into IOC container
        BeanDefinitionReaderUtils.registerWithGeneratedName(beanDefinition, registry);

    }


    private void registerReferenceAnnotationBeanPostProcessor(BeanDefinitionRegistry registry) {
		// Click here to see that he obtained the BeanDefinition through ReferenceAnnotationBeanPostProcessor.class
        BeanRegistrar.registerInfrastructureBean(registry,
                ReferenceAnnotationBeanPostProcessor.BEAN_NAME, ReferenceAnnotationBeanPostProcessor.class);

    }

    private Set<String> getPackagesToScan(AnnotationMetadata metadata) {
        // Gets the property collection of the DubboComponentScan annotation
        AnnotationAttributes attributes = AnnotationAttributes.fromMap(
                metadata.getAnnotationAttributes(DubboComponentScan.class.getName()));
        // Gets the value specified by three numeric values
        String[] basePackages = attributes.getStringArray("basePackages");
        Class<?>[] basePackageClasses = attributes.getClassArray("basePackageClasses");
        String[] value = attributes.getStringArray("value");

        // Convert all to fully qualified class names and remove duplicates
        Set<String> packagesToScan = new LinkedHashSet<String>(Arrays.asList(value));
        packagesToScan.addAll(Arrays.asList(basePackages));
        for (Class<?> basePackageClass : basePackageClasses) {
            packagesToScan.add(ClassUtils.getPackageName(basePackageClass));
        }
        if (packagesToScan.isEmpty()) {
            return Collections.singleton(ClassUtils.getPackageName(metadata.getClassName()));
        }
        return packagesToScan;
    }

}
Looking at the complete code, we can find that the core of the injected IOC container lies in two classes, one is ServiceAnnotationBeanPostProcessor, and the other is ReferenceAnnotationBeanPostProcessor. The BeanDefinition obtained is directly affected by these two classes, and the BeanDefinition is used to save the relevant information of the Bean, including attributes, construction method parameters Depending on the Bean name and whether it is singleton or delayed loading, it is the raw material for instantiating a Bean. Spring instantiates a Bean according to the information in the BeanDefinition. Let's look at the ServiceAnnotationBeanPostProcessor class,
// It implements many interfaces, but we only need to focus on BeanDefinitionRegistryPostProcessor. Public class serviceannotationbeanpostprocessor implements BeanDefinitionRegistryPostProcessor, environmentaware, resourceloaderaware, beanclassloaderaware {@ override public void postprocessbeandefinitionregistry (beandefinitionregistry) throws beanexception {set < string > resolvedpackagestoscan = resolvepackagestoscan (packagestoscan); if (! Collectionutils. Isempty (resolvedpackagestoscan)) {/ / focus on this method registerServiceBeans(resolvedPackagesToScan, registry);} / / omit} //The above method calls his private void registerservicebeans (set < string > packagestoscan, beandefinitionregistry) {/ / I'm glad to see this class name. This class inherits ClassPathBeanDefinitionScanner, dubboclasspathbeandefinitionscanner, scanner = new dubboclasspathbeandefinitionscanner (registry, environment, resourceloader); beannamegenerator beannamegenerator = resolvebeannamegenerator (Registry); / / set the bean name generator scanner.setBeanNameGenerator(beanNameGenerator); / / set the filter. Only those annotated by the service are injected into scanner.addincludefilter (New annotationtypefilter (service. Class)) ; / / add the compatibility for legacy Dubbo's @ service add support for legacy service annotation scanner.addincludefilter (New annotationtypefilter (COM. Alibaba. Dubbo. Config. Annotation. Service. Class)); for (string packagetoscan: packagestoscan) {/ / scan the classes annotated by two @ services and register them in the Ioc container scanner.scan (packagetoscan) ; / / find all BeanDefinitionHolders of @ service wherether @ ComponentScan scans or not. / / find all BeanDefinitionHolders of @ service, regardless of whether @ ComponentScan is scanned or not. Set < beandefinitionholder > BeanDefinitionHolders = findservicebeandefinitionholders (scanner, packagetoscan, registry, beannamegenerator); if (! Collectionutils. Isempty (BeanDefinitionHolders)) {for (beandefinitionholder: BeanDefinitionHolders) {/ / traverse a single registerServiceBean(beanDefinitionHolder, registry, scanner) registered in the Ioc container ;}} / /... Omit}} private void registerservicebean (beandefinitionholder, beandefinitionholder, beandefinitionregistry, dubboclasspathbeandefinitionscanner scanner) {/ / the bytecode of the corresponding class class class <? > beanclass = resolveclass (beandefinitionholder); / / is the class annotated by either of Dubbo's two services? Annotation service = findServiceAnnotation(beanClass); / / get the attribute annotation attributes of the service annotation. Serviceannotation attributes = getannotation attributes (service, false, false) ; / / get the interface class of the service <? > interfaceclass = resolveserviceinterfaceclass (serviceannotationattributes, beanclass); / / service name String annotatedServiceBeanName = beanDefinitionHolder.getBeanName() ; / / build beandefinition abstractbeandefinition servicebeandefinition = buildservicebeandefinition (service, serviceannotationattributes, interfaceclass, annotatedservicebeanname); / / generate service name string beanname = generateservicebeanname (serviceannotationattributes, interfaceclass); if (scanner. Checkcandidate (beanname, servicebeandefinition)) {/ / register in Ioc registry. Registerbeandefinition (beanname, servicebeandefinition); / /... Omit} / / omit} / / is the class annotated by one of Dubbo's two services? Private annotation findserviceannotation (Class<?> beanClass) { Annotation service = findMergedAnnotation(beanClass, Service.class); if (service == null) { service = findMergedAnnotation(beanClass, com.alibaba.dubbo.config.annotation.Service.class); } return service; }}
Nacos deployment
Stand alone deployment
Nacos is installed in two ways: Nacos source code installation and compiled installation package installation. The installation package can be downloaded from github, Download address , where source is the source package and the other is the compilation package
Compile package installation
The installation of the compilation package is very simple. Unzip the compilation package file, CMD into nacos/bin / and execute startup.cmd -m standalone. Of course, if you use linux, download the compilation package of linux and execute. / startup.sh -m standalone to start a single machine
Source package installation
- Configuring maven environment variables
- Unzip the source package into the root directory and execute MVN - Prelease Nacos clean install - U construction. After construction, a distribution directory will be created.
- cd distribution/target/nacos-server-$version/nacos/bin
- Execute the same commands as the compiled package
After successful installation, you can access the nacos login interface through the deployed ip address: 8848/nacos. The account and password are both nacos
Nacos high availability deployment
Environmental requirements
The environment in this deployment is:
- 64 bit Os Linux/Unix/Mac, linux system is recommended
- 3 servers or virtual machines
- 64 bit JDK above 1.8
- maven 3.2.x and above
- Only three or more nacos nodes can form a cluster
- MySql database (preferably version 5.7)
configuration file
The following files are contained in the nacos/conf directory
- Application.properties: the default configuration file for the springboot project
- cluster.conf.example: cluster configuration sample file
- Nacos Mysql.sql: initial script of Mysql database. Nacos uses its own Derby database by default and can be configured as Mysql.
- Nacos-logback.xml: log configuration file of Nacos
cluster.conf is required to configure the nacos cluster. We can directly rename the provided example file and modify the configuration information similar to the following
192.168.13.104:8848192.168.13.105:8848192.168.13.106:8848
Keep the configuration of the three machines consistent, and the firewall opens port 8848
## Close the firewall directly, which is not recommended in production systemctl stop firewalld.service## Open the port and the configuration takes effect. It is recommended to open the port in production firewall-cmd --zone=public --add-port=8848/tcp --permanent# --zone Scope# --add-port=5121/tcp Add a port in the format:/Communication protocol# --permanent takes effect permanently. Without this parameter, it will become invalid after restart. Firewall CMD -- reload
Configure MySql database
- Create database nacos_config and initialize with nacos-mysql.sql
- Modify the application.properties file under nacos/conf and add mysql configuration
spring.datasource.platform=mysqldb.num=1db.url.0=jdbc:mysql://192.168.13.106:3306/nacos-configdb.user=rootdb.password=root
Start the nacos service
Enter the bin directory of nacos deployed by the three machines respectively, execute the sh startup.sh or start.cmd -m cluster command to start the service. After the service is started successfully, nacos\logs\start.out can obtain the following logs, indicating that the service is started successfully.
2021-07-29 4:00:24,654 INFO Nacos Log files: /data/program/nacos/logs/2021-07-29 4:00:24,654 INFO Nacos Conf files: /data/program/nacos/conf/2021-07-29 4:00:24,654 INFO Nacos Data files: /data/program/nacos/data/2021-07-29 4:00:24,654 INFO Nacos started successfully in cluster mode.
Access the nacos console through ip:8848/nacos, and you can see the node information of the cluster under the node list.
Nacos registry
Dubbo integrated nacos service registration and discovery
Service registration
demo source code : https://gitee.com/yiming_1/spring-cloud-0alibaba/tree/master/spring-boot-dubbo-nacos-sample
Service discovery
Server demo source code : https://gitee.com/yiming_1/spring-cloud-alibaba/tree/master/spring-cloud-nacos-sample
Consumer demo source code : https://gitee.com/yiming_1/spring-cloud-alibaba/tree/master/spring-cloud-nacos-consumer
The principle of Nacos as a registry
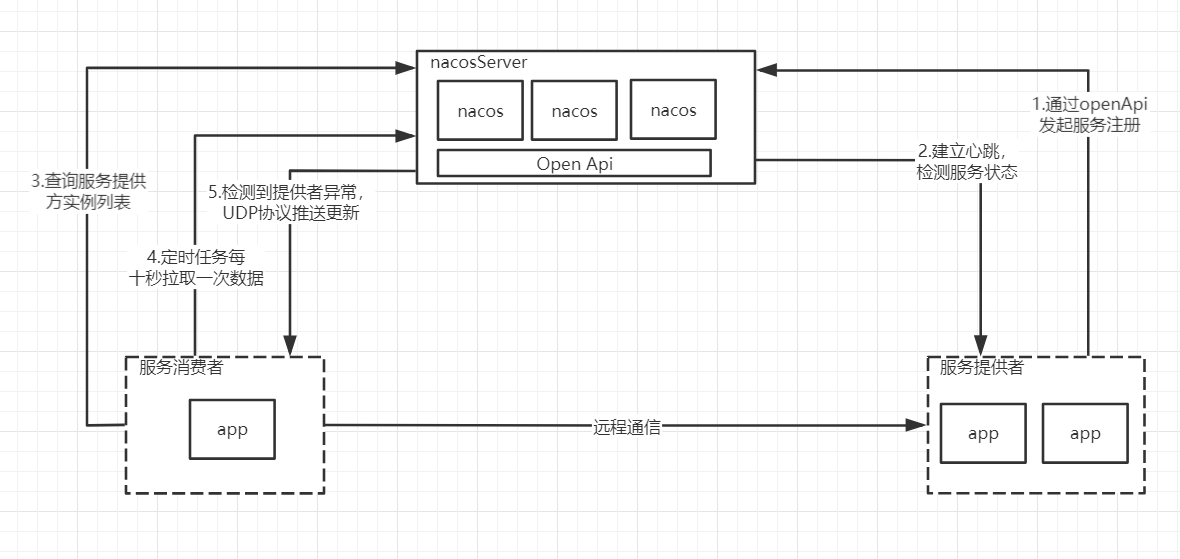
flow chart
Service registration source code
There is an interface org.springframework.cloud.client.serviceregistry.ServiceRegistry in the spring cloud common package. This interface is the service registration standard provided by spring cloud. Components integrated into spring cloud to realize service registration will implement this interface.
public interface ServiceRegistry<R extends Registration> { // Service registration void register(R registration); // Unregister void deregister(R registration); void close(); void setStatus(R registration, String status); < T> T getStatus(R registration);}
This interface has an implementation class com.alibaba.cloud.nacos.registry.NacosServiceRegistry. You can clearly see the signs managed by SpringBoot on the class with idea

The three party dependent classes are managed by Springboot. Obviously, spring boot starter technology is used. They are either imported by @ Import annotation or spring.factories. It is found that com.alibaba.cloud.nacos.NacosDiscoveryAutoConfiguration is exported in spring.factories. This class is a configuration class, It is found in this class that the NacosServiceRegistry is injected into the IOC container.
// Inject into IOC container NacosServiceRegistry@Beanpublic NacosServiceRegistry nacosServiceRegistry(NacosDiscoveryProperties nacosDiscoveryProperties) { return new NacosServiceRegistry(nacosDiscoveryProperties);} / / this class nacosautoserviceregistration is also injected. This class is very important and will be used later@ Bean@ConditionalOnBean(AutoServiceRegistrationProperties.class)public NacosAutoServiceRegistration nacosAutoServiceRegistration( NacosServiceRegistry registry, AutoServiceRegistrationProperties autoServiceRegistrationProperties, NacosRegistration registration) { return new NacosAutoServiceRegistration(registry, autoServiceRegistrationProperties, registration);}
Nacos service registry is indeed injected into the IOC container. When was it triggered and registered into Nacos according to Nacos service registry? Returning to the spring.factories file of the Commons package, you can see that org.springframework.boot.autoconfigure.EnableAutoConfiguration exports an org.springframework.cloud.client.serviceregistry.AutoServiceRegistrationAutoConfiguration
@Configuration@Import(AutoServiceRegistrationConfiguration.class)@ConditionalOnProperty(value = "spring.cloud.service-registry.auto-registration.enabled", matchIfMissing = true)public class AutoServiceRegistrationAutoConfiguration { // This class is injected into the nacos package, which implements NacosAutoServiceRegistration, that is, the heavy set of classes mentioned above @ Autowired(required = false) private AutoServiceRegistration autoServiceRegistration; @ Autowired private AutoServiceRegistrationProperties properties; @ PostConstruct protected void init() { if (this.autoServiceRegistration == null && this.properties.isFailFast()) { throw new IllegalStateException("Auto Service Registration has " + "been requested, but there is no AutoServiceRegistration bean"); } }}
You can see that an AutoServiceRegistration is injected into this configuration class. The implementation of this interface has a NacosAutoServiceRegistration. The inheritance relationship of NacosAutoServiceRegistration (another class injected into IOC in NacosDiscoveryAutoConfiguration) is as follows:
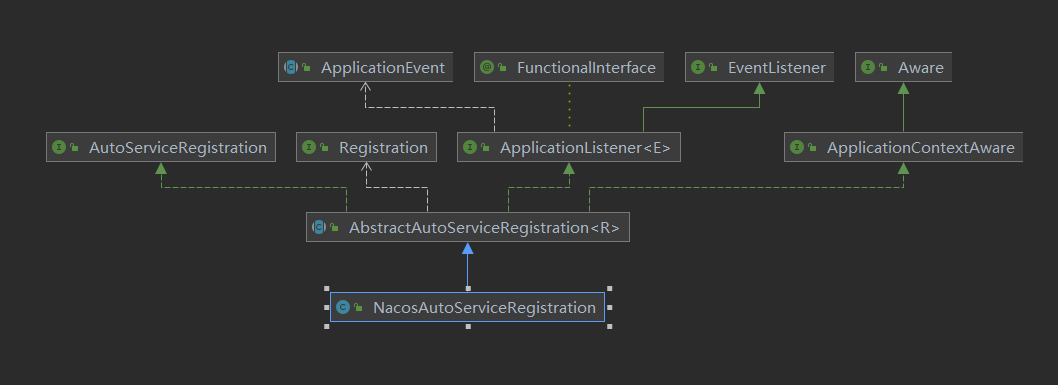
The parent class of NacosAutoServiceRegistration is an abstract class of AbstractAutoServiceRegistration. This abstract class implements the ApplicationListener interface. ApplicationListener is a listening event. See the implementation of this interface by AbstractAutoServiceRegistration
@Override@SuppressWarnings("deprecation")public void onApplicationEvent(WebServerInitializedEvent event) { bind(event);}
The interface listens on a WebServerInitializedEvent event triggered by the web container, calling a bind() method in the method, calling the start() method in the last line of the bind() method, and calling a register() method in the start() method.
protected void register() { // Service registration this.serviceRegistry.register(getRegistration());}
serviceRegistry.register() is called here to register the service. The serviceRegistry is injected through the constructor. When NacosAutoServiceRegistration is initialized, it will be injected into the nacoserviceregistry managed by the IOC container. Finally, the closed loop is closed. You can see in the register() method rewritten by nacoserviceregistry
namingService.registerInstance(serviceId, group, instance);
This method is the method to register into the nacos instance:
public void registerInstance(String serviceName, String groupName, Instance instance) throws NacosException { if (instance.isEphemeral()) { BeatInfo beatInfo = new BeatInfo(); beatInfo.setServiceName(NamingUtils.getGroupedName(serviceName, groupName)); beatInfo.setIp(instance.getIp()); beatInfo.setPort(instance.getPort()); beatInfo.setCluster(instance.getClusterName()); beatInfo.setWeight(instance.getWeight()); beatInfo.setMetadata(instance.getMetadata()); beatInfo.setScheduled(false); long instanceInterval = instance.getInstanceHeartBeatInterval(); beatInfo.setPeriod(instanceInterval == 0L ? DEFAULT_HEART_BEAT_INTERVAL : instanceInterval); // Heartbeat this.beatReactor.addBeatInfo(NamingUtils.getGroupedName(serviceName, groupName), beatInfo);} / / register the service instance this.serverProxy.registerService(NamingUtils.getGroupedName(serviceName, groupName), groupName, instance);}
In this method, beatReactor.addBeatInfo() is the implementation method of heartbeat. Click to see
public void addBeatInfo(String serviceName, BeatInfo beatInfo) { LogUtils.NAMING_LOGGER.info("[BEAT] adding beat: {} to beat map.", beatInfo); String key = this.buildKey(serviceName, beatInfo.getIp(), beatInfo.getPort()); BeatInfo existBeat = null; if ((existBeat = (BeatInfo)this.dom2Beat.remove(key)) != null) { existBeat.setStopped(true); } this.dom2Beat.put(key, beatInfo); // Timed task sends heartbeat package this. Executorservice. Schedule (New beatreactor. Beattask (beatinfo), beatinfo. Getperiod(), timeunit. Milliseconds); MetricsMonitor.getDom2BeatSizeMonitor().set((double)this.dom2Beat.size()); }
From executorService.schedule, we can see that a scheduled task is started to send data packets to the server, and then a thread is started to continuously detect the response of the server. If no response is received, the server fails, and the server updates the service status through this data packet.
Server registration interface source code
The service registration server interface is in the InstanceController class under the Nacos naming module.
@CanDistro@PostMapping@Secured(parser = NamingResourceParser.class, action = ActionTypes.WRITE)public String register(HttpServletRequest request) throws Exception { final String namespaceId = WebUtils .optional(request, CommonParams.NAMESPACE_ID, Constants.DEFAULT_NAMESPACE_ID); final String serviceName = WebUtils.required(request, CommonParams.SERVICE_NAME); NamingUtils.checkServiceNameFormat(serviceName); final Instance instance = parseInstance(request); getInstanceOperator().registerInstance(namespaceId, serviceName, instance); return "ok";}
This method doesn't look good in other ways. Get the namespaceId, serviceName, get the instance and register the service according to the request. getInstanceOperator().registerInstance(), take a look at this method.
public void registerInstance(String namespaceId, String serviceName, Instance instance) throws NacosException { com.alibaba.nacos.naming.core.Instance coreInstance = (com.alibaba.nacos.naming.core.Instance) instance; // Register service serviceManager.registerInstance(namespaceId, serviceName, coreInstance);}
Keep looking down
public void registerInstance(String namespaceId, String serviceName, Instance instance) throws NacosException { // Create an empty service createemptyservice (namespaceid, servicename, instance. Isephemeral()); Service service = getService(namespaceId, serviceName); checkServiceIsNull(service, namespaceId, serviceName); // Add an instance addInstance(namespaceId, serviceName, instance.isEphemeral(), instance);}
In the createEmptyService() method, the createServiceIfAbsent() method is called, and the code is as follows:
public void createServiceIfAbsent(String namespaceId, String serviceName, boolean local, Cluster cluster) throws NacosException { // Does the container have a service? Service service = getService(namespaceId, serviceName); // If (service = = null) {loggers.srv_log.info ("creating empty service {}: {}", namespaceid, servicename); service = new service(); service.setname (servicename); service.setnamespaceid (namespaceid); service.setgroupname (namingutils. Getgroupname (servicename)) ; / / now validate the service. If failed, exception will be thrown service. Setlastmodifiedmillis (system. Currenttimemillis()); service. Calculatechecksum(); / / if there is a cluster, put it into the Map of the cluster If (cluster! = null) {cluster. Setservice (service); service. Getclustermap(). Put (cluster. Getname(), cluster);} service. Validate(); / / put it into the container where the service is stored. See this method putserviceandinit (service); if (! Local) {addorreplaceservice (service); } } }
private void putServiceAndInit(Service service) throws NacosException { // Put it into the service cache, nothing but double check the lock into a concurrenthashmap putservice (service); service = getservice (service. Getnamespaceid(), service. Getname()); // Create heartbeat checkTask = new HealthCheckTask(this);HealthCheckReactor.scheduleCheck(checkTask); doing health check is also a scheduled task service.init(); / / data consistency monitoring consistencyservice. Listen (keybuilder. Buildinstancelistkey (service. Getnamespaceid(), service. Getname(), true), service) ; consistencyService .listen(KeyBuilder.buildInstanceListKey(service.getNamespaceId(), service.getName(), false), service); Loggers.SRV_LOG.info("[NEW-SERVICE] {}", service.toJson()); }
Dynamic sensing principle of service address
In fact, it has been shown in the flow chart. It is very simple. The consumer establishes a heartbeat with the registration center and pulls the provider list every 10s. After the provider registers and enters the registration center, it establishes a heartbeat with the registration center. The registration center senses that the heartbeat is abnormal, updates the service list, sends the message to the consumer in the form of udp, and the consumer receives the message to update the service address.
Nacos configuration center
Disadvantages of traditional yml configuration
- It is difficult to realize the dynamic update of configuration. If such requirements are required, the configuration information can only be pumped to memory or middleware
- Centralized configuration management. To change a configuration file under the cluster, you need to modify multiple configuration files
Nacos integrated Boot read configuration
nacos configuration center demo : https://gitee.com/yiming_1/spring-cloud-alibaba/tree/master/spring-cloud-nacos-config
Configuration field
- Data Id: identifies the ID of a configuration set of nacos. It is usually used to organize and divide the configuration set of the system
- Group: identifies the group to which the configuration belongs
- Configuration format: configure the format followed by the content lock
Configure read rules
- The configuration items of the configuration center should be placed in bootstrap.properties or bootstrap.yaml/yml, because the priority of bootstrap is higher than that of application.
- If spring.cloud.nacos.config.prefix is specified, the Data Id will be read s p r i n g . c l o u d . n a c o s . c o n f i g . p r e f i x . {spring.cloud.nacos.config.prefix}. Configuration file for spring. Cloud. Nacos. Config. Prefix. {spring. Cloud. Nacos. Config. File extension}
- spring.cloud.nacos.config.prefix is not specified, and the read Data Id is s p r i n g . a p p l i c a t i o n . n a m e . {spring.application.name}. Configuration file for spring. Application. Name. {spring. Cloud. Nacos. Config. File extension}
- If spring.profiles.active=env is configured in the bootstrap configuration file, {spring.application.name}- e n v . {env}. Env. {spring. Cloud. Nacos. Config. File extension} configuration
namespace and Group
nacos configuration center data model
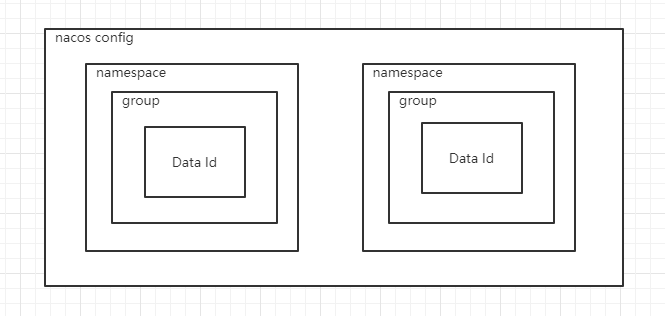
The official suggestion is that namespace is used to solve the isolation problem of multi environment or multi tenant data, while group is used to solve the data grouping at the business level. Before design, the namespace needs to be modified
And group qualitative
Multiple configuration extensions
spring.cloud.nacos.config.ext-config[n].data-id=example.properties #appoint dataIdspring.cloud.nacos.config.ext-config[n].group=DEFAULT_GROUP #appoint DEFAULT_GROUPspring.cloud.nacos.config.ext-config[n].refresh=true #Whether to refresh dynamically
Points to note during use:
- The configuration data ID must have a file format suffix
- When there are multiple data IDS, the higher the n, the higher the priority
- If ext config and s p r i n g . a p p l i c a t i o n . n a m e . {spring.application.name}. If spring. Application. Name. {file extension: properties} exists, the latter has the highest priority.
nacos configuration center principle
Dynamic monitoring pull and push
Pull means that the client takes the initiative to pull, and push means that the server takes the initiative to push; both have their own advantages and disadvantages. Pull needs to be pulled regularly, and if the time interval is large, it will not be real-time, and if the time interval is small, it will cause great pressure on the server; push requires the server to maintain a long connection with the client. If there are many clients, it needs to waste memory resources to maintain the connection. In order to detect the effectiveness of the connection, it may also need to send heartbeat packets .
nacos dynamic listening mode
nacos adopts a more comprehensive mode. The main body is still pull, but the pull mechanism changes. After the server receives the pull request, the server checks whether the configuration information has changed. If there is any change, it directly returns the latest information. If there is no change, it hold s the request and waits for a change or more than 29.5 seconds to return the result. This method is called long polling, This not only avoids the problem of high server pressure or poor timeliness caused by polling pull, but also avoids the waste of resources caused by long connection + heartbeat.
Implementation principle of long polling
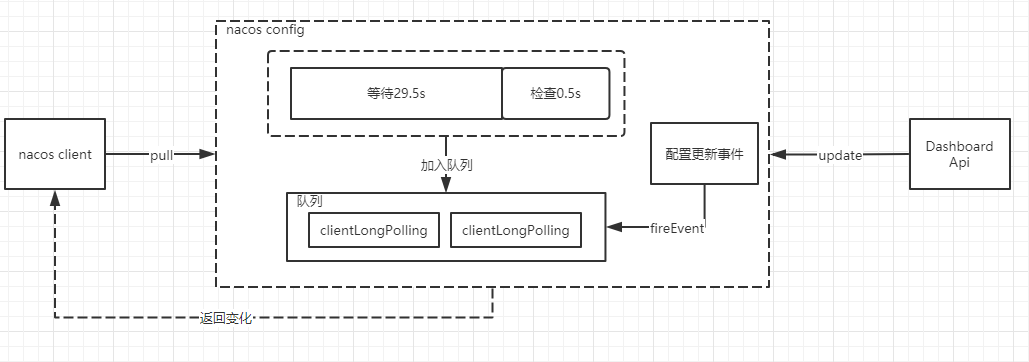
After nacos obtains the client's request, if the configuration is not updated, it will set a scheduled task, delay the execution for 29.5 seconds, and add the current client's long polling connection to the allSubs queue. At this time, if there is an update, an update event mechanism will be triggered. The task listening to the event will return through the connection in the task to complete the push operation.
Sentinel circuit breaker
Basic concepts
Current limiting algorithm
Counter
It is relatively simple to limit the number of accesses in each time period. The accumulator accumulates the number of accesses, reaches the threshold limit, and clears the next time period. However, there will be a critical problem. The server will receive the number of requests whose sum exceeds the threshold at the same time before and after the critical point of the two time periods, but does not exceed the threshold in each period The number of requests for processing capacity.
sliding window
Based on the counter algorithm, a smaller granularity is divided, and the sum of the requests of the last n particles is taken as the limiting condition, so that the outdated time slice can be discarded. (in fact, I feel that the critical problem is not avoided in essence, but slowed down)
Leaky bucket
The leaky bucket algorithm is to put the access request directly into the leaky bucket when it arrives. If the current capacity has reached the upper limit, it will be discarded. The leaky bucket releases the access request at a fixed rate until the leaky bucket is empty.
Token bucket
The token bucket algorithm is that the program adds tokens to the token bucket at the speed of R (r = time period / current limit value) until the token bucket is full. When the request arrives, it requests a token from the token bucket. If the token is obtained, it passes the request, otherwise the current limit policy is triggered. Compared with the leaky bucket, the advantage of the token bucket is that if you want to process an average of 13 requests per second, the leaky bucket controls the outflow rate, so you can't handle the situation that the instantaneous is greater than 13. However, the token bucket limits the inflow rate of tokens, that is, the tokens accumulated in the bucket can be eaten up instantaneously, and the instantaneous processing can exceed 13, Can squeeze higher server performance. Compared with the counter or sliding window, the token bucket can also better limit the critical point problem, because when the tokens in the bucket are used up, the rate of generating tokens will not be so fast, so it can effectively limit the problem of two large requests at the critical point.
Fuse
Fusing means that when the service cannot normally provide services to service callers, in order to prevent the avalanche effect of the whole system, temporarily isolate the faulty interface and disconnect the connection with the external interface. When fusing is triggered, subsequent calls to the service will fail directly until the service returns to normal.
Difference between fusing and current limiting
Fusing means that the caller affects its processing speed in order to avoid being blocked by the caller. It is a restriction on the downstream, while current limiting is a restriction on the request amount of the upstream caller. The two are different for different objects.
Demotion
Service degradation refers to low priority processing of less important services. To put it bluntly, it is to give system resources to high priority services as much as possible. Resources are limited and requests are unlimited. If the service is not degraded during the concurrency peak period, on the one hand, it will certainly affect the performance of the overall service. If it is serious, it may lead to downtime and unavailability of some important services. Therefore, in the peak period, in order to ensure the availability of core functions and services of the website, some services should be degraded.
-
Denial of service
Judge the application source, reject the service request of low priority applications during peak hours, and ensure the normal operation of core applications.
-
Shut down service
Since it is the peak period, you can close some unpopular or marginal unimportant services and give up resources for core services.
Basic application of flow control
First, Sentinel core library is introduced
<dependency> <groupId>com.alibaba.csp</groupId> <artifactId>sentinel-core</artifactId> <version>1.7.1</version></dependency>
Define a common method
/** * Throw an abnormal flow control * @ param i */ private static void doSomething(int i) { try(Entry entry = SphU.entry("doSomething")){ System.out.println(i + " hello sentinel"); }catch (BlockException e){ System.err.println(i + " Flow control"); } }
Formulate current limiting rules and add
private static void initFlowsRules(){ List<FlowRule> rules = new ArrayList<>(); FlowRule flowRule = new FlowRule(); // The protected resource SphU.entry parameter corresponds to flowRule.setResource("doSomething")// Current limiting type, QPS and concurrent thread flowrule.setgrade (ruleconstant. Flow_grade_qps); flowRule.setCount(20); rules.add(flowRule); FlowRuleManager.loadRules(rules); }
test
public static void main(String[] args) throws InterruptedException { initFlowsRules(); int i = 1; while (true){ Thread.sleep(20); doSomething(i); i++; }}
This method will run an exception when limiting current, and it also returns Boolean values
/** * Return a Boolean flow control * @ param i */private static void doSomething1(int i) { if (SphO.entry("doSomething")){ try { System.out.println(i + " hello sentinel"); }finally { SphO.exit(); } }else { System.err.println(i + " Flow control"); }}
You can also use annotation
@SentinelResource(value = "getUserById", blockHandler = "blockHandlerForUser") public HashMap getUserById(Integer id){ return new HashMap(2){ { put("name", "xsl"); } }; } public HashMap blockHandlerForUser(String id, BlockException e){ return new HashMap(2){ { put("Flow control", "Flow control"); } }; }
Flow control type
- Concurrent threads: counts the number of context threads of the current request. If the threshold is exceeded, the request will be rejected.
- QPS: number of queries per second.
Flow control behavior
- Direct reject: when the request traffic exceeds the threshold, an exception is thrown directly.
- Warm Up: cold start. It can be used if you want the number of requests to increase gradually and reach the maximum allowable processing request after an expected time.
- Uniform queuing: strictly control the interval of requests to make requests pass at a uniform speed
- Cold start + uniform queue
Basic application of fuse
The configuration of service fusing is similar to that of current limiting, except that FlowRule is used for current limiting and DegradeRule is used for fusing. The configuration code is as follows.
private static void initDegradeRule(){ List<DegradeRule> rules = new ArrayList<>(); DegradeRule degradeRule = new DegradeRule(); degradeRule.setResource("KEY"); degradeRule.setCount(20); // Fuse strategy degradeRule.setGrade(RuleConstant.DEGRADE_GRADE_RT)// Fuse degradation time window, how long it will automatically fuse degraderule.settimewindow (10) after triggering fuse// Trigger the fuse degradeRule.setMinRequestAmount(5) after the average RT of the number of requests in 1s exceeds the threshold// Minimum number of requests triggering abnormal fusing degraderule.setrtslowrequestamount (5); rules.add(degradeRule);}
Spring cloud integration Sentinel
SPI extension point access Sentinel
Create a springboot web project and introduce cloud dependency and sentinel dependency
<dependency> <groupId>org.springframework.boot</groupId> <artifactId>spring-boot-starter-web</artifactId> </dependency> <dependency> <groupId>org.springframework.cloud</groupId> <artifactId>spring-cloud-dependencies</artifactId> <version>Greenwich.RELEASE</version> </dependency> <dependency> <groupId>com.alibaba.cloud</groupId> <artifactId>spring-cloud-starter-alibaba-sentinel</artifactId> <version>2.1.1.RELEASE</version> </dependency>
Write a rest interface and configure current limiting protection resources through SentinelResource
package com.example.sentinel.controller;import com.alibaba.csp.sentinel.annotation.SentinelResource;import com.alibaba.csp.sentinel.slots.block.BlockException;import org.springframework.web.bind.annotation.GetMapping;import org.springframework.web.bind.annotation.RestController;/** * Test sentinel * * @author xsl */@RestControllerpublic class HelloController { @SentinelResource(value = "hello", blockHandler = "blockHandleHello") @GetMapping("/say") public String sayHello(){ return "hello sentinel"; } public String blockHandleHello(BlockException e){ return "The current is limited"; }}
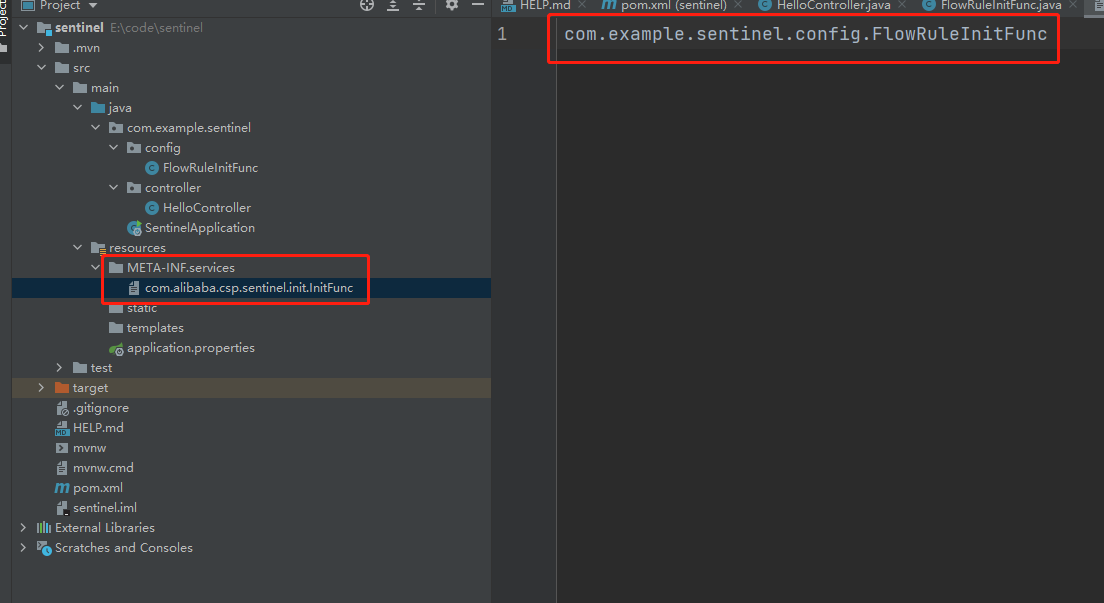
Implement InitFunc interface
package com.example.sentinel.config;import com.alibaba.csp.sentinel.init.InitFunc;import com.alibaba.csp.sentinel.slots.block.RuleConstant;import com.alibaba.csp.sentinel.slots.block.flow.FlowRule;import com.alibaba.csp.sentinel.slots.block.flow.FlowRuleManager;import java.util.ArrayList;import java.util.List;/** * Configure flow control rules * * @ author xsl */public class FlowRuleInitFunc implements InitFunc { @Override public void init() throws Exception { List<FlowRule> rules = new ArrayList<>(); FlowRule flowRule = new FlowRule(); flowRule.setCount(1); flowRule.setResource("hello"); flowRule.setGrade(RuleConstant.FLOW_GRADE_QPS); flowRule.setLimitApp("default"); rules.add(flowRule); FlowRuleManager.loadRules(rules); }}
Create a META/services/com.alibaba.csp.sentinel.init.InitFunc file in the resources directory, and then fill in the fully qualified class name of the InitFunc implementation class in the file
Dashboard realizes flow control
Start sentinel dashboard
java -Dserver.port=7777 -Dcsp.sentinel.dashboard.server=localhost:7777 -Dproject.name=sentinel-dashboard -jar sentinel-dashboard-1.8.2.jar
Delete the SPI extension file and the implementation of InitFunc, and delete the resource embedding point, leaving only a simple Controller interface
package com.example.sentinel.controller;import org.springframework.web.bind.annotation.GetMapping;import org.springframework.web.bind.annotation.RestController;/** * Test sentinel * * @author xsl */@RestControllerpublic class HelloController { @GetMapping("/say") public String sayHello(){ return "hello sentinel"; }}
Add sentinel dashboard configuration:
spring: application: name: spring-cloud-sentinel-sample cloud: sentinel: transport: dashboard: 127.0.0.1:7777
Start the service, access the say interface (you can only see it on the dashboard after being accessed for the first time), then open localhost:7777 and enter the account and password. The initial account and password are sentinel. You can see the application.name configured by yml on the home page, click it, then click the cluster link, find the interface, click flow control, and set the single machine threshold 1, You can see the newly added flow control in the flow control rule
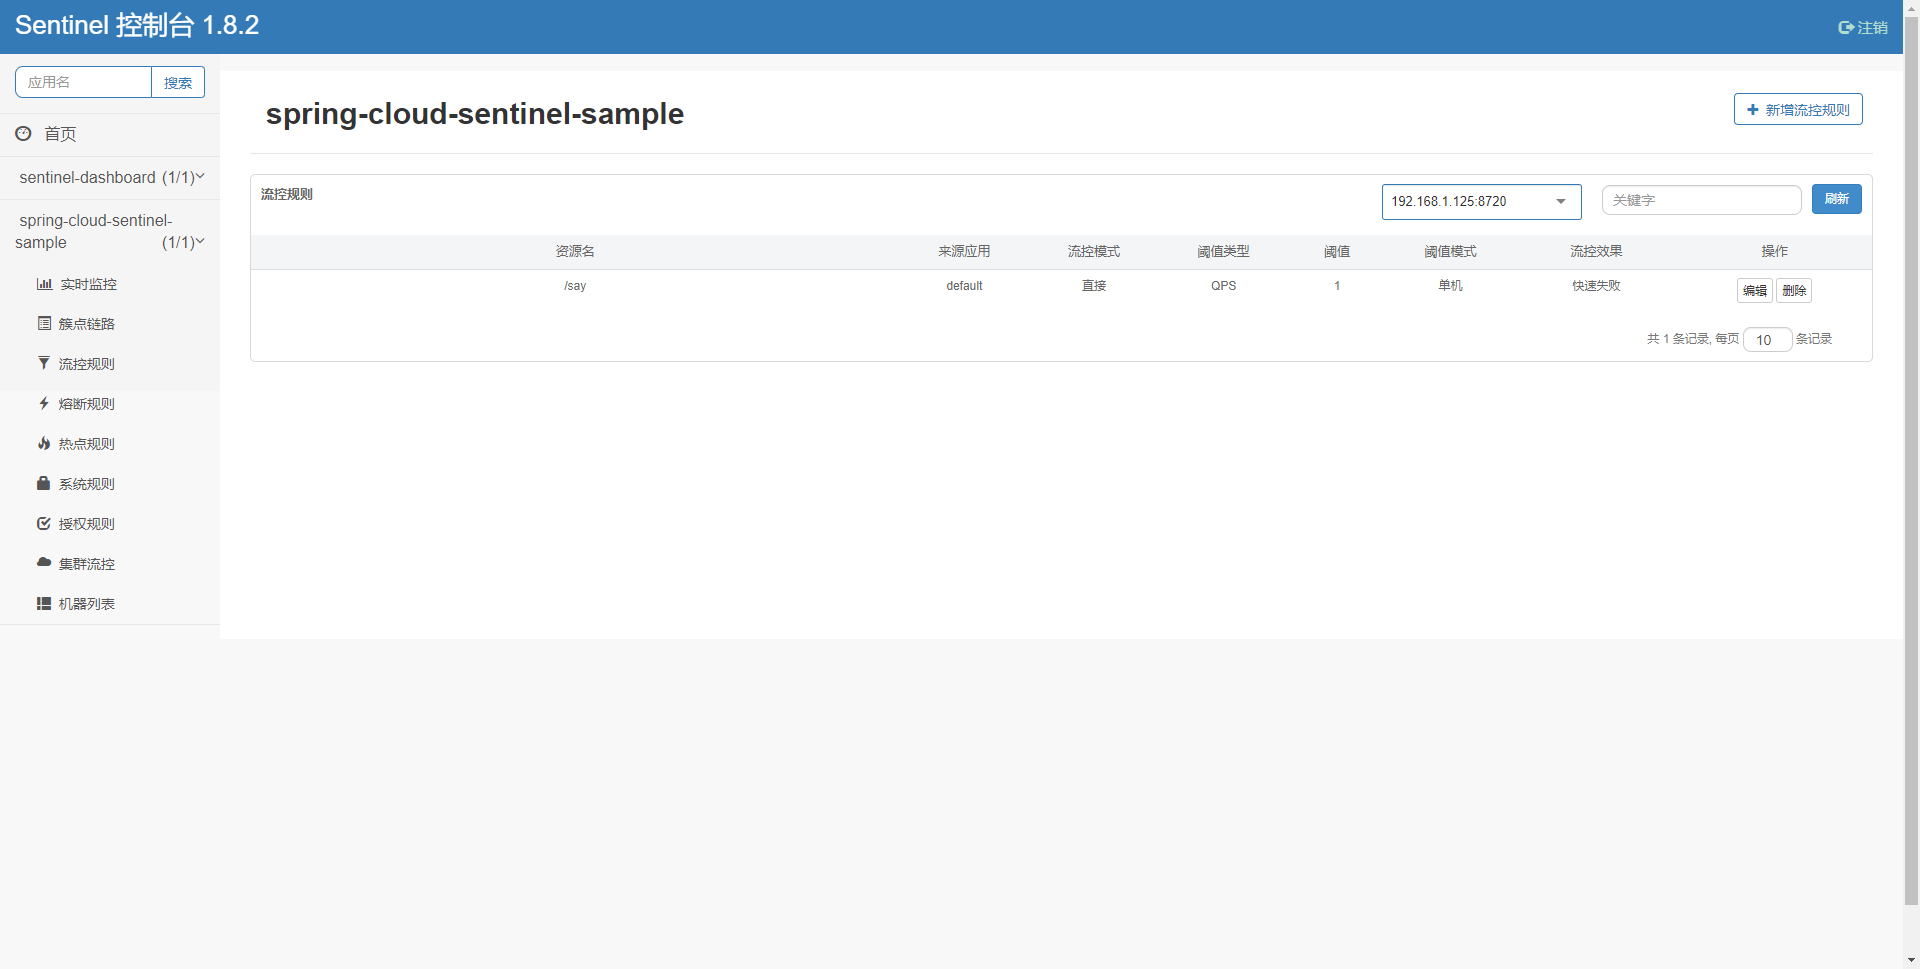
Quickly access the say interface again and output Blocked by Sentinel (flow limiting)
Custom URL flow restriction exception
By default, the URL will return directly after triggering flow restriction: Blocked by Sentinel (flow limiting). In actual development, we probably need to return a Json or jump directly to a degraded page. We can implement it in the following ways.
Return json
Configure a CustomUrlBlockHandler to implement UrlBlockHandler and inject it into the IOC container of Spring
package com.example.sentinel.handler;import com.alibaba.csp.sentinel.adapter.servlet.callback.UrlBlockHandler;import com.alibaba.csp.sentinel.slots.block.BlockException;import org.springframework.stereotype.Service;import javax.servlet.http.HttpServletRequest;import javax.servlet.http.HttpServletResponse;import java.io.IOException;/** * Current limiting processing * * @ author xsl */@Servicepublic class CustomUrlBlockHandler implements UrlBlockHandler { @Override public void blocked(HttpServletRequest httpServletRequest, HttpServletResponse httpServletResponse, BlockException e) throws IOException { httpServletResponse.setHeader("Content-Type", "application/json;charset=UTF-8"); String message = "{\"code\":9999, \"msg\":\"There are too many visitors\"}"; httpServletResponse.getWriter().write(message); }}
Restart the service, access the interface again, set the flow control rules on the dashboard, and find that the returned is a json
{"code":9999, "msg":"There are too many visitors"}
Jump to degraded page
Through spring. Cloud. Sentinel. Servlet. Block page = {URL}
URL resource cleaning
During interface flow control, there is a problem with the statistics of URLs in the rest style, such as "/ clean/{id}", because it counts the requests under different IDS, and the default resource threshold of sentinel is 6000, and the excess will not take effect. In this case, we can implement resource cleaning through the url cleaner interface, that is, for "/ clean/{id} "Such URLs are collected under" / clean / * "
package com.example.sentinel;import com.alibaba.csp.sentinel.adapter.servlet.callback.UrlCleaner;import org.springframework.stereotype.Service;/** * Resource cleaning configuration * * @ author xsl */@Servicepublic class CustomerUrlCleaner implements UrlCleaner { @Override public String clean(String s) { if (s.startsWith("/clean/")){ return "/clean/*"; } return s; }}
Sentinel integrates Nacos to realize dynamic flow control rules
Sentinel stores routing rules in memory, which will be lost after application restart. However, Nacos has its own database or Mysql database. Sentinel provides support for dynamic data sources. Of course, it provides not only Nacos support, but also consumer, Zookeeper, Redis, Nacos, Apollo, etcd, etc.
Dependency:
<dependency> <groupId>org.springframework.boot</groupId> <artifactId>spring-boot-starter-web</artifactId> </dependency> <dependency> <groupId>org.springframework.cloud</groupId> <artifactId>spring-cloud-dependencies</artifactId> <version>Greenwich.RELEASE</version> </dependency> <dependency> <groupId>com.alibaba.cloud</groupId> <artifactId>spring-cloud-starter-alibaba-sentinel</artifactId> <version>2.1.1.RELEASE</version> </dependency> <dependency> <groupId>com.alibaba.csp</groupId> <artifactId>sentinel-datasource-nacos</artifactId> <version>1.7.0</version> </dependency>
Create a rest interface for testing
package com.example.sentinelnacos.controller;import org.springframework.web.bind.annotation.GetMapping;import org.springframework.web.bind.annotation.RestController;/** * @author xsl */@RestControllerpublic class DynamicController { @GetMapping("/dynamic") public String dynamic(){ return "hello dynamic rule"; }}
Add configuration
spring: application: name: spring-cloud-sentinel-dynamic cloud: sentinel: transport: dashboard: 127.0.0.1:7777 datasource: ## support nacos,redis,apollo,zk,file - nacos: server-addr: 127.0.0.1:8848 data-id: ${spring.application.name}-sentinel-flow groud-id: DEFAULT_GROUP ## support json and xml data-type: json ## What are the types of rules? Flow, grade, param flow, GW flow rule type: flow
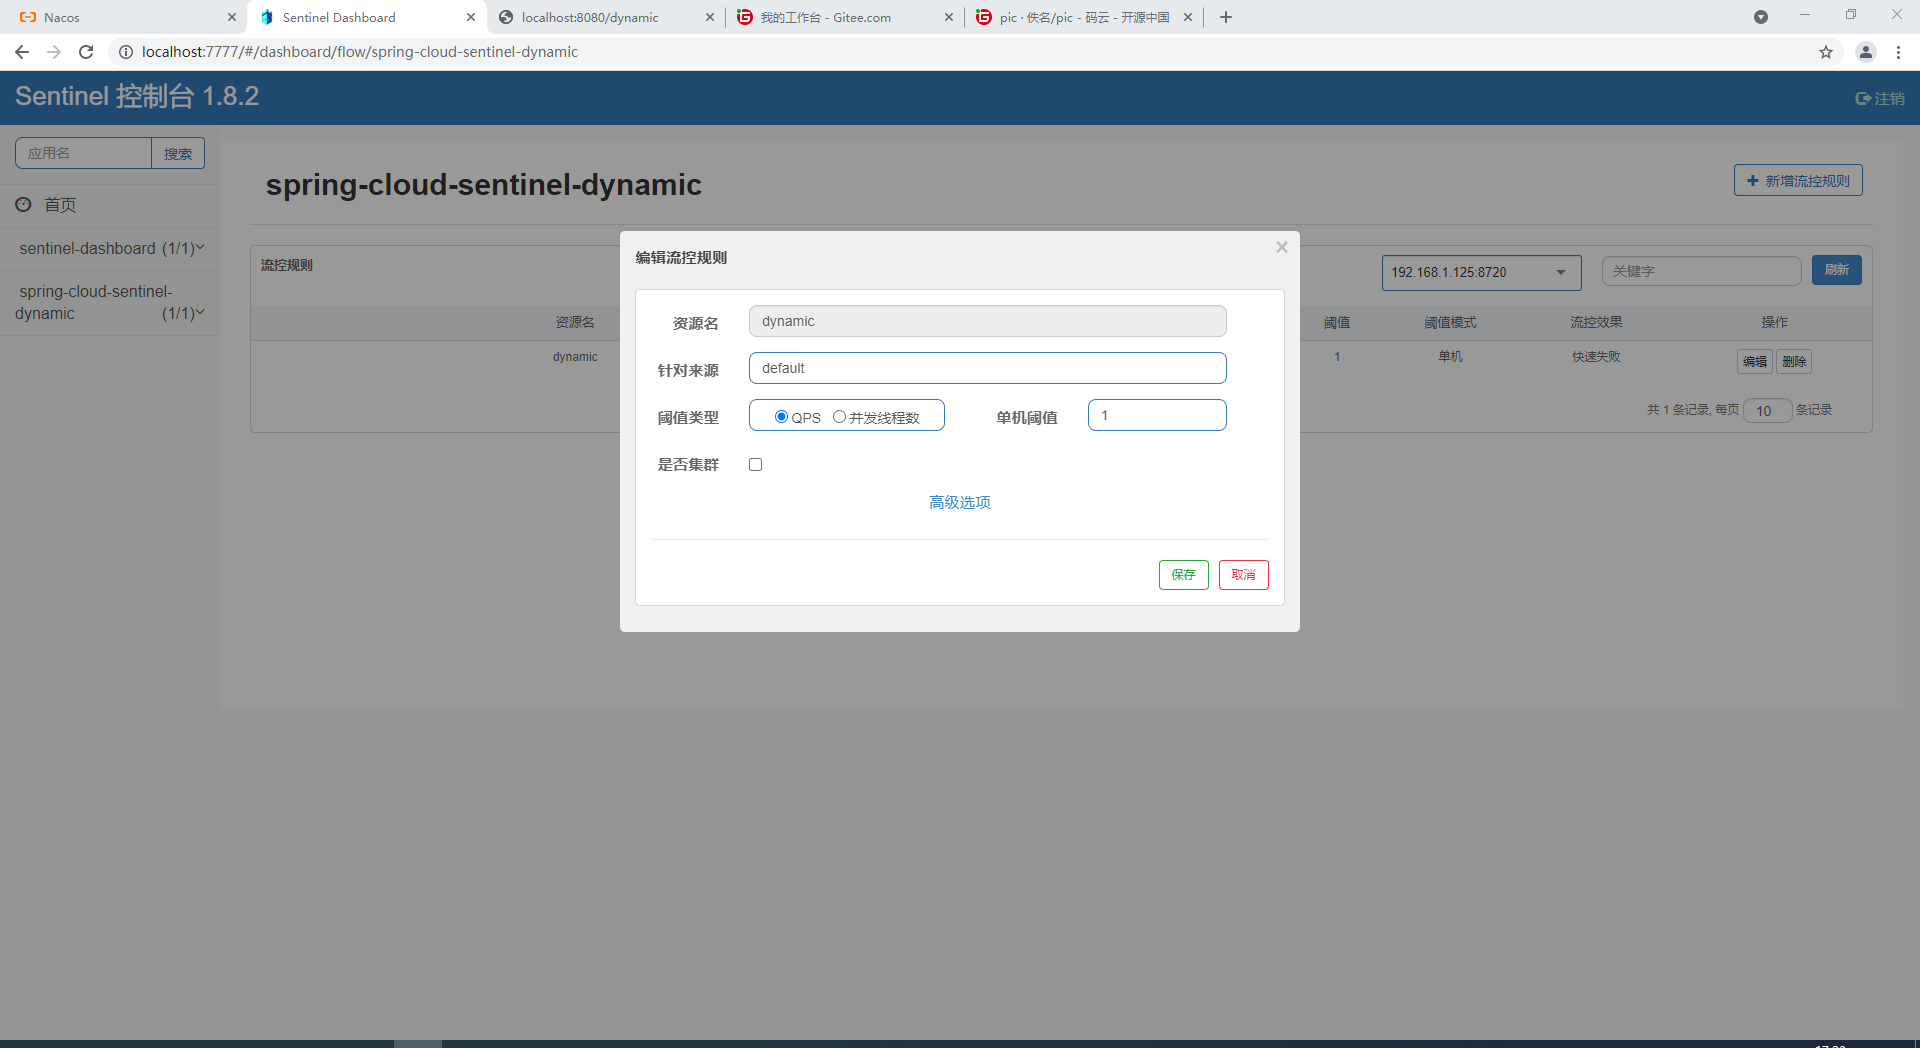
Log in to the console and create flow control configuration rules
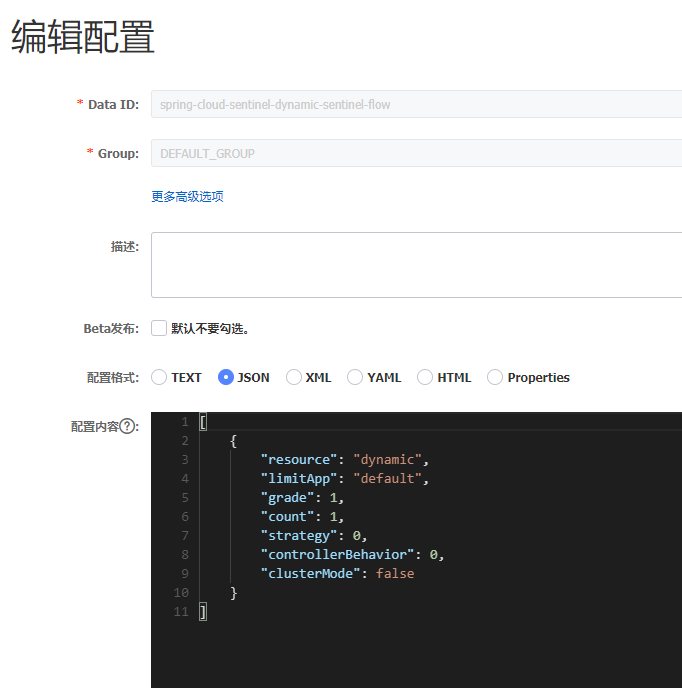
Log in to sentinel dashboard to see that the configured flow control rules have been loaded
Distributed transaction
CAP theorem
C: (Consistency) refers to Consistency, which means that data can be consistent among multiple copies (strict Consistency)
A: (Availability) refers to Availability. A non failed node returns a reasonable response (not an error or timeout response) within a reasonable time.
P: (Partition tolerance) refers to partition fault tolerance. When a distributed system has a network partition, it can still provide services to the outside world.
CAP theory proves that in distributed systems, either CP or AP can be met. Why? Because network communication is often unreliable, and some network delays, exceptions and fluctuations are very common, the partition fault tolerance of P must be guaranteed, which is the premise of providing services, so we can only choose between C and A.
CP: abandon high availability and achieve strong consistency. The previous XA protocol is such a scheme.
AP: abandon strong consistency and achieve final consistency, which is the main choice for Internet companies to solve the problem of distributed data consistency.
BASE theory
BASE theory is an idea derived from AP in CAP theorem. The core idea is to sacrifice strong data consistency for high availability. It has the following characteristics:
- Basic availability: when a distributed system fails, it is allowed to lose some availability and ensure the availability of core functions.
- Soft State: it allows the data in the system to have an intermediate state, which does not affect the availability of the system, that is, it allows the synchronization between the data copies of different nodes in the system to have a delay.
- Eventually Consistent: the data in intermediate status will reach the final data consistency after a period of time.
Terminology
TM: transaction manager (Transaction Coordinator)
RM: Resource Manager
XA protocol
Two phase submission agreement
Transaction execution process:
- Preparation phase: TM informs RM to prepare branch transactions, records transaction logs, and informs the transaction manager of the results.
- Commit / rollback phase: if the resource manager explicitly returns success in the preparation phase, the transaction manager initiates a transaction commit instruction to all resource managers to complete the data change, and vice versa.
Disadvantages:
- Synchronous blocking: all participants are synchronously blocked. A clear response is required for any instruction before proceeding to the next step. Otherwise, they are blocked and the occupied resources are locked all the time.
- Network fluctuation: due to network fluctuation, only some RM S receive Commit, resulting in inconsistent data
Three phase submission agreement
- Query stage: TM sends a transaction execution request to RM to ask whether the instruction can be completed. Participants only need to answer yes and No.
- Preparation stage: TM decides whether to continue the execution according to the feedback from RM. If it can, it sends a preCommit request to all participants. RM receives the request to write redo and undo log s, but does not commit, and then ack responds and waits for TM's next notification.
- Commit / rollback phase: if each RM is successfully prepared, the transaction is committed; if any RM fails, the transaction is rolled back.
Compared with phase II and phase III:
- Query is added to find out that the operation cannot be performed as soon as possible, so as to reduce the waste of resources and time
- After the preparation phase, both TM and RM introduce a timeout mechanism. Once the timeout occurs, the transaction will continue to be committed (because it is considered to be more likely to succeed by default)
TCC compensation scheme
TCC (try confirm cancel) compensatory scheme refers to splitting a service into three parts. T is the verification of data or the reservation of resources. The first C is to confirm the real execution task and operate the resources reserved in step T, and the second C is to cancel the execution and release the resources reserved in step T.
For example, if you purchase 1000 yuan of A financial product through the account balance, there are two transaction operations involved, one is to deduct the account balance A and the other is to deduct the subscription amount B of the financial product.
Then A can be divided into three steps:
- The balance of T A account is frozen for 1000 yuan, but the balance is not deducted. It can be understood that this account can be recorded in one place. This purchase is frozen for 1000 yuan
- Confirm A account empties the frozen amount and deducts 1000 yuan from the balance
- Cancel delete the frozen RMB 1000
B can be divided into three steps:
- T financial products are frozen for 1000 yuan, which can be understood similarly to A
- Confirm the subscription amount of financial products can be deducted by 1000 yuan
- Cancel unfreeze
Then, when purchasing financial products, the Application first notifies the TCC framework to freeze the two services a and B, that is, execute the T interface. If the implementation is successful in the Try phase, it notifies Confirm, but if any t is unsuccessful, it notifies all to Cancel. Because the service and TCC service communicate through the network, the network barking is unreliable (fluctuating) For other reasons, the TCC service needs to retry failures, so the interfaces exposed by the TCC need to meet idempotency.
Reliability message final consistency scheme
The final consistency scheme of reliable messages is actually the practice of Base theory, that is, the problem of transactions. We do not enforce consistency requirements, but just send a message to the message queue for consumers to consume.
Let's take the example of TCC compensation
Step A is as follows:
begin transaction;
try{
sendMsg();
update money;
commit transaction;
}catch(Exception e){
rollback transaction;
}
However, after the sendMsg action is sent, if an exception occurs, the update money can be rolled back, but the message cannot be pulled back. If the exchange is done, Mq may send the message successfully, but the network has a problem timeout response, resulting in the transaction rollback, but the message is sent out. In this case, we can use RocketMQ transaction messages. The specific execution logic is as follows:
- The producer sends a transaction message to the message queue. The message queue only records the data of this message. At this time, the consumer cannot consume this message
- The producer executes specific business logic to complete local transaction operations
- The producer sends a confirmation message to the message queue server according to the execution result of the local transaction. If the local transaction is executed successfully, it sends a commit message to indicate that the message can be consumed. Otherwise, the message queue server will delete the message stored in the first step
- If the producer fails to send a commit message to the message queue server due to some circumstances during the execution of local transactions, the message queue will actively check the producer regularly to obtain the local transaction results, and determine whether the message needs to be delivered to the consumer according to the check results
- After the consumer consumes the message, the ack message is sent to the queue server, and the message consumption is successful.