Getting Started with Spring Cloud
Micro-Services and Micro-Service Architecture
Micro-service architecture is a new system architecture.Its design idea is to split the single architecture system into several independent running applets which can be called and cooperated with each other.The capabilities that each applet provides to the overall system are called microservices.
Since each microservice runs independently, each microservice takes up a process independently.Lightweight HTTP RESTFUL protocol communication is used between micro-services.Each micro-service program is not restricted by the programming language. The whole system is concerned with the specific services provided by the micro-service program, and is not concerned with its specific implementation.Each microservice can have its own independent database.You can either operate on your own stand-alone data or on the database of the overall system.
Introduction to Spring Cloud
Introduction to Baidu Encyclopedia
Spring Cloud is an ordered collection of frameworks.It cleverly simplifies the development of distributed system infrastructure using the convenience of Spring Boot development, such as service discovery registration, configuration center, message bus, load balancing, circuit breakers, data monitoring, etc. All of which can be started and deployed at one click with Spring Boot development style.Spring Cloud does not make wheels over and over again. Instead, it combines mature, proven service frameworks developed by companies and re-encapsulates them in Spring Boot style, masking complex configuration and implementation principles, ultimately giving developers a set of distributed system development toolkits that are easy to understand, deploy, and maintain.
Chinese Spring Cloud Network
https://www.springcloud.cc/
Spring Cloud Chinese Community
http://www.springcloud.cn/
Service Provider Project
This example uses Spring's ReestTemplate to make consumer calls to providers, and does not use Spring Cloud, but it is a running test environment for subsequent Spring Clouds.Use the MySql database and Spring Data JPA as the persistence layer technology.
Create a project


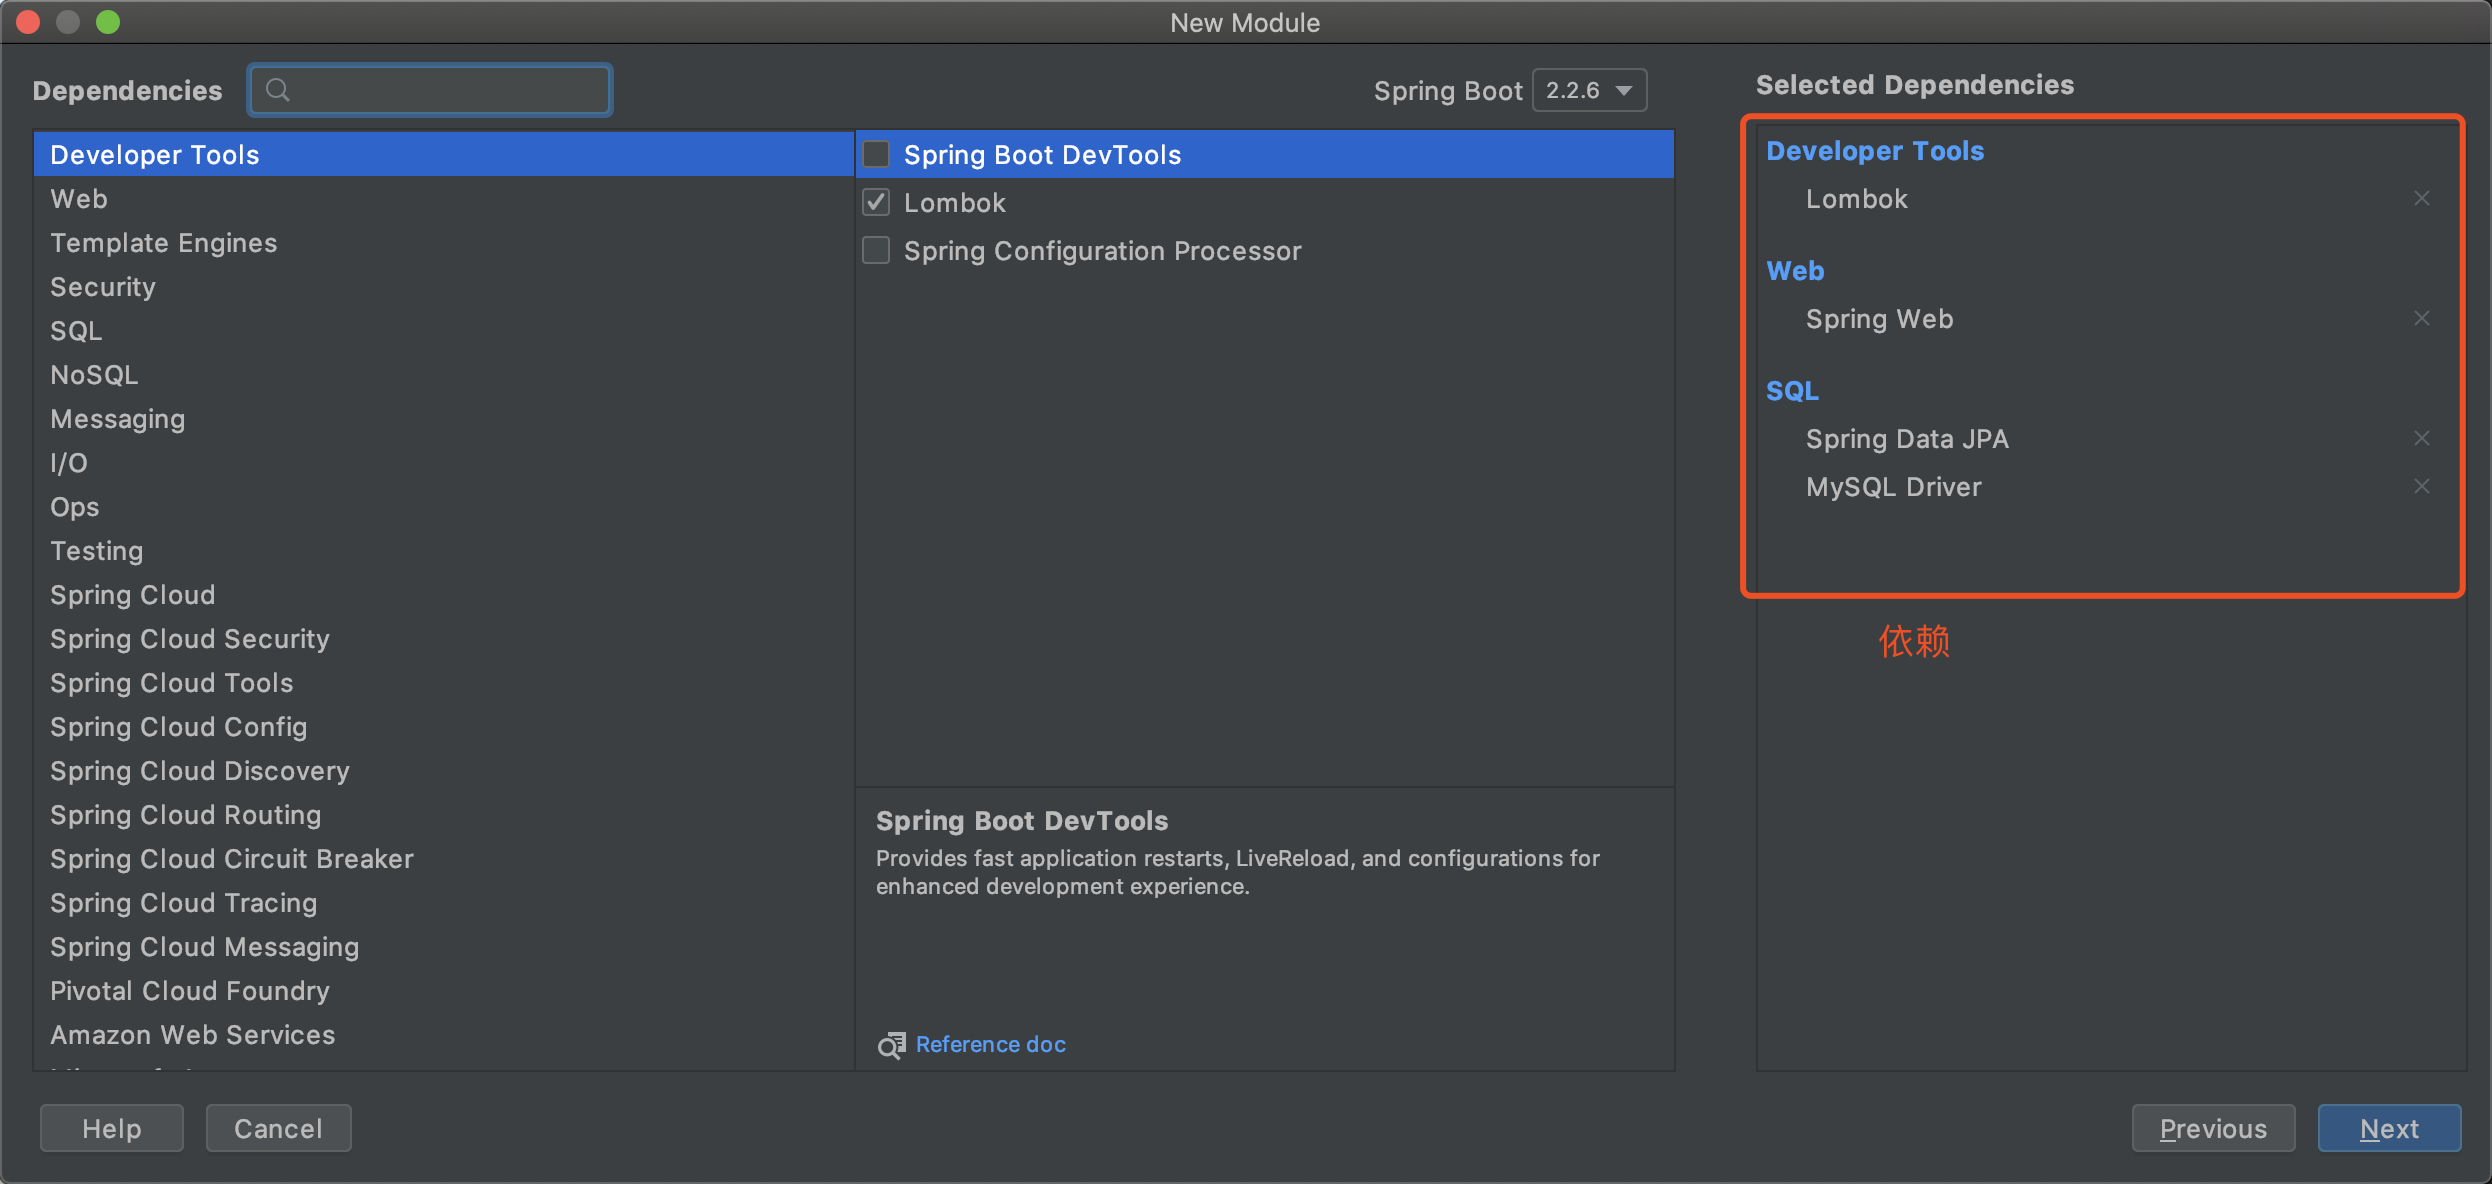
Add Druid Dependency
pom.xml
<!--Druid rely on-->
        <dependency>
            <groupId>com.alibaba</groupId>
            <artifactId>druid</artifactId>
            <version>1.1.10</version>
        </dependency>
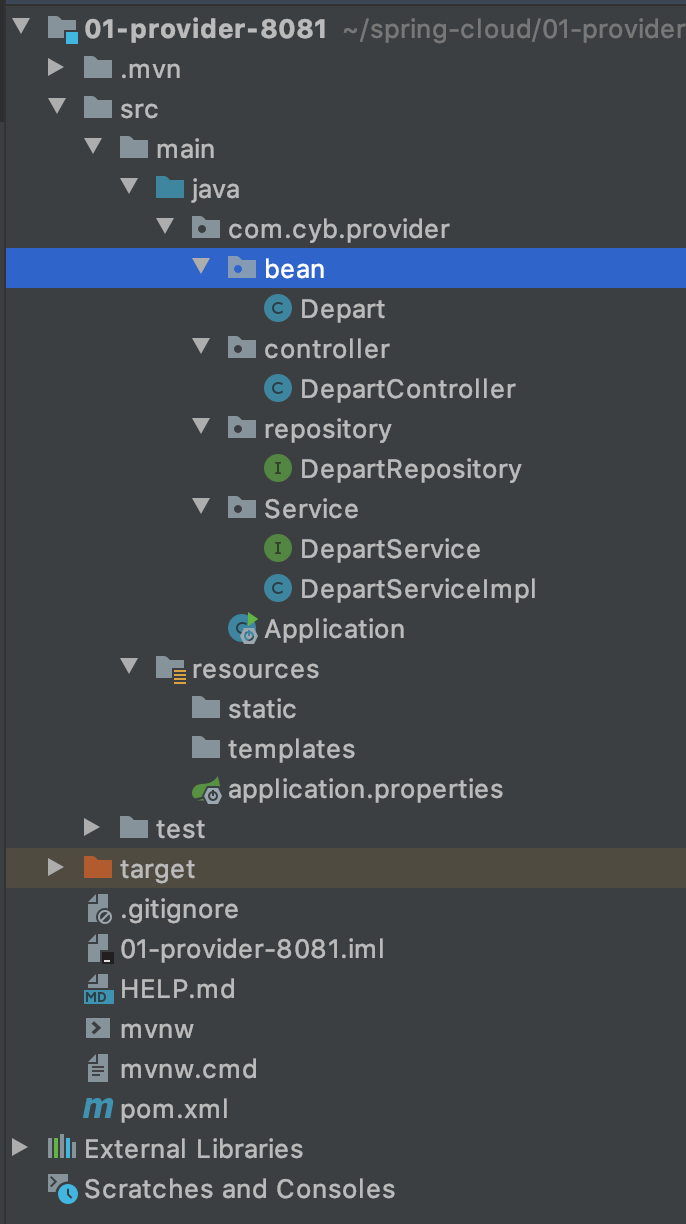
Define bean packages (hold entity classes)
The Controller processor method returns a value that is responded to by the browser as JSON data; this data conversion is done by the HTTP MessageConverter interface of SpringMvc.
Note that by default, Hibernate uses a delayed loading policy for queries on all objects. To add the @JsonIgnoreProperties annotation, the delayed loading and related properties are ignored, that is, the delayed loading policy is not used.If you need to delay loading, you can configure it specifically in the spring boot configuration file.
Depart.java
package com.cyb.provider.bean;

import com.fasterxml.jackson.annotation.JsonIgnoreProperties;
import lombok.Data;

import javax.persistence.Entity;
import javax.persistence.GeneratedValue;
import javax.persistence.GenerationType;
import javax.persistence.Id;

@Data
@Entity(name = "t_depart") //Entity Classes and"t_depart"Mapping relationships; do not write mappings representing entity classes and tables of the same name
@JsonIgnoreProperties({"hibernateLazyInitializer","handler","fieldHandler"}) //Delayed Loading; First parameter, Delayed Loading Initializer; 2, 3, Processing properties and fields
public class Depart {
    @Id
    @GeneratedValue(strategy = GenerationType.IDENTITY) //Automatically generate database, self-increment ID
    private Integer id;
    private String name;
    private String dbase;
}
Define a repository package (store dao)
DepartRepository.java
package com.cyb.provider.repository;

import com.cyb.provider.bean.Depart;
import org.springframework.data.jpa.repository.JpaRepository;

//Generic: The first indicates who the operation entity class is; the second is the self-incrementing column type of the current table
public interface DepartRepository extends JpaRepository<Depart,Integer> {

}
Note: Interfaces are defined
Define service packages
DepartService.java (Business Interface)
package com.cyb.provider.Service;

import com.cyb.provider.bean.Depart;
import java.util.List;

/**
 * Business Interface
 */
public interface DepartService {
    /**
     * increase
     * @param depart
     * @return
     */
    boolean saveDepart(Depart depart);

    /**
     * delete
     * @param id
     * @return
     */
    boolean removeDepartById(int id);

    /**
     * modify
     * @param depart
     * @return
     */
    boolean modifyDepart(Depart depart);

    /**
     * Query id
     * @param id
     * @return
     */
    Depart getDepartById(int id);

    /**
     * Query all
     * @return
     */
    List<Depart> listAllDeparts();
}
DepartServiceImpl.java (Business Interface Implementation Class)
package com.cyb.provider.Service;

import com.cyb.provider.bean.Depart;
import com.cyb.provider.repository.DepartRepository;
import org.springframework.beans.factory.annotation.Autowired;
import org.springframework.stereotype.Service;

import java.util.List;
@Service
public class DepartServiceImpl implements DepartService {
    @Autowired
    private DepartRepository repository;

    @Override
    public boolean saveDepart(Depart depart) {
        //Return result has value, operation succeeds; no value fails, operation fails
        return repository.save(depart) == null ? false : true;
    }

    @Override
    public boolean removeDepartById(int id) {
        //about deleteById Method, if DB This exists in id,Must be deleted; there is no such id,Throw an exception
        if (repository.existsById(id)) {
            repository.deleteById(id);
            return true;
        }
        return false;
    }

    @Override
    public boolean modifyDepart(Depart depart) {
        //Return result has value, operation succeeds; no value fails, operation fails
        return repository.save(depart) == null ? false : true;
    }

    @Override
    public Depart getDepartById(int id) {
        //getOne()Method: If specified id No, this method will throw an exception
        if (repository.existsById(id)){
            return repository.getOne(id);
        }
        Depart depart=new Depart();
        depart.setName("not this depart");
        return depart;
    }

    @Override
    public List<Depart> listAllDeparts() {
        return repository.findAll();
    }
}
Define the controller package (controller)
DepartController.java
package com.cyb.provider.controller;

import com.cyb.provider.Service.DepartService;
import com.cyb.provider.bean.Depart;
import org.springframework.beans.factory.annotation.Autowired;
import org.springframework.web.bind.annotation.*;

import java.util.List;

@RequestMapping("/provider/depart")
@RestController
public class DepartController {

    @Autowired
    private DepartService service;

    @PostMapping("/save")
    public boolean saveHandle(@RequestBody Depart depart) {
        return service.saveDepart(depart);
    }

    @DeleteMapping("/del/{id}")
    public boolean deleteHandle(@PathVariable("id") int id) {
        return service.removeDepartById(id);
    }

    @PutMapping("/update")
    public boolean updateHandle(@RequestBody Depart depart) {
        return service.modifyDepart(depart);
    }

    @GetMapping("/get/{id}")
    public Depart getHandle(@PathVariable("id") int id) {
        return service.getDepartById(id);
    }

    @GetMapping("/list")
    public List<Depart> listHandle() {
        return service.listAllDeparts();
    }
}
Supplement:
1, @PathVariable: Gets the placeholder in the request path
2,@RestController=@ResponseBody + @Controller
    2.1 If the Controller is annotated with @RestController only, the method in the Controller cannot return a jsp page, or html. The configured View Resolver, InternalResourceViewResolver, does not work and the content returned is what is in Return.
    2.2 If you need to return to the specified page, you need @Controller with the view resolver InternalResourceViewResolver.
    If you need to return JSON, XML, or custom mediaType content to the page, you need to add the @ResponseBody annotation to the corresponding method.
configuration file
application.properties
# Port number
server.port=8081
# Whether application startup automatically creates tables, defaulting to false
spring.jpa.generate-ddl=true
# Whether to display sql statements in the console, defaulting to false
spring.jpa.show-sql=true
# Set not to rebuild tables at application startup
spring.jpa.hibernate.ddl-auto=none
# data type
spring.datasource.type=com.alibaba.druid.pool.DruidDataSource
spring.datasource.url=jdbc:mysql://localhost:3306/demo?useUnicode=true&characterEncoding=UTF-8&serverTimezone=Asia/Shanghai
spring.datasource.username=root
spring.datasource.password=root

# Format Log Output
logging.pattern.console=level-%level%msg%n
# Log level at Spring Boot startup
logging.level.root=info
# Log level at hibernate runtime
logging.level.org.hibernate=info
# Display dynamic parameter values in SQL when show-sql is true
logging.level.org.hibernate.type.descriptor.sql.BasicBinder=trace
# Display query results when show-sql is true
logging.level.org.hibernate.type.descriptor.sql.BasicExtractor=trace
# Control the log level displayed when your code runs
logging.level.com.cyb.provider=debug
Project Structure Diagram
Service Consumer Project
Create a project

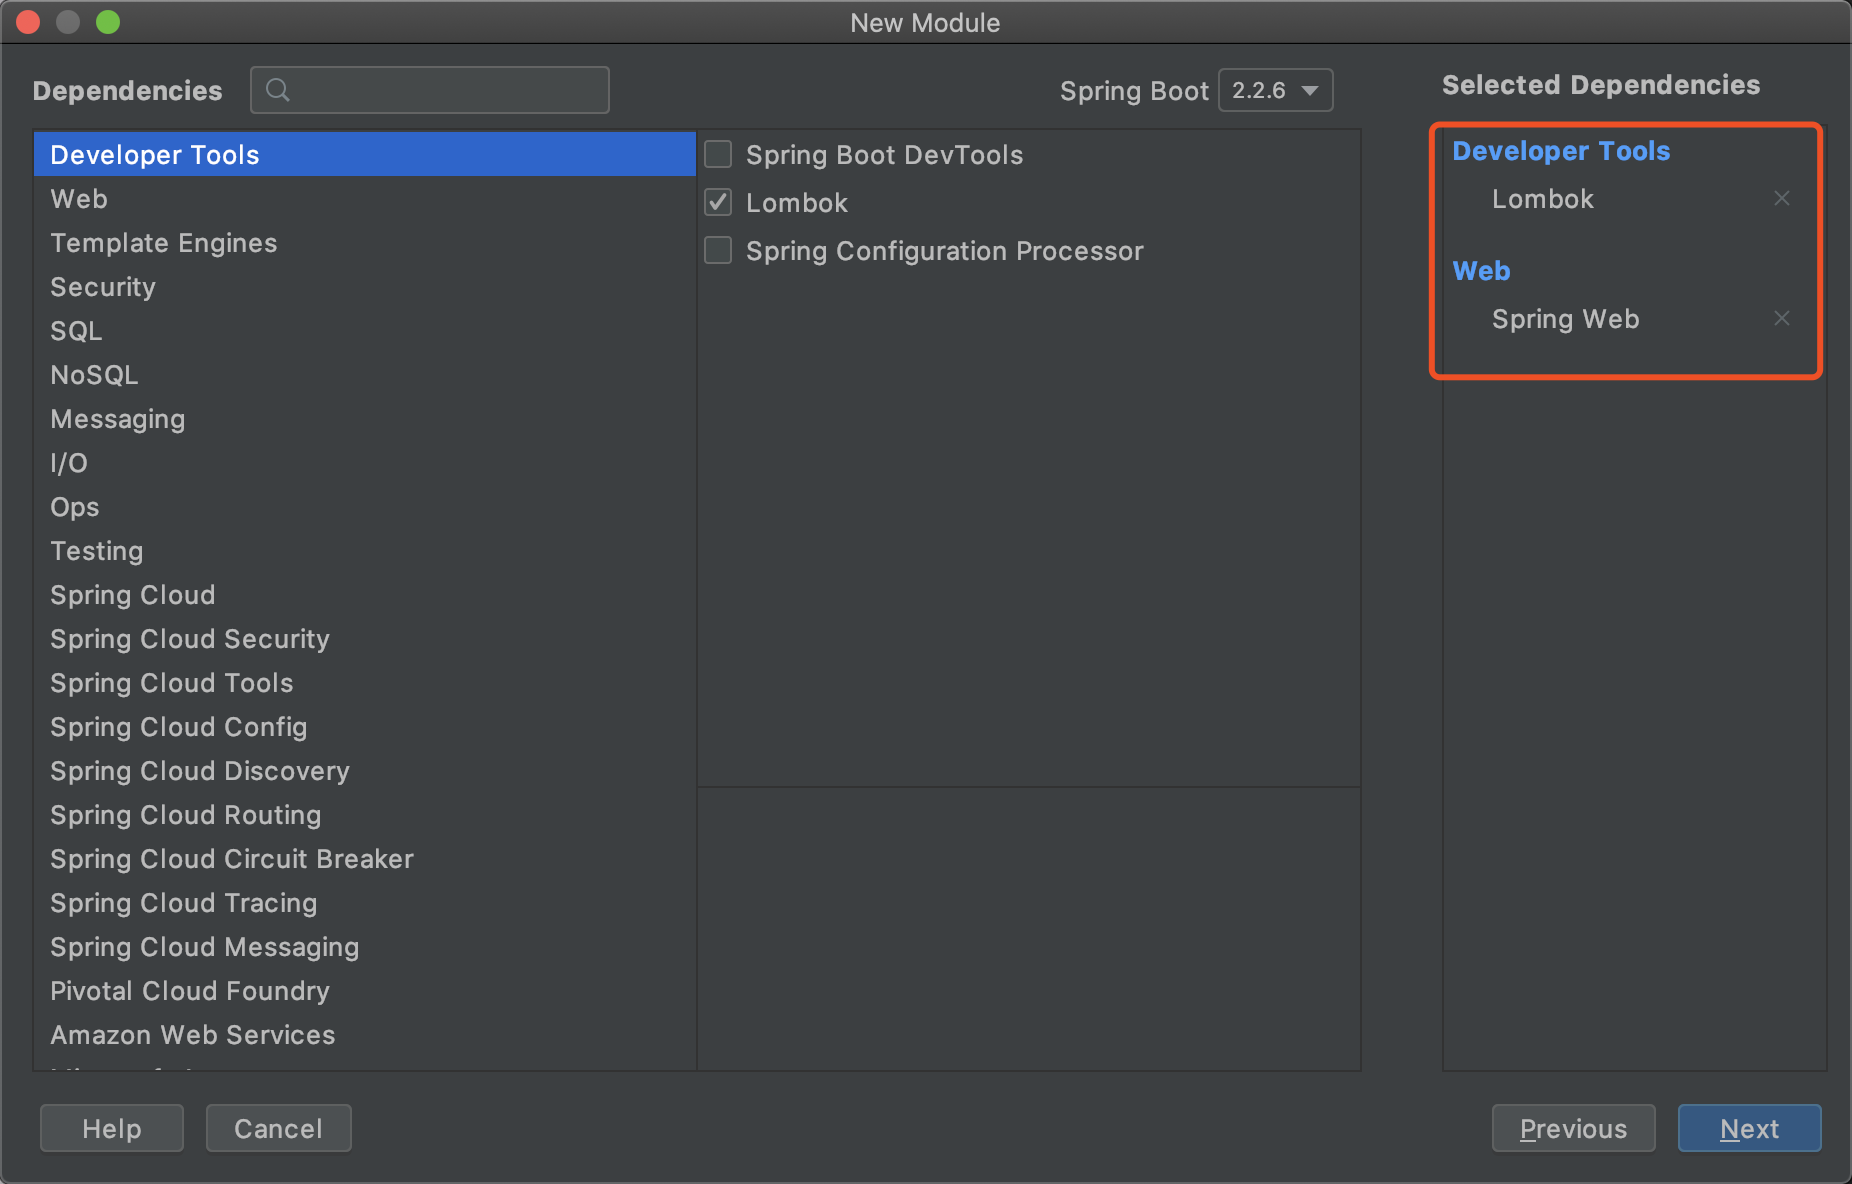
Define a bean package
Depart.java
package com.com.consumer.bean;

import lombok.Data;

@Data
public class Depart {
    private Integer id;
    private String name;
    private String dbase;
}
Define the codeconfig package
DepartCodeConfig.java
package com.com.consumer.codeconfig;

import org.springframework.context.annotation.Bean;
import org.springframework.context.annotation.Configuration;
import org.springframework.web.client.RestTemplate;

@Configuration
public class DepartCodeConfig {
    @Bean
    public RestTemplate restTemplate(){
        return new RestTemplate();
    }
}
Define the controller package
DepartController.java
package com.com.consumer.controller;

import com.com.consumer.bean.Depart;
import org.springframework.beans.factory.annotation.Autowired;
import org.springframework.web.bind.annotation.*;
import org.springframework.web.client.RestTemplate;

import java.util.List;

@RestController
@RequestMapping("/consumer/depart")
public class DepartController {
    @Autowired
    private RestTemplate restTemplate;
    @PostMapping("/save")
    public boolean saveHandle(Depart depart) {
        String url="http://localhost:8081/provider/depart/save";
        return restTemplate.postForObject(url,depart,Boolean.class);
    }

    @DeleteMapping("/del/{id}")
    public void deleteHandle(@PathVariable("id") int id) {
        String url="http://localhost:8081/provider/depart/del/"+id;
        restTemplate.delete(url);
    }

    @PutMapping("/update")
    public void updateHandle(@RequestBody Depart depart) {
        String url="http://localhost:8081/provider/depart/update";
        restTemplate.put(url,depart);
    }

    @GetMapping("/get/{id}")
    public Depart getHandle(@PathVariable("id") int id) {
        String url="http://localhost:8081/provider/depart/get/"+id;
        return restTemplate.getForObject(url,Depart.class);
    }

    @GetMapping("/list")
    public List<Depart> listHandle() {
        String url="http://localhost:8081/provider/depart/list";
        return restTemplate.getForObject(url,List.class);
    }
}
application.properties
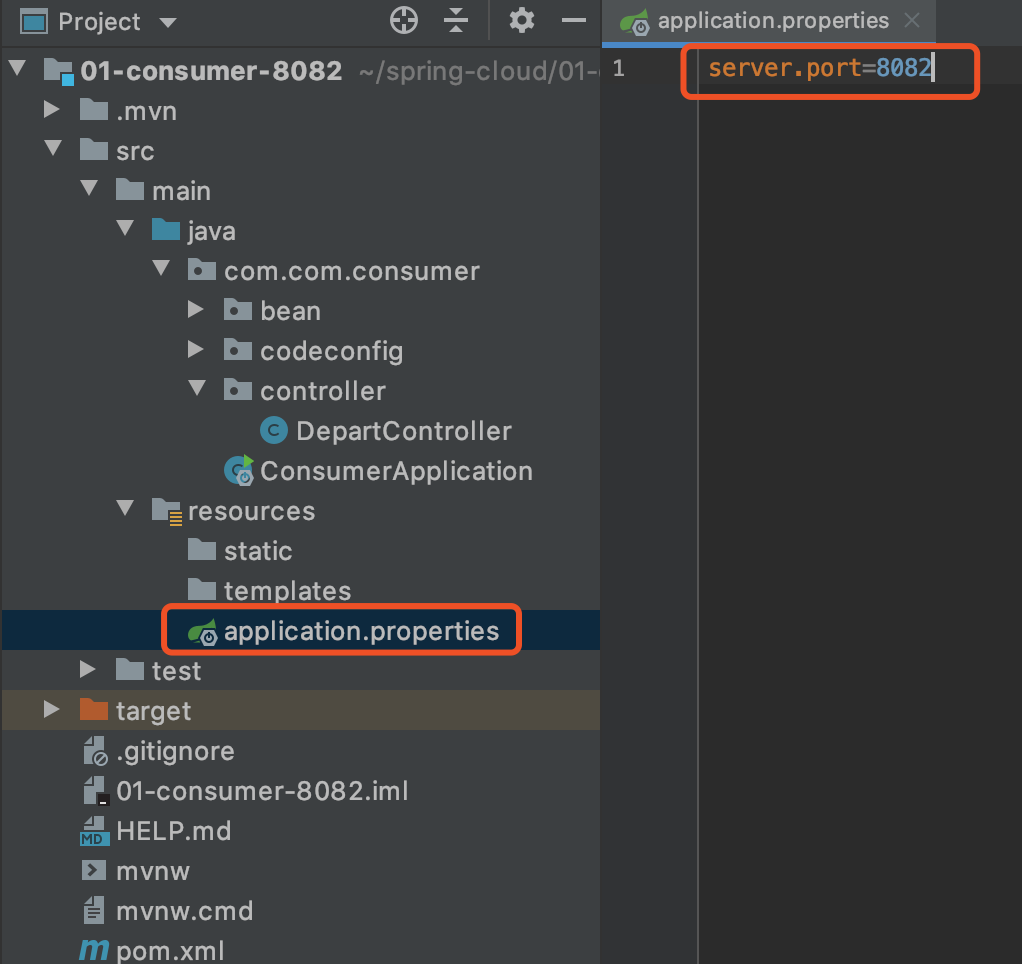
Project Structure Diagram

Restlet Client Test
Installation Tutorial: Point me straight
Microservice Center Eureka
github
Create Eureka Service Center
Overall steps
- Import Eureka Dependencies
- Configuring EurekaServer in the configuration file
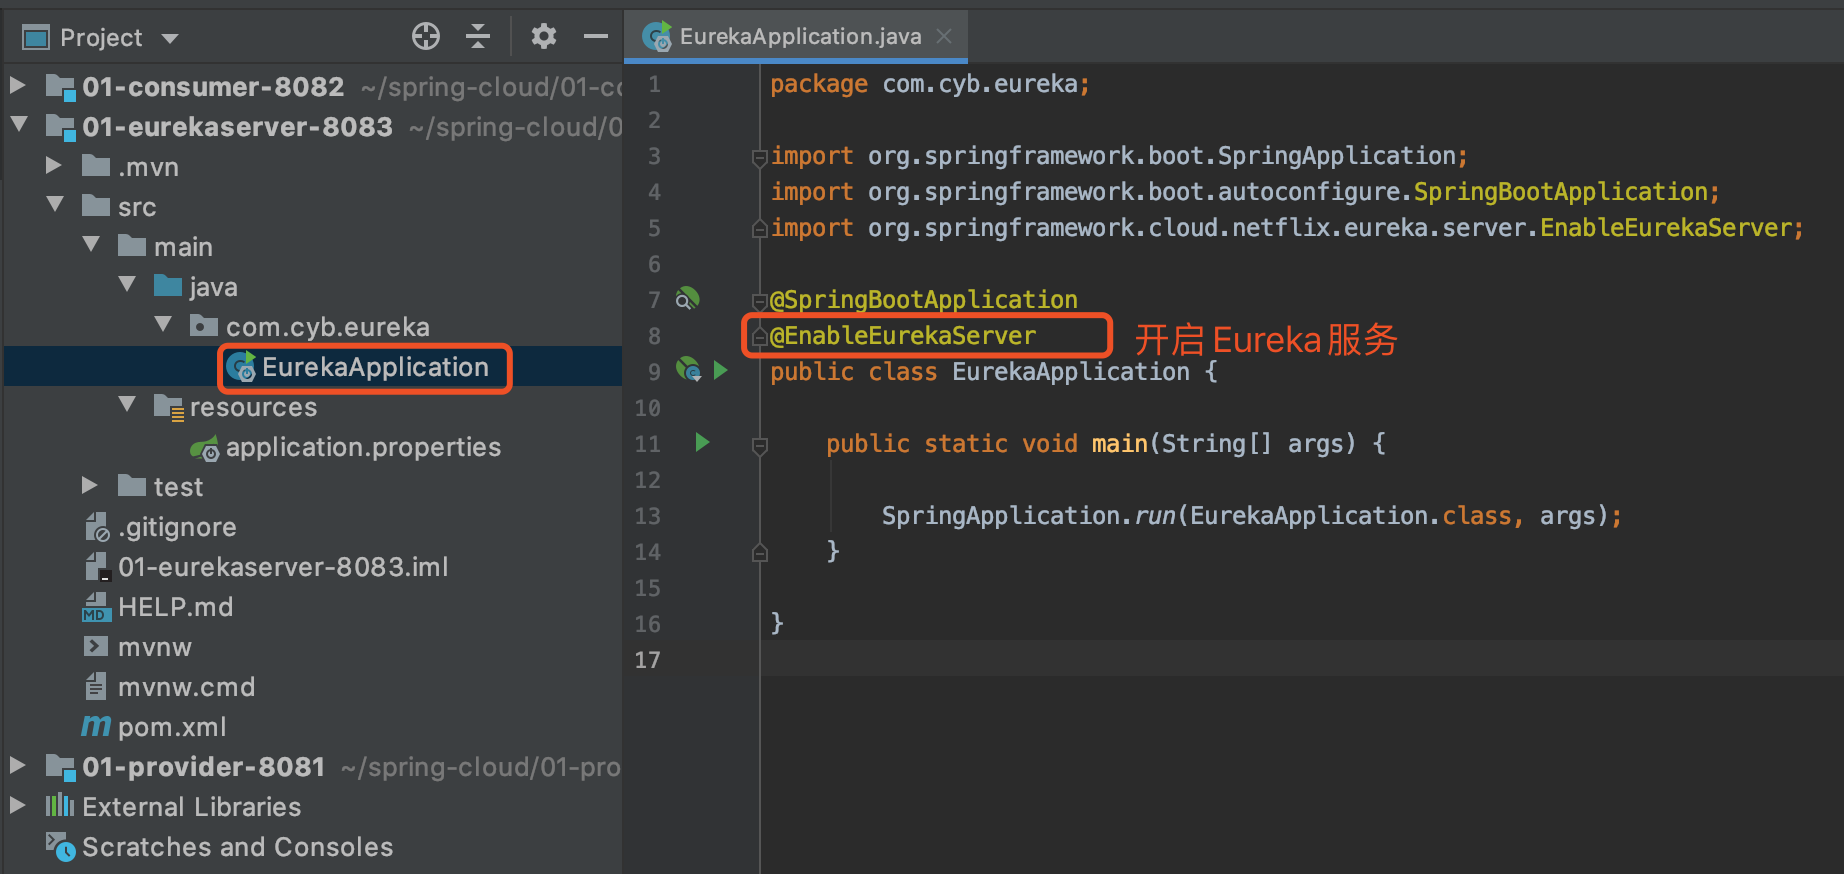
- Add the comment @EnableEurekaServer to the startup class to open Eureka
Create a project

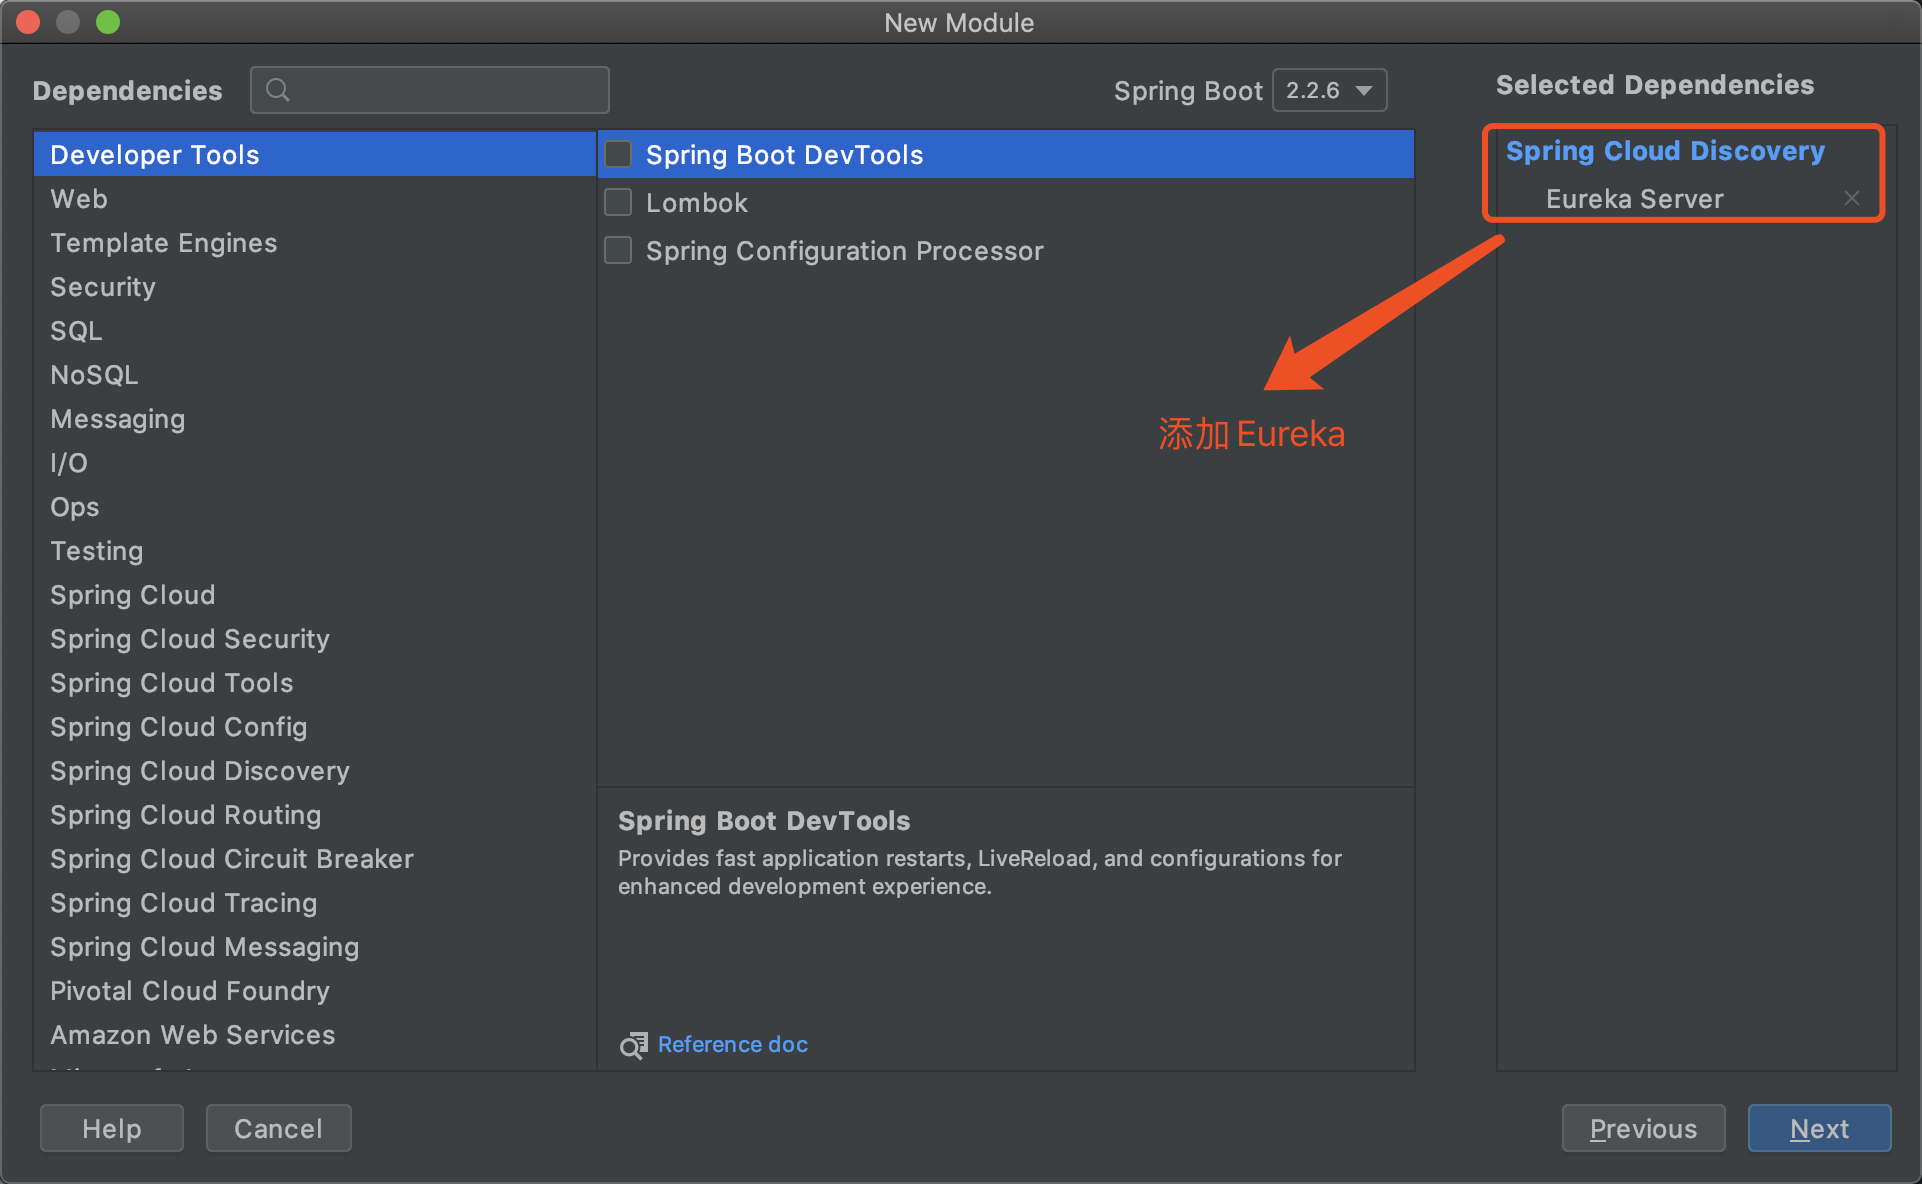
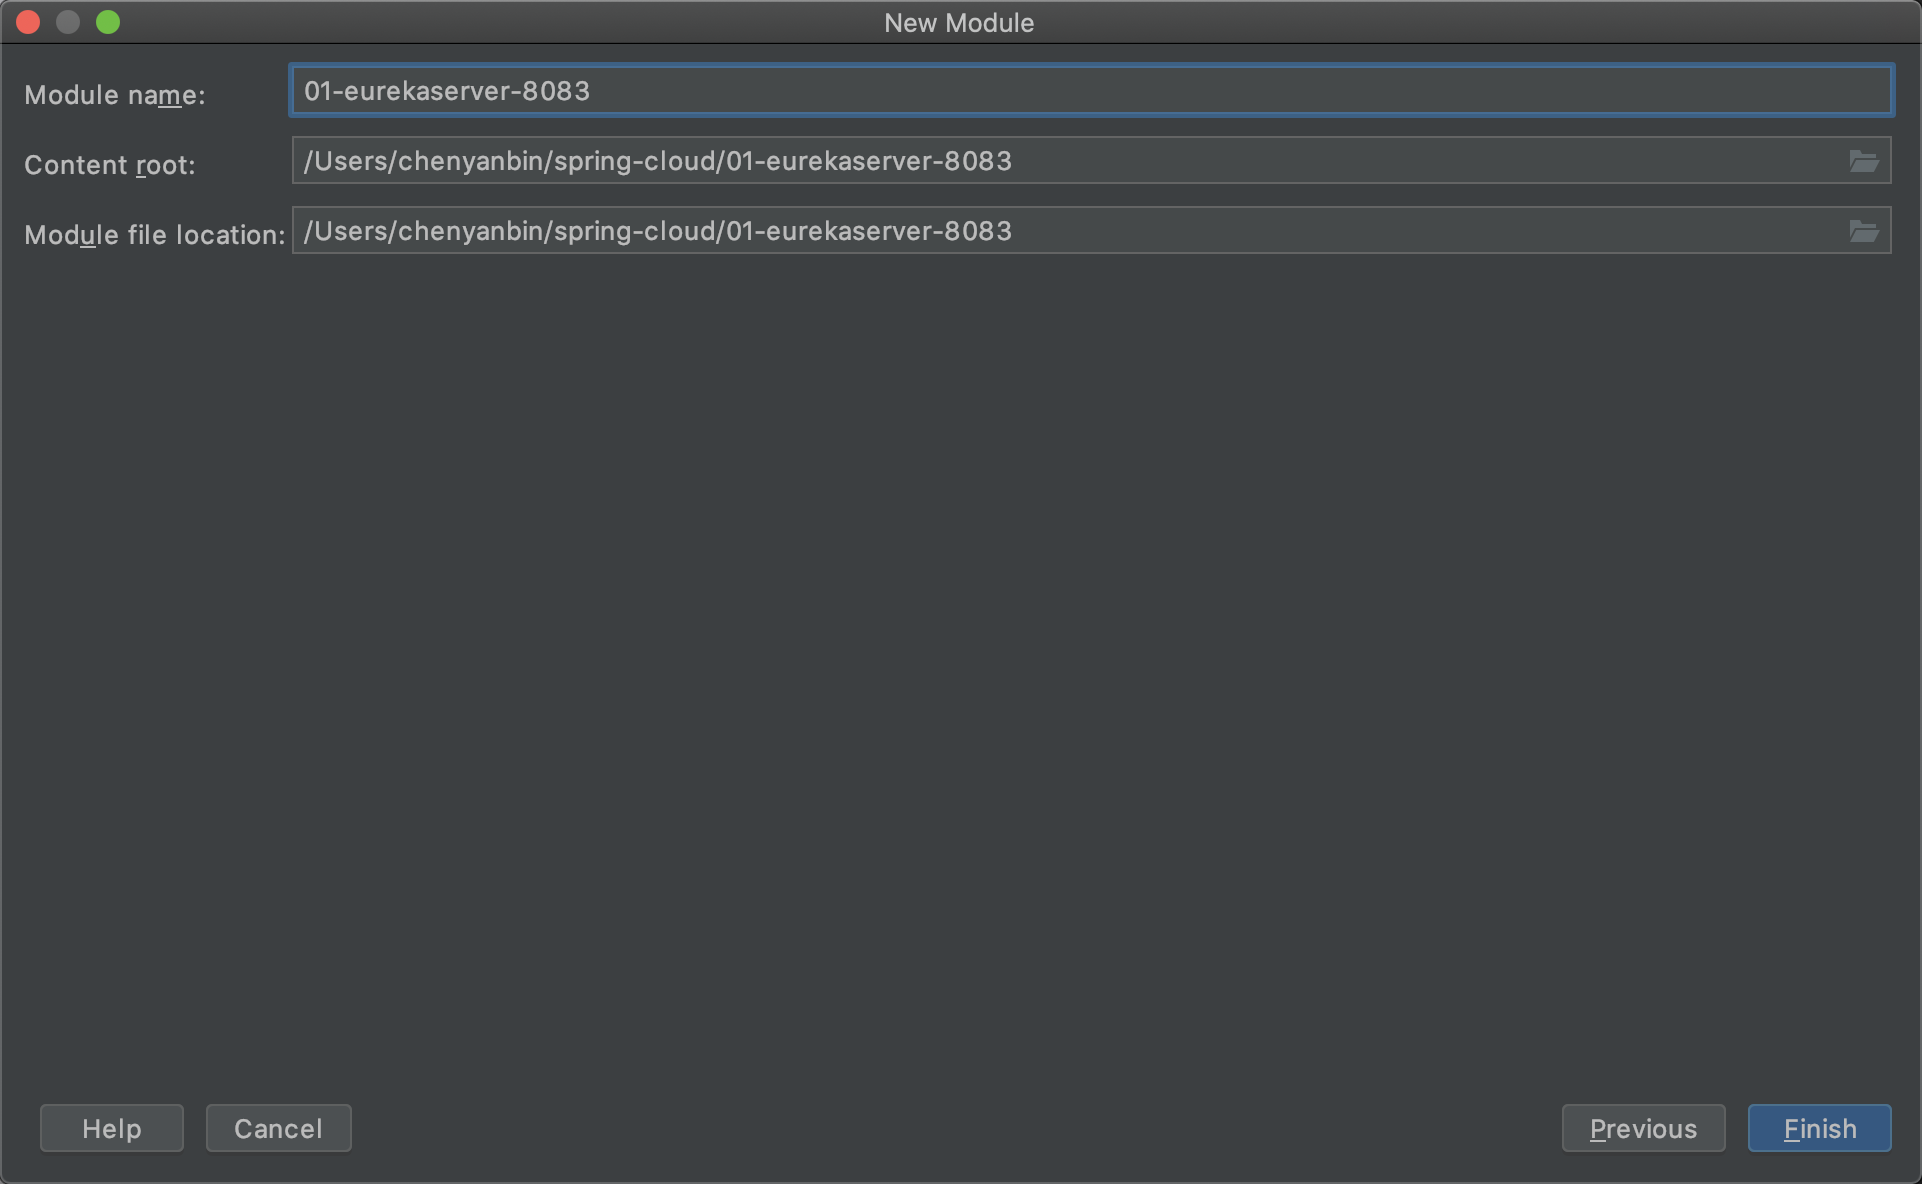
Import dependencies (note)
Note that the dependencies to be imported here are not directly dependent on the Spring Cloud project.Instead, Eureka Server relies on it. Before JDK9, it contained the dependencies it needed. After JDK9, Eureka's dependencies were kicked out and needed to be added separately.You don't need the following dependencies before JDK9. I'm using JDK13 for this demonstration, so you need to add the following dependencies.
pom.xml
<!--Eureka Add Dependency Start-->
        <dependency>
            <groupId>javax.xml.bind</groupId>
            <artifactId>jaxb-api</artifactId>
            <version>2.3.0</version>
        </dependency>

        <dependency>
            <groupId>com.sun.xml.bind</groupId>
            <artifactId>jaxb-core</artifactId>
            <version>2.3.0</version>
        </dependency>

        <dependency>
            <groupId>com.sun.xml.bind</groupId>
            <artifactId>jaxb-impl</artifactId>
            <version>2.3.0</version>
        </dependency>

        <dependency>
            <groupId>javax.activation</groupId>
            <artifactId>activation</artifactId>
            <version>1.1.1</version>
        </dependency>
        <!--Eureka Add Dependency End-->
Set Profile
application.properties
server.port=8083
# Configure Eureka, start
# Configure Eureka host name
eureka.instance.hostname=localhost
# Specifies whether the current host needs to be registered with the registry (no, because the current host is a Server, not a Client)
eureka.client.register-with-eureka=false
# Specifies whether the current host needs to obtain registration information (no, because the current host is a Server, not a Client)
eureka.client.fetch-registry=false
# ${eureka.instance.hostname} and ${server.port}, dynamically introducing the value of a variable
# Exposure Service Center Address
eureka.client.service-url.defaultZone=http://${eureka.instance.hostname}:${server.port}/eureka
Add annotation on startup class
Project Start Test
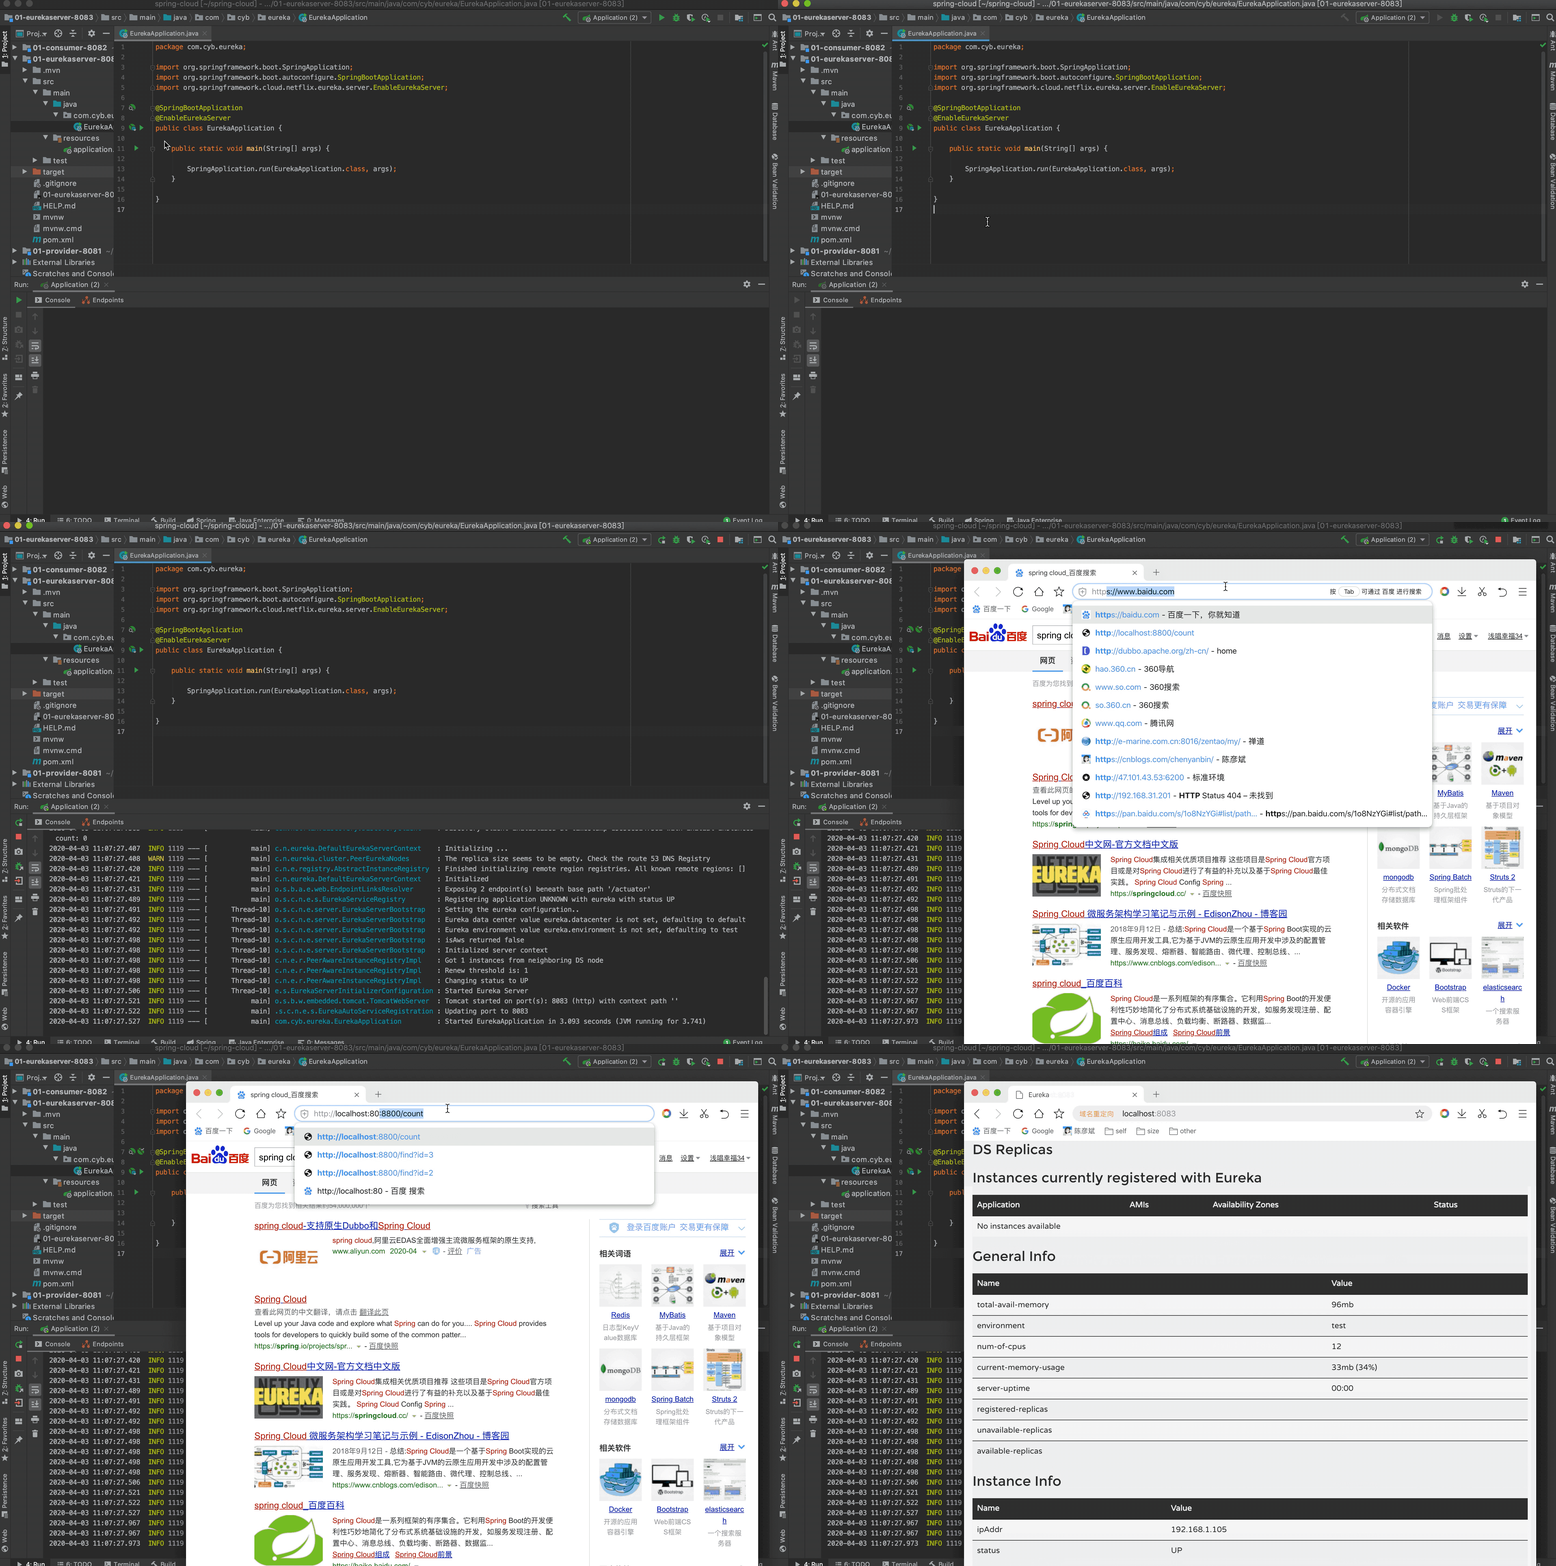
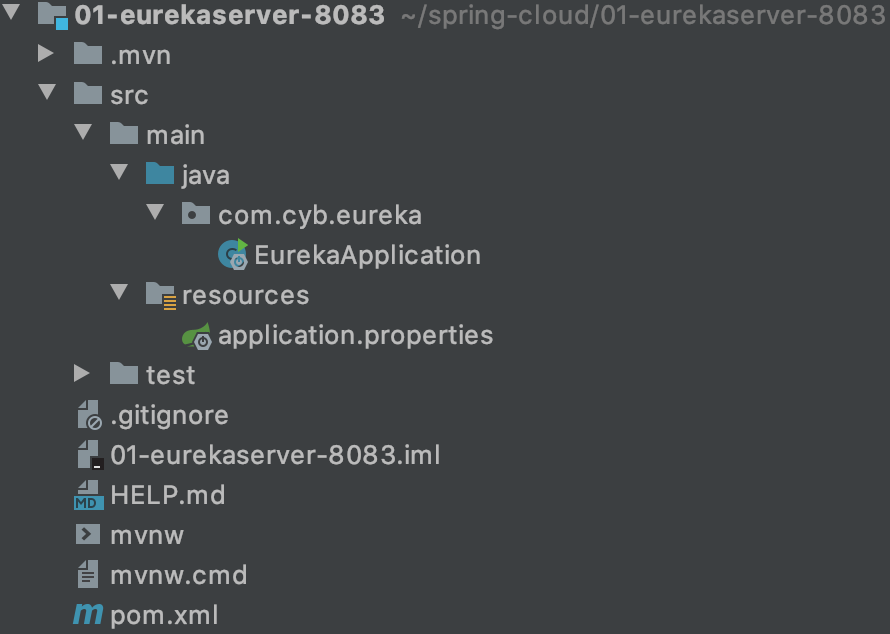
Project Structure Diagram
Create Provider Project 2
Overall steps
- Add Eureka Client Dependency
- Specify the Eureka registry to register in the configuration file
- Add the @EnableEurekaClient annotation to the startup class
Create a project
One copy: 01-provider-8081, renamed 02-provider-8081
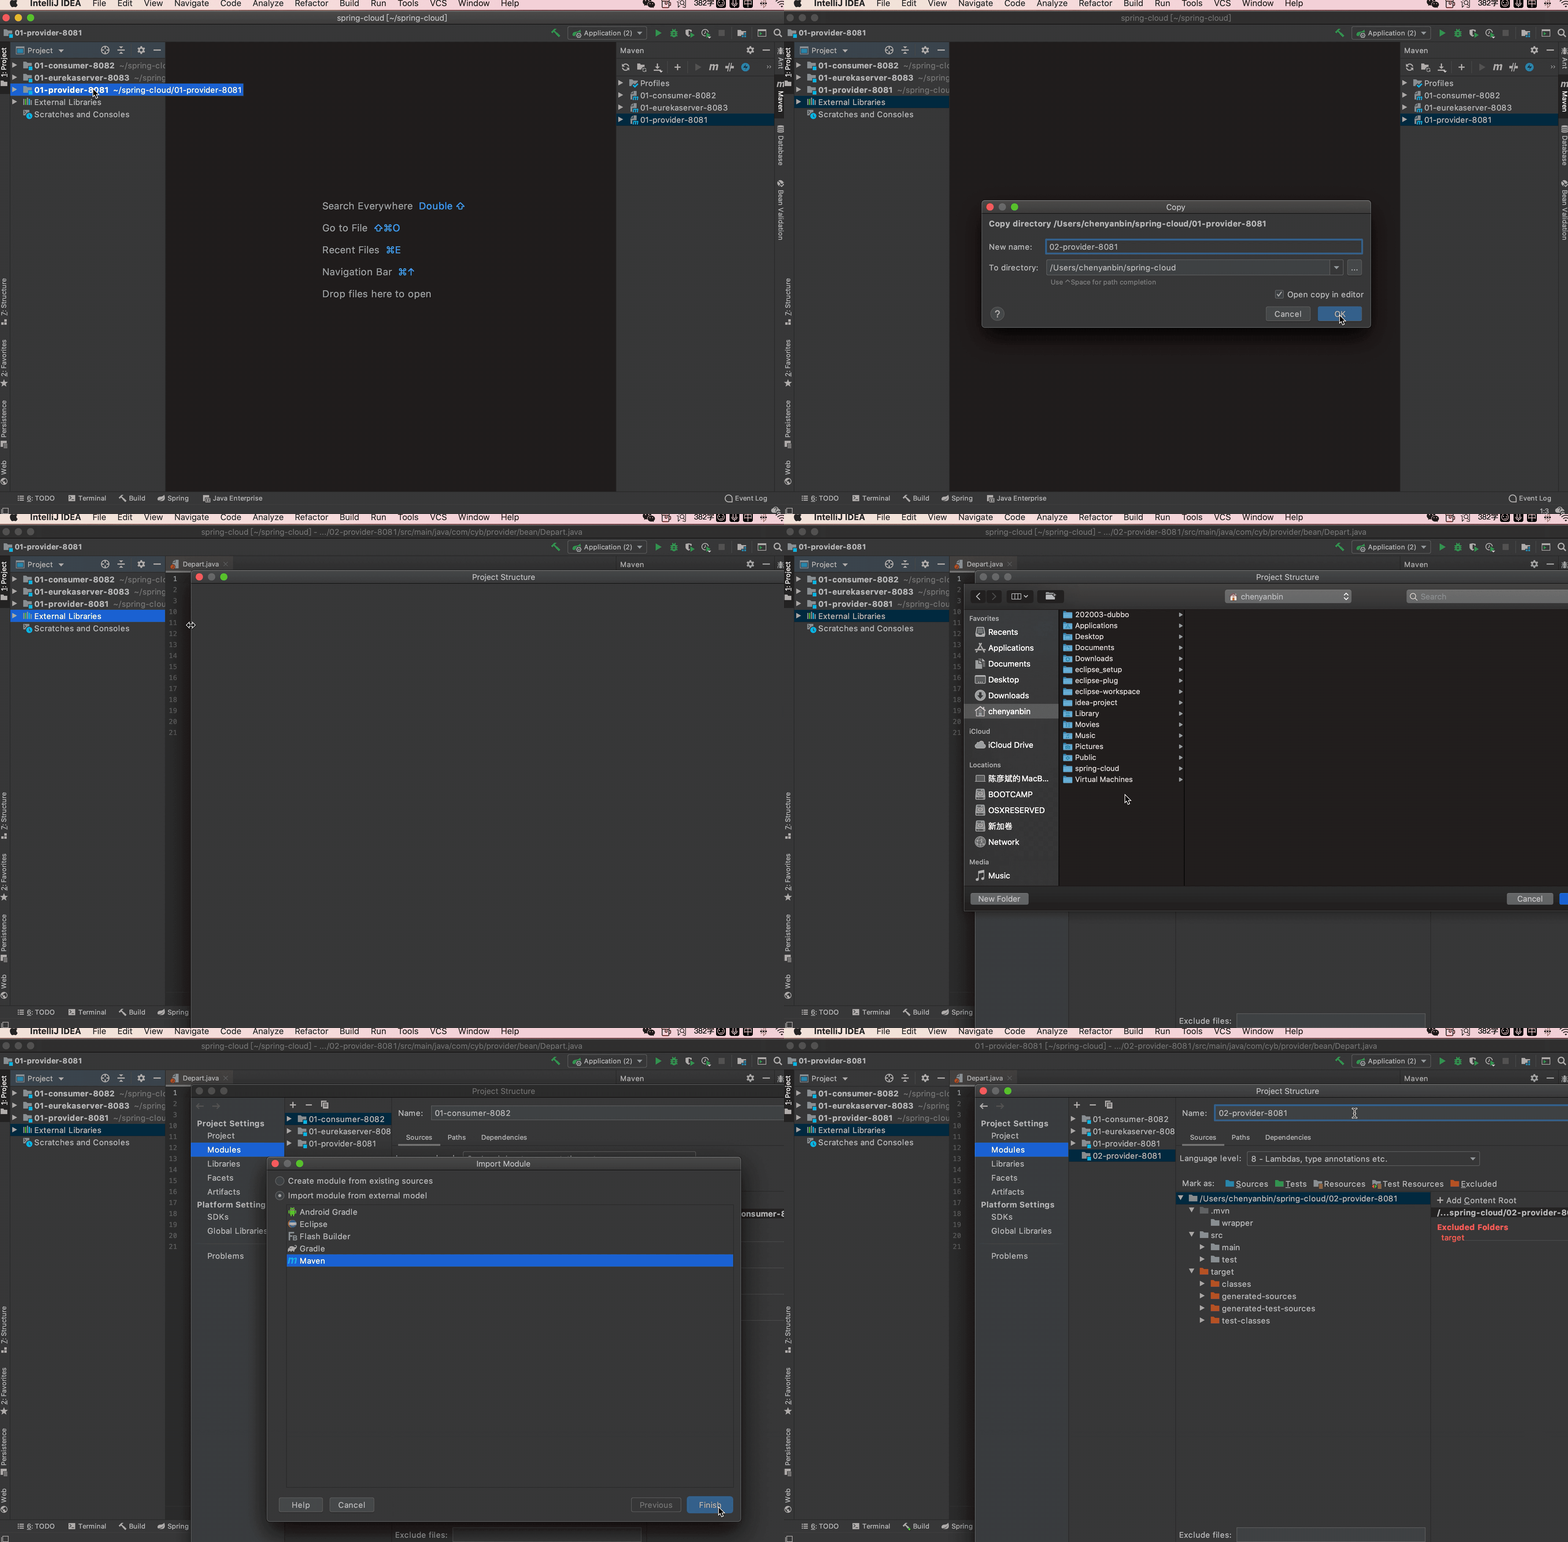
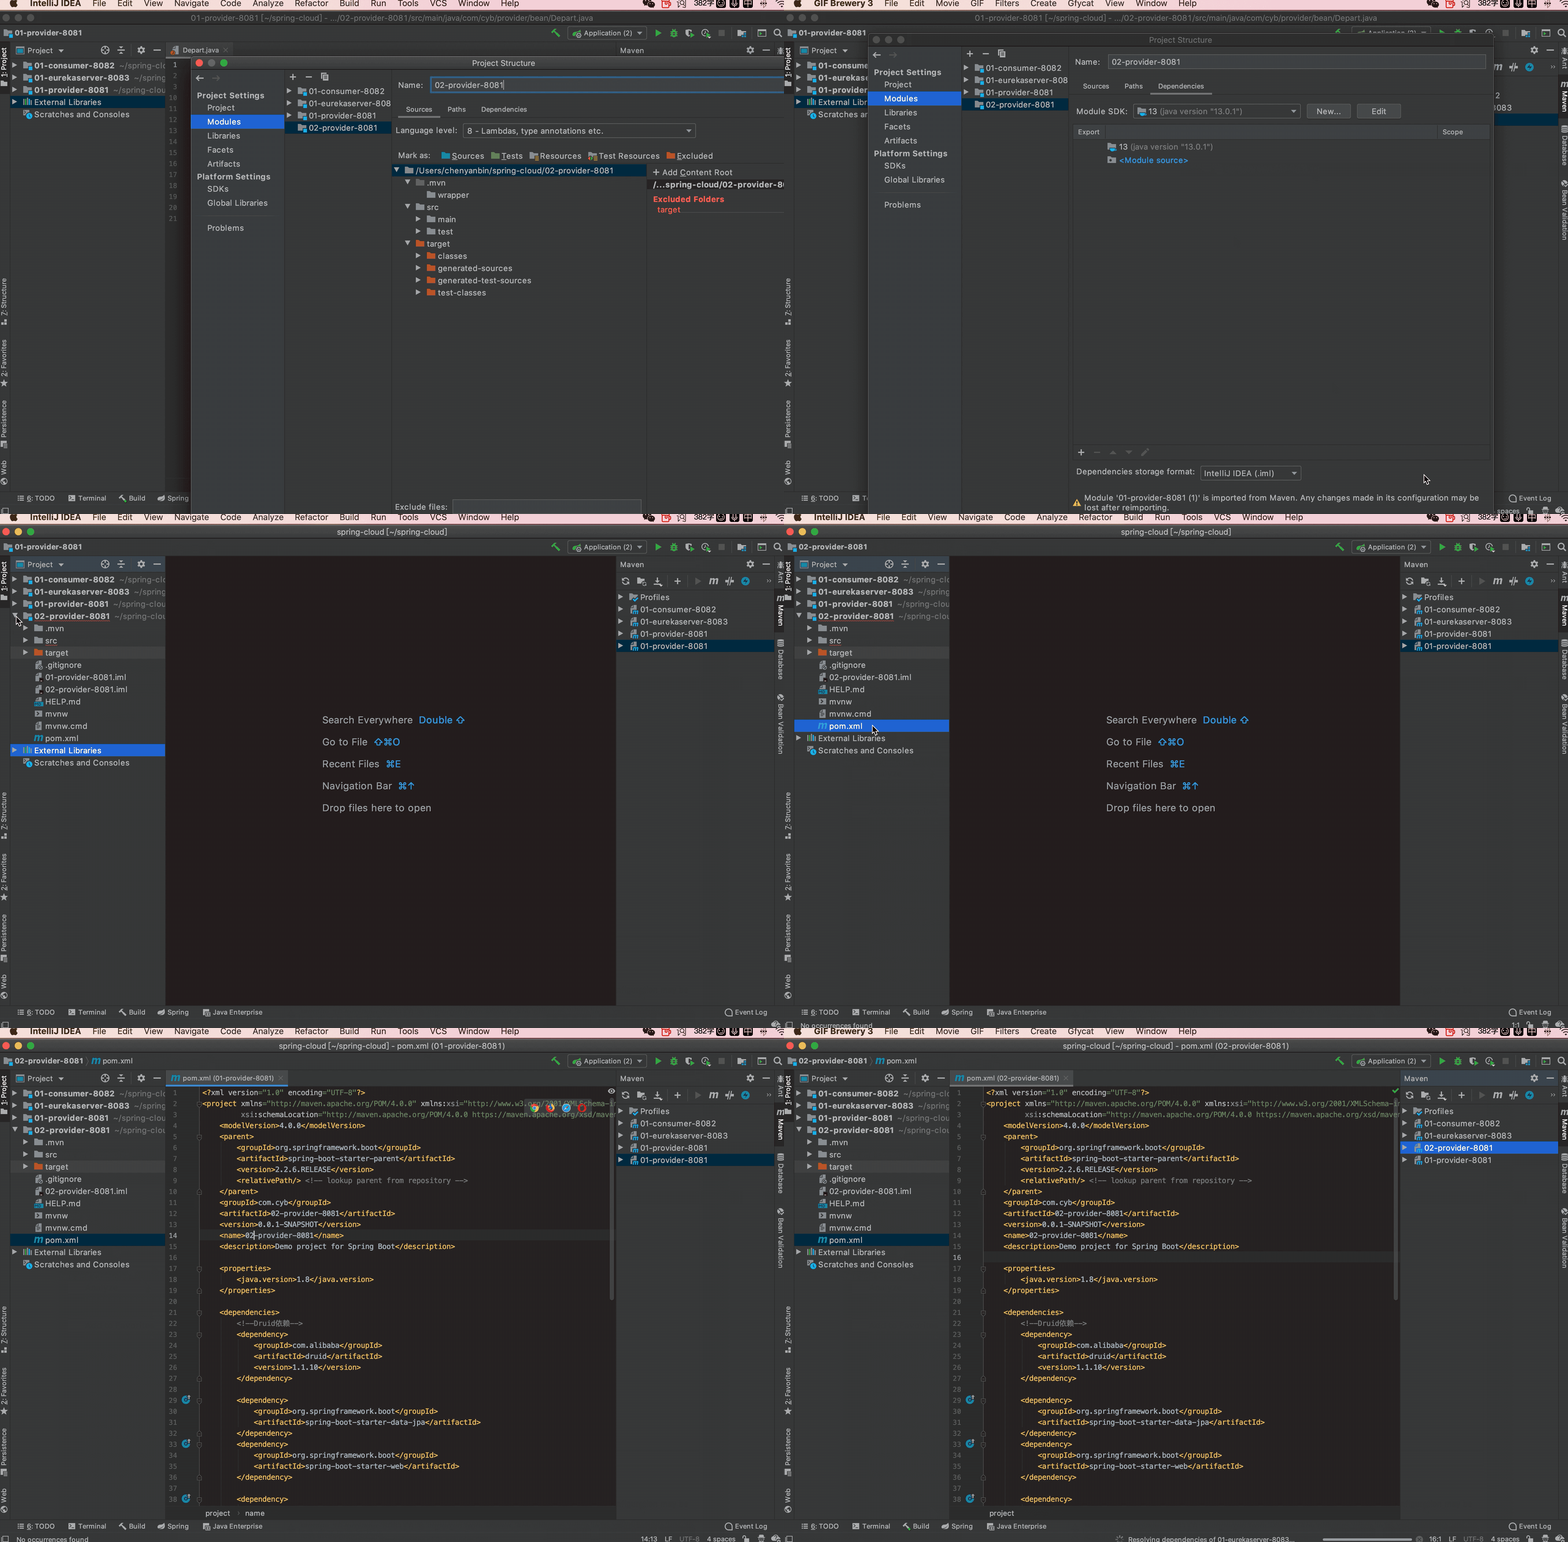
Add Dependency
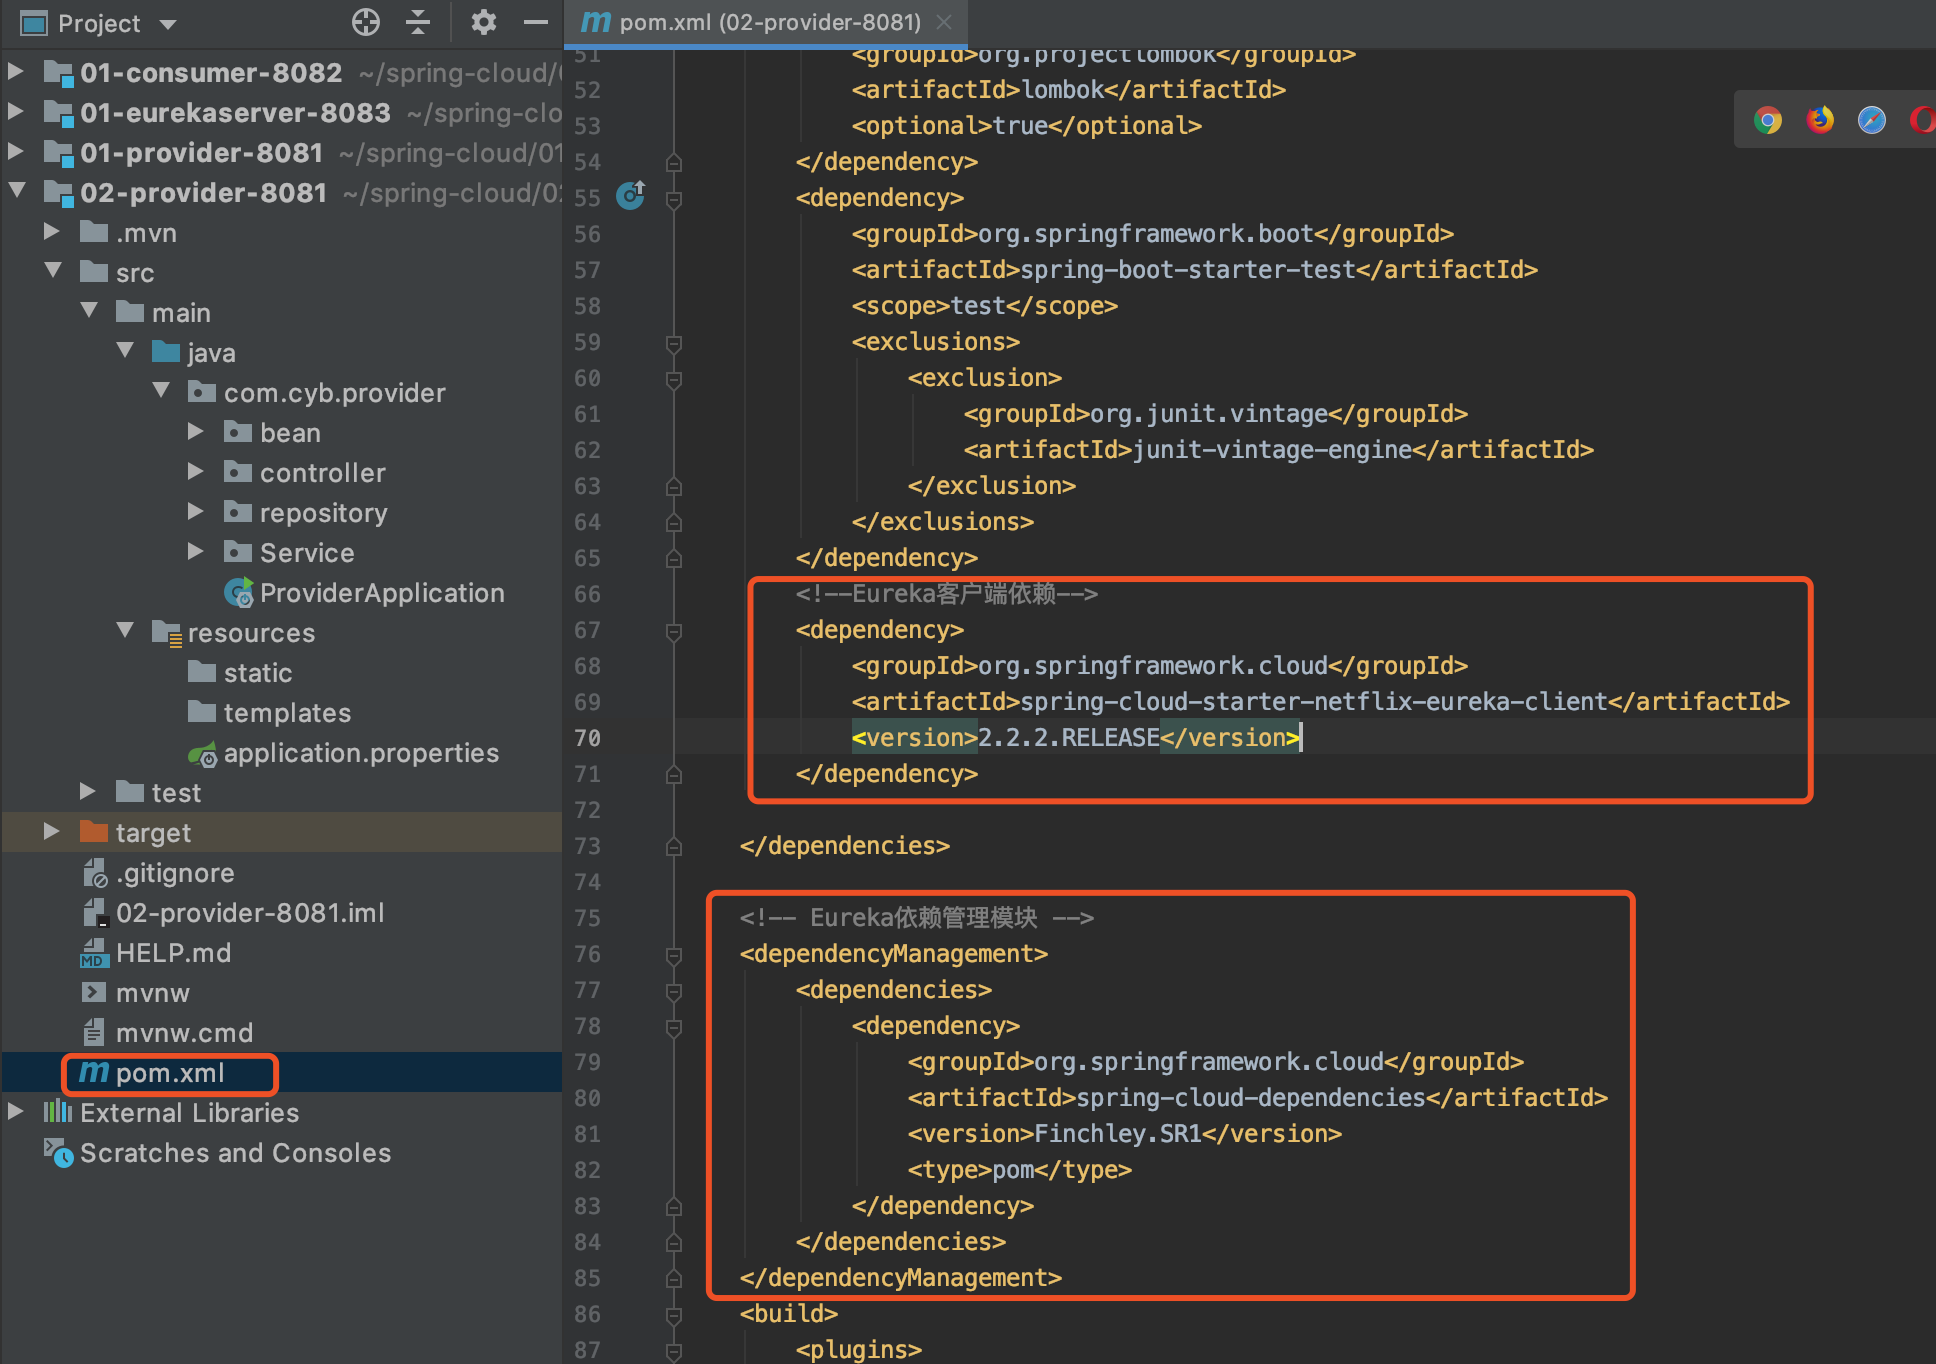
<dependencies>
        <!--Eureka Client Dependency-->
        <dependency>
            <groupId>org.springframework.cloud</groupId>
            <artifactId>spring-cloud-starter-netflix-eureka-client</artifactId>
            <version>2.2.2.RELEASE</version>
        </dependency>
    </dependencies>

    <!-- Eureka Dependency Management Module -->
    <dependencyManagement>
        <dependencies>
            <dependency>
                <groupId>org.springframework.cloud</groupId>
                <artifactId>spring-cloud-dependencies</artifactId>
                <version>Finchley.SR1</version>
                <type>pom</type>
            </dependency>
        </dependencies>
    </dependencyManagement>
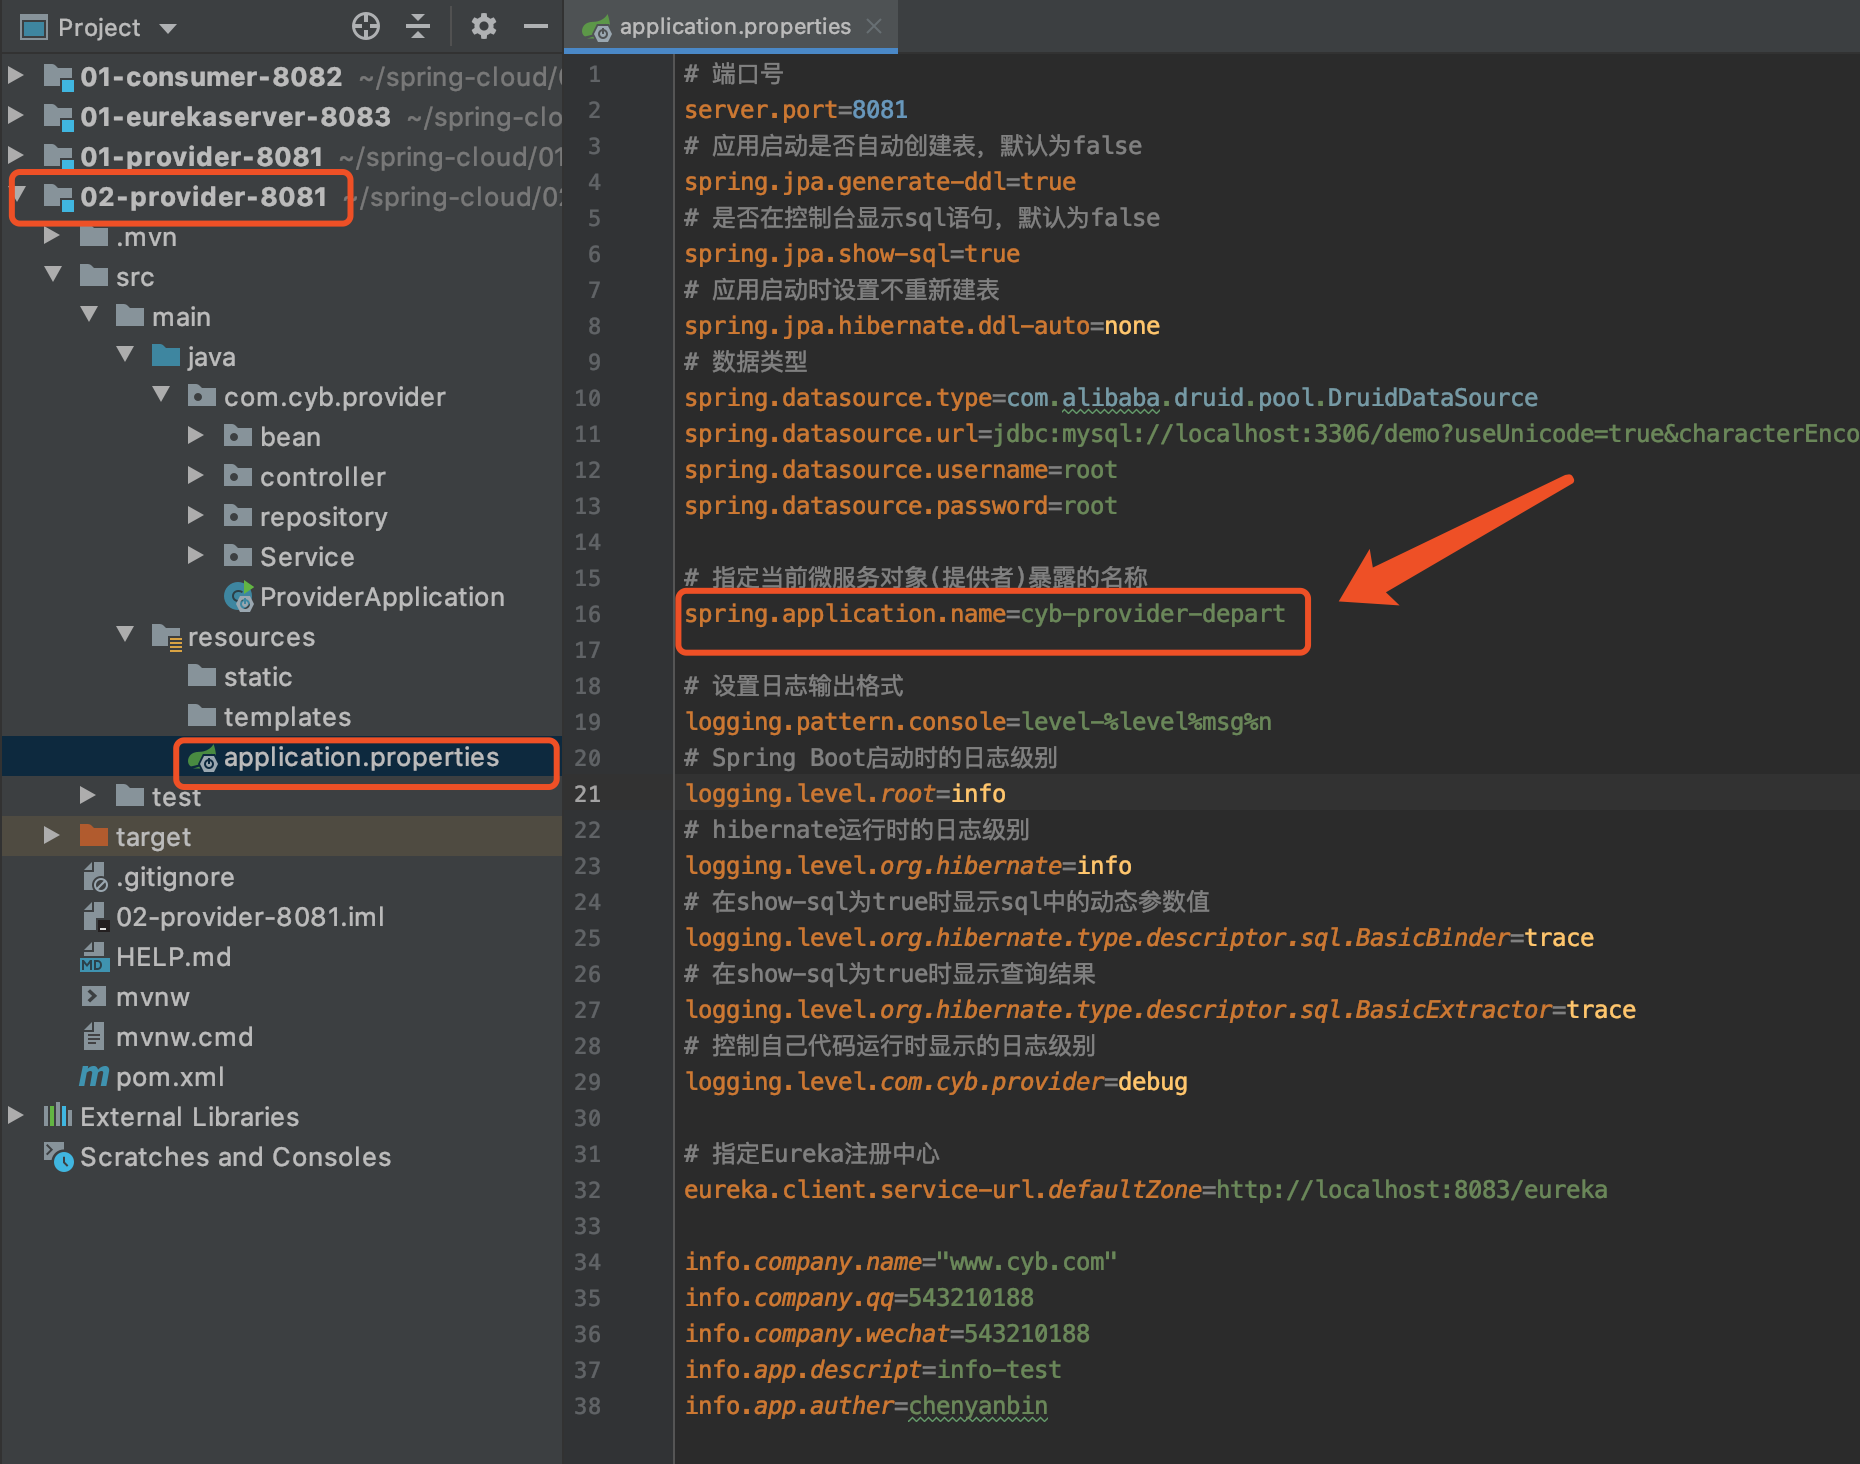
Modify Profile

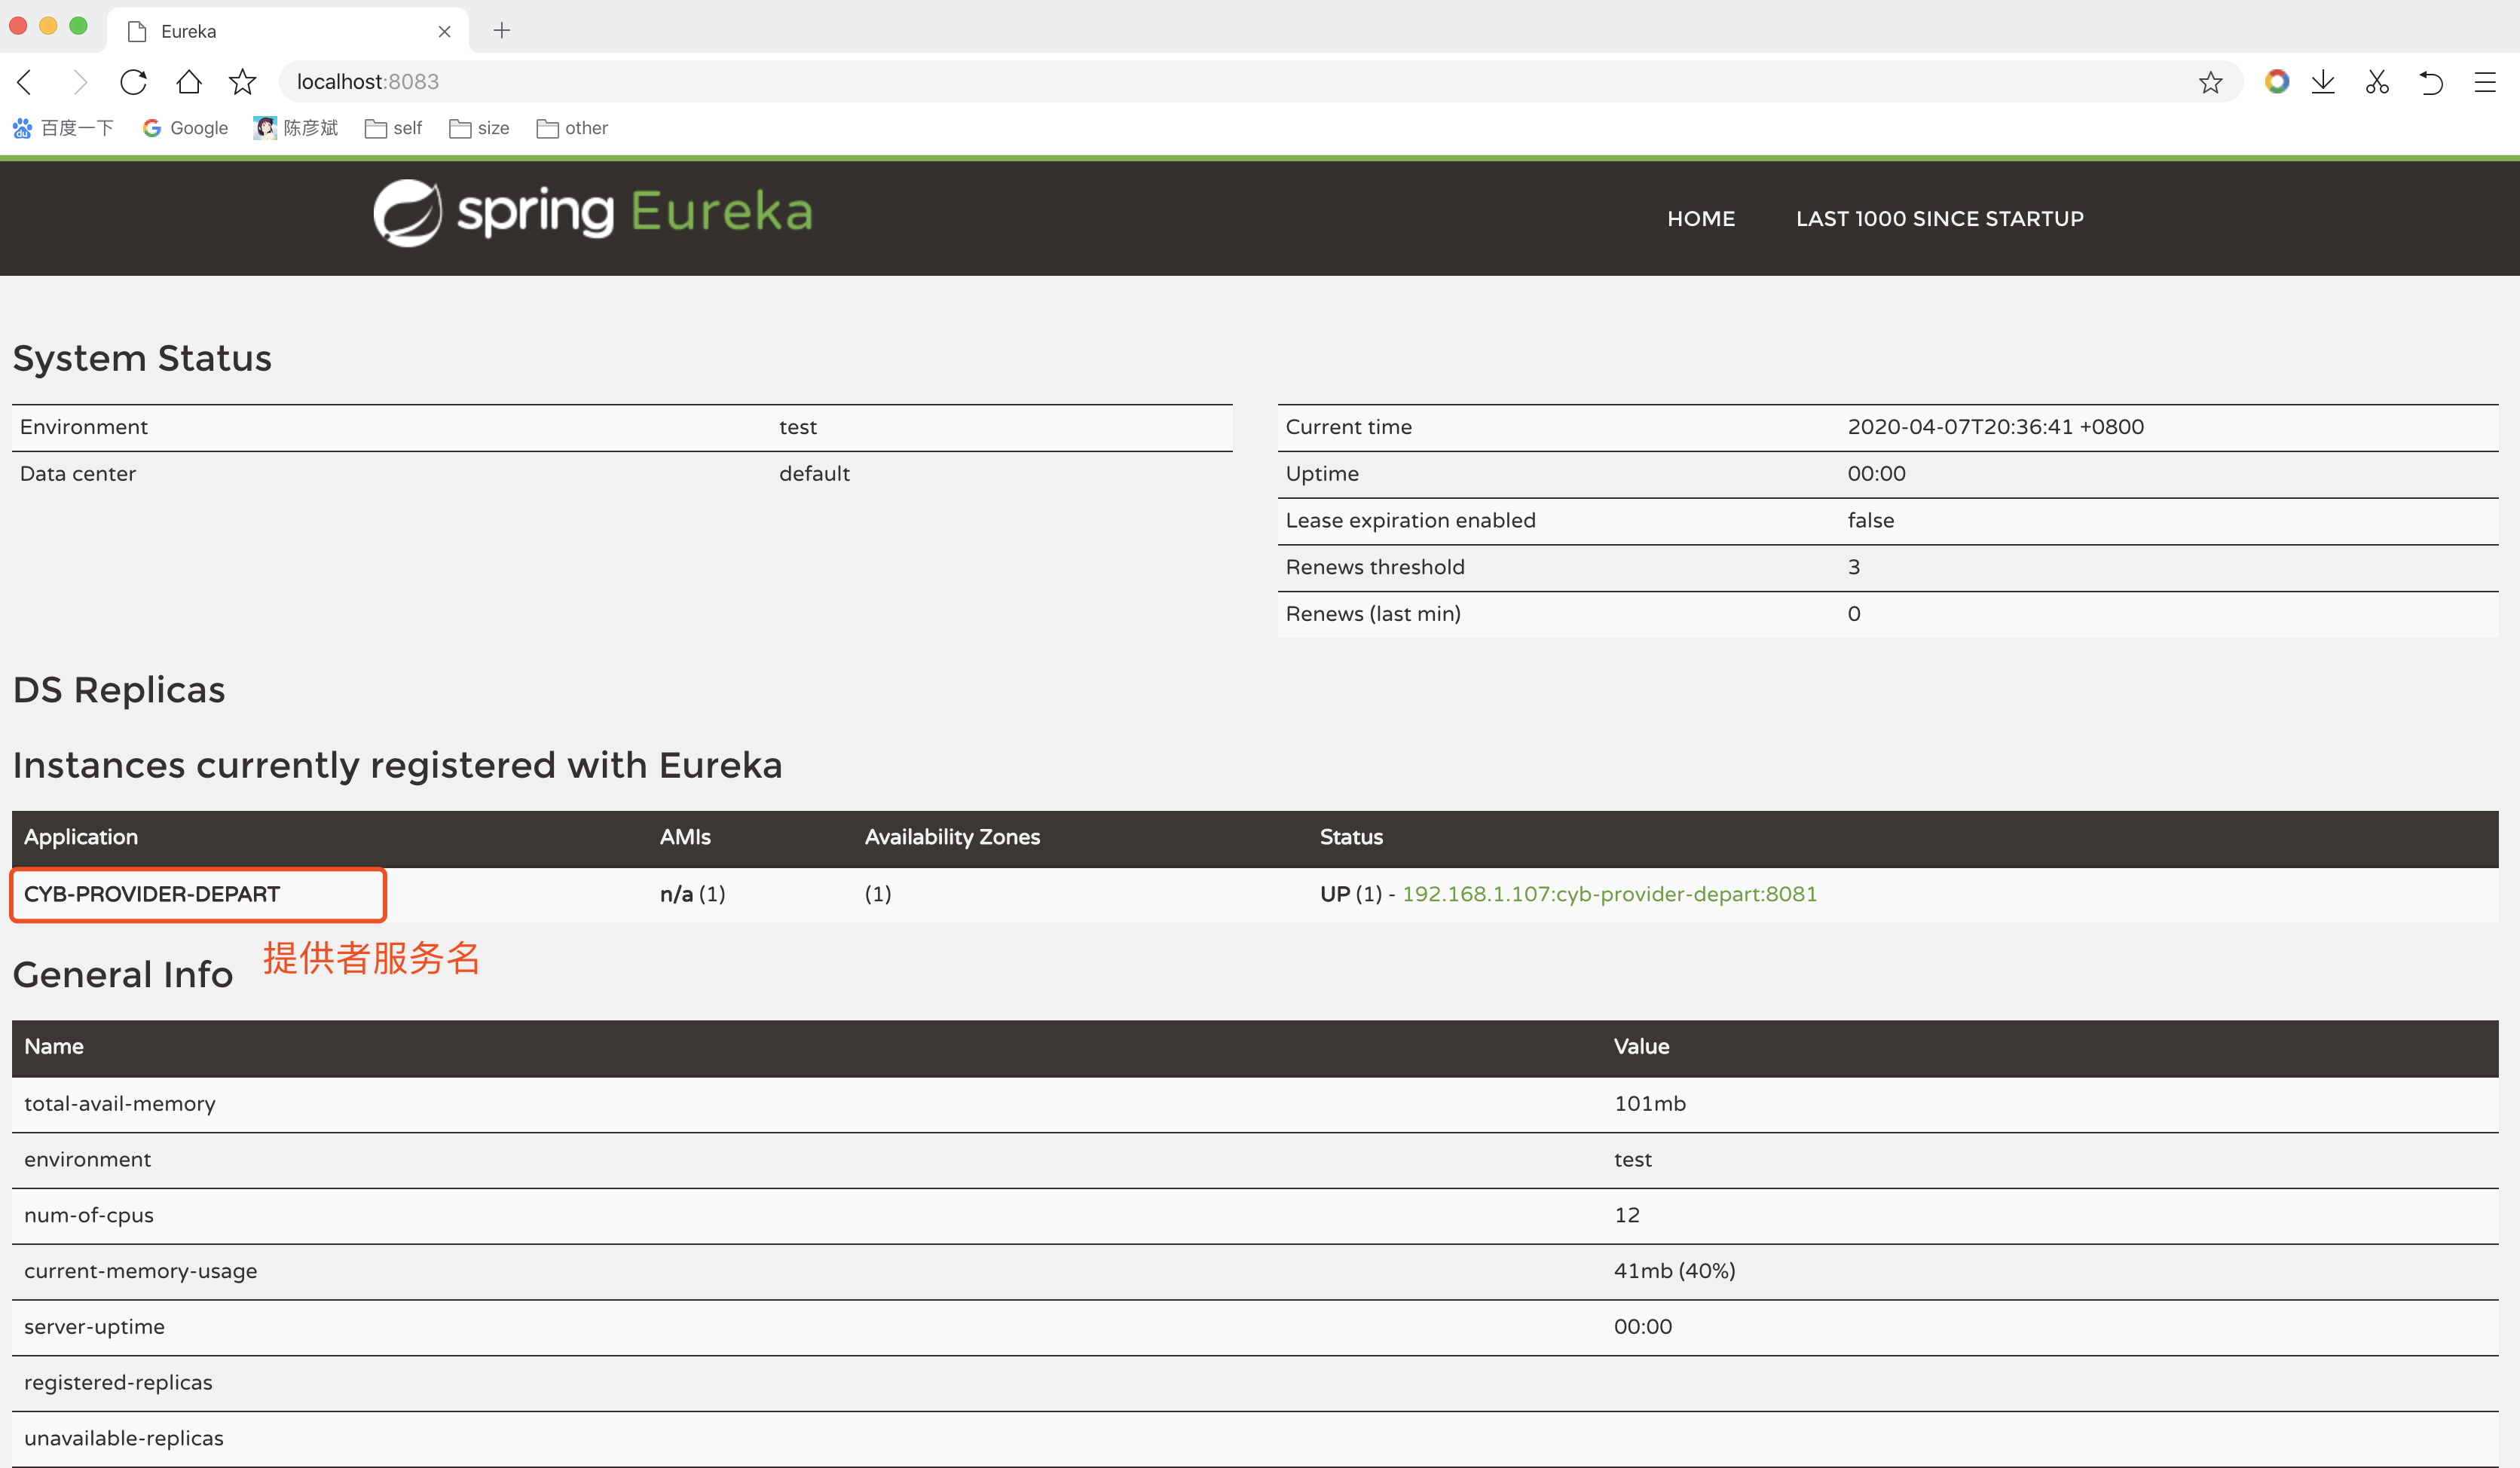
Modify client name in registry (ignorable)
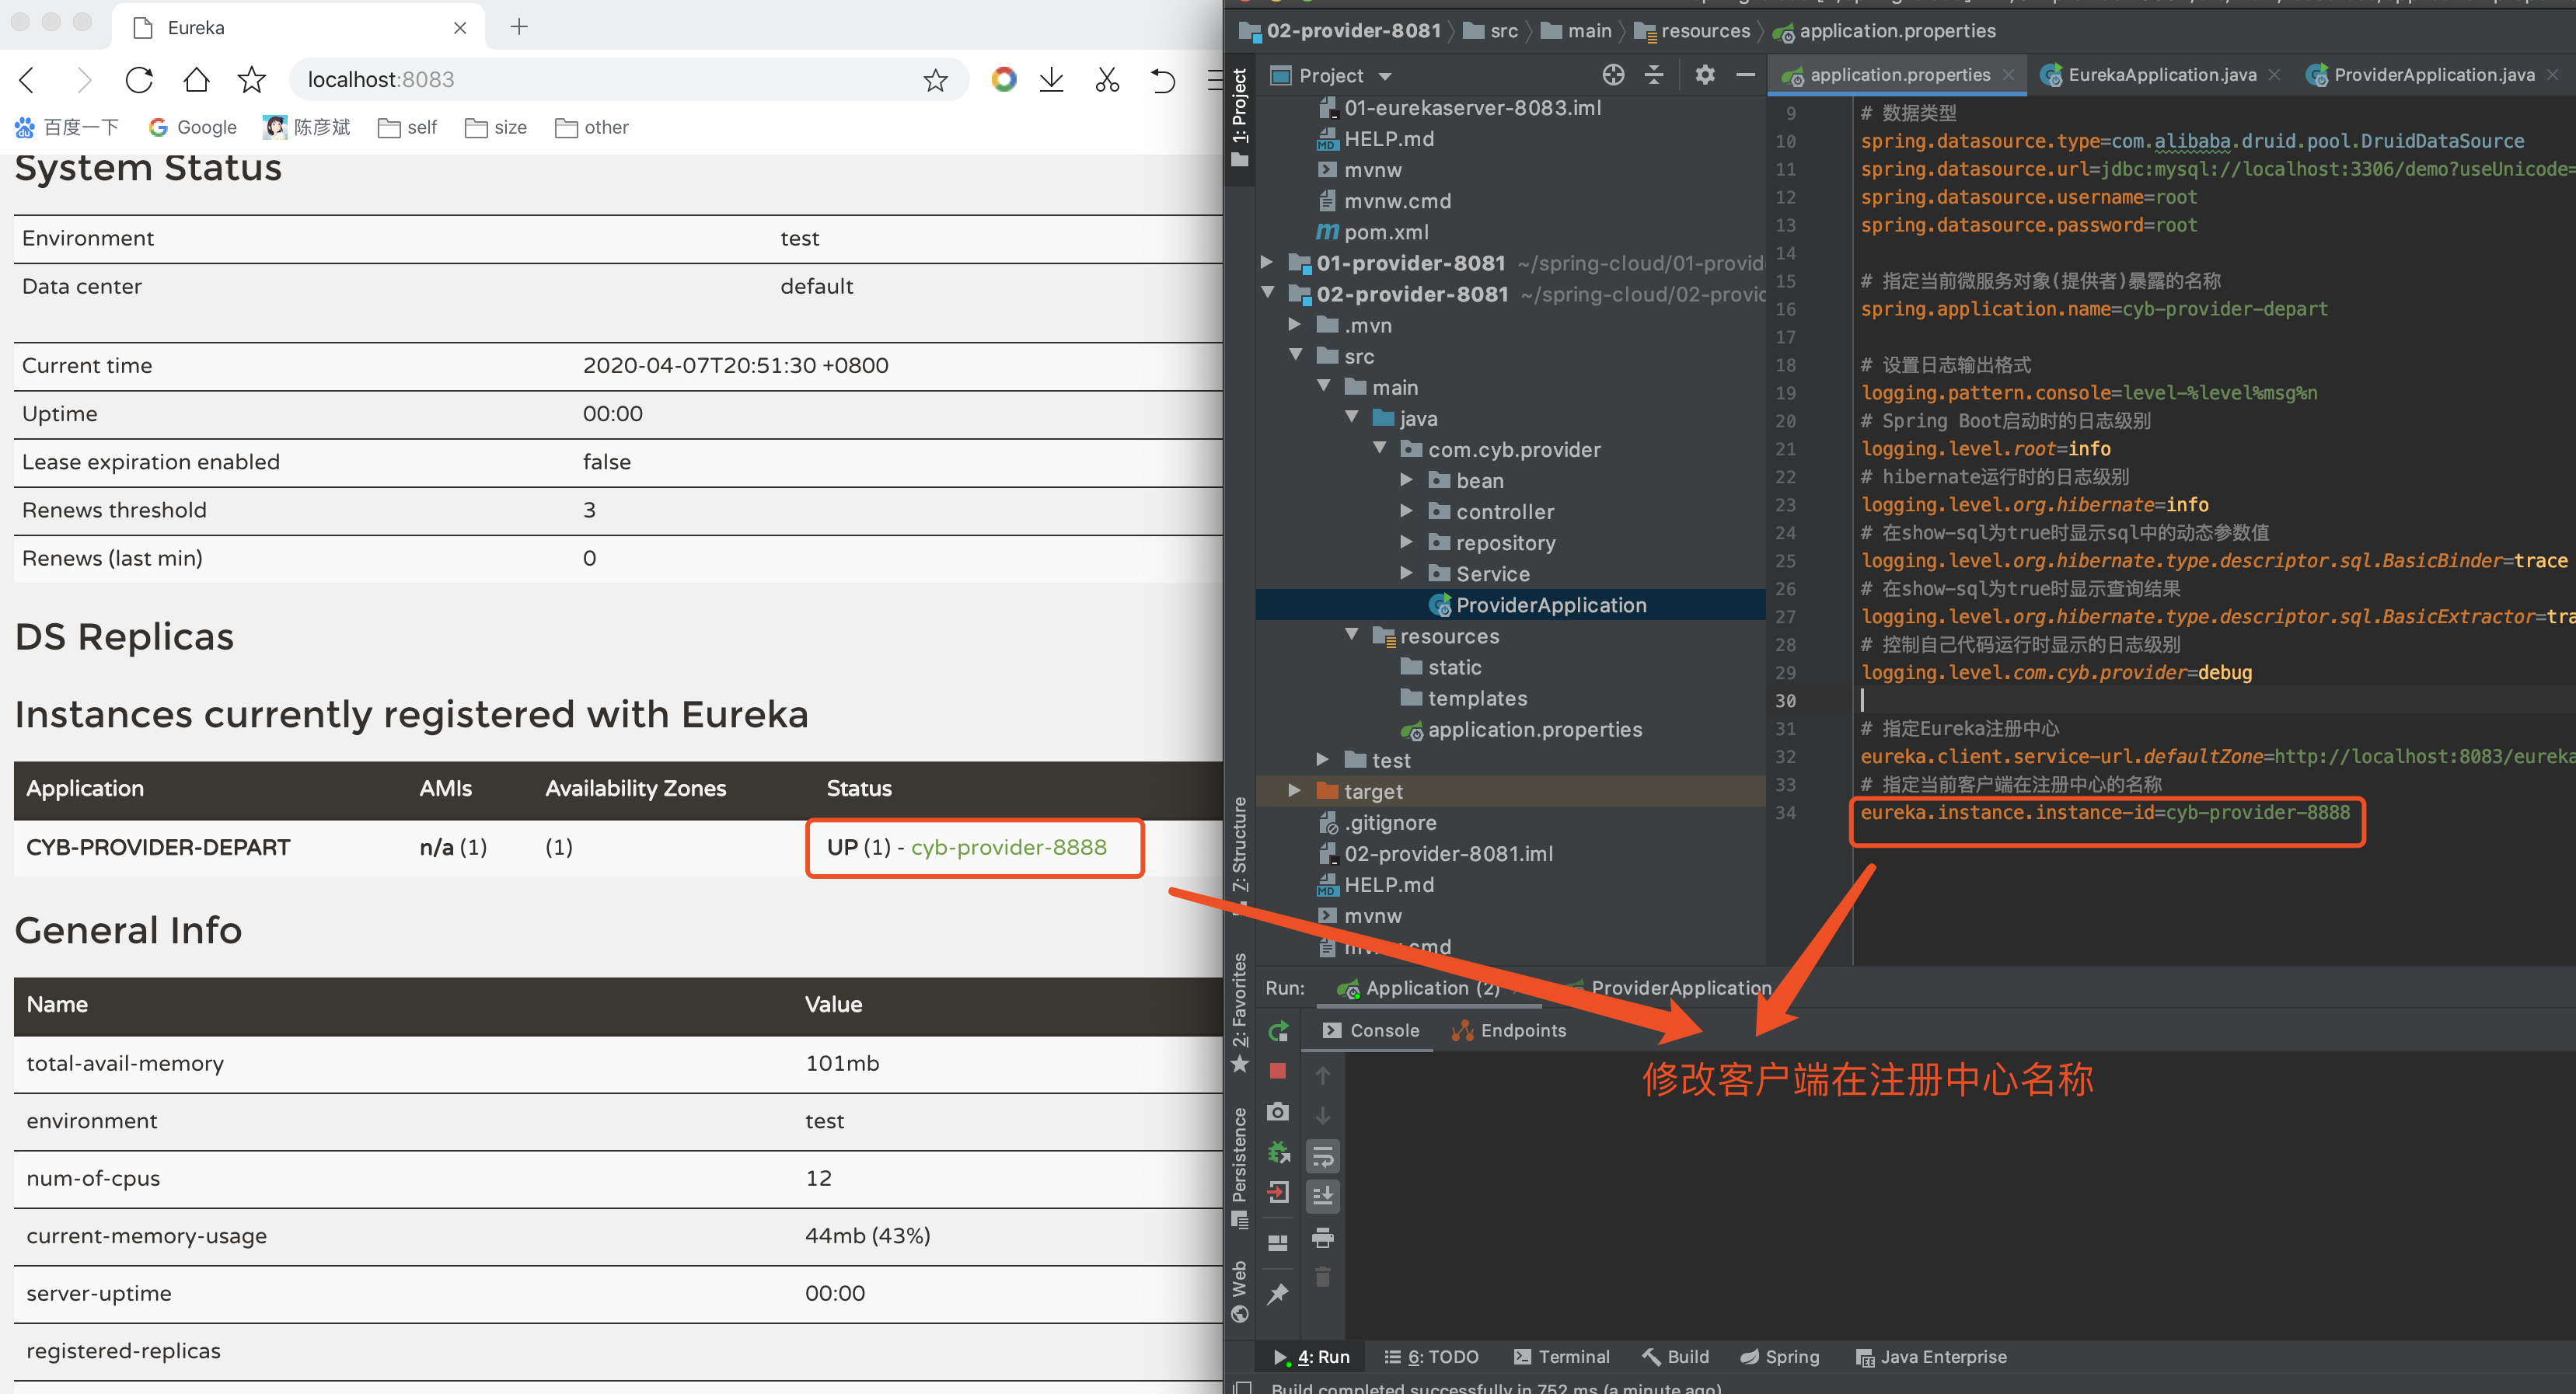
actuator improves microservice info
Problem Display

You can see that by clicking on the hyperlink of the status of the micro service, you can see the 404 error page because the info monitoring terminal of the actuator is not set in the provider profile.
Add Provider Dependency
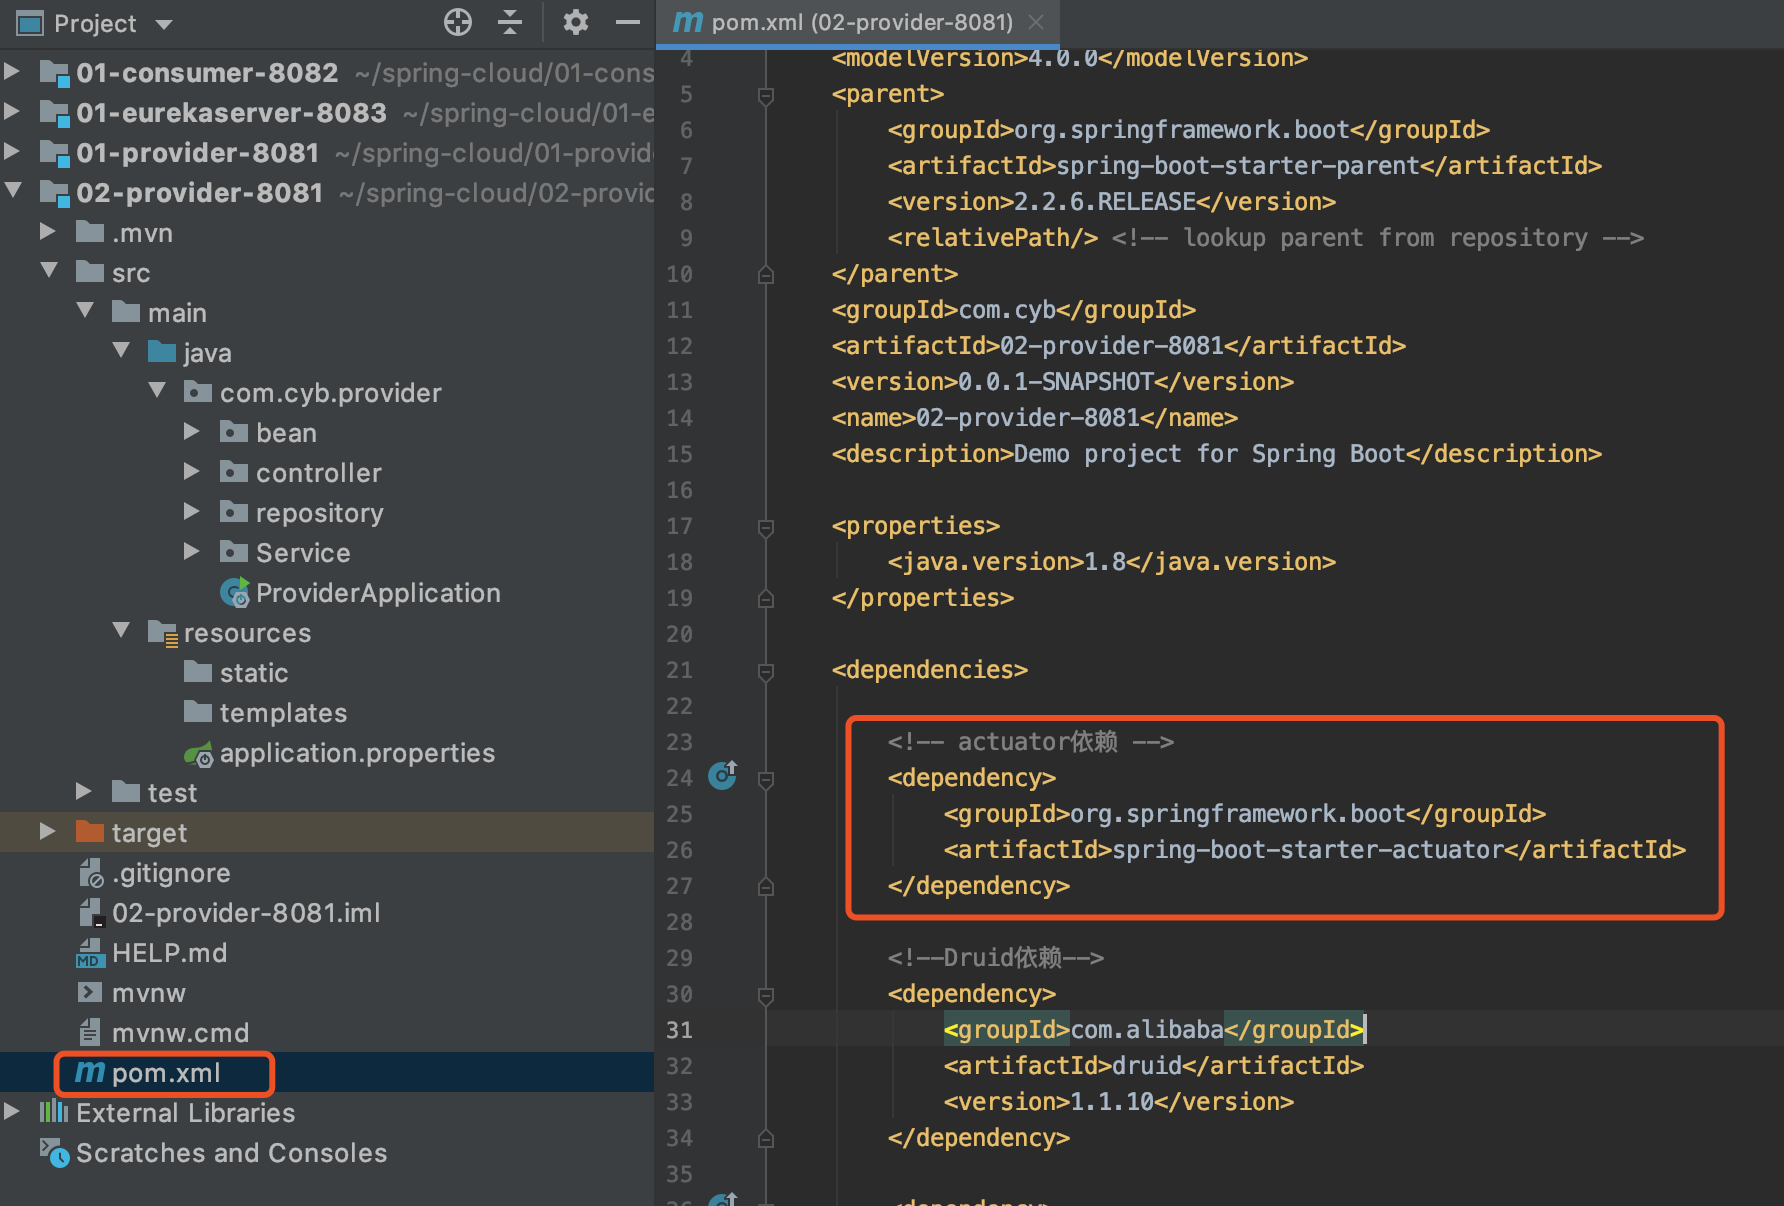
<!-- actuator rely on -->
        <dependency>
            <groupId>org.springframework.boot</groupId>
            <artifactId>spring-boot-starter-actuator</artifactId>
        </dependency>
Add info profile
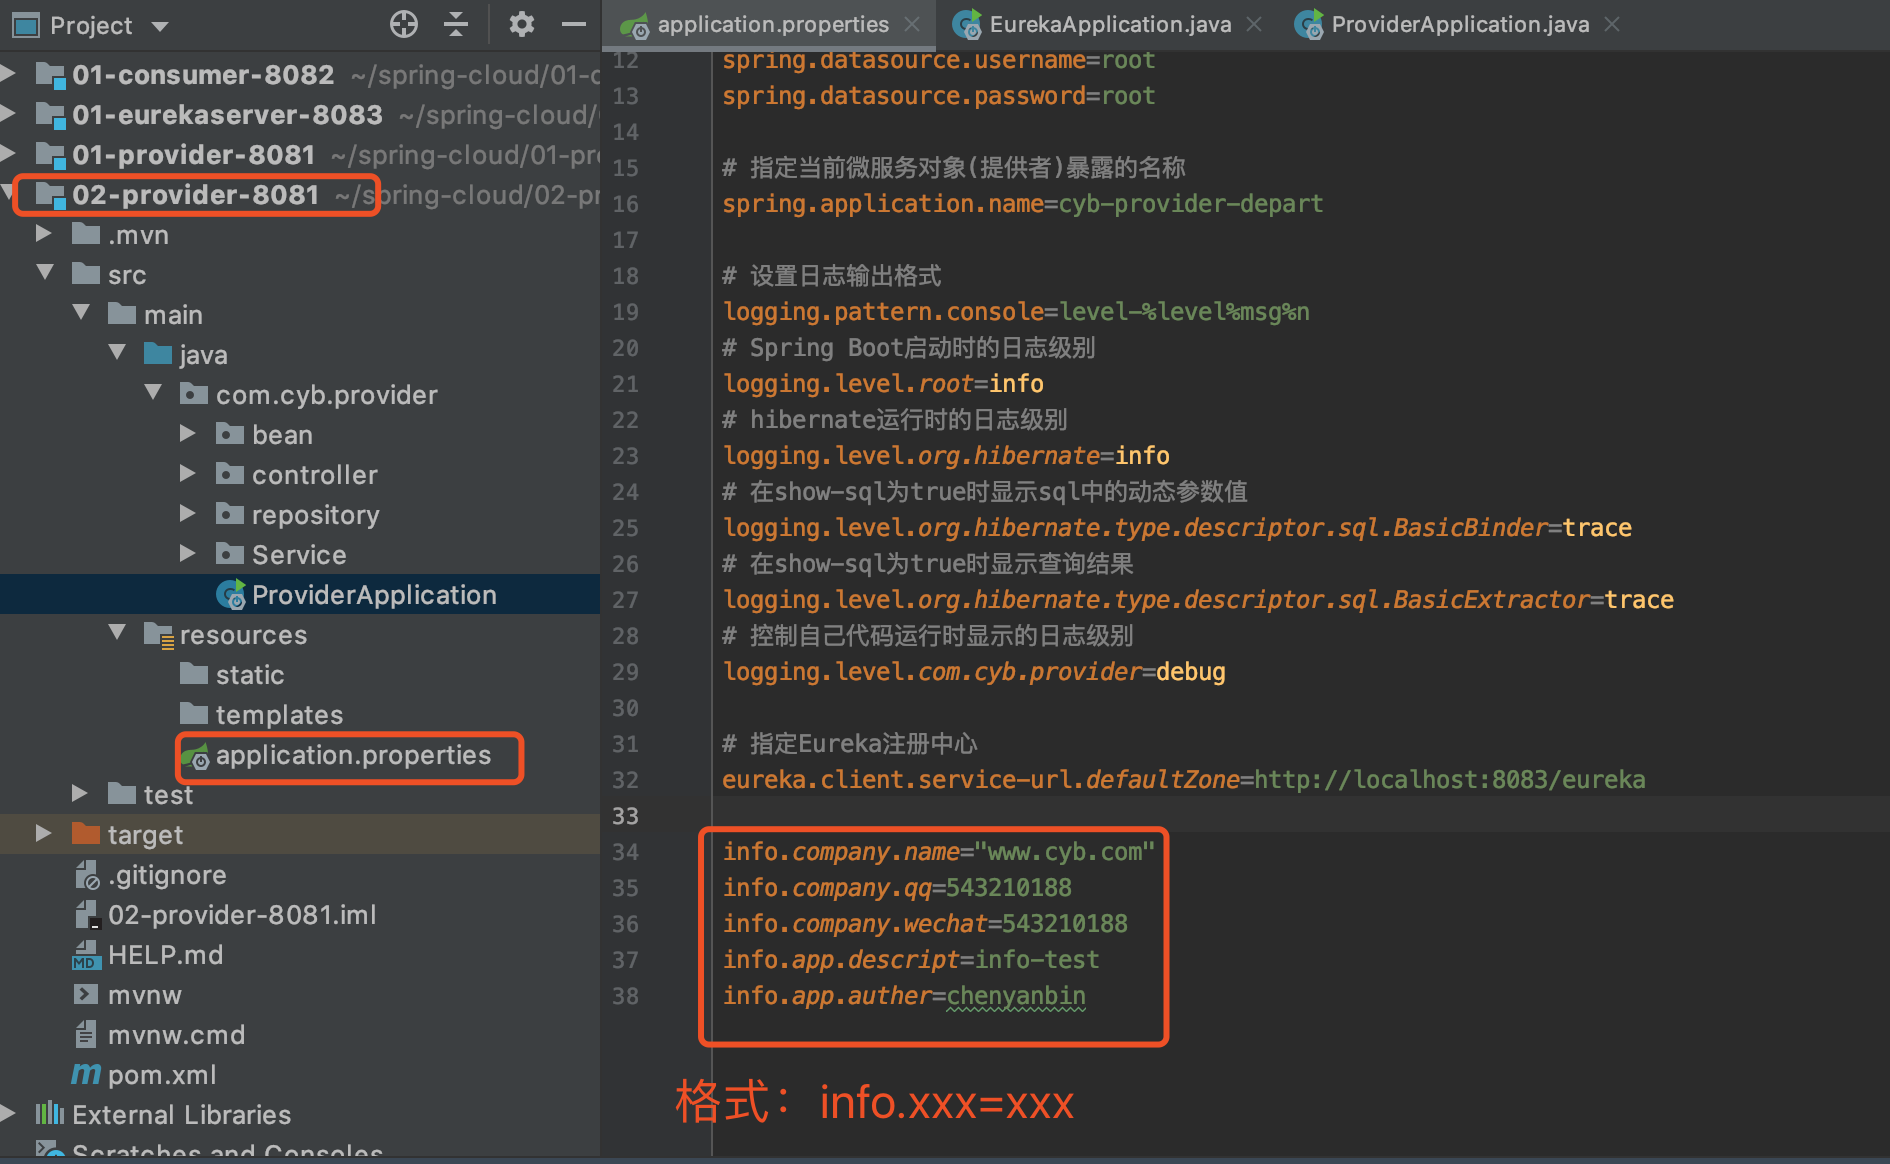
test

Be careful!!
This is where you need to modify the version of pom.xml in Provider 2 (I have already modified the above version, which is negligible here). As a result of dependency problems, look at my other blog: Point me straight Here we just need the version number here
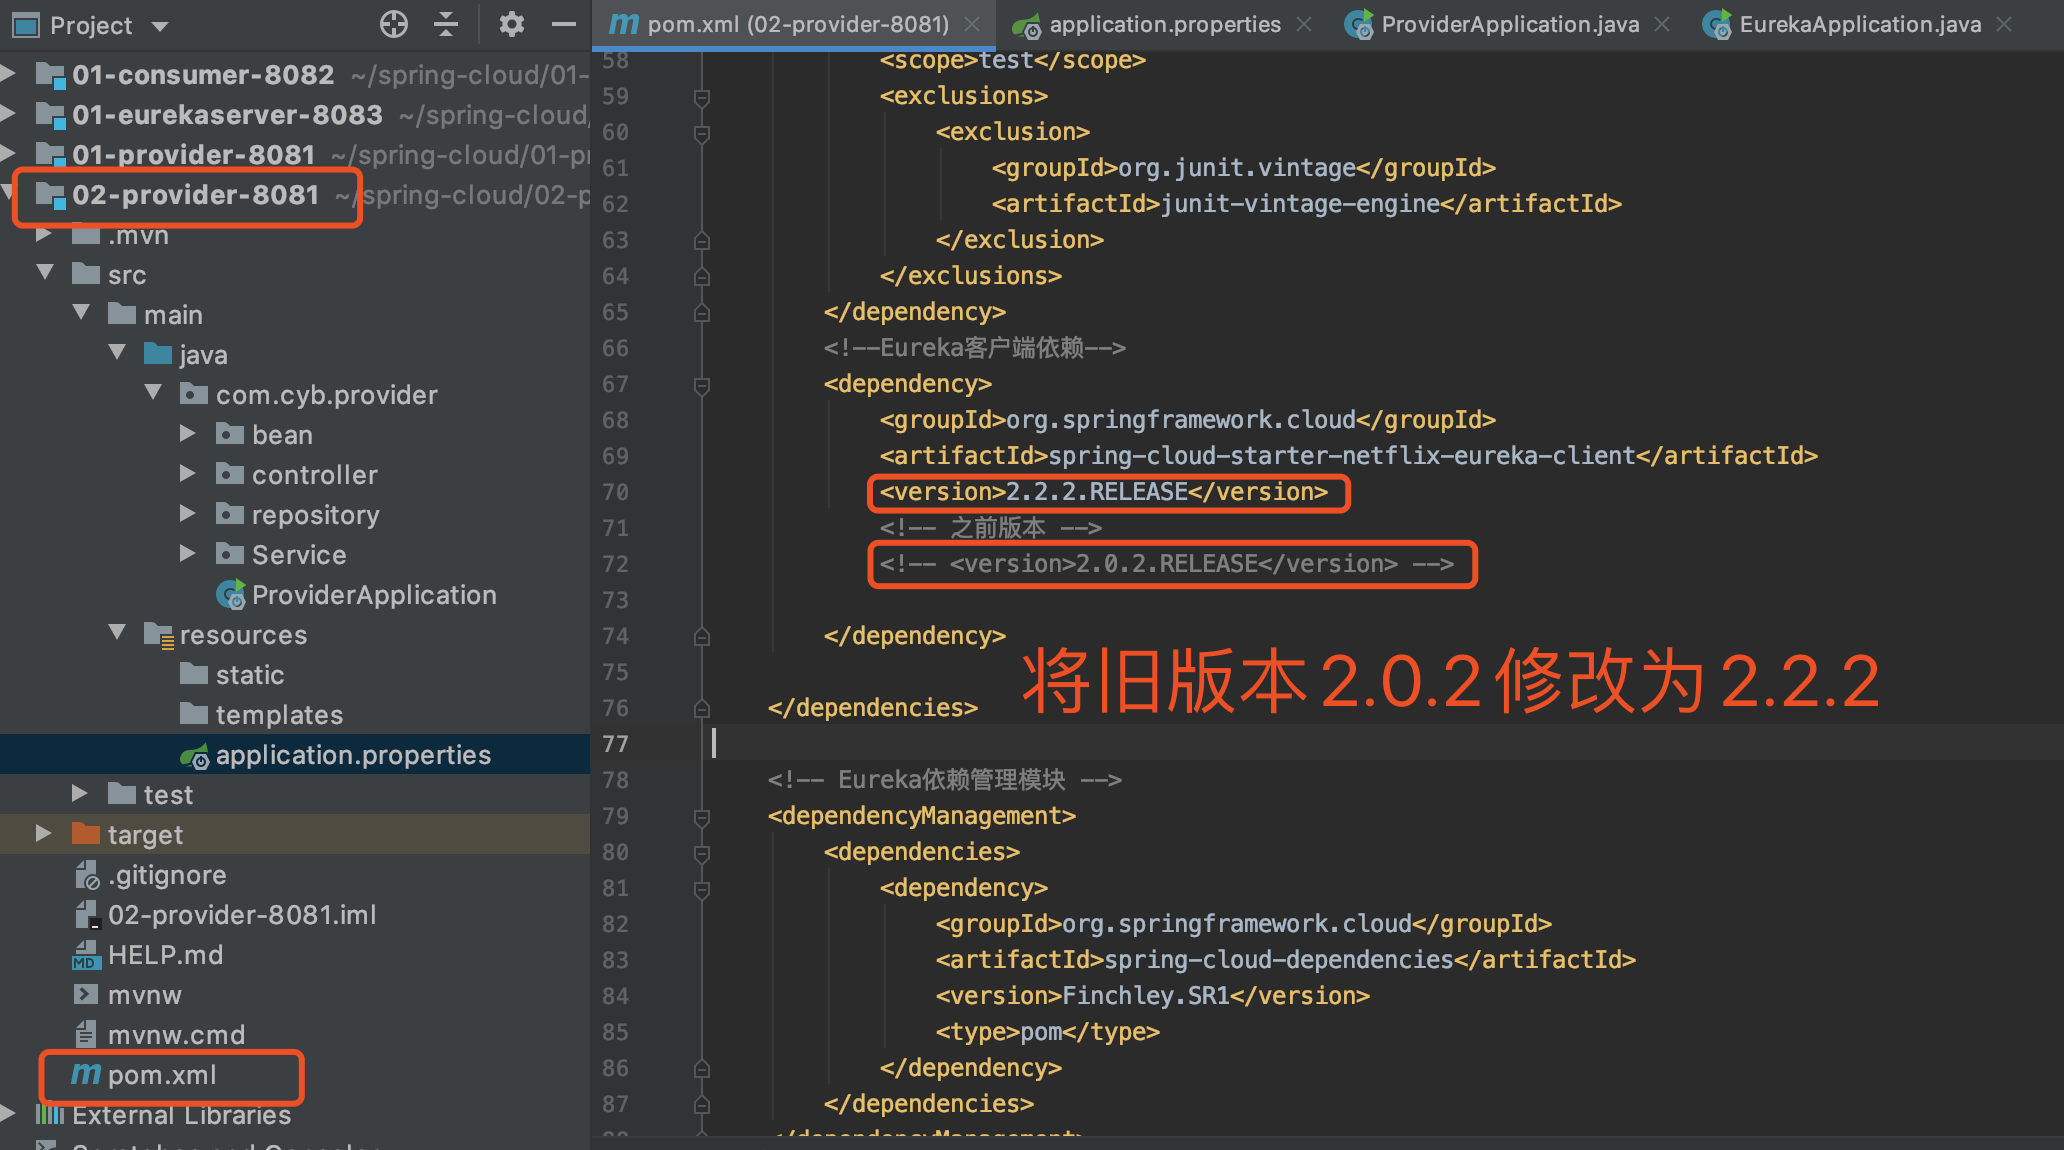
Complete pom.xml
<?xml version="1.0" encoding="UTF-8"?>
<project xmlns="http://maven.apache.org/POM/4.0.0" xmlns:xsi="http://www.w3.org/2001/XMLSchema-instance"
         xsi:schemaLocation="http://maven.apache.org/POM/4.0.0 https://maven.apache.org/xsd/maven-4.0.0.xsd">
    <modelVersion>4.0.0</modelVersion>
    <parent>
        <groupId>org.springframework.boot</groupId>
        <artifactId>spring-boot-starter-parent</artifactId>
        <version>2.2.6.RELEASE</version>
        <relativePath/> <!-- lookup parent from repository -->
    </parent>
    <groupId>com.cyb</groupId>
    <artifactId>02-provider-8081</artifactId>
    <version>0.0.1-SNAPSHOT</version>
    <name>02-provider-8081</name>
    <description>Demo project for Spring Boot</description>

    <properties>
        <java.version>1.8</java.version>
    </properties>

    <dependencies>

        <!-- actuator rely on -->
        <dependency>
            <groupId>org.springframework.boot</groupId>
            <artifactId>spring-boot-starter-actuator</artifactId>
        </dependency>

        <!--Druid rely on-->
        <dependency>
            <groupId>com.alibaba</groupId>
            <artifactId>druid</artifactId>
            <version>1.1.10</version>
        </dependency>

        <dependency>
            <groupId>org.springframework.boot</groupId>
            <artifactId>spring-boot-starter-data-jpa</artifactId>
        </dependency>
        <dependency>
            <groupId>org.springframework.boot</groupId>
            <artifactId>spring-boot-starter-web</artifactId>
        </dependency>

        <dependency>
            <groupId>mysql</groupId>
            <artifactId>mysql-connector-java</artifactId>
            <scope>runtime</scope>
        </dependency>
        <dependency>
            <groupId>org.projectlombok</groupId>
            <artifactId>lombok</artifactId>
            <optional>true</optional>
        </dependency>
        <dependency>
            <groupId>org.springframework.boot</groupId>
            <artifactId>spring-boot-starter-test</artifactId>
            <scope>test</scope>
            <exclusions>
                <exclusion>
                    <groupId>org.junit.vintage</groupId>
                    <artifactId>junit-vintage-engine</artifactId>
                </exclusion>
            </exclusions>
        </dependency>
        <!--Eureka Client Dependency-->
        <dependency>
            <groupId>org.springframework.cloud</groupId>
            <artifactId>spring-cloud-starter-netflix-eureka-client</artifactId>
            <version>2.2.2.RELEASE</version>
            <!-- Previous versions -->
            <!-- <version>2.0.2.RELEASE</version> -->

        </dependency>

    </dependencies>

    <!-- Eureka Dependency Management Module -->
    <dependencyManagement>
        <dependencies>
            <dependency>
                <groupId>org.springframework.cloud</groupId>
                <artifactId>spring-cloud-dependencies</artifactId>
                <version>Finchley.SR1</version>
                <type>pom</type>
            </dependency>
        </dependencies>
    </dependencyManagement>
    <build>
        <plugins>
            <plugin>
                <groupId>org.springframework.boot</groupId>
                <artifactId>spring-boot-maven-plugin</artifactId>
            </plugin>
        </plugins>
    </build>

</project>
Create Consumer Engineering 2
Consumers consume services using the service name exposed by the provider (spring.application.name).
Overall steps
- Add Eureka Client Dependency
- Specify the Eureka registry in the configuration file
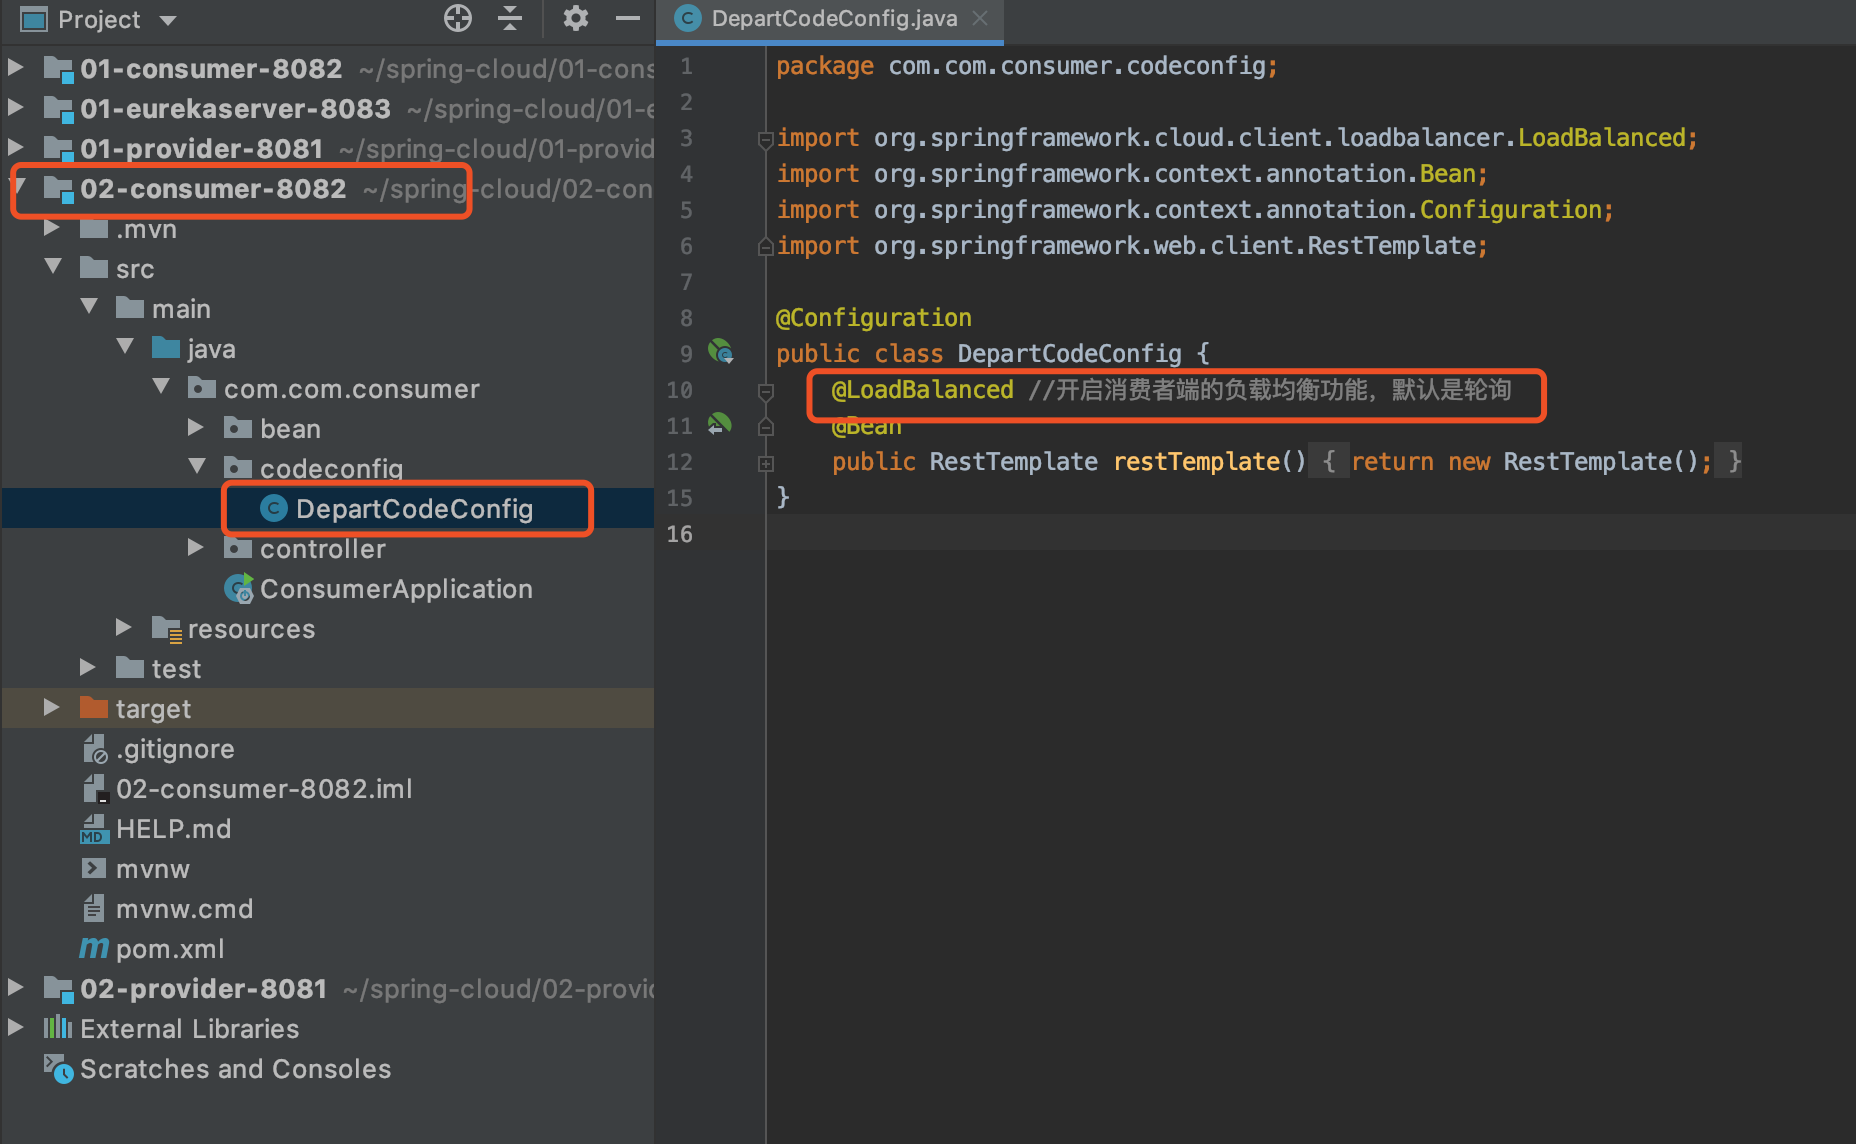
- Add the @LoadBalanced annotation to the DepartCodeConfig class
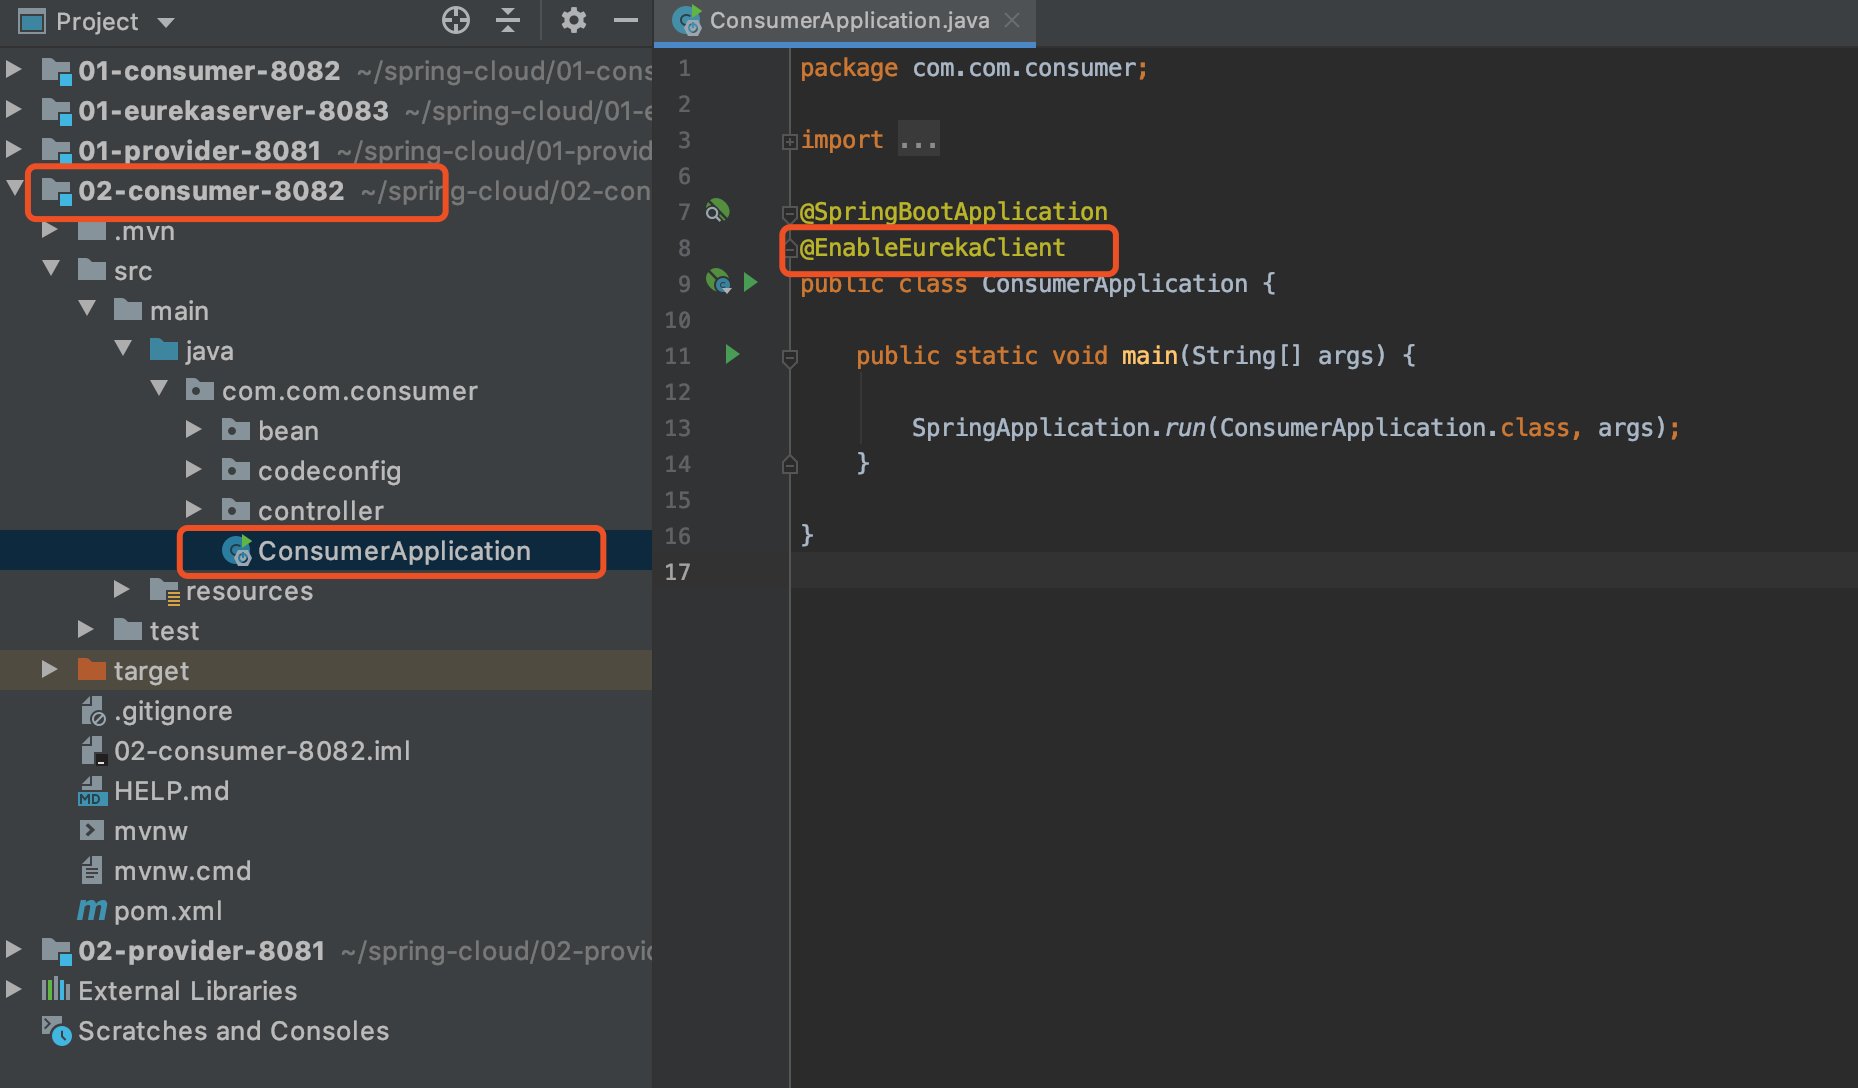
- Add the @EnableEurekaClient annotation to the startup class
Create a project
Duplicate 01-consumer-8082, duplicate 02-consumer-8082, for details on how the above provider created the project.
Add Dependency
pom.xml
<!--Eureka Client Dependency-->
        <dependency>
            <groupId>org.springframework.cloud</groupId>
            <artifactId>spring-cloud-starter-netflix-eureka-client</artifactId>
            <version>2.2.2.RELEASE</version>
        </dependency>


    <!-- Eureka Dependency Management Module -->
    <dependencyManagement>
        <dependencies>
            <dependency>
                <groupId>org.springframework.cloud</groupId>
                <artifactId>spring-cloud-dependencies</artifactId>
                <version>Finchley.SR1</version>
                <type>pom</type>
            </dependency>
        </dependencies>
    </dependencyManagement>
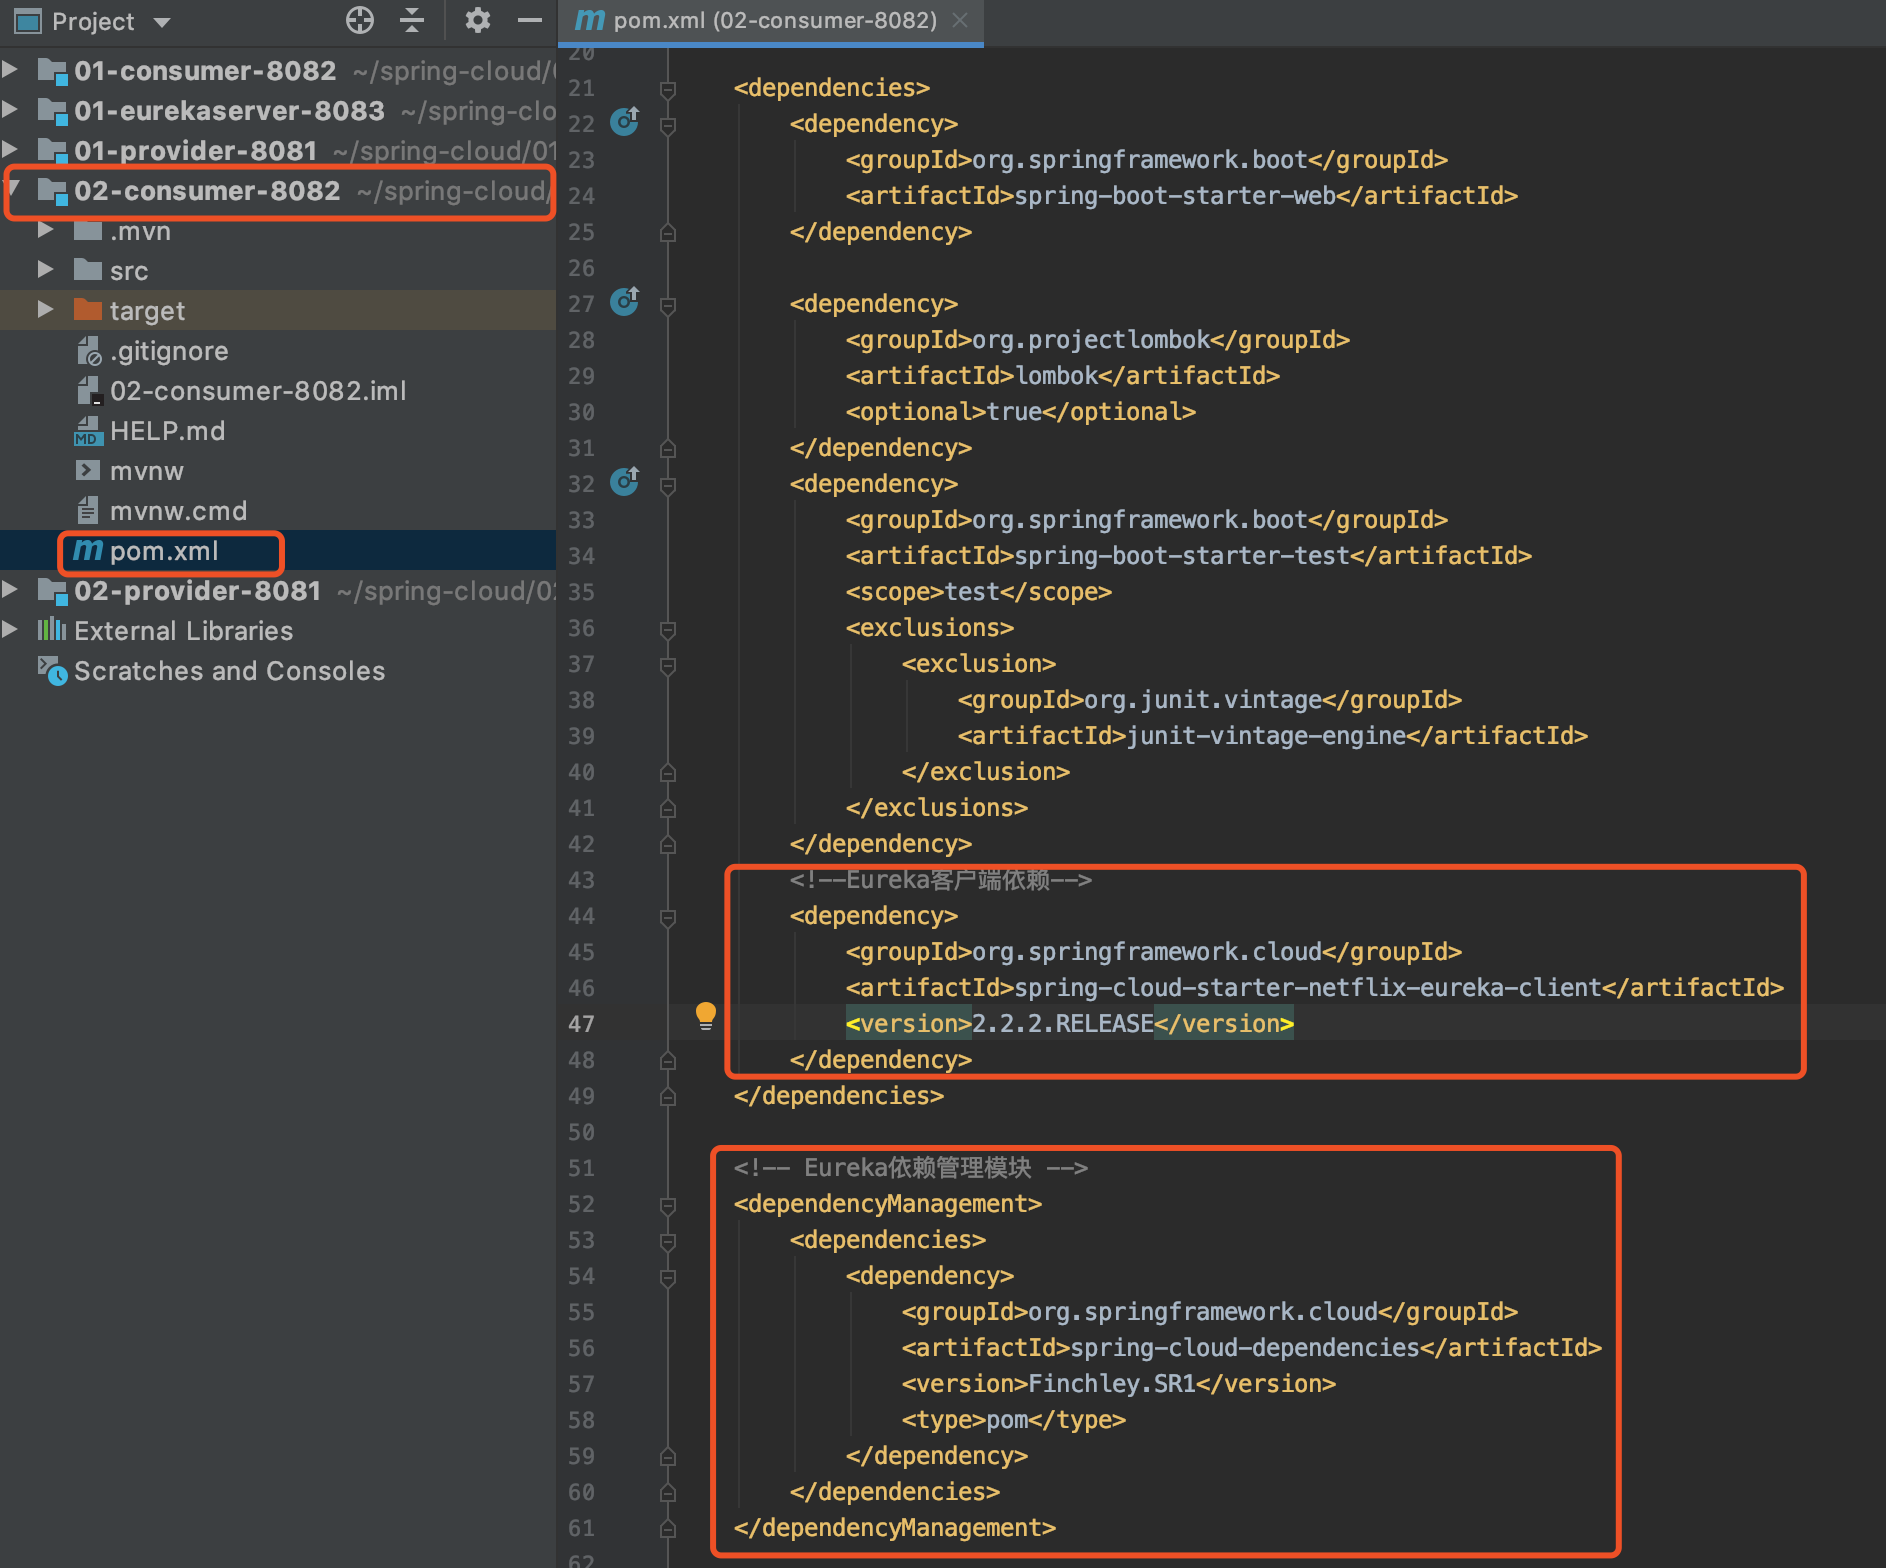
<!--To configure info, add the following dependencies, not configure ignorable, I added in the case!!!-->
        <!--actuator dependency-->
        <dependency>
            <groupId>org.springframework.boot</groupId>
            <artifactId>spring-boot-starter-actuator</artifactId>
        </dependency>
Modify Profile
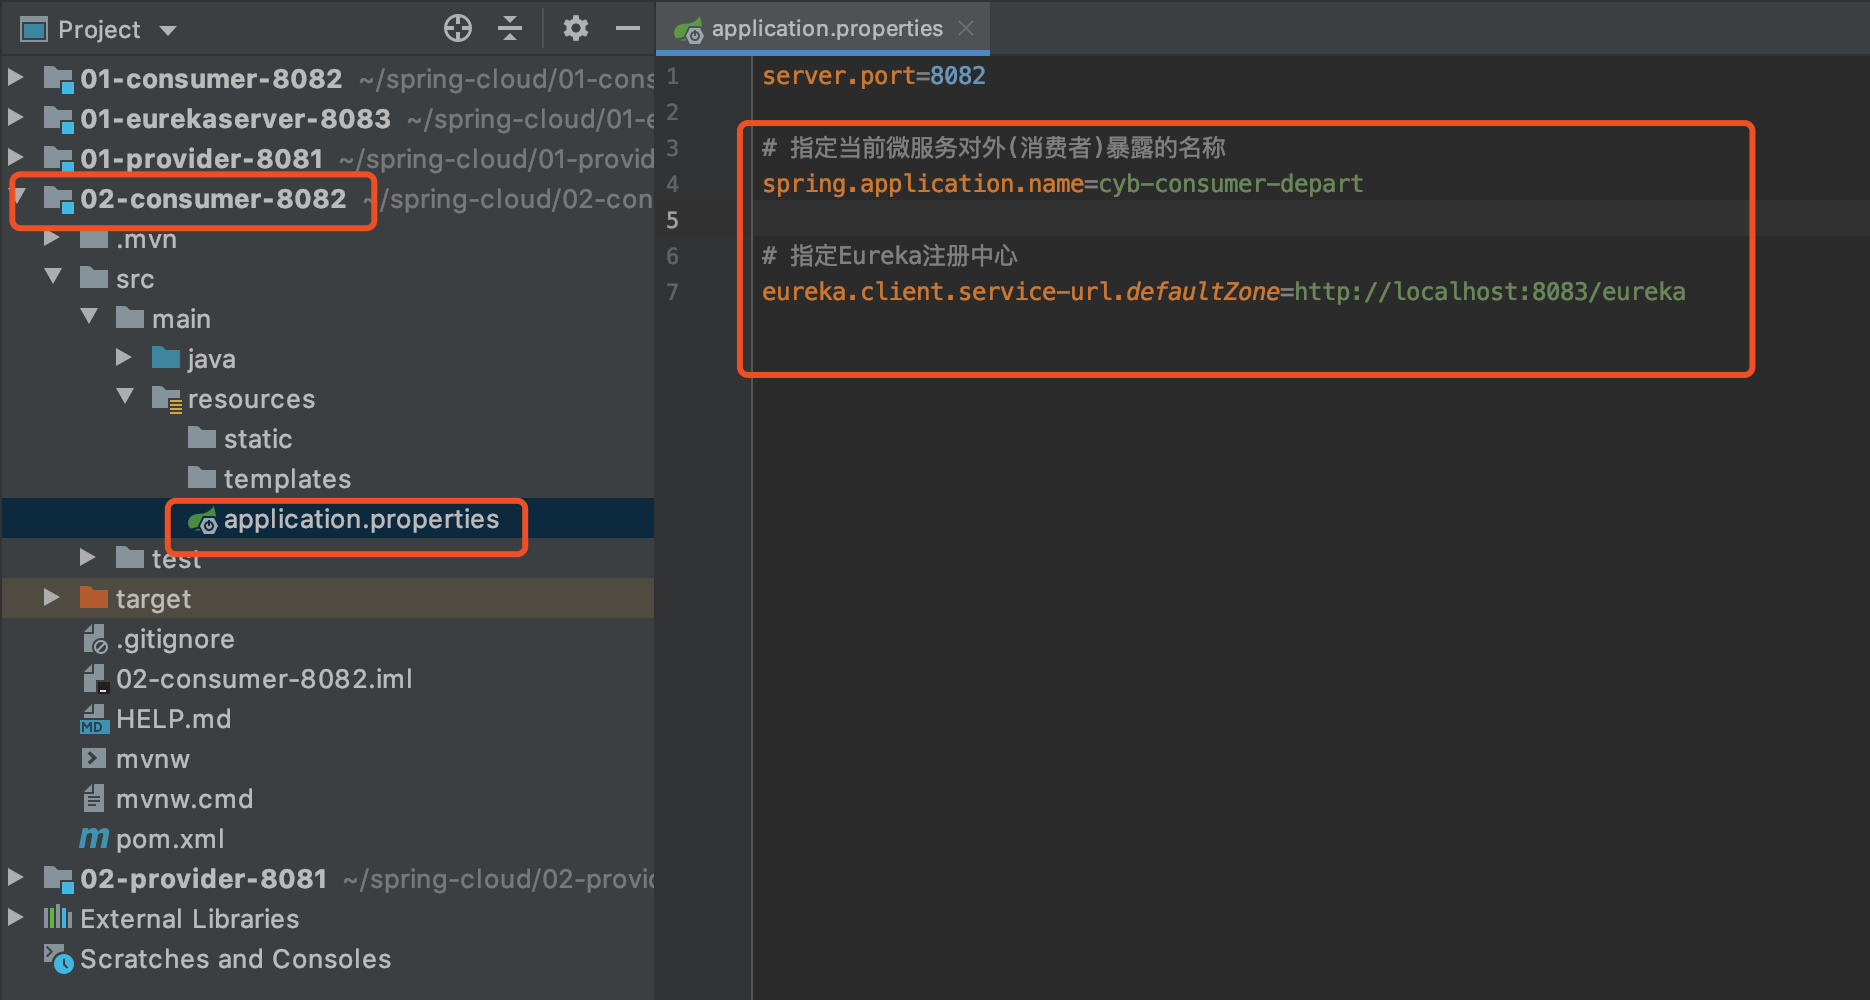
server.port=8082

# Specify the name of the current external (consumer) exposure of the microservice
spring.application.name=cyb-consumer-depart

# Specify the Eureka Registry
eureka.client.service-url.defaultZone=http://localhost:8083/eureka
Add the @LoadBalanced annotation
Add annotation on startup class
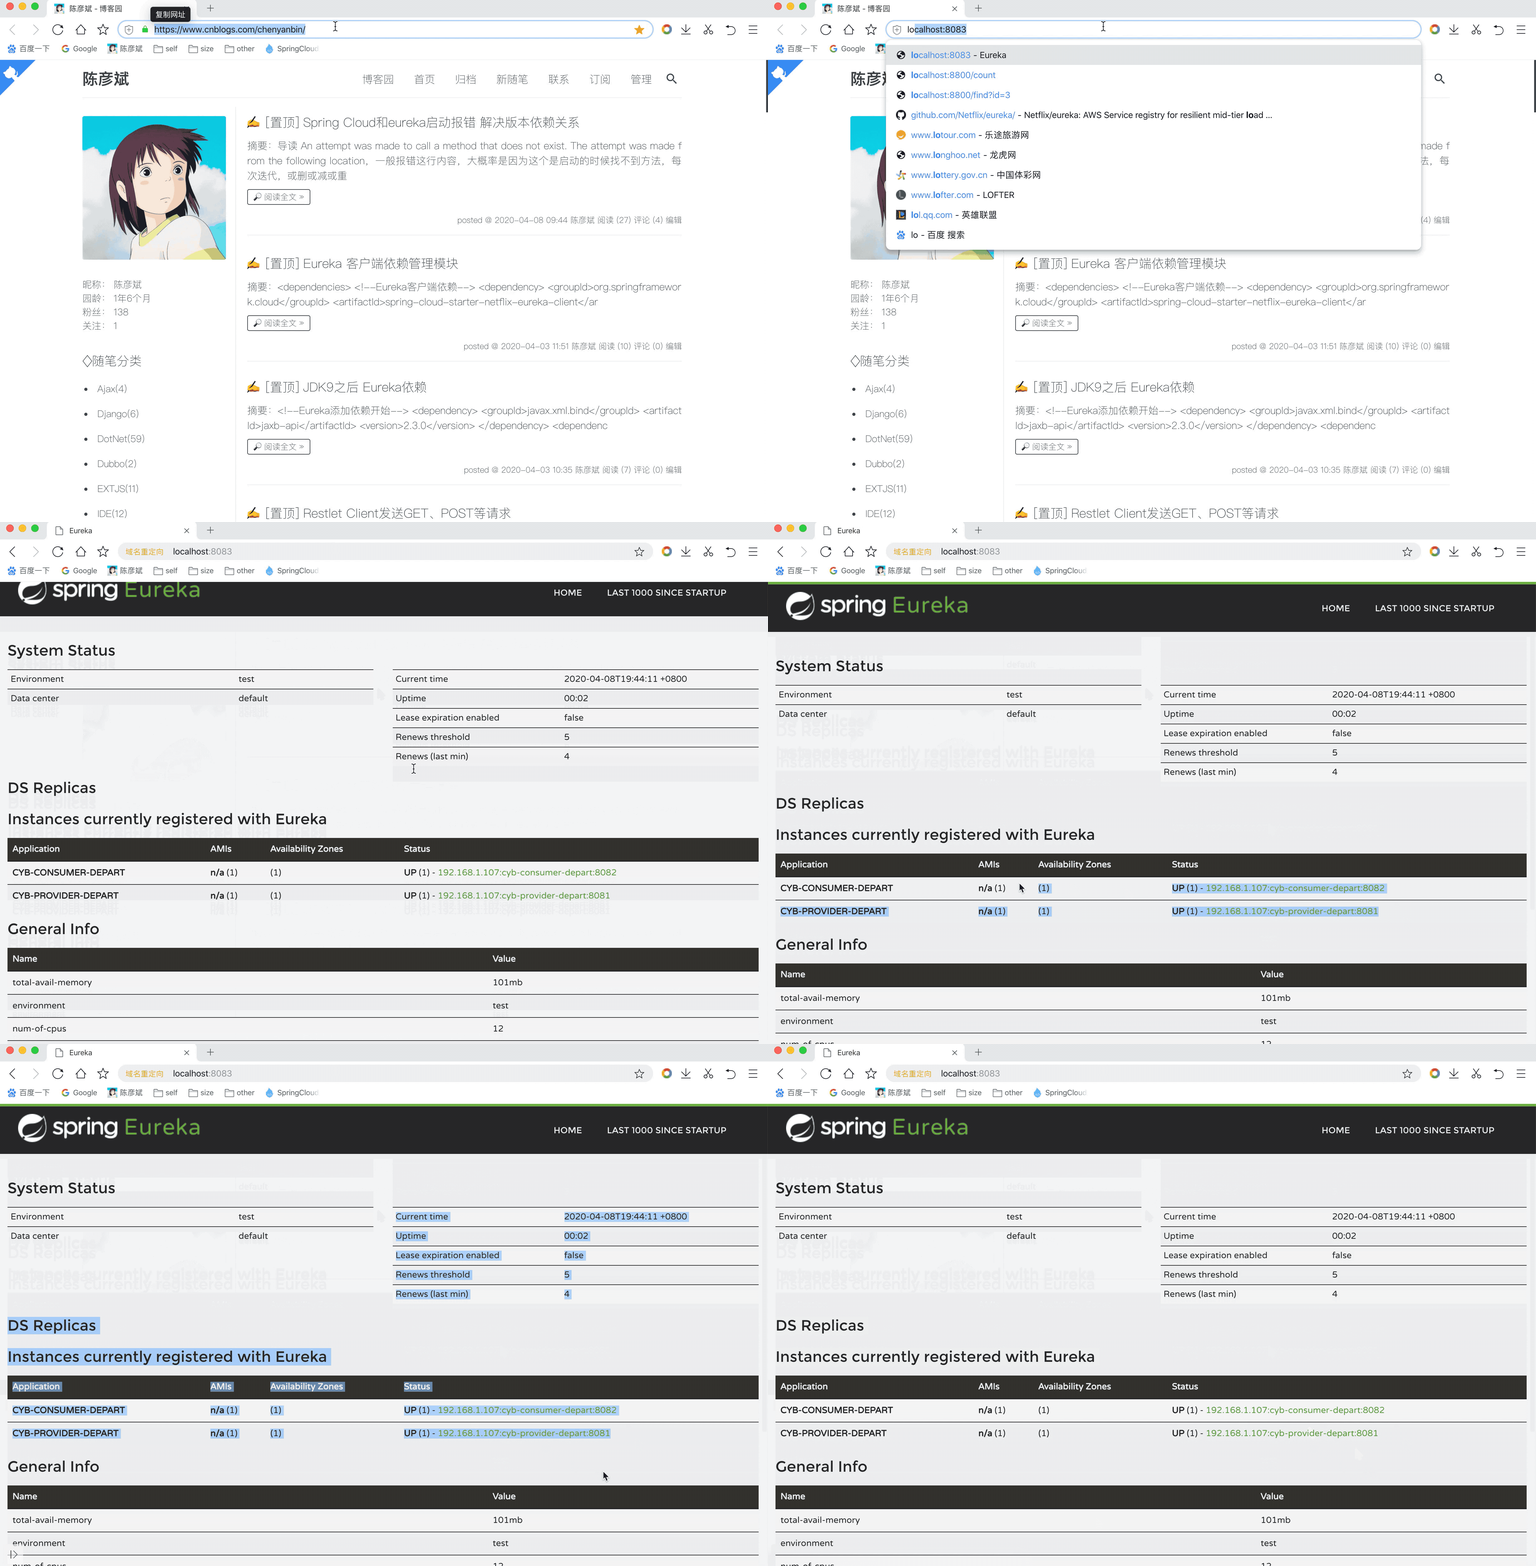
Project Start
Service Discovery
That is, read the list of services in Eureka Server through the Service Discovery Client to get the details of the microservice with the specified name.
Modify Processor
In any microservice provider or consumer processor, the list of microservices for Eureka Server can be read as long as the Service Discovery Client is available.Modify the processor class in 02-provider-8081 in the case
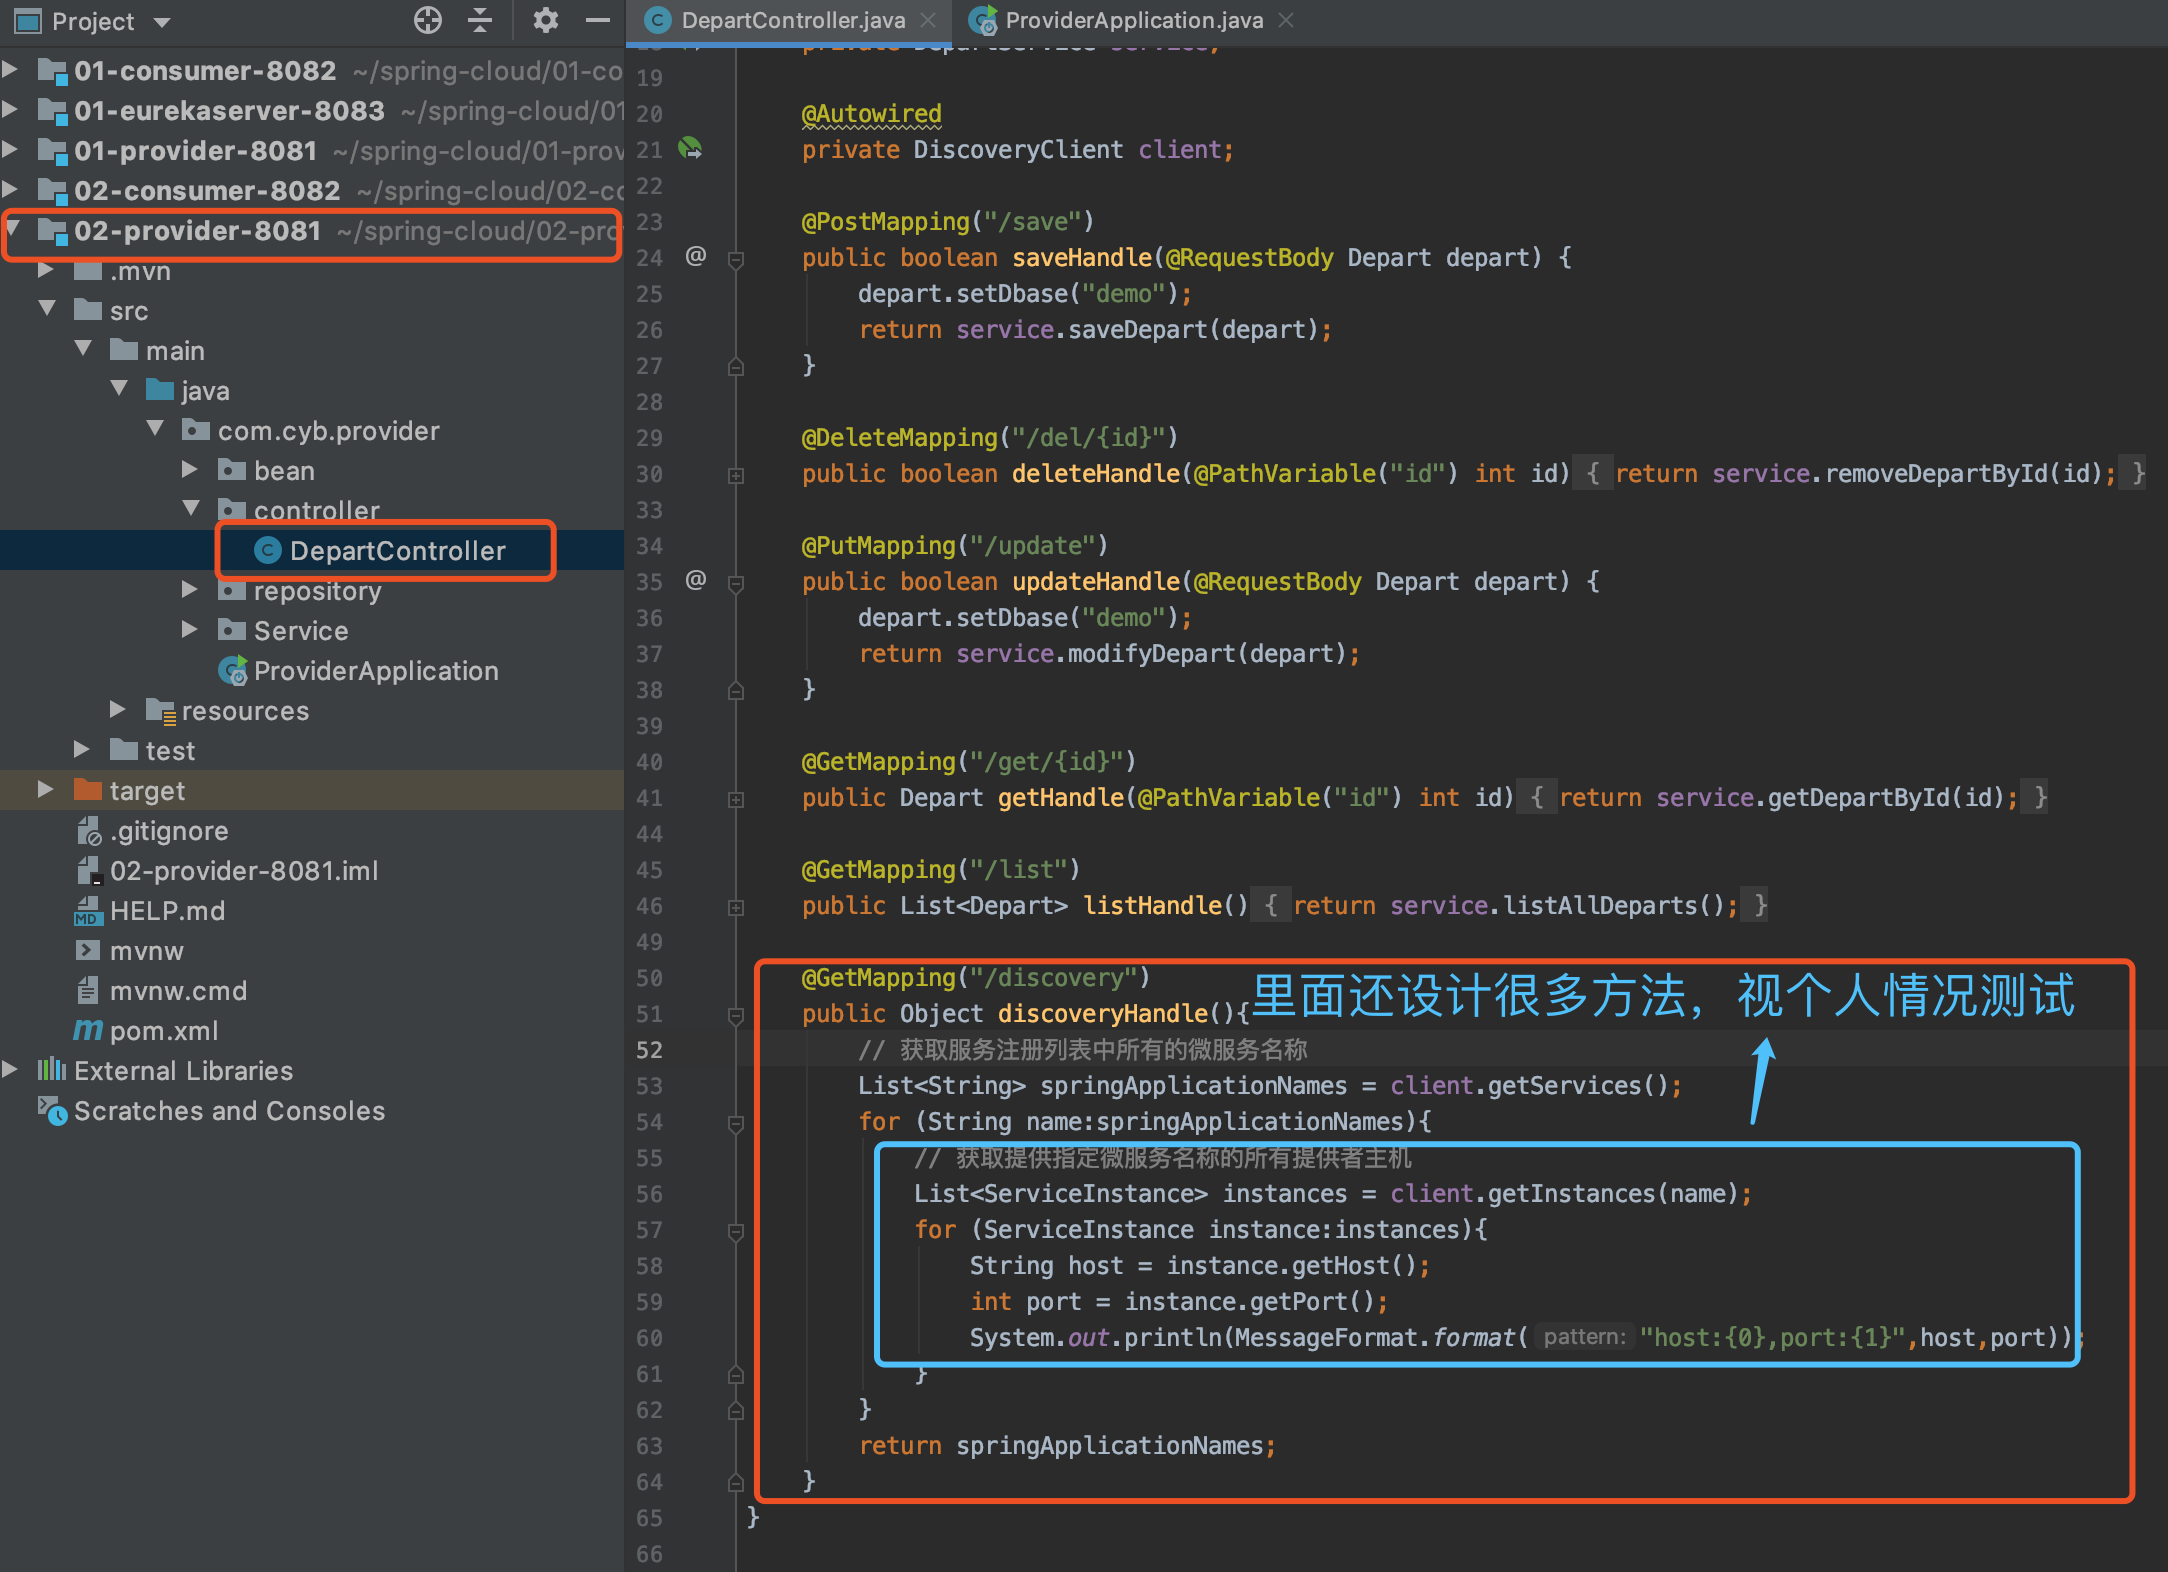
@GetMapping("/discovery")
    public Object discoveryHandle(){
        // Get all the microservice names in the service registration list
        List<String> springApplicationNames = client.getServices();
        for (String name:springApplicationNames){
            // Gets all provider hosts that provide the specified microservice name
            List<ServiceInstance> instances = client.getInstances(name);
            for (ServiceInstance instance:instances){
                String host = instance.getHost();
                int port = instance.getPort();
                System.out.println(MessageFormat.format("host:{0},port:{1}",host,port));
            }
        }
        return springApplicationNames;
    }
test

EurekaServer Cluster
A single EurekaServer not only has limited throughput, but also has a single point of problem, so we will use the EurekaServer cluster, which contains three EurekaServer nodes with port numbers of 8123, 8456, 8789.
Set up a domain name
Since these Eureka are running on the current host here, and the Eureka management page only shows the domain name of the Eureka host, not the port number, we set up a different domain name for each Eureka node in order to distinguish the hosts in the Eureka cluster from each other in the Eureka management page.
You need to modify the host file. For the sake of node time, no children's shoes, see my other blog about how to set the host file: Point me straight
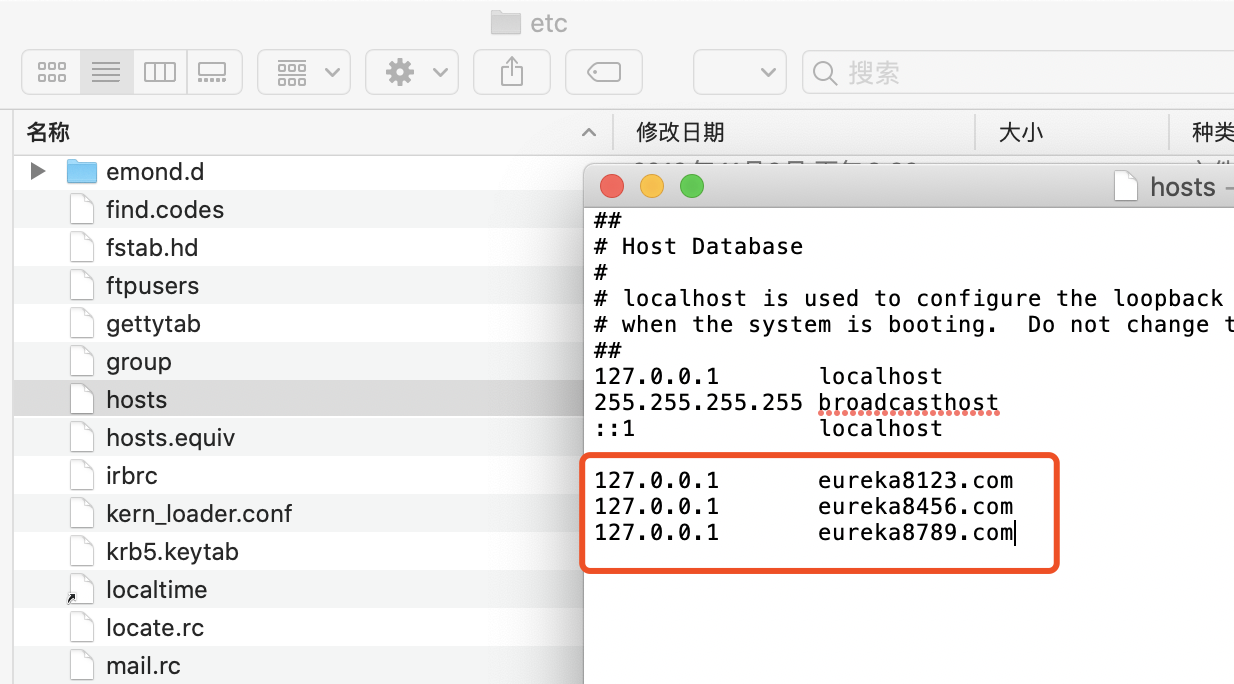
Copy and modify EurekaServer
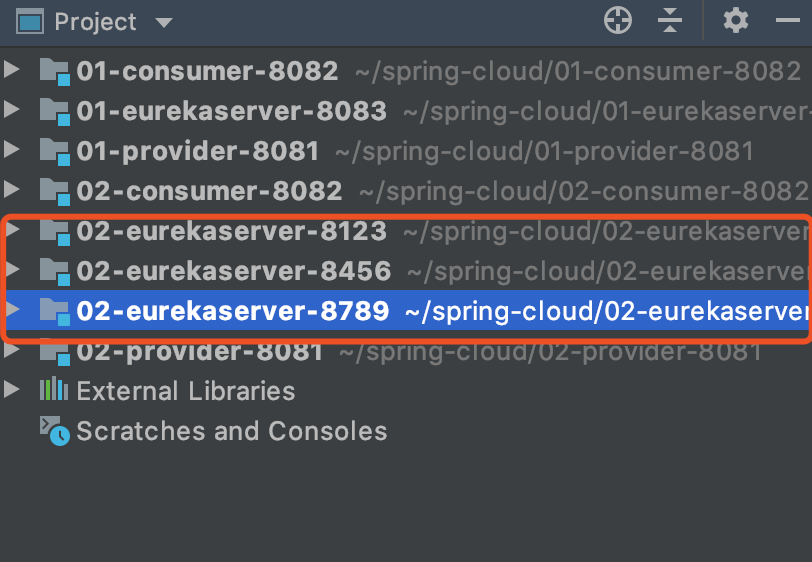
Three copies of 01-eurekaserver-8083 were copied and renamed, respectively: 02-eurekaserver-8123, 02-eurekaserver-8456, and 02-eurekaserver-8789;
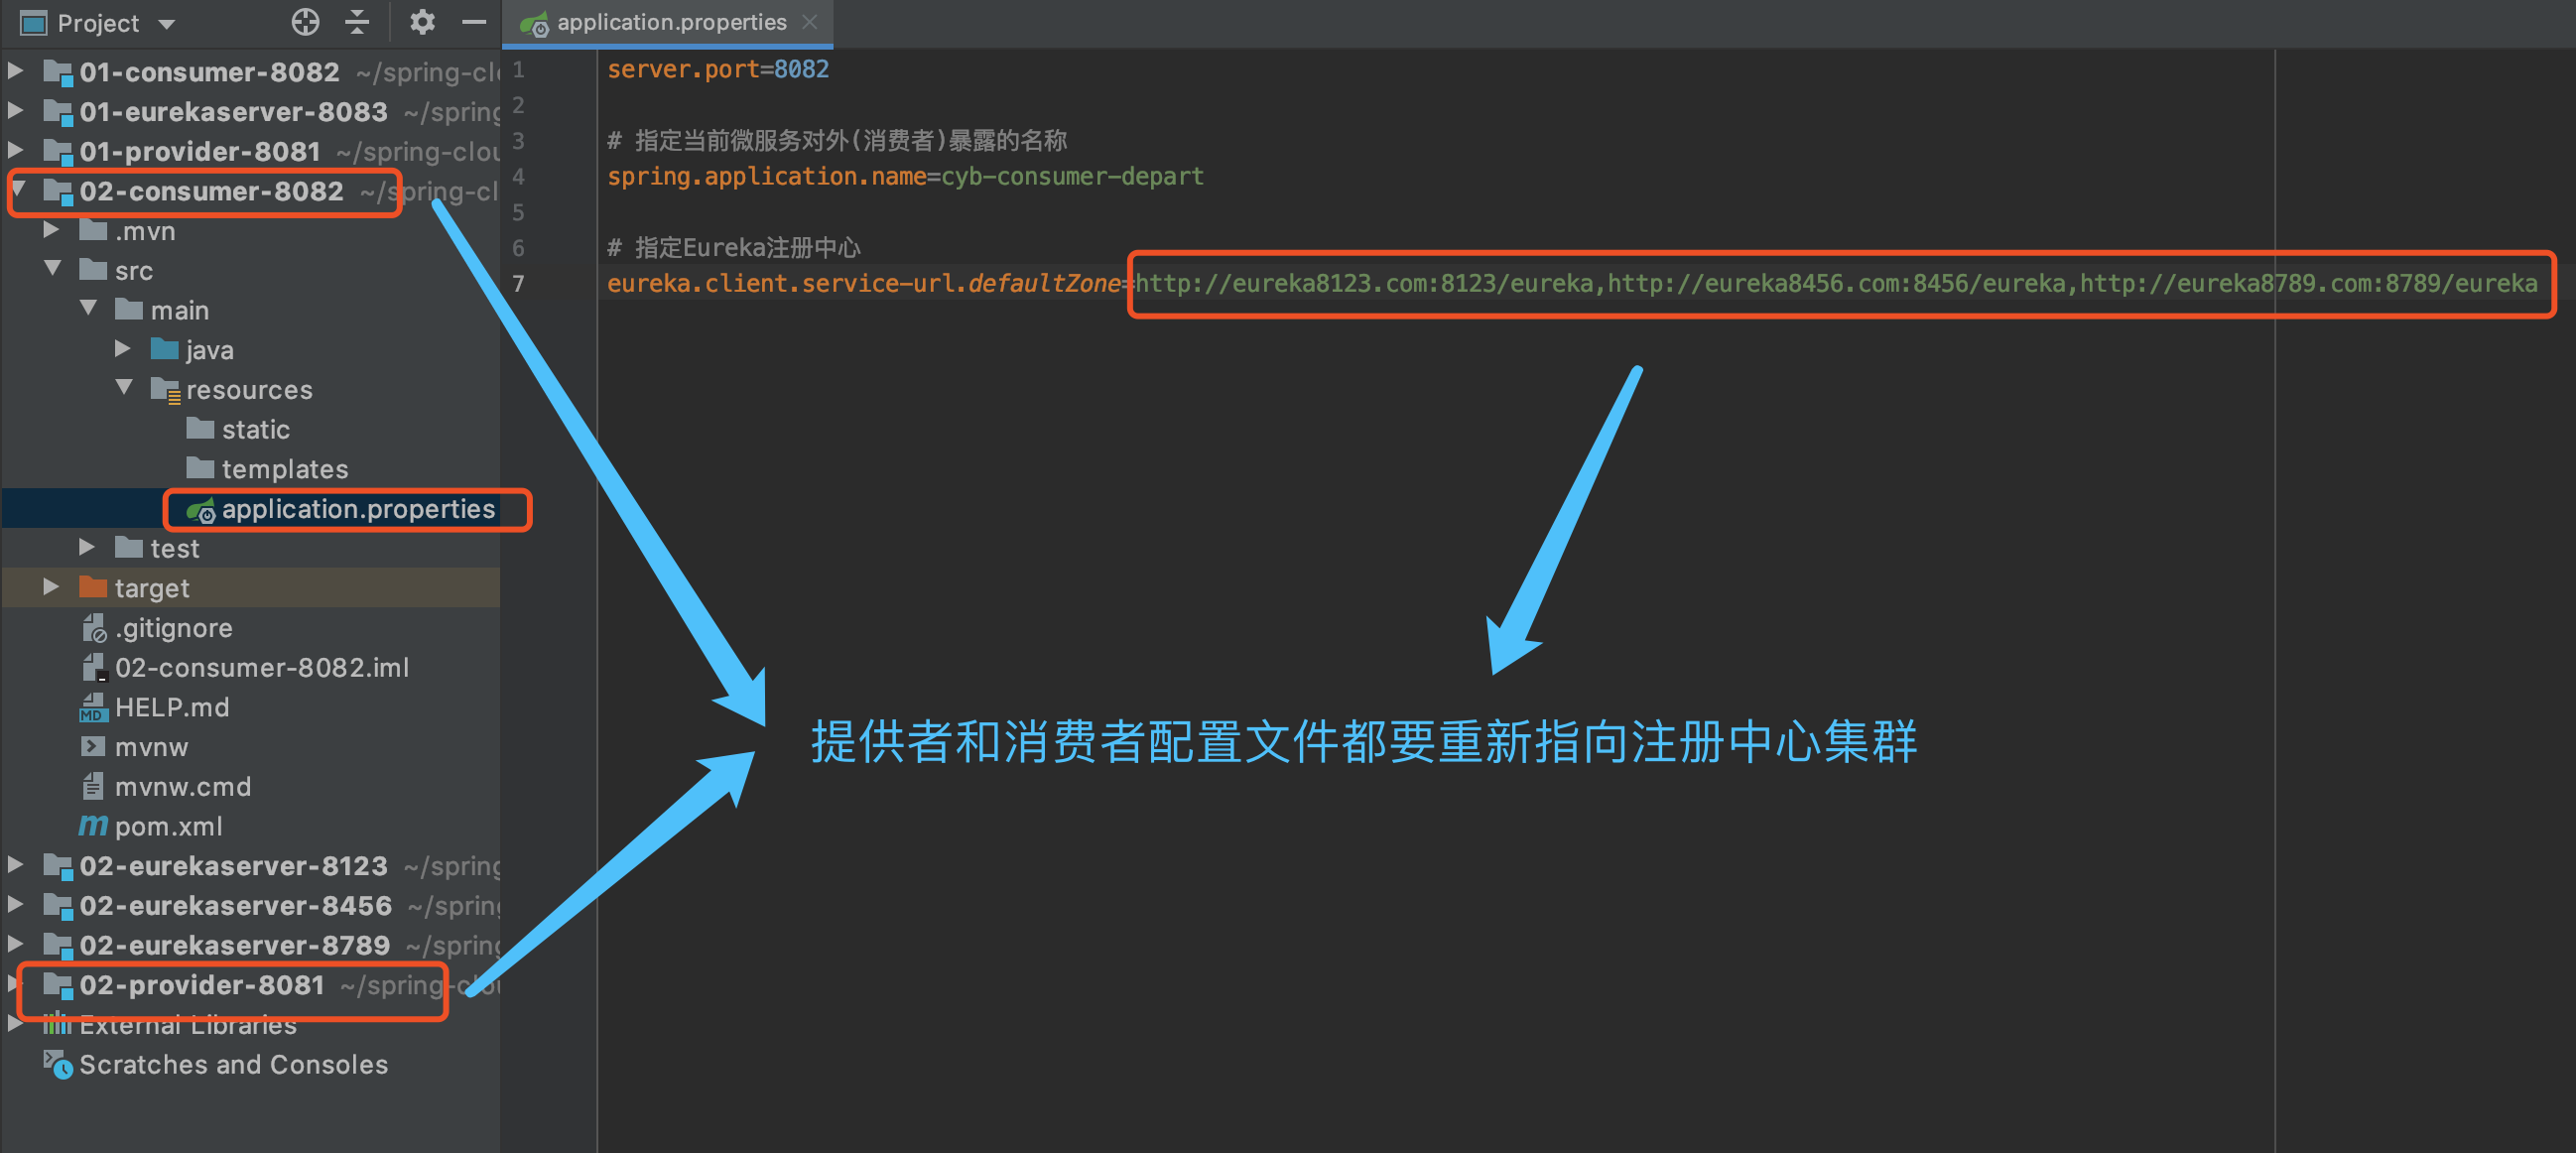
Modify EurekaServer configuration file
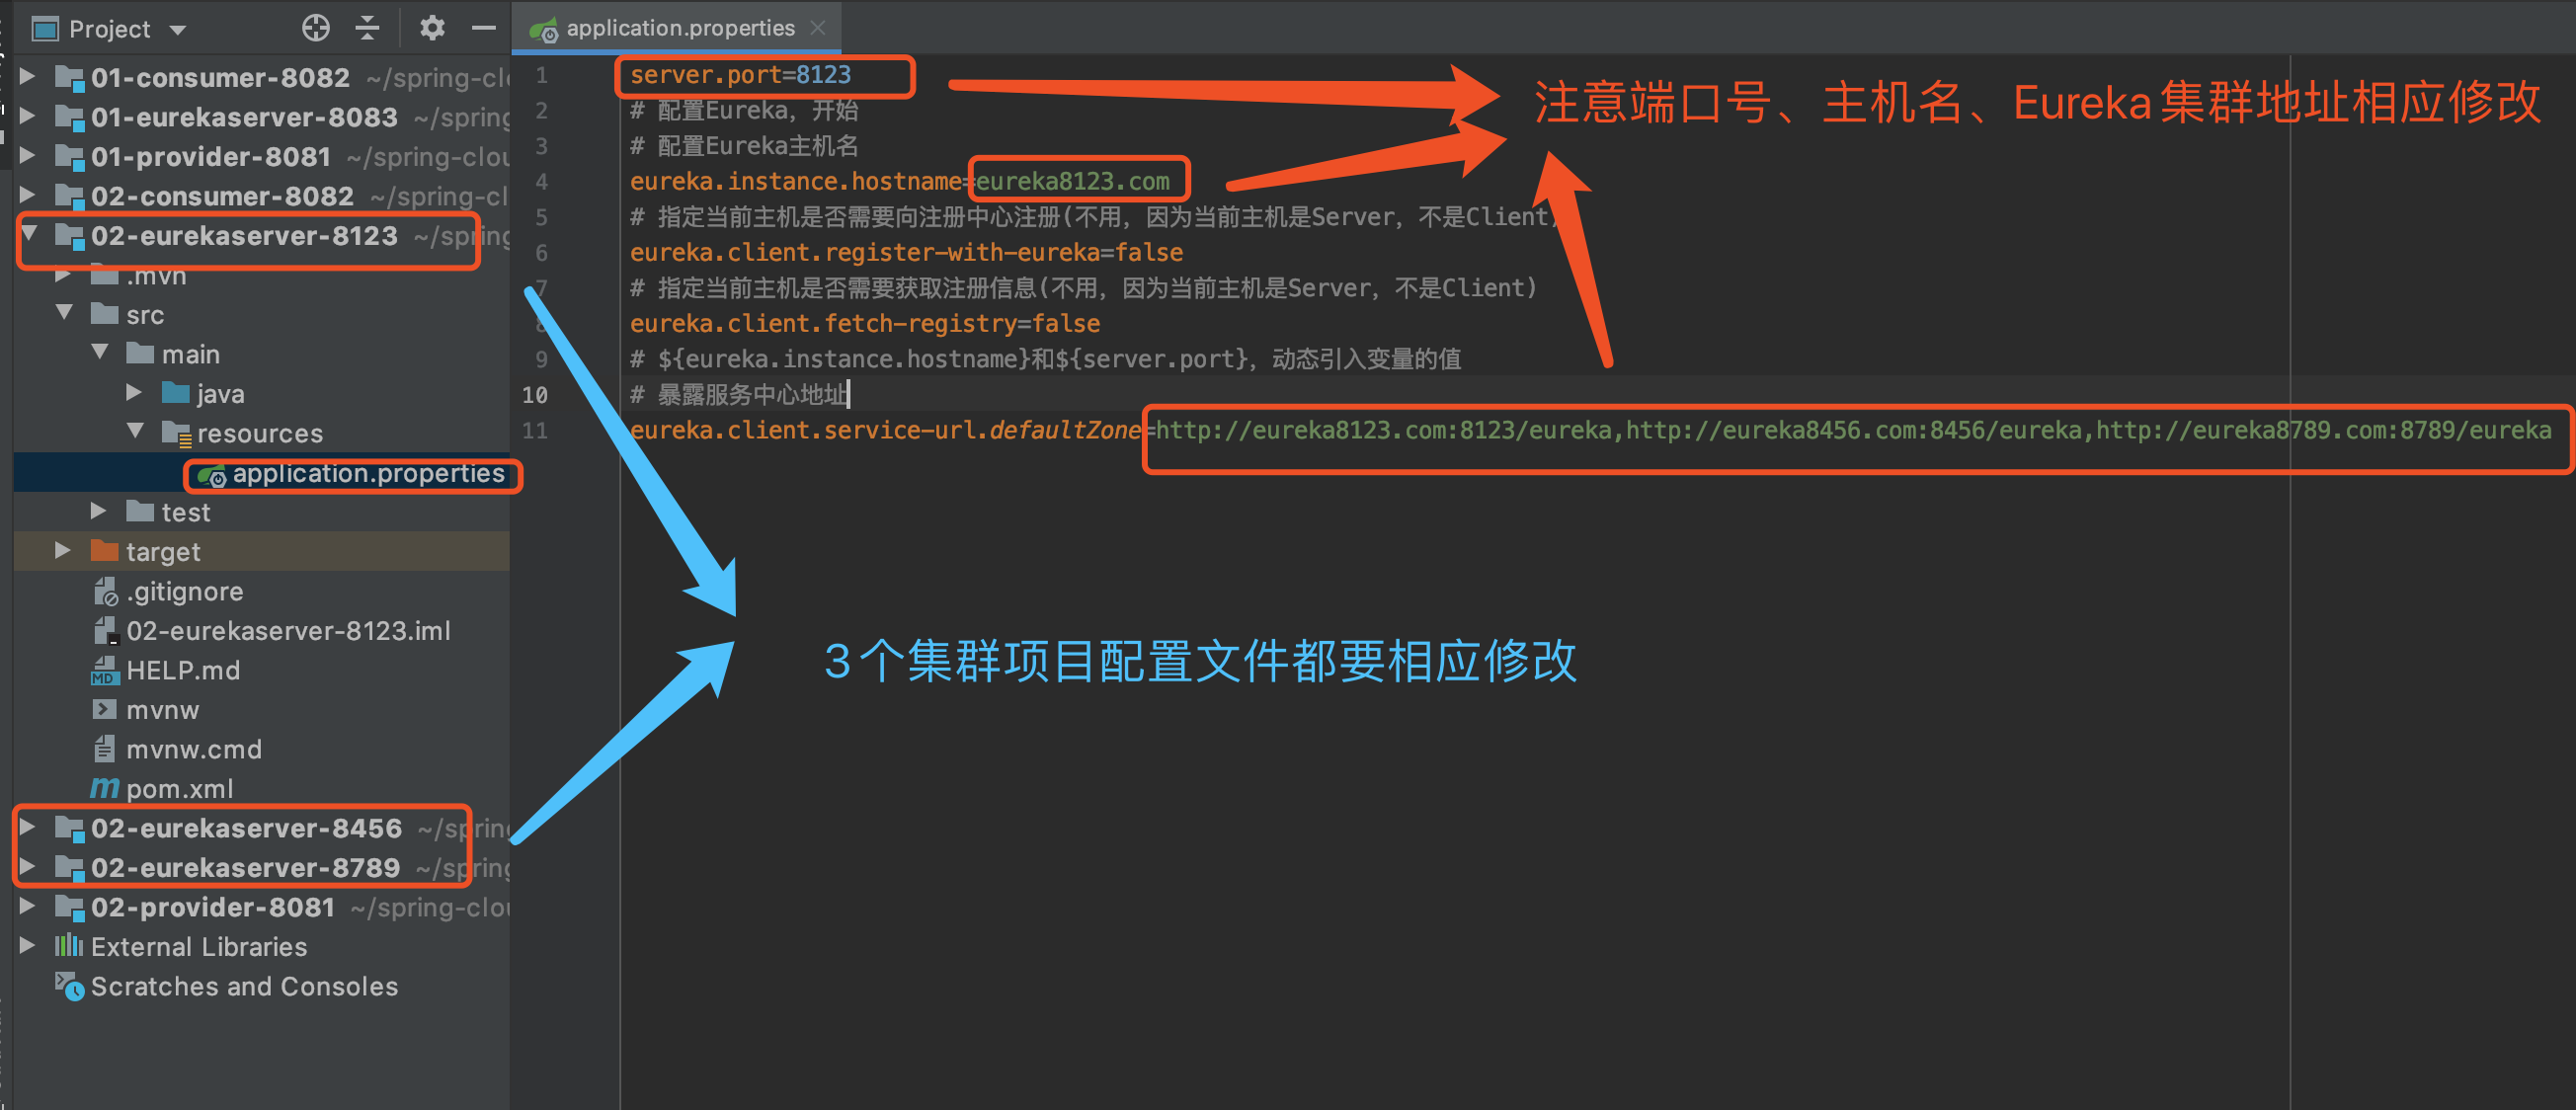
Note: ","No space in the middle of the partition!!!"Three items in the cluster need to be modified accordingly!!!
Modify client configuration
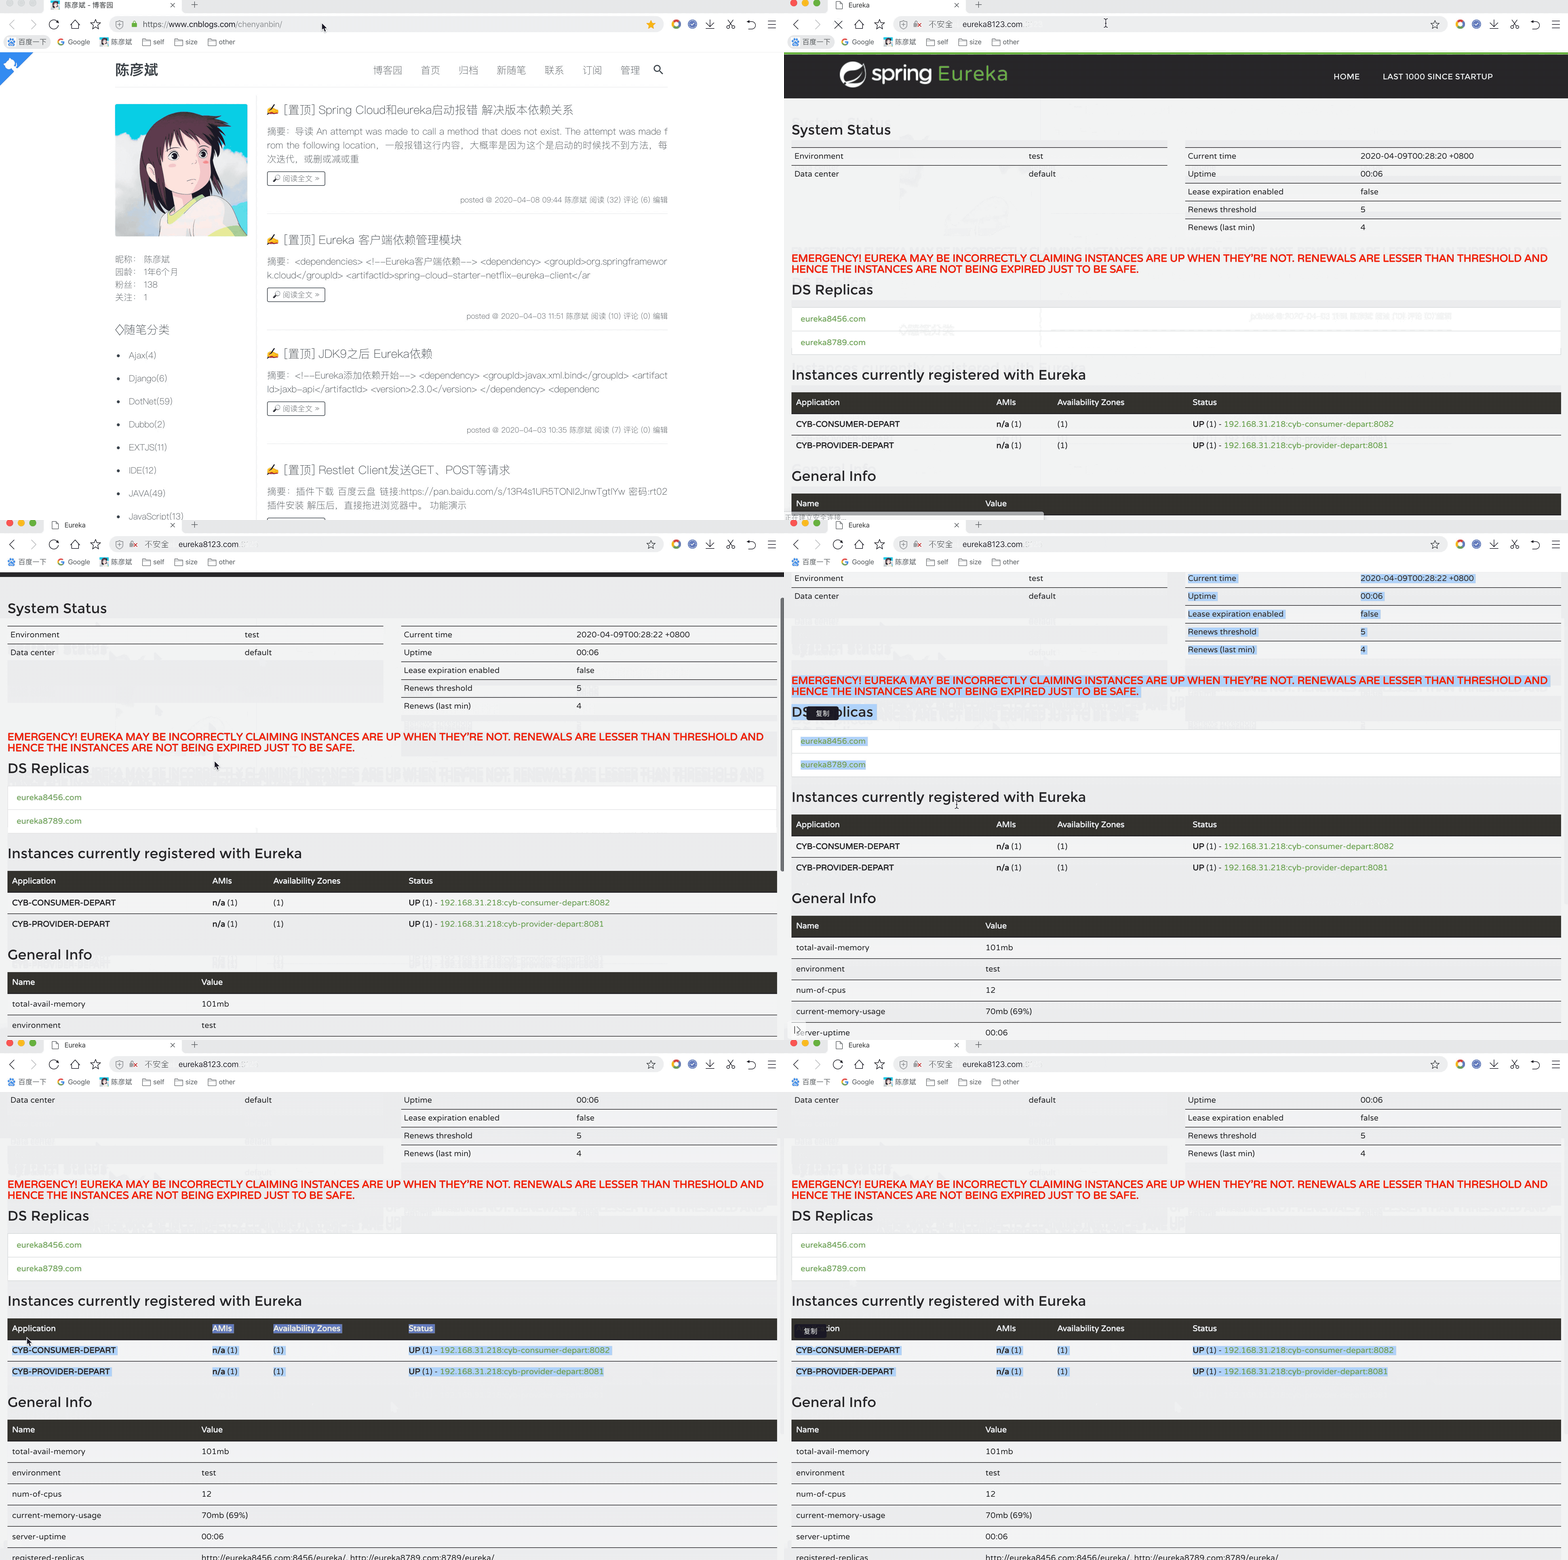
Run Access

Declarative REST Client OpenFeign
Create Consumer Engineering
There is no need to modify the provider project, just the consumer project.
Copy 02-consumer-8082 and rename it 03-consumer-feign-8082

Overall steps
- Add openfeign dependencies
- Define the Service interface and specify the microservice it binds to
- Modify the processor to consume microservices through the Service interface
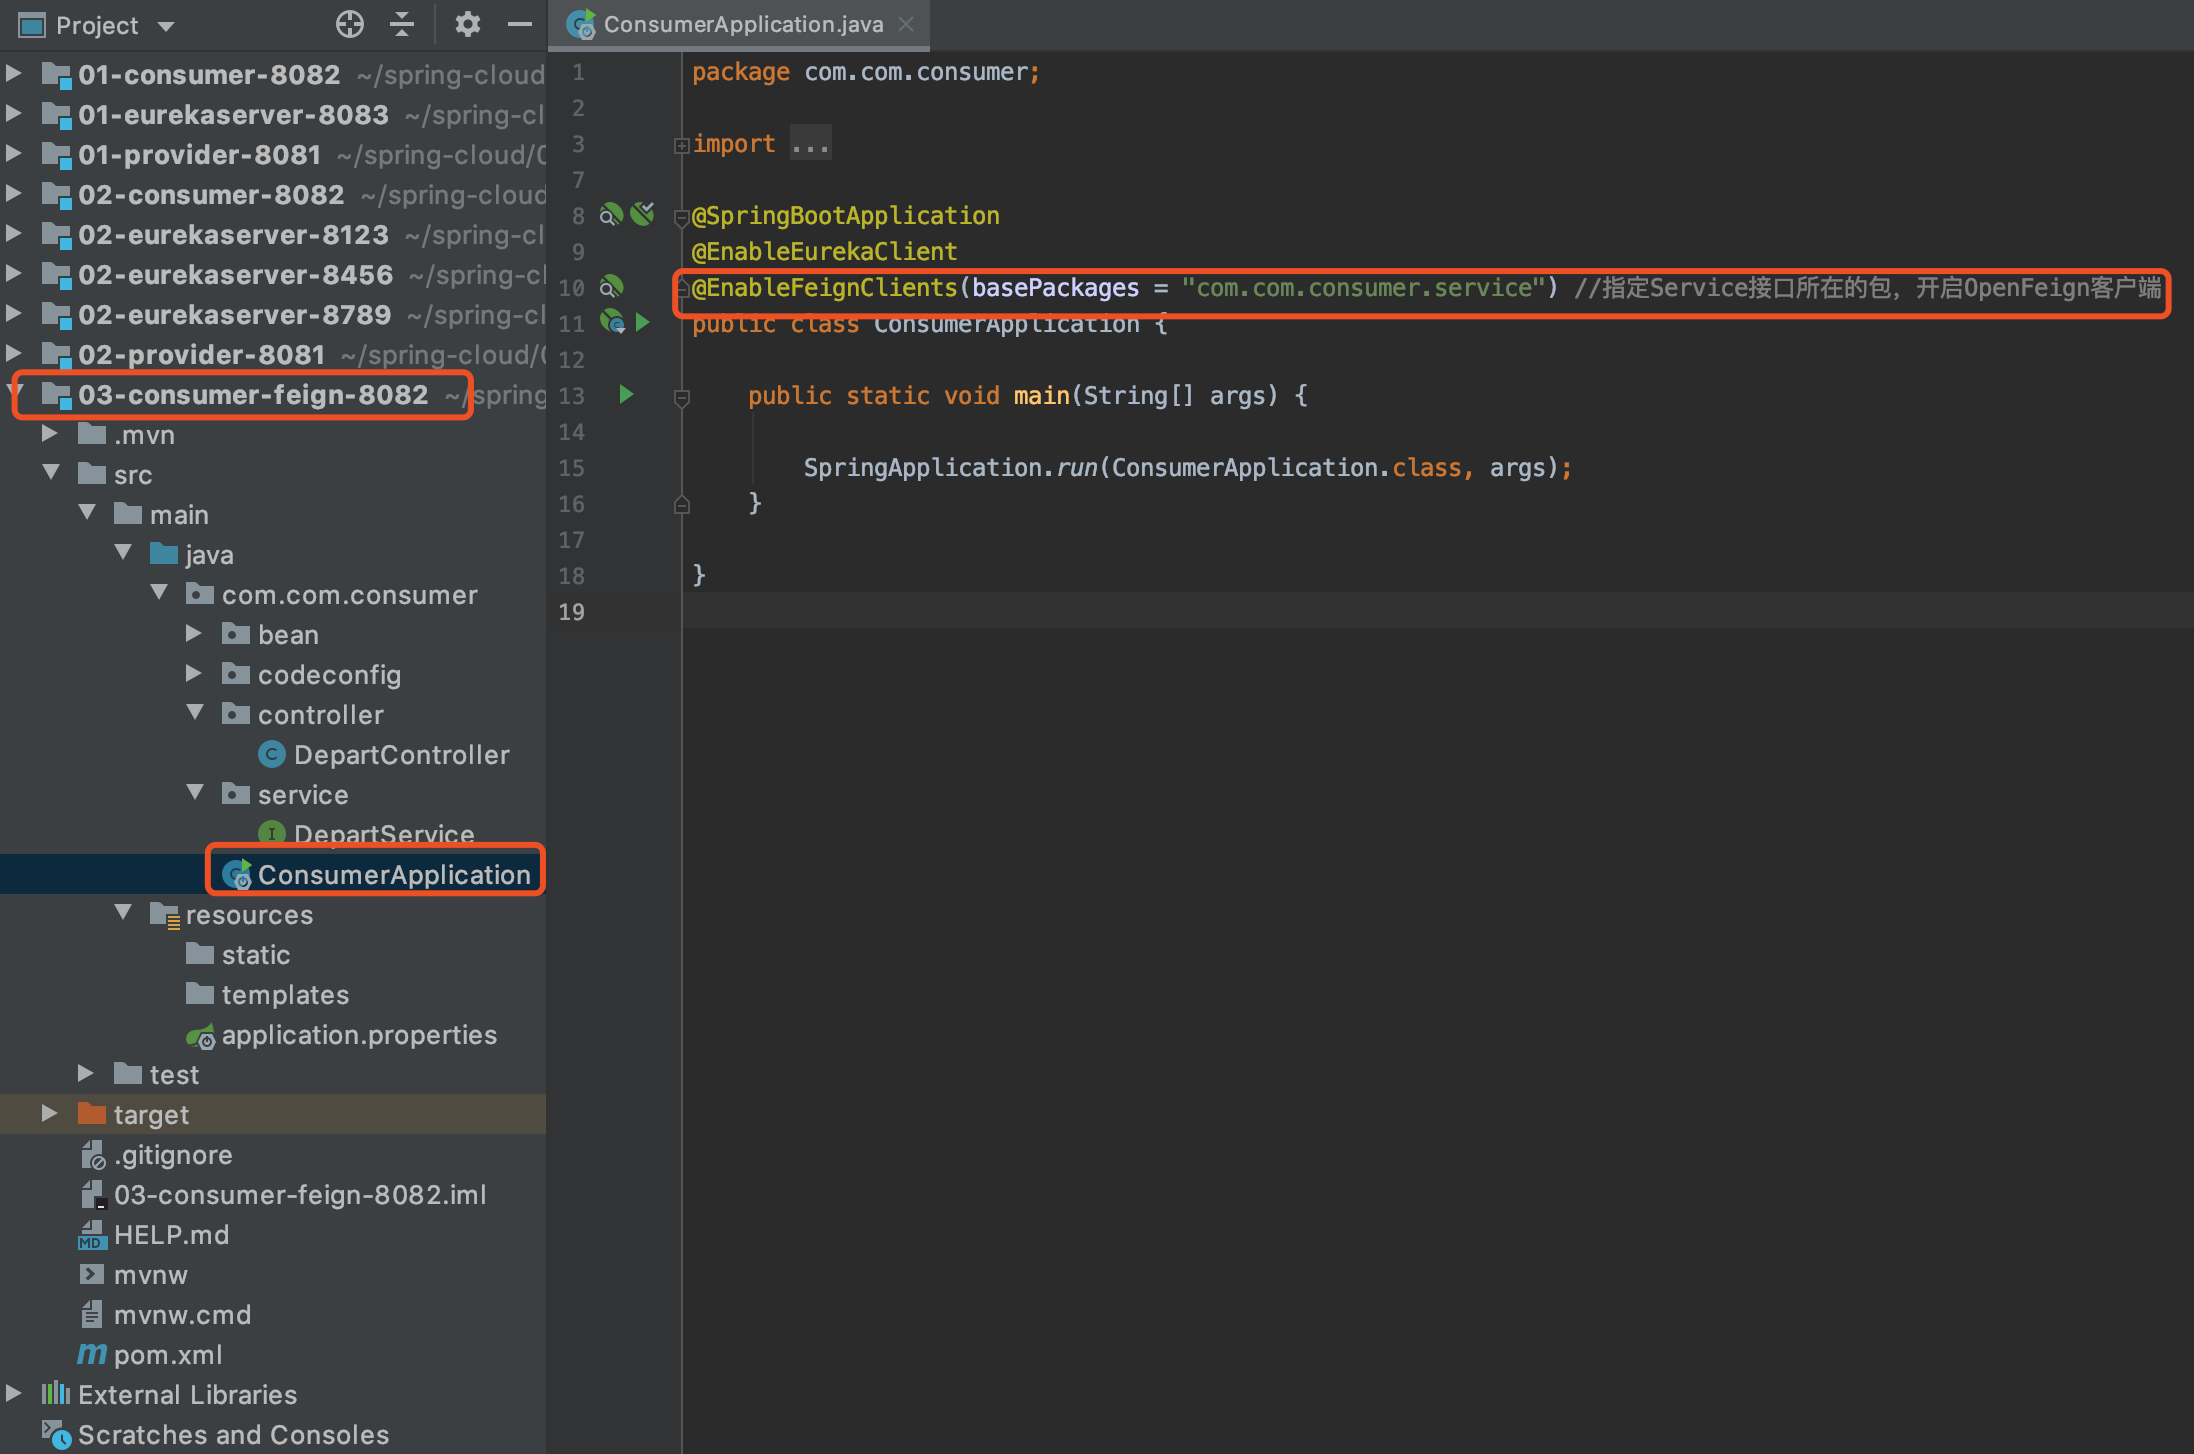
- Add the @EnableFeignClients annotation to the startup class
Add Dependency
pom.xml
<!-- openfeign rely on -->
        <dependency>
            <groupId>org.springframework.cloud</groupId>
            <artifactId>spring-cloud-starter-openfeign</artifactId>
            <version>2.2.2.RELEASE</version>
        </dependency>
Define Service
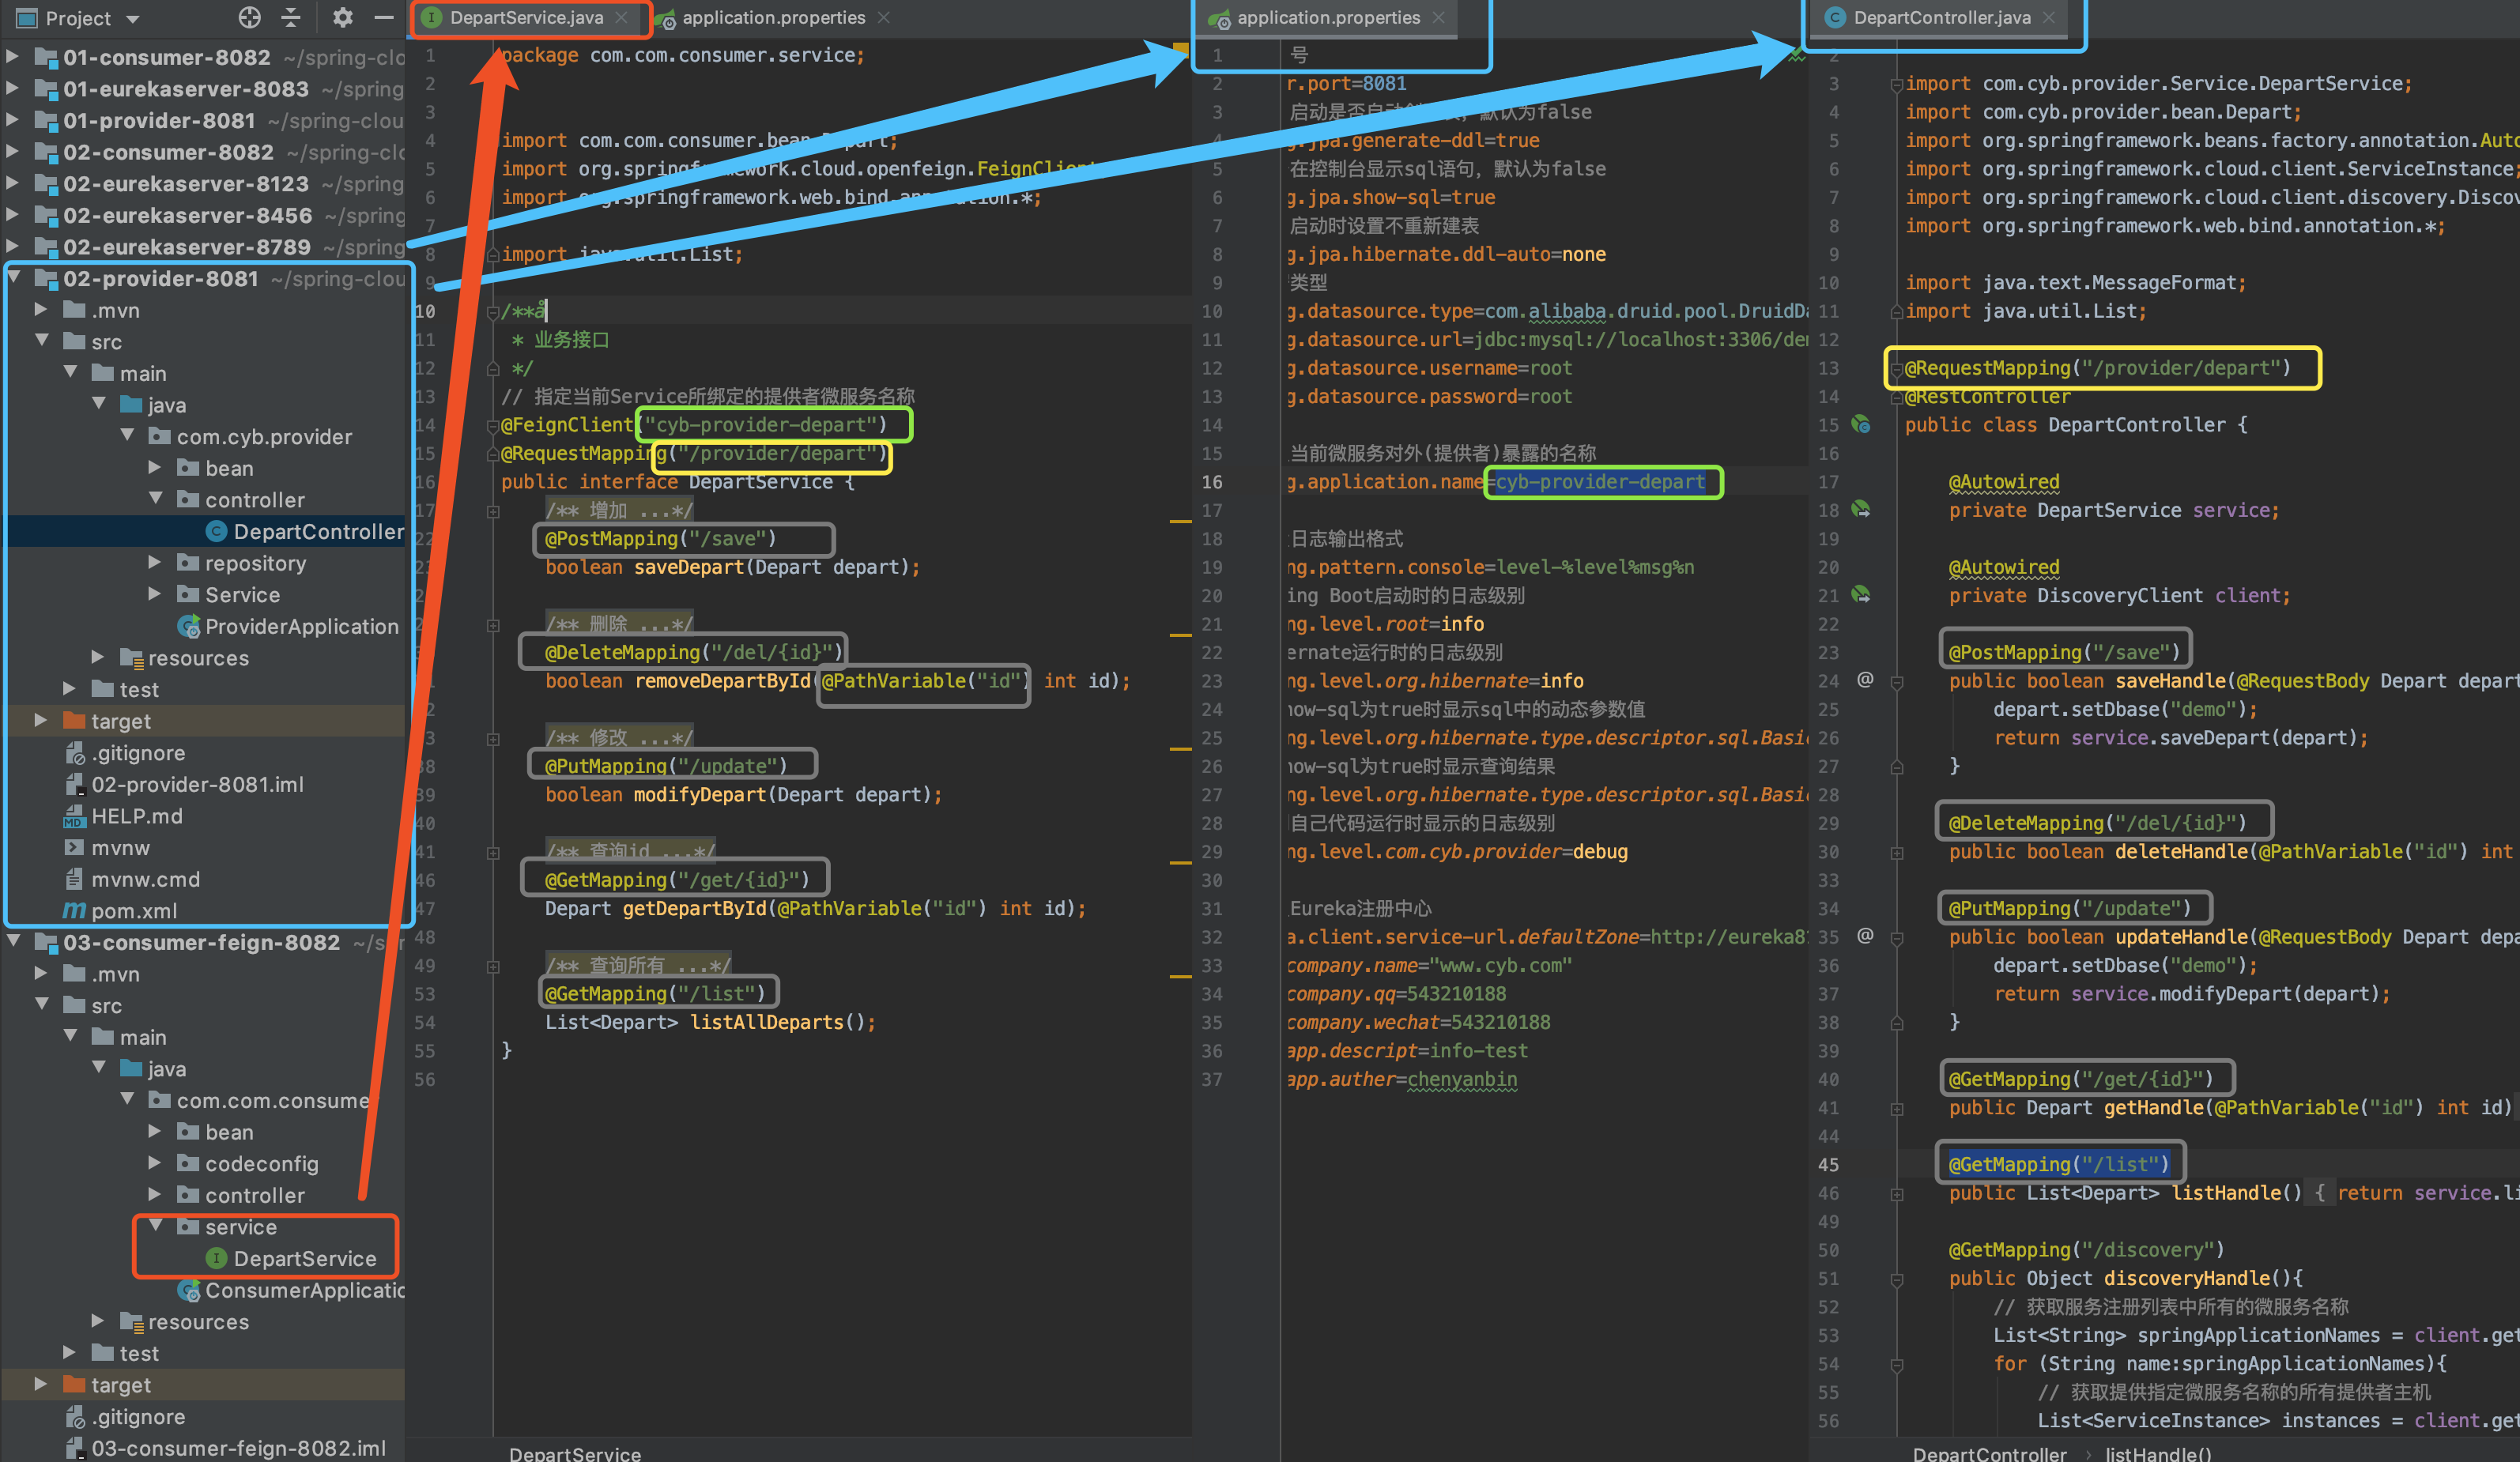
package com.com.consumer.service;


import com.com.consumer.bean.Depart;
import org.springframework.cloud.openfeign.FeignClient;
import org.springframework.web.bind.annotation.*;

import java.util.List;

/**
 * Business Interface
 */
// Specify the current Service The provider microservice name bound
@FeignClient("cyb-provider-depart")
@RequestMapping("/provider/depart")
public interface DepartService {
    /**
     * increase
     * @param depart
     * @return
     */
    @PostMapping("/save")
    boolean saveDepart(Depart depart);

    /**
     * delete
     * @param id
     * @return
     */
    @DeleteMapping("/del/{id}")
    boolean removeDepartById(@PathVariable("id") int id);

    /**
     * modify
     * @param depart
     * @return
     */
    @PutMapping("/update")
    boolean modifyDepart(Depart depart);

    /**
     * Query id
     * @param id
     * @return
     */
    @GetMapping("/get/{id}")
    Depart getDepartById(@PathVariable("id") int id);

    /**
     * Query all
     * @return
     */
    @GetMapping("/list")
    List<Depart> listAllDeparts();
}
Modify Processor
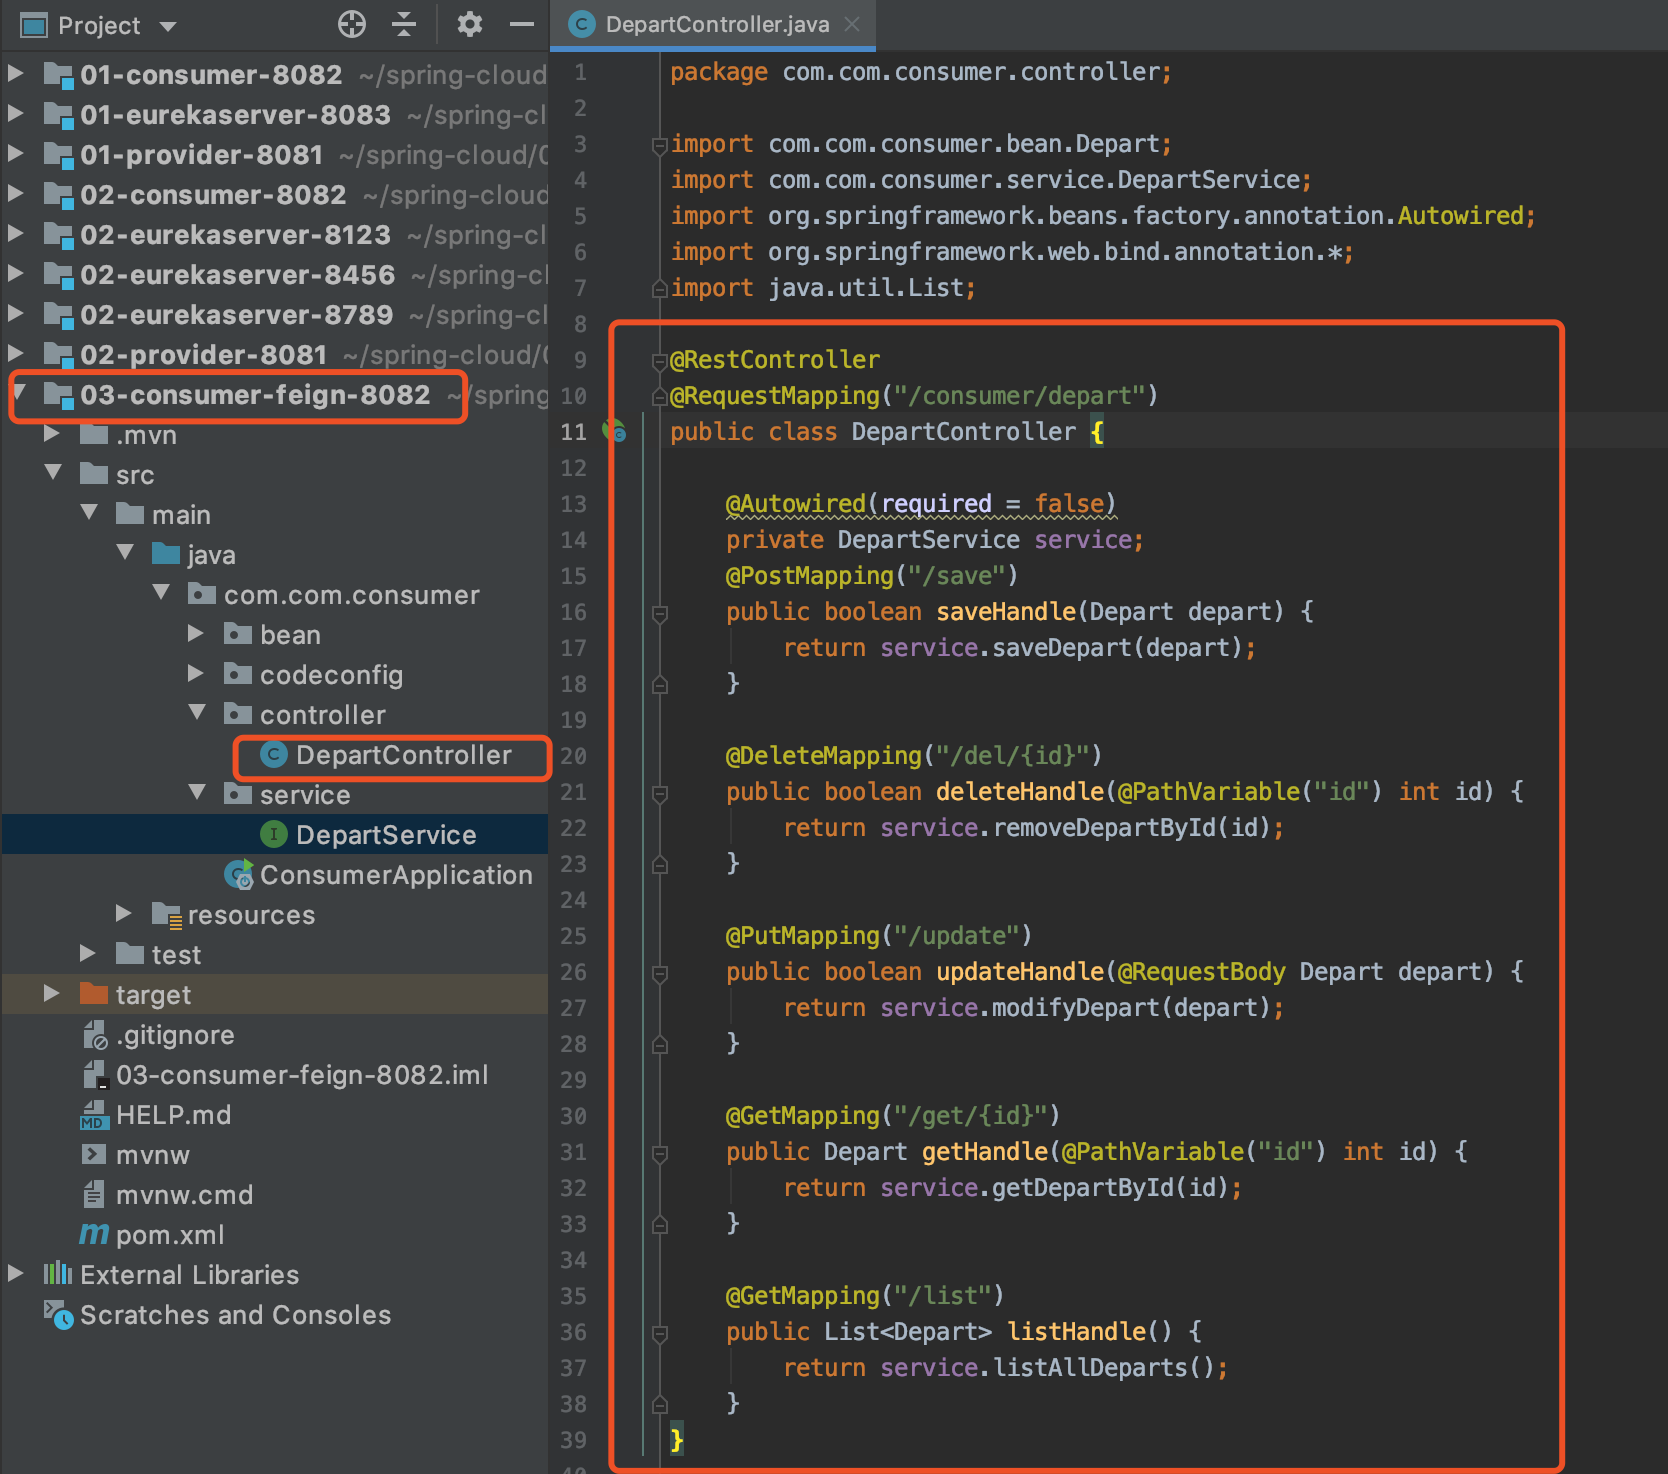
package com.com.consumer.controller;

import com.com.consumer.bean.Depart;
import com.com.consumer.service.DepartService;
import org.springframework.beans.factory.annotation.Autowired;
import org.springframework.web.bind.annotation.*;
import java.util.List;

@RestController
@RequestMapping("/consumer/depart")
public class DepartController {

    @Autowired(required = false)
    private DepartService service;
    @PostMapping("/save")
    public boolean saveHandle(Depart depart) {
        return service.saveDepart(depart);
    }

    @DeleteMapping("/del/{id}")
    public boolean deleteHandle(@PathVariable("id") int id) {
        return service.removeDepartById(id);
    }

    @PutMapping("/update")
    public boolean updateHandle(@RequestBody Depart depart) {
        return service.modifyDepart(depart);
    }

    @GetMapping("/get/{id}")
    public Depart getHandle(@PathVariable("id") int id) {
        return service.getDepartById(id);
    }

    @GetMapping("/list")
    public List<Depart> listHandle() {
        return service.listAllDeparts();
    }
}
Add annotation on startup class
test
For demonstration purposes, the eureka cluster is not needed, and the effect is the same

Start separately: 01-eurekaserver-8083; 02-provider-8081 (need to modify eureka registry address); 03-consumer-feign-8082 (need to modify eureka registry address)

Ribbon Load Balancing
The previous example consumed microservices through the OpenFeign interface, but did not reflect the load balancing capabilities.
Ribbo Load Balancing Demo
System Structure
Load balancing requires setting up multiple service providers and systems as follows: a microservice is provided by three providers, and consumers use Ribbon to access these three providers for load balancing.Ribbon first selects the EurekaService with less access to the same region, then gets a list of services from the EurekaServer, and then selects a service provider based on a user-specified load balancing policy.

Create 3 databases
- demo1; demo2; demo3
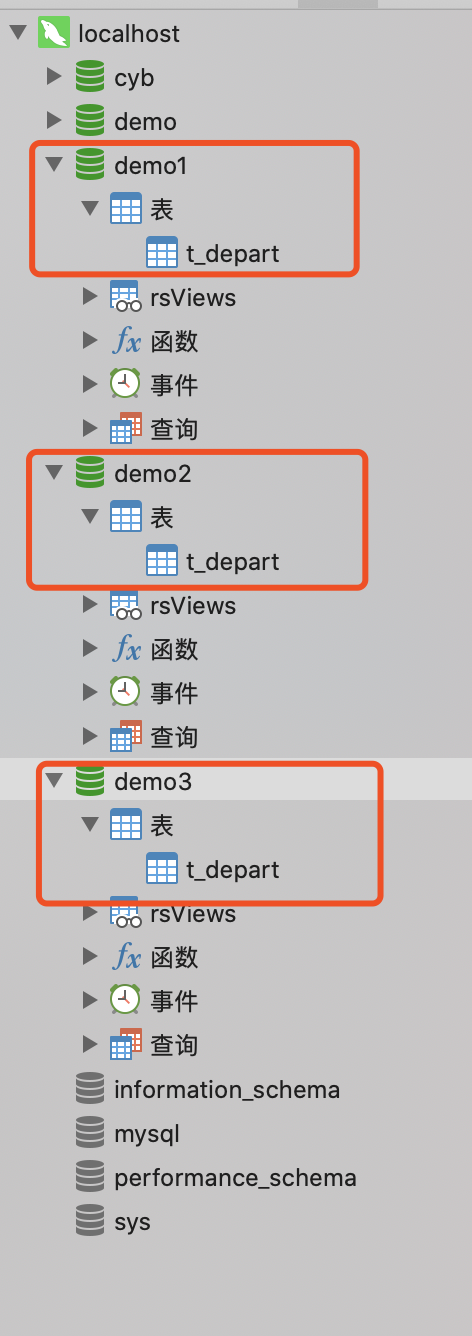
Three libraries, three tables, three data

Create three providers
Copy 02-provider-8081 and rename: 02-provider-8091; 02-provider-8092; 02-provider-8093, modify port number, database connected, etc.
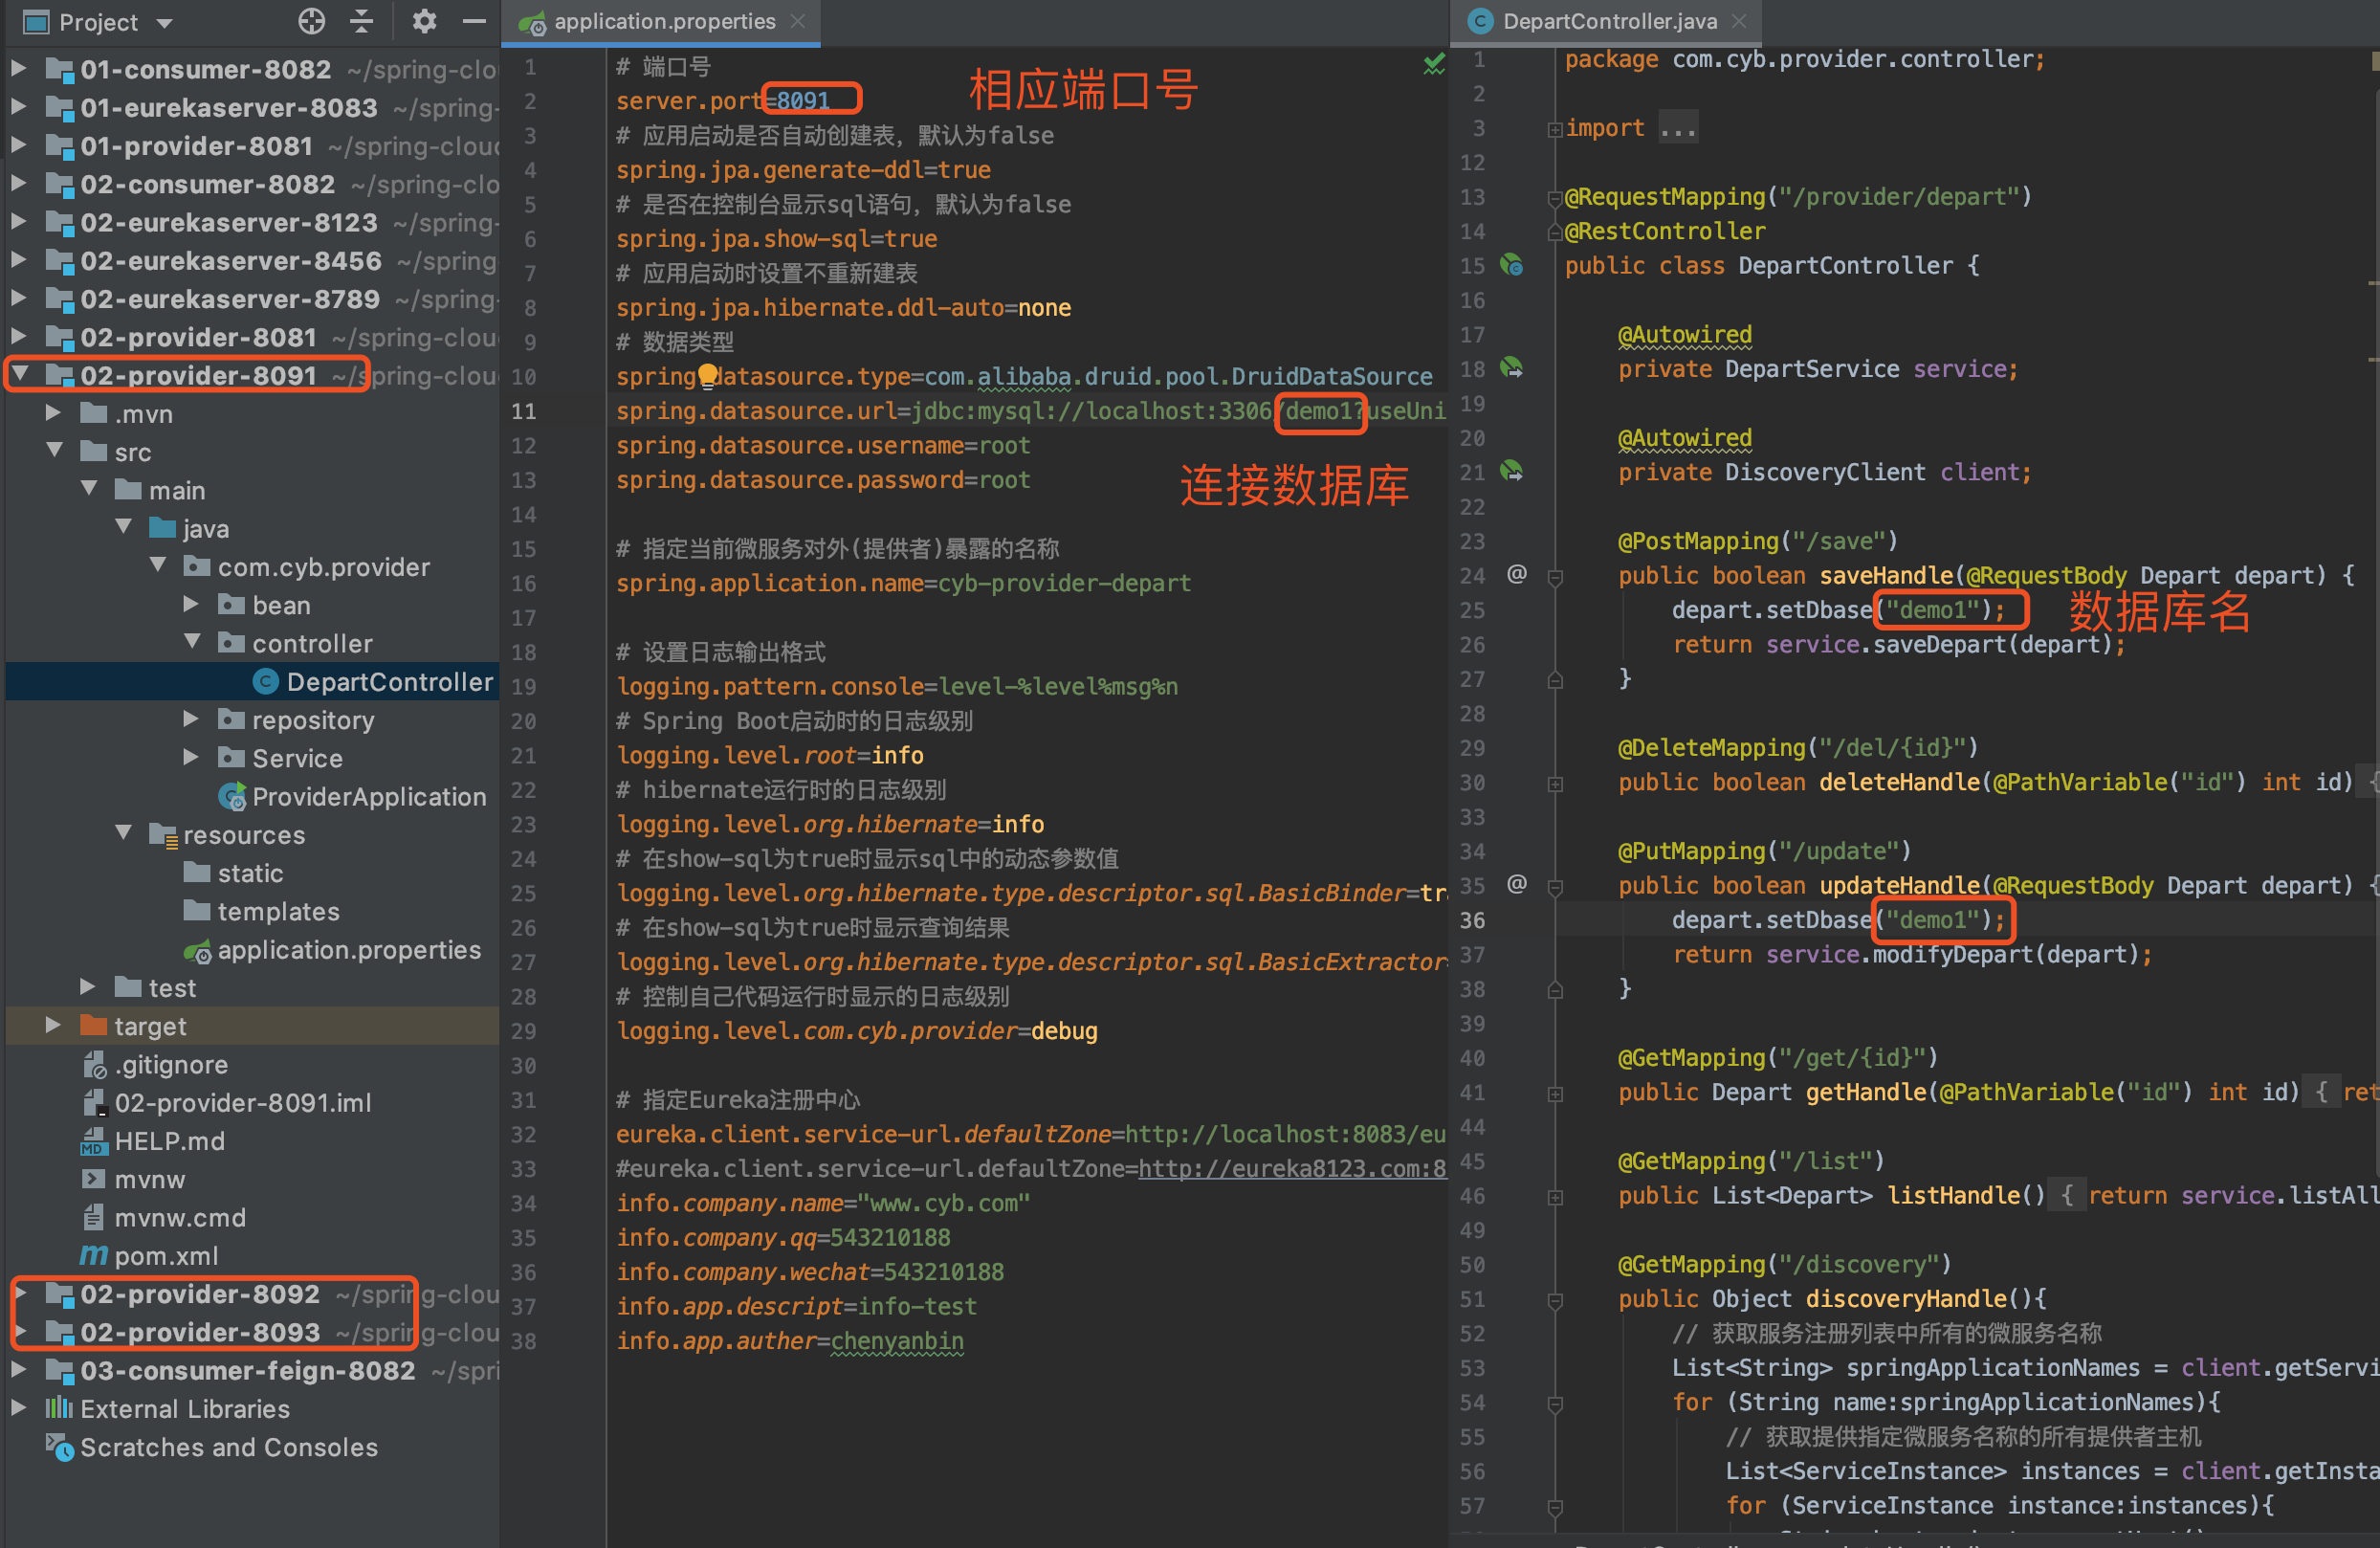
test
Start in sequence: 01-eurekaserver-8083; 02-provider-8091; 02-provider-8092; 02-provider-8093; 03-consumer-feign-8082


We find that when consumers are invoked, consumers invoke Provider 1, Provider 2, Provider 3 in turn because the default load balancing algorithm is polling, and he supports other algorithms.
Load Balancing Algorithm IRule
Ribbon provides a variety of load balancing strategy algorithms, such as polling, random, response time weighted, and so on.The default is the polling algorithm, or you can specify the Ribbon default algorithm.
IRule interface
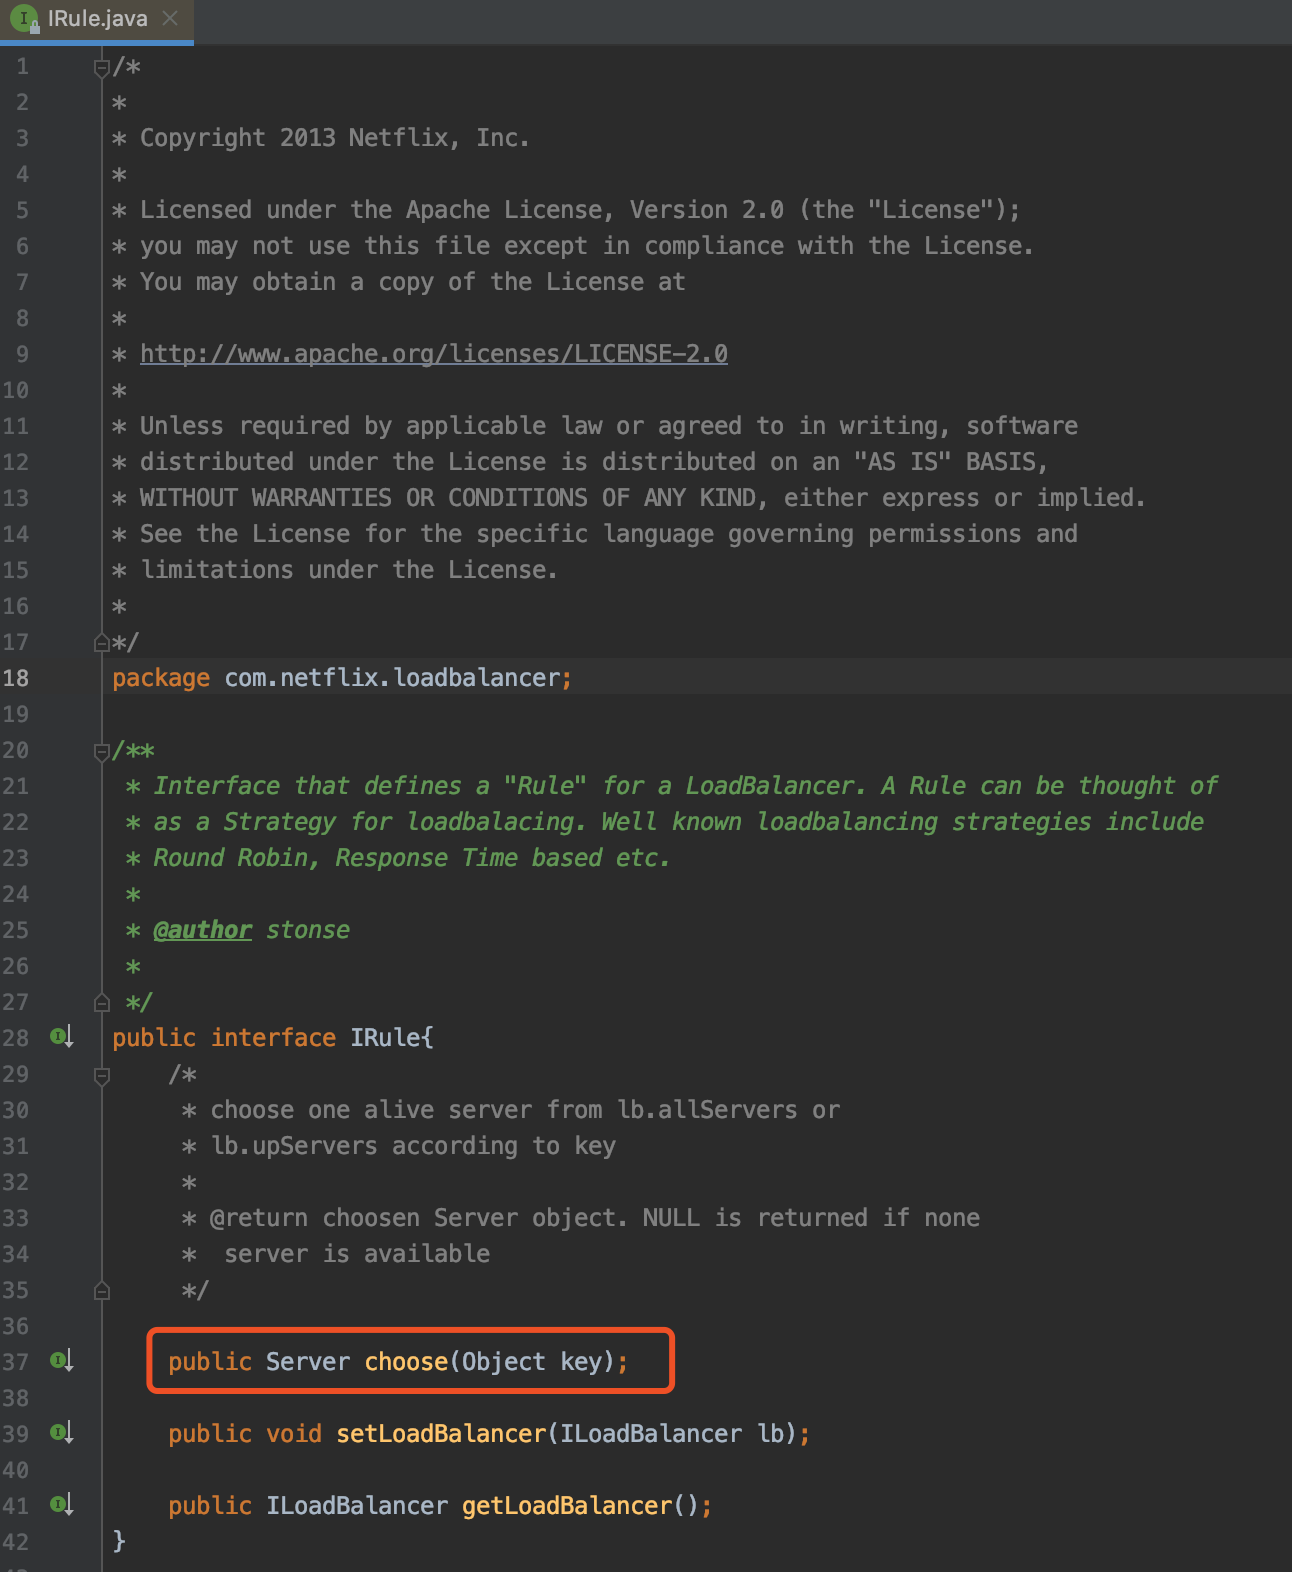
Select() method
Ribbon's load balancing algorithm needs to implement the IRule interface, in which the core method is the select() method, which is how providers are selected.
Ribbon's own algorithm
There are seven built-in available load balancing algorithms for Ribbon.
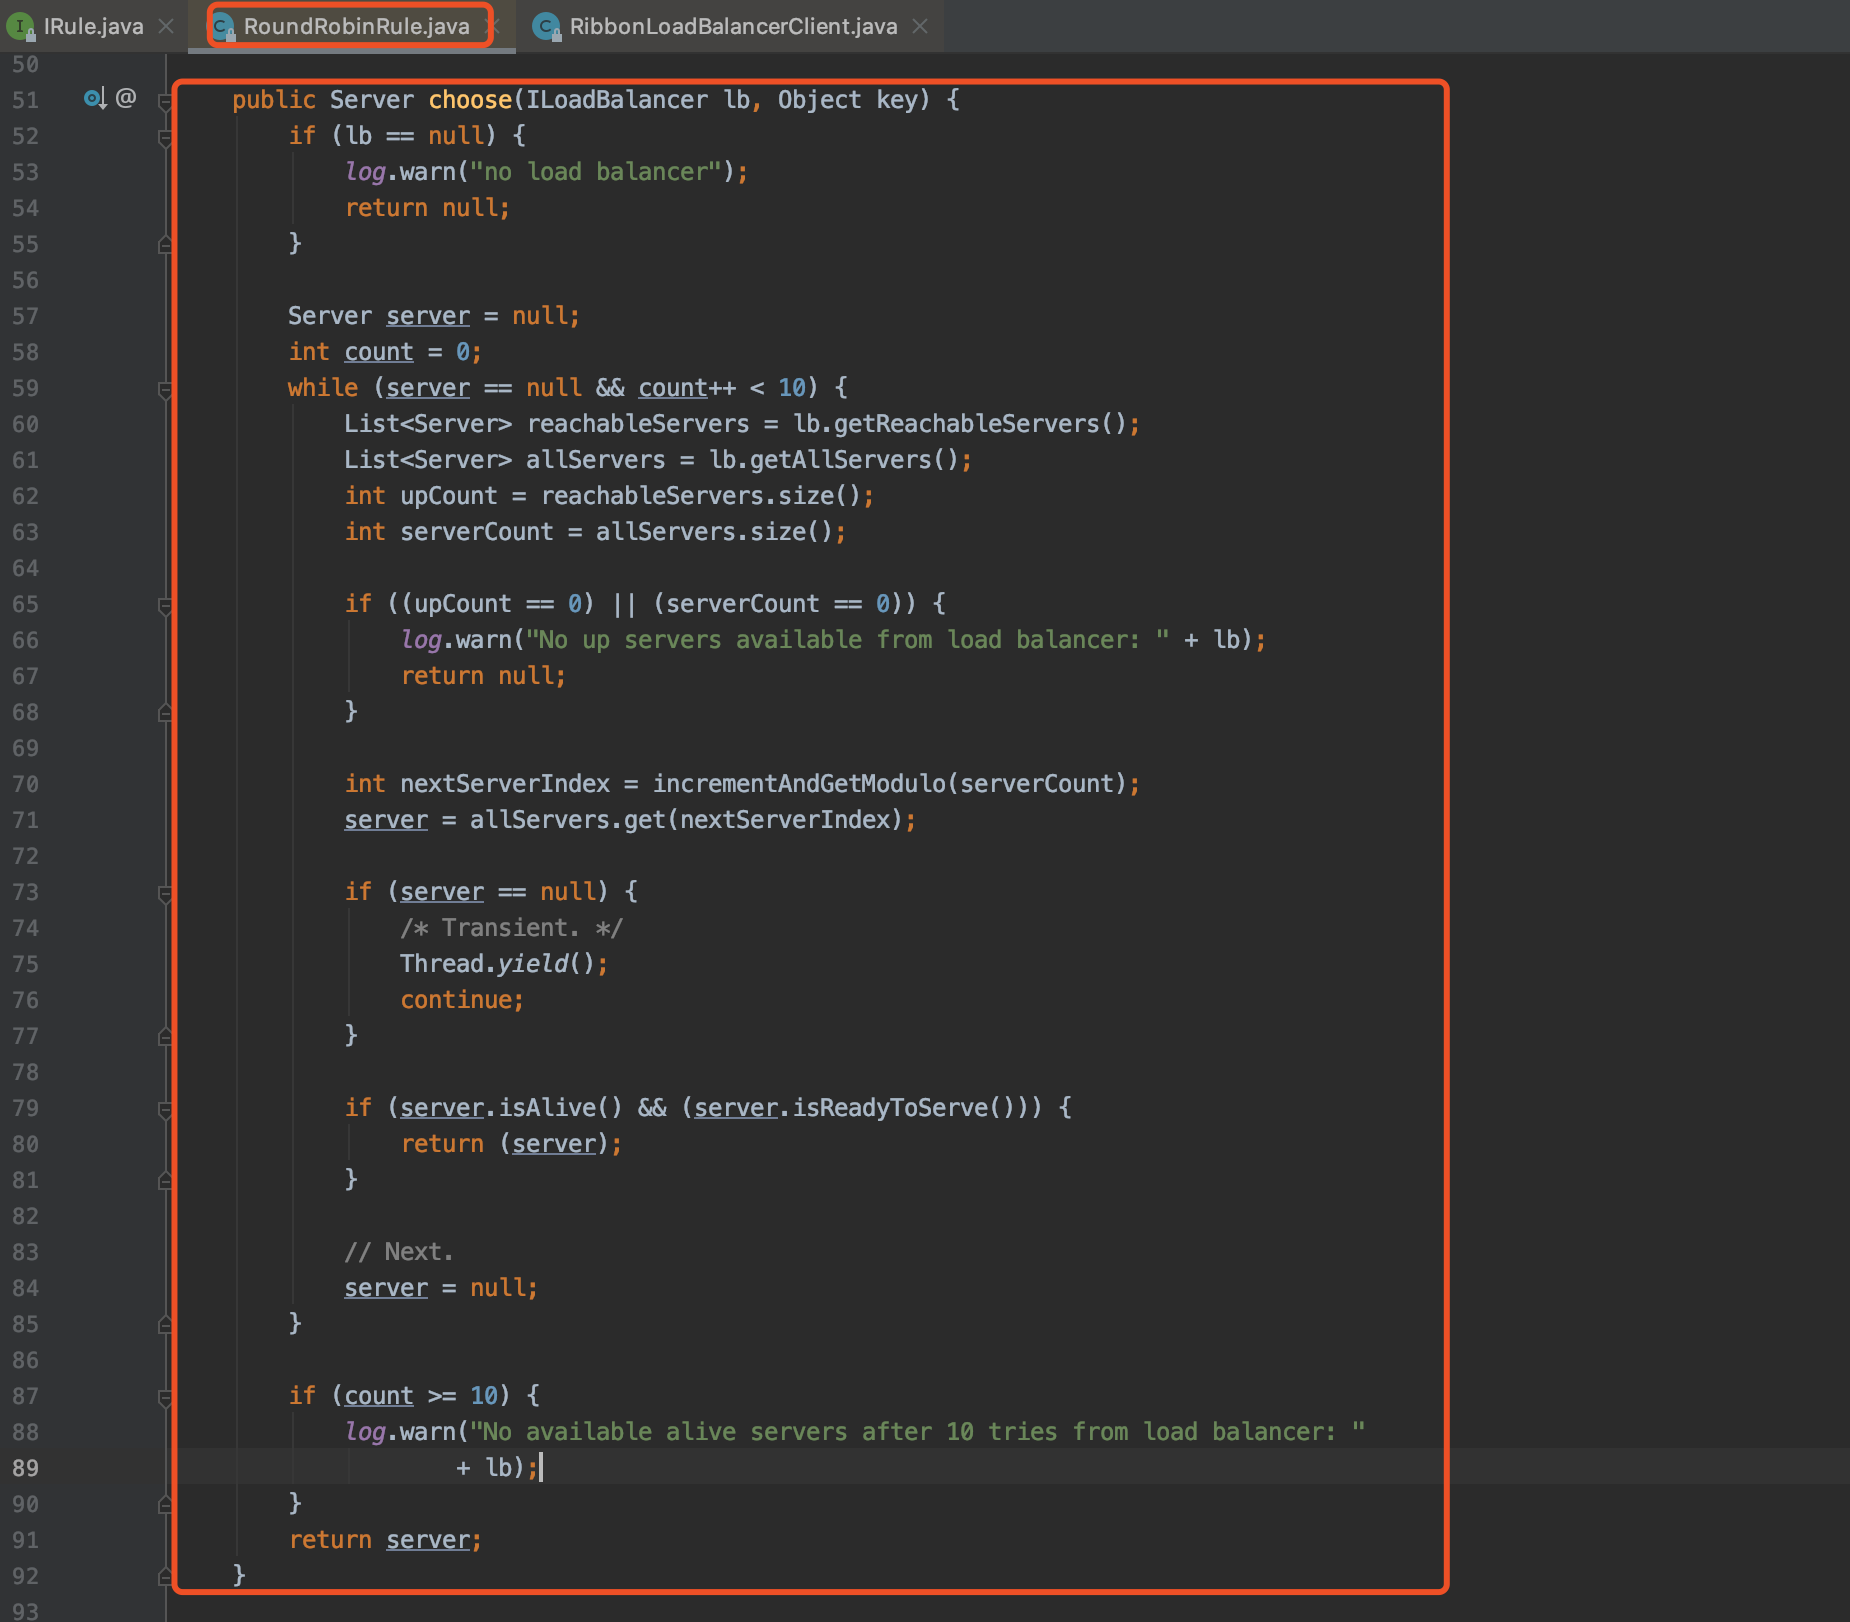
1,RoundRobinRule
Polling policy.Ribbon's default strategy
2,BestAvailableRule
Select the provider with the least concurrency, that is, the provider with the least number of consumers connected.It traverses each provider in the list of services and selects the provider with the smallest number of minimalConcurrentConnections currently connected.

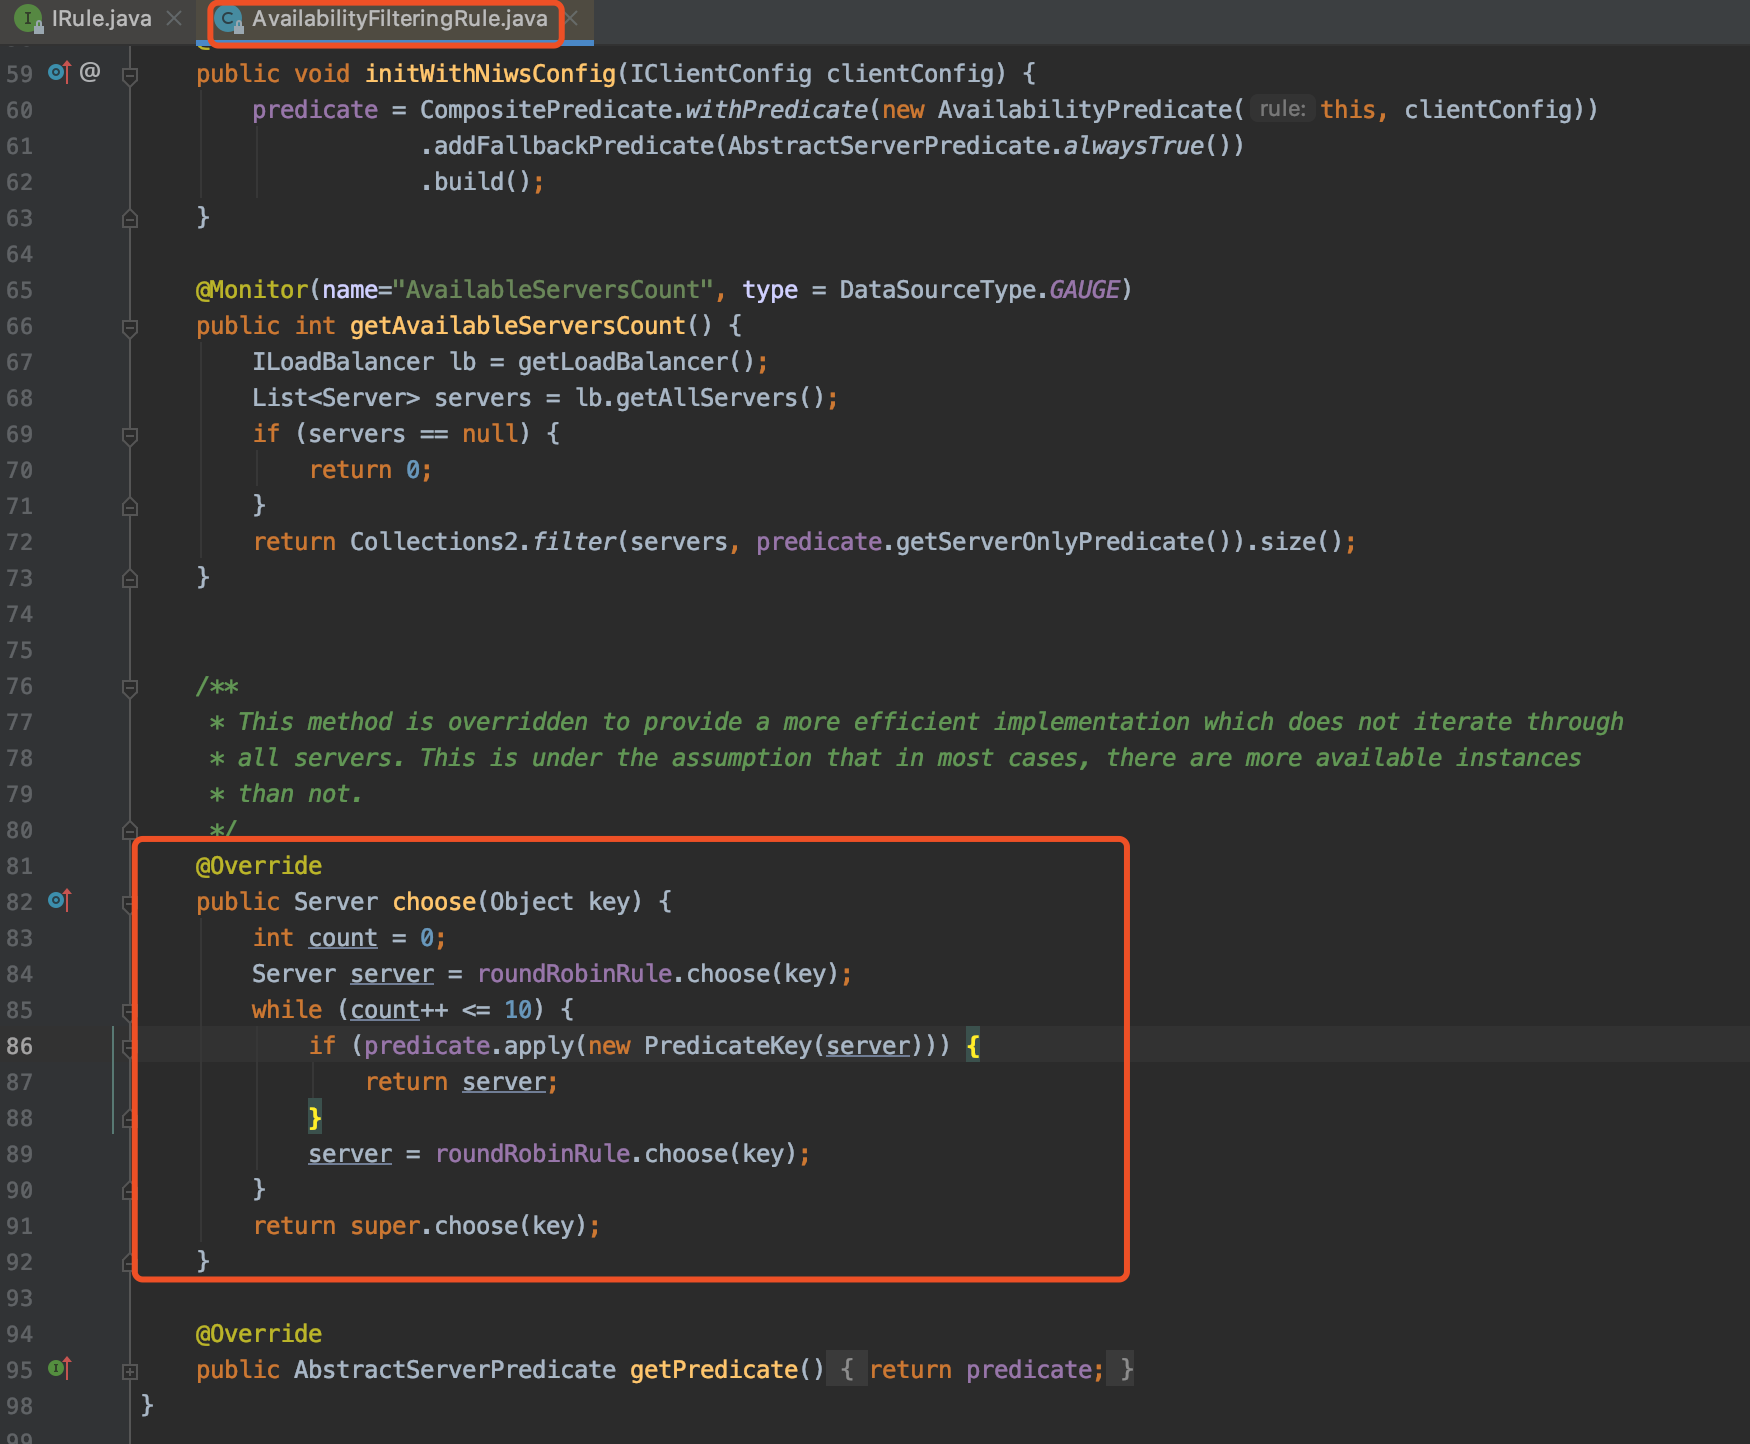
3,AvailabilityFilteringRule
Filter out providers that are in short circuit tripping state due to continuous connection or read failures, or have exceeded connection limits, and use polling policy for remaining providers.
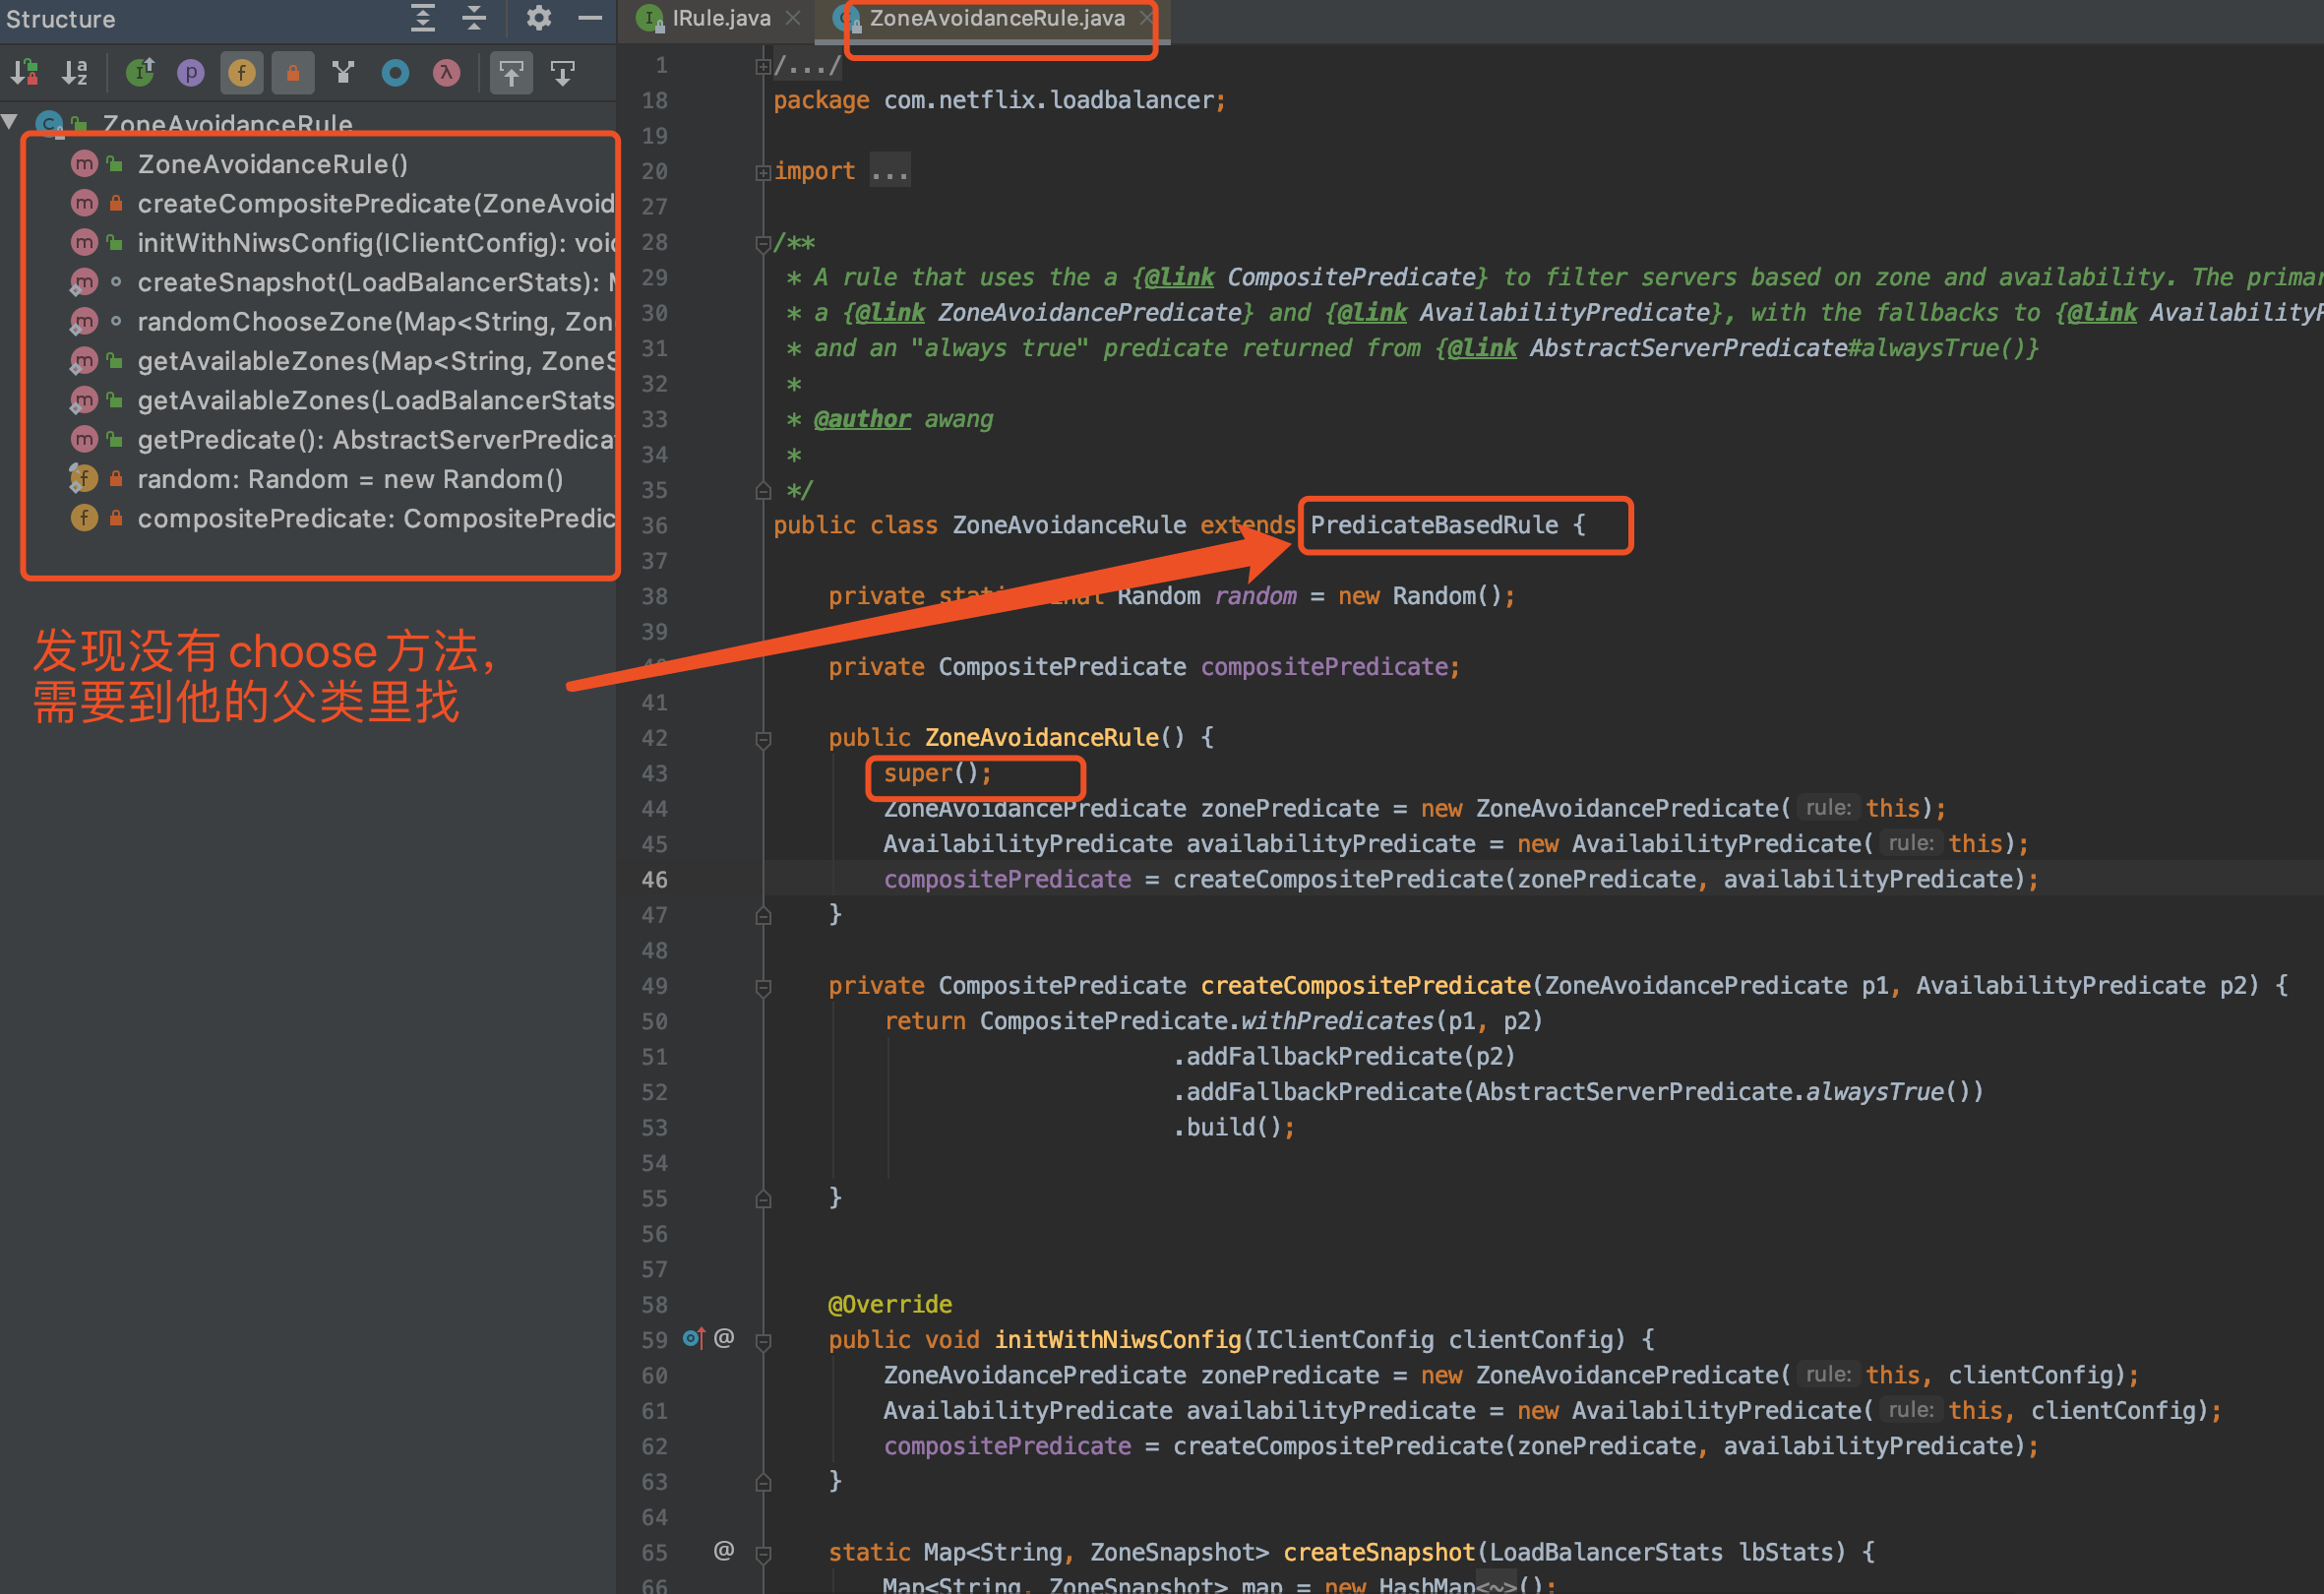
4,ZoneAvoidanceRule
Compoundly determine the performance of the provider in the region and the availability of the provider to select the server.

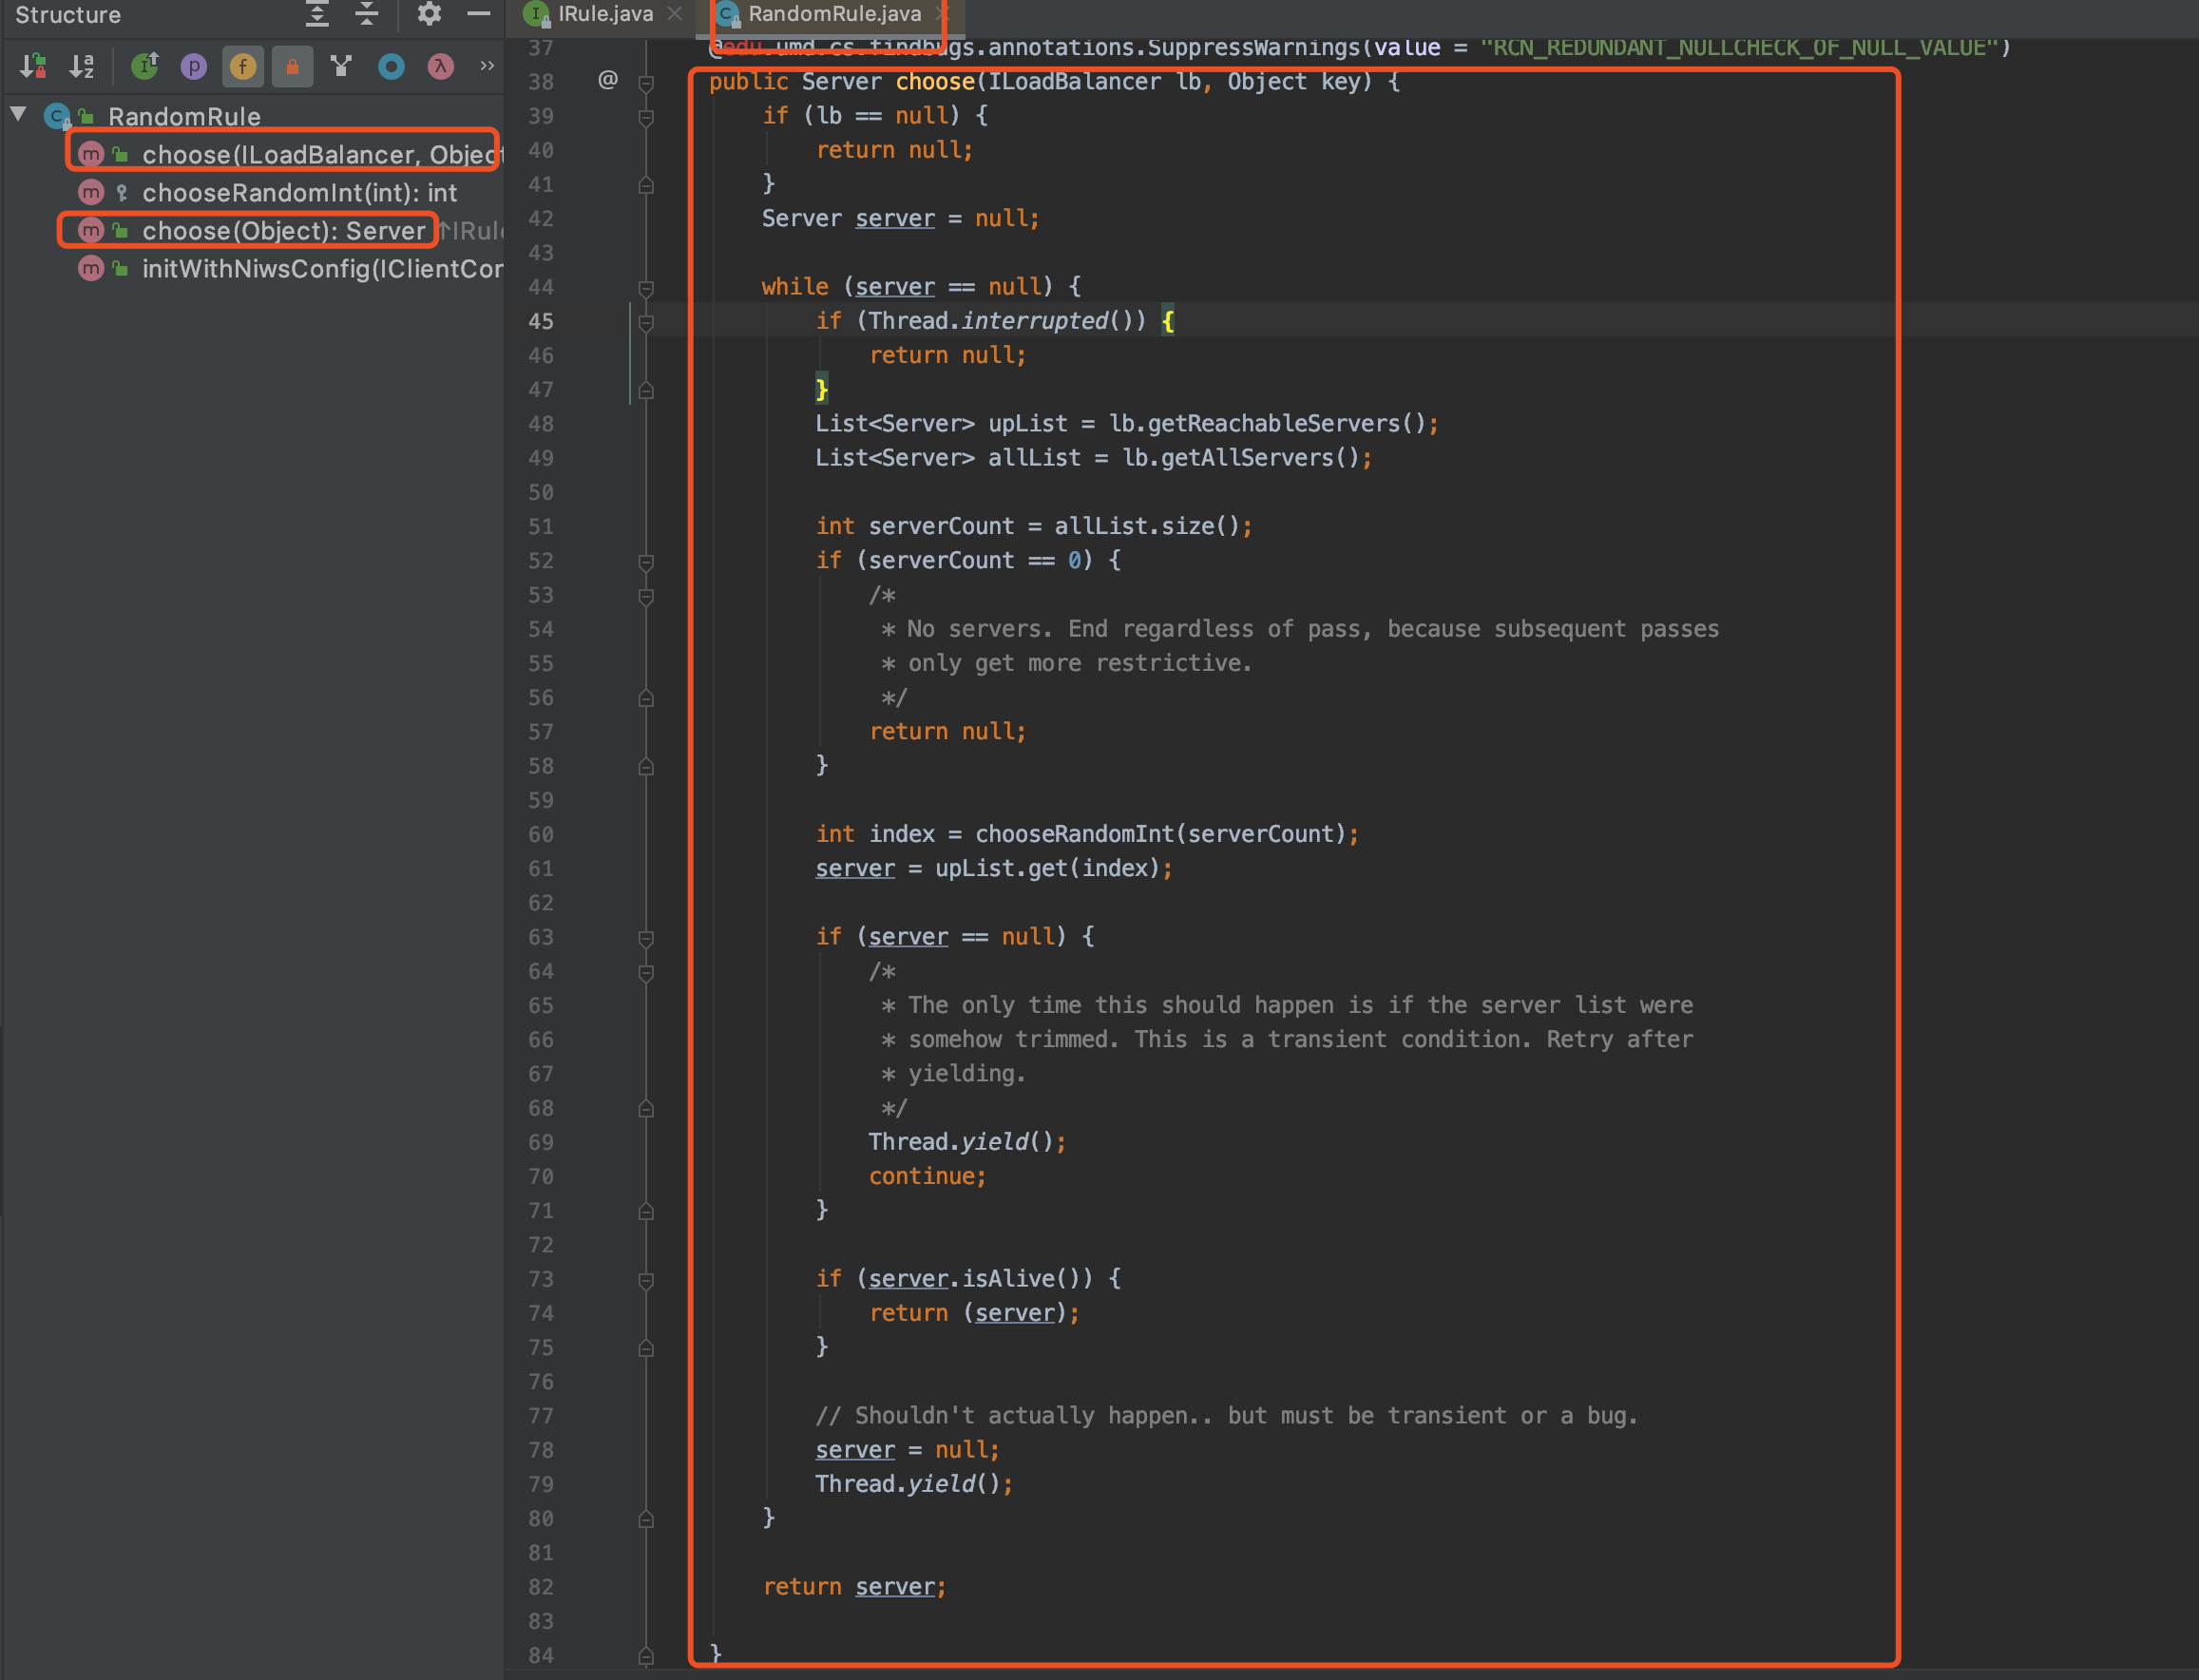
5,RandomRule
A random policy that randomly selects one of all available provider s.
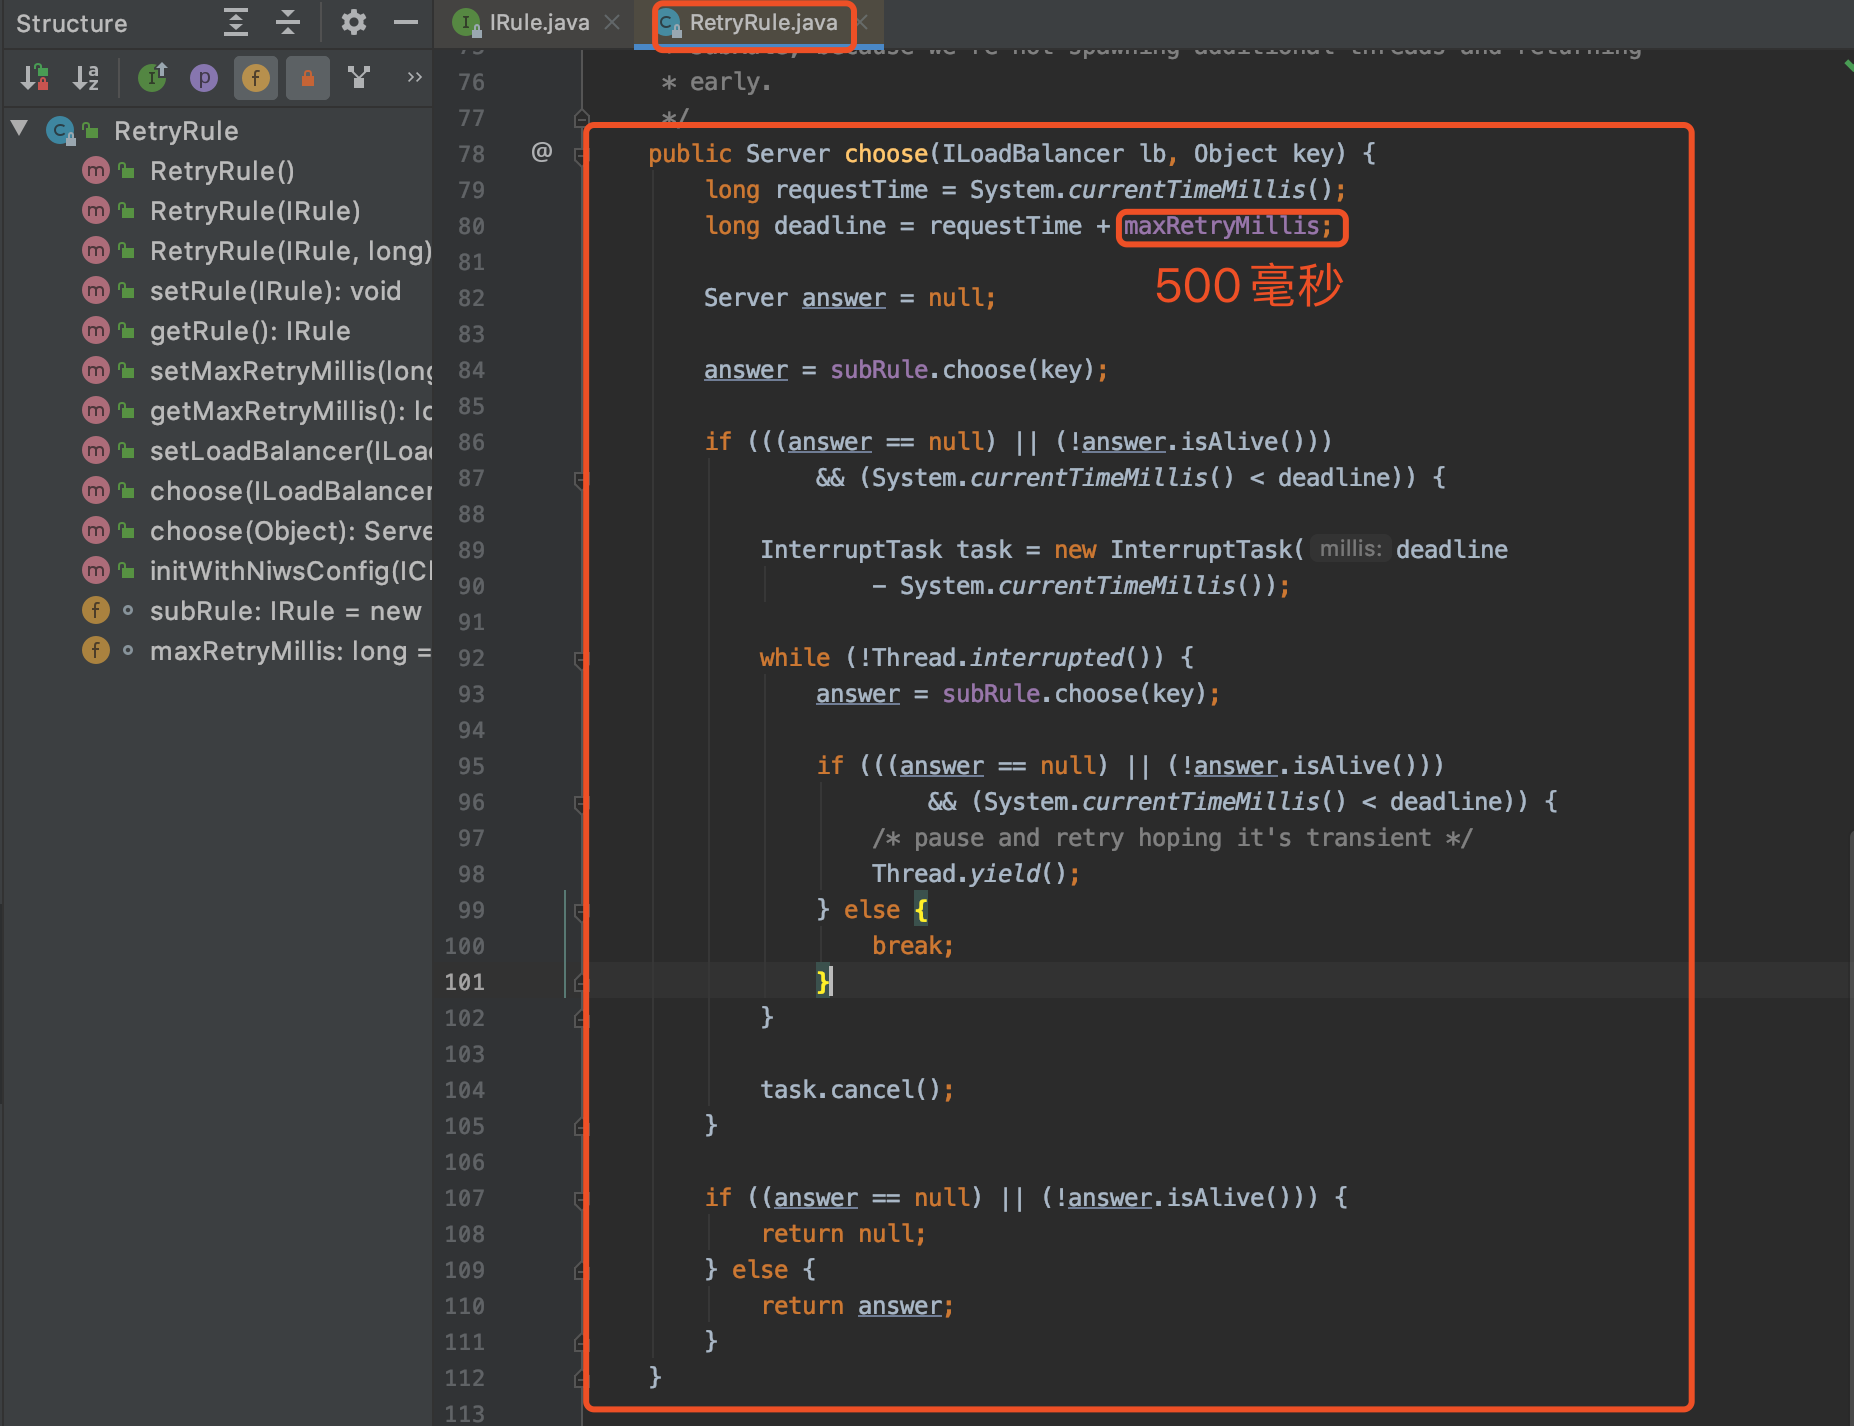
6,RetryRule
Get the provider according to the RoundRobinRule policy first, and then try again within the specified time limit if it fails.The default time limit is 500 milliseconds.
7,WeightedResponseTimeRule
Weight response time policy, which calculates the weight based on the average response time of each provider. The faster the response time, the greater the weight, the higher the probability of being selected. Polling policy is used at startup, and subsequent selection is based on the weight.

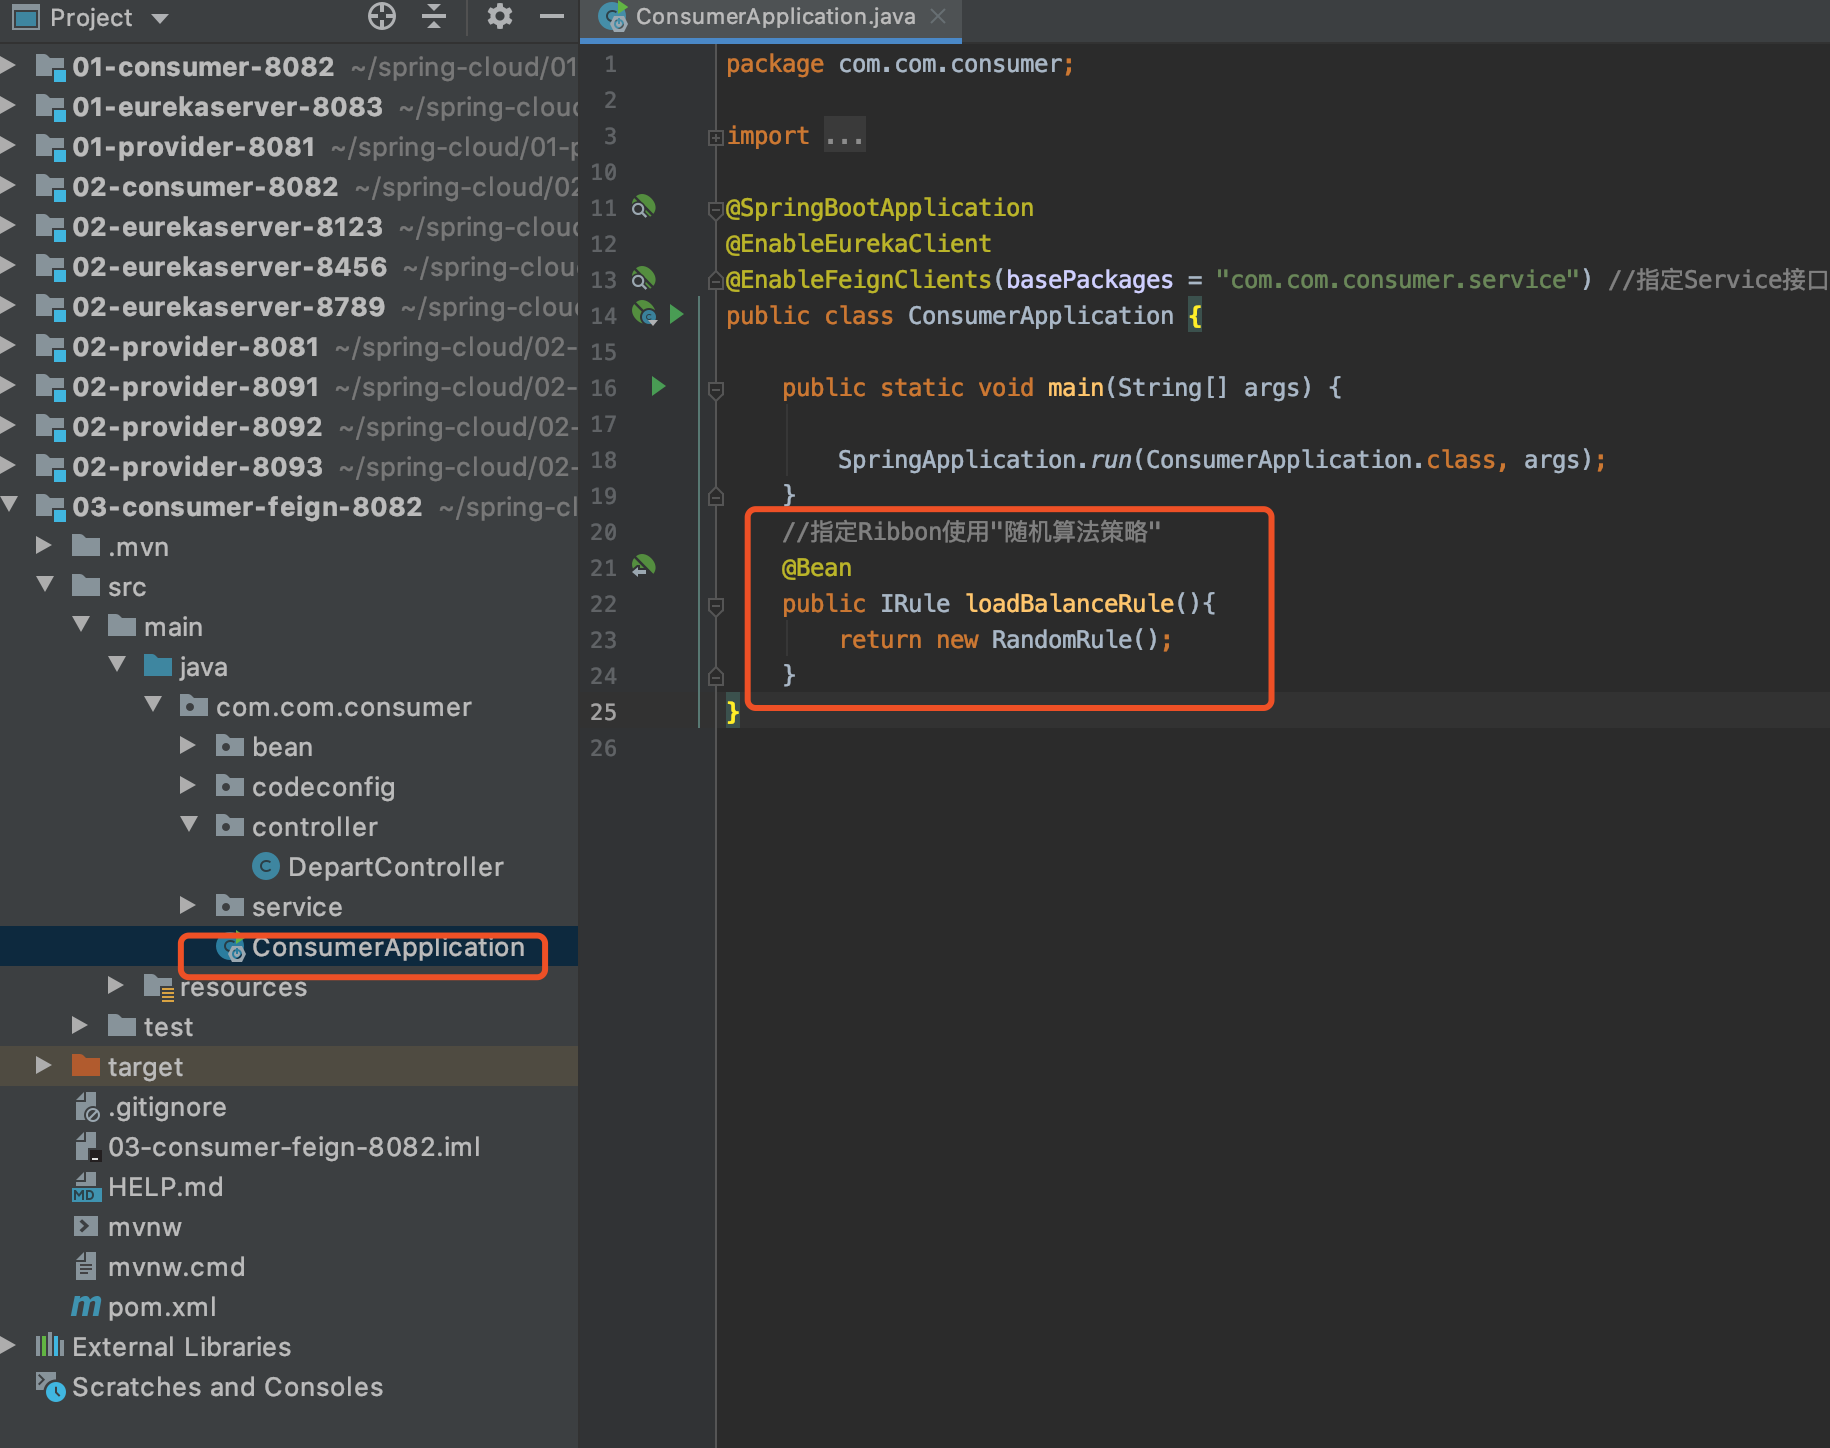
Change Default Policy
Ribbon defaults to RoundRobinRule, which is the polling policy.Simply add the following code to the startup class
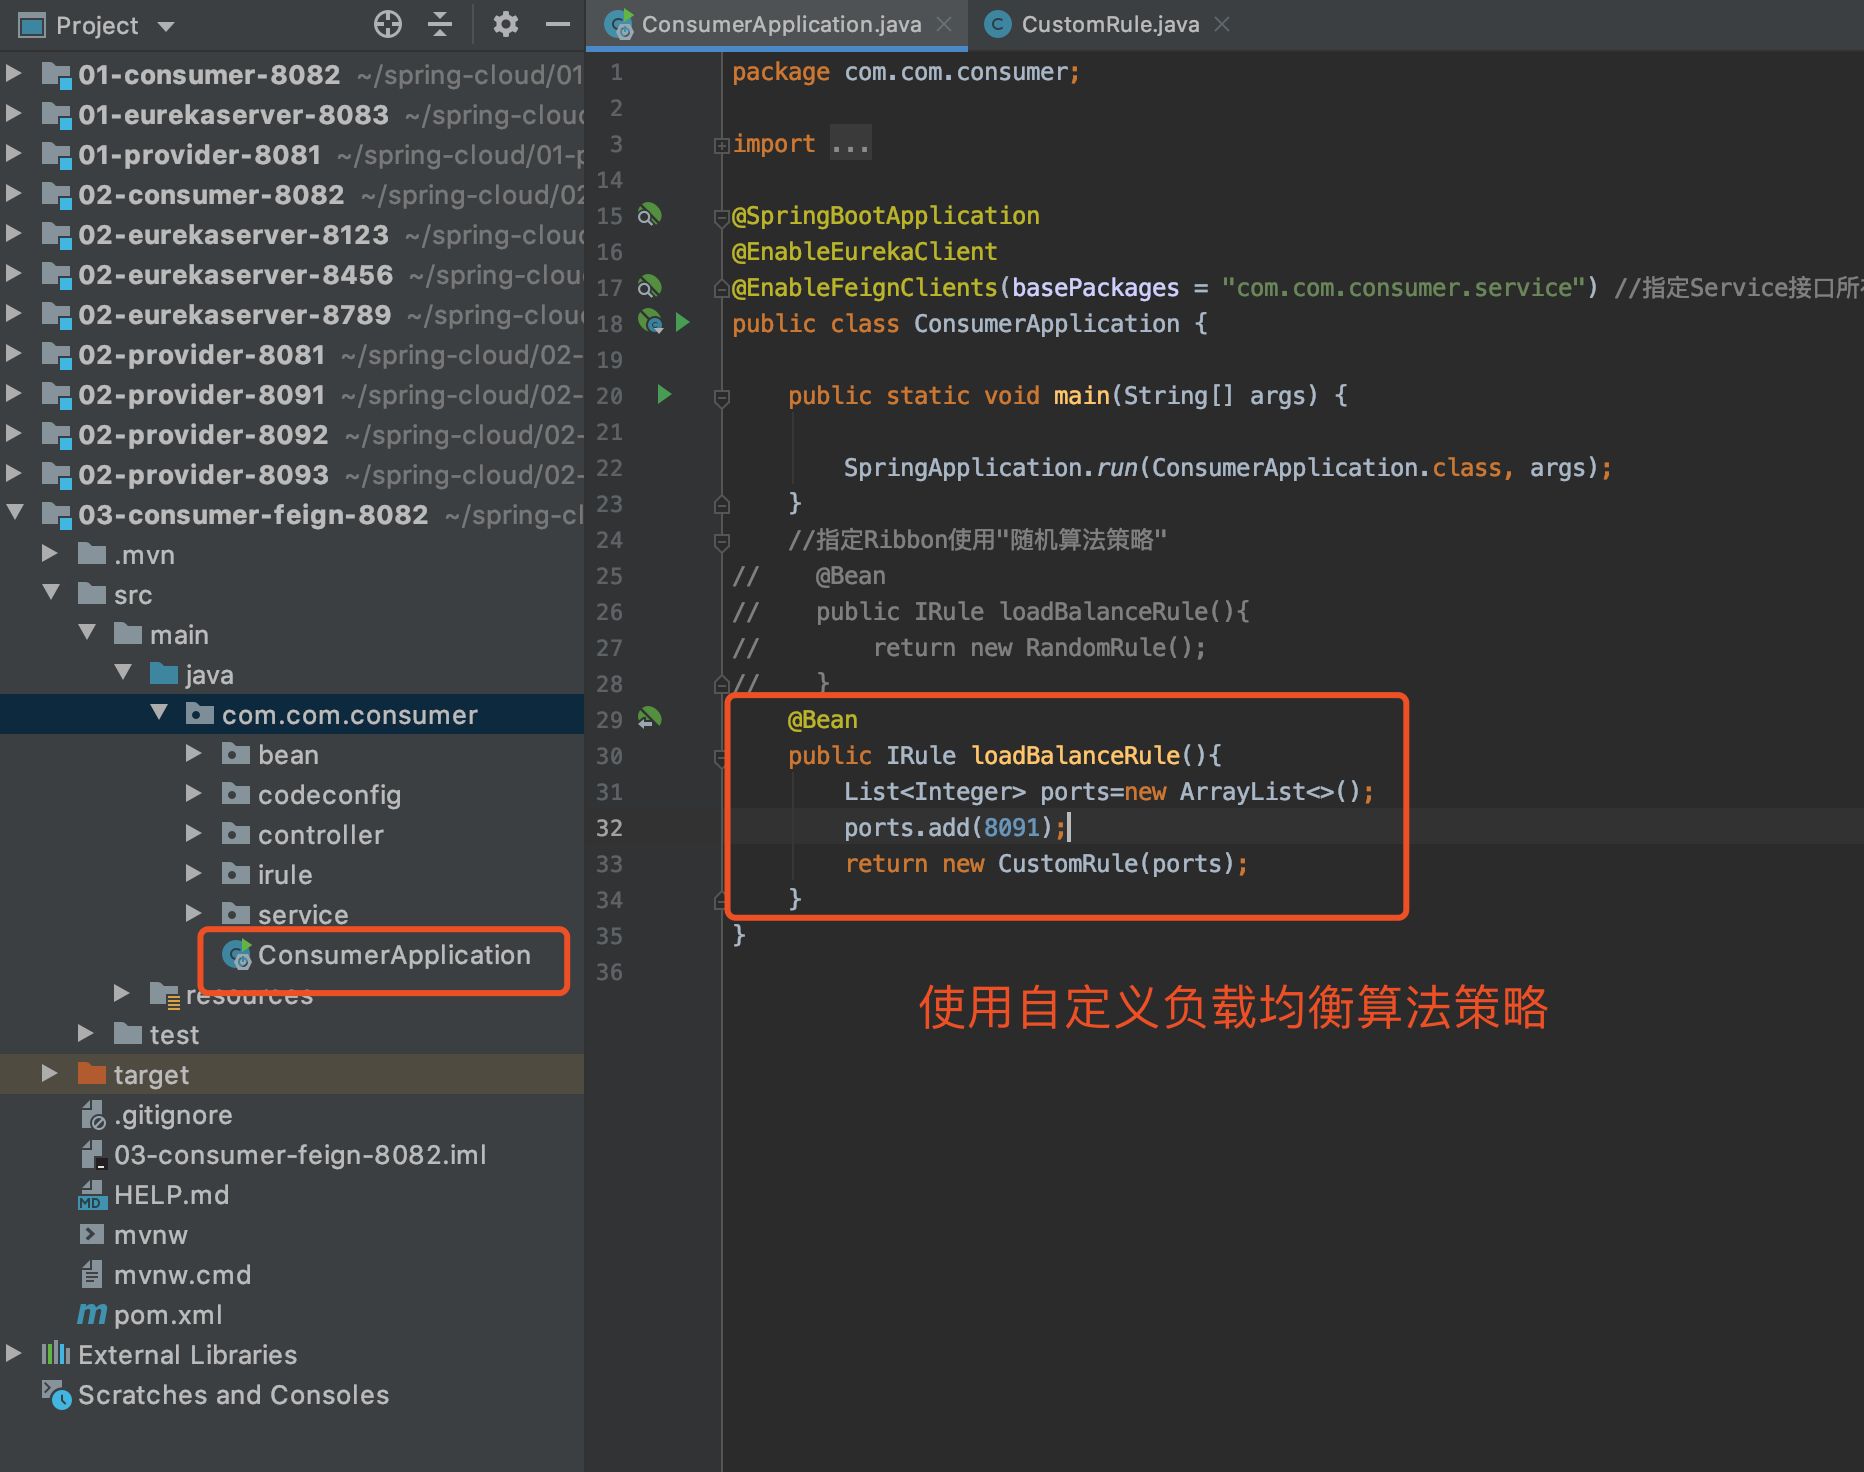
Custom Load Balancing Policy
The idea of this load balancing strategy is to remove the provider with the specified port number from all available providers and make a random selection of the remaining providers.

CustomRule.java
package com.com.consumer.irule;

import com.netflix.loadbalancer.ILoadBalancer;
import com.netflix.loadbalancer.IRule;
import com.netflix.loadbalancer.Server;

import java.util.ArrayList;
import java.util.List;
import java.util.Random;

/**
 * Custom Load Balancing Algorithm
 * Remove the provider with the specified port number from all available providers, and make a random selection of the remaining providers
 */
public class CustomRule implements IRule {
    private ILoadBalancer lb;
    /**
     * To exclude the provider port number collection
     */
    private List<Integer> excludePorts;

    public CustomRule() {
    }

    public CustomRule(List<Integer> excludePorts) {
        this.excludePorts = excludePorts;
    }

    @Override
    public Server choose(Object key) {
        // Get all available providers
        List<Server> servers = lb.getReachableServers();
        // Gets all providers that drain the specified port number
        List<Server> availableServers = this.getAvailableServers(servers);
        // Randomly get available providers from the remaining providers
        return this.getAvailableRandomServers(availableServers);
    }

    // Gets all providers that drain the specified port number
    private List<Server> getAvailableServers(List<Server> servers) {
        // Nothing to exclude Server,All will be available directly Servers Return
        if (excludePorts == null || excludePorts.size() == 0) return servers;
        // Defines a collection to hold the Server
        List<Server> aservers = new ArrayList<>();
        boolean flag;
        for (Server server : servers) {
            flag = true;
            for (Integer port : excludePorts) {
                if (server.getPort() == port) {
                    flag = false;
                    break;
                }
            }
            // if flag by false,Explain the above for Loop Executed break,Describes the currently traversed Server Is to be excluded
            if (flag) aservers.add(server);
        }
        return aservers;
    }

    // Randomly get available providers from the remaining providers
    private Server getAvailableRandomServers(List<Server> availableServers) {
        // Get one[0,availableServers.size()]A random integer of
        int index = new Random().nextInt(availableServers.size());
        return availableServers.get(index);
    }


    @Override
    public void setLoadBalancer(ILoadBalancer lb) {
        this.lb = lb;
    }

    @Override
    public ILoadBalancer getLoadBalancer() {
        return lb;
    }
}
Hystrix Fusing Mechanism and Service Degradation
Introduction to Service Rupture
To understand service disruption, you need to first understand the avalanche effect and service avalanche.
Avalanche effect
The avalanche effect is prone to occur in Distributed Systems
In IO services, assume that service A depends on service B and service C, while service B and C may depend on other services. Continuing will cause the call link to be too long, technically referred to as 1->N fan out.

If one or more of the invoked subservices on A's link are unavailable or have a high latency, the request to invoke A's service will be blocked.
Blocked A requests consume process, IO and other resources of the system. As more requests for A services and more computer resources are consumed, system bottlenecks will appear, making other requests unavailable and eventually causing the business system to crash. This phenomenon is called avalanche effect.
For example, a car production line that produces different cars requires different parts.If a part cannot be supplied in time for a variety of reasons without that part, many of the subsequent parts that have arrived will not be installed.A missing part prevents the whole car from assembling, leaving it in a state of waiting for the parts to be assembled until they are in place.
At this time, if there are many models that need this part, the whole factory will be in a waiting state, and many automotive parts have been generated previously, other parts that cannot be installed at this time will consume a lot of money, sites and other resources because of waiting.
One component eventually paralyzes all production, which is the avalanche effect.
Service avalanche
The avalanche effect occurs in a distributed SOA(Service-Oriented Architecture) system and is referred to as a service avalanche.
A large number of user requests are unexpectedly all blocked, i.e. avalanche of the service.
An example is a system that relies on 30 microservices and 99.99% of each service is available.Then the availability of the whole system is 99.99% to the 30th power, which is about 99.7%.Why 30 power?If the system depends on two micro-services and the availability of one micro-service is 99.99%, then the availability of the combination of two micro-services is 99.99%*99.99%. Similarly, the availability of 30 micro-services is 99.99% for each micro-service, and the availability of these 30 micro-services is 99.99% for 30 times.
That is, there will be a 0.3% failure rate for the entire system.If there are 100 million requests, 300,000 failures will occur.As the number of service dependencies increases, the probability of service instability increases exponentially.
Fuse mechanism
The melting mechanism is an effective solution to service avalanche.When the provider requested by the service consumer is temporarily unable to provide the service, the consumer will be blocked and occupy the request link for a long time.To prevent this from happening, the system will disconnect this request link directly through a circuit breaker when a threshold limit is set and the provider's service is not yet available.This solution, like a fuse, is called a fuse mechanism.
Introduction to Hystrix
Official address
https://github.com/Netflix/Hystrix
Introduction to Service Demotion
In accessing distributed systems, the following two situations often occur:
1. When the overall load of the entire micro-service architecture exceeds the preset threshold, or when upcoming traffic is expected to exceed the preset threshold, we can delay or suspend the use of some unimportant or non-urgent services in order to ensure that important or basic services can function properly.This is service break, similar to service break with active pulling of the gate.At this point, if consumers consume these delayed/suspended services, they will be blocked and waiting for a response from the provider.
2. When a consumer accesses a micro-service, the provider responds too slowly to the consumer due to network or other reasons, and the service times out or there is no response at all, this is also a kind of service break, similar to service break when the fuse automatically breaks.The consumer is then forced to block and wait for a response from the provider.
In the event of a service crash, not only is the user experience poor, but it also consumes a large amount of system resources.To solve this problem, a scenario is set up when writing consumer-side code: a default, temporary preprocessing scenario on the consumer side that gives consumers an acceptable result.That is, for users (referring to people, not consumers), the services they consume are not provided by the providers who should provide the services, but by service consumers temporarily, and the quality of services has been degraded.The "service breakdown" on the provider side and the "local service" on the consumer side constitute the "service downgrade".
Simply put, service downgrade refers to a situation where the consumer side of a service invokes local operations to temporarily give the results of user effects in order to increase the user experience and ensure the proper functioning of the real system when the provider of the service cannot provide the service properly.
Hystrix Service Demotion
Overall steps
- Add hystrix dependencies
- Modify the processor, add the @HystrixCommond annotation to the processor method, and add the processing method
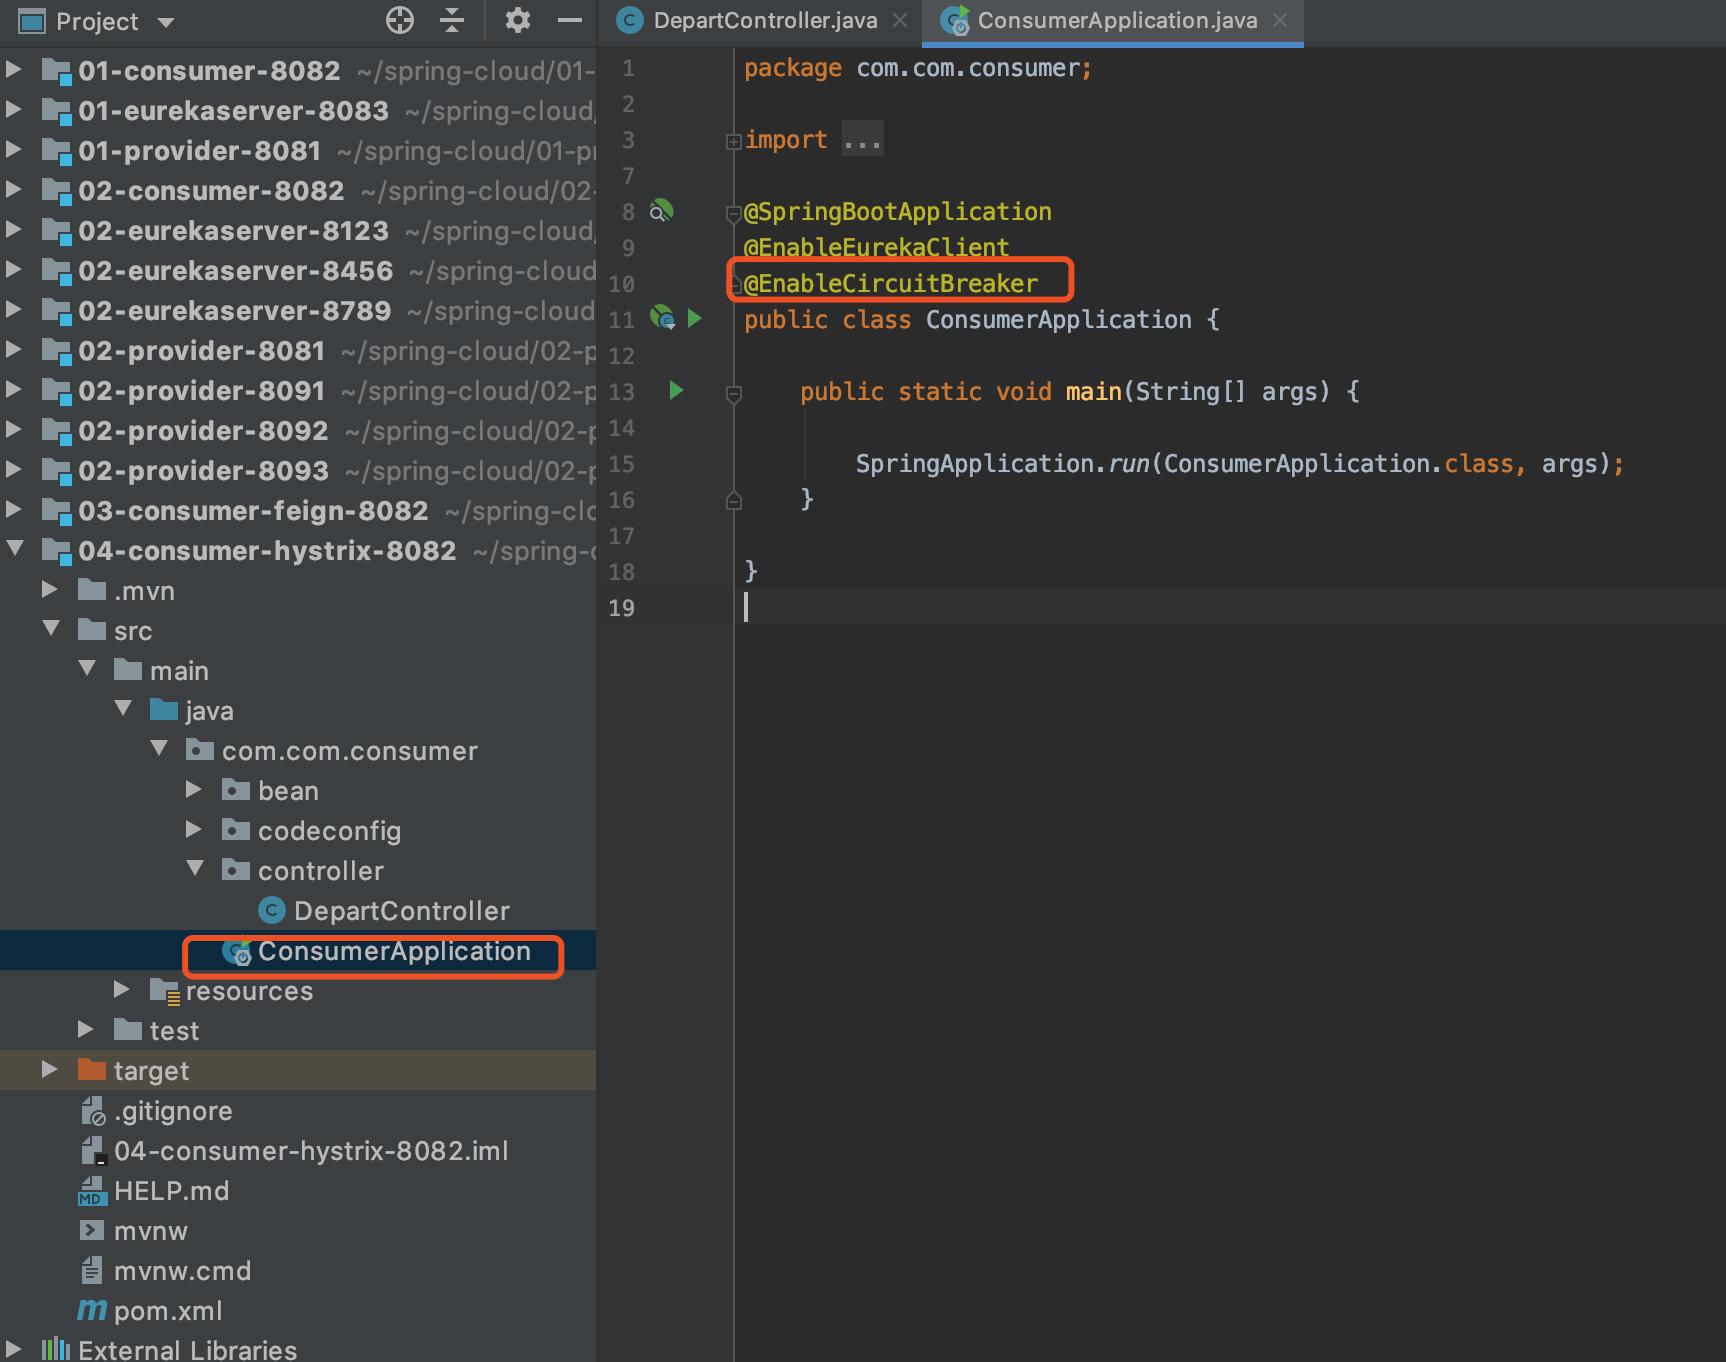
- Add the @EnableCircuitBreaker annotation to the startup class
Create Consumer Engineering
1. Create a project
Copy 02-consumer-8082 and rename 04-consumer-hystrix-8082
2. Add Dependency
<!-- hystrix rely on -->
        <dependency>
            <groupId>org.springframework.cloud</groupId>
            <artifactId>spring-cloud-starter-netflix-hystrix</artifactId>
            <version>2.2.2.RELEASE</version>
        </dependency>
3. Modify Processor

Note: In practice, a method corresponds to a processing function
4. Add annotations on the startup class
test
For demonstration purposes, only open the eureka Notes Center and consumers
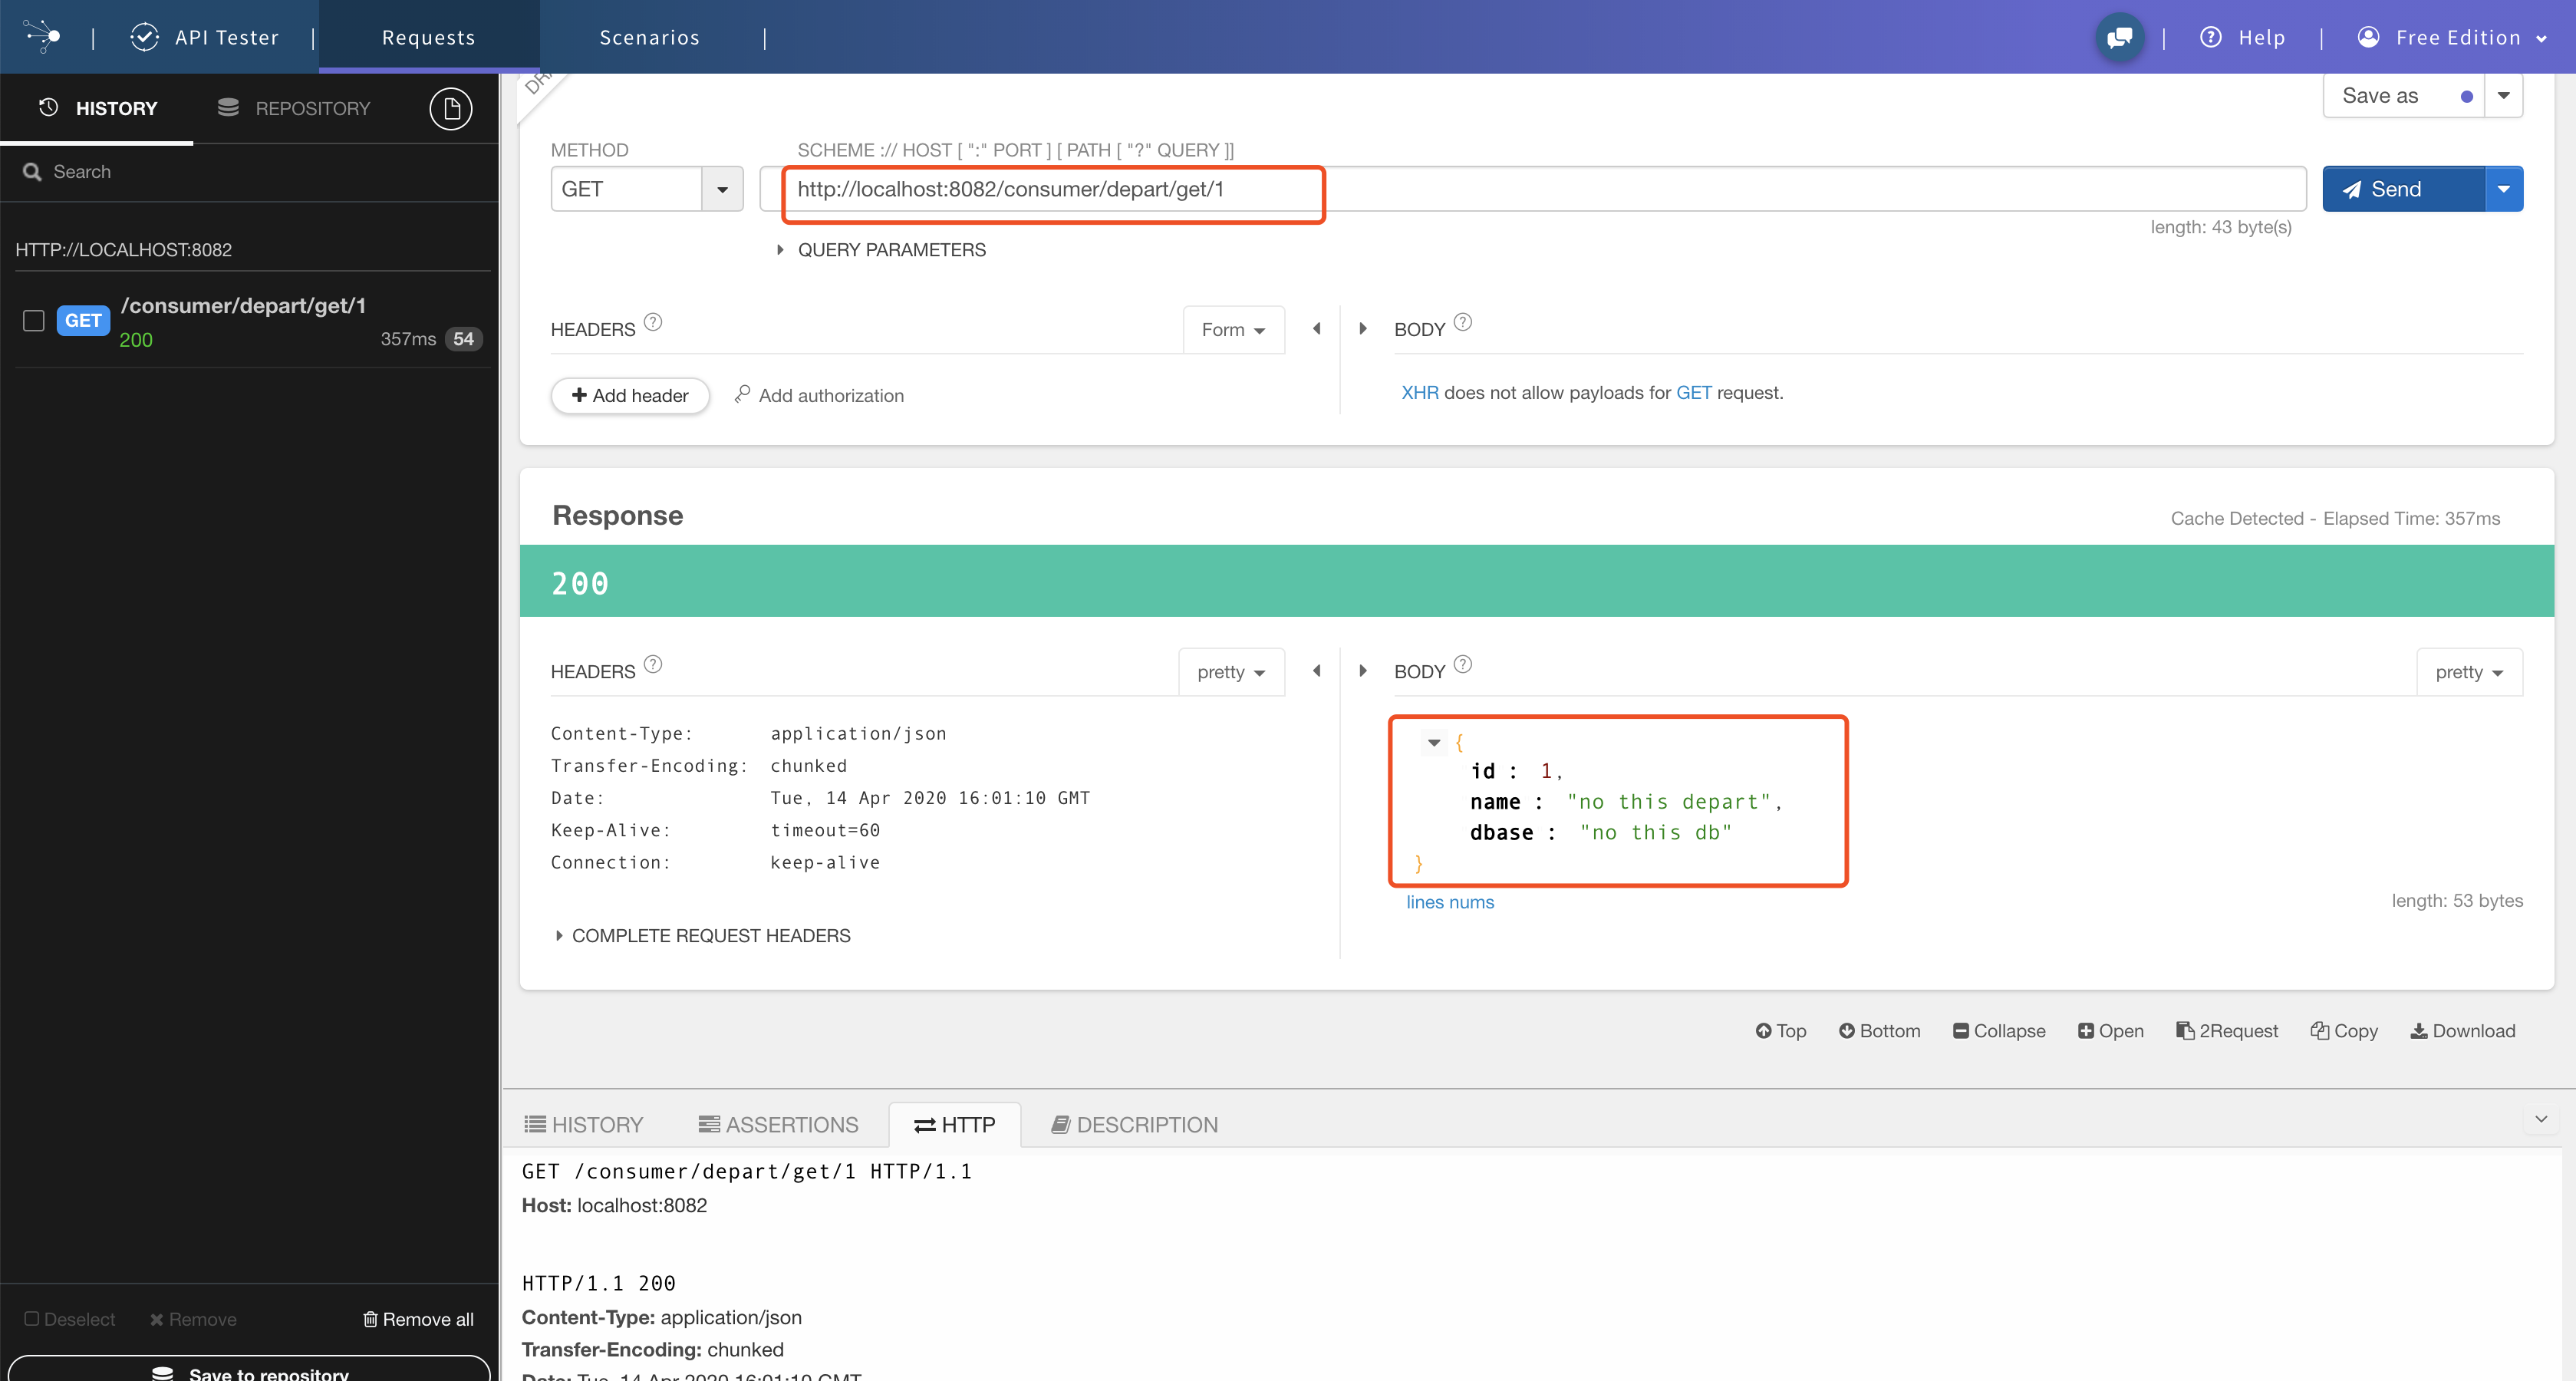
Hystrix+Feign Service Demotion
Overall steps
- Define the demotion processing class under the package where the Feign interface is located
- Specify the demotion processing class to use in the Feign interface
- Turn on Feign support for Hystrix in the configuration file
Create Consumer Engineering
Copy 03-consumer-feign-8082 and rename 04-consumer-feign-hystrix-8082
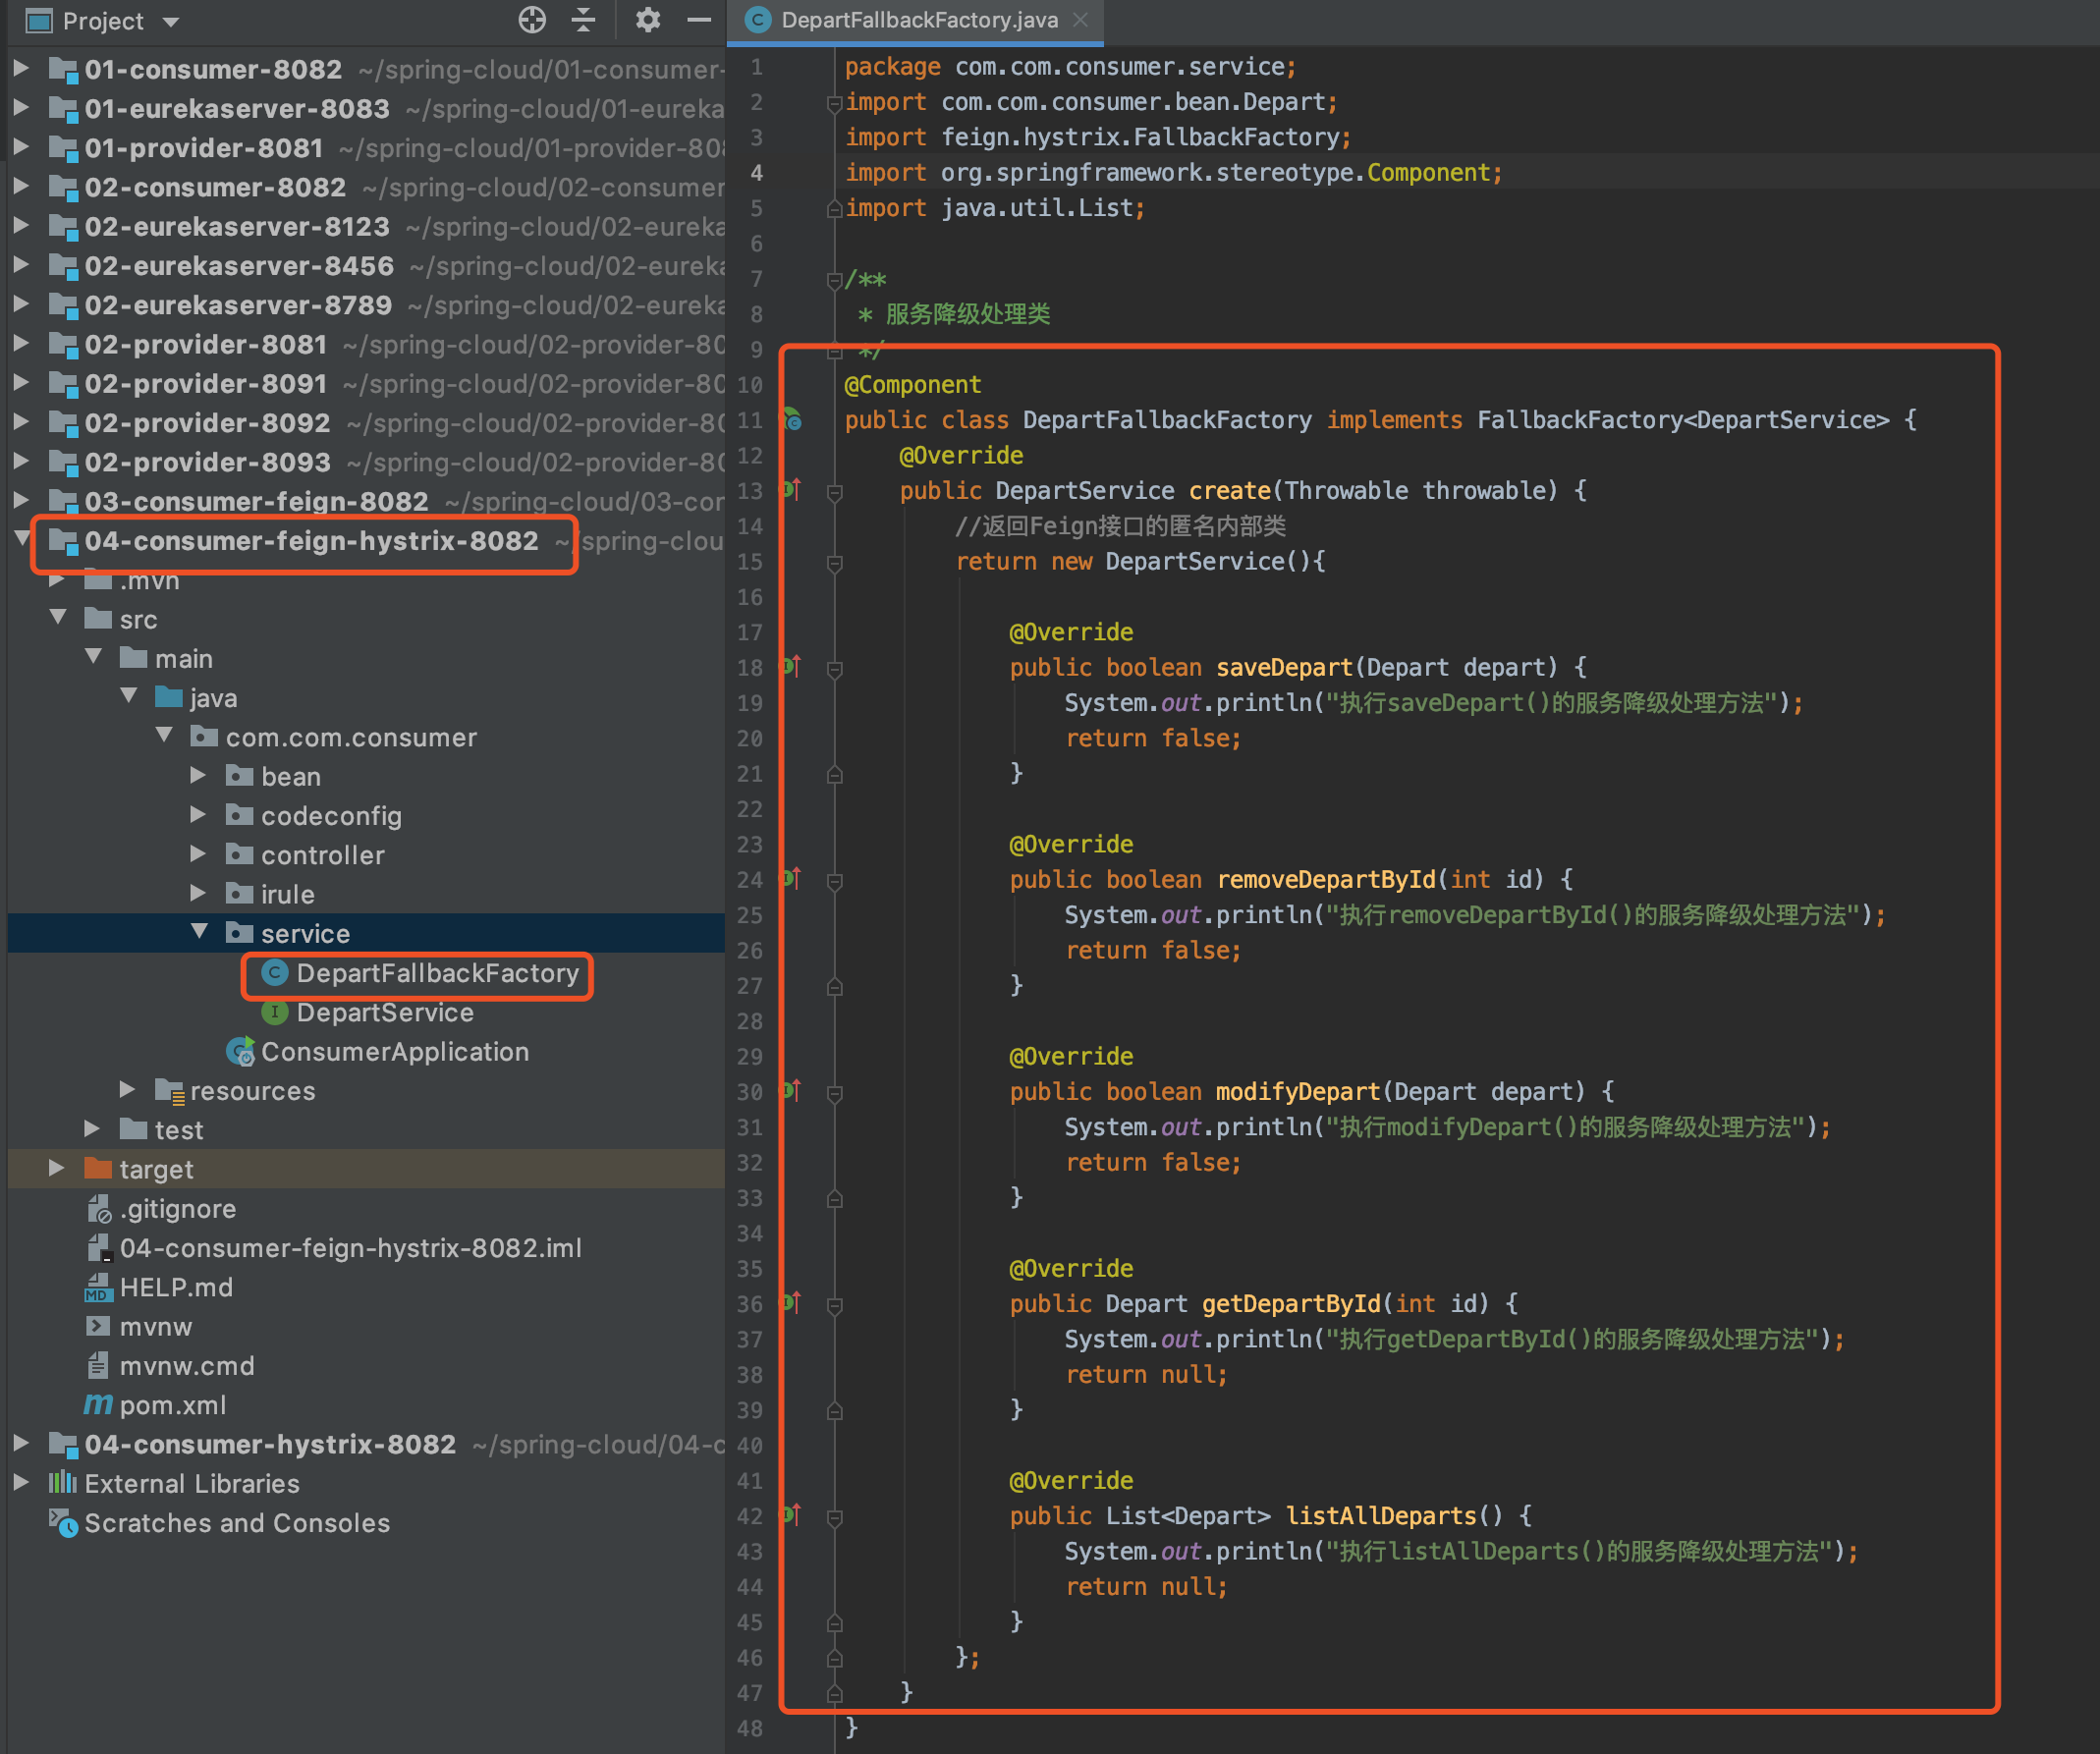
Define the demotion processing class
The downgrade processing class needs to implement the FallbackFactory interface, which is generic to the Feign interface.This class can be defined under any package, but is generally defined under the same package as the Feign solution.
This class requires the @Component annotation to indicate that it will be handed over to the Spring container for management.
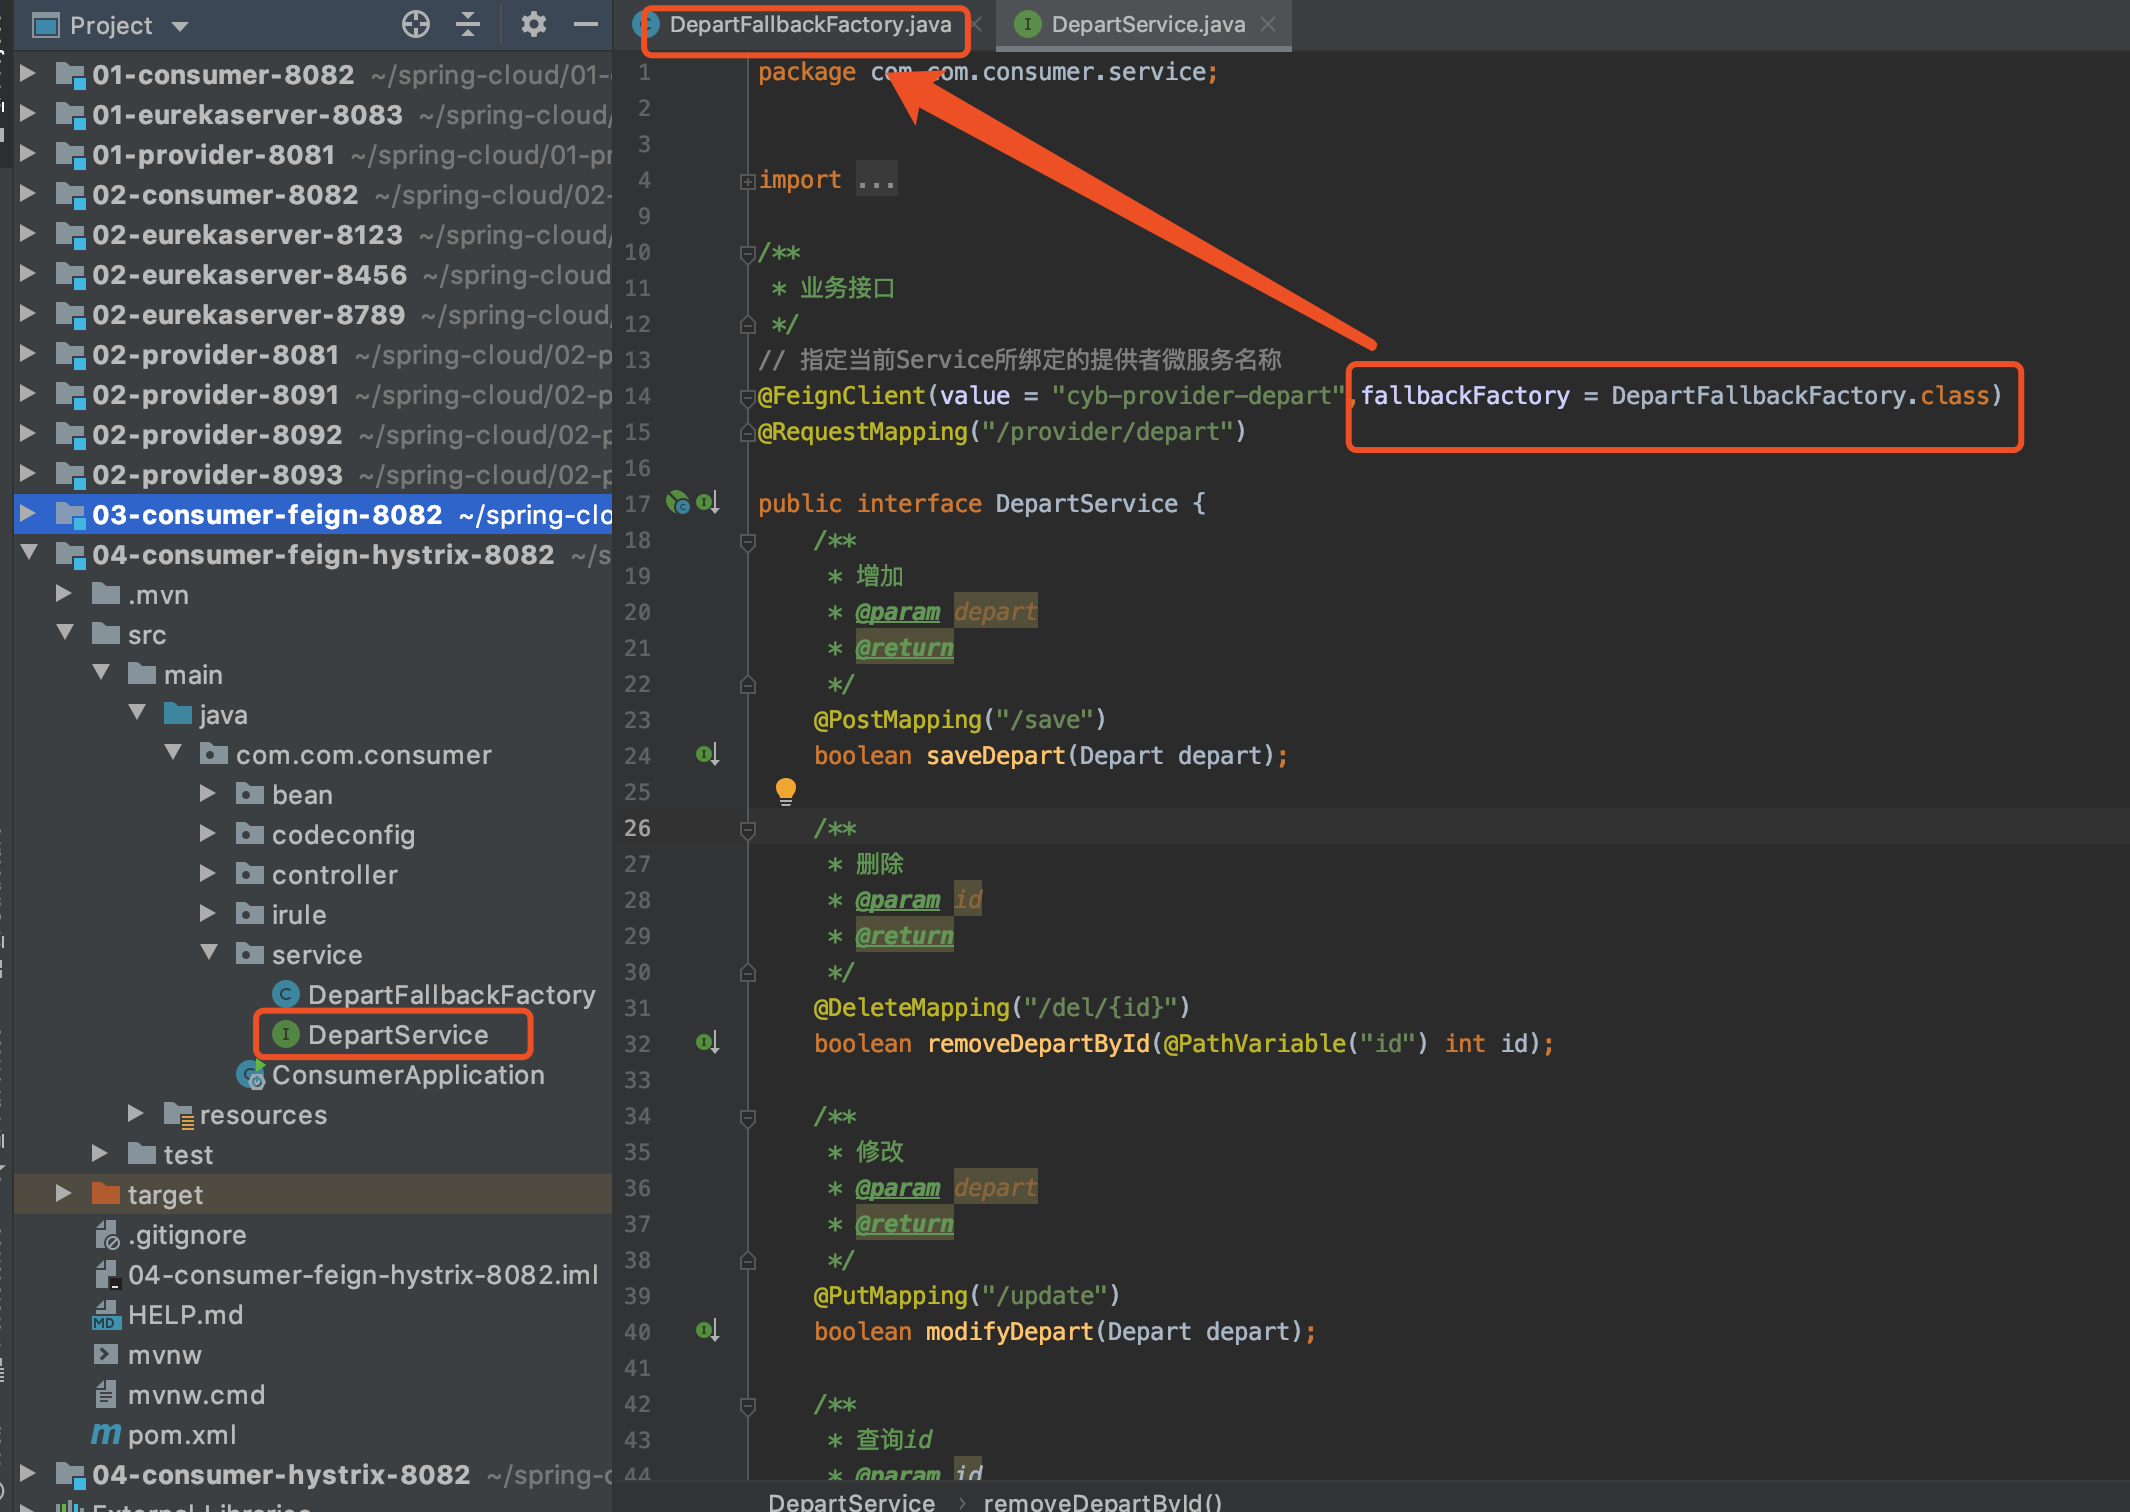
Specify a demoted processor class on an interface class
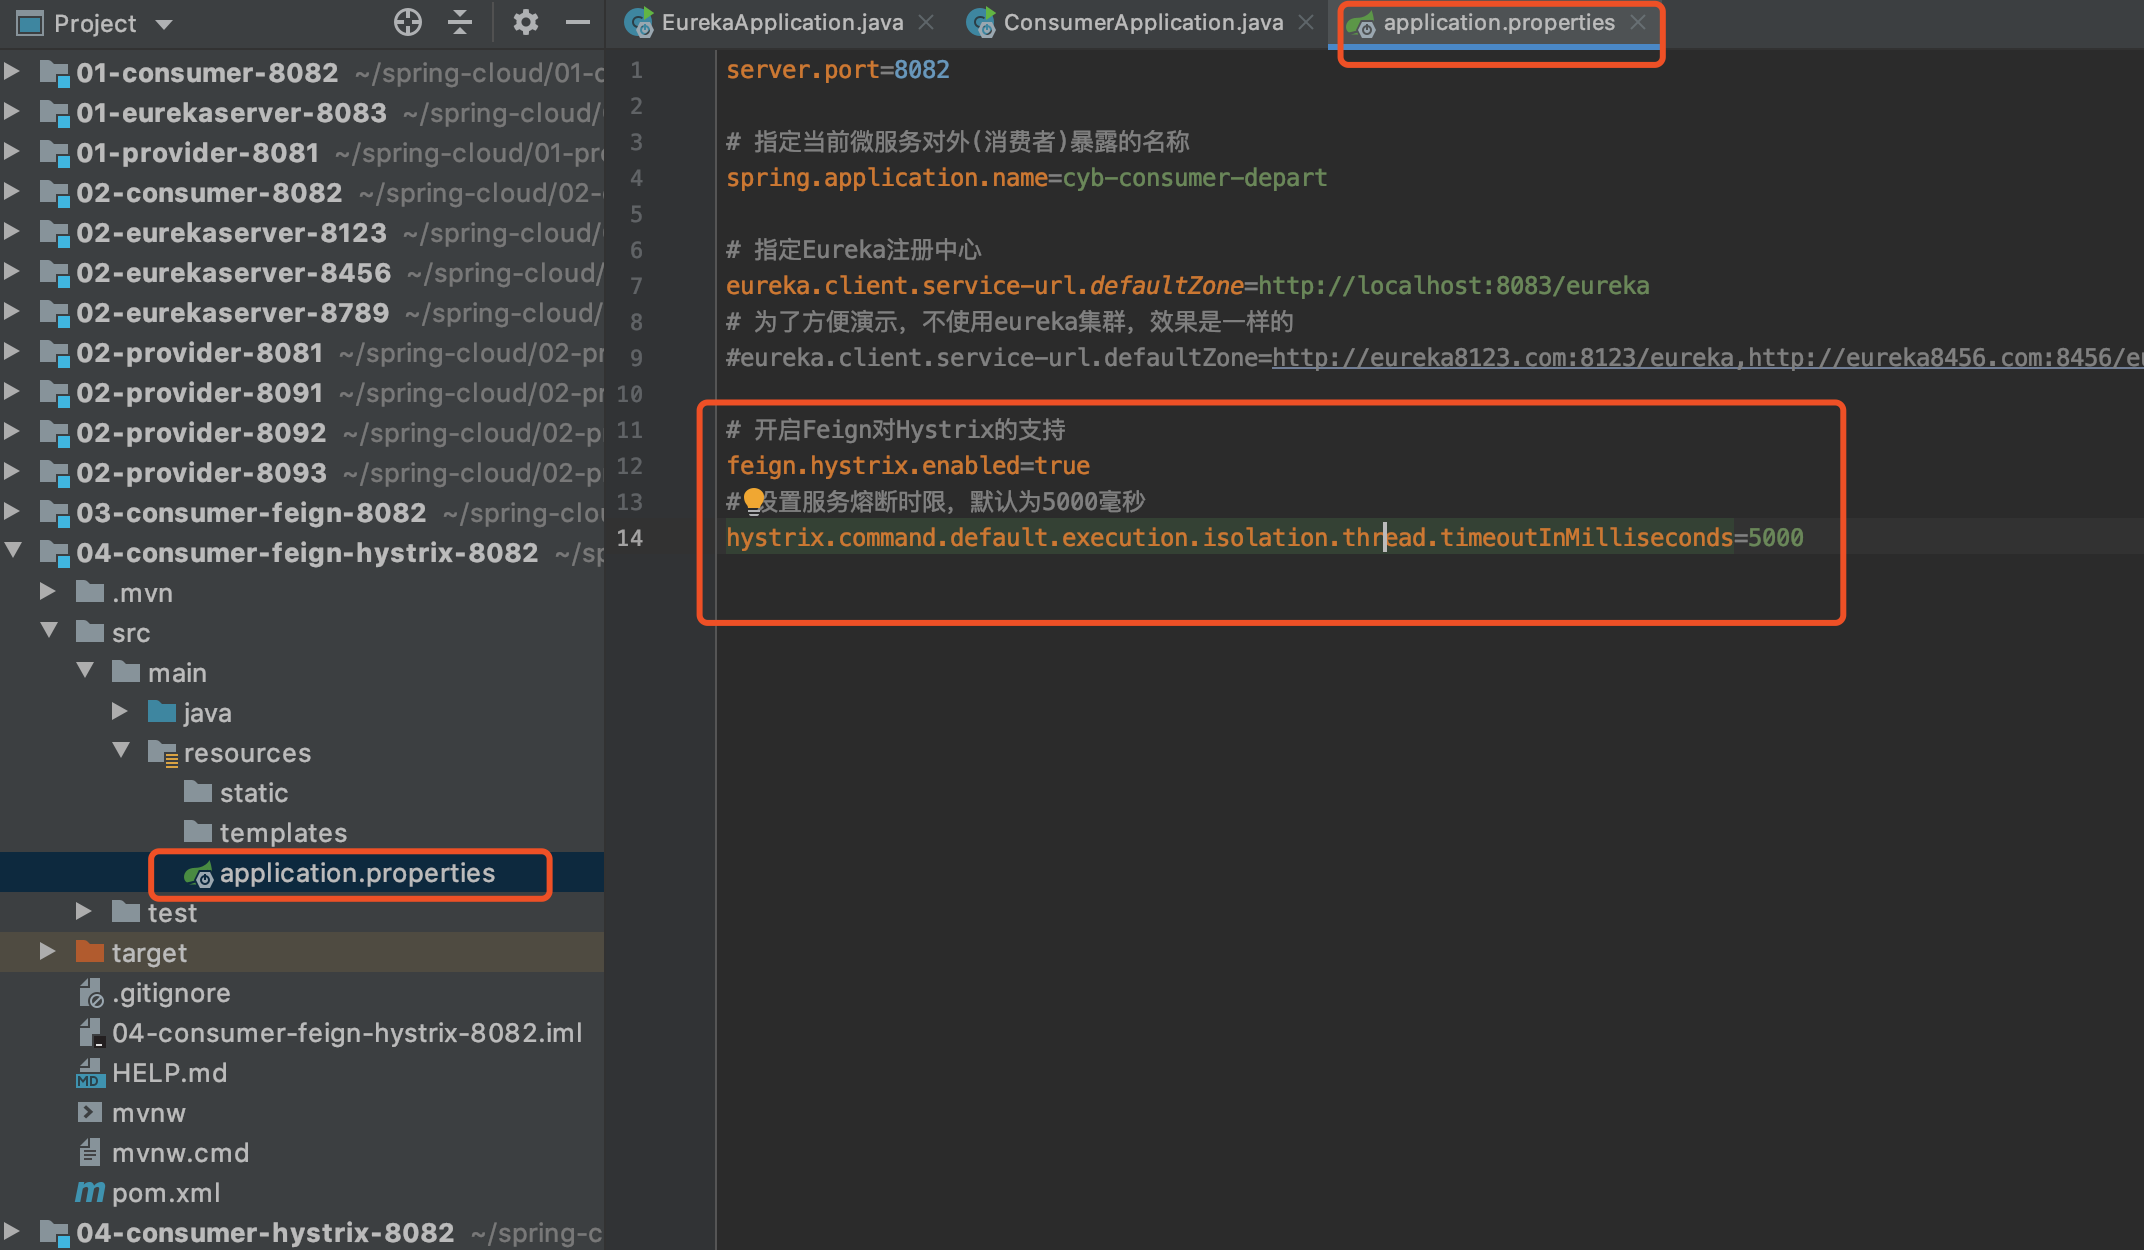
Modify Profile
Add the following to the configuration file without automatic prompting
test

Note: Method level priority is less than class level priority
Gateway Service Zuul
Official address
https://github.com/Netflix/zuul
Simple summary
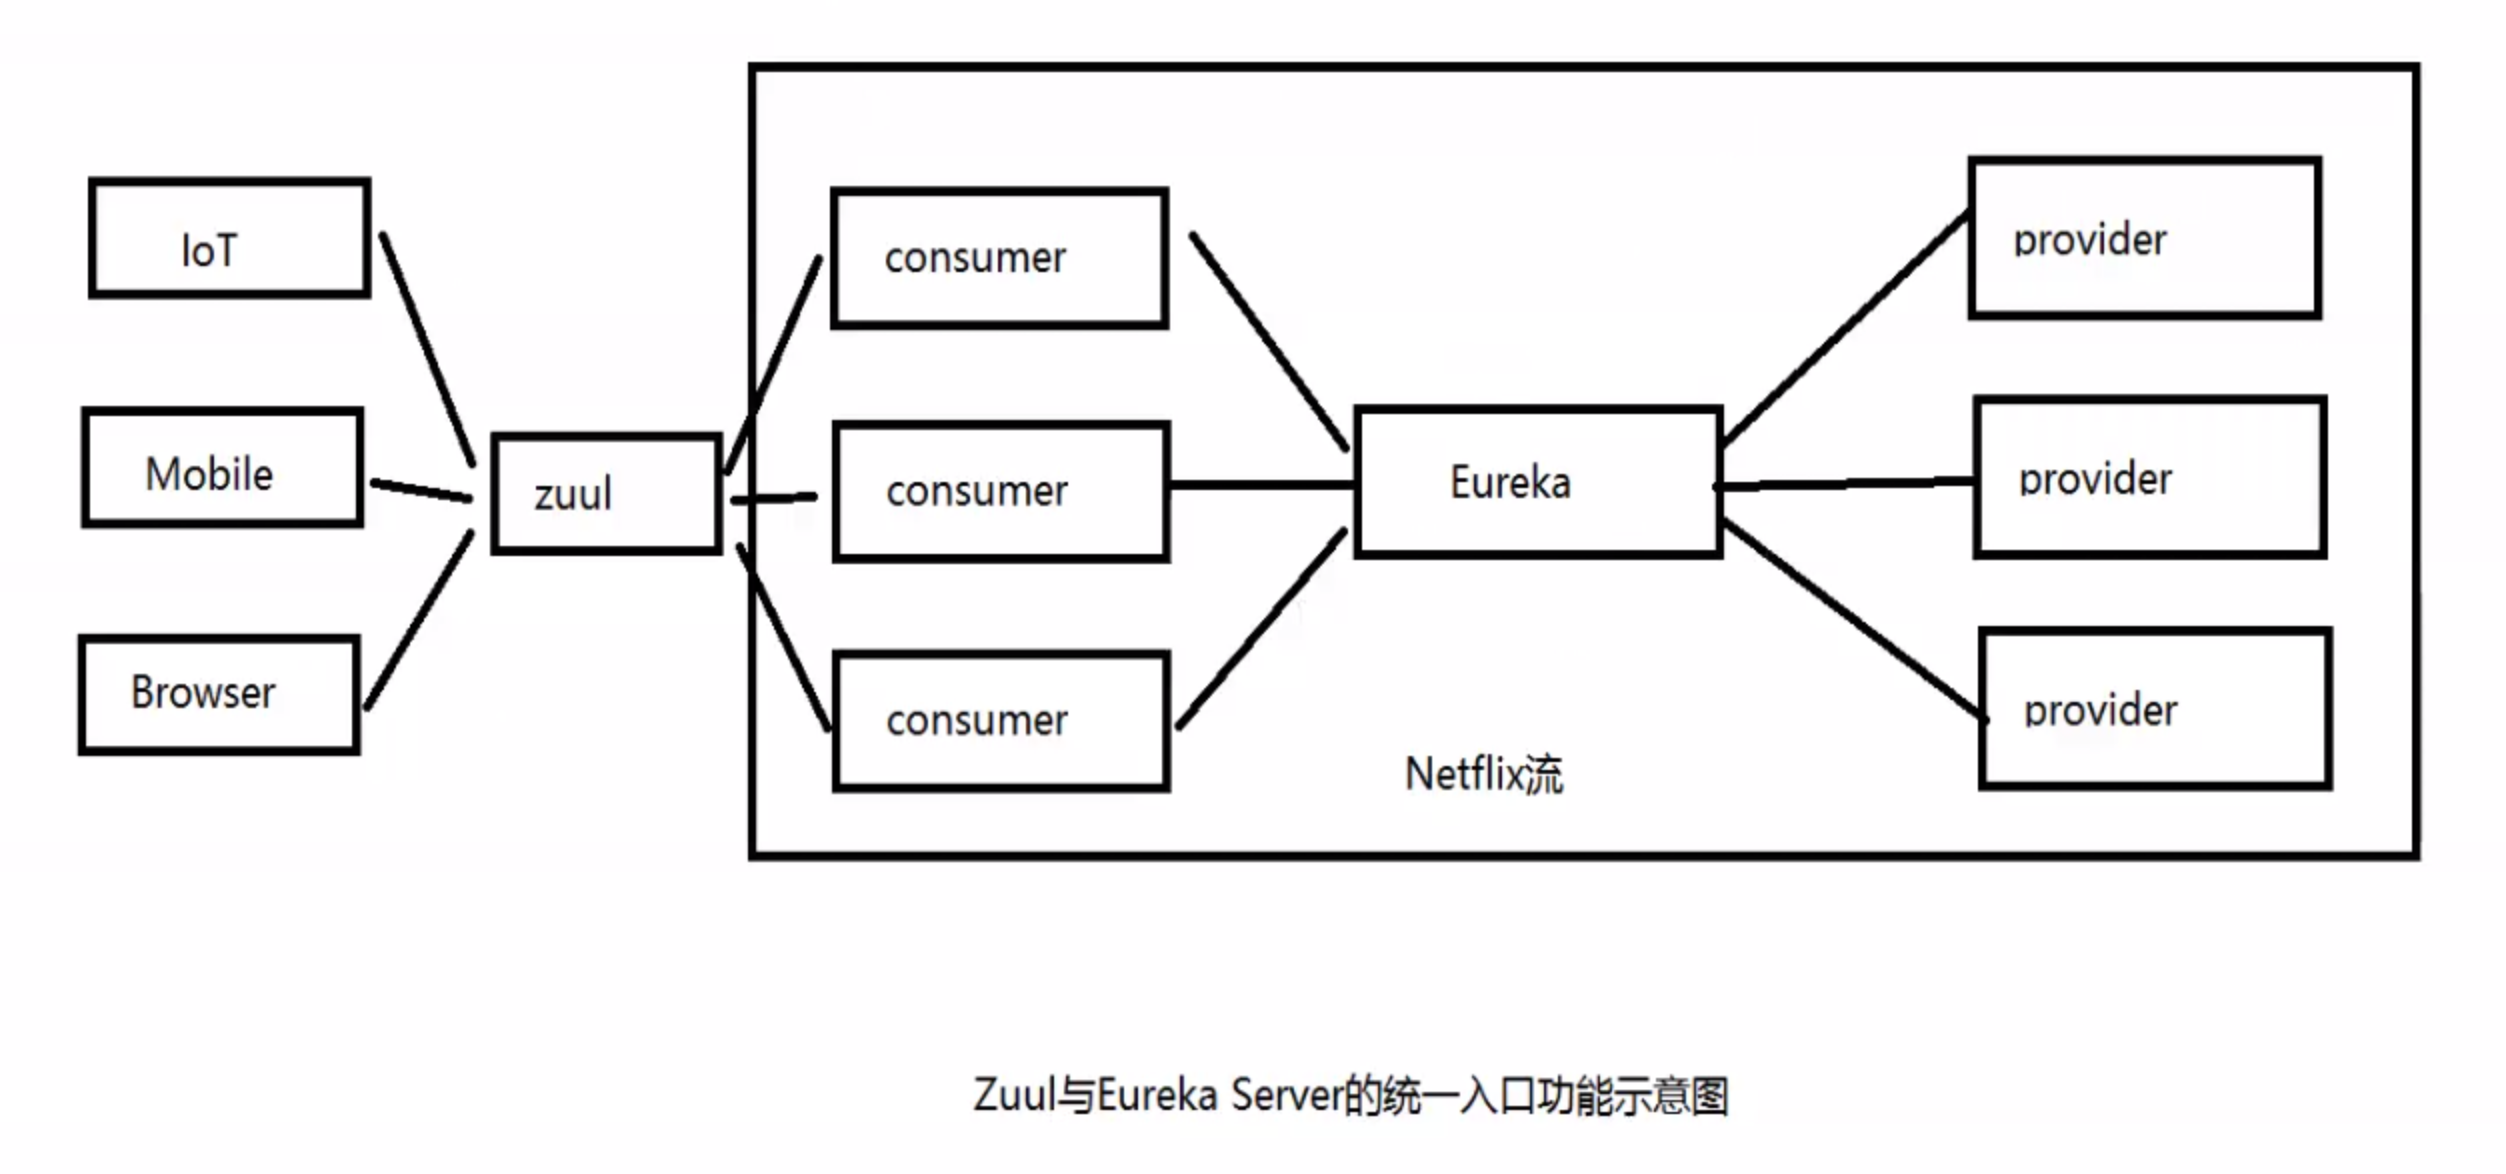
Zuul mainly provides the ability to filter the requested route.Routing function refers to forwarding external requests to specific micro-service instances, which is a unified entry for external access to micro-services.The filtering function mainly refers to intervening in the processing of requests, checking requests, aggregating services and so on.
Zuul integrates with Eureka, registers Zuul as an application under Eureka service governance, and obtains additional microservice information from Eureka Server so that external access to microservices is forwarded through Zull.
Basic Usage
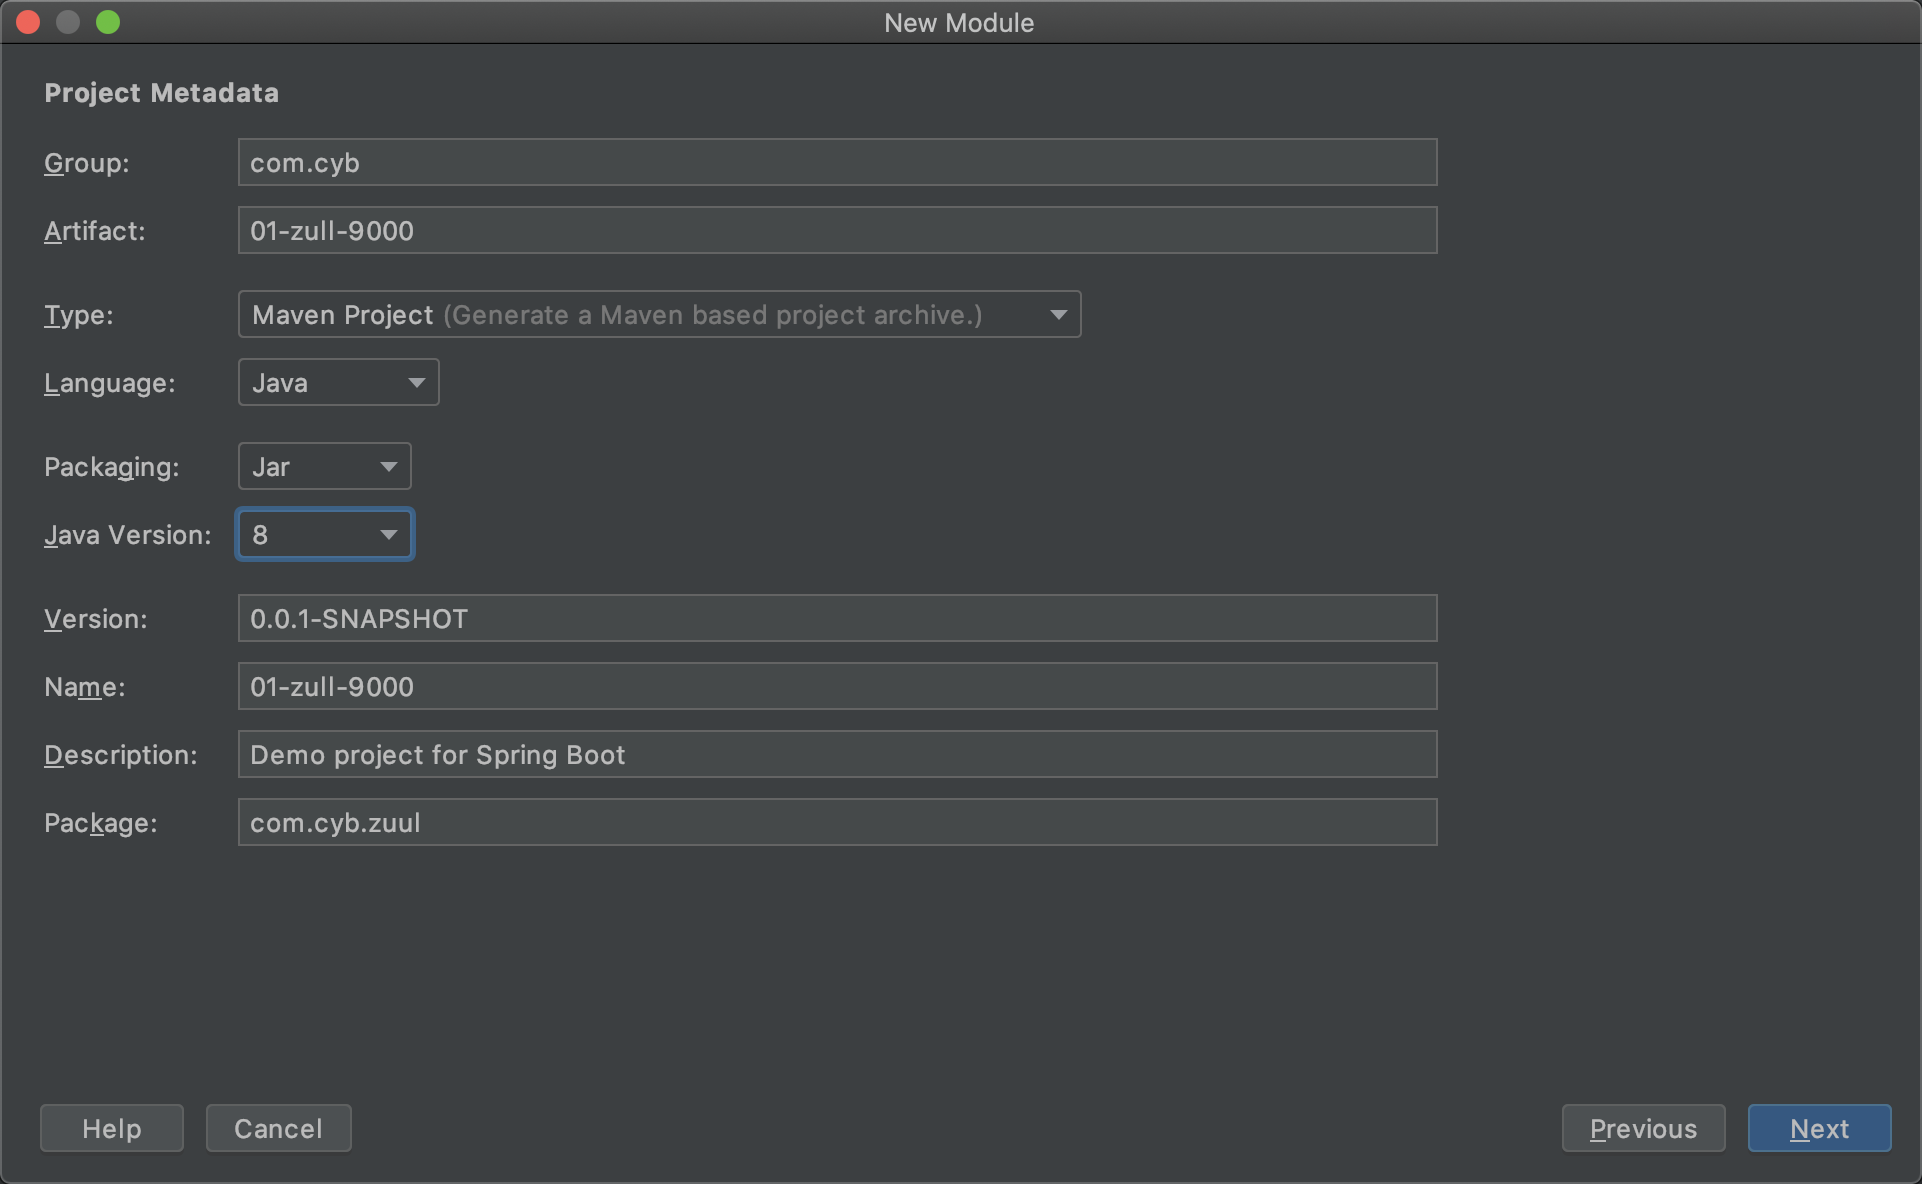
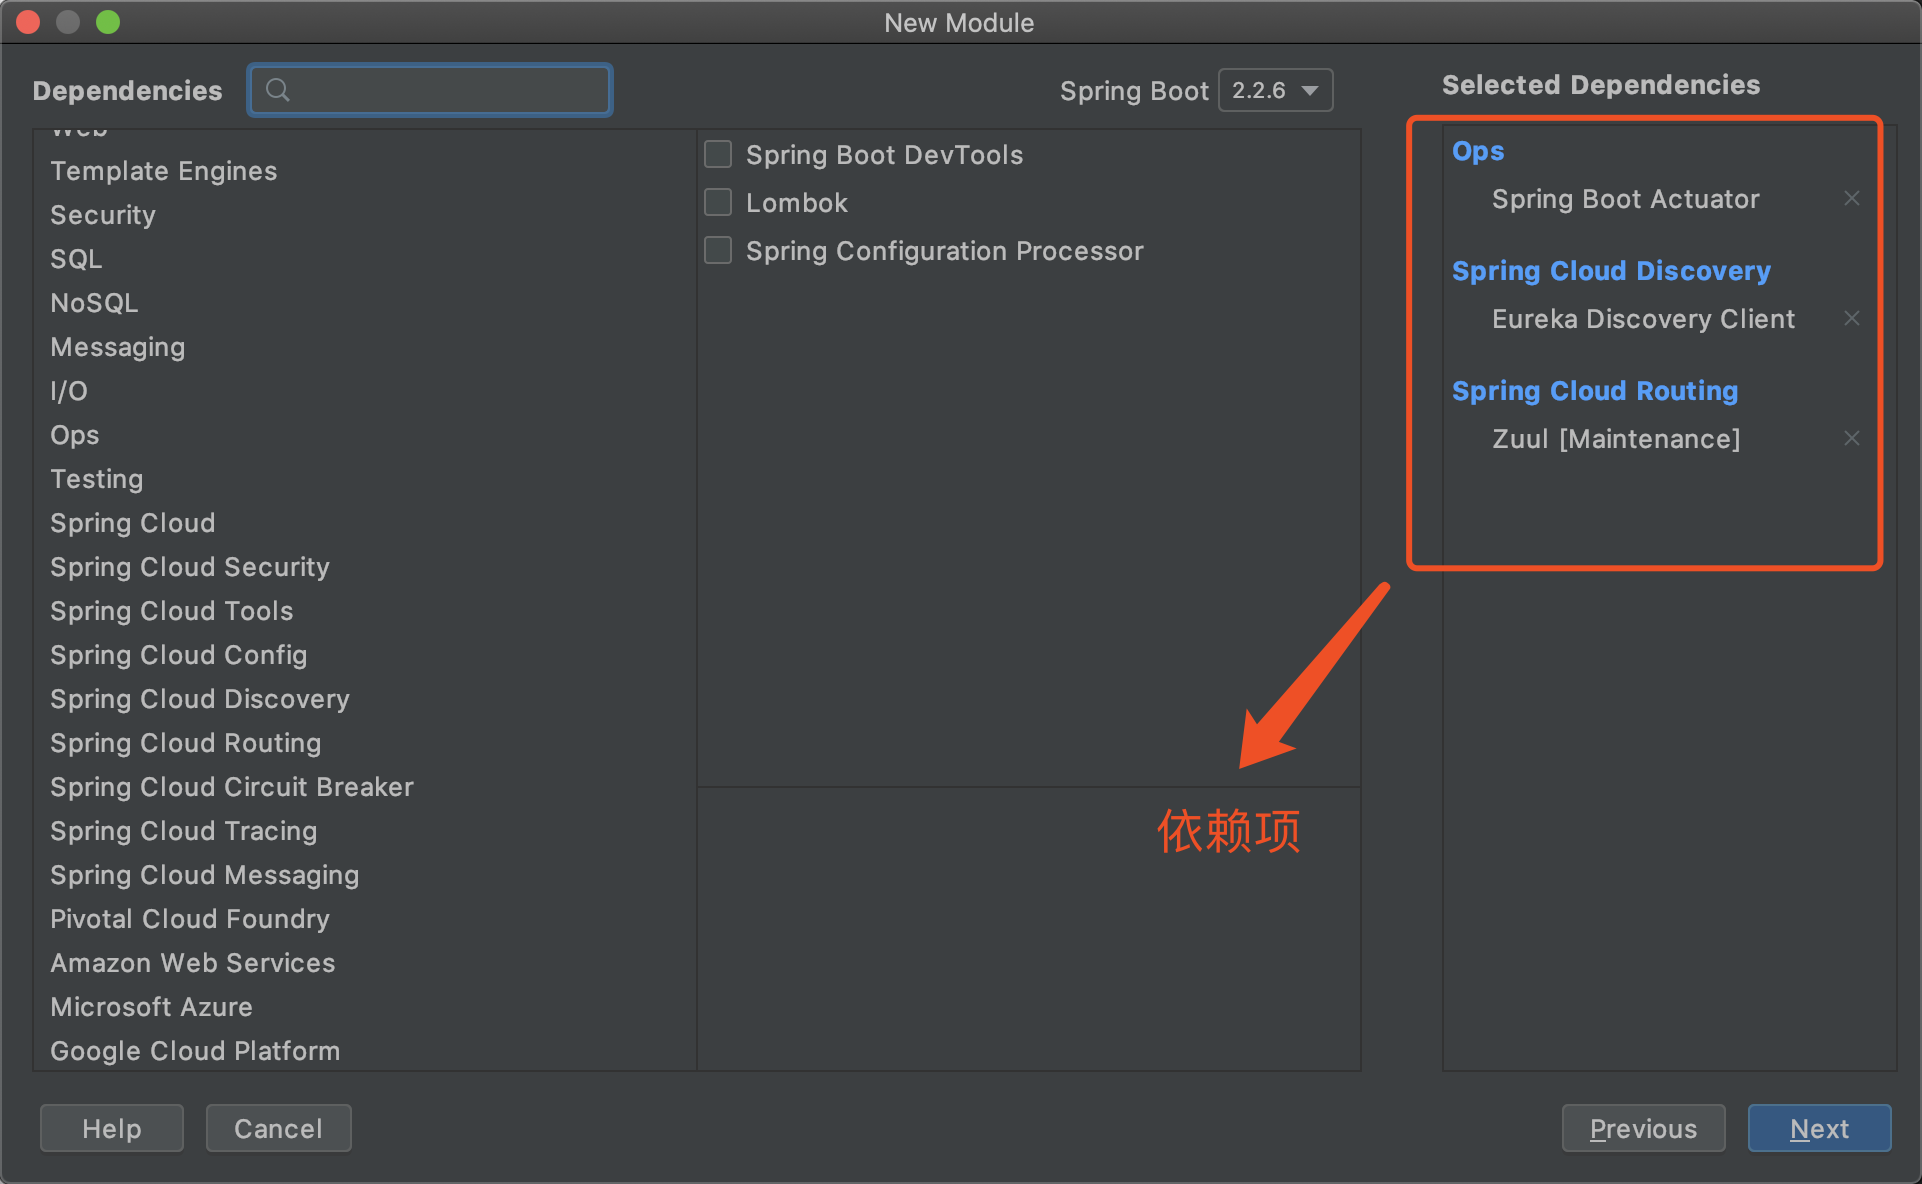
Create zuul Gateway Server
Modify Profile

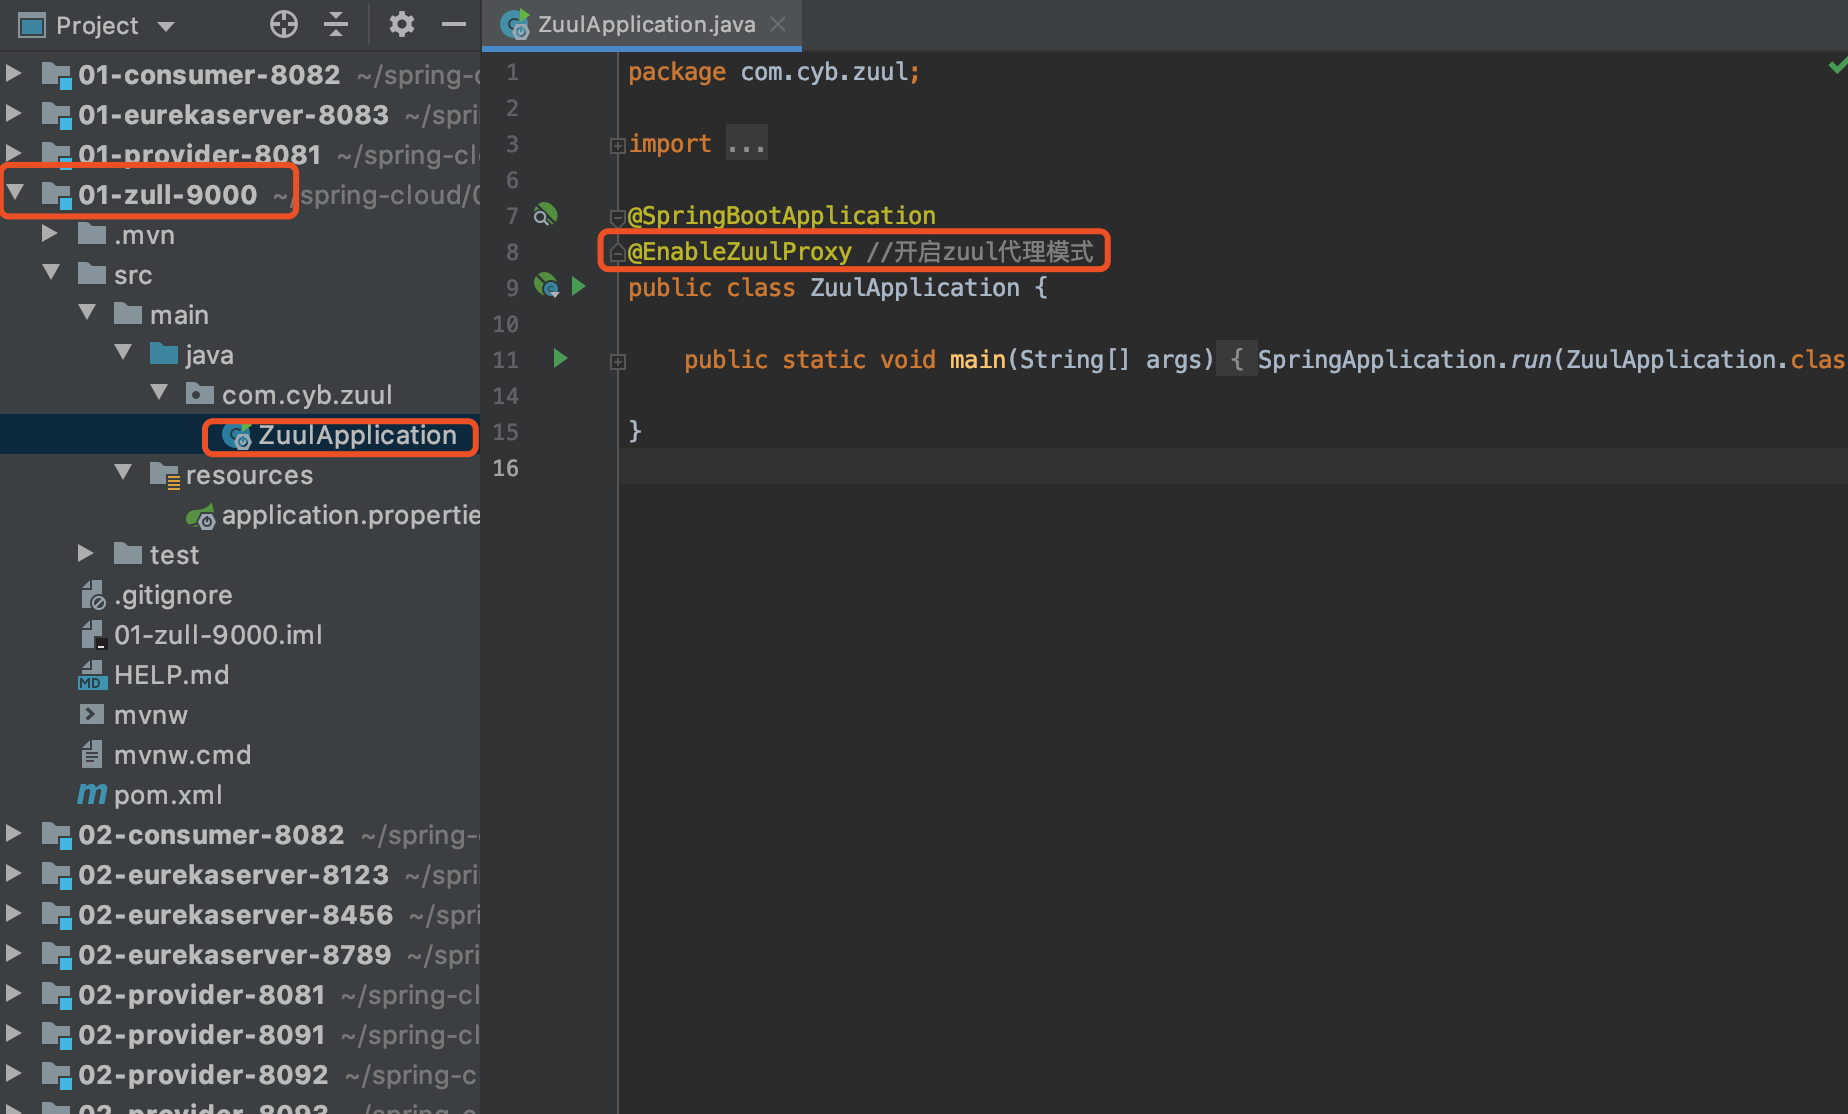
Modify Startup Class
Start test
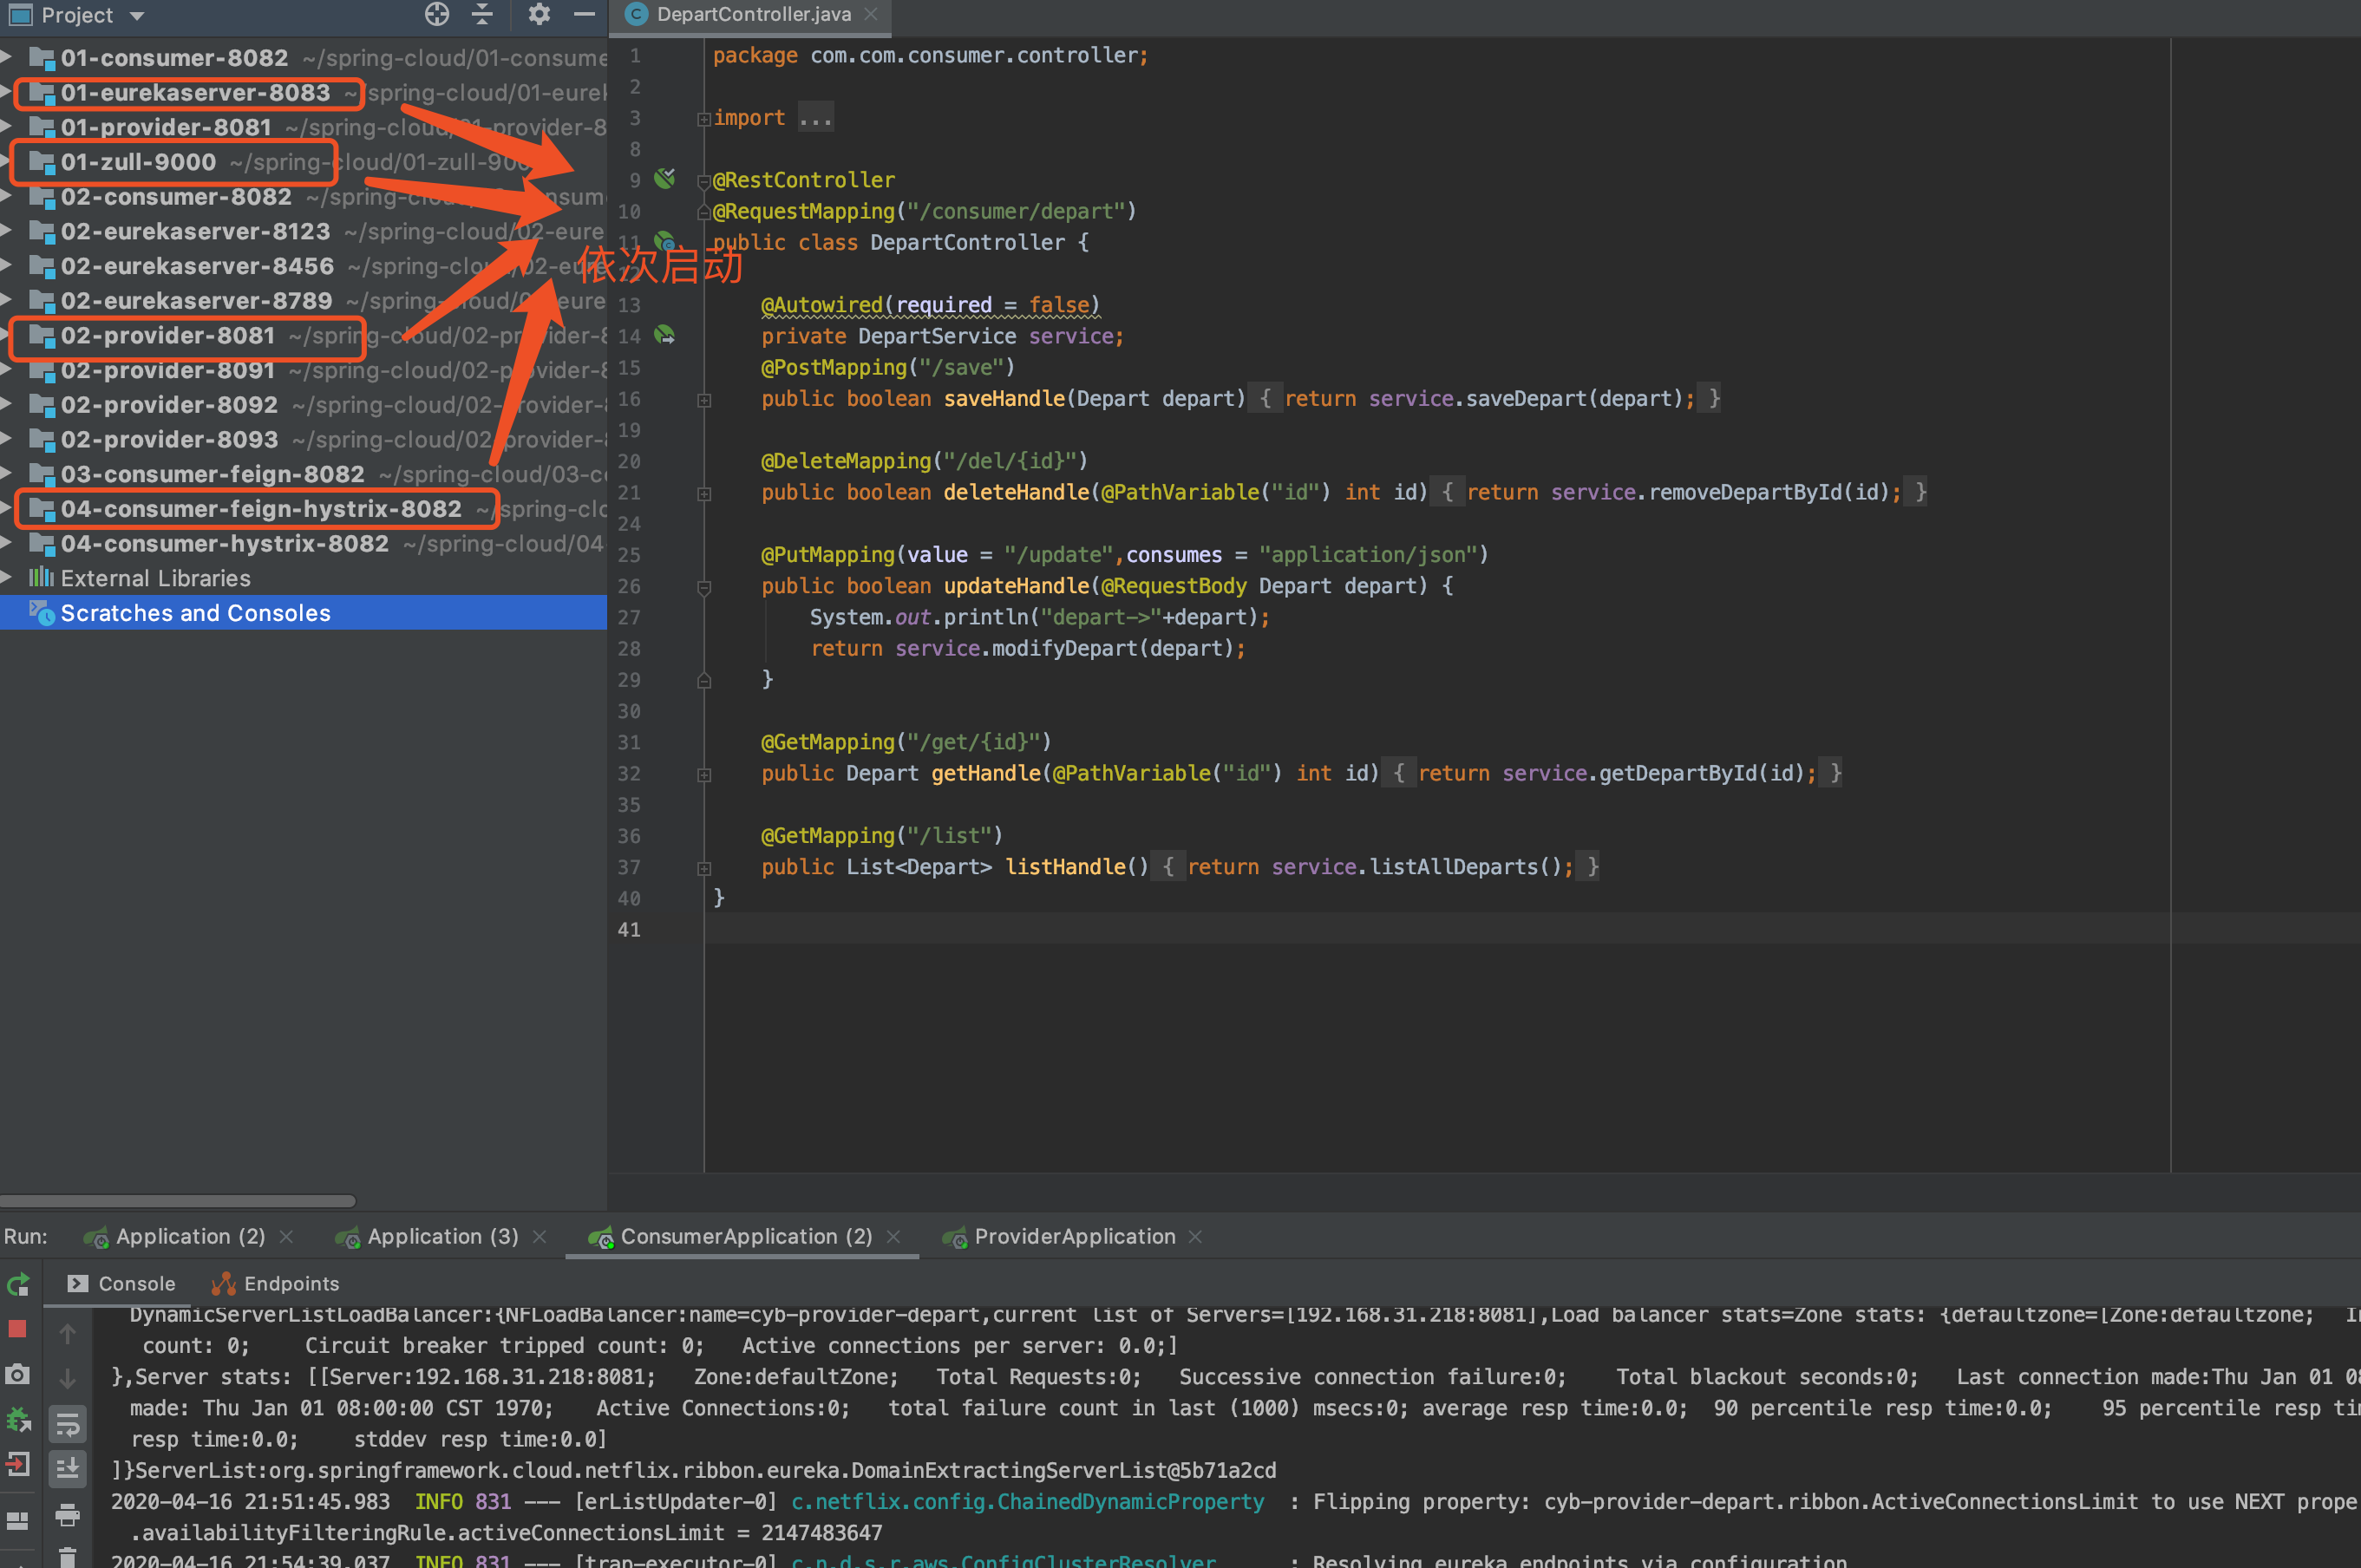
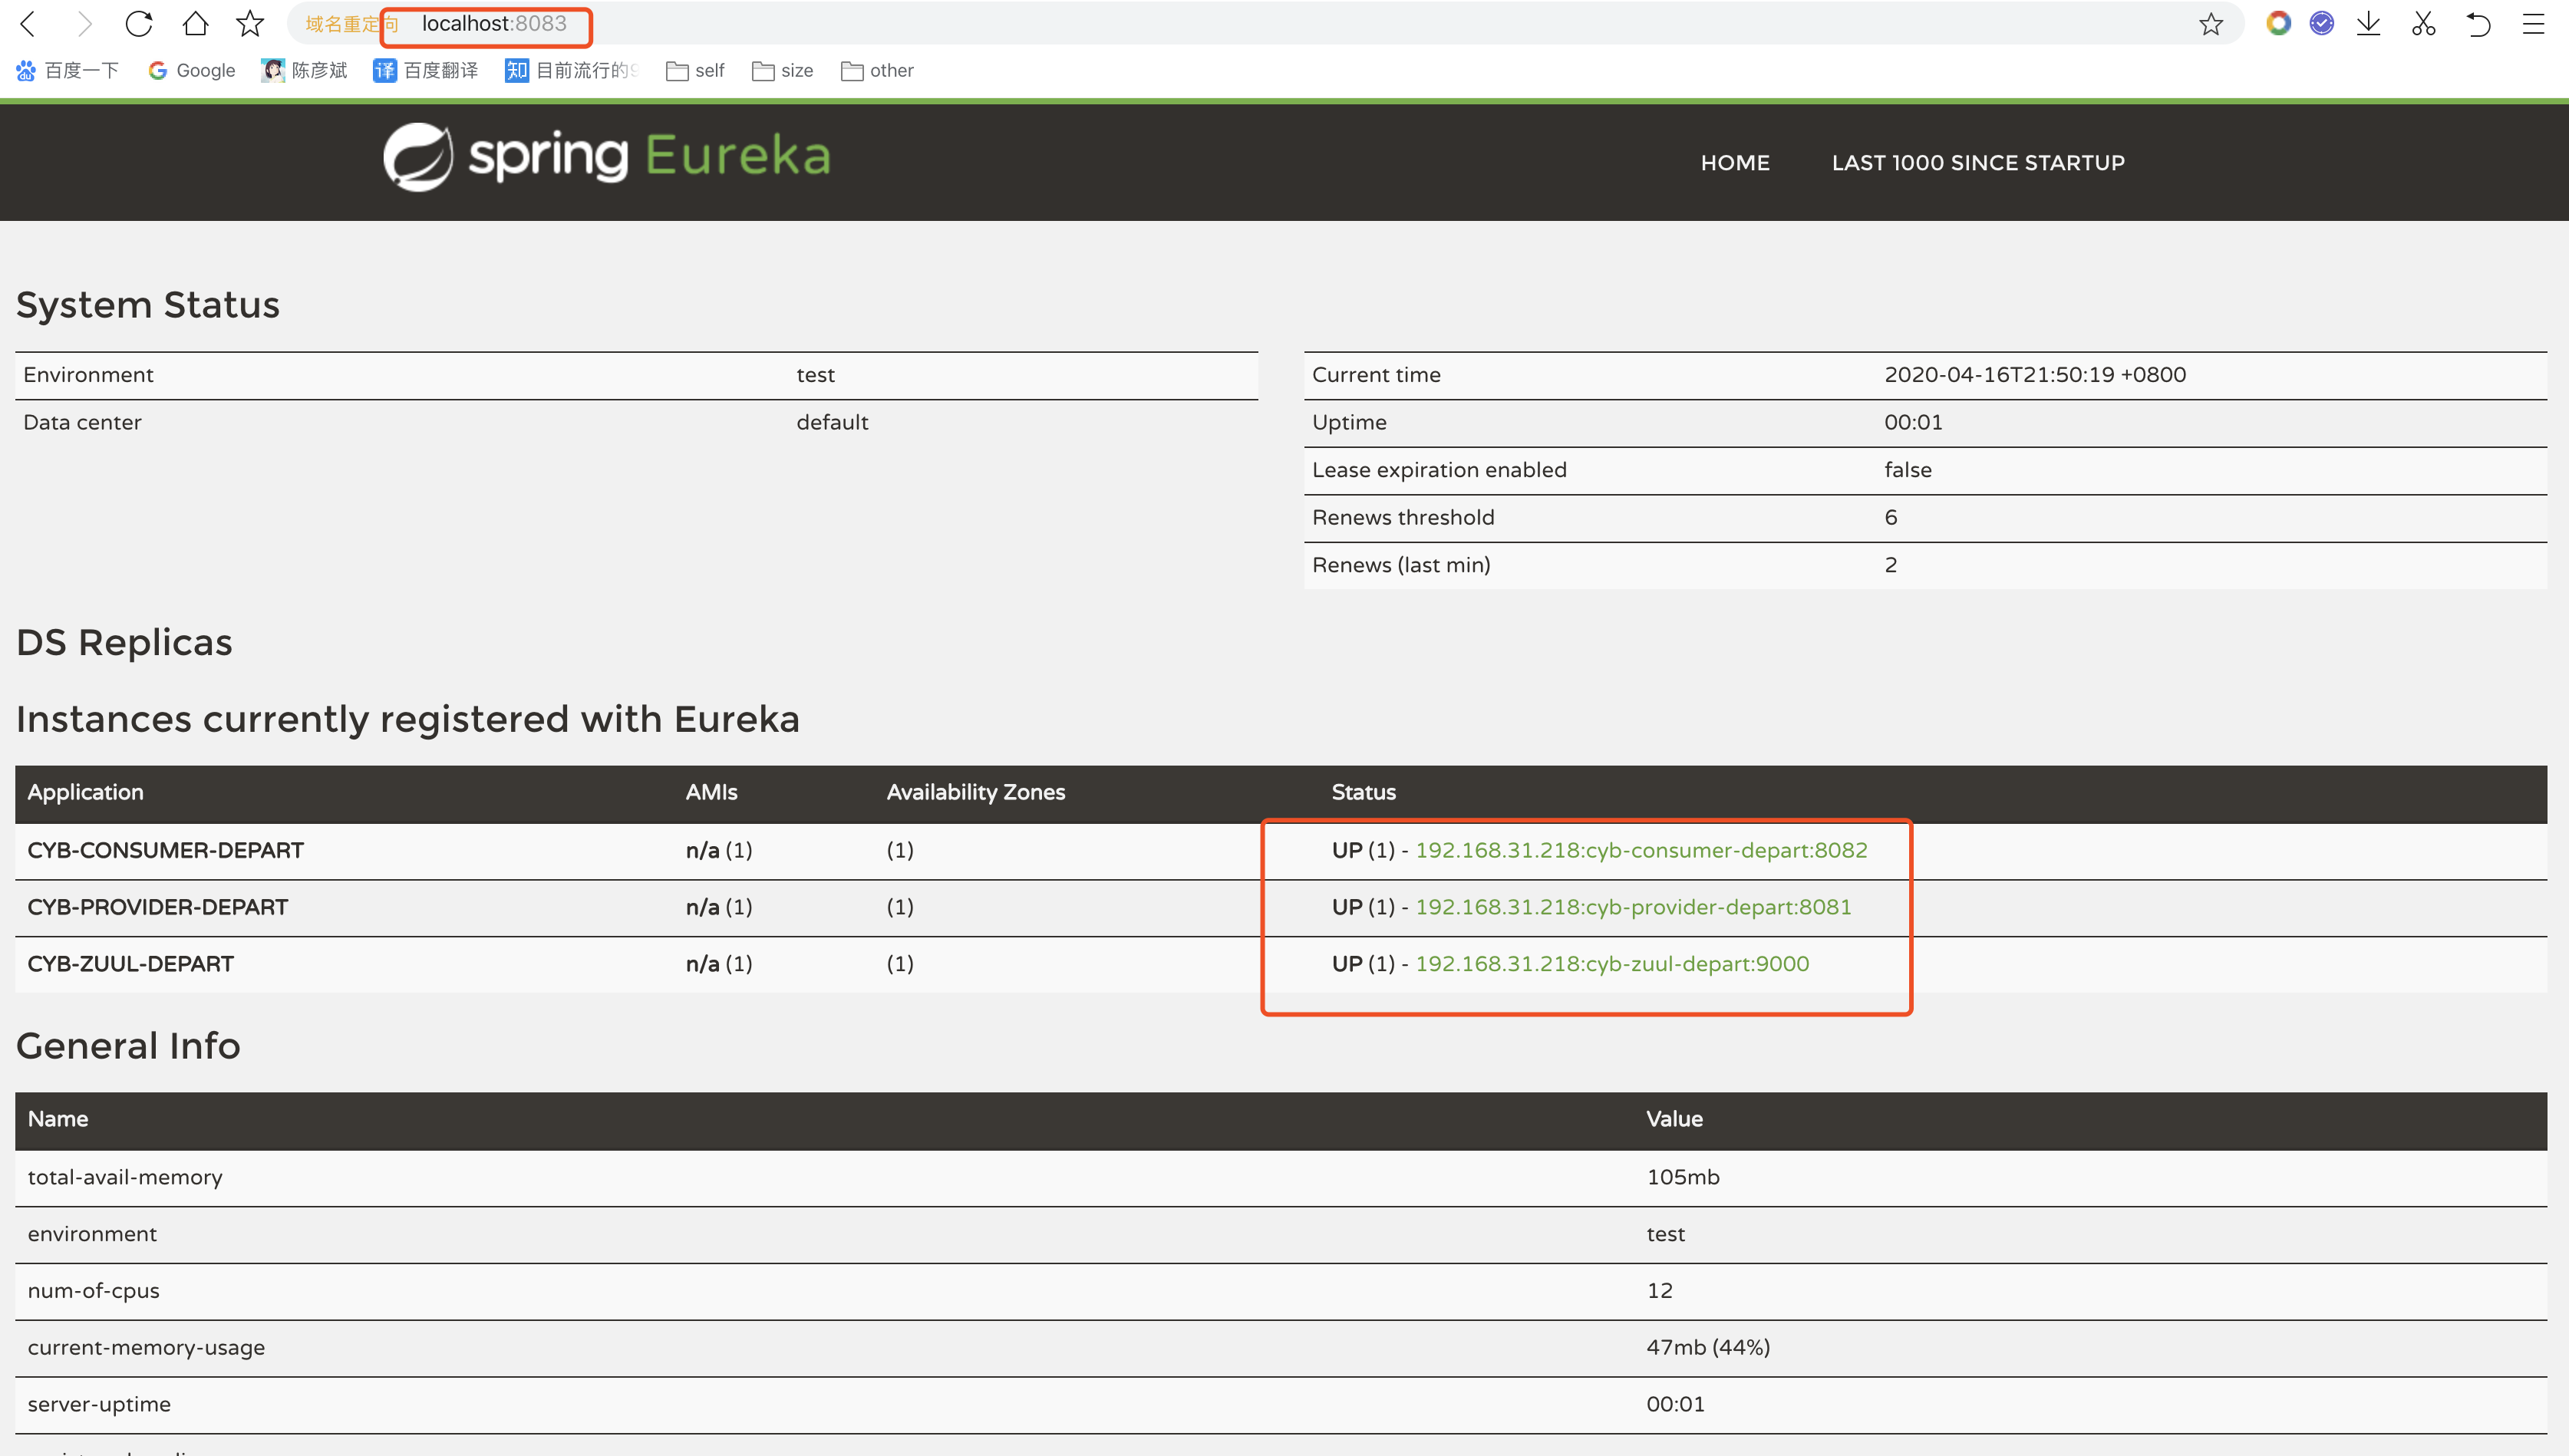

Set zull routing mapping rules
In the above test, we found that the service name is exposed directly to the consumer, and in order to protect and hide the service name, we can configure a mapping path for it to expose the mapping path to the consumer.

server.port=9000
# Specify the Eureka Registry
eureka.client.service-url.defaultZone=http://localhost:8083/eureka

spring.application.name=cyb-zuul-depart

# Zuul: set zuul routing rules
# somedepart.service-id: Specify the name of the microservice to replace
zuul.routes.somedepart.service-id=cyb-consumer-depart
# Specify the path to replace with
zuul.routes.somedepart.path=/cyb/**
The following points should be noted for this configuration:
- somedepart: You can name it as you like, but service-id and path are keywords and cannot be changed
- somedepart.service-id: Specifies the name of the microservice to be replaced
- somedepart.path: Specifies the path used to replace the specified microservice name
Access Test


Once the zuul routing rules are set, they can be accessed in both ways.
Ignore service name
Although the above configurations can access the microservice using a mapping path, they can still access the microservice through the original service name, that is, the above configurations do not hide and protect the original microservice name.The Ignore Micro-Service property can be set in the configuration file to replace the use of the original micro-service name.Two ways: 1. Ignore specified microservices; 2. Ignore all microservices
Ignore specified microservice name
Specify microservices to ignore in the configuration file

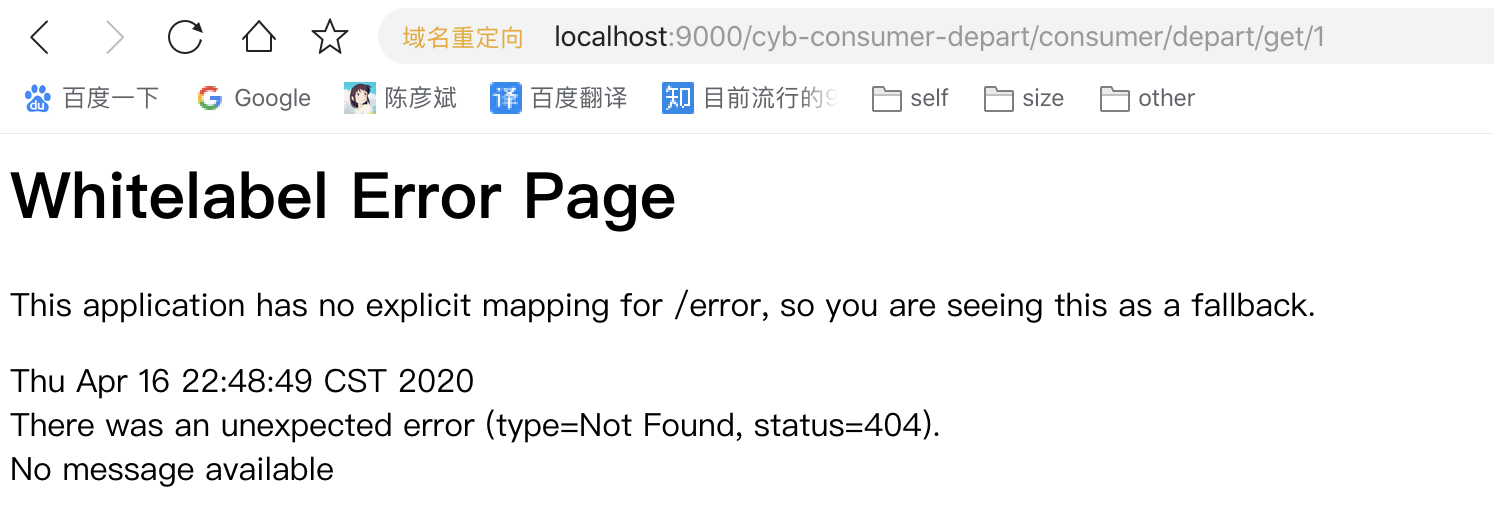

The microservice is no longer accessible by the microservice name at this time, but is normally accessible by mapping the path
Ignore all microservice names

Note: The effect is the same as ignoring the specified microservice above!
Configuring a uniform prefix for a mapped path
In general, we add a prefix to the map path to represent module information, company name, etc. This prefix is generally required for each microservice, so we can configure the prefix for the map path uniformly.
server.port=9000
# Specify the Eureka Registry
eureka.client.service-url.defaultZone=http://localhost:8083/eureka

spring.application.name=cyb-zuul-depart

# Zuul: set zuul routing rules
# somedepart.service-id: Specify the name of the microservice to replace
zuul.routes.somedepart.service-id=cyb-consumer-depart
# Specify the path to replace with
zuul.routes.somedepart.path=/cyb/**
# Specify microservices to ignore
# zuul.ignored-services=cyb-consumer-depart
# Ignore all microservices
zuul.ignored-services=*
# Uniform prefix for specified access
zuul.prefix=/test

Practice Source Download
Baidu Cloud Disk
 Link: https://pan.baidu.com/s/1OYwtq9O-3dF5fEuADNcIhA Password: pj5a