Message queuing - RabbitMQ
Teaching video address: Learning companion - flying brother - rabbitmq
Code address: link: https://pan.baidu.com/s/1-N0vQRhAO4kbkRk9w8BS2w
Extraction code: zoh7
What is middleware
Since the 1980s, Chinese enterprises have gradually carried out information construction. Due to the immature methods and systems and the continuous changes of enterprise business and market demand, an enterprise may run multiple different business systems at the same time. These systems may be based on different operating systems, different databases and heterogeneous network environment. The problem now is how to combine these information systems into an organic collaborative whole to truly realize enterprise cross platform and distributed applications. Middleware is the solution. It trades its complexity for the simplicity of enterprise applications.
Middleware is software between operating system and application program. Some people think it should be a part of operating system. When using middleware, people often integrate a group of middleware to form a platform (including development platform and operation platform), but there must be a communication middleware in this group of middleware, that is, middleware = platform + communication. This definition also limits that it can be called middleware only when used in distributed systems, At the same time, it can be distinguished from supporting software and practical software.
give an example:
Why use message oriented middleware
Specifically, middleware shields the complexity of the underlying operating system, makes program developers face a simple and unified development environment, reduces the complexity of program design, focuses on their own business, and does not have to work repeatedly for the migration of programs on different system software, thus greatly reducing the technical burden. Middleware brings the application system not only the simplicity of development and the shortening of development cycle, but also reduces the workload of system maintenance, operation and management, but also reduces the investment of the overall cost of the computer.
Middleware features
In order to solve the problem of distributed heterogeneity, the concept of middleware is proposed. Middleware is a common service between platforms (hardware and operating system) and applications, as shown in the figure below. These services have standard program interfaces and protocols. For different operating systems and hardware platforms, they can have a variety of implementations that comply with interface and protocol specifications.
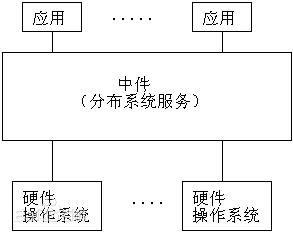
It may be difficult to give a strict definition to middleware, but middleware should have the following characteristics:
(1) Meet the needs of a large number of applications
(2) Runs on a variety of hardware and OS platforms
(3) Support distributed computing and provide transparent interaction of applications or services across networks, hardware and OS platforms
(4) Support standard protocols
(5) Support standard interfaces
Due to the importance of standard interfaces for portability and standard protocols for interoperability, middleware has become the main part of many standardization work. For application software development, middleware is far more important than operating system and network services. The program interface provided by middleware defines a relatively stable high-level application environment. No matter how the underlying computer hardware and system software are updated, as long as the middleware is upgraded and the external interface definition of middleware remains unchanged, the application software hardly needs any modification, Thus, it protects the significant investment of enterprises in application software development and maintenance.
In short: middleware has a great feature, which is separated from the specific design objectives and has modules that provide universal independent functional requirements. This makes the middleware must be replaceable. If the middleware is irreplaceable in a system design and there is no problem with the architecture and framework design, it is the middleware. It may be a middleware elsewhere and an engine in the system. Ha.
When will middleware technology be used in the project
In the architecture and reconstruction of the project, we need to carefully consider and think about the use of any technology and architecture change, because the integration and change of any technology may increase personnel, technology and cost. Middleware technology is generally used more in some Internet companies or projects. If you are only a start-up company, it is recommended to use a single architecture, Add a cache middleware at most. Don't blindly pursue new or so-called high performance. Behind the pursuit must be the business driver and project driver, because once the pursuit means that your learning cost, the company's personnel structure, server cost, maintenance and operation cost will increase, so you need to choose and consider carefully.
However, as an open person, you must have the ability and thinking to learn middleware technology. Otherwise, it is easy to master estimation or mention it in the interview when the project reaches a stage. These technologies are not new in today's era, If you want to master and explore, the key is to spend your time and energy on discussion and research.
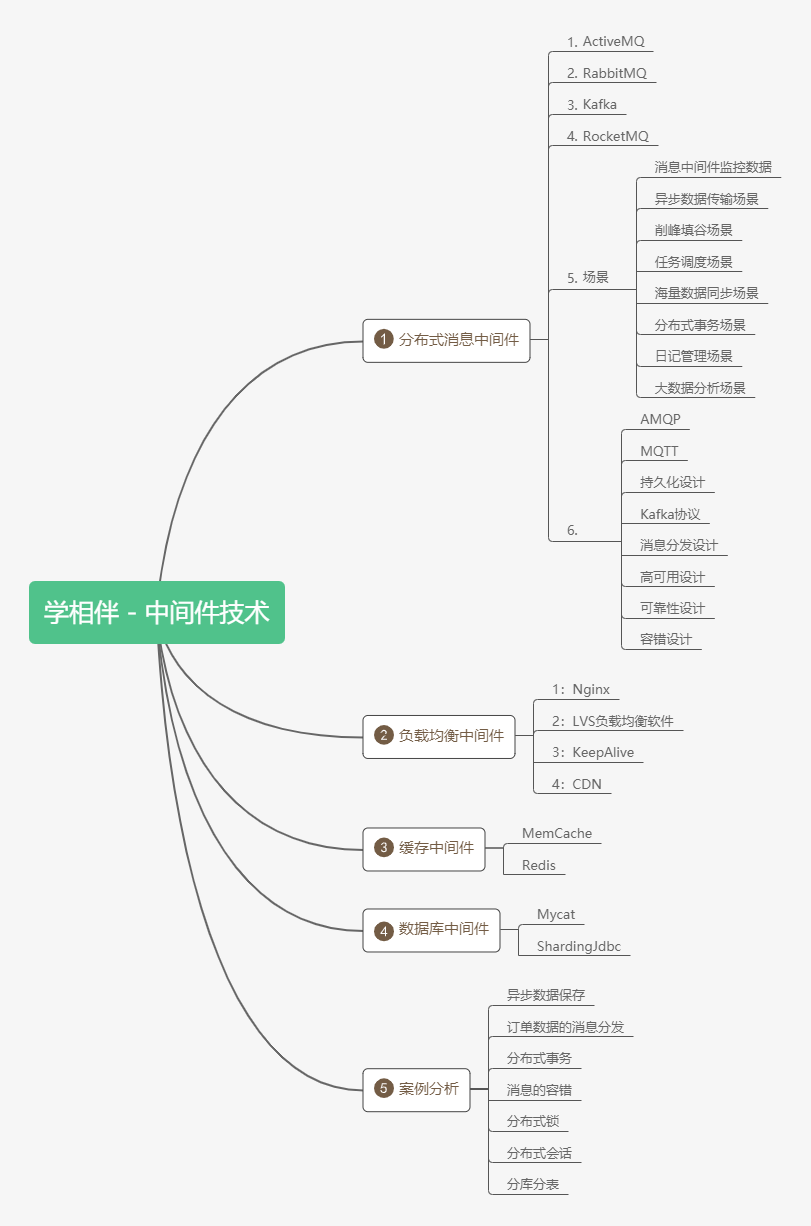
Overview of middleware technology and architecture
What is message oriented middleware
In actual projects, most enterprise project development adopts the single architecture mode in the early stage, as shown in the following figure:
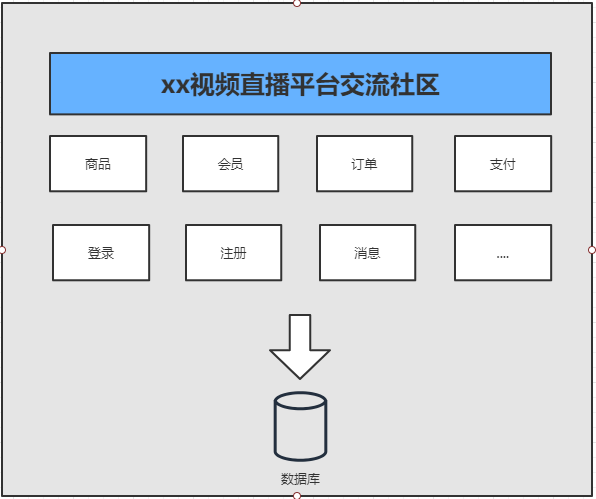
Monomer architecture
In enterprise development, most of the initial architectures adopt the mode of single architecture, and the typical feature of this architecture is to put all businesses and modules, source code and static resource files in one project. If a module is upgraded or iterated, the project will be recompiled and redeployed. The problems with this architecture are:
1: Coupling too high
2: The cost of operation and maintenance is too high
3: Difficult to maintain
4: High cost of server
5: And the complexity of upgrading the architecture will also increase
In this way, there is a subsequent distributed architecture system. as follows
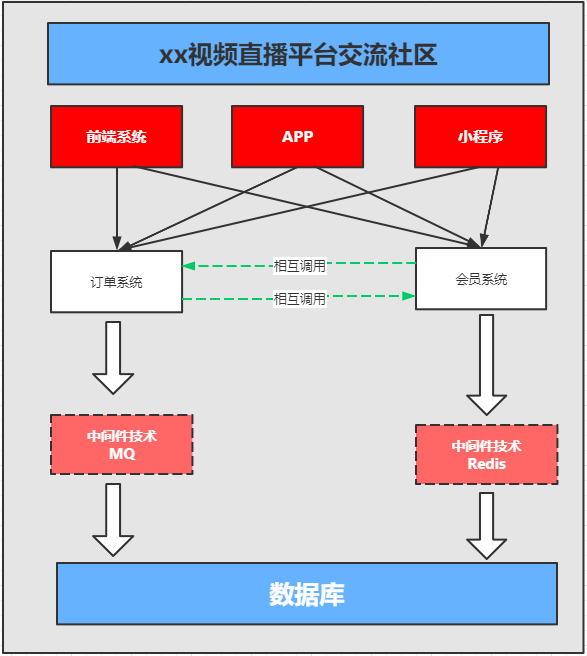
Distributed architecture
What is a distributed system
More popular: a request is completed by multiple services (services or systems) on the server side
Different from the single architecture, the single architecture is that a request initiates a jvm scheduling Thread (specifically tomcat Thread pool) to allocate a Thread thread Thread to process the request until it is released, while the distributed system is that a request is completed jointly by multiple systems, and the jvm and environment may be independent. If it is a metaphor in life, the single structure wants to build a small house and can be completed soon. If you want to build a bird's nest or a large building, you must coordinate and distribute all links. This purpose is also a problem to be deployed and considered in the later stage of project development. We can't see that the characteristics and problems of distributed architecture system are as follows:
Existing problems
1: High learning cost and too many technology stacks
2: Increased operation and maintenance costs and server costs
3: The cost of personnel will also increase
4: The load of the project will also increase
5: The number of errors and fault tolerance will also multiply
6: The choice of occupied server port and communication cost is high
7: Security considerations and factors force you to choose RMI/MQ related server-side communication.
benefit
1: The independence of the service system reduces the occupied server resources and the occupied hardware cost. To be exact, the service resources can be reasonably allocated without causing a waste of server resources
2: Independent maintenance and deployment of the system, reduced coupling and pluggability.
3: The choice of system architecture and technology stack can become flexible (instead of simply choosing java)
4: Flexible deployment will not cause the platform to be paralyzed and out of service due to deployment.
Architecture of distributed system based on Message Oriented Middleware
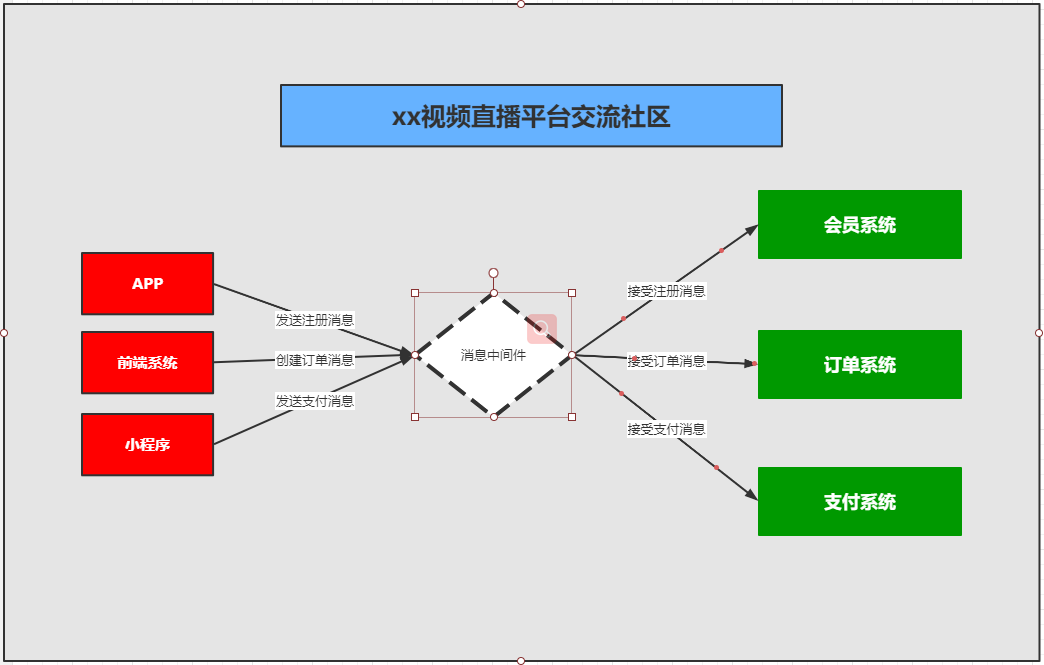
As can be seen from the above figure, the of message oriented middleware is
1: Use reliable message passing mechanism for direct communication between the system and the system
2: By providing message delivery and message queuing mechanism, it can expand the communication between processes in the distributed system environment.
Scenario of message oriented middleware application
1: Cross system data transfer
2: High concurrent traffic peak clipping
3: Data distribution and asynchronous processing
4: Big data analysis and transmission
5: Distributed transaction
For example, when you have a data to be migrated or too many concurrent requests, for example, you have 10W concurrent requests to place orders. Before these orders are warehoused, we can stack the order requests into the message queue to make them warehoused and executed stably and reliably.
Common message oriented middleware
ActiveMQ, RabbitMQ, Kafka, RocketMQ, etc.
The essence and design of Message Oriented Middleware
It is a technical service with the functions of receiving data, receiving requests, storing data, sending data and so on.
MQ message queue: it is responsible for data transmission, reception, storage and transmission, so the performance should be more than ordinary services and technologies.

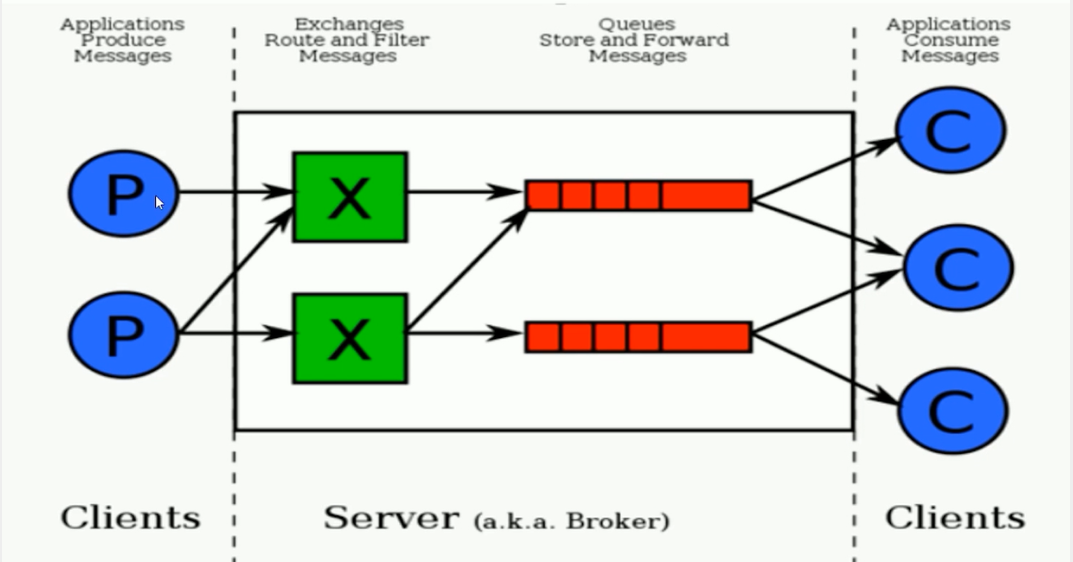
Who will produce, store and consume messages?

The core component of Message Oriented Middleware
1: Message protocol
2: Message persistence mechanism
3: Message distribution policy
4: High availability and reliability of messages
5: Fault tolerance mechanism of message
Message queuing protocol
What is an agreement
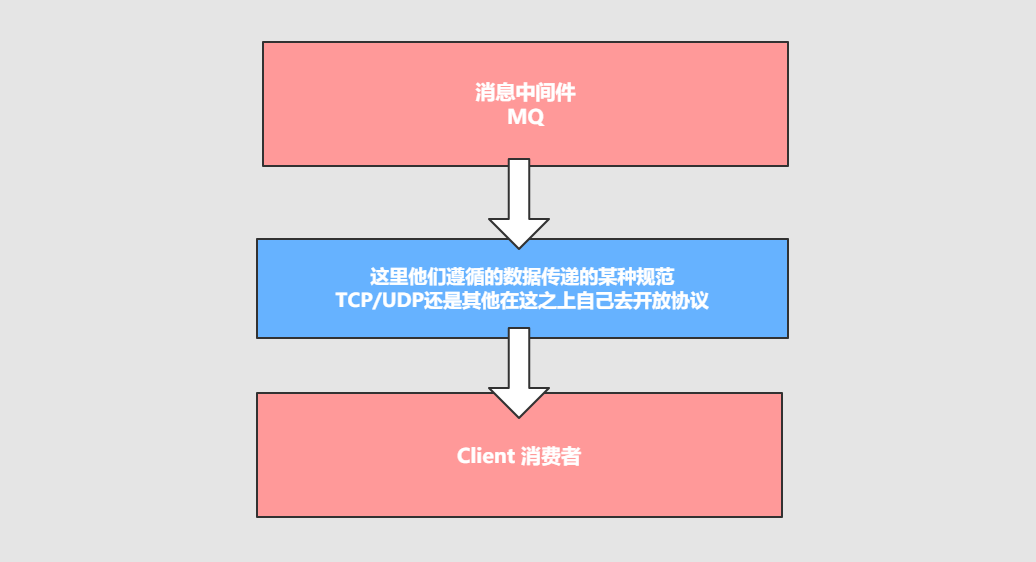
We know that message oriented middleware is responsible for the three parts of data transmission, storage, distribution and consumption. In the process of data storage and distribution, you must follow some agreed and popular specifications. Do you use the underlying TCP/IP, UDP protocol or other self built protocols, and these agreed and popular specifications are called protocols.
The so-called agreement means:
1: A set of conventions that the computer bottom operating system and application program follow together when communicating. Only by following the common conventions and specifications, the system and the bottom operating system can communicate with each other.
2: Different from general network applications, it is mainly responsible for data acceptance and transmission, so its performance is relatively high.
3: The protocol must strictly abide by the specifications for data format and data exchange between computers.
Three elements of network protocol
- Grammar. Syntax is the structure and format of user data and control information, as well as the order in which data appears.
- Semantics. Semantics is to explain the meaning of each part of control information. It specifies what control information needs to be sent, and what actions to complete and what response to make.
- Timing. Timing is a detailed description of the sequence of events.
For example, I send a message to the queue in what data format, and then what is the meaning of each part, the actions executed after sending, the actions of consumer consumption messages, and the response results and feedback after consumption, and then process it according to the corresponding execution order. If you still don't understand the http request protocol that everyone contacts every day:
1: Syntax: http specifies the format of request message and response message.
2: Semantics: a request initiated by a client is called a request. (this is a definition, and you initiate a post/get request)
3: Timing: a request corresponds to a response. (there must be a request before there is a response. This is the timing)
The message middleware does not use http protocol, but the common message middleware protocols are: OpenWire, AMQP, MQTT, Kafka and OpenMessage protocol.
Interview question: why doesn't message oriented middleware directly use http protocol?
1: Because the http request message header and response message header are relatively complex, including cookie s, data encryption and decryption, status code, response code and other additional functions. However, for a message, we do not need to be so complex or necessary. It is actually responsible for data transmission, storage and distribution. We must pursue high performance. Try to be concise and fast.
2: In most cases, http is mostly short links. In the actual interaction process, a request to response is likely to be interrupted. After the interruption, it will not be persistent, resulting in the loss of requests. This is not conducive to the business scenario of message middleware, because message middleware may be a long-term process of obtaining messages. In case of problems and faults, data or messages should be persistent. The purpose is to ensure the highly reliable and stable operation of messages and data.
AMQP protocol
AMQP: (full name: Advanced Message Queuing Protocol) is an advanced message queuing protocol. Jointly designed by JPMorgan Chase group and other companies. It is an application layer standard high-level message queuing protocol that provides unified messaging services. It is an open standard of application layer protocol. It is designed for message oriented middleware. The client and message middleware based on this protocol can deliver messages, which is not limited by different products and different development languages of the client / middleware. The implementations in Erlang include RabbitMQ and so on.
characteristic:
1: Distributed transaction support.
2: Message persistence support.
3: High performance and reliable message processing advantages.

MQTT protocol
MQTT protocol: (message queuing Telecommunication Transport) message queuing is an instant messaging protocol opened by IBM and an important part of the architecture of the Internet of things system.
characteristic:
- 1: Light weight
- 2: Simple structure
- 3: Fast transmission, transaction not supported
- 4: No persistence design.
Application scenario:
- 1: Applicable to limited computing power
- 2: Low bandwidth
- 3: The scene of network instability.
supporter:
OpenMessage protocol

It is an application development standard in the fields of distributed message middleware and stream processing jointly founded by Alibaba, Yahoo, Didi travel, Stremalio and other companies in recent years.
characteristic:
1: Simple structure
2: Fast parsing speed
3: Support transaction and persistence design.
Kafka protocol

Kafka protocol is a binary protocol based on TCP/IP. The message is divided by length and consists of some basic data types.
Features:
1: Simple structure
2: Fast parsing speed
3: No transaction support
4: Persistent design
Summary
Protocol: it is a conventional specification and mechanism built on the basis of tcp/ip protocol. Its main purpose is to enable the client (application java, go) to communicate and communicate. And the specification under this protocol must have persistence, high availability and high reliable performance.
Message queue persistence
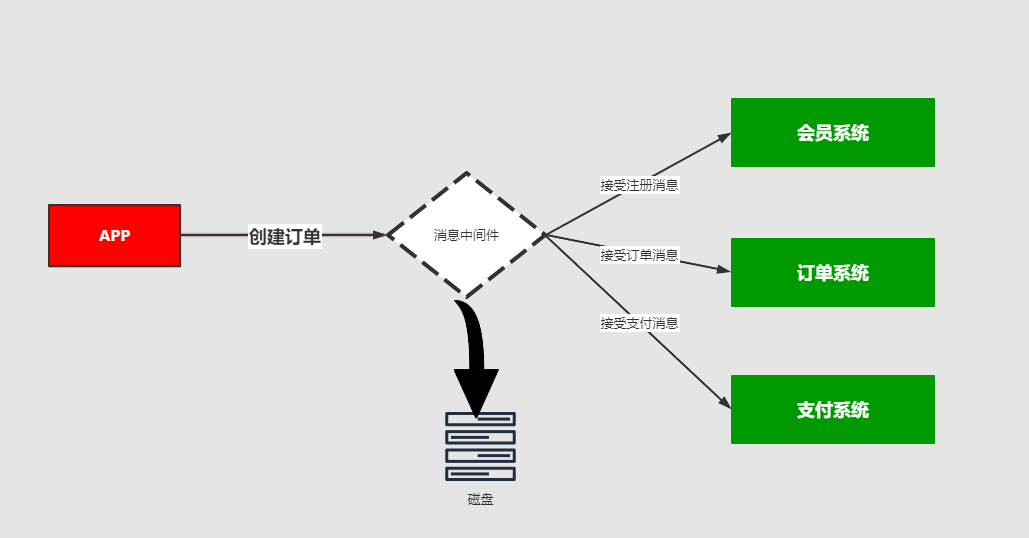
Persistence
Simply put, it is to store the data on disk instead of in memory. It will disappear when the server is restarted and disconnected, so that the data can be saved permanently.
https://kuangstudy.oss-cn-beijing.aliyuncs.com/bbs/2021/02/28/kuangstudyf908e193-4ca3-44b7-87d0-cbb17b55a107.png
Common persistence methods
| ActiveMQ | RabbitMQ | Kafka | Kafka | |
|---|---|---|---|---|
| file store | support | support | support | support |
| file store | / | / | / | / |
Message distribution policy
Message distribution policy
MQ message queuing has the following roles
1: Producer
2: Store message
3: Consumer
After the producer generates the message, MQ stores it. How does the consumer get the message? Generally, there are two ways to obtain data: push or pull. A typical git has a push-pull mechanism. The http request we send is a typical process of pulling database data back. Message queue MQ is a push process, and these push mechanisms are applicable to many business scenarios and have many corresponding push mechanism policies.
Scenario analysis I
For example, I placed an order on the APP. We have many systems and services. How do we know that this message is consumed by that system or those services or systems? At this time, we need a distribution strategy. This requires a consumption strategy. Or call it the methodology of consumption.
Scenario analysis II
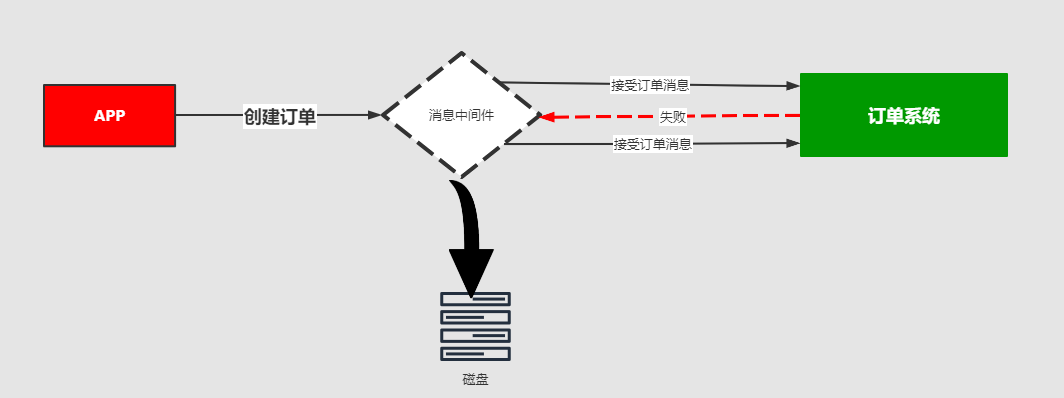
In the process of sending messages, there may be exceptions, network jitter, faults, etc. because the messages cannot be consumed, such as the user placing an order, consuming MQ acceptance, and the order system failure, resulting in the user's payment failure. At this time, the message middleware must support the message retry mechanism strategy. That is, support: in case of problems and failures, messages can be retransmitted without loss.
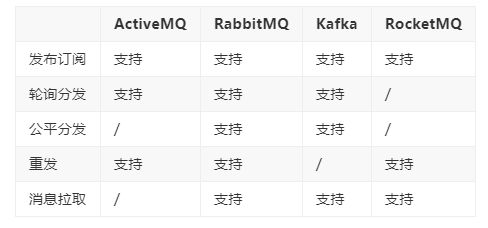
Mechanism and comparison of message distribution strategies
Message queuing is highly available and reliable
What is the high availability mechanism
The so-called high availability refers to the ability of the product to perform the specified function under the specified conditions and at the specified time or time.
When the business volume increases, the request is too large. A message middleware server will touch the limit of hardware (CPU, memory and disk). A message server can no longer meet the business needs, so the message middleware must support cluster deployment. To achieve high availability.
Cluster mode 1 - deployment of master slave shared data
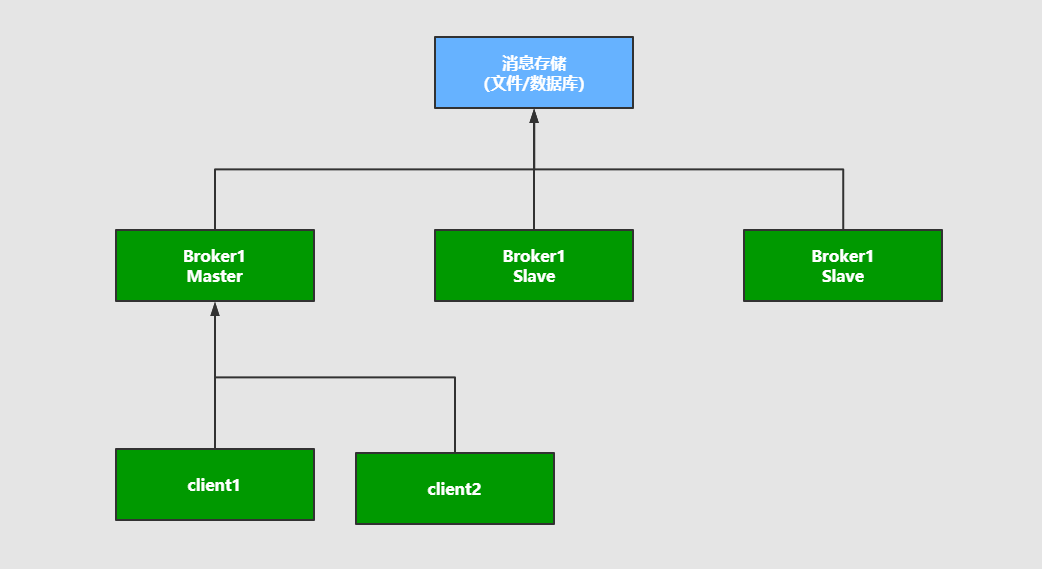
Explanation: the producer sends the consumption to the Master node. All are connected to the message queue to share the data area. The Master node is responsible for writing. Once the Master hangs up, the slave node continues to serve. Thus forming high availability,
Cluster mode 2 - Master Slave synchronous deployment mode
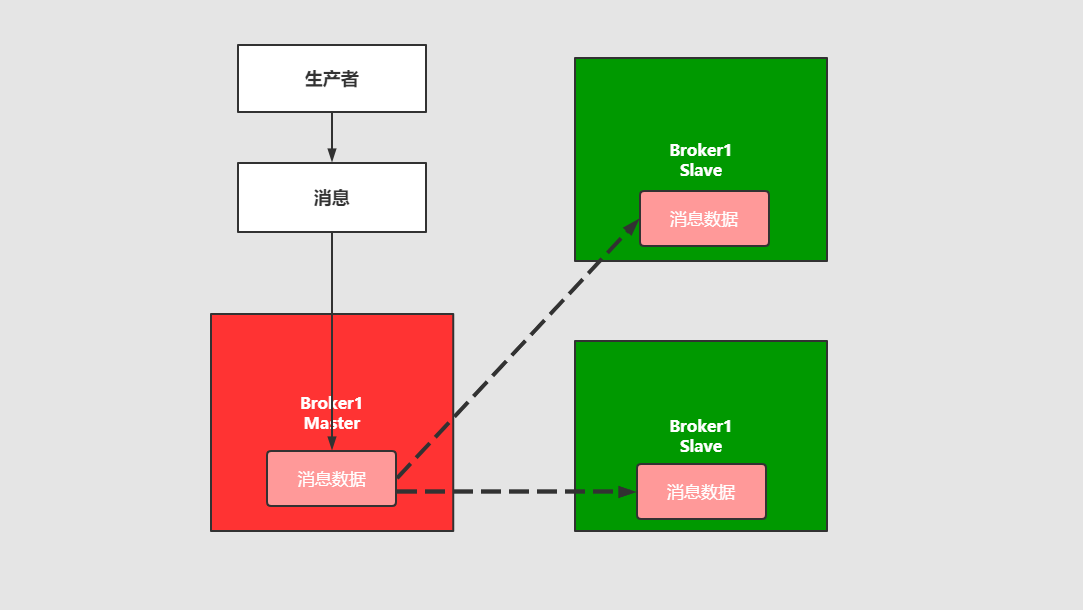
Explanation: messages written in this mode are also on the Master node, but the Master node will synchronize data to the slave node to form a replica, which is very similar to the zookeeper or redis Master-slave mechanism. In this way, the effect of load balancing can be achieved. If consumers have multiple nodes, they can go to different nodes to consume, thinking that the copy and synchronization of messages will temporarily use a lot of bandwidth and network resources. It will be used in the following rabbtmq.
Cluster mode 3 - Multi master cluster synchronous deployment mode
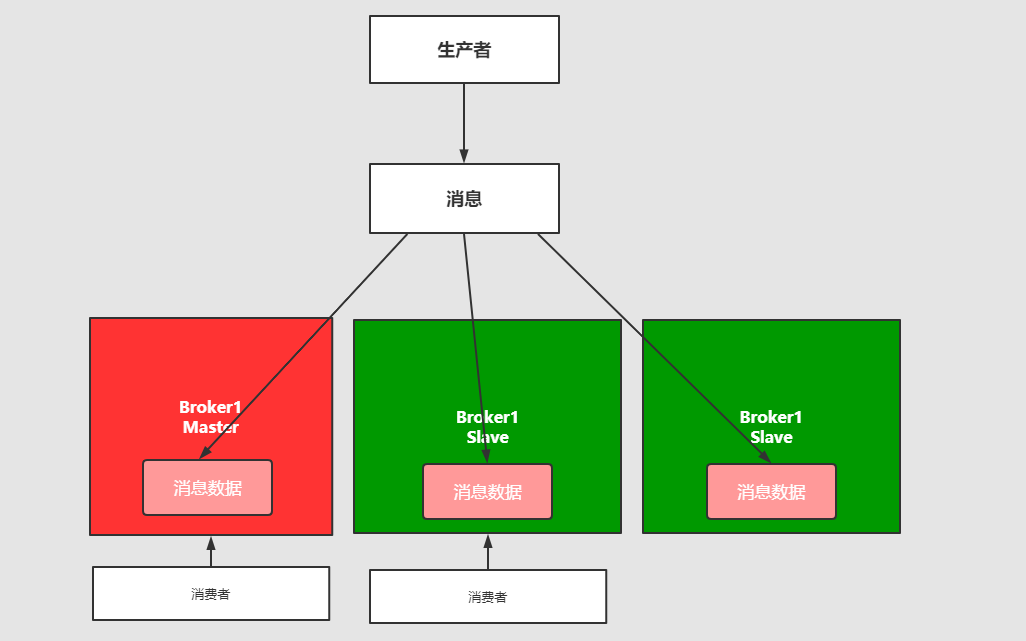
Explanation: it is not very different from the above, but it can be written to any node.
Cluster mode 4 - Multi master cluster forwarding deployment mode
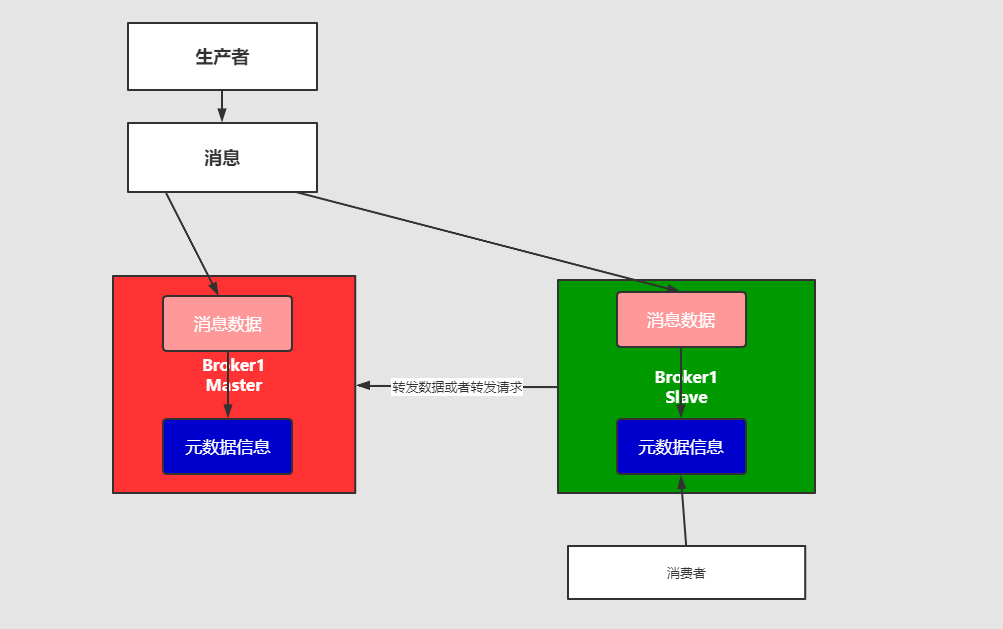
Cluster mode 5: the combination of master slave and brewer cluster
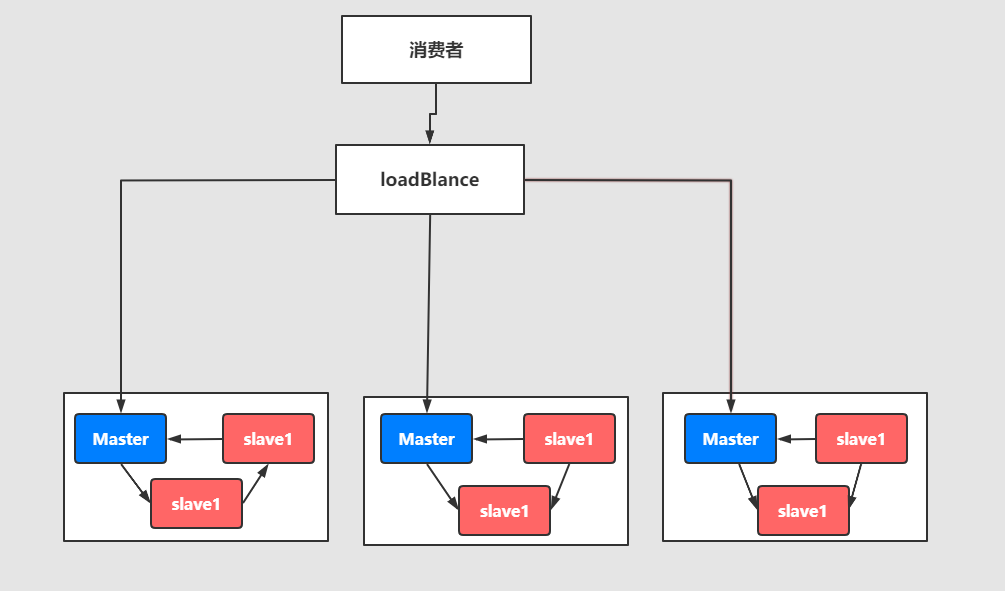
Explanation: the multi master and multi slave hot standby mechanism is implemented to complete the high availability of messages and the hot standby mechanism of data. When the production scale reaches a certain stage, this kind of use frequency is relatively high.
This cluster mode will be analyzed and explained in the subsequent courses. Their ultimate goal is to ensure that the message server will not hang up and can still continue to use the message service in case of failure.
Anyway, there are three sentences:
1: Or message sharing,
2: Or message synchronization
3: Or metadata sharing
What is a highly reliable mechanism
The so-called high availability means that the system can operate continuously without failure. For example, a sudden system crash, error reporting, exception, etc. do not affect the normal operation of online business. The probability of error is very low, which is called high reliability.
In high concurrency business scenarios, if the high reliability of the system cannot be guaranteed, the hidden dangers and losses will be very serious.
How to ensure the reliability of middleware messages? Two aspects can be considered:
1: Message transmission: ensure the correctness of data analysis between systems through protocols.
2: Reliable message storage: ensure the reliability of messages through persistence.
RabbitMQ introduction and installation
summary
Official website: https://www.rabbitmq.com/
What is RabbitMQ? The official gives this explanation:
RabbitMQ is the most widely deployed open source message broker.
With tens of thousands of users, RabbitMQ is one of the most popular open source message brokers. From T-Mobile to Runtastic, RabbitMQ is used worldwide at small startups and large enterprises.
RabbitMQ is lightweight and easy to deploy on premises and in the cloud. It supports multiple messaging protocols. RabbitMQ can be deployed in distributed and federated configurations to meet high-scale, high-availability requirements.
RabbitMQ runs on many operating systems and cloud environments, and provides a wide range of developer tools for most popular languages.
After translation:
RabbitMQ is the most widely deployed open source message broker.
RabbitMQ has thousands of users and is one of the most popular open source message brokers. From T-Mobile to Runtastic, RabbitMQ is used in small start-ups and large enterprises around the world.
RabbitMQ is lightweight and easy to deploy on premises and in the cloud. It supports a variety of messaging protocols. RabbitMQ can be deployed in distributed and federated configurations to meet the requirements of large-scale and high availability.
RabbitMQ runs on many operating systems and cloud environments and provides a wide range of developer tools for most popular languages.
Installing RabbitMQ
1: Download address: https://www.rabbitmq.com/download.html
2: Environment preparation: CentOS7.x+ / Erlang
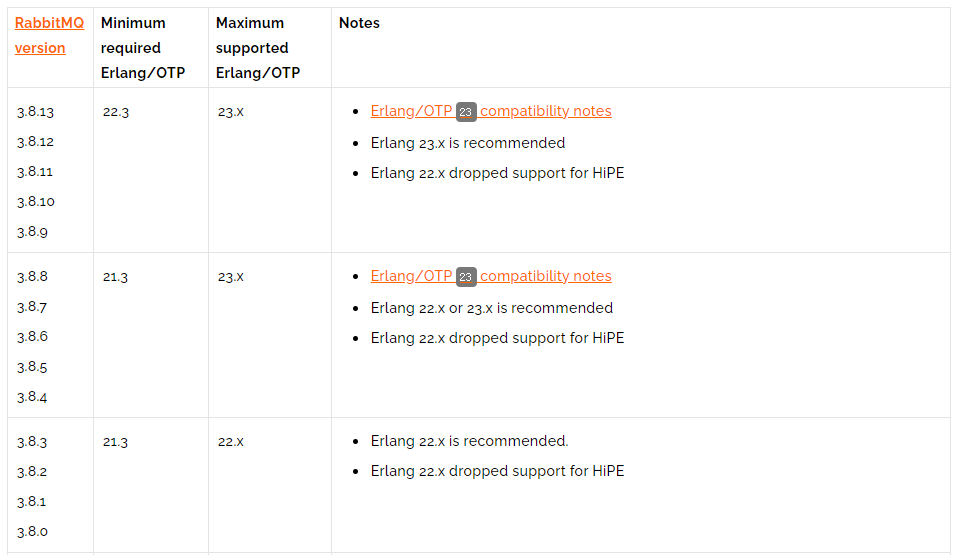
RabbitMQ is developed in Erlang language, so the system environment must provide Erlang environment. The first step is to install Erlang.
Comparison between Erlang and RabbitMQ versions: https://www.rabbitmq.com/which-erlang.html
Erlang installation
View system version number
[root@iZm5eauu5f1ulwtdgwqnsbZ ~]# lsb_release -a
LSB Version:    :core-4.1-amd64:core-4.1-noarch
Distributor ID: CentOS
Description:    CentOS Linux release 8.3.2011
Release:        8.3.2011
Codename:       n/a
Install Download
Reference address: https://www.erlang-solutions.com/downloads/
wget https://packages.erlang-solutions.com/erlang-solutions-2.0-1.noarch.rpm
rpm -Uvh erlang-solutions-2.0-1.noarch.rpm
Installation succeeded
yum install -y erlang

erl -v
Install socat
yum install -y socat
Installing rabbitmq
Download address: https://www.rabbitmq.com/download.html
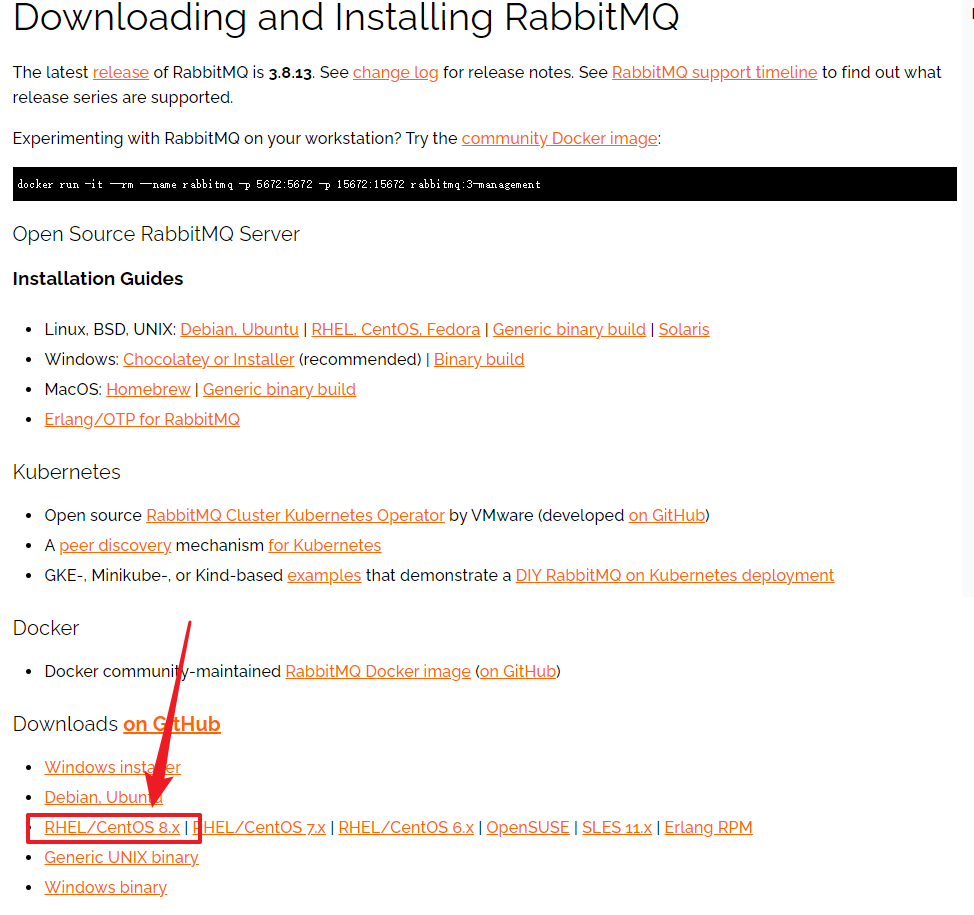
Download rabbitmq
> wget https://github.com/rabbitmq/rabbitmq-server/releases/download/v3.8.13/rabbitmq-server-3.8.13-1.el8.noarch.rpm
> rpm -Uvh rabbitmq-server-3.8.13-1.el8.noarch.rpm
Start rabbitmq service
# Start service
> systemctl start rabbitmq-server
# View service status
> systemctl status rabbitmq-server
# Out of Service
> systemctl stop rabbitmq-server
# Startup service
> systemctl enable rabbitmq-server
RabbitMQ configuration
RabbitMQ has a configuration file by default, which defines the related configuration information of RabbitMQ. By default, it can meet the daily development needs. If you need to modify it, you need to create a configuration file to overwrite it.
Refer to the official website:
1:https://www.rabbitmq.com/documentation.html
2:https://www.rabbitmq.com/configure.html
3:https://www.rabbitmq.com/configure.html#config-items
4: https://github.com/rabbitmq/rabbitmq-server/blob/add-debug-messages-to-quorum_queue_SUITE/docs/rabbitmq.conf.example
Related port
5672: communication port of rabbitmq
25672: the CLI communication port between rabbitmq nodes is
15672:RabbitMQ HTTP_API port, which can only be accessed by administrator users. It is used to manage rabbitmq. The Management plug-in needs to be started.
18838883: the port on which the MQTT plug-in starts.
61613, 61614: the port when the STOMP client plug-in is enabled.
15674, 15675: STOMP port and MOTT port based on webssocket
It must be noted that RabbitMQ will bind some ports after installation. If you purchase Alibaba cloud or Tencent cloud related servers, you must add the corresponding ports to the firewall in the security group.
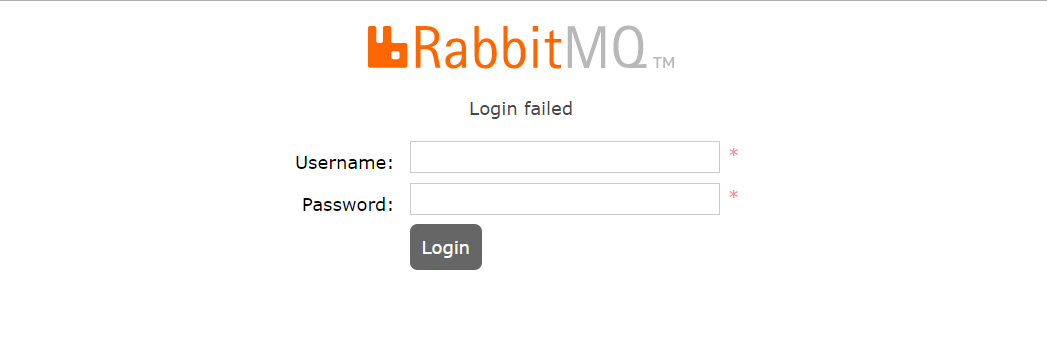
RabbitMQWeb management interface and authorization operation
RabbitMQ management interface
By default, rabbitmq is a client-side plug-in that is not installed on the web side. It needs to be installed before it can take effect
rabbitmq-plugins enable rabbitmq_management
Note: rabbitmq has a default account and password: guest can only be accessed under localhost by default, so you need to add a remote login user.
After installation, restart the service
systemctl restart rabbitmq-server
Remember to open the 15672 port in the security group of the corresponding server (Alibaba cloud, Tencent cloud, etc.).
Access in browser
http://ip:15672/ As follows:
Authorized account and password
New user
rabbitmqctl add_user admin admin
Set user assigned operation permissions
rabbitmqctl set_user_tags admin administrator
User level:
- 1. administrator can log in to the console, view all information, and manage rabbitmq
- 2. The monitoring monitor logs in to the console to view all information
- 3. policymaker the policy maker logs in to the console and specifies the policy
- 4. Management common administrator login console
Add resource permissions for users
windows
rabbitmqctl.bat set_permissions -p / admin ".*" ".*" ".*"
linux
rabbitmqctl set_permissions -p / admin ".*" ".*" ".*"
Summary:
rabbitmqctl add_user Account password
rabbitmqctl set_user_tags account number administrator
rabbitmqctl change_password Username Newpassword Change Password
rabbitmqctl delete_user Username delete user
rabbitmqctl list_users View user list
rabbitmqctl set_permissions -p / user name ".*" ".*" ".*" Set for user administrator role
rabbitmqctl set_permissions -p / root ".*" ".*" ".*"
Docker installation of RabbitMQ
Docker installing RabbitMQ
Virtualization container technology - Installation of Docker
(1)yum Update package to latest
> yum update
(2)Install the required packages, yum-util provide yum-config-manager Function, the other two are devicemapper Drive dependent
> yum install -y yum-utils device-mapper-persistent-data lvm2
(3)set up yum Source: alicloud
> yum-config-manager --add-repo http://mirrors.aliyun.com/docker-ce/linux/centos/docker-ce.repo
(4)install docker
> yum install docker-ce -y
(5)View after installation docker edition
> docker -v
 (6) Install accelerated mirror
 sudo mkdir -p /etc/docker
 sudo tee /etc/docker/daemon.json <<-'EOF'
 {
  "registry-mirrors": ["https://0wrdwnn6.mirror.aliyuncs.com"]
 }
 EOF
 sudo systemctl daemon-reload
 sudo systemctl restart docker
``
### Related commands of docker
```bash
# Start docker:
systemctl start docker
# Stop docker:
systemctl stop docker
# Restart docker:
systemctl restart docker
# View docker status:
systemctl status docker
# Startup:
systemctl enable docker
systemctl unenable docker
# View docker profile
docker info
# View docker help documentation
docker --help
Installing rabbitmq
Reference website:
1: https://www.rabbitmq.com/download.html
2: https://registry.hub.docker.com/_/rabbitmq/
Get rabbit image:
docker pull rabbitmq:management
Create and run containers
docker run -di --name=myrabbit -p 15672:15672 rabbitmq:management
- hostname: Specifies the container host name
- Name: Specifies the container name
-p: Map mq port numbers to local
Or set the user and password at runtime
docker run -di --name myrabbit -e RABBITMQ_DEFAULT_USER=admin -e RABBITMQ_DEFAULT_PASS=admin -p 15672:15672 -p 5672:5672 -p 25672:25672 -p 61613:61613 -p 1883:1883 rabbitmq:management
view log
docker logs -f myrabbit
The container operates normally
Use http: / / your IP address: 15672 to access the rabbit console
Additional Linux related troubleshooting commands
> more xxx.log  View journal information
> netstat -naop | grep 5672 Check whether the port is occupied
> ps -ef | grep 5672  View process
> systemctl stop service
Role classification of RabbitMQ
Role classification of RabbitMQ
none:
- The management plugin cannot be accessed
management: view related node information
- List the virtual machines that you can log in through AMQP
- View the queues,exchanges and bindings information of your virtual machine node virtual hosts
- View and close your channels and connections
- View statistics about your virtual machine node virtual hosts. Include the activity information of other users in the virtual hosts of this node.
Policymaker
- Include all management permissions
- View, create and delete the policies and parameters information to which your virtual hosts belong.
Monitoring
- Include all management permissions
- List all virtual hosts, including virtual hosts that cannot log in.
- View the connections and channels information of other users
- View node level data, such as clustering and memory usage
- View global statistics for all virtual hosts.
Administrator
- Highest authority
- You can create and delete virtual hosts
- users can be viewed, created and deleted
- View and create permissions
- Close connections for all users
Specific operation interface

RabbitMQ introduction case - Simple mode
Implementation steps
1: jdk1.8
2: Build a maven project
3: Import maven dependency of rabbitmq
4: Start rabbitmq server service
5: Define producer
6: Define consumer
7: Observe the process of messages in rabbitmq server service
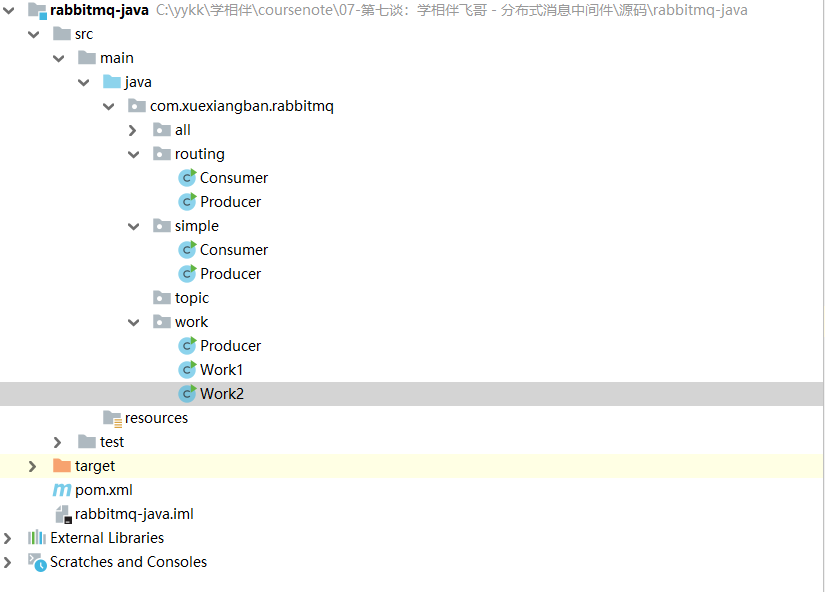
Build a maven project
Import maven dependency of rabbitmq
Java Native dependencies
<dependency>
    <groupId>com.rabbitmq</groupId>
    <artifactId>amqp-client</artifactId>
    <version>5.10.0</version>
</dependency>
spring dependency
<dependency>
    <groupId>org.springframework.amqp</groupId>
    <artifactId>spring-amqp</artifactId>
    <version>2.2.5.RELEASE</version>
</dependency>
<dependency>
    <groupId>org.springframework.amqp</groupId>
    <artifactId>spring-rabbit</artifactId>
    <version>2.2.5.RELEASE</version>
</dependency>
springboot dependency
<dependency>
    <groupId>org.springframework.boot</groupId>
    <artifactId>spring-boot-starter-amqp</artifactId>
</dependency>
The above can be selected according to your own project environment.
Fan Wai: rabbitmq and spring are open products of the same company, so their support is also very perfect, which is one reason why rabbitmq is recommended.
Start rabbitmq server service
systemctl start rabbitmq-server
 perhaps
docker start myrabbit
Define producer
import com.rabbitmq.client.Channel;
import com.rabbitmq.client.Connection;
import com.rabbitmq.client.ConnectionFactory;
/**
 * @author: Learning companion - flying brother
 * @description: Producer Simple queue producer
 * @Date : 2021/3/2
 */
public class Producer {
    public static void main(String[] args) {
        // 1: Create connection factory
        ConnectionFactory connectionFactory = new ConnectionFactory();
        // 2: Set connection properties
        connectionFactory.setHost("47.104.141.27");
        connectionFactory.setPort(5672);
        connectionFactory.setVirtualHost("/");
        connectionFactory.setUsername("admin");
        connectionFactory.setPassword("admin");
        Connection connection = null;
        Channel channel = null;
        try {
            // 3: Get connection from connection factory
            connection = connectionFactory.newConnection("producer");
            // 4: Get channel from connection
            channel = connection.createChannel();
            // 5: Declare that the queue stores messages
            /*
             *  If the queue does not exist, it is created
             *  Rabbitmq It is not allowed to create two identical queue names, otherwise an error will be reported.
             *
             *  @params1:  queue The name of the queue
             *  @params2:  durable Is the queue persistent
             *  @params3:  exclusive Exclusive, that is, private. If true, the current queue will be locked, other channels cannot be accessed, and the connection will be closed automatically
             *  @params4:  autoDelete Whether to delete the message automatically, and whether to delete the message automatically after the last consumer disconnects.
             *  @params5:  arguments You can set additional parameters of the queue, the validity period of the queue, the maximum length of messages, the message life cycle of the queue, and so on.
             * */
            channel.queueDeclare("queue1", false, false, false, null);
            // 6: Prepare to send the contents of the message
            String message = "Hello, learn to accompany!!!";
            // 7: Send a message to the middleware rabbitmq server
            // @params1: switch exchange
            // @params2: queue name / routing
            // @params3: property configuration
            // @params4: send message content
            channel.basicPublish("", "queue1", null, message.getBytes());
            System.out.println("Message sent successfully!");
        } catch (Exception ex) {
            ex.printStackTrace();
            System.out.println("Exception in sending message...");
        } finally {
            // 7: Release connection close channel
            if (channel != null && channel.isOpen()) {
                try {
                    channel.close();
                } catch (Exception ex) {
                    ex.printStackTrace();
                }
            }
            if (connection != null) {
                try {
                    connection.close();
                } catch (Exception ex) {
                    ex.printStackTrace();
                }
            }
        }
    }
}
Execute sending. At this time, you can view the information of the queue on the web console
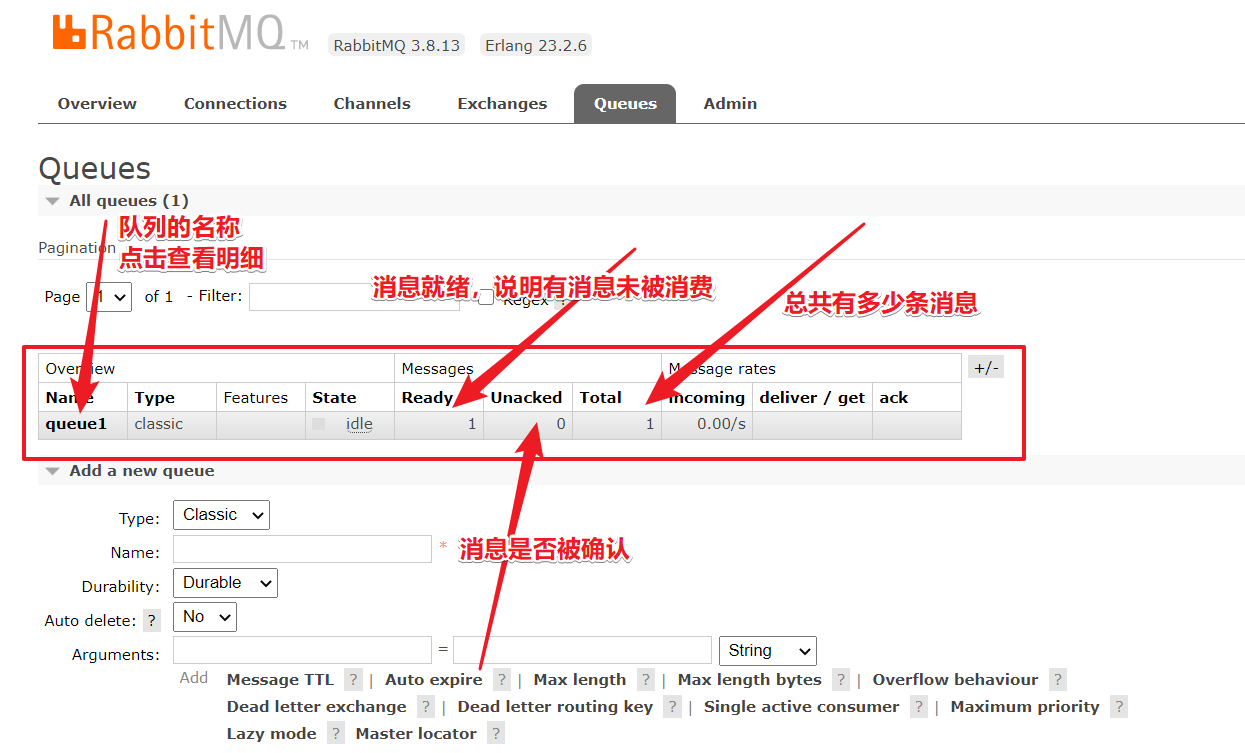

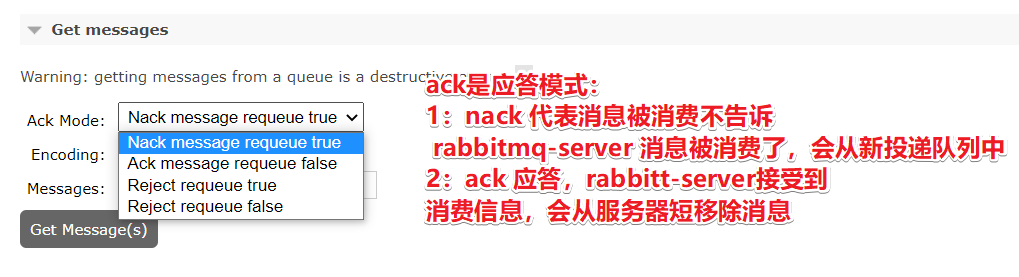
We can preview and test the messages in the queue as follows:
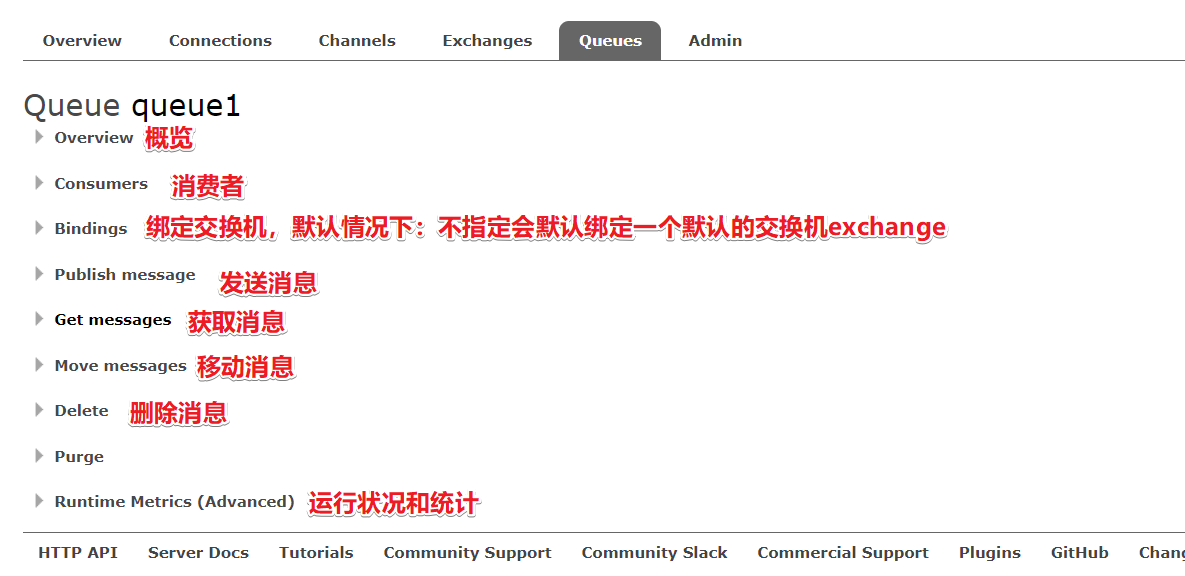
Preview and get messages for testing
Define consumer
import com.rabbitmq.client.Channel;
import com.rabbitmq.client.Connection;
import com.rabbitmq.client.ConnectionFactory;
/**
 * @author: Learning companion - flying brother
 * @description: Producer Simple queue producer
 * @Date : 2021/3/2
 */
public class Producer {
    public static void main(String[] args) {
        // 1: Create connection factory
        ConnectionFactory connectionFactory = new ConnectionFactory();
        // 2: Set connection properties
        connectionFactory.setHost("47.104.141.27");
        connectionFactory.setPort(5672);
        connectionFactory.setVirtualHost("/");
        connectionFactory.setUsername("admin");
        connectionFactory.setPassword("admin");
        Connection connection = null;
        Channel channel = null;
        try {
            // 3: Get connection from connection factory
            connection = connectionFactory.newConnection("producer");
            // 4: Get channel from connection
            channel = connection.createChannel();
            // 5: Declare that the queue stores messages
            /*
             *  If the queue does not exist, it is created
             *  Rabbitmq It is not allowed to create two identical queue names, otherwise an error will be reported.
             *
             *  @params1:  queue The name of the queue
             *  @params2:  durable Is the queue persistent
             *  @params3:  exclusive Exclusive, that is, private. If true, the current queue will be locked, other channels cannot be accessed, and the connection will be closed automatically
             *  @params4:  autoDelete Whether to delete the message automatically, and whether to delete the message automatically after the last consumer disconnects.
             *  @params5:  arguments You can set additional parameters of the queue, the validity period of the queue, the maximum length of messages, the message life cycle of the queue, and so on.
             * */
            channel.queueDeclare("queue1", false, false, false, null);
            // 6: Prepare to send the contents of the message
            String message = "Hello, learn to accompany!!!";
            // 7: Send a message to the middleware rabbitmq server
            // @params1: switch exchange
            // @params2: queue name / routing
            // @params3: property configuration
            // @params4: send message content
            channel.basicPublish("", "queue1", null, message.getBytes());
            System.out.println("Message sent successfully!");
        } catch (Exception ex) {
            ex.printStackTrace();
            System.out.println("Exception in sending message...");
        } finally {
            // 7: Release connection close channel
            if (channel != null && channel.isOpen()) {
                try {
                    channel.close();
                } catch (Exception ex) {
                    ex.printStackTrace();
                }
            }
            if (connection != null) {
                try {
                    connection.close();
                } catch (Exception ex) {
                    ex.printStackTrace();
                }
            }
        }
    }
}
Run view rabbit console
AMQP
What is AMQP
Full name of AMQP: Advanced message queuing protocol. It is a development standard of application layer protocol and is designed for message oriented middleware.
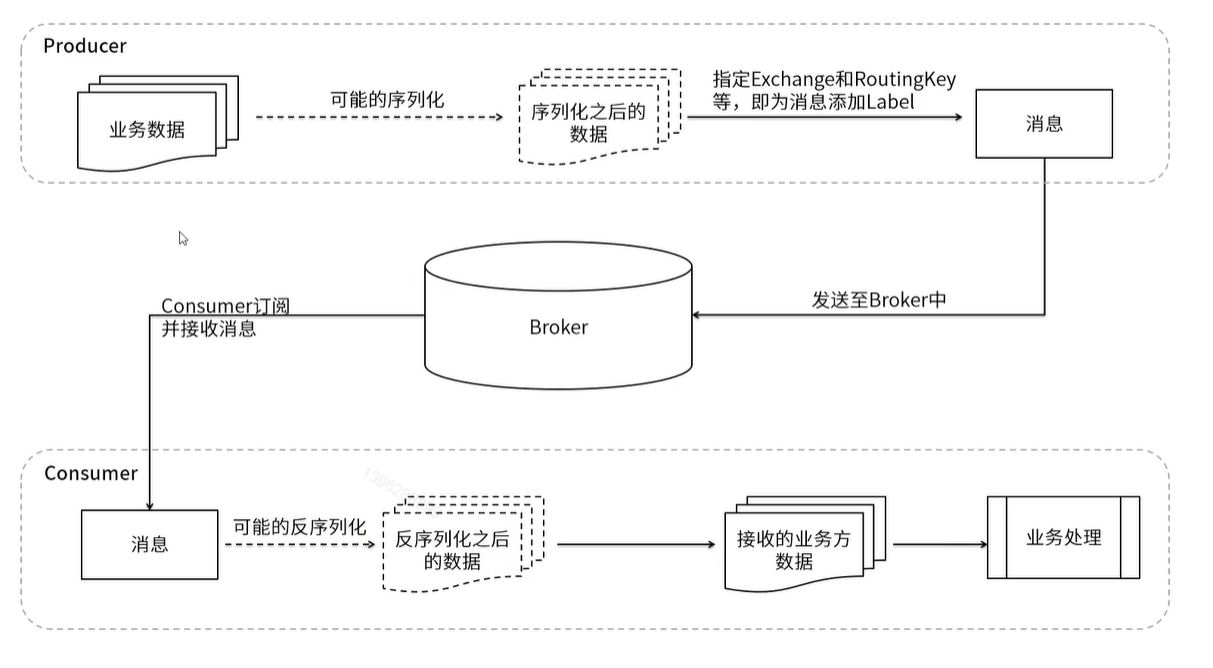
AMQP producer flow process
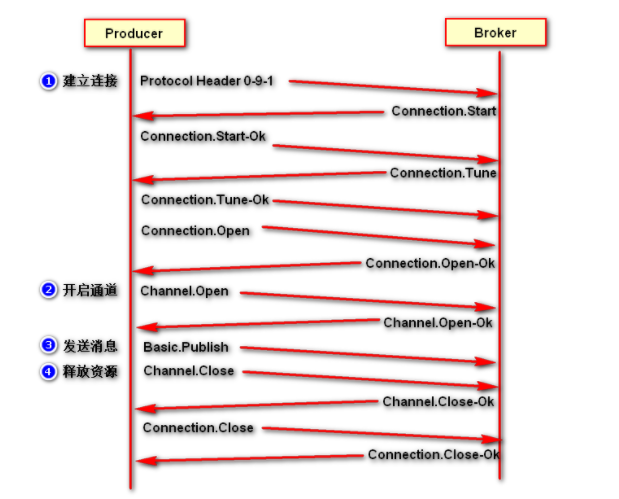
AMQP consumer circulation process
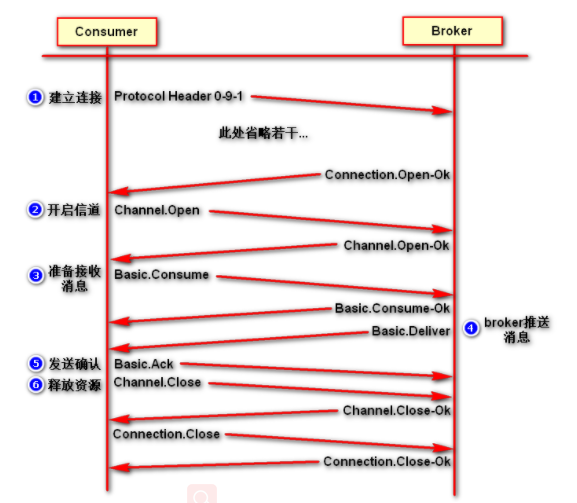
The core components of RabbitMQ
The core components of RabbitMQ
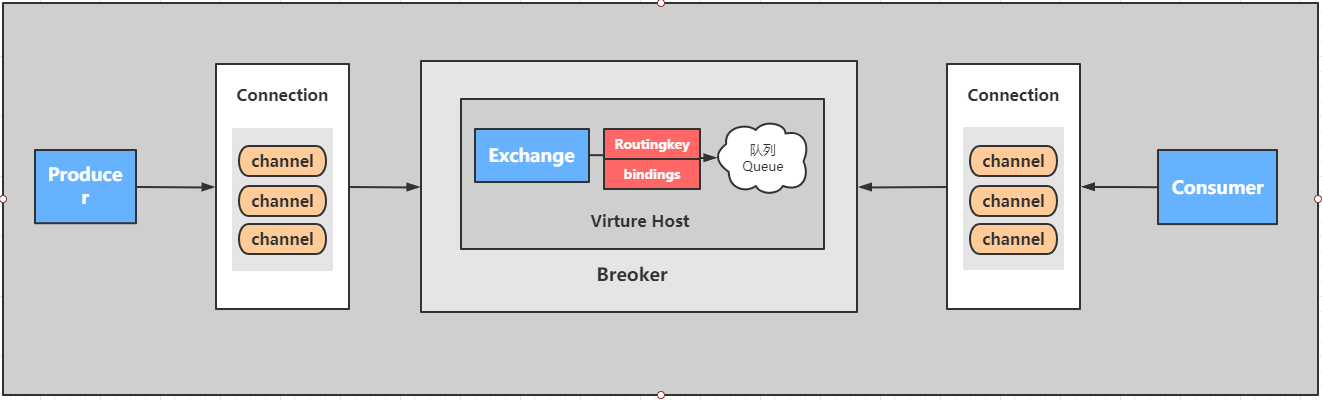
Core concepts:
Server: also known as Broker, it accepts client connections and implements AMQP entity services. Install rabbitmq server
Connection: connection, the network connection between the application and the Broker, TCP/IP / three handshakes and four waves
Channel: network channel. Almost all operations are carried out in the channel. The channel is the channel for message reading and writing. The client can establish access to each channel, and each channel represents a session task.
Message: Message: the data transmitted between the service and the application. It is composed of properties and body. Properties can modify the message, such as message priority, delay and other advanced features. Body is the content of the message body.
The Virtual Host virtual address is used for logical isolation and message routing at the top layer. A Virtual Host can have several exhanges and queues. There can be no Exchange with the same name in the same Virtual Host
Exchange: the switch accepts messages and sends messages to the bound queue according to the routing key. (not capable of message storage)
Bindings: virtual connection between Exchange and Queue. Multiple routing key s can be protected in binding
Routing key: a routing rule that virtual machines can use to determine how to route a specific message.
Queue: queue: also known as Message Queue, Message Queue, saves messages and forwards them to consumers.
What does the overall architecture of RabbitMQ look like?
Running process of RabbitMQ
RabbitMQ supports message mode
Refer to the official website: https://www.rabbitmq.com/getstarted.html
Simple mode
Work mode
- Type: None
- Features: distribution mechanism
Publish subscribe mode
Type: fanout
Features: Fanout - publish and subscribe mode. It is a broadcast mechanism. It is a mode without routing key.
Routing mode
- Type: direct
- Features: matching mode with routing key
Topic mode
- Type: topic
- Features: fuzzy routing key matching pattern
Parameter mode
- Type: headers
- Features: parameter matching mode
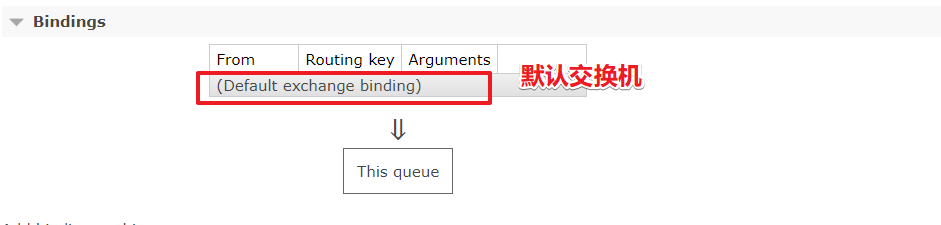
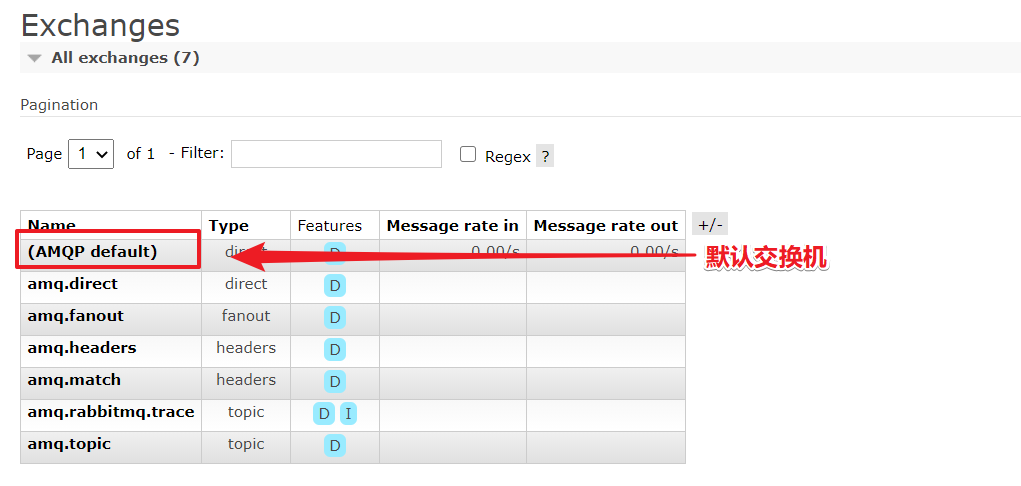
Summary
rabbitmq must have a switch to send messages
RabbitMQ entry case - fanout mode
RabbitMQ supports message mode
Refer to the official website: https://www.rabbitmq.com/getstarted.html
Publish subscribe mode of RabbitMQ
Illustration:
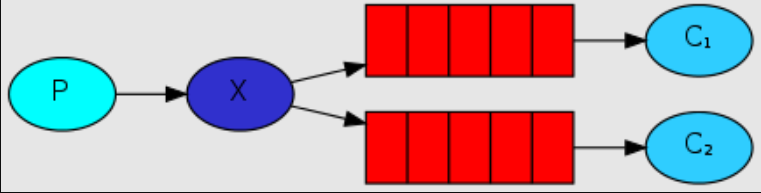
Implementation of publish subscribe mode
Type: fanout
Features: Fanout - publish and subscribe mode. It is a broadcast mechanism. It is a mode without routing key.
producer
import com.rabbitmq.client.Channel;
import com.rabbitmq.client.Connection;
import com.rabbitmq.client.ConnectionFactory;
/**
 * @author: Learning companion - flying brother
 * @description: Producer Simple queue producer
 * @Date : 2021/3/2
 */
public class Producer {
    public static void main(String[] args) {
        // 1: Create connection factory
        ConnectionFactory connectionFactory = new ConnectionFactory();
        // 2: Set connection properties
        connectionFactory.setHost("47.104.141.27");
        connectionFactory.setPort(5672);
        connectionFactory.setVirtualHost("/");
        connectionFactory.setUsername("admin");
        connectionFactory.setPassword("admin");
        Connection connection = null;
        Channel channel = null;
        try {
            // 3: Get connection from connection factory
            connection = connectionFactory.newConnection("producer");
            // 4: Get channel from connection
            channel = connection.createChannel();
            // 6: Prepare to send the contents of the message
            String message = "Hello, learn to accompany!!!";
            String  exchangeName = "fanout-exchange";
            String routingKey = "";
            // 7: Send a message to the middleware rabbitmq server
            // @params1: switch exchange
            // @params2: queue name / routingkey
            // @params3: property configuration
            // @params4: send message content
            channel.basicPublish(exchangeName, routingKey, null, message.getBytes());
            System.out.println("Message sent successfully!");
        } catch (Exception ex) {
            ex.printStackTrace();
            System.out.println("Exception in sending message...");
        } finally {
            // 7: Release connection close channel
            if (channel != null && channel.isOpen()) {
                try {
                    channel.close();
                } catch (Exception ex) {
                    ex.printStackTrace();
                }
            }
            if (connection != null) {
                try {
                    connection.close();
                } catch (Exception ex) {
                    ex.printStackTrace();
                }
            }
        }
    }
}
consumer
package com.xuexiangban.rabbitmq.routing;
import com.rabbitmq.client.*;
import java.io.IOException;
/**
 * @author: Learning companion - flying brother
 * @description: Consumer
 * @Date : 2021/3/2
 */
public class Consumer {
    private static Runnable runnable = () -> {
        // 1: Create connection factory
        ConnectionFactory connectionFactory = new ConnectionFactory();
        // 2: Set connection properties
        connectionFactory.setHost("47.104.141.27");
        connectionFactory.setPort(5672);
        connectionFactory.setVirtualHost("/");
        connectionFactory.setUsername("admin");
        connectionFactory.setPassword("admin");
        //Gets the name of the queue
        final String queueName = Thread.currentThread().getName();
        Connection connection = null;
        Channel channel = null;
        try {
            // 3: Get connection from connection factory
            connection = connectionFactory.newConnection("producer");
            // 4: Get channel from connection
            channel = connection.createChannel();
            // 5: Declare that the queue stores messages
            /*
             *  If the queue does not exist, it is created
             *  Rabbitmq It is not allowed to create two identical queue names, otherwise an error will be reported.
             *
             *  @params1:  queue The name of the queue
             *  @params2:  durable Is the queue persistent
             *  @params3:  exclusive Exclusive, that is, private. If true, the current queue will be locked, other channels cannot be accessed, and the connection will be closed automatically
             *  @params4:  autoDelete Whether to delete the message automatically, and whether to delete the message automatically after the last consumer disconnects.
             *  @params5:  arguments You can set additional parameters of the queue, the validity period of the queue, the maximum length of messages, the message life cycle of the queue, and so on.
             * */
            // Here, if the queue has been created once, it does not need to be defined
            //channel.queueDeclare("queue1", false, false, false, null);
            // 6: Defines a callback that accepts messages
            Channel finalChannel = channel;
            finalChannel.basicConsume(queueName, true, new DeliverCallback() {
                @Override
                public void handle(String s, Delivery delivery) throws IOException {
                    System.out.println(queueName + ": The message received is:" + new String(delivery.getBody(), "UTF-8"));
                }
            }, new CancelCallback() {
                @Override
                public void handle(String s) throws IOException {
                }
            });
            System.out.println(queueName + ": Start receiving messages");
            System.in.read();
        } catch (Exception ex) {
            ex.printStackTrace();
            System.out.println("Exception in sending message...");
        } finally {
            // 7: Release connection close channel
            if (channel != null && channel.isOpen()) {
                try {
                    channel.close();
                } catch (Exception ex) {
                    ex.printStackTrace();
                }
            }
            if (connection != null && connection.isOpen()) {
                try {
                    connection.close();
                } catch (Exception ex) {
                    ex.printStackTrace();
                }
            }
        }
    };
    public static void main(String[] args) {
        // Start three threads to execute
        new Thread(runnable, "queue-1").start();
        new Thread(runnable, "queue-2").start();
        new Thread(runnable, "queue-3").start();
    }
}
RabbitMQ starter case - Direct mode
Direct mode of RabbitMQ
graphic
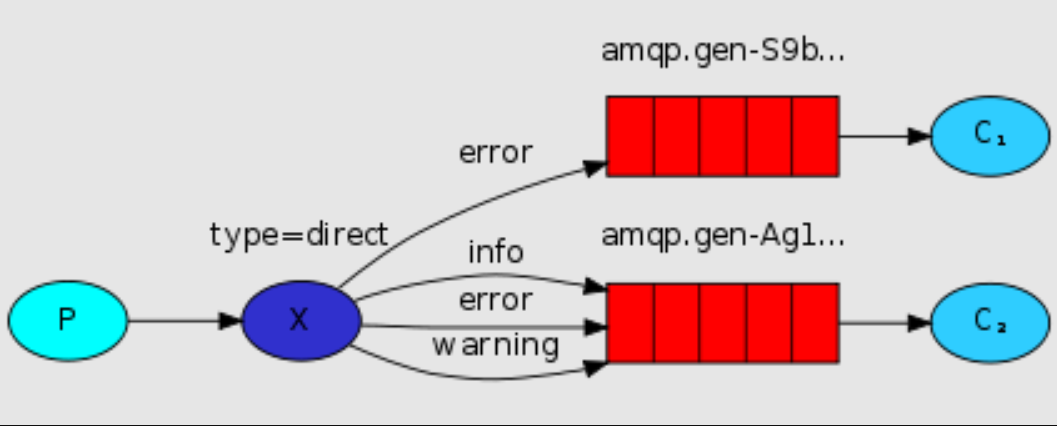
Implementation of publish subscribe mode
Type: direct
Features: Direct mode is a superposition of fanout mode and adds the routing RoutingKey mode.
producer
import com.rabbitmq.client.Channel;
import com.rabbitmq.client.Connection;
import com.rabbitmq.client.ConnectionFactory;
/**
 * @author: Learning companion - flying brother
 * @description: Producer Simple queue producer
 * @Date : 2021/3/2
 */
public class Producer {
    public static void main(String[] args) {
        // 1: Create connection factory
        ConnectionFactory connectionFactory = new ConnectionFactory();
        // 2: Set connection properties
        connectionFactory.setHost("47.104.141.27");
        connectionFactory.setPort(5672);
        connectionFactory.setVirtualHost("/");
        connectionFactory.setUsername("admin");
        connectionFactory.setPassword("admin");
        Connection connection = null;
        Channel channel = null;
        try {
            // 3: Get connection from connection factory
            connection = connectionFactory.newConnection("producer");
            // 4: Get channel from connection
            channel = connection.createChannel();
            // 6: Prepare to send the contents of the message
            String message = "Hello, learn to accompany!!!";
            String  exchangeName = "direct-exchange";
            String routingKey1 = "testkey";
            String routingKey2 = "testkey2";
            // 7: Send a message to the middleware rabbitmq server
            // @params1: switch exchange
            // @params2: queue name / routingkey
            // @params3: property configuration
            // @params4: send message content
            channel.basicPublish(exchangeName, routingKey1, null, message.getBytes());
            channel.basicPublish(exchangeName, routingKey2, null, message.getBytes());
            System.out.println("Message sent successfully!");
        } catch (Exception ex) {
            ex.printStackTrace();
            System.out.println("Exception in sending message...");
        } finally {
            // 7: Release connection close channel
            if (channel != null && channel.isOpen()) {
                try {
                    channel.close();
                } catch (Exception ex) {
                    ex.printStackTrace();
                }
            }
            if (connection != null) {
                try {
                    connection.close();
                } catch (Exception ex) {
                    ex.printStackTrace();
                }
            }
        }
    }
}
consumer
import com.rabbitmq.client.*;
import java.io.IOException;
/**
 * @author: Learning companion - flying brother
 * @description: Consumer
 * @Date : 2021/3/2
 */
public class Consumer {
    private static Runnable runnable = () -> {
        // 1: Create connection factory
        ConnectionFactory connectionFactory = new ConnectionFactory();
        // 2: Set connection properties
        connectionFactory.setHost("47.104.141.27");
        connectionFactory.setPort(5672);
        connectionFactory.setVirtualHost("/");
        connectionFactory.setUsername("admin");
        connectionFactory.setPassword("admin");
        //Gets the name of the queue
        final String queueName = Thread.currentThread().getName();
        Connection connection = null;
        Channel channel = null;
        try {
            // 3: Get connection from connection factory
            connection = connectionFactory.newConnection("producer");
            // 4: Get channel from connection
            channel = connection.createChannel();
            // 5: Declare that the queue stores messages
            /*
             *  If the queue does not exist, it is created
             *  Rabbitmq It is not allowed to create two identical queue names, otherwise an error will be reported.
             *
             *  @params1:  queue The name of the queue
             *  @params2:  durable Is the queue persistent
             *  @params3:  exclusive Exclusive, that is, private. If true, the current queue will be locked, other channels cannot be accessed, and the connection will be closed automatically
             *  @params4:  autoDelete Whether to delete the message automatically, and whether to delete the message automatically after the last consumer disconnects.
             *  @params5:  arguments You can set additional parameters of the queue, the validity period of the queue, the maximum length of messages, the message life cycle of the queue, and so on.
             * */
            // Here, if the queue has been created once, it does not need to be defined
            //channel.queueDeclare("queue1", false, false, false, null);
            // 6: Defines a callback that accepts messages
            Channel finalChannel = channel;
            finalChannel.basicConsume(queueName, true, new DeliverCallback() {
                @Override
                public void handle(String s, Delivery delivery) throws IOException {
                    System.out.println(queueName + ": The message received is:" + new String(delivery.getBody(), "UTF-8"));
                }
            }, new CancelCallback() {
                @Override
                public void handle(String s) throws IOException {
                }
            });
            System.out.println(queueName + ": Start receiving messages");
            System.in.read();
        } catch (Exception ex) {
            ex.printStackTrace();
            System.out.println("Exception in sending message...");
        } finally {
            // 7: Release connection close channel
            if (channel != null && channel.isOpen()) {
                try {
                    channel.close();
                } catch (Exception ex) {
                    ex.printStackTrace();
                }
            }
            if (connection != null && connection.isOpen()) {
                try {
                    connection.close();
                } catch (Exception ex) {
                    ex.printStackTrace();
                }
            }
        }
    };
    public static void main(String[] args) {
        // Start three threads to execute
        new Thread(runnable, "queue-1").start();
        new Thread(runnable, "queue-2").start();
        new Thread(runnable, "queue-3").start();
    }
}
RabbitMQ introduction case - Topic mode
Topic mode of RabbitMQ
graphic
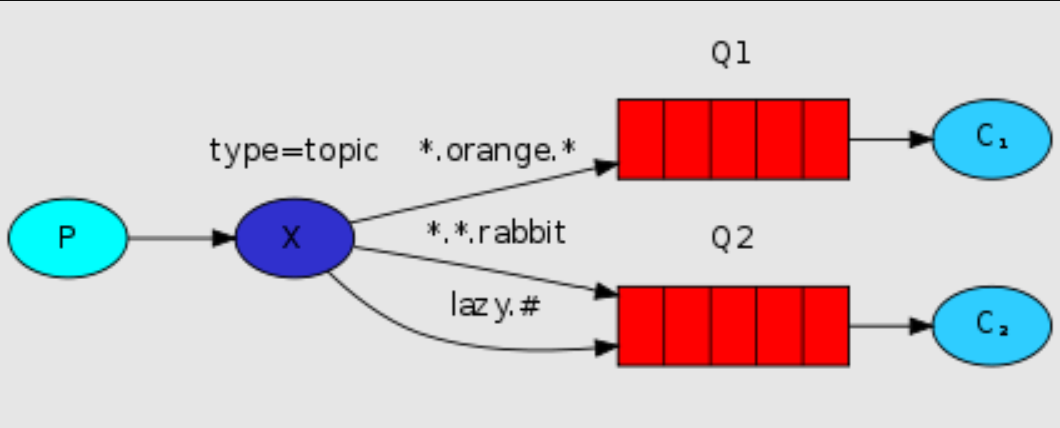
Implementation of publish subscribe mode
Type: topic
Features: Topic mode is a superposition of direct mode and adds the mode of fuzzy routing RoutingKey.
import com.rabbitmq.client.Channel;
import com.rabbitmq.client.Connection;
import com.rabbitmq.client.ConnectionFactory;
/**
 * @author: Learning companion - flying brother
 * @description: Producer Simple queue producer
 * @Date : 2021/3/2
 */
public class Producer {
    public static void main(String[] args) {
        // 1: Create connection factory
        ConnectionFactory connectionFactory = new ConnectionFactory();
        // 2: Set connection properties
        connectionFactory.setHost("47.104.141.27");
        connectionFactory.setPort(5672);
        connectionFactory.setVirtualHost("/");
        connectionFactory.setUsername("admin");
        connectionFactory.setPassword("admin");
        Connection connection = null;
        Channel channel = null;
        try {
            // 3: Get connection from connection factory
            connection = connectionFactory.newConnection("producer");
            // 4: Get channel from connection
            channel = connection.createChannel();
            // 6: Prepare to send the contents of the message
            String message = "Hello, learn to accompany!!!";
            String  exchangeName = "topic-exchange";
            String routingKey1 = "com.course.order";//Can receive queue-1 and queue-2
            String routingKey2 = "com.order.user";//Can receive queue-1 and queue-3
            // 7: Send a message to the middleware rabbitmq server
            // @params1: switch exchange
            // @params2: queue name / routingkey
            // @params3: property configuration
            // @params4: send message content
            channel.basicPublish(exchangeName, routingKey1, null, message.getBytes());
            System.out.println("Message sent successfully!");
        } catch (Exception ex) {
            ex.printStackTrace();
            System.out.println("Exception in sending message...");
        } finally {
            // 7: Release connection close channel
            if (channel != null && channel.isOpen()) {
                try {
                    channel.close();
                } catch (Exception ex) {
                    ex.printStackTrace();
                }
            }
            if (connection != null) {
                try {
                    connection.close();
                } catch (Exception ex) {
                    ex.printStackTrace();
                }
            }
        }
    }
}
consumer
package com.xuexiangban.rabbitmq.routing;
import com.rabbitmq.client.*;
import java.io.IOException;
/**
 * @author: Learning companion - flying brother
 * @description: Consumer
 * @Date : 2021/3/2
 */
public class Consumer {
    private static Runnable runnable = () -> {
        // 1: Create connection factory
        ConnectionFactory connectionFactory = new ConnectionFactory();
        // 2: Set connection properties
        connectionFactory.setHost("47.104.141.27");
        connectionFactory.setPort(5672);
        connectionFactory.setVirtualHost("/");
        connectionFactory.setUsername("admin");
        connectionFactory.setPassword("admin");
        //Gets the name of the queue
        final String queueName = Thread.currentThread().getName();
        Connection connection = null;
        Channel channel = null;
        try {
            // 3: Get connection from connection factory
            connection = connectionFactory.newConnection("producer");
            // 4: Get channel from connection
            channel = connection.createChannel();
            // 5: Declare that the queue stores messages
            /*
             *  If the queue does not exist, it is created
             *  Rabbitmq It is not allowed to create two identical queue names, otherwise an error will be reported.
             *
             *  @params1:  queue The name of the queue
             *  @params2:  durable Is the queue persistent
             *  @params3:  exclusive Exclusive, that is, private. If true, the current queue will be locked, other channels cannot be accessed, and the connection will be closed automatically
             *  @params4:  autoDelete Whether to delete the message automatically, and whether to delete the message automatically after the last consumer disconnects.
             *  @params5:  arguments You can set additional parameters of the queue, the validity period of the queue, the maximum length of messages, the message life cycle of the queue, and so on.
             * */
            // Here, if the queue has been created once, it does not need to be defined
            //channel.queueDeclare("queue1", false, false, false, null);
            // 6: Defines a callback that accepts messages
            Channel finalChannel = channel;
            finalChannel.basicConsume(queueName, true, new DeliverCallback() {
                @Override
                public void handle(String s, Delivery delivery) throws IOException {
                    System.out.println(queueName + ": The message received is:" + new String(delivery.getBody(), "UTF-8"));
                }
            }, new CancelCallback() {
                @Override
                public void handle(String s) throws IOException {
                }
            });
            System.out.println(queueName + ": Start receiving messages");
            System.in.read();
        } catch (Exception ex) {
            ex.printStackTrace();
            System.out.println("Exception in sending message...");
        } finally {
            // 7: Release connection close channel
            if (channel != null && channel.isOpen()) {
                try {
                    channel.close();
                } catch (Exception ex) {
                    ex.printStackTrace();
                }
            }
            if (connection != null && connection.isOpen()) {
                try {
                    connection.close();
                } catch (Exception ex) {
                    ex.printStackTrace();
                }
            }
        }
    };
    public static void main(String[] args) {
        // Start three threads to execute
        new Thread(runnable, "queue-1").start();
        new Thread(runnable, "queue-2").start();
        new Thread(runnable, "queue-3").start();
    }
}
Full creation method
Declare a switch of type direct
package com.xuexiangban.rabbitmq.routing;
import com.rabbitmq.client.Channel;
import com.rabbitmq.client.Connection;
import com.rabbitmq.client.ConnectionFactory;
/**
 * @author: Learning companion - flying brother
 * @description: Producer Simple queue producer
 * @Date : 2021/3/2
 */
public class Producer {
    public static void main(String[] args) {
        // 1: Create connection factory
        ConnectionFactory connectionFactory = new ConnectionFactory();
        // 2: Set connection properties
        connectionFactory.setHost("47.104.141.27");
        connectionFactory.setPort(5672);
        connectionFactory.setVirtualHost("/");
        connectionFactory.setUsername("admin");
        connectionFactory.setPassword("admin");
        Connection connection = null;
        Channel channel = null;
        try {
            // 3: Get connection from connection factory
            connection = connectionFactory.newConnection("producer");
            // 4: Get channel from connection
            channel = connection.createChannel();
            // 6: Prepare to send the contents of the message
            String message = "Hello, learn to accompany!!!";
            String  exchangeName = "direct-message-exchange";
            String exchangeType="direct";

	    //Claim switch
            channel.exchangeDeclare(exchangeName,exchangeType,true); //true means no loss
	    //Declaration queue
	    channel.queueDeclare("queue1", false, false, false, null);
	    //Binding the relationship between switch and queue
            channel.queueBind("queue1",exchangeName,"message");
	    channel.basicPublish(exchangeName, "message", null, message.getBytes());
            System.out.println("Message sent successfully!");
        } catch (Exception ex) {
            ex.printStackTrace();
            System.out.println("Exception in sending message...");
        } finally {
            // 7: Release connection close channel
            if (channel != null && channel.isOpen()) {
                try {
                    channel.close();
                } catch (Exception ex) {
                    ex.printStackTrace();
                }
            }
            if (connection != null) {
                try {
                    connection.close();
                } catch (Exception ex) {
                    ex.printStackTrace();
                }
            }
        }
    }
}
RabbitMQ entry case - Work mode - round robin
Work mode polling mode (round robin)
graphic
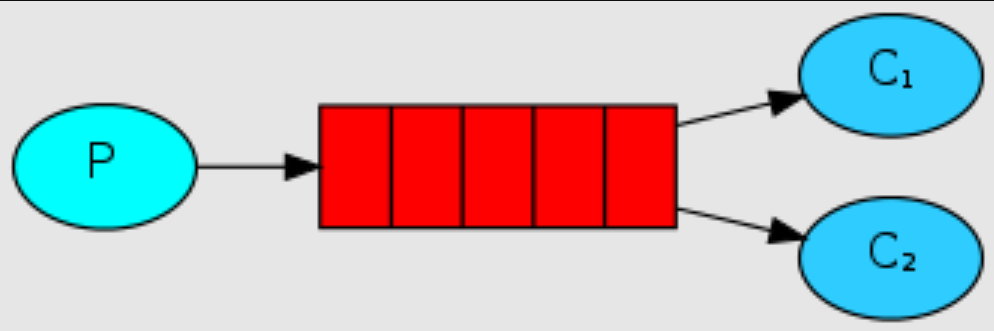
When there are multiple consumers, which consumer will consume our news, and how can we balance the amount of consumer consumption information?
There are two main modes:
1. Distribution in polling mode: one for each consumer, distributed equally;
2. Fair distribution: fair distribution is carried out according to the consumption capacity of consumers, with more fast processing and less slow processing; Distribution according to work;
Work mode - round robin
- Type: None
- Features: this mode receives messages. When multiple consumers access, the message allocation mode is that one message is allocated by one consumer until the message consumption is completed;
producer
import com.rabbitmq.client.Channel;
import com.rabbitmq.client.Connection;
import com.rabbitmq.client.ConnectionFactory;
/**
 * @author: Learning companion - flying brother
 * @description: Producer Simple queue producer
 * @Date : 2021/3/2
 */
public class Producer {
    public static void main(String[] args) {
        // 1: Create connection factory
        ConnectionFactory connectionFactory = new ConnectionFactory();
        // 2: Set connection properties
        connectionFactory.setHost("47.104.141.27");
        connectionFactory.setPort(5672);
        connectionFactory.setVirtualHost("/");
        connectionFactory.setUsername("admin");
        connectionFactory.setPassword("admin");
        Connection connection = null;
        Channel channel = null;
        try {
            // 3: Get connection from connection factory
            connection = connectionFactory.newConnection("producer");
            // 4: Get channel from connection
            channel = connection.createChannel();
            // 6: Prepare to send the contents of the message
            //===============================end topic mode==================================
            for (int i = 1; i <= 20; i++) {
                //Content of the message
                String msg = "Learning companion:" + i;
                // 7: Send a message to the middleware rabbitmq server
                // @params1: switch exchange
                // @params2: queue name / routingkey
                // @params3: property configuration
                // @params4: send message content
                channel.basicPublish("", "queue1", null, msg.getBytes());
            }
            System.out.println("Message sent successfully!");
        } catch (Exception ex) {
            ex.printStackTrace();
            System.out.println("Exception in sending message...");
        } finally {
            // 7: Release connection close channel
            if (channel != null && channel.isOpen()) {
                try {
                    channel.close();
                } catch (Exception ex) {
                    ex.printStackTrace();
                }
            }
            if (connection != null) {
                try {
                    connection.close();
                } catch (Exception ex) {
                    ex.printStackTrace();
                }
            }
        }
    }
}
Consumer - Work1
package com.xuexiangban.rabbitmq.work.lunxun;
import com.rabbitmq.client.*;
import java.io.IOException;
/**
 * @author: Learning companion - flying brother
 * @description: Consumer
 * @Date : 2021/3/2
 */
public class Work1 {
    public static void main(String[] args) {
        // 1: Create connection factory
        ConnectionFactory connectionFactory = new ConnectionFactory();
        // 2: Set connection properties
        connectionFactory.setHost("47.104.141.27");
        connectionFactory.setPort(5672);
        connectionFactory.setVirtualHost("/");
        connectionFactory.setUsername("admin");
        connectionFactory.setPassword("admin");
        Connection connection = null;
        Channel channel = null;
        try {
            // 3: Get connection from connection factory
            connection = connectionFactory.newConnection("consumer-Work1");
            // 4: Get channel from connection
            channel = connection.createChannel();
            // 5: Declare that the queue stores messages
            /*
             *  If the queue does not exist, it is created
             *  Rabbitmq It is not allowed to create two identical queue names, otherwise an error will be reported.
             *
             *  @params1:  queue The name of the queue
             *  @params2:  durable Is the queue persistent
             *  @params3:  exclusive Exclusive, that is, private. If true, the current queue will be locked, other channels cannot be accessed, and the connection will be closed automatically
             *  @params4:  autoDelete Whether to delete the message automatically, and whether to delete the message automatically after the last consumer disconnects.
             *  @params5:  arguments You can set additional parameters of the queue, the validity period of the queue, the maximum length of messages, the message life cycle of the queue, and so on.
             * */
            // Here, if the queue has been created once, it does not need to be defined
//            channel.queueDeclare("queue1", false, false, false, null);
            // At the same time, the server will only push one message to the consumer
            // 6: Defines a callback that accepts messages
            Channel finalChannel = channel;
            finalChannel.basicQos(1);
            finalChannel.basicConsume("queue1", true, new DeliverCallback() {
                @Override
                public void handle(String s, Delivery delivery) throws IOException {
                    try{
                        System.out.println("Work1-The message received is:" + new String(delivery.getBody(), "UTF-8"));
                        Thread.sleep(2000);
                    }catch(Exception ex){
                        ex.printStackTrace();
                    }
                }
            }, new CancelCallback() {
                @Override
                public void handle(String s) throws IOException {
                }
            });
            System.out.println("Work1-Start receiving messages");
            System.in.read();
        } catch (Exception ex) {
            ex.printStackTrace();
            System.out.println("Exception in sending message...");
        } finally {
            // 7: Release connection close channel
            if (channel != null && channel.isOpen()) {
                try {
                    channel.close();
                } catch (Exception ex) {
                    ex.printStackTrace();
                }
            }
            if (connection != null && connection.isOpen()) {
                try {
                    connection.close();
                } catch (Exception ex) {
                    ex.printStackTrace();
                }
            }
        }
    }
}
Consumer - Work2
import com.rabbitmq.client.*;
import java.io.IOException;
/**
 * @author: Learning companion - flying brother
 * @description: Consumer
 * @Date : 2021/3/2
 */
public class Work2 {
    public static void main(String[] args) {
        // 1: Create connection factory
        ConnectionFactory connectionFactory = new ConnectionFactory();
        // 2: Set connection properties
        connectionFactory.setHost("47.104.141.27");
        connectionFactory.setPort(5672);
        connectionFactory.setVirtualHost("/");
        connectionFactory.setUsername("admin");
        connectionFactory.setPassword("admin");
        Connection connection = null;
        Channel channel = null;
        try {
            // 3: Get connection from connection factory
            connection = connectionFactory.newConnection("consumer-Work2");
            // 4: Get channel from connection
            channel = connection.createChannel();
            // 5: Declare that the queue stores messages
            /*
             *  If the queue does not exist, it is created
             *  Rabbitmq It is not allowed to create two identical queue names, otherwise an error will be reported.
             *
             *  @params1:  queue The name of the queue
             *  @params2:  durable Is the queue persistent
             *  @params3:  exclusive Exclusive, that is, private. If true, the current queue will be locked, other channels cannot be accessed, and the connection will be closed automatically
             *  @params4:  autoDelete Whether to delete the message automatically, and whether to delete the message automatically after the last consumer disconnects.
             *  @params5:  arguments You can set additional parameters of the queue, the validity period of the queue, the maximum length of messages, the message life cycle of the queue, and so on.
             * */
            // Here, if the queue has been created once, it does not need to be defined
            //channel.queueDeclare("queue1", false, true, false, null);
            // At the same time, the server will only push one message to the consumer
            //channel.basicQos(1);
            // 6: Defines a callback that accepts messages
            Channel finalChannel = channel;
            finalChannel.basicQos(1);
            finalChannel.basicConsume("queue1", true, new DeliverCallback() {
                @Override
                public void handle(String s, Delivery delivery) throws IOException {
                    try{
                        System.out.println("Work2-The message received is:" + new String(delivery.getBody(), "UTF-8"));
                        Thread.sleep(200);
                    }catch(Exception ex){
                        ex.printStackTrace();
                    }
                }
            }, new CancelCallback() {
                @Override
                public void handle(String s) throws IOException {
                }
            });
            System.out.println("Work2-Start receiving messages");
            System.in.read();
        } catch (Exception ex) {
            ex.printStackTrace();
            System.out.println("Exception in sending message...");
        } finally {
            // 7: Release connection close channel
            if (channel != null && channel.isOpen()) {
                try {
                    channel.close();
                } catch (Exception ex) {
                    ex.printStackTrace();
                }
            }
            if (connection != null && connection.isOpen()) {
                try {
                    connection.close();
                } catch (Exception ex) {
                    ex.printStackTrace();
                }
            }
        }
    }
}
Summary
work1 and work2 have different message processing capabilities, but the number of messages processed in the end is the same, which is "distributed equally".
RabbitMQ entry case - Work mode - Fair Dispatch
Work mode - Fair Dispatch
graphic
When there are multiple consumers, which consumer will consume our news, and how can we balance the amount of consumer consumption information?
There are two main modes:
1. Distribution in polling mode: one for each consumer, distributed equally;
2. Fair distribution: fair distribution is carried out according to the consumption capacity of consumers, with more fast processing and less slow processing; distribution according to work
Work mode - Fair Dispatch
- Type: None
- Features: due to the different ability of message receivers to process messages, there is a problem of processing speed and slowness. We need those who can handle faster to process more and those who are slow to process less;
producer
import com.rabbitmq.client.Channel;
import com.rabbitmq.client.Connection;
import com.rabbitmq.client.ConnectionFactory;
/**
 * @author: Learning companion - flying brother
 * @description: Producer Simple queue producer
 * @Date : 2021/3/2
 */
public class Producer {
    public static void main(String[] args) {
        // 1: Create connection factory
        ConnectionFactory connectionFactory = new ConnectionFactory();
        // 2: Set connection properties
        connectionFactory.setHost("47.104.141.27");
        connectionFactory.setPort(5672);
        connectionFactory.setVirtualHost("/");
        connectionFactory.setUsername("admin");
        connectionFactory.setPassword("admin");
        Connection connection = null;
        Channel channel = null;
        try {
            // 3: Get connection from connection factory
            connection = connectionFactory.newConnection("producer");
            // 4: Get channel from connection
            channel = connection.createChannel();
            // 6: Prepare to send the contents of the message
            //===============================end topic mode==================================
            for (int i = 1; i <= 20; i++) {
                //Content of the message
                String msg = "Learning companion:" + i;
                // 7: Send a message to the middleware rabbitmq server
                // @params1: switch exchange
                // @params2: queue name / routingkey
                // @params3: property configuration
                // @params4: send message content
                channel.basicPublish("", "queue1", null, msg.getBytes());
            }
            System.out.println("Message sent successfully!");
        } catch (Exception ex) {
            ex.printStackTrace();
            System.out.println("Exception in sending message...");
        } finally {
            // 7: Release connection close channel
            if (channel != null && channel.isOpen()) {
                try {
                    channel.close();
                } catch (Exception ex) {
                    ex.printStackTrace();
                }
            }
            if (connection != null) {
                try {
                    connection.close();
                } catch (Exception ex) {
                    ex.printStackTrace();
                }
            }
        }
    }
}
Consumer - Work1
import com.rabbitmq.client.*;
import java.io.IOException;
/**
 * @author: Learning companion - flying brother
 * @description: Consumer
 * @Date : 2021/3/2
 */
public class Work1 {
    public static void main(String[] args) {
        // 1: Create connection factory
        ConnectionFactory connectionFactory = new ConnectionFactory();
        // 2: Set connection properties
        connectionFactory.setHost("47.104.141.27");
        connectionFactory.setPort(5672);
        connectionFactory.setVirtualHost("/");
        connectionFactory.setUsername("admin");
        connectionFactory.setPassword("admin");
        Connection connection = null;
        Channel channel = null;
        try {
            // 3: Get connection from connection factory
            connection = connectionFactory.newConnection("consumer-Work1");
            // 4: Get channel from connection
            channel = connection.createChannel();
            // 5: Declare that the queue stores messages
            /*
             *  If the queue does not exist, it is created
             *  Rabbitmq It is not allowed to create two identical queue names, otherwise an error will be reported.
             *
             *  @params1:  queue The name of the queue
             *  @params2:  durable Is the queue persistent
             *  @params3:  exclusive Exclusive, that is, private. If true, the current queue will be locked, other channels cannot be accessed, and the connection will be closed automatically
             *  @params4:  autoDelete Whether to delete the message automatically, and whether to delete the message automatically after the last consumer disconnects.
             *  @params5:  arguments You can set additional parameters of the queue, the validity period of the queue, the maximum length of messages, the message life cycle of the queue, and so on.
             * */
            // Here, if the queue has been created once, it does not need to be defined
//            channel.queueDeclare("queue1", false, false, false, null);
            // At the same time, the server will only push one message to the consumer
            // 6: Defines a callback that accepts messages
            Channel finalChannel = channel;
            finalChannel.basicQos(1);
            finalChannel.basicConsume("queue1", false, new DeliverCallback() {
                @Override
                public void handle(String s, Delivery delivery) throws IOException {
                    try{
                        System.out.println("Work1-The message received is:" + new String(delivery.getBody(), "UTF-8"));
                        Thread.sleep(2000);
                        finalChannel.basicAck(delivery.getEnvelope().getDeliveryTag(),false);
                    }catch(Exception ex){
                        ex.printStackTrace();
                    }
                }
            }, new CancelCallback() {
                @Override
                public void handle(String s) throws IOException {
                }
            });
            System.out.println("Work1-Start receiving messages");
            System.in.read();
        } catch (Exception ex) {
            ex.printStackTrace();
            System.out.println("Exception in sending message...");
        } finally {
            // 7: Release connection close channel
            if (channel != null && channel.isOpen()) {
                try {
                    channel.close();
                } catch (Exception ex) {
                    ex.printStackTrace();
                }
            }
            if (connection != null && connection.isOpen()) {
                try {
                    connection.close();
                } catch (Exception ex) {
                    ex.printStackTrace();
                }
            }
        }
    }
}
Consumer - Work2
import com.rabbitmq.client.*;
import java.io.IOException;
/**
 * @author: Learning companion - flying brother
 * @description: Consumer
 * @Date : 2021/3/2
 */
public class Work2 {
    public static void main(String[] args) {
        // 1: Create connection factory
        ConnectionFactory connectionFactory = new ConnectionFactory();
        // 2: Set connection properties
        connectionFactory.setHost("47.104.141.27");
        connectionFactory.setPort(5672);
        connectionFactory.setVirtualHost("/");
        connectionFactory.setUsername("admin");
        connectionFactory.setPassword("admin");
        Connection connection = null;
        Channel channel = null;
        try {
            // 3: Get connection from connection factory
            connection = connectionFactory.newConnection("consumer-Work2");
            // 4: Get channel from connection
            channel = connection.createChannel();
            // 5: Declare that the queue stores messages
            /*
             *  If the queue does not exist, it is created
             *  Rabbitmq It is not allowed to create two identical queue names, otherwise an error will be reported.
             *
             *  @params1:  queue The name of the queue
             *  @params2:  durable Is the queue persistent
             *  @params3:  exclusive Exclusive, that is, private. If true, the current queue will be locked, other channels cannot be accessed, and the connection will be closed automatically
             *  @params4:  autoDelete Whether to delete the message automatically, and whether to delete the message automatically after the last consumer disconnects.
             *  @params5:  arguments You can set additional parameters of the queue, the validity period of the queue, the maximum length of messages, the message life cycle of the queue, and so on.
             * */
            // Here, if the queue has been created once, it does not need to be defined
            //channel.queueDeclare("queue1", false, true, false, null);
            // At the same time, the server will only push one message to the consumer
            //channel.basicQos(1);
            // 6: Defines a callback that accepts messages
            Channel finalChannel = channel;
            finalChannel.basicQos(1);
            finalChannel.basicConsume("queue1", false, new DeliverCallback() {
                @Override
                public void handle(String s, Delivery delivery) throws IOException {
                    try{
                        System.out.println("Work2-The message received is:" + new String(delivery.getBody(), "UTF-8"));
                        Thread.sleep(200);
                        finalChannel.basicAck(delivery.getEnvelope().getDeliveryTag(),false);
                    }catch(Exception ex){
                        ex.printStackTrace();
                    }
                }
            }, new CancelCallback() {
                @Override
                public void handle(String s) throws IOException {
                }
            });
            System.out.println("Work2-Start receiving messages");
            System.in.read();
        } catch (Exception ex) {
            ex.printStackTrace();
            System.out.println("Exception in sending message...");
        } finally {
            // 7: Release connection close channel
            if (channel != null && channel.isOpen()) {
                try {
                    channel.close();
                } catch (Exception ex) {
                    ex.printStackTrace();
                }
            }
            if (connection != null && connection.isOpen()) {
                try {
                    connection.close();
                } catch (Exception ex) {
                    ex.printStackTrace();
                }
            }
        }
    }
}
Summary
It can be seen from the results that consumer 1 processed more messages at the same time; The above code implements the fair distribution mode;
- The consumer receives one message at a time, with the code channel.BasicQos(0, 1, false);
- Fair distribution requires consumers to turn on manual response and turn off automatic response
- Turn off the automatic response code channel.BasicConsume("queue_test", false, consumer);
- The consumer opens the manual response code: channel.BasicAck(ea.DeliveryTag, false);
summary
- When there are many messages in the queue, we usually open multiple consumers to process messages; Fair distribution and polling distribution are both patterns we often use.
- The main idea of polling distribution is "equal distribution", regardless of the processing capacity of consumers, all consumers share equally; In this case, the server with weak processing capacity is always processing messages, while the server with strong processing capacity is idle after processing messages;
- The main idea of fair distribution is "those who can do more", distribute according to demand, and those with strong ability do more.
RabbitMQ usage scenario
Decoupling, peak shaving, asynchronous
Synchronous asynchronous problem (serial)
Serial mode: after successfully writing the order information into the database, send the registration email and then send the registration SMS. After the above three tasks are completed, return to the client
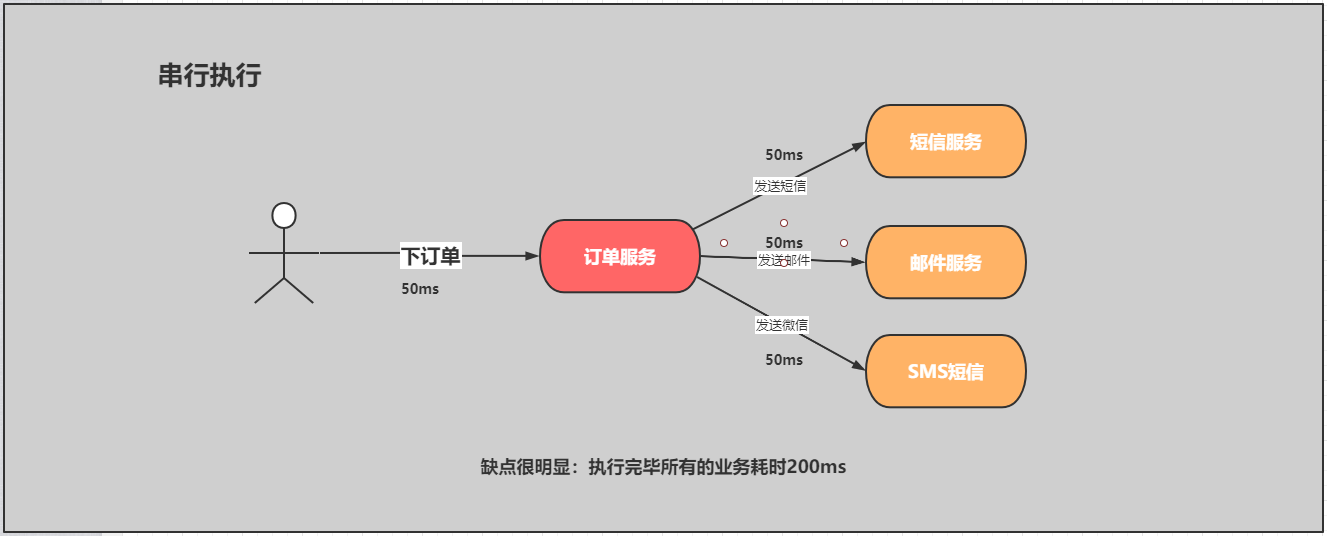
code
public void makeOrder(){
    // 1: save order
    orderService.saveOrder();
    // 2: Send SMS service
    messageService.sendSMS("order");//1-2 s
    // 3: Send email service
    emailService.sendEmail("order");//1-2 s
    // 4: Send APP service
    appService.sendApp("order");
}
Parallel asynchronous thread pool
Parallel mode: after the order information is successfully written into the database, send the registration email and send the registration SMS at the same time. After the above three tasks are completed, return to the client. The difference from serial is that the parallel method can improve the processing time
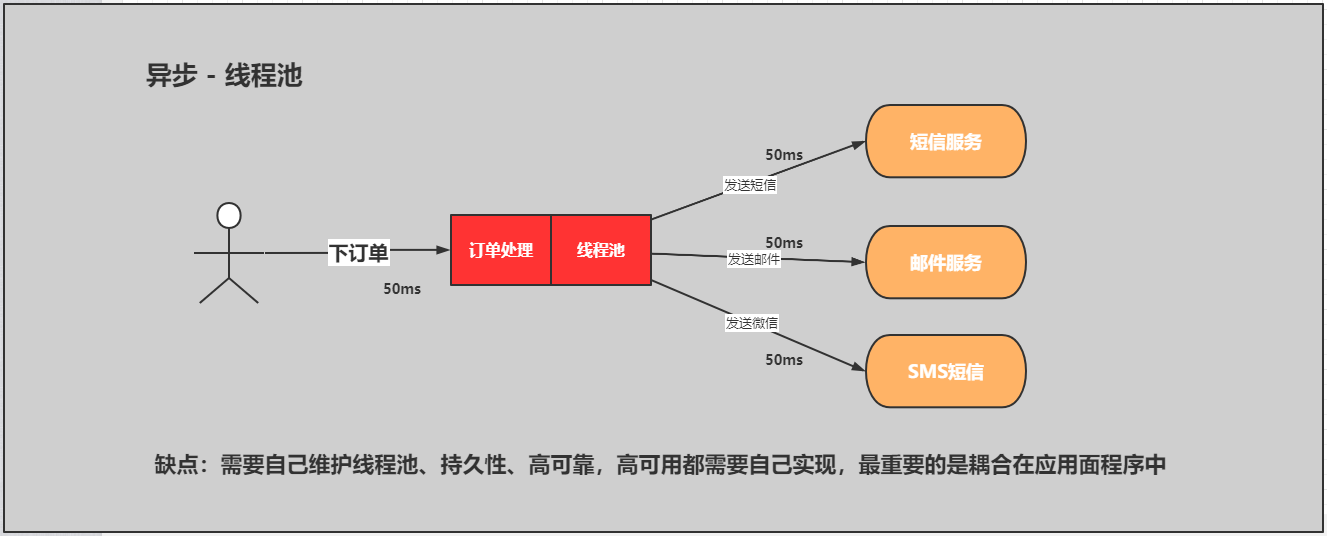
code
public void makeOrder(){
    // 1: save order
    orderService.saveOrder();
   // Correlation sending
   relationMessage();
}
public void relationMessage(){
    // asynchronous
     theadpool.submit(new Callable<Object>{
         public Object call(){
             // 2: Send SMS service
             messageService.sendSMS("order");
         }
     })
    // asynchronous
     theadpool.submit(new Callable<Object>{
         public Object call(){
              // 3: Send email service
            emailService.sendEmail("order");
         }
     })
      // asynchronous
     theadpool.submit(new Callable<Object>{
         public Object call(){
             // 4: Send SMS service
             appService.sendApp("order");
         }
     })
      // asynchronous
         theadpool.submit(new Callable<Object>{
         public Object call(){
             // 4: Send SMS service
             appService.sendApp("order");
         }
     })
}
Problems:
1: High coupling
2: You need to write your own thread pool. The maintenance cost is too high
3: Messages may be lost. You need to make message compensation yourself
4: How to ensure the reliability of the message? Write it yourself
5: If the server cannot be hosted, you need to write high availability
Asynchronous message queuing

benefit
1: Fully decoupled, bridging with MQ
2: There is an independent thread pool and running model
3: If a message occurs, it may be lost. MQ has persistence function
4: How to ensure the reliability of messages, dead letter queue and message transfer, etc
5: If the server cannot be hosted, you need to write high availability, and the HA image model is high availability.
According to the above agreement, the user's response time is equivalent to the time when the order information is written to the database, that is, 50 milliseconds. Register e-mail, send SMS, write to the message queue and return directly. Therefore, the speed of writing to the message queue is very fast and can be basically ignored. Therefore, the user's response time may be 50 milliseconds. Therefore, after the architecture is changed, the throughput of the system is increased to 20 QPS per second. It is three times higher than serial and two times higher than parallel
code
public void makeOrder(){
    // 1: save order
    orderService.saveOrder();
    rabbitTemplate.convertSend("ex","2","Message content");
}
High cohesion, low coupling

Peak clipping of flow
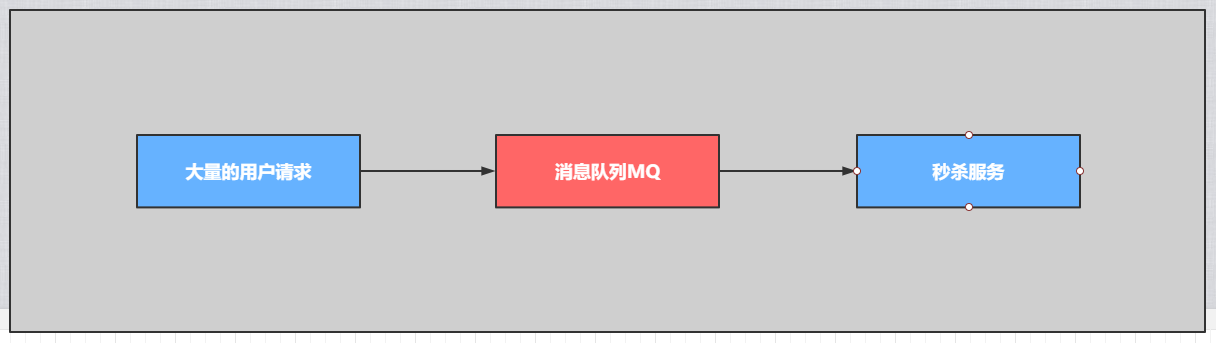
- Reliable consumption and production of distributed transactions
- Data synchronization of index, cache and static processing
- Flow monitoring
- Log monitoring (ELK)
- Order placing, order distribution and ticket grabbing
Rabbitmq springboot case fanout mode
Overall core

target
Use springboot to complete the consumption mode of rabbitmq - Fanout
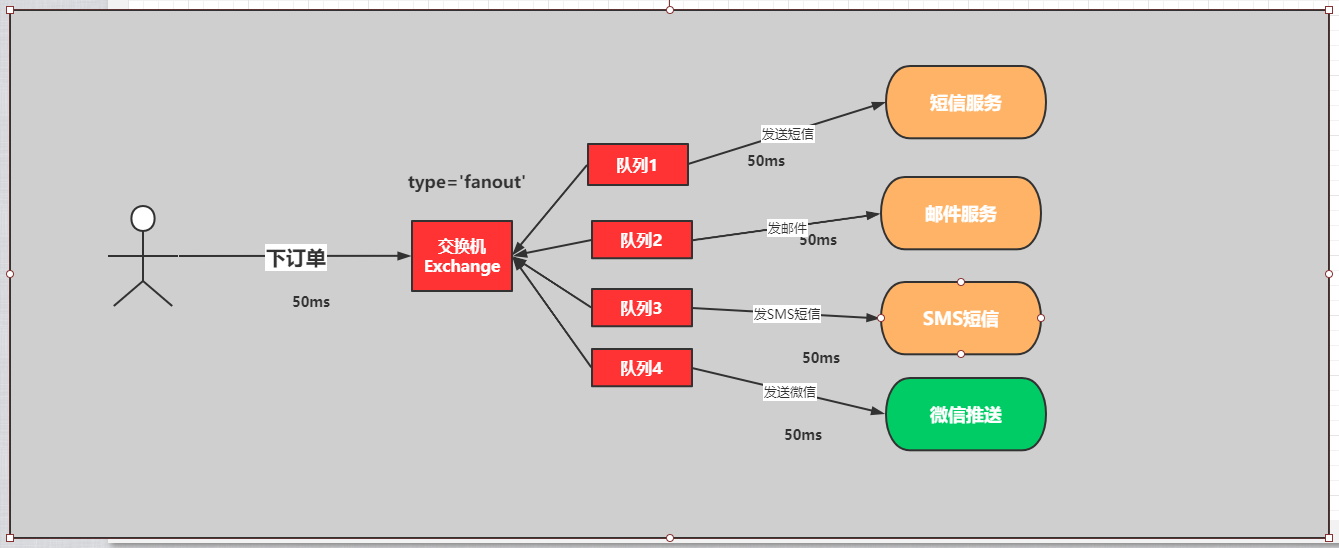
Implementation steps
1: Create producer project: sspringboot rabbitmq fanout producer
2: Create a consumer project: springboot rabbitmq fanout consumer
3: Introducing the dependency of spring boot rabbitmq
4: Distribute and test messages
5: View and observe the condition of the web console
Concrete implementation
producer
1. Create producer project: sspringboot rabbitmq fanout producer
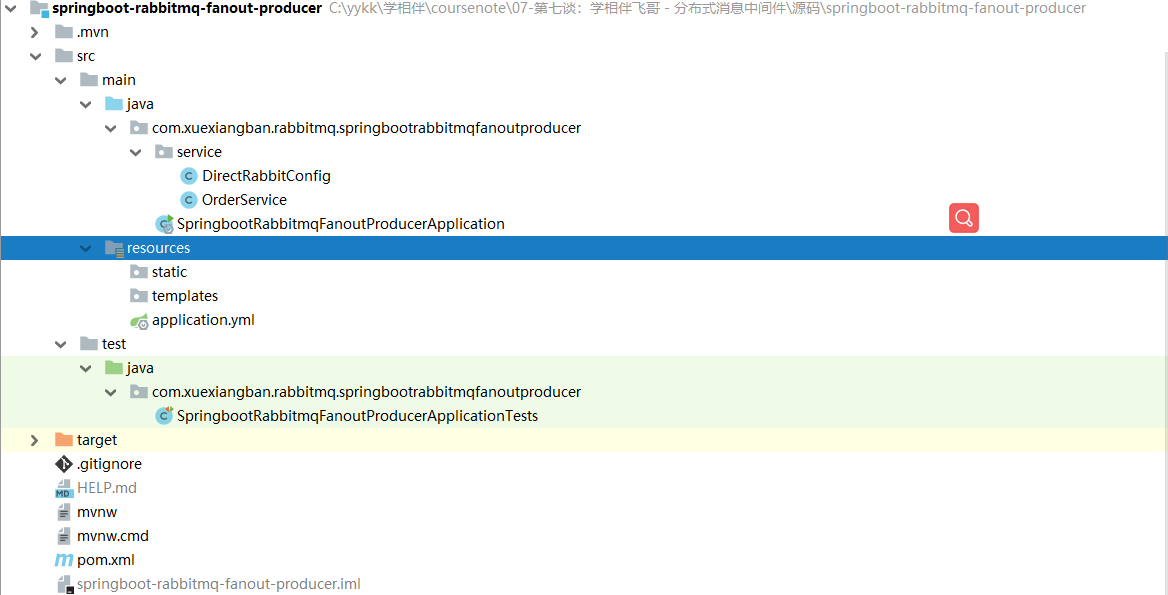
2. Introducing dependencies in pom.xml
<dependency>
    <groupId>org.springframework.boot</groupId>
    <artifactId>spring-boot-starter-amqp</artifactId>
</dependency>
<dependency>
    <groupId>org.springframework.boot</groupId>
    <artifactId>spring-boot-starter-web</artifactId>
</dependency>
3. Configure in application.yml
# Service port
server:
  port: 8080
# Configure rabbitmq service
spring:
  rabbitmq:
    username: admin
    password: admin
    virtual-host: /
    host: 47.104.141.27
    port: 5672
4: Define the producer of the order
package com.xuexiangban.rabbitmq.springbootrabbitmqfanoutproducer.service;
import org.springframework.amqp.rabbit.core.RabbitTemplate;
import org.springframework.beans.factory.annotation.Autowired;
import org.springframework.stereotype.Component;
import java.util.UUID;
/**
 * @author: Learning companion - flying brother
 * @description: OrderService
 * @Date : 2021/3/4
 */
@Component
public class OrderService {
    @Autowired
    private RabbitTemplate rabbitTemplate;
    // 1: Define switch
    private String exchangeName = "fanout_order_exchange";
    // 2: Routing key
    private String routeKey = "";
    public void makeOrder(Long userId, Long productId, int num) {
        // 1: Simulated user orders
        String orderNumer = UUID.randomUUID().toString();
        // 2: Query the inventory of commodities according to commodity ID and productid
        // int numstore = productSerivce.getProductNum(productId);
        // 3: Judge whether the inventory is sufficient
        // If (Num > numstore) {return "insufficient commodity inventory...;}
        // 4: Order logic
        // orderService.saveOrder(order);
        // 5: If the order is placed successfully, the inventory shall be deducted
        // 6: After placing the order
        System.out.println("user " + userId + ",The order number is:" + orderNumer);
        // Send order information to RabbitMQ fanout
        rabbitTemplate.convertAndSend(exchangeName, routeKey, orderNumer);
    }
}
4. Binding relationship
package com.xuexiangban.rabbitmq.springbootrabbitmqfanoutproducer.service;
import org.springframework.amqp.core.Binding;
import org.springframework.amqp.core.BindingBuilder;
import org.springframework.amqp.core.DirectExchange;
import org.springframework.amqp.core.Queue;
import org.springframework.context.annotation.Bean;
import org.springframework.context.annotation.Configuration;
/**
 * @Author : JCccc
 * @CreateTime : 2019/9/3
 * @Description :
 **/
@Configuration
public class DirectRabbitConfig {
    //Queue name: TestDirectQueue
    @Bean
    public Queue emailQueue() {
        // durable: whether to persist. The default value is false. Persistent queue: it will be stored on the disk. It still exists when the message agent restarts. Temporary queue: the current connection is valid
        // exclusive: it is also false by default. It can only be used by the currently created connection, and the queue will be deleted after the connection is closed. This reference takes precedence over durable
        // autoDelete: whether to delete automatically. When no producer or consumer uses this queue, the queue will be deleted automatically.
        //   return new Queue("TestDirectQueue",true,true,false);
        //Generally, it's good to set the persistence of the queue. The other two are false by default
        return new Queue("email.fanout.queue", true);
    }
    @Bean
    public Queue smsQueue() {
        // durable: whether to persist. The default value is false. Persistent queue: it will be stored on the disk. It still exists when the message agent restarts. Temporary queue: the current connection is valid
        // exclusive: it is also false by default. It can only be used by the currently created connection, and the queue will be deleted after the connection is closed. This reference takes precedence over durable
        // autoDelete: whether to delete automatically. When no producer or consumer uses this queue, the queue will be deleted automatically.
        //   return new Queue("TestDirectQueue",true,true,false);
        //Generally, it's good to set the persistence of the queue. The other two are false by default
        return new Queue("sms.fanout.queue", true);
    }
    @Bean
    public Queue weixinQueue() {
        // durable: whether to persist. The default value is false. Persistent queue: it will be stored on the disk. It still exists when the message agent restarts. Temporary queue: the current connection is valid
        // exclusive: it is also false by default. It can only be used by the currently created connection, and the queue will be deleted after the connection is closed. This reference takes precedence over durable
        // autoDelete: whether to delete automatically. When no producer or consumer uses this queue, the queue will be deleted automatically.
        //   return new Queue("TestDirectQueue",true,true,false);
        //Generally, it's good to set the persistence of the queue. The other two are false by default
        return new Queue("weixin.fanout.queue", true);
    }
    //Name of Direct switch: TestDirectExchange
    @Bean
    public DirectExchange fanoutOrderExchange() {
        //  return new DirectExchange("TestDirectExchange",true,true);
        return new DirectExchange("fanout_order_exchange", true, false);
    }
    //Binding binds the queue to the switch and sets the key for matching: TestDirectRouting
    @Bean
    public Binding bindingDirect1() {
        return BindingBuilder.bind(weixinQueue()).to(fanoutOrderExchange()).with("");
    }
    @Bean
    public Binding bindingDirect2() {
        return BindingBuilder.bind(smsQueue()).to(fanoutOrderExchange()).with("");
    }
    @Bean
    public Binding bindingDirect3() {
        return BindingBuilder.bind(emailQueue()).to(fanoutOrderExchange()).with("");
    }
}
5. Test
package com.xuexiangban.rabbitmq.springbootrabbitmqfanoutproducer;
import com.xuexiangban.rabbitmq.springbootrabbitmqfanoutproducer.service.OrderService;
import org.junit.jupiter.api.Test;
import org.springframework.beans.factory.annotation.Autowired;
import org.springframework.boot.test.context.SpringBootTest;
@SpringBootTest
class SpringbootRabbitmqFanoutProducerApplicationTests {
    @Autowired
    OrderService orderService;
    @Test
    public void contextLoads() throws Exception {
        for (int i = 0; i < 10; i++) {
            Thread.sleep(1000);
            Long userId = 100L + i;
            Long productId = 10001L + i;
            int num = 10;
            orderService.makeOrder(userId, productId, num);
        }
    }
}
Define consumer
1. Create a consumer project: springboot rabbitmq fanout consumer
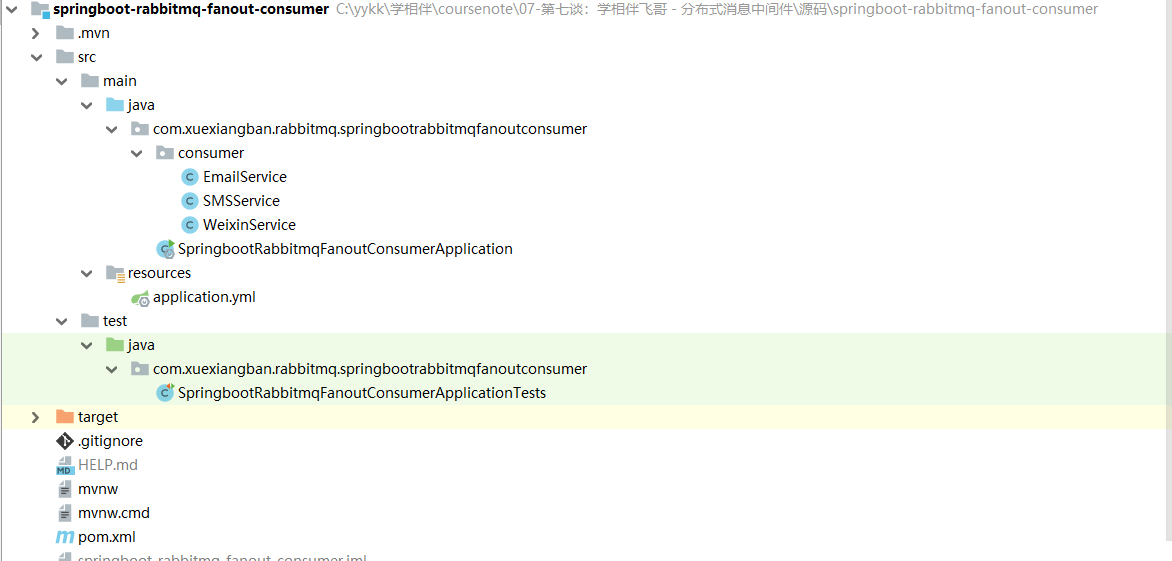
2. Import dependent pom.xml
<dependency>
    <groupId>org.springframework.boot</groupId>
    <artifactId>spring-boot-starter-amqp</artifactId>
</dependency>
<dependency>
    <groupId>org.springframework.boot</groupId>
    <artifactId>spring-boot-starter-web</artifactId>
</dependency>
3. Configure in application.yml
# Service port
server:
  port: 8081
# Configure rabbitmq service
spring:
  rabbitmq:
    username: admin
    password: admin
    virtual-host: /
    host: 47.104.141.27
    port: 5672
4. Consumer - mail service
package com.xuexiangban.rabbitmq.springbootrabbitmqfanoutconsumer.consumer;
import org.springframework.amqp.core.ExchangeTypes;
import org.springframework.amqp.rabbit.annotation.*;
import org.springframework.stereotype.Component;
// bindings are actually used to determine the binding relationship between the queue and the switch
@RabbitListener(bindings =@QueueBinding(
        // email.fanout.queue is the name of the queue, which can be defined by yourself.
        value = @Queue(value = "email.fanout.queue",autoDelete = "false"),
        // The name of the order.fanout switch must be consistent with the manufacturer
        exchange = @Exchange(value = "fanout_order_exchange",
                // Here is the determined rabbitmq mode: fanout is broadcast mode and publish subscribe mode
                type = ExchangeTypes.FANOUT)
))
@Component
public class EmailService {
    // @RabbitHandler represents that this method is a message receiving method. This does not have a return value
    @RabbitHandler
    public void messagerevice(String message){
        // The logic of sending email is omitted here
        System.out.println("email-------------->" + message);
    }
}
5. Consumer SMS service
package com.xuexiangban.rabbitmq.springbootrabbitmqfanoutconsumer.consumer;
import org.springframework.amqp.core.ExchangeTypes;
import org.springframework.amqp.rabbit.annotation.*;
import org.springframework.stereotype.Component;
// bindings are actually used to determine the binding relationship between the queue and the switch
@RabbitListener(bindings =@QueueBinding(
        // email.fanout.queue is the name of the queue, which can be defined by yourself.
        value = @Queue(value = "sms.fanout.queue",autoDelete = "false"),
        // The name of the order.fanout switch must be consistent with the manufacturer
        exchange = @Exchange(value = "fanout_order_exchange",
                // Here is the determined rabbitmq mode: fanout is broadcast mode and publish subscribe mode
                type = ExchangeTypes.FANOUT)
))
@Component
public class SMSService {
    // @RabbitHandler represents that this method is a message receiving method. This does not have a return value
    @RabbitHandler
    public void messagerevice(String message){
        // The logic of sending email is omitted here
        System.out.println("sms-------------->" + message);
    }
}
6. Consumer wechat service
package com.xuexiangban.rabbitmq.springbootrabbitmqfanoutconsumer.consumer;
import org.springframework.amqp.core.ExchangeTypes;
import org.springframework.amqp.rabbit.annotation.*;
import org.springframework.stereotype.Component;
// bindings are actually used to determine the binding relationship between the queue and the switch
@RabbitListener(bindings =@QueueBinding(
        // email.fanout.queue is the name of the queue, which can be defined by yourself.
        value = @Queue(value = "weixin.fanout.queue",autoDelete = "false"),
        // The name of the order.fanout switch must be consistent with the manufacturer
        exchange = @Exchange(value = "fanout_order_exchange",
                // Here is the determined rabbitmq mode: fanout is broadcast mode and publish subscribe mode
                type = ExchangeTypes.FANOUT)
))
@Component
public class WeixinService {
    // @RabbitHandler represents that this method is a message receiving method. This does not have a return value
    @RabbitHandler
    public void messagerevice(String message){
        // The logic of sending email is omitted here
        System.out.println("weixin-------------->" + message);
    }
}
7. Start the service SpringbootRabbitmqFanoutConsumerApplication and check the effect

Rabbitmq springboot case - direct mode
Overall core
01. Objectives
Use springboot to complete the consumption mode of rabbitmq - Direct
02. Implementation steps
1: Create producer project: sspringboot rabbitmq direct producer
2: Create a consumer project: springboot rabbitmq direct consumer
3: Introducing the dependency of spring boot rabbitmq
4: Distribute and test messages
5: View and observe the condition of the web console
Concrete implementation
03. Producer
1. Create producer project: sspringboot rabbitmq direct producer
2. Introducing dependencies in pom.xml
<dependency>
    <groupId>org.springframework.boot</groupId>
    <artifactId>spring-boot-starter-amqp</artifactId>
</dependency>
<dependency>
    <groupId>org.springframework.boot</groupId>
    <artifactId>spring-boot-starter-web</artifactId>
</dependency>
3. Configure in application.yml
# Service port
server:
  port: 8080
# Configure rabbitmq service
spring:
  rabbitmq:
    username: admin
    password: admin
    virtual-host: /
    host: 47.104.141.27
    port: 5672
4: Define the producer of the order
import org.springframework.amqp.rabbit.core.RabbitTemplate;
import org.springframework.beans.factory.annotation.Autowired;
import org.springframework.stereotype.Component;
import java.util.UUID;
/**
 * @author: Learning companion - flying brother
 * @description: OrderService
 * @Date : 2021/3/4
 */
@Component
public class OrderService {
    @Autowired
    private RabbitTemplate rabbitTemplate;
    // 1: Define switch
    private String exchangeName = "direct_order_exchange";
    // 2: Routing key
    private String routeKey = "email";
    public void makeOrder(Long userId, Long productId, int num) {
        // 1: Simulated user orders
        String orderNumer = UUID.randomUUID().toString();
        // 2: Query the inventory of commodities according to commodity ID and productid
        // int numstore = productSerivce.getProductNum(productId);
        // 3: Judge whether the inventory is sufficient
        // If (Num > numstore) {return "insufficient commodity inventory...;}
        // 4: Order logic
        // orderService.saveOrder(order);
        // 5: If the order is placed successfully, the inventory shall be deducted
        // 6: After placing the order
        System.out.println("user " + userId + ",The order number is:" + orderNumer);
        // Send order information to RabbitMQ Direct
        rabbitTemplate.convertAndSend(exchangeName, routeKey, orderNumer);
    }
}
4. Binding relationship
package com.xuexiangban.rabbitmq.springbootrabbitmqfanoutproducer.service;
import org.springframework.amqp.core.Binding;
import org.springframework.amqp.core.BindingBuilder;
import org.springframework.amqp.core.DirectExchange;
import org.springframework.amqp.core.Queue;
import org.springframework.context.annotation.Bean;
import org.springframework.context.annotation.Configuration;
/**
 * @Author : JCccc
 * @CreateTime : 2019/9/3
 * @Description :
 **/
@Configuration
public class DirectRabbitConfig {
    //Queue name: TestDirectQueue
    @Bean
    public Queue emailQueue() {
        // durable: whether to persist. The default value is false. Persistent queue: it will be stored on the disk. It still exists when the message agent restarts. Temporary queue: the current connection is valid
        // exclusive: it is also false by default. It can only be used by the currently created connection, and the queue will be deleted after the connection is closed. This reference takes precedence over durable
        // autoDelete: whether to delete automatically. When no producer or consumer uses this queue, the queue will be deleted automatically.
        //   return new Queue("TestDirectQueue",true,true,false);
        //Generally, it's good to set the persistence of the queue. The other two are false by default
        return new Queue("email.direct.queue", true);
    }
    @Bean
    public Queue smsQueue() {
        // durable: whether to persist. The default value is false. Persistent queue: it will be stored on the disk. It still exists when the message agent restarts. Temporary queue: the current connection is valid
        // exclusive: it is also false by default. It can only be used by the currently created connection, and the queue will be deleted after the connection is closed. This reference takes precedence over durable
        // autoDelete: whether to delete automatically. When no producer or consumer uses this queue, the queue will be deleted automatically.
        //   return new Queue("TestDirectQueue",true,true,false);
        //Generally, it's good to set the persistence of the queue. The other two are false by default
        return new Queue("sms.direct.queue", true);
    }
    @Bean
    public Queue weixinQueue() {
        // durable: whether to persist. The default value is false. Persistent queue: it will be stored on the disk. It still exists when the message agent restarts. Temporary queue: the current connection is valid
        // exclusive: it is also false by default. It can only be used by the currently created connection, and the queue will be deleted after the connection is closed. This reference takes precedence over durable
        // autoDelete: whether to delete automatically. When no producer or consumer uses this queue, the queue will be deleted automatically.
        //   return new Queue("TestDirectQueue",true,true,false);
        //Generally, it's good to set the persistence of the queue. The other two are false by default
        return new Queue("weixin.direct.queue", true);
    }
    //Name of Direct switch: TestDirectExchange
    @Bean
    public DirectExchange directOrderExchange() {
        //  return new DirectExchange("TestDirectExchange",true,true);
        return new DirectExchange("direct_Order_exchange", true, false);
    }
    //Binding binds the queue to the switch and sets the key for matching: TestDirectRouting
    @Bean
    public Binding bindingDirect1() {
        return BindingBuilder.bind(weixinQueue()).to(directOrderExchange()).with("");
    }
    @Bean
    public Binding bindingDirect2() {
        return BindingBuilder.bind(smsQueue()).to(directOrderExchange()).with("");
    }
    @Bean
    public Binding bindingDirect3() {
        return BindingBuilder.bind(emailQueue()).to(directOrderExchange()).with("");
    }
}
5. Test
package com.xuexiangban.rabbitmq.springbootrabbitmqfanoutproducer;
import com.xuexiangban.rabbitmq.springbootrabbitmqfanoutproducer.service.OrderService;
import org.junit.jupiter.api.Test;
import org.springframework.beans.factory.annotation.Autowired;
import org.springframework.boot.test.context.SpringBootTest;
@SpringBootTest
class SpringbootRabbitmqFanoutProducerApplicationTests {
    @Autowired
    OrderService orderService;
    @Test
    public void contextLoads() throws Exception {
        for (int i = 0; i < 10; i++) {
            Thread.sleep(1000);
            Long userId = 100L + i;
            Long productId = 10001L + i;
            int num = 10;
            orderService.makeOrder(userId, productId, num);
        }
    }
}
04. Defining consumers
1. Create a consumer project: springboot rabbitmq fanout consumer
2. Import dependent pom.xml
<dependency>
    <groupId>org.springframework.boot</groupId>
    <artifactId>spring-boot-starter-amqp</artifactId>
</dependency>
<dependency>
    <groupId>org.springframework.boot</groupId>
    <artifactId>spring-boot-starter-web</artifactId>
</dependency>
3. Configure in application.yml
# Service port
server:
  port: 8081
# Configure rabbitmq service
spring:
  rabbitmq:
    username: admin
    password: admin
    virtual-host: /
    host: 47.104.141.27
    port: 5672
4. Consumer - mail service
package com.xuexiangban.rabbitmq.springbootrabbitmqfanoutconsumer.consumer;
import org.springframework.amqp.core.ExchangeTypes;
import org.springframework.amqp.rabbit.annotation.*;
import org.springframework.stereotype.Component;
// bindings are actually used to determine the binding relationship between the queue and the switch
@RabbitListener(bindings =@QueueBinding(
        // email.fanout.queue is the name of the queue, which can be defined by yourself.
        value = @Queue(value = "email.direct.queue",autoDelete = "false"),
        // The name of the order.fanout switch must be consistent with the manufacturer
        exchange = @Exchange(value = "direct_order_exchange",
                type = ExchangeTypes.DIRECT)
))
@Component
public class EmailService {
    // @RabbitHandler represents that this method is a message receiving method. This does not have a return value
    @RabbitHandler
    public void messagerevice(String message){
        // The logic of sending email is omitted here
        System.out.println("email-------------->" + message);
    }
}
5. Consumer SMS service
package com.xuexiangban.rabbitmq.springbootrabbitmqfanoutconsumer.consumer;
import org.springframework.amqp.core.ExchangeTypes;
import org.springframework.amqp.rabbit.annotation.*;
import org.springframework.stereotype.Component;
// bindings are actually used to determine the binding relationship between the queue and the switch
@RabbitListener(bindings =@QueueBinding(
        // email.fanout.queue is the name of the queue, which can be defined by yourself.
        value = @Queue(value = "sms.direct.queue",autoDelete = "false"),
        // The name of the order.fanout switch must be consistent with the manufacturer
        exchange = @Exchange(value = "direct_Order_exchange",
                type = ExchangeTypes.DIRECT)
))
@Component
public class SMSService {
    // @RabbitHandler represents that this method is a message receiving method. This does not have a return value
    @RabbitHandler
    public void messagerevice(String message){
        // The logic of sending email is omitted here
        System.out.println("sms-------------->" + message);
    }
}
6. Consumer wechat service
package com.xuexiangban.rabbitmq.springbootrabbitmqfanoutconsumer.consumer;
import org.springframework.amqp.core.ExchangeTypes;
import org.springframework.amqp.rabbit.annotation.*;
import org.springframework.stereotype.Component;
// bindings are actually used to determine the binding relationship between the queue and the switch
@RabbitListener(bindings =@QueueBinding(
        // email.fanout.queue is the name of the queue, which can be defined by yourself.
        value = @Queue(value = "weixin.fanout.queue",autoDelete = "false"),
        // The name of the order.fanout switch must be consistent with the manufacturer
        exchange = @Exchange(value = "direct_Order_exchange",
                type = ExchangeTypes.DIRECT)
))
@Component
public class WeixinService {
    // @RabbitHandler represents that this method is a message receiving method. This does not have a return value
    @RabbitHandler
    public void messagerevice(String message){
        // The logic of sending email is omitted here
        System.out.println("weixin-------------->" + message);
    }
}
7. Start the service SpringbootRabbitmqDirectConsumerApplication and check the effect
Rabbitmq springboot case topic mode
Overall core
01. Objectives
Use springboot to complete the consumption mode of rabbitmq - Topic
It is not very different from the above two modes
RabbitMQ advanced - expiration time TTL
1. Overview
The expiration time TTL indicates that the expected time can be set for the message and can be received by the consumer within this time; After that, the message will be deleted automatically. RabbitMQ can set TTL for messages and queues. At present, there are two methods to set.
- The first method is to set the queue property so that all messages in the queue have the same expiration time.
- The second method is to set the message separately, and the TTL of each message can be different.
If the above two methods are used at the same time, the expiration time of the message shall be subject to the value with the smaller TTL between them. Once the lifetime of the message in the queue exceeds the set TTL value, it is called dead message. It is delivered to the dead letter queue, and the consumer will no longer receive the message.
1-1. Set queue TTL
Code settings
package com.xuexiangban.rabbitmq.ttl;
import com.rabbitmq.client.AMQP;
import com.rabbitmq.client.Channel;
import com.rabbitmq.client.Connection;
import com.rabbitmq.client.ConnectionFactory;
import org.springframework.amqp.core.Message;
import org.springframework.amqp.core.MessageProperties;
import java.util.HashMap;
import java.util.Map;
/**
 * @author: Learning companion - flying brother
 * @description: Producer Simple queue producer
 * @Date : 2021/3/2
 */
public class Producer {
    public static void main(String[] args) {
        // 1: Create connection factory
        ConnectionFactory connectionFactory = new ConnectionFactory();
        // 2: Set connection properties
        connectionFactory.setHost("47.104.141.27");
        connectionFactory.setPort(5672);
        connectionFactory.setVirtualHost("/");
        connectionFactory.setUsername("admin");
        connectionFactory.setPassword("admin");
        Connection connection = null;
        Channel channel = null;
        try {
            // 3: Get connection from connection factory
            connection = connectionFactory.newConnection("producer");
            // 4: Get channel from connection
            channel = connection.createChannel();
            // 5: Declare that the queue stores messages
            /*
             *  If the queue does not exist, it is created
             *  Rabbitmq It is not allowed to create two identical queue names, otherwise an error will be reported.
             *
             *  @params1:  queue The name of the queue
             *  @params2:  durable Is the queue persistent
             *  @params3:  exclusive Exclusive, that is, private. If true, the current queue will be locked, other channels cannot be accessed, and the connection will be closed automatically
             *  @params4:  autoDelete Whether to delete the message automatically, and whether to delete the message automatically after the last consumer disconnects.
             *  @params5:  arguments You can set additional parameters of the queue, the validity period of the queue, the maximum length of messages, the message life cycle of the queue, and so on.
             * */
            Map<String,Object> args2 = new HashMap<>();
            args2.put("x-message-ttl",5000);
            channel.queueDeclare("ttl.queue", true, false, false, args2);
            // 6: Prepare to send the contents of the message
            String message = "Hello, learn to accompany!!!";
            Map<String, Object> headers = new HashMap<String, Object>();
            headers.put("x", "1");
            headers.put("y", "1");
            AMQP.BasicProperties basicProperties = new AMQP.BasicProperties().builder()
                    .deliveryMode(2) // Transmission mode
                    .priority(1)
                    .contentEncoding("UTF-8") // Coding mode
                    .expiration("3000") // Expiration time
                    .headers(headers).build(); //Custom properties
            // 7: Send a message to the middleware rabbitmq server
            // @params1: switch exchange
            // @params2: queue name / routing
            // @params3: property configuration
            // @params4: send message content
            for (int i = 0; i <100 ; i++) {
                channel.basicPublish("", "ttl.queue", basicProperties, message.getBytes());
                System.out.println("Message sent successfully!");
                Thread.sleep(1000);
            }
        } catch (Exception ex) {
            ex.printStackTrace();
            System.out.println("Exception in sending message...");
        } finally {
            // 7: Release connection close channel
            if (channel != null && channel.isOpen()) {
                try {
                    channel.close();
                } catch (Exception ex) {
                    ex.printStackTrace();
                }
            }
            if (connection != null && connection.isOpen()) {
                try {
                    connection.close();
                } catch (Exception ex) {
                    ex.printStackTrace();
                }
            }
        }
    }
}
Test class
package com.xuexiangban.rabbitmq.ttl;
import com.rabbitmq.client.*;
import java.io.IOException;
/**
 * @author: Learning companion - flying brother
 * @description: Consumer
 * @Date : 2021/3/2
 */
public class Consumer {
    public static void main(String[] args) {
        // 1: Create connection factory
        ConnectionFactory connectionFactory = new ConnectionFactory();
        // 2: Set connection properties
        connectionFactory.setHost("47.104.141.27");
        connectionFactory.setPort(5672);
        connectionFactory.setVirtualHost("/");
        connectionFactory.setUsername("admin");
        connectionFactory.setPassword("admin");
        Connection connection = null;
        Channel channel = null;
        try {
            // 3: Get connection from connection factory
            connection = connectionFactory.newConnection("consumer");
            // 4: Get channel from connection
            channel = connection.createChannel();
            // 5: Declare that the queue stores messages
            /*
             *  If the queue does not exist, it is created
             *  Rabbitmq It is not allowed to create two identical queue names, otherwise an error will be reported.
             *
             *  @params1:  queue The name of the queue
             *  @params2:  durable Is the queue persistent
             *  @params3:  exclusive Exclusive, that is, private. If true, the current queue will be locked, other channels cannot be accessed, and the connection will be closed automatically
             *  @params4:  autoDelete Whether to delete the message automatically, and whether to delete the message automatically after the last consumer disconnects.
             *  @params5:  arguments You can set additional parameters of the queue, the validity period of the queue, the maximum length of messages, the message life cycle of the queue, and so on.
             * */
            // Here, if the queue has been created once, it does not need to be defined
            //channel.queueDeclare("queue1", false, false, false, null);
            // 6: Defines a callback that accepts messages
            Channel finalChannel = channel;
            finalChannel.basicConsume("ttl.queue", true, new DefaultConsumer(channel){
                @Override
                public void handleDelivery(String consumerTag, Envelope envelope, AMQP.BasicProperties properties, byte[] body) throws IOException {
                    System.out.println(properties);
                    System.out.println("The message obtained is:" + new String(body,"UTF-8"));
                }
            });
            System.out.println("Start receiving messages");
            System.in.read();
        } catch (Exception ex) {
            ex.printStackTrace();
            System.out.println("Exception in sending message...");
        } finally {
            // 7: Release connection close channel
            if (channel != null && channel.isOpen()) {
                try {
                    channel.close();
                } catch (Exception ex) {
                    ex.printStackTrace();
                }
            }
            if (connection != null && connection.isOpen()) {
                try {
                    connection.close();
                } catch (Exception ex) {
                    ex.printStackTrace();
                }
            }
        }
    }
}
The value of parameter x-message-ttl must be a non negative 32-bit integer (0 < = n < = 2 ^ 32-1), representing the value of TTL in milliseconds. Thus, a value of 6000 indicates that the current message existing in the queue will only survive for up to 6 seconds.
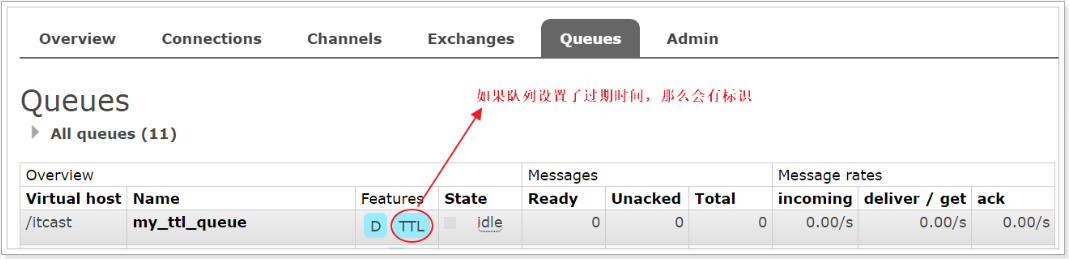
SpringBoot configuration
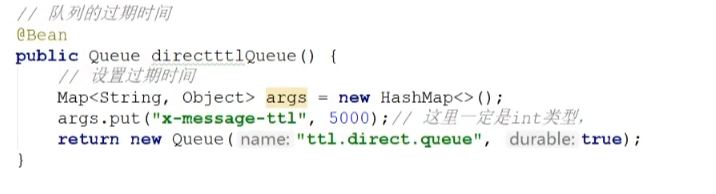
1-2. Setting message TTL
Expiration time of the message; You only need to set the expiration time when sending messages (which can be sent to any queue, whether the queue belongs to a switch or not). Write the following methods in the test class to send messages and set the expiration time to the queue:
package com.xuexiangban.rabbitmq.ttl;
import com.rabbitmq.client.AMQP;
import com.rabbitmq.client.Channel;
import com.rabbitmq.client.Connection;
import com.rabbitmq.client.ConnectionFactory;
import java.util.HashMap;
import java.util.Map;
/**
 * @author: Learning companion - flying brother
 * @description: Producer Simple queue producer
 * @Date : 2021/3/2
 */
public class MessageTTLProducer {
    public static void main(String[] args) {
        // 1: Create connection factory
        ConnectionFactory connectionFactory = new ConnectionFactory();
        // 2: Set connection properties
        connectionFactory.setHost("47.104.141.27");
        connectionFactory.setPort(5672);
        connectionFactory.setVirtualHost("/");
        connectionFactory.setUsername("admin");
        connectionFactory.setPassword("admin");
        Connection connection = null;
        Channel channel = null;
        try {
            // 3: Get connection from connection factory
            connection = connectionFactory.newConnection("producer");
            // 4: Get channel from connection
            channel = connection.createChannel();
            // 5: Declare that the queue stores messages
            /*
             *  If the queue does not exist, it is created
             *  Rabbitmq It is not allowed to create two identical queue names, otherwise an error will be reported.
             *
             *  @params1:  queue The name of the queue
             *  @params2:  durable Is the queue persistent
             *  @params3:  exclusive Exclusive, that is, private. If true, the current queue will be locked, other channels cannot be accessed, and the connection will be closed automatically
             *  @params4:  autoDelete Whether to delete the message automatically, and whether to delete the message automatically after the last consumer disconnects.
             *  @params5:  arguments You can set additional parameters of the queue, the validity period of the queue, the maximum length of messages, the message life cycle of the queue, and so on.
             * */
            channel.queueDeclare("ttl.queue2", true, false, false, null);
            // 6: Prepare to send the contents of the message
            String message = "Hello, learn to accompany!!!";
            Map<String, Object> headers = new HashMap<String, Object>();
            headers.put("x", "1");
            headers.put("y", "1");
            AMQP.BasicProperties basicProperties = new AMQP.BasicProperties().builder()
                    .deliveryMode(2) // Transmission mode
                    .priority(1)
                    .contentEncoding("UTF-8") // Coding mode
                    .expiration("5000") // Expiration time
                    .headers(headers).build(); //Custom properties
            // 7: Send a message to the middleware rabbitmq server
            // @params1: switch exchange
            // @params2: queue name / routing
            // @params3: property configuration
            // @params4: send message content
            for (int i = 0; i <10 ; i++) {
                channel.basicPublish("", "ttl.queue2", basicProperties, message.getBytes());
                System.out.println("Message sent successfully!");
            }
        } catch (Exception ex) {
            ex.printStackTrace();
            System.out.println("Exception in sending message...");
        } finally {
            // 7: Release connection close channel
            if (channel != null && channel.isOpen()) {
                try {
                    channel.close();
                } catch (Exception ex) {
                    ex.printStackTrace();
                }
            }
            if (connection != null && connection.isOpen()) {
                try {
                    connection.close();
                } catch (Exception ex) {
                    ex.printStackTrace();
                }
            }
        }
    }
}
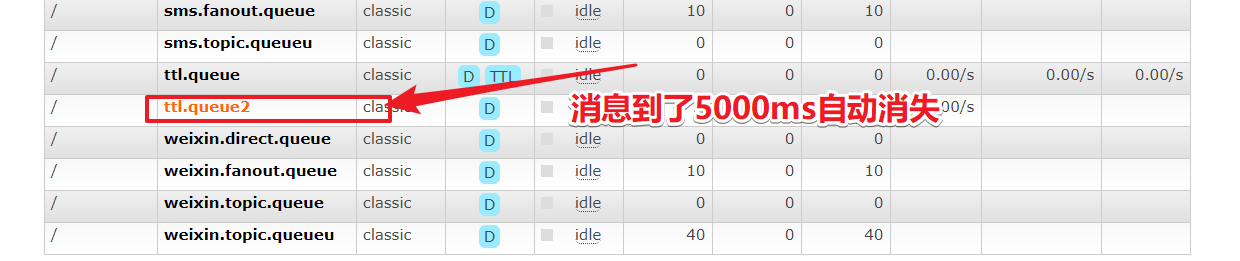
The expiration field represents the TTL value in microseconds. It has the same constraints as x-message-ttl. Because the expiration field must be of string type, the broker will only accept numbers expressed as strings.
When the TTL values of queue and message are specified at the same time, the smaller of the two will work.
SpringBoot configuration
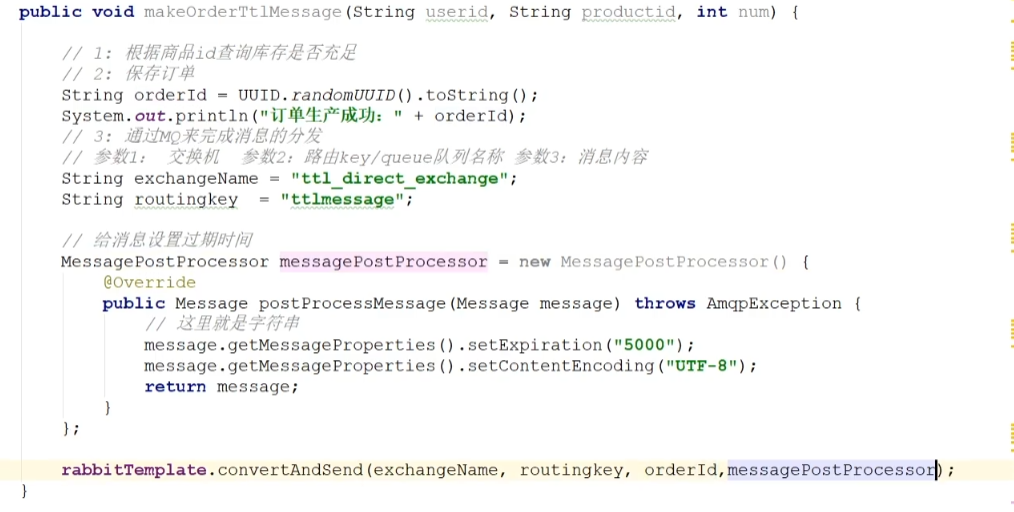
RabbitMQ advanced - configuration of message confirmation mechanism
The NONE value disables the publish confirmation mode and is the default value
The CORRELATED value is the callback method that will be triggered after the message is successfully published to the exchange, as shown in example 1
After testing, the SIMPLE value has two effects. One effect is the same as the CORRELATED value, which will trigger the callback method. The other is to use the rabbitTemplate to call the waitForConfirms or waitForConfirmsOrDie method after successfully publishing the message, wait for the broker node to return the sending result, and determine the logic of the next step according to the returned result, Note that if the waitForConfirmsOrDie method returns false, the channel will be closed, and messages cannot be sent to the broker next;
# Service port
server:
  port: 8080
# Configure rabbitmq service
spring:
  rabbitmq:
    username: admin
    password: admin
    virtual-host: /
    host: 47.104.141.27
    port: 5672
    publisher-confirm-type: correlated
package com.xuexiangban.rabbitmq.springbootorderrabbitmqproducer.callback;
import org.springframework.amqp.rabbit.connection.CorrelationData;
import org.springframework.amqp.rabbit.core.RabbitTemplate;
import org.springframework.stereotype.Component;
/**
 * @description:
 * @author: xuke
 * @time: 2021/3/5 23:25
 */
public class MessageConfirmCallback implements RabbitTemplate.ConfirmCallback {
    @Override
    public void confirm(CorrelationData correlationData, boolean ack, String cause) {
        if(ack){
            System.out.println("Message confirmation succeeded!!!!");
        }else{
            System.out.println("Message confirmation failed!!!!");
        }
    }
}
/**
     * @Author xuke
     * @Description Simulate the business of placing orders for goods purchased by users
     * @Date 22:26 2021/3/5
     * @Param [userId, productId, num]
     * @return void
     **/
    public void makeOrderTopic(String userId,String productId,int num){
        // 1: Query whether the inventory is sufficient according to the commodity id
        // 2: Save order
        String orderId = UUID.randomUUID().toString();
        System.out.println("Order saved successfully: id Yes:" + orderId);
        // 3: Send message
        //com.#  duanxin
        //#.email.* email
        //#.sms.# sms
        // Set message confirmation mechanism
        rabbitTemplate.setConfirmCallback(new MessageConfirmCallback());
        rabbitTemplate.convertAndSend("topic_order_ex","com.email.sms.xxx",orderId);
    }
RabbitMQ advanced - dead letter queue
DLX, fully known as dead letter exchange, can be called dead letter switch or dead letter mailbox. When a message becomes dead message in a queue, it can be re sent to another switch, which is DLX. The queue bound to DLX is called dead message queue.
The message may become a dead letter due to the following reasons:
- Message rejected
- Message expiration
- The queue has reached its maximum length
DLX is also a normal switch. It is no different from a general switch. It can be specified on any queue. In fact, it is to set the properties of a queue. When there is a dead letter in the queue, Rabbitmq will automatically republish the message to the set DLX, and then route it to another queue, the dead letter queue.
To use dead letter queue, you only need to set the queue parameter x-dead-letter-exchange to specify the switch when defining the queue.
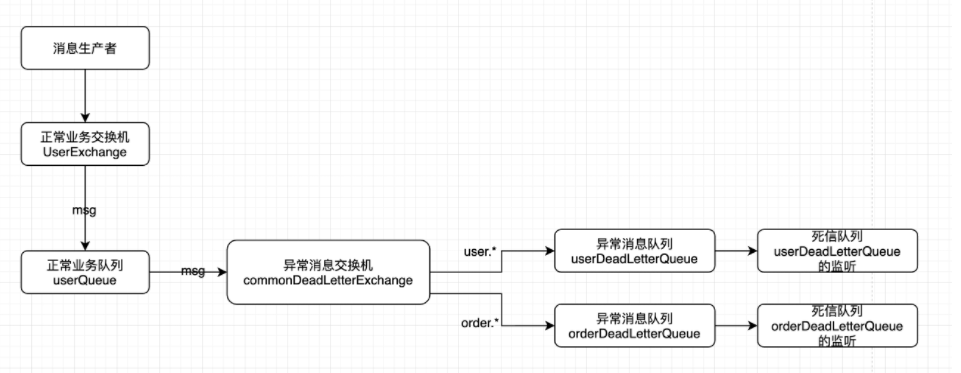
Results in rabbitMQ administration interface
Not expired:

After expiration:

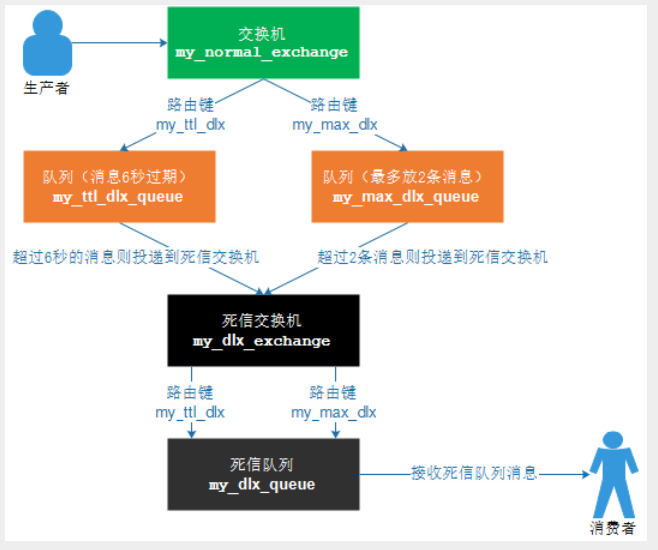
Dead letter queue test for message expiration
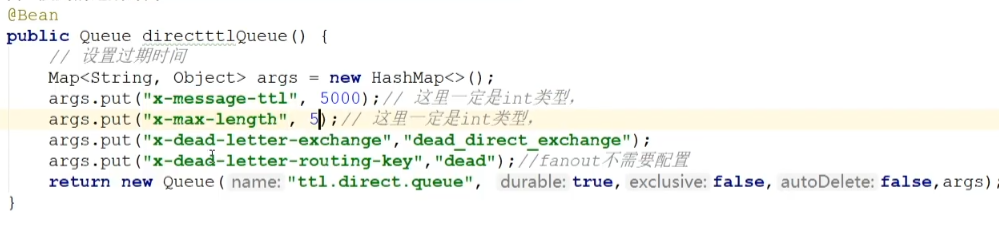
RabbitMQ operation and maintenance - persistence mechanism and memory disk monitoring
01. RibbitMQ persistence
Persistence is the process of writing information to disk.
02. RabbitMQ persistent message
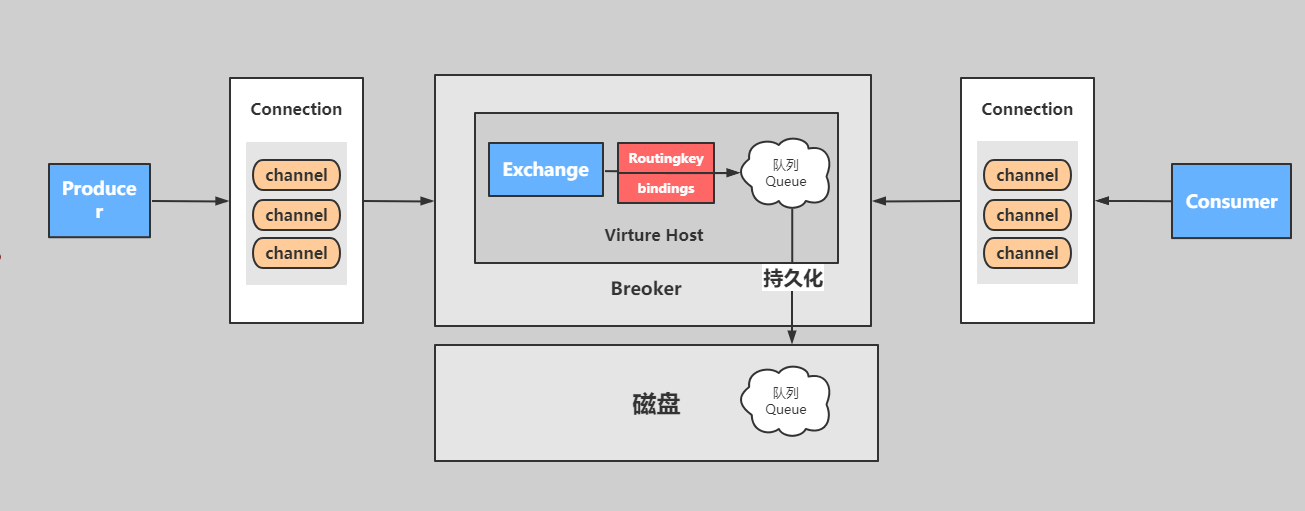
Putting messages in memory by default is to speed up transmission and consumption, and storing them in disk is to ensure the persistence of message data.
03. RabbitMQ non persistent message
Non persistent messages: when memory is not enough, messages and data will be transferred to disk, but after restart, non persistent queue messages will be lost.
04. RabbitMQ persistence classification
The persistence queues of RabbitMQ are divided into:
1: Queue persistence
2: Message persistence
3: Switch persistence
Both persistent and non persistent messages can be written to disk, but non persistent messages can only be written to disk when there is insufficient memory.
05. Code implementation of RabbitMQ queue persistence
Queue persistence is achieved by defining the durable parameter of the queue. The queue will be persistent only when durable is true.
// Parameter 1: name
// Parameter 2: persist,
// Parameter 3: unique du queue,
// Parameter 4: delete automatically when not in use,
// Parameter 5: other parameters
channel.queueDeclare(queueName,true,false,false,null);
If parameter 2 is set to true, it means persistence. That is, durable=true. The persistent queue has a D flag in the web console
![])(https://kuangstudy.oss-cn-beijing.aliyuncs.com/bbs/2021/03/03/kuangstudy12ada711-de53-41bd-bfa1-2e63377d5c2e.png)
testing procedure
1: A temporary queue can be established
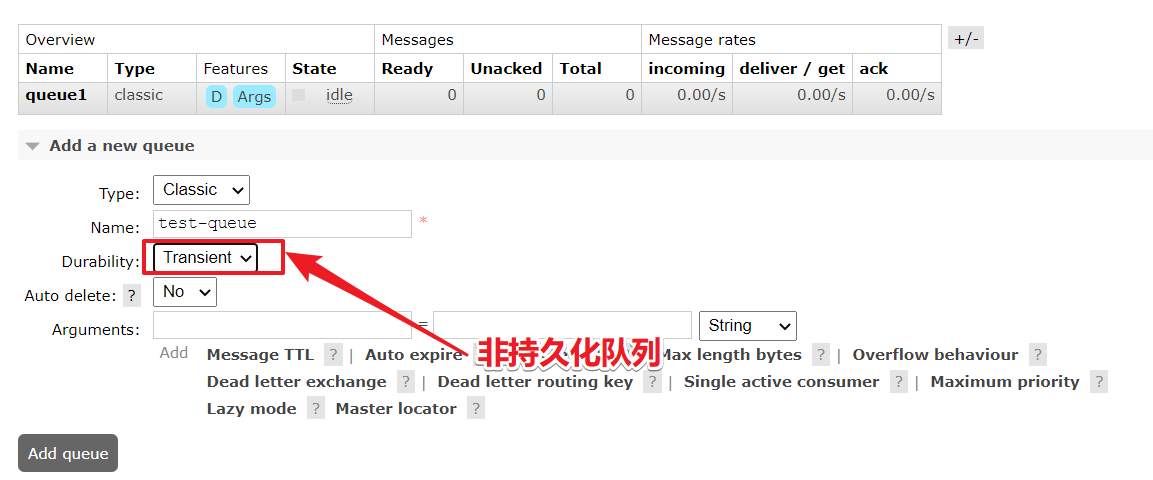
2: Then restart the rabbit server service, and you will find that the persistent queue is still there, but the non persistent queue will be lost.
06. RabbitMQ message persistence
Message persistence is to set whether to persist through the attribute deliveryMode of the message, which is passed in through the parameter of basicPublish when sending the message.
// Parameter 1: switch name
// Parameter 2: queue or route key
// Parameter 3: whether to persist messages
// Parameter 4: send message content
channel.basicPublish(exchangeName, routingKey1, MessageProperties.PERSISTENT_TEXT_PLAIN, message.getBytes());
07. RabbitMQ switch persistence
Like the queue, the switch also needs to set the persistent identity at the time of definition, otherwise it will be lost after the rabbit server service is restarted.
// Parameter 1: switch name
// Parameter 2: switch type, topic/direct/fanout/headers
// Parameter 3: persist
channel.exchangeDeclare(exchangeName,exchangeType,true);
RabbitMQ operation and maintenance - monitoring of memory and disk
01. RabbitMQ memory warning
When the memory usage exceeds the configured threshold or the remaining disk space exceeds the configured threshold, RabbitMQ will temporarily block the connection of the client and stop receiving messages from the client, so as to avoid the collapse of the server, and the mentality detection mechanism between the client and the server will also fail.
As shown below:
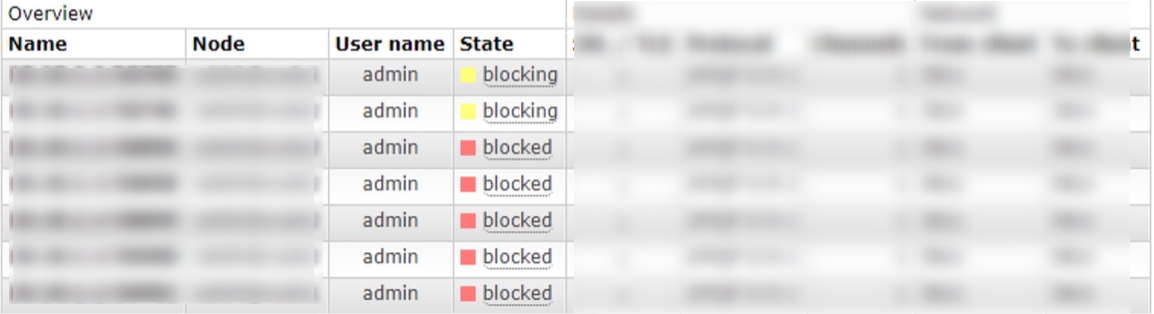
When blocking or blocked occurs, it indicates that the threshold and are reached and the high load is running.
02. Memory control of RabbitMQ
Refer to the help documentation: https://www.rabbitmq.com/configure.html
When a warning occurs, it can be modified and adjusted through configuration
02-1. Command mode
rabbitmqctl set_vm_memory_high_watermark <fraction>
rabbitmqctl set_vm_memory_high_watermark absolute 50MB
fraction/value is the memory threshold. The default is 0.4/2GB, which means that when RabbitMQ's memory exceeds 40%, a warning will be generated and all producers' connections will be blocked. The threshold value modified by this command will be invalid after the broker is restarted. The threshold value set by modifying the configuration file will not disappear with the restart, but it will not take effect until the broker is restarted like modifying the configuration file.
analysis:
rabbitmqctl set_vm_memory_high_watermark absolute 50MB
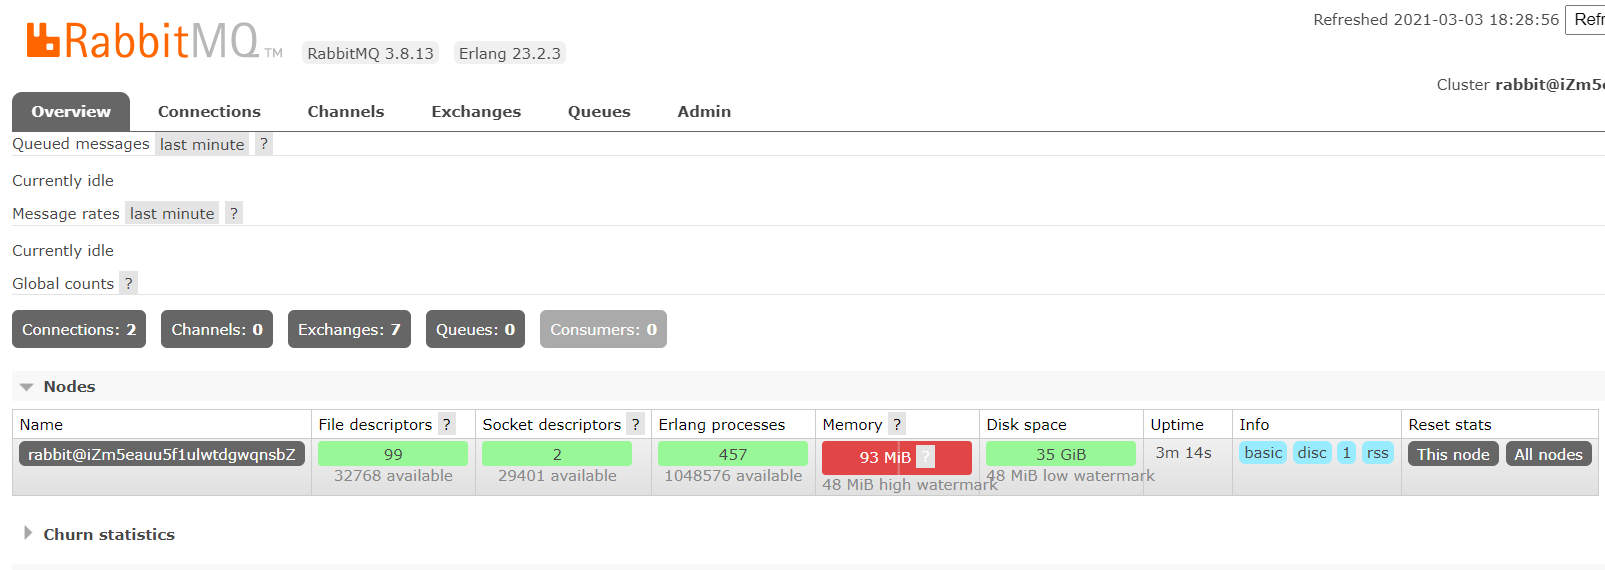
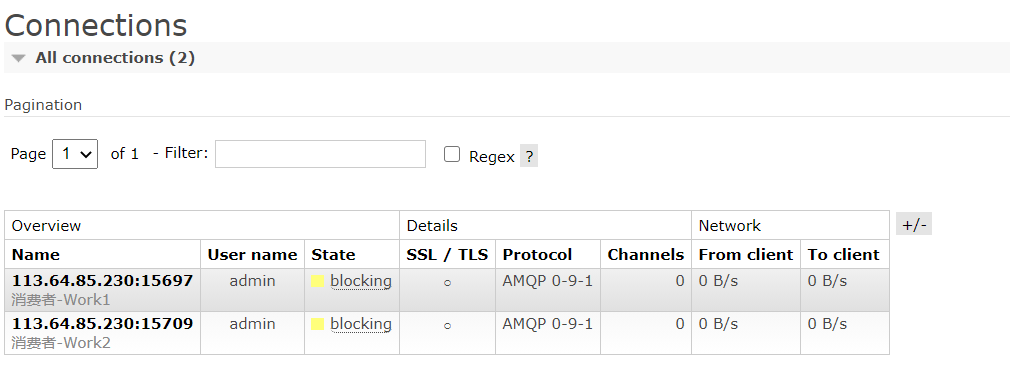
02-2. Configuration file mode rabbitmq.conf
Current configuration file: / etc/rabbitmq/rabbitmq.conf
#default
#vm_memory_high_watermark.relative = 0.4
# Use the relative value to set fraction. The recommended value is between 04 and 0.7, and it is not recommended to exceed 0.7
vm_memory_high_watermark.relative = 0.6
# The absolute value of absolute is used, but it is KB, MB and GB. The corresponding commands are as follows
vm_memory_high_watermark.absolute = 2GB
03. RabbitMQ memory page feed
Before a Broker node and memory blocking producer, it will try to page forward the messages in the queue to disk to free up memory space. Both persistent and non persistent messages will be written to disk. The persistent message itself has a copy in the disk, so the persistent messages will be cleared from memory during the transfer process.
By default, page feed processing occurs when the memory reaches the threshold of 50%.
That is, when the memory threshold is 0.4 by default, page feed will be performed when the memory exceeds 0.4 * 0.5 = 0.2.
For example, there is 1000MB of memory. When the memory utilization reaches 400mb, it has reached the limit. However, because the configured page feed memory is 0.5, 200MB of memory will be transferred to the disk before reaching the limit of 400mb. So as to achieve stable operation.
You can set vm_memory_high_watermark_paging_ratio to adjust
vm_memory_high_watermark.relative = 0.4
vm_memory_high_watermark_paging_ratio = 0.7(Set a value less than 1)
Why is the setting less than 1? Think you if you set the threshold to 1. Memory has reached its limit. It doesn't make much sense for you to change pages.
04. Disk alert of RabbitMQ
When the remaining disk space is lower than the determined threshold, RabbitMQ will also block the producer, which can avoid running out of disk space and causing the server to crash due to the continuous page change of non persistent messages.
By default: when the disk alert is 50MB, the alert will be performed. Indicates that the current disk space of 50MB will block the producer and stop the process of page feed of memory messages to the disk.
This threshold can be reduced, but it can not completely eliminate the possibility of crash caused by disk exhaustion. For example, in the gap between two disk space checks, the first check is 60MB, the second check may be 1MB, and a warning will appear.
Modify by command as follows:
rabbitmqctl set_disk_free_limit  <disk_limit>
rabbitmqctl set_disk_free_limit memory_limit  <fraction>
disk_limit: Fixed unit KB MB GB
fraction : Is the relative threshold, and the recommended range is:1.0~2.0 between. (relative to memory)
The configuration file is configured as follows:
disk_free_limit.relative = 3.0
disk_free_limit.absolute = 50mb
RabbitMQ advanced cluster
01. RabbitMQ cluster
RabbitMQ, a message queuing middleware product, is written based on Erlang. Erlang language is naturally distributed (realized by synchronizing magic cookie s of each node of Erlang cluster). Therefore, RabbitMQ naturally supports Clustering. This makes it unnecessary for RabbitMQ to implement the HA scheme and save the metadata of the cluster through ZooKeeper like ActiveMQ and Kafka. Cluster is a way to ensure reliability. At the same time, it can increase message throughput through horizontal expansion.
In the actual use process, multi machine and multi instance deployment is adopted. In order to facilitate students to practice building, sometimes you have to build a rabbitmq cluster on one machine. This chapter mainly focuses on single machine and multi instance.
Main reference official documents: https://www.rabbitmq.com/clustering.html
02. Cluster construction
The premise of configuration is that your rabbitmq can run. For example, "ps aux|grep rabbitmq" can see relevant processes. For example, running "rabbitmqctl status" can see the following information without error:
Execute the following command to view:
ps aux|grep rabbitmq

perhaps
systemctl status rabbitmq-server
Note: ensure that RabbitMQ can run. After that, stop the stand-alone RabbitMQ service until the RabbitMQ process is not visible in the background
03. Single machine multi instance building
Scenario: suppose there are two rabbit MQ nodes, rabbit-1 and rabbit-2. Rabbit-1 is the master node and rabbit-2 is the slave node.
Start command: RABBITMQ_NODE_PORT=5672 RABBITMQ_NODENAME=rabbit-1 rabbitmq-server -detached
End command: rabbitmqctl -n rabbit-1 stop
03-1. Step 1: start the first node rabbit-1
> sudo RABBITMQ_NODE_PORT=5672 RABBITMQ_NODENAME=rabbit-1 rabbitmq-server start &
...............ellipsis...................
  ##########  Logs: /var/log/rabbitmq/rabbit-1.log
  ######  ##        /var/log/rabbitmq/rabbit-1-sasl.log
  ##########
              Starting broker...
 completed with 7 plugins.
At this point, the rabbit-1 node is started.
03-2. Start the second node rabbit-2
Note: the web management plug-in port is occupied, so you should also specify the port number occupied by its Web plug-in
RABBITMQ_SERVER_START_ARGS="-rabbitmq_management listener [{port,15673}]"
sudo RABBITMQ_NODE_PORT=5673 RABBITMQ_SERVER_START_ARGS="-rabbitmq_management listener [{port,15673}]" RABBITMQ_NODENAME=rabbit-2 rabbitmq-server start &
..............ellipsis..................
  ##########  Logs: /var/log/rabbitmq/rabbit-2.log
  ######  ##        /var/log/rabbitmq/rabbit-2-sasl.log
  ##########
              Starting broker...
 completed with 7 plugins.
At this point, the rabbit-2 node is started
03-3. Verify and start "ps aux|grep rabbitmq"
rabbitmq  2022  2.7  0.4 5349380 77020 ?       Sl   11:03   0:06 /usr/lib/erlang/erts-9.2/bin/beam.smp -W w -A 128 -P 1048576 -t 5000000 -stbt db -zdbbl 128000 -K true -B i -- -root /usr/lib/erlang -progname erl -- -home /var/lib/rabbitmq -- -pa /usr/lib/rabbitmq/lib/rabbitmq_server-3.6.15/ebin -noshell -noinput -s rabbit boot -sname rabbit-1 -boot start_sasl -kernel inet_default_connect_options [{nodelay,true}] -rabbit tcp_listeners [{"auto",5672}] -sasl errlog_type error -sasl sasl_error_logger false -rabbit error_logger {file,"/var/log/rabbitmq/rabbit-1.log"} -rabbit sasl_error_logger {file,"/var/log/rabbitmq/rabbit-1-sasl.log"} -rabbit enabled_plugins_file "/etc/rabbitmq/enabled_plugins" -rabbit plugins_dir "/usr/lib/rabbitmq/plugins:/usr/lib/rabbitmq/lib/rabbitmq_server-3.6.15/plugins" -rabbit plugins_expand_dir "/var/lib/rabbitmq/mnesia/rabbit-1-plugins-expand" -os_mon start_cpu_sup false -os_mon start_disksup false -os_mon start_memsup false -mnesia dir "/var/lib/rabbitmq/mnesia/rabbit-1" -kernel inet_dist_listen_min 25672 -kernel inet_dist_listen_max 25672 start
rabbitmq  2402  4.2  0.4 5352196 77196 ?       Sl   11:05   0:05 /usr/lib/erlang/erts-9.2/bin/beam.smp -W w -A 128 -P 1048576 -t 5000000 -stbt db -zdbbl 128000 -K true -B i -- -root /usr/lib/erlang -progname erl -- -home /var/lib/rabbitmq -- -pa /usr/lib/rabbitmq/lib/rabbitmq_server-3.6.15/ebin -noshell -noinput -s rabbit boot -sname rabbit-2 -boot start_sasl -kernel inet_default_connect_options [{nodelay,true}] -rabbit tcp_listeners [{"auto",5673}] -sasl errlog_type error -sasl sasl_error_logger false -rabbit error_logger {file,"/var/log/rabbitmq/rabbit-2.log"} -rabbit sasl_error_logger {file,"/var/log/rabbitmq/rabbit-2-sasl.log"} -rabbit enabled_plugins_file "/etc/rabbitmq/enabled_plugins" -rabbit plugins_dir "/usr/lib/rabbitmq/plugins:/usr/lib/rabbitmq/lib/rabbitmq_server-3.6.15/plugins" -rabbit plugins_expand_dir "/var/lib/rabbitmq/mnesia/rabbit-2-plugins-expand" -os_mon start_cpu_sup false -os_mon start_disksup false -os_mon start_memsup false -mnesia dir "/var/lib/rabbitmq/mnesia/rabbit-2" -rabbitmq_management listener [{port,15673}] -kernel inet_dist_listen_min 25673 -kernel inet_dist_listen_max 25673 start
03-4. rabbit-1 operation as the master node
#Stop application
> sudo rabbitmqctl -n rabbit-1 stop_app
#The purpose is to clear the historical data on the node (if it is not cleared, the node cannot be added to the cluster)
> sudo rabbitmqctl -n rabbit-1 reset
#Start application
> sudo rabbitmqctl -n rabbit-1 start_app
03-5. rabbit2 operates as a slave node
# Stop application
> sudo rabbitmqctl -n rabbit-2 stop_app
# The purpose is to clear the historical data on the node (if it is not cleared, the node cannot be added to the cluster)
> sudo rabbitmqctl -n rabbit-2 reset
# Add rabbit2 node to rabbit1 (master node) cluster [host name of server node server]
> sudo rabbitmqctl -n rabbit-2 join_cluster rabbit-1@'Server-node'
# Start application
> sudo rabbitmqctl -n rabbit-2 start_app
03-6. Verify cluster status
> sudo rabbitmqctl cluster_status -n rabbit-1
//The cluster has two nodes: rabbit-1@Server-node,rabbit-2@Server-node
[{nodes,[{disc,['rabbit-1@Server-node','rabbit-2@Server-node']}]},
 {running_nodes,['rabbit-2@Server-node','rabbit-1@Server-node']},
 {cluster_name,<<"rabbit-1@Server-node.localdomain">>},
 {partitions,[]},
 {alarms,[{'rabbit-2@Server-node',[]},{'rabbit-1@Server-node',[]}]}]
03-7. Web Monitoring

Note: the user name and password should be set for 15672 node-1 and 15673 node-2 when accessing the web node management. As follows:
rabbitmqctl -n rabbit-1 add_user admin admin
rabbitmqctl -n rabbit-1 set_user_tags admin administrator
rabbitmqctl -n rabbit-1 set_permissions -p / admin ".*" ".*" ".*"
rabbitmqctl -n rabbit-2 add_user admin admin
rabbitmqctl -n rabbit-2 set_user_tags admin administrator
rabbitmqctl -n rabbit-2 set_permissions -p / admin ".*" ".*" ".*"
03-8. Summary
Tips:
If the multi machine deployment mode is adopted, the cookie of one node needs to be read and copied to other nodes (whether the nodes can communicate with each other through the cookie). The cookie is stored in / var/lib/rabbitmq/.erlang.cookie.
For example, the host names are rabbit-1 and rabbit-2 respectively
1. Start each node one by one
2. Configure the hosts file of each node (vim /etc/hosts)
ip1: rabbit-1
ip2: rabbit-2
Other steps are the same as single machine deployment
RabbitMQ advanced distributed transaction
sketch
Distributed transaction means that the operations of transactions are located on different nodes, and the AICD characteristics of transactions need to be guaranteed.
For example, in the order placement scenario, if the inventory and order are not on the same node, distributed transactions are involved.
01. Distributed transaction mode
In a distributed system, there are no more than those solutions to realize distributed transactions.
1, Two phase submission (2PC) requires the support of database manufacturers. java components include atomikos, etc.
Two phase commit (2PC) coordinates the behavior of participants by introducing a Coordinator, and finally determines whether these participants want to really execute transactions.
Preparation stage
The coordinator asks the participant whether the transaction is executed successfully, and the participant sends back the transaction execution result.
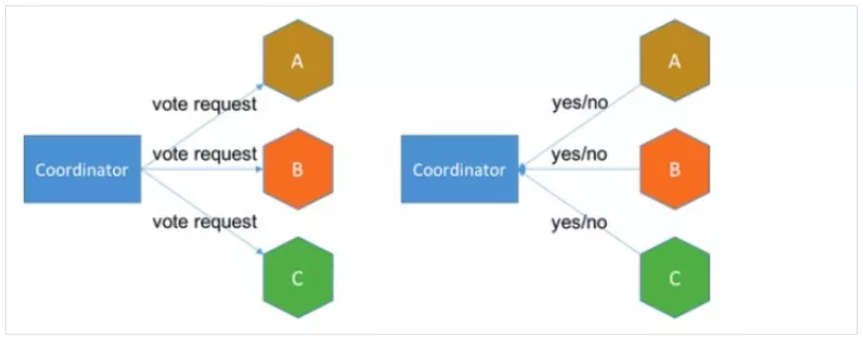
1.2 submission stage
If the transaction is successfully executed on each participant, the transaction coordinator sends a notification to the participant to submit the transaction; Otherwise, the coordinator sends a notification to the participant to roll back the transaction.
It should be noted that in the preparation phase, the participants executed the transaction but did not commit it. Only after receiving the notification from the coordinator in the commit phase can the commit or rollback be performed.
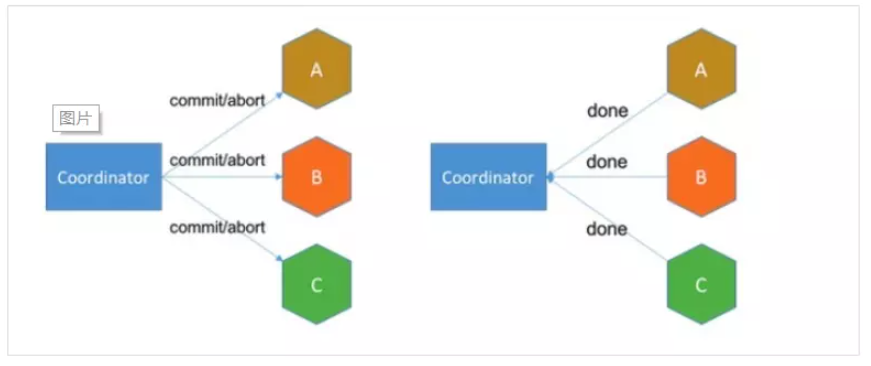
Existing problems
- 2.1 synchronization blocking all transaction participants are in synchronization blocking state when waiting for the response of other participants, and cannot perform other operations.
- 2.2 single point problem coordinator plays a very important role in 2PC, and failure will have a great impact. Especially in phase 2, when a fault occurs, all participants will be waiting and unable to complete other operations.
- 2.3 data inconsistency in phase 2, if the coordinator only sends part of the Commit message and the network is abnormal, only some participants receive the Commit message, that is, only some participants submit transactions, resulting in system data inconsistency.
- 2.4 being too conservative, the failure of any node will lead to the failure of the whole transaction, and there is no perfect fault-tolerant mechanism.
2, Compensation Affairs (TCC) Yan Xuan, Ali, ant financial services.
TCC is actually a compensation mechanism adopted. Its core idea is to register a corresponding confirmation and compensation (revocation) operation for each operation. It is divided into three stages:
- The Try stage is mainly to detect and reserve resources for the business system
- The Confirm phase is mainly used to Confirm and submit the business system. When the Try phase is successfully executed and the Confirm phase is started, the default - the Confirm phase will not make an error. That is, as long as Try succeeds, Confirm will succeed.
- The Cancel phase is mainly used to Cancel the business and release the reserved resources when the business execution is wrong and needs to be rolled back.
For example, if Bob wants to transfer money to Smith, the idea is: we have a local method, which is called in turn
1: First, in the Try phase, you need to call the remote interface to freeze Smith and Bob's money.
2: In the Confirm phase, the transfer operation called remotely is executed, and the transfer is unfrozen successfully.
3: If step 2 succeeds, the transfer succeeds. If step 2 fails, the unfreezing method (Cancel) corresponding to the remote freezing interface is called.
Advantages: compared with 2PC, the implementation and process are relatively simple, but the data consistency is also worse than 2PC
Disadvantages: the disadvantages are quite obvious. It may fail in steps 2 and 3. TCC is a compensation method in the application layer, so programmers need to write a lot of compensation code during implementation. In some scenarios, some business processes may not be well defined and processed with TCC.
Three, local message table (asynchronous guarantee) such as: Alipay, WeChat pay the initiative to query the payment status, the form of the bill.
The local message table and the business data table are in the same database, so the local transaction can be used to ensure that the operations on the two tables meet the transaction characteristics, and the message queue is used to ensure the final consistency.
- After one party of the distributed transaction completes the operation of writing business data, a message is sent to the local message table. The local transaction can ensure that the message will be written to the local message table.
- Then forward the messages in the local message table to Kafka and other message queues. If the forwarding is successful, delete the messages from the local message table, otherwise continue to forward again.
- On the other side of the distributed transaction operation, read a message from the message queue and perform the operation in the message.
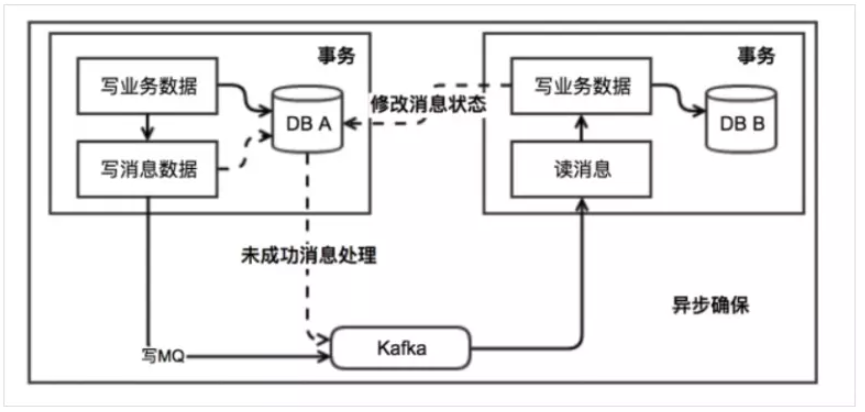
Advantages: a very classic implementation avoids distributed transactions and achieves final consistency.
Disadvantages: the message table will be coupled to the business system. If there is no encapsulated solution, there will be a lot of chores to deal with.
4, MQ transaction message asynchronous scenario, with strong universality and expansibility.
Some third-party MQS support transaction messages, such as RocketMQ. The way they support transaction messages is similar to the two-phase submission, but some mainstream MQS in the market do not support transaction messages, such as Kafka.
Taking Alibaba's RabbitMQ middleware as an example, the idea is roughly as follows:
- In the first stage, the Prepared message will get the message address.
- The second stage executes local transactions, and the third stage accesses the message through the address obtained in the first stage and modifies the status.
That is, in the business method, you need to submit two requests to the message queue, one to send a message and one to confirm a message. If the confirmation message fails to be sent, RabbitMQ will regularly scan the transaction messages in the message cluster. When the Prepared message is found, it will confirm to the message sender. Therefore, the manufacturer needs to implement a check interface. RabbitMQ will decide whether to rollback or continue to send the confirmation message according to the policy set by the sender. This ensures that the message sending and the local transaction succeed or fail at the same time.
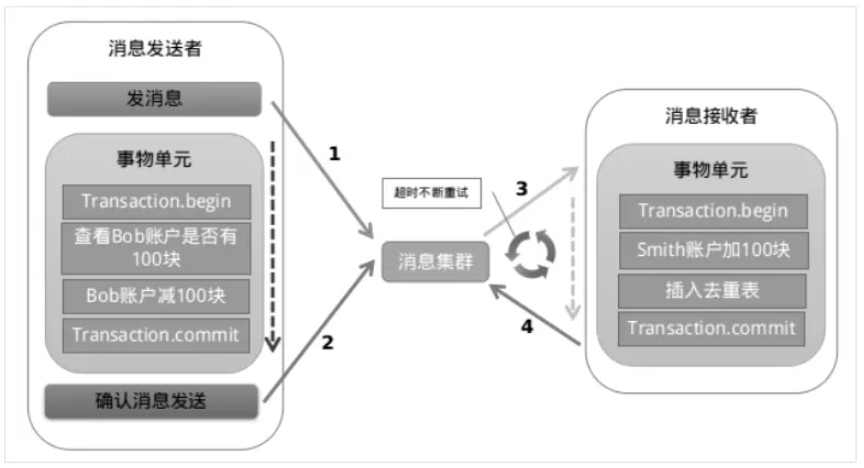
Advantages: final consistency is achieved without relying on local database transactions.
Disadvantages: it is difficult to implement, mainstream MQ does not support it, and the code of RocketMQ transaction message is not open source.
5, Summary
Through this paper, we summarize and compare the advantages and disadvantages of several distributed decomposition schemes. Distributed transaction itself is a technical problem. There is no perfect scheme to deal with all scenarios. We should choose according to the business scenario. Ali RocketMQ implements distributed transactions. Now there are many distributed transaction coordinators, such as LCN. You can try more.
02. Specific implementation
Complete architecture diagram of distributed transactions
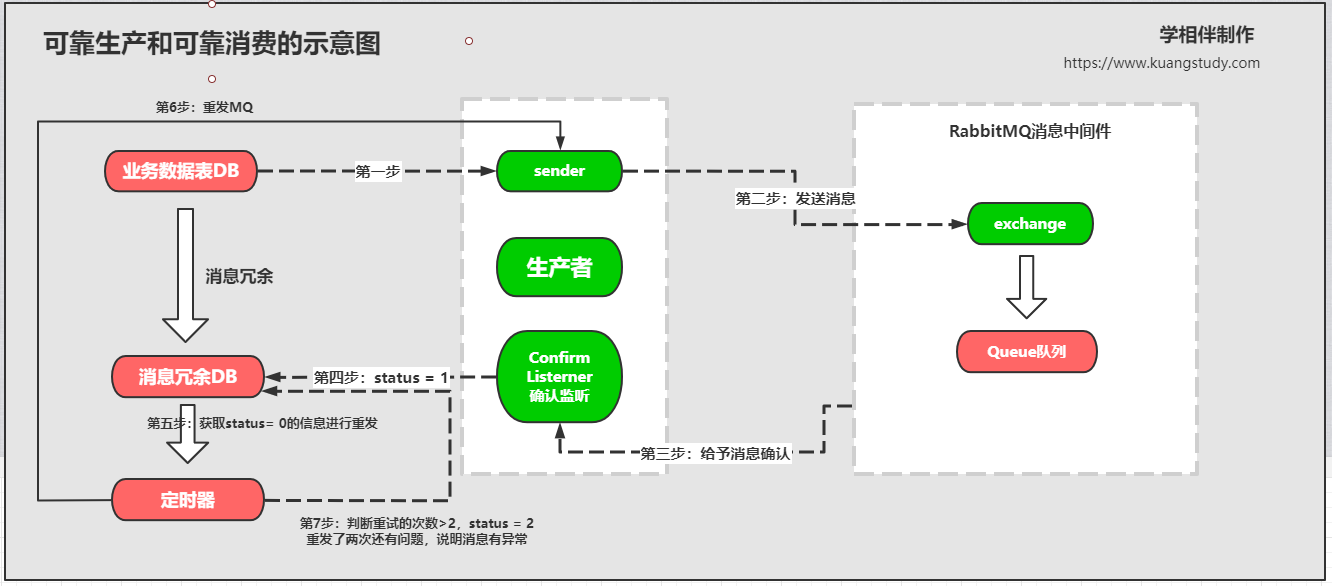
Meituan takeout structure:
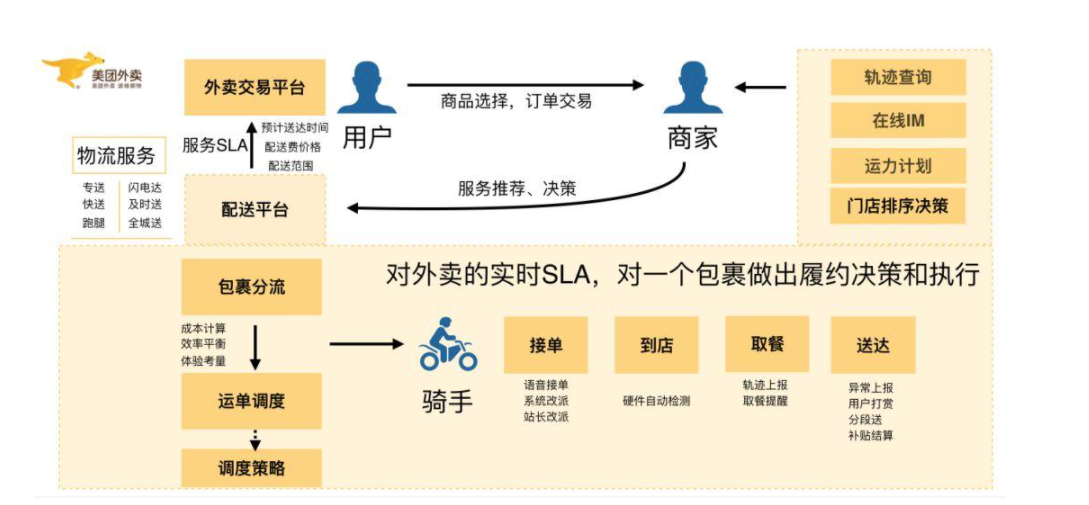
2-01 distributed transactions between systems
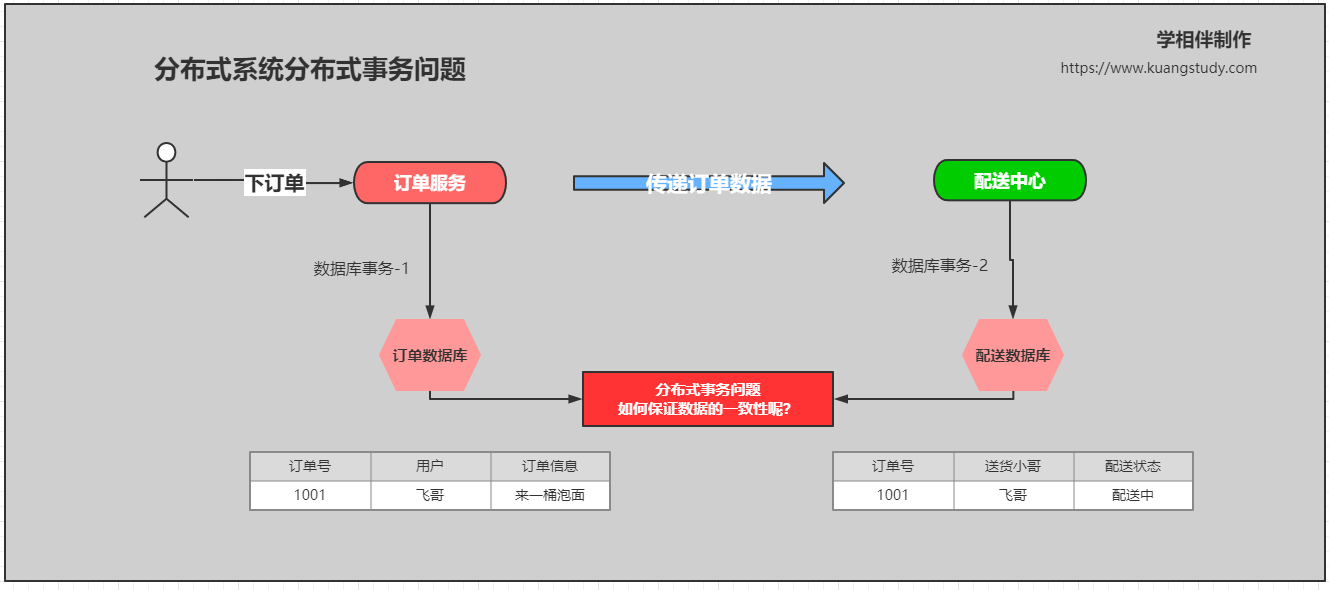
2-02. Transaction rollback during inter system call
import com.xuexiangban.rabbitmq.dao.OrderDataBaseService;
import com.xuexiangban.rabbitmq.pojo.Order;
import org.springframework.beans.factory.annotation.Autowired;
import org.springframework.http.client.SimpleClientHttpRequestFactory;
import org.springframework.stereotype.Service;
import org.springframework.transaction.annotation.Transactional;
import org.springframework.web.client.RestTemplate;
@Service
public class OrderService {
    @Autowired
    private OrderDataBaseService orderDataBaseService;
    // Create order
    @Transactional(rollbackFor = Exception.class) // Add transaction for the entire method of order creation
    public void createOrder(Order orderInfo) throws Exception {
        // 1: Order information - insert order system, order database transaction
        orderDataBaseService.saveOrder(orderInfo);
        // 2: Send order information to waybill system through Http interface
        String result = dispatchHttpApi(orderInfo.getOrderId());
        if(!"success".equals(result)) {
            throw new Exception("Order creation failed,The reason is that the waybill interface call failed!");
        }
    }
    /**
     *  Simulate the http request interface sending, the waybill system, and pass the order number to the spring cloud
     * @return
     */
    private String dispatchHttpApi(String orderId) {
        SimpleClientHttpRequestFactory factory  = new SimpleClientHttpRequestFactory();
        // Link timeout > 3 seconds
        factory.setConnectTimeout(3000);
        // Processing timeout > 2 seconds
        factory.setReadTimeout(2000);
        // Send http request
        String url = "http://localhost:9000/dispatch/order?orderId="+orderId;
        RestTemplate restTemplate = new RestTemplate(factory);//abnormal
        String result = restTemplate.getForObject(url, String.class);
        return result;
    }
}
2-03. Overall design idea of distributed transaction based on MQ
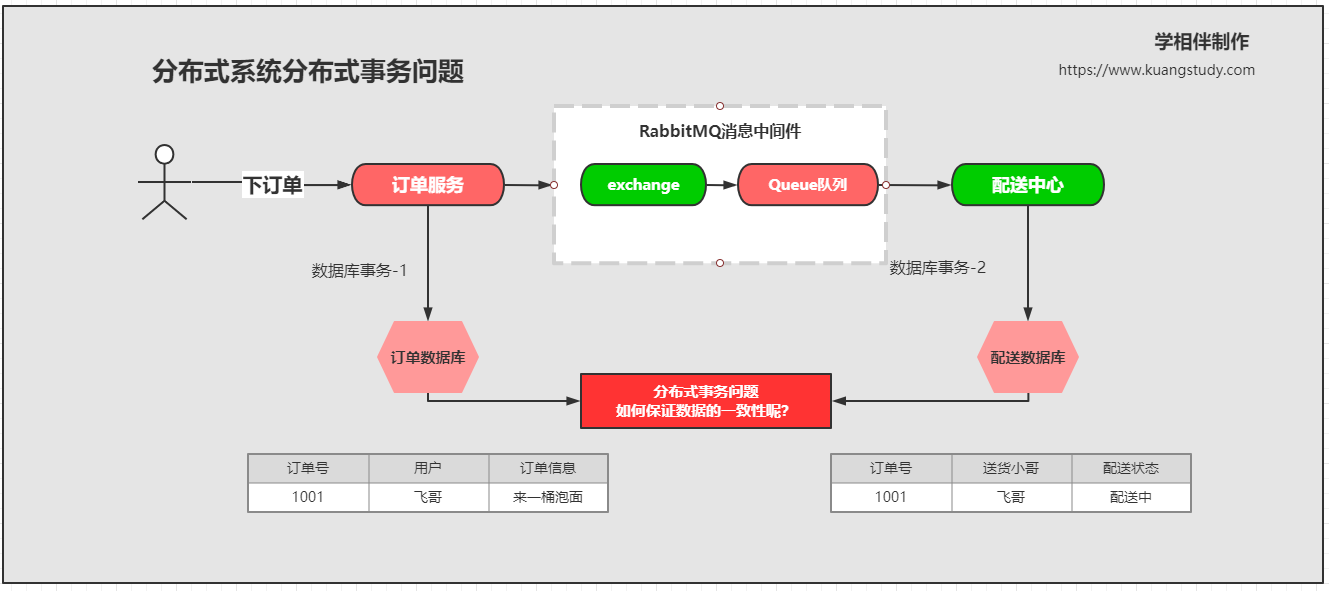
2-04. Reliable production of MQ based distributed transaction messages
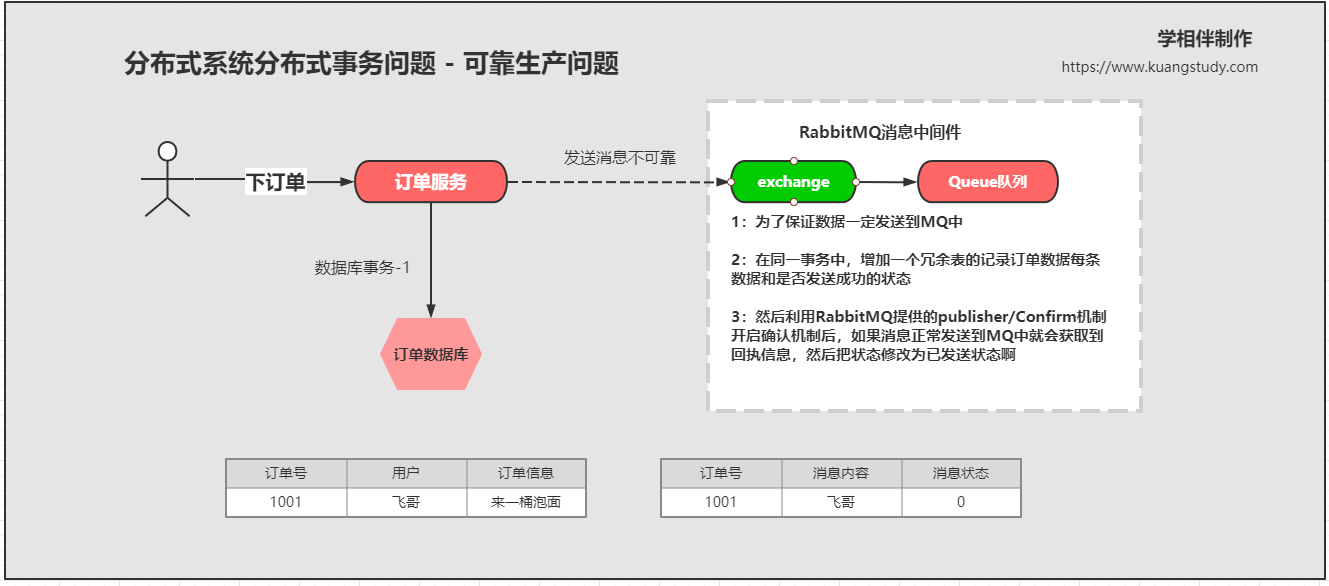
If there are exceptions and failures in the MQ server at this time, the message cannot obtain the receipt information. How to solve it?
2-04-01. Reliable production of MQ based distributed transaction messages - scheduled retransmission
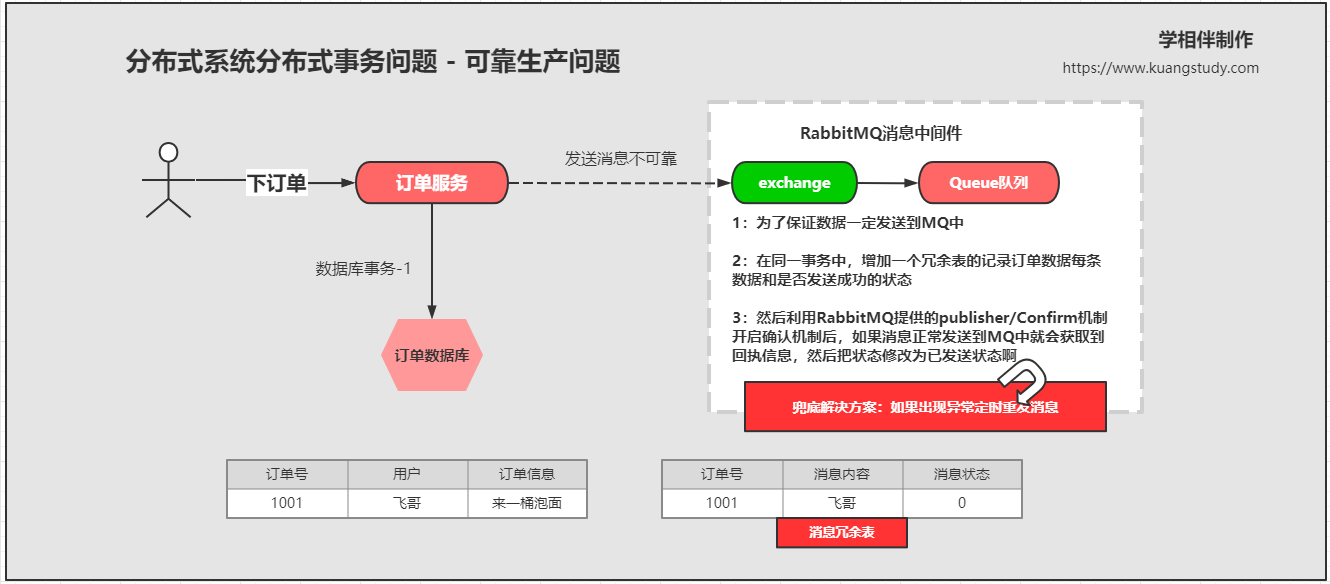
2-06. Reliable consumption of MQ based distributed transaction messages
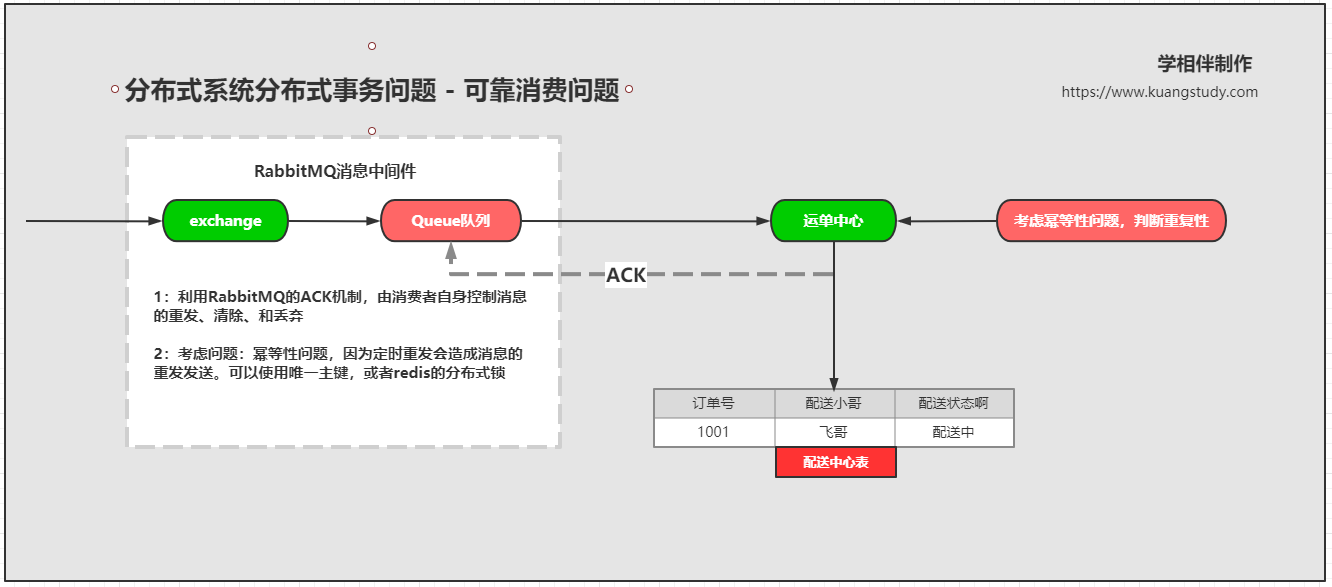
2-07 message retransmission of MQ based distributed transaction messages
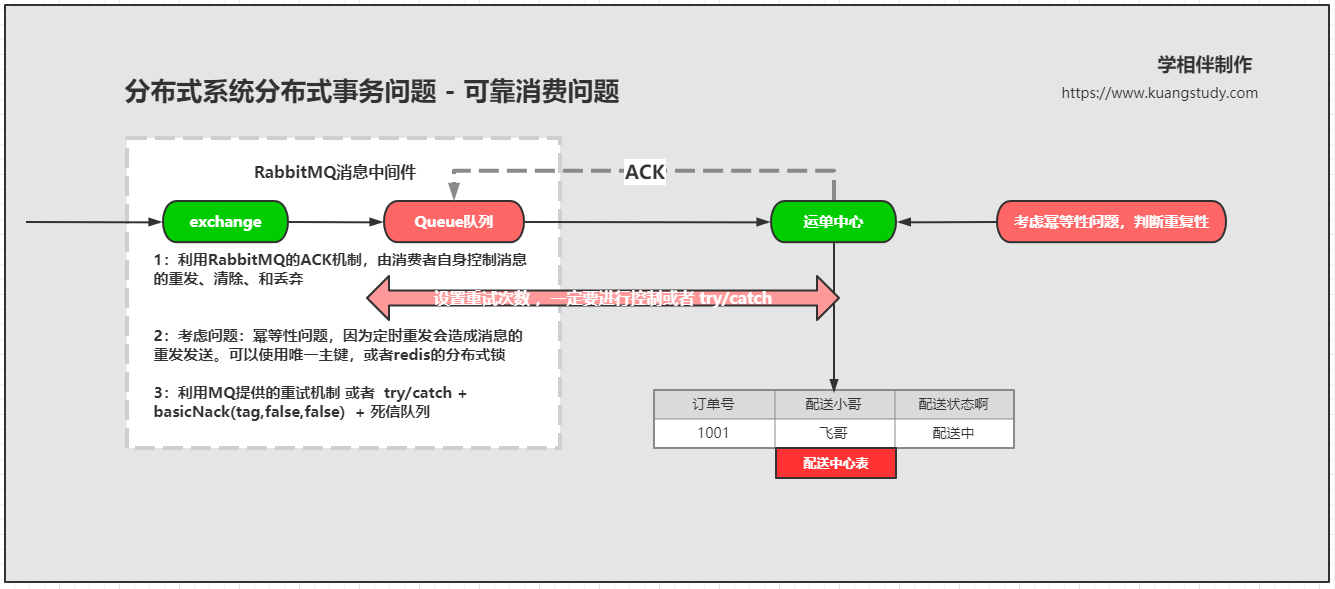
2-08. Dead letter queue message transfer of MQ based distributed transaction messages + manual processing
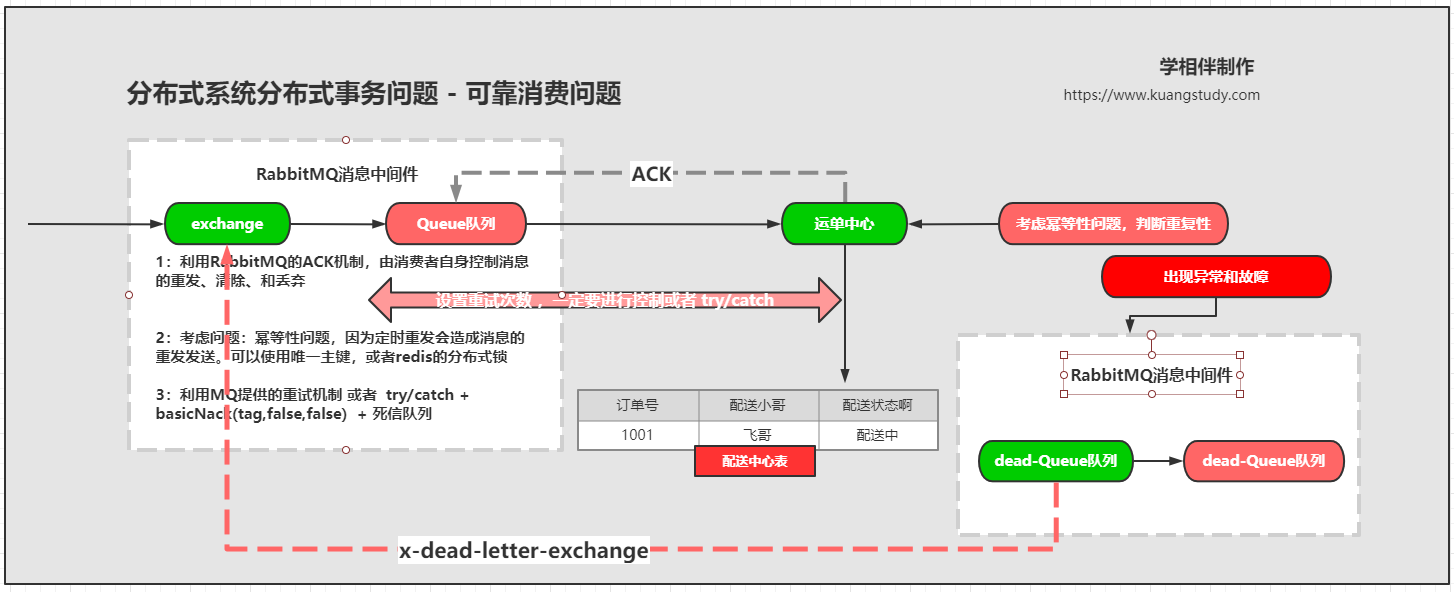
If the dead letter queue reports an error, it will be processed manually
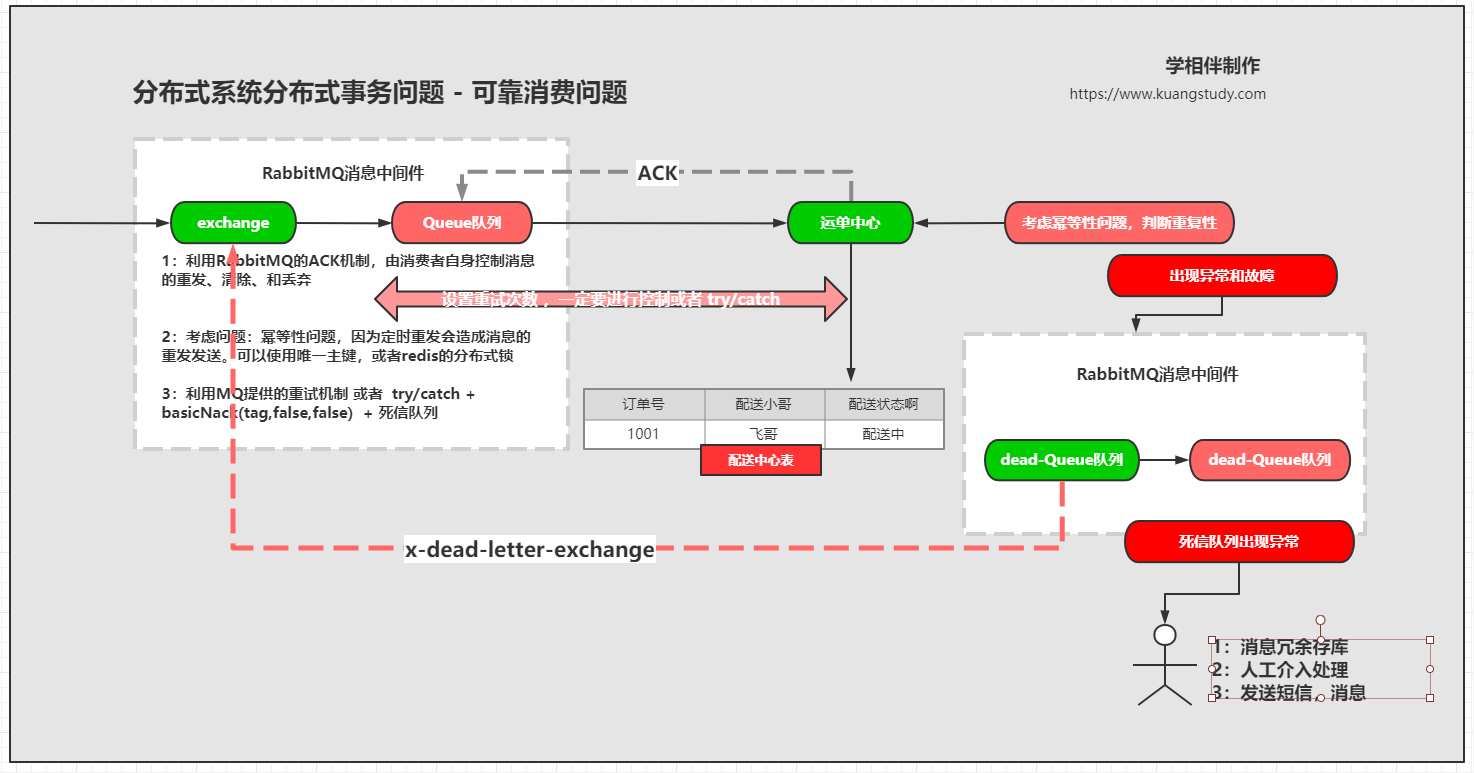
2-09. Precautions for message retry of dead letter queue of MQ based distributed transaction messages
2-10. Customized retransmission of MQ based distributed transaction messages
03. Summary
Advantages of MQ based distributed transaction solution:
1. Strong universality
2. Convenient expansion
3. The coupling degree is low and the scheme is relatively mature
Disadvantages of MQ based distributed transaction solution:
1. Based on message oriented middleware, it is only suitable for asynchronous scenarios
2. Messages will delay processing, which needs to be tolerated by the business
proposal
1. Try to avoid distributed transactions
2. Try to make non core business asynchronous
Spring boot integration rabbitmq cluster configuration details
pringboot integration rabbitmq
Cluster creation method is omitted here
Integration start
1. Introduce starter
···xml
org.springframework.boot
spring-boot-starter-parent
2.2.6.RELEASE
org.springframework.boot
spring-boot-starter-amqp
2: The detailed configuration is as follows
```yaml
rabbitmq:
    addresses: 127.0.0.1:6605,127.0.0.1:6606,127.0.0.1:6705 #Specify the addresses of the server to which the client is connected, separated by commas (addresses first, then host)
#    port:
    ##The cluster configuration addresses are separated by commas
    # addresses: ip:port,ip:port
    password: admin
    username: 123456
    virtual-host: / # Connect to vhost of rabbitMQ
    requested-heartbeat: #Specifies the heartbeat timeout, in seconds, 0 is unspecified; Default 60s
    publisher-confirms: #Enable publish confirmation
    publisher-reurns: # Enable publish return
    connection-timeout: #Connection timeout, in milliseconds. 0 means infinity. No timeout
    cache:
      channel.size: # Number of channel s held in the cache
      channel.checkout-timeout: # When the number of caches is set, the timeout time of obtaining a channel from the cache, in milliseconds; If 0, a new channel is always created
      connection.size: # The number of cached connections, which takes effect only in CONNECTION mode
      connection.mode: # CONNECTION factory cache mode: CHANNEL and CONNECTION
    listener:
      simple.auto-startup: # Automatically start container on startup
      simple.acknowledge-mode: # Indicates the message confirmation mode, which has three configuration modes: none, manual and auto; Default Auto
      simple.concurrency: # Minimum number of consumers
      simple.max-concurrency: # Largest number of consumers
      simple.prefetch: # Specify how many messages a request can process. If there are transactions, the number must be greater than or equal to the number of transactions
      simple.transaction-size: # Specify the number of messages for a transaction, preferably less than or equal to the number of prefetch es
      simple.default-requeue-rejected: # Decide whether the rejected message will rejoin the team; The default is true (related to the parameter acknowledge mode)
      simple.idle-event-interval: # How long does it take to publish an idle container, in milliseconds
      simple.retry.enabled: # Is listening retry available
      simple.retry.max-attempts: # max retries
      simple.retry.initial-interval: # The interval between the first and second attempts to publish or deliver a message
      simple.retry.multiplier: # Multiplier applied to the last retry interval
      simple.retry.max-interval: # Maximum retry interval
      simple.retry.stateless: # Is the retry stateful or stateless
    template:
      mandatory: # Enable mandatory information; Default false
      receive-timeout: # Timeout for receive() operation
      reply-timeout: # Timeout for sendAndReceive() operation
      retry.enabled: # Is send retry available
      retry.max-attempts: # max retries
      retry.initial-interval: # The interval between the first and second attempts to publish or deliver a message
      retry.multiplier: # Multiplier applied to the last retry interval
      retry.max-interval: #Maximum retry interval
Note: there are many related configurations. You only need to pay attention to some common configurations
For the sender, the following configuration is required:
1 configure CachingConnectionFactory
2 configure Exchange/Queue/Binding
3 configure RabbitAdmin to create Exchange/Queue/Binding in the previous step
4 configure the RabbitTemplate to send messages. The RabbitTemplate obtains the Connection through the CachingConnectionFactory, and then wants to specify the Exchange to send messages
For the consumer, the following configuration is required:
1 configure CachingConnectionFactory
2 configure Exchange/Queue/Binding
3 configure RabbitAdmin to create Exchange/Queue/Binding in the previous step
4. Configure RabbitListenerContainerFactory
5 configure @ RabbitListener/@RabbitHandler to receive messages
By default, the main configurations are as follows:
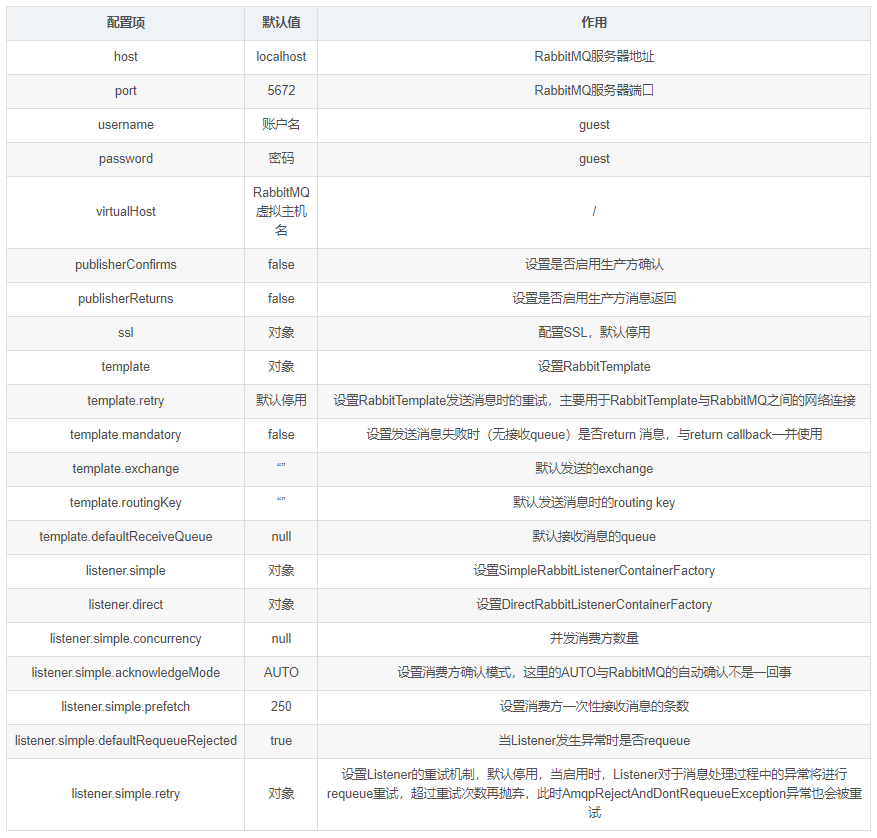
3. Main objects of spring AMQP
Note: if you don't know about AMQP, please go to the official website
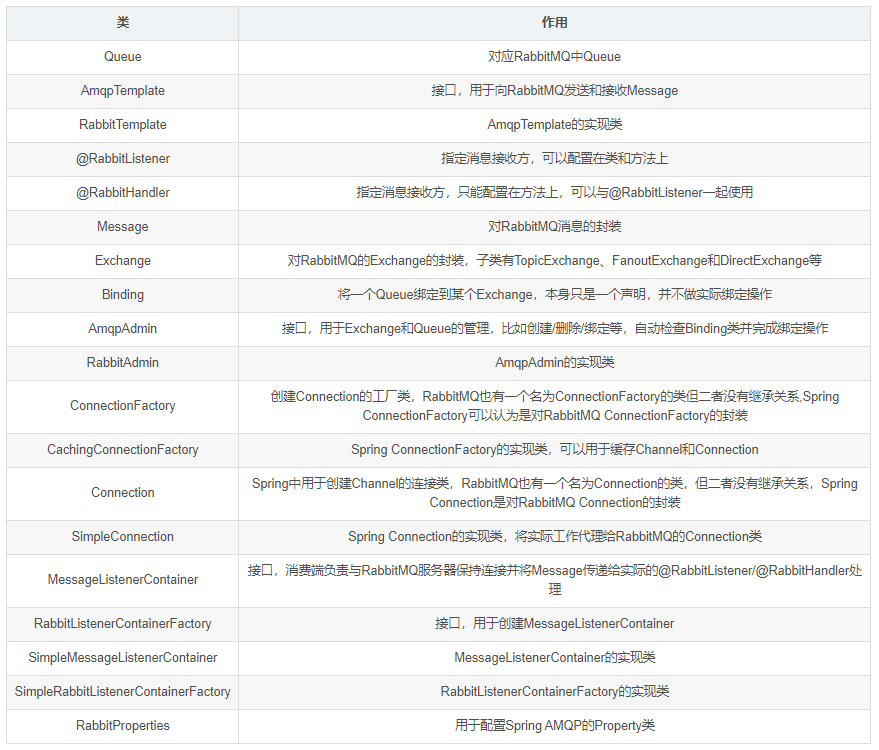
4 use:
By configuring how classes are loaded:
import org.slf4j.Logger;
import org.slf4j.LoggerFactory;
import org.springframework.amqp.core.AcknowledgeMode;
import org.springframework.amqp.core.Binding;
import org.springframework.amqp.core.BindingBuilder;
import org.springframework.amqp.core.DirectExchange;
import org.springframework.amqp.core.Queue;
import org.springframework.amqp.core.TopicExchange;
import org.springframework.amqp.rabbit.config.SimpleRabbitListenerContainerFactory;
import org.springframework.amqp.rabbit.connection.CachingConnectionFactory;
import org.springframework.amqp.rabbit.connection.ConnectionFactory;
import org.springframework.amqp.rabbit.core.RabbitAdmin;
import org.springframework.amqp.rabbit.core.RabbitTemplate;
import org.springframework.amqp.rabbit.listener.RabbitListenerContainerFactory;
import org.springframework.amqp.support.converter.Jackson2JsonMessageConverter;
import org.springframework.beans.factory.annotation.Autowired;
import org.springframework.beans.factory.annotation.Value;
import org.springframework.context.annotation.Bean;
import org.springframework.context.annotation.Configuration;
import java.util.HashMap;
import java.util.Map;
@Configuration
public class RabbitConfig {
    private static final Logger logger = LoggerFactory.getLogger(RabbitConfig.class);
    public static final String RECEIVEDLXEXCHANGE="spring-ex";
    public static final String RECEIVEDLXQUEUE="spring-qu1";
    public static final String RECEIVEDLXROUTINGKEY="aa";
    public static final String DIRECTEXCHANGE="spring-ex";
    public static final String MDMQUEUE="mdmQueue";
    public static final String TOPICEXCHANGE="spring-top";
    @Value("${spring.rabbitmq.addresses}")
    private String hosts;
    @Value("${spring.rabbitmq.username}")
    private String userName;
    @Value("${spring.rabbitmq.password}")
    private String password;
    @Value("${spring.rabbitmq.virtual-host}")
    private String virtualHost;
 /*   @Value("${rabbit.channelCacheSize}")
    private int channelCacheSize;*/
//    @Value("${rabbit.port}")
//    private int port;
/*    @Autowired
    private ConfirmCallBackListener confirmCallBackListener;
    @Autowired
    private ReturnCallBackListener returnCallBackListener;*/
    @Bean
    public ConnectionFactory connectionFactory(){
        CachingConnectionFactory cachingConnectionFactory = new CachingConnectionFactory();
        cachingConnectionFactory.setAddresses(hosts);
        cachingConnectionFactory.setUsername(userName);
        cachingConnectionFactory.setPassword(password);
//        cachingConnectionFactory.setChannelCacheSize(channelCacheSize);
        //cachingConnectionFactory.setPort(port);
        cachingConnectionFactory.setVirtualHost(virtualHost);
        //Set connection factory cache mode:
        cachingConnectionFactory.setCacheMode(CachingConnectionFactory.CacheMode.CONNECTION);
        //Number of cache connections
        cachingConnectionFactory.setConnectionCacheSize(3);
        //Set connection limits
        cachingConnectionFactory.setConnectionLimit(6);
        logger.info("The connection factory is set, and the connection address is{}"+hosts);
        logger.info("The connection factory setting is completed, and the user is connected{}"+userName);
        return cachingConnectionFactory;
    }
    @Bean
    public RabbitAdmin rabbitAdmin(){
        RabbitAdmin rabbitAdmin = new RabbitAdmin(connectionFactory());
        rabbitAdmin.setAutoStartup(true);
        rabbitAdmin.setIgnoreDeclarationExceptions(true);
        rabbitAdmin.declareBinding(bindingMdmQueue());
        //Declare topic switch
        rabbitAdmin.declareExchange(directExchange());
        logger.info("Administrator setup complete");
        return rabbitAdmin;
    }
    @Bean
    public RabbitListenerContainerFactory listenerContainerFactory() {
        SimpleRabbitListenerContainerFactory factory = new SimpleRabbitListenerContainerFactory();
        factory.setConnectionFactory(connectionFactory());
        factory.setMessageConverter(new Jackson2JsonMessageConverter());
        //Minimum number of consumers
        factory.setConcurrentConsumers(10);
        //Maximum number of consumers
        factory.setMaxConcurrentConsumers(10);
        //Maximum number of messages processed by a request
        factory.setPrefetchCount(10);
        //
        factory.setChannelTransacted(true);
        //No queuing by default
        factory.setDefaultRequeueRejected(true);
        //Manually acknowledge receipt of the message
        factory.setAcknowledgeMode(AcknowledgeMode.MANUAL);
        logger.info("Listener setup complete");
        return factory;
    }
    @Bean
    public DirectExchange directExchange(){
        return new DirectExchange(DIRECTEXCHANGE,true,false);
    }
    @Bean
    public Queue mdmQueue(){
        Map arguments = new HashMap<>();
        // Bind the queue to the private message switch
        arguments.put("x-dead-letter-exchange",RECEIVEDLXEXCHANGE);
        arguments.put("x-dead-letter-routing-key",RECEIVEDLXROUTINGKEY);
        logger.info("Queue switch binding complete");
        return new Queue(RECEIVEDLXQUEUE,true,false,false,arguments);
    }
    @Bean
    Binding bindingMdmQueue() {
        return BindingBuilder.bind(mdmQueue()).to(directExchange()).with("");
    }
    @Bean
    public RabbitTemplate rabbitTemplate(){
        RabbitTemplate rabbitTemplate = new RabbitTemplate(connectionFactory());
        rabbitTemplate.setMandatory(true);
        //Release confirmation
//        rabbitTemplate.setConfirmCallback(confirmCallBackListener);
        // Enable publish return
//        rabbitTemplate.setReturnCallback(returnCallBackListener);
        logger.info("Connection template setting completed");
        return rabbitTemplate;
    }
  /*  @Bean
    public TopicExchange topicExchange(){
        return new TopicExchange(TOPICEXCHANGE,true,false);
    }*/
  /*
*//**
     * @return DirectExchange
     *//*
    @Bean
    public DirectExchange dlxExchange() {
        return new DirectExchange(RECEIVEDLXEXCHANGE,true,false);
    }
*//*
*
     * @return Queue
*//*
    @Bean
    public Queue dlxQueue() {
        return new Queue(RECEIVEDLXQUEUE,true);
    }
*//*
     * @return Binding
     *//*
    @Bean
    public Binding binding() {
        return BindingBuilder.bind(dlxQueue()).to(dlxExchange()).with(RECEIVEDLXROUTINGKEY);
    }*/
}
Load in two ways
1 through configuration file
2 through configuration class
Note: the above is loaded through configuration files and configuration classes. Common configurations are shown above. In actual use, the producer and consumer should be configured separately, and the relevant configuration will also change slightly, and the general configuration will remain unchanged. For more information, see the official website configuration.
RabbitMQ cluster monitoring
Cluster monitoring
In the vast Internet industry, RabbitMQ almost always has clusters, so the monitoring of clusters has become an essential part of the enterprise ecology. Next, we will explain the main four kinds of monitoring.
1. Management interface monitoring
For management interface monitoring, we need to open the corresponding plug-ins (rabbitmq plugins enable rabbitmq_management)
Then visit http://ip:15672
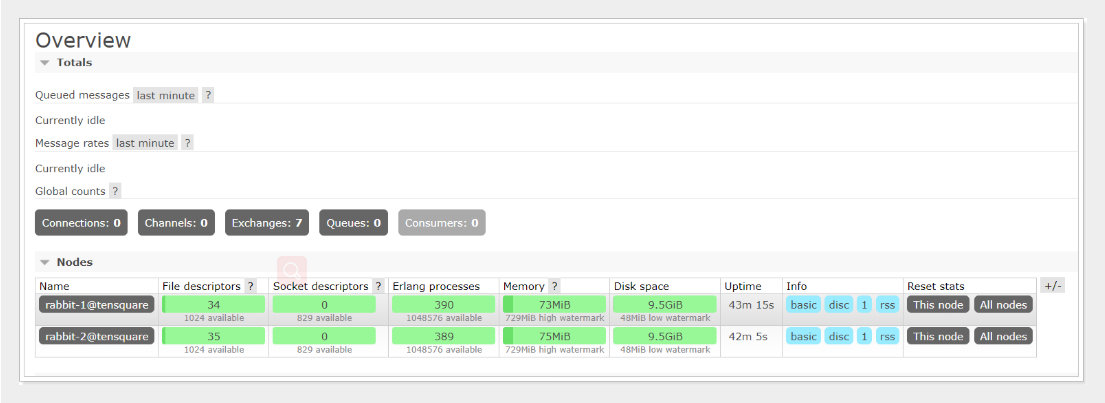
On the management console, we can intuitively see whether each node in the cluster is normal. If it is red, it means that the node is down. At the same time, we can easily view the memory, disk and other related information of each node. It is also very convenient to use. Unfortunately, this function is relatively simple, and there is no personalized setting of alarm and other columns. At the same time, it is difficult to connect it to other monitoring systems of the company for unified management. Therefore, it is not scalable and is generally used in small clusters of small enterprises.
2. tracing log monitoring
For enterprise application development, we usually pay more attention to our messages, and even put the reliability of messages first in many scenarios. However, it is inevitable that our MQ cluster will have abnormal message loss or the client cannot send messages. At this time, in order to help developers locate the problem quickly, We can monitor the delivery and consumption of messages, and the tracing log monitoring plug-in helps us realize this function
The message tracking of the message center needs to be implemented using trace. Trace is used by Rabbitmq to record every message sent, which is convenient for developers using Rabbitmq to debug and troubleshoot. Visual interfaces can be provided in the form of plug-ins. After trace is started, it will automatically create the system Exchange: amq.rabbitmq.trace. Each queue will automatically bind to the Exchange, and the messages sent to the queue after binding will be recorded in the trace log.
Message tracking enable and view
The following are the related commands and usage of trace (to use trace, you need to enable the rabbitmq plug-in first, and then turn on the switch):
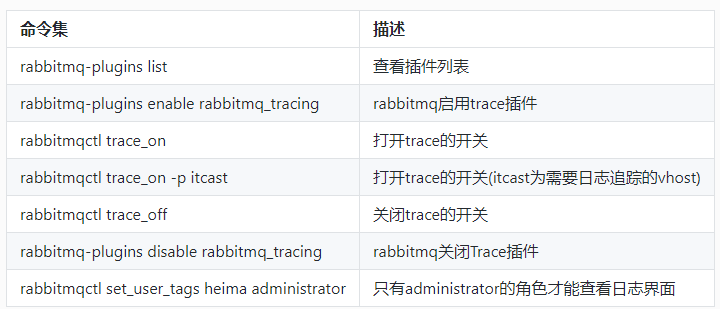
| Command set | describe |
|---|---|
| rabbitmq-plugins list | View the list of plug-ins |
| rabbitmq-plugins enable rabbitmq_tracing | rabbitmq enables the trace plug-in |
| rabbitmqctl trace_on | Turn on the trace switch |
| rabbitmqctl trace_on -p itcast | Turn on the trace switch (itcast is the Vhost that needs log tracking) |
| rabbitmqctl trace_off | Turn off the switch of trace |
| rabbitmq-plugins disable rabbitmq_tracing | rabbitmq closes the Trace plug-in |
| rabbitmqctl set_user_tags heima administrator | Only the administrator role can view the log interface |
Install the plug-in and start trace_ After on, you will find multiple exchange: amq.rabbitmq.trace of type: topic.

2. Log tracking
1. Send message
rabbitTemplate.convertAndSend("spring_queue", "Send only queue spring_queue News of--01. ");
2. View trace
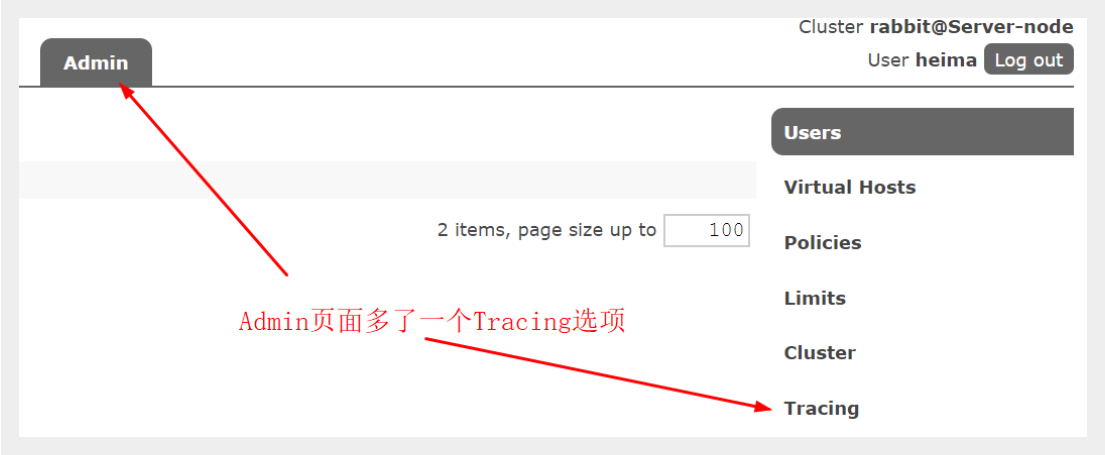
Click Tracing to view Trace log files
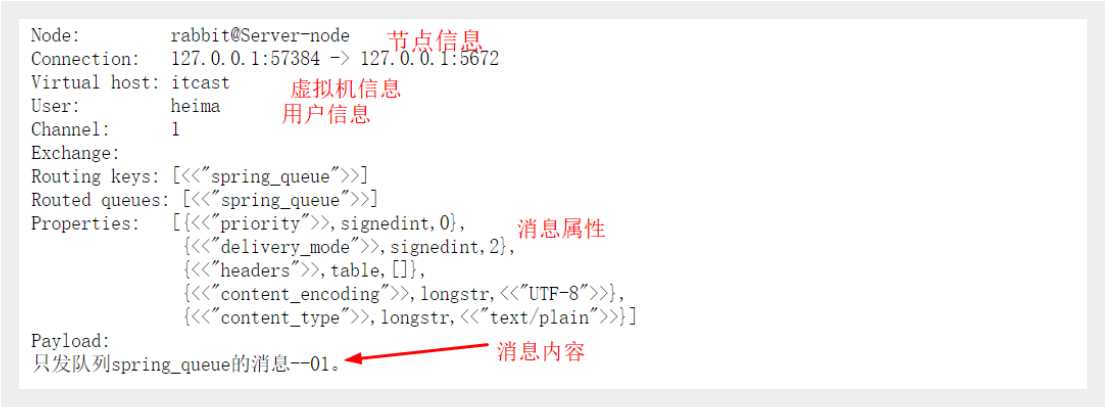
4. Click xuexiangban-trace.log to confirm the correctness of the message trace
3. Customize your own monitoring system
RabbitMQ provides rich restful api interfaces. We can get the corresponding cluster data through these interfaces. At this time, we can customize our monitoring system.
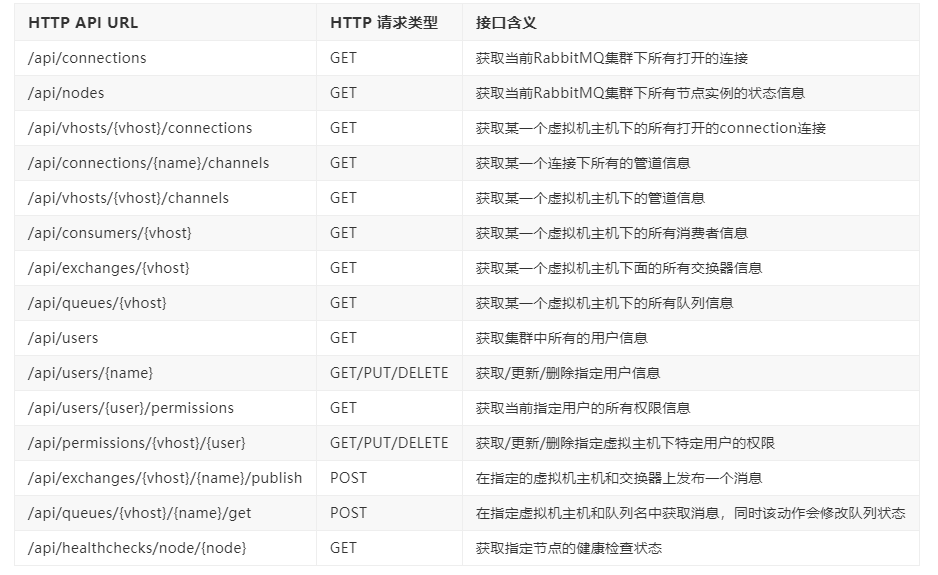
More API related information and descriptions can be accessed http://ip:15672/api/
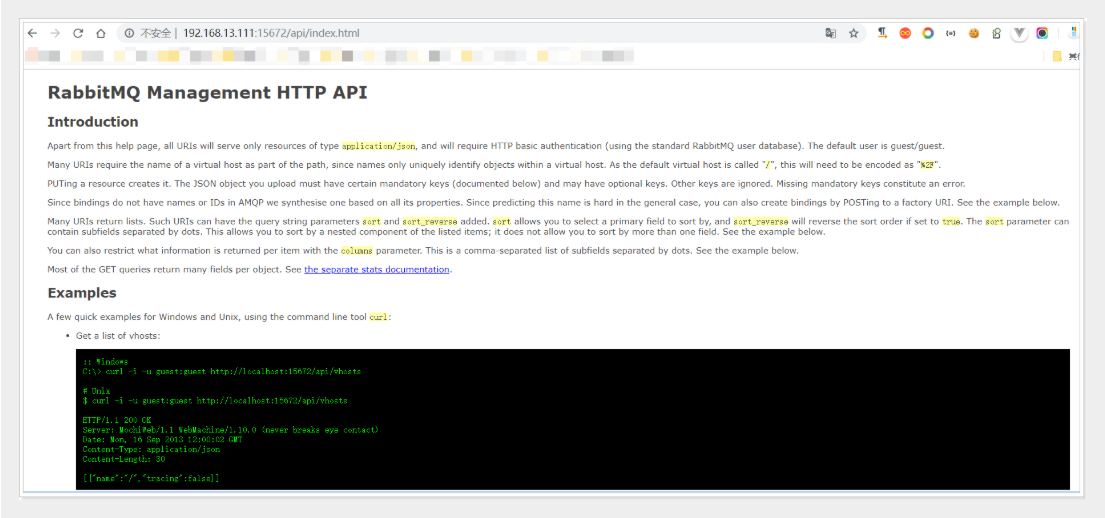
Next, we use the RabbitMQ Http API interface to obtain cluster monitoring data
HttpClient and related Jar of Jackson
<dependency>
    <groupId>org.apache.httpcomponents</groupId>
    <artifactId>httpclient</artifactId>
    <version>4.3.6</version>
</dependency>
<dependency>
 <groupId>com.fasterxml.jackson.core</groupId>
 <artifactId>jackson-databind</artifactId>
 <version>2.7.4</version>
</dependency>
<dependency>
 <groupId>com.fasterxml.jackson.core</groupId>
 <artifactId>jackson-annotations</artifactId>
 <version>2.7.4</version>
</dependency>
<dependency>
 <groupId>com.fasterxml.jackson.core</groupId>
 <artifactId>jackson-core</artifactId>
 <version>2.7.4</version>
</dependency>
Create the monitorrabbit MQ class to implement the specific code
import com.fasterxml.jackson.databind.DeserializationFeature;
import com.fasterxml.jackson.databind.JsonNode;
import com.fasterxml.jackson.databind.ObjectMapper;
import org.apache.http.HttpEntity;
import org.apache.http.auth.UsernamePasswordCredentials;
import org.apache.http.client.methods.CloseableHttpResponse;
import org.apache.http.client.methods.HttpGet;
import org.apache.http.impl.auth.BasicScheme;
import org.apache.http.impl.client.CloseableHttpClient;
import org.apache.http.impl.client.HttpClients;
import org.apache.http.util.EntityUtils;
import java.io.IOException;
import java.util.HashMap;
import java.util.Iterator;
import java.util.Map;
/**
 * RabbitMQ Monitoring of
 */
public class MonitorRabbitMQ {
    //HTTP API of RabbitMQ -- get the status information of each instance of the cluster, and replace the ip with the ip of the corresponding instance deployed by yourself
    private static String RABBIT_NODES_STATUS_REST_URL = "http://192.168.13.111:15672/api/nodes";
    //RabbitMQ's HTTP API -- obtain cluster user information, and replace the ip with the ip of the corresponding instance deployed by yourself
    private static String RABBIT_USERS_REST_URL = "http://192.168.13.111:15672/api/users";
    //User name of rabbitmq
    private static String RABBIT_USER_NAME = "guest";
    //Password for rabbitmq
    private static String RABBIT_USER_PWD = "guest";
    public static void main(String[] args) {
        try {
            //Step 1. Get the status information of each node instance of rabbitmq cluster
            Map<String, ClusterStatus> clusterMap =
                    fetchRabbtMQClusterStatus(RABBIT_NODES_STATUS_REST_URL, RABBIT_USER_NAME, RABBIT_USER_PWD);
            //Step 2. Print out the status information of each node instance
            for (Map.Entry entry : clusterMap.entrySet()) {
                System.out.println(entry.getKey() + " : " + entry.getValue());
            }
            //step3. Get rabbitmq cluster user information
            Map<String, User> userMap =
                    fetchRabbtMQUsers(RABBIT_USERS_REST_URL, RABBIT_USER_NAME, RABBIT_USER_PWD);
            //step4. Print out rabbitmq cluster user information
            for (Map.Entry entry : userMap.entrySet()) {
                System.out.println(entry.getKey() + " : " + entry.getValue());
            }
        } catch (IOException e) {
            e.printStackTrace();
        }
    }
    public static Map<String, ClusterStatus> fetchRabbtMQClusterStatus(String url, String username, String password) throws IOException {
        Map<String, ClusterStatus> clusterStatusMap = new HashMap<String, ClusterStatus>();
        String nodeData = getData(url, username, password);
        JsonNode jsonNode = null;
        try {
            jsonNode = JsonUtil.toJsonNode(nodeData);
        } catch (IOException e) {
            e.printStackTrace();
        }
        Iterator<JsonNode> iterator = jsonNode.iterator();
        while (iterator.hasNext()) {
            JsonNode next = iterator.next();
            ClusterStatus status = new ClusterStatus();
            status.setDiskFree(next.get("disk_free").asLong());
            status.setFdUsed(next.get("fd_used").asLong());
            status.setMemoryUsed(next.get("mem_used").asLong());
            status.setProcUsed(next.get("proc_used").asLong());
            status.setSocketUsed(next.get("sockets_used").asLong());
            clusterStatusMap.put(next.get("name").asText(), status);
        }
        return clusterStatusMap;
    }
    public static Map<String, User> fetchRabbtMQUsers(String url, String username, String password) throws IOException {
        Map<String, User> userMap = new HashMap<String, User>();
        String nodeData = getData(url, username, password);
        JsonNode jsonNode = null;
        try {
            jsonNode = JsonUtil.toJsonNode(nodeData);
        } catch (IOException e) {
            e.printStackTrace();
        }
        Iterator<JsonNode> iterator = jsonNode.iterator();
        while (iterator.hasNext()) {
            JsonNode next = iterator.next();
            User user = new User();
            user.setName(next.get("name").asText());
            user.setTags(next.get("tags").asText());
            userMap.put(next.get("name").asText(), user);
        }
        return userMap;
    }
    public static String getData(String url, String username, String password) throws IOException {
        CloseableHttpClient httpClient = HttpClients.createDefault();
        UsernamePasswordCredentials creds = new UsernamePasswordCredentials(username, password);
        HttpGet httpGet = new HttpGet(url);
        httpGet.addHeader(BasicScheme.authenticate(creds, "UTF-8", false));
        httpGet.setHeader("Content-Type", "application/json");
        CloseableHttpResponse response = httpClient.execute(httpGet);
        try {
            if (response.getStatusLine().getStatusCode() != 200) {
                System.out.println("call http api to get rabbitmq data return code: " + response.getStatusLine().getStatusCode() + ", url: " + url);
            }
            HttpEntity entity = response.getEntity();
            if (entity != null) {
                return EntityUtils.toString(entity);
            }
        } finally {
            response.close();
        }
        return null;
    }
    public static class JsonUtil {
        private static ObjectMapper objectMapper = new ObjectMapper();
        static {
            objectMapper.disable(DeserializationFeature.FAIL_ON_UNKNOWN_PROPERTIES);
            //objectMapper.disable(SerializationFeature.FAIL_ON_EMPTY_BEANS);
        }
        public static JsonNode toJsonNode(String jsonString) throws IOException {
            return objectMapper.readTree(jsonString);
        }
    }
    public static class User {
        private String name;
        private String tags;
        @Override
        public String toString() {
            return "User{" +
                    "name=" + name +
                    ", tags=" + tags +
                    '}';
        }
        //GET/SET method omitted
        public String getName() {
            return name;
        }
        public void setName(String name) {
            this.name = name;
        }
        public String getTags() {
            return tags;
        }
        public void setTags(String tags) {
            this.tags = tags;
        }
    }
    public static class ClusterStatus {
        private long diskFree;
        private long diskLimit;
        private long fdUsed;
        private long fdTotal;
        private long socketUsed;
        private long socketTotal;
        private long memoryUsed;
        private long memoryLimit;
        private long procUsed;
        private long procTotal;
        // Getter and Setter methods are omitted here
        public long getDiskFree() {
            return diskFree;
        }
        public void setDiskFree(long diskFree) {
            this.diskFree = diskFree;
        }
        public long getDiskLimit() {
            return diskLimit;
        }
        public void setDiskLimit(long diskLimit) {
            this.diskLimit = diskLimit;
        }
        public long getFdUsed() {
            return fdUsed;
        }
        public void setFdUsed(long fdUsed) {
            this.fdUsed = fdUsed;
        }
        public long getFdTotal() {
            return fdTotal;
        }
        public void setFdTotal(long fdTotal) {
            this.fdTotal = fdTotal;
        }
        public long getSocketUsed() {
            return socketUsed;
        }
        public void setSocketUsed(long socketUsed) {
            this.socketUsed = socketUsed;
        }
        public long getSocketTotal() {
            return socketTotal;
        }
        public void setSocketTotal(long socketTotal) {
            this.socketTotal = socketTotal;
        }
        public long getMemoryUsed() {
            return memoryUsed;
        }
        public void setMemoryUsed(long memoryUsed) {
            this.memoryUsed = memoryUsed;
        }
        public long getMemoryLimit() {
            return memoryLimit;
        }
        public void setMemoryLimit(long memoryLimit) {
            this.memoryLimit = memoryLimit;
        }
        public long getProcUsed() {
            return procUsed;
        }
        public void setProcUsed(long procUsed) {
            this.procUsed = procUsed;
        }
        public long getProcTotal() {
            return procTotal;
        }
        public void setProcTotal(long procTotal) {
            this.procTotal = procTotal;
        }
        @Override
        public String toString() {
            return "ClusterStatus{" +
                    "diskFree=" + diskFree +
                    ", diskLimit=" + diskLimit +
                    ", fdUsed=" + fdUsed +
                    ", fdTotal=" + fdTotal +
                    ", socketUsed=" + socketUsed +
                    ", socketTotal=" + socketTotal +
                    ", memoryUsed=" + memoryUsed +
                    ", memoryLimit=" + memoryLimit +
                    ", procUsed=" + procUsed +
                    ", procTotal=" + procTotal +
                    '}';
        }
    }
}
Start test

4. Zabbix monitors RabbitMQ
Zabbix is an enterprise level open source solution that provides distributed system monitoring and network monitoring functions based on the WEB interface. It can also help us build an MQ cluster monitoring system and provide early warning and other functions. However, due to its high requirements for construction and configuration, it is generally built by the operation and maintenance personnel, Interested students can visit https://www.zabbix.com/ Learn from the official website.