Before saving bricks
When the router TTL saved the brick, many netizens reported that they saw the information and couldn't choose. They watched the Startup menu roll over again and again.
I have uploaded detailed video tutorials to watermelon, today's headlines and BiliBili. It is estimated that these two websites can accept hundreds of megabytes of video
The video address is as follows:
Just before the release of the recall practice record, I found a material.
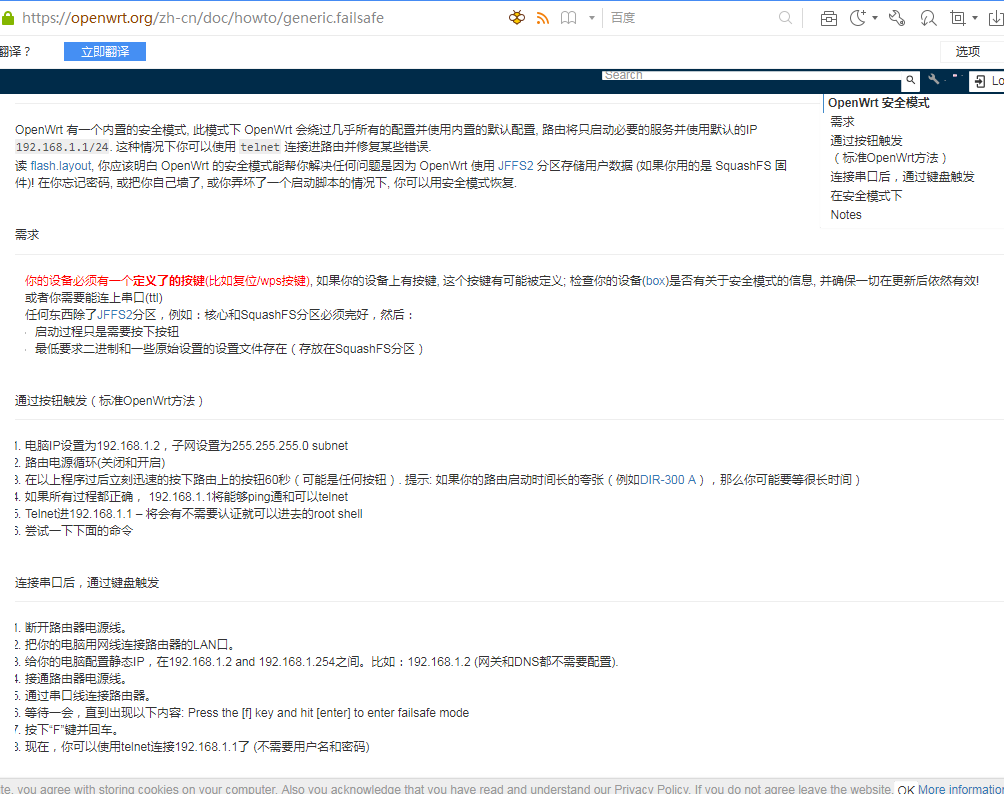
[OpenWrt Wiki] OpenWrt security mode
Explain the criminal process first:
After brushing a great God's old maozi (Russian) firmware (pandavan) is not the same as Pandora box firmware. One extension is. trx and the other is. bin. Generally, you can brush it in PB-BOOT.
Then, I swiped the latest version of "dada" great God modified firmware. I felt a bit stuck on the setting page. Later, I found another firmware with a better interface, so I wanted to swipe it.
After the firmware is finished, upgrade the firmware, upload and write are normal, and then restart will turn yellow. Restart, reset and res will not work. Network cable connection, the computer can't get IP
It has become a brick with a yellow light.
(the following tutorial is for the yellow light always on brick, only for Xiaomi router 3, which has not been tried in other versions of Xiaomi router 3!)
The next day, I couldn't stand loneliness. I brushed a Pb boot Xiaomi router 3 with Pandora system. It was good. I wanted to reply to Xiaomi official and intended to brush other firmware. Results during the recovery process, bricks were turned.
Here I would like to introduce the "Xiaomi router 3 Pandora firmware brushing tutorial" of "le * Chuan". On Jianshu and a website, there are methods to brush Pandora and the official tutorial. When I brush another Xiaomi 3 into bricks, I go to the comment area to see rows of corpses...., But there should be a problem with the brushing method. Please pay attention. After writing the memoir of this machine, start recording videos and doing nanny tutorials.
Remind you that instead of pursuing large and comprehensive functional software, you'd better brush Pb boot first (I found the latest version in 2019, which seems to be compatible with 2018). Otherwise, you won't come to see my TTL brick rescue memoir.
A month ago, I still didn't understand anything. I finished brushing 7-8 routers. Xiaomi 3, the same model, was out of control.
Basic steps
- Remove the back shell of the router and connect the cable.
- Prepare two software settings and one firmware to be swiped in (see that a great God said not to use Xiaomi's official firmware, and the written partitions are inconsistent?)
- Brush in firmware with TTL
- Restart complete
It feels so simple, but I did it for a week!!!!
Note: my tutorial can only solve the problem that the yellow light is always on (please refer to the experiment if the light is not on and the red light is red)
preparation
Hardware preparation:
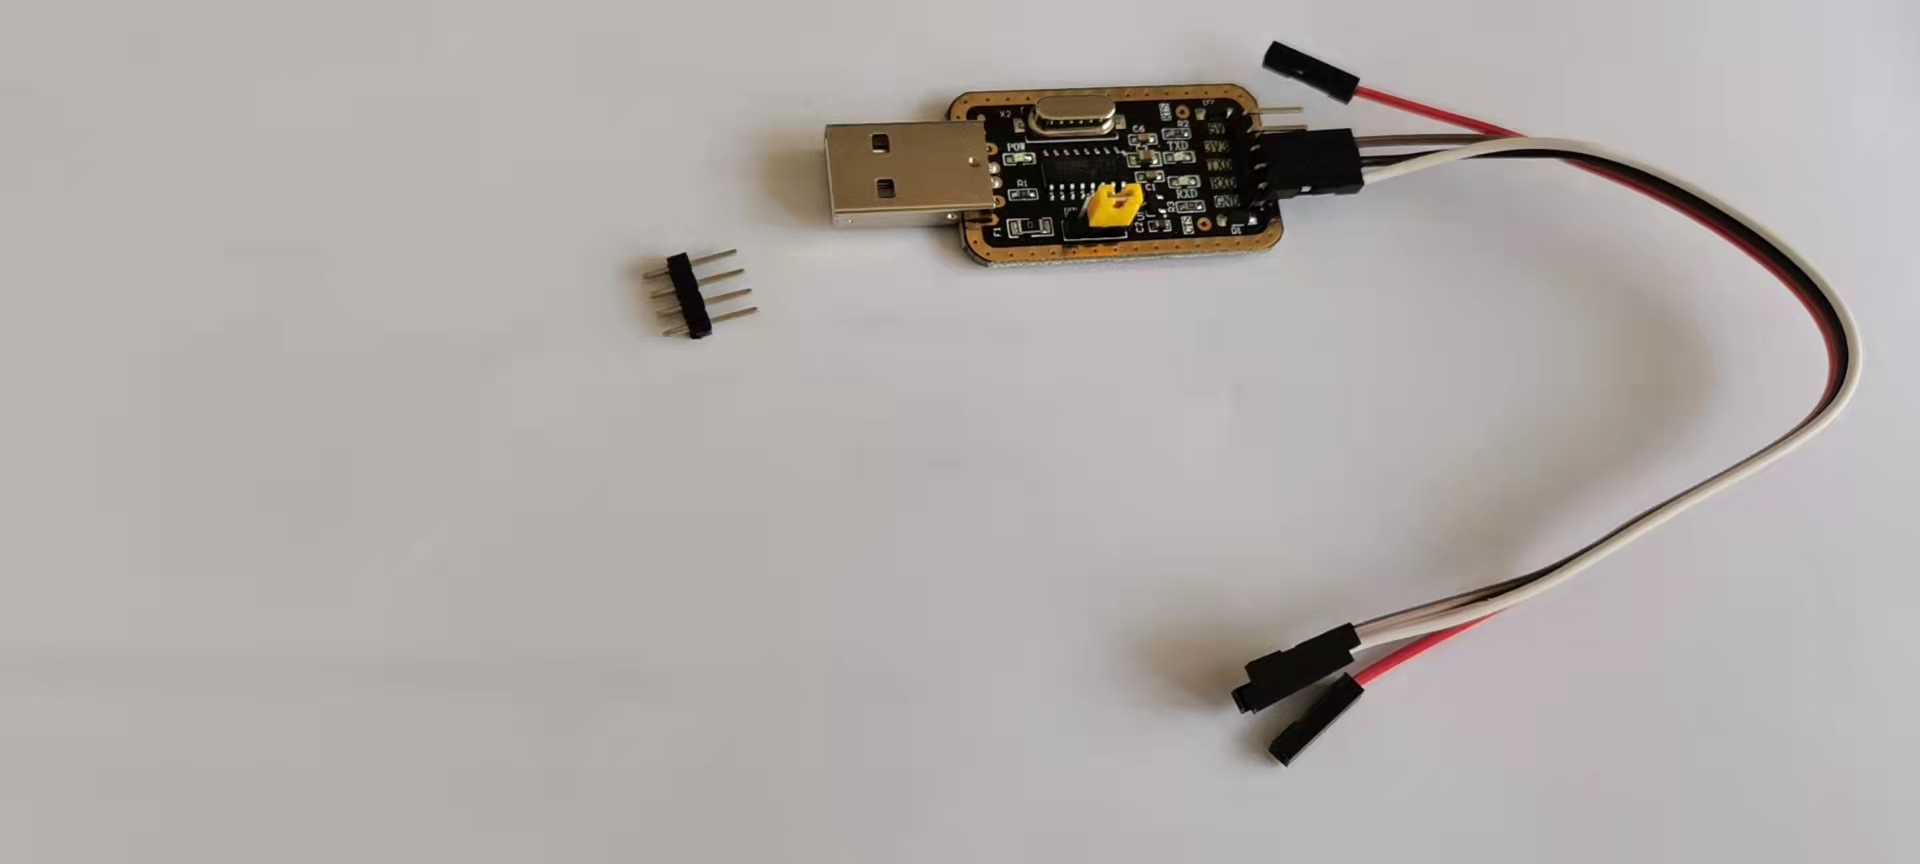
1. Taobao purchase: USB to TTL-CH340 module, DuPont cable, row needle.
I bought a set of links from a great God post.
USB to TTL USB to serial port download cable CH340G module

(plus the freight of 12 yuan, there is exactly one set, both 3.3V and 5V.
Remember this brand. Because of this brand or CH340G, I didn't finish it at 2 o'clock that night. There were a lot of random codes and no words that I could understand. Later, I checked a lot of data and finally knew the reason. That's why I chose putty software.)
After receiving it, it's like this
2. Network cable
3. Optional
USB extension cable (pay attention to power supply), power socket with switch, a calculator for accounting
I'll talk about it later in the video. Ha ha ha ha
Software preparation:
Required: putty tftp Brush firmware (preferably Pandora and laomaozi, not OPENWRT.) CH340 serial driver
Optional: Xshell Serial port assistant software secureCRT These software functions seem to be the same as PUTTY, but I strongly recommend PUTTY. You will know why later.
System preparation:
Turn off firewall, anti-virus software, especially 360
It's best to disconnect the Internet or other networks, otherwise there will be inexplicable problems
Start work:
- Disassemble the rear shell of Xiaomi router 3. (Figure) there is only one screw under the label on the back. Remove it and pry open the router. It's best to pry it up and down. I use the tool originally sent by replacing the mobile phone battery. As shown in the red circle
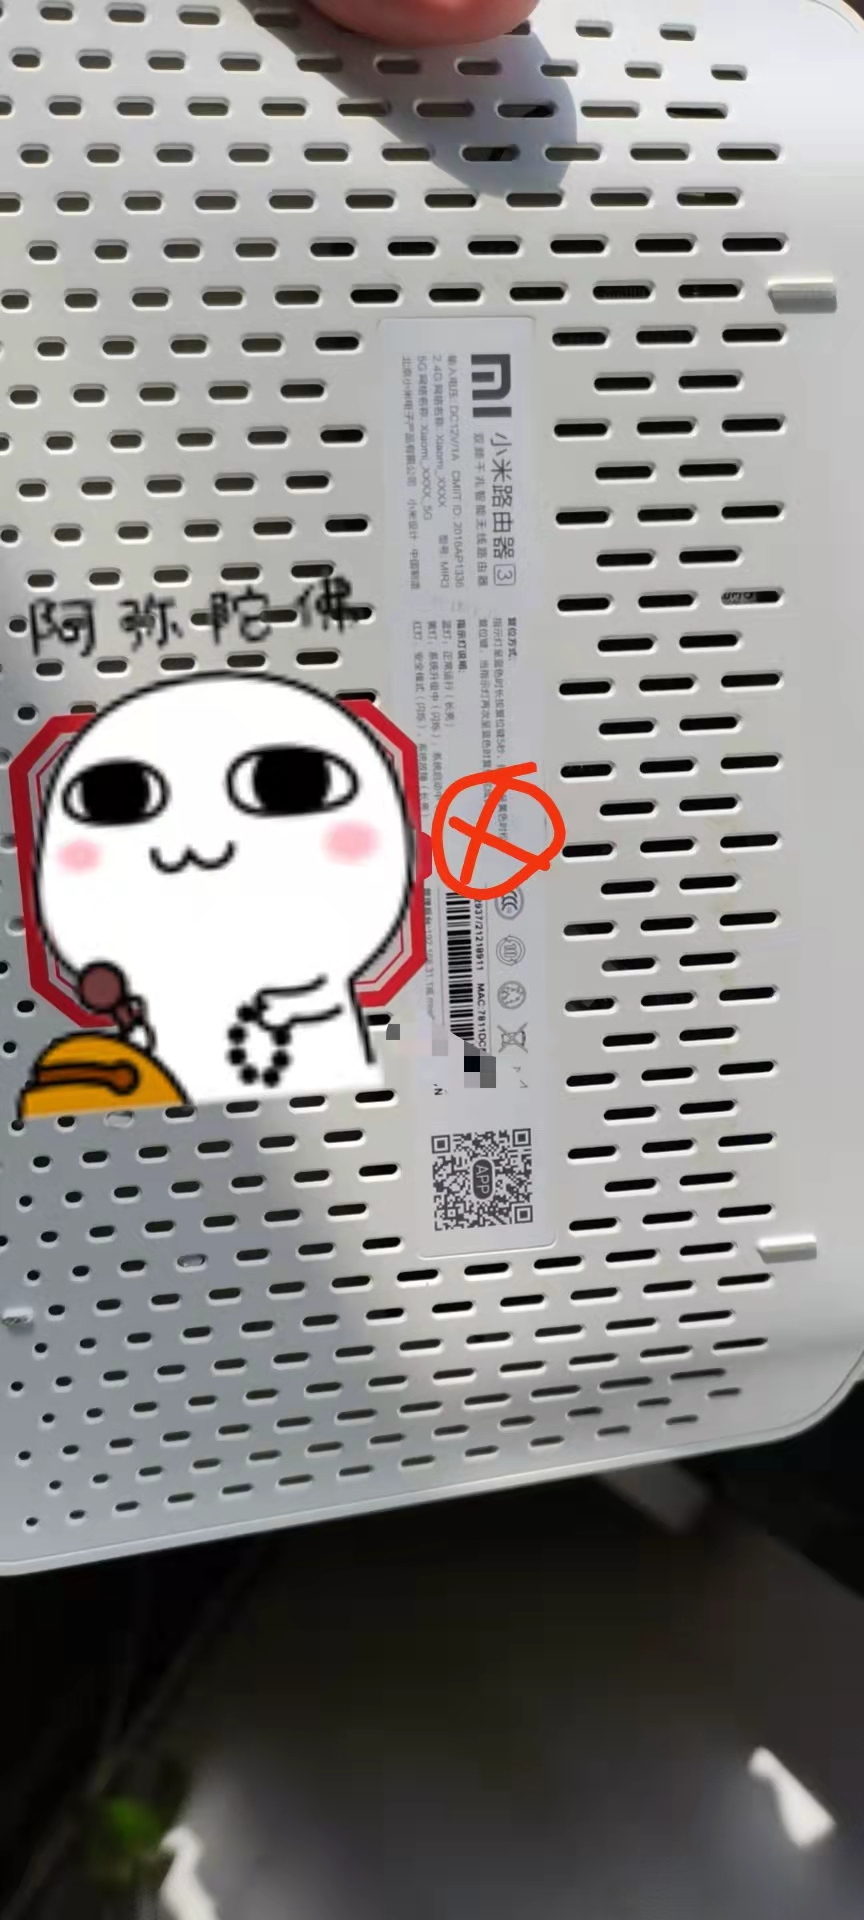
Then pry open the clips around. It is recommended to pry down from the antenna to peel off the fan hot shell and leak the whole circuit board
2. Connect the computer to the lan port of the router with the network cable. The router is not powered on first, and connect the USB transfer ttl line:
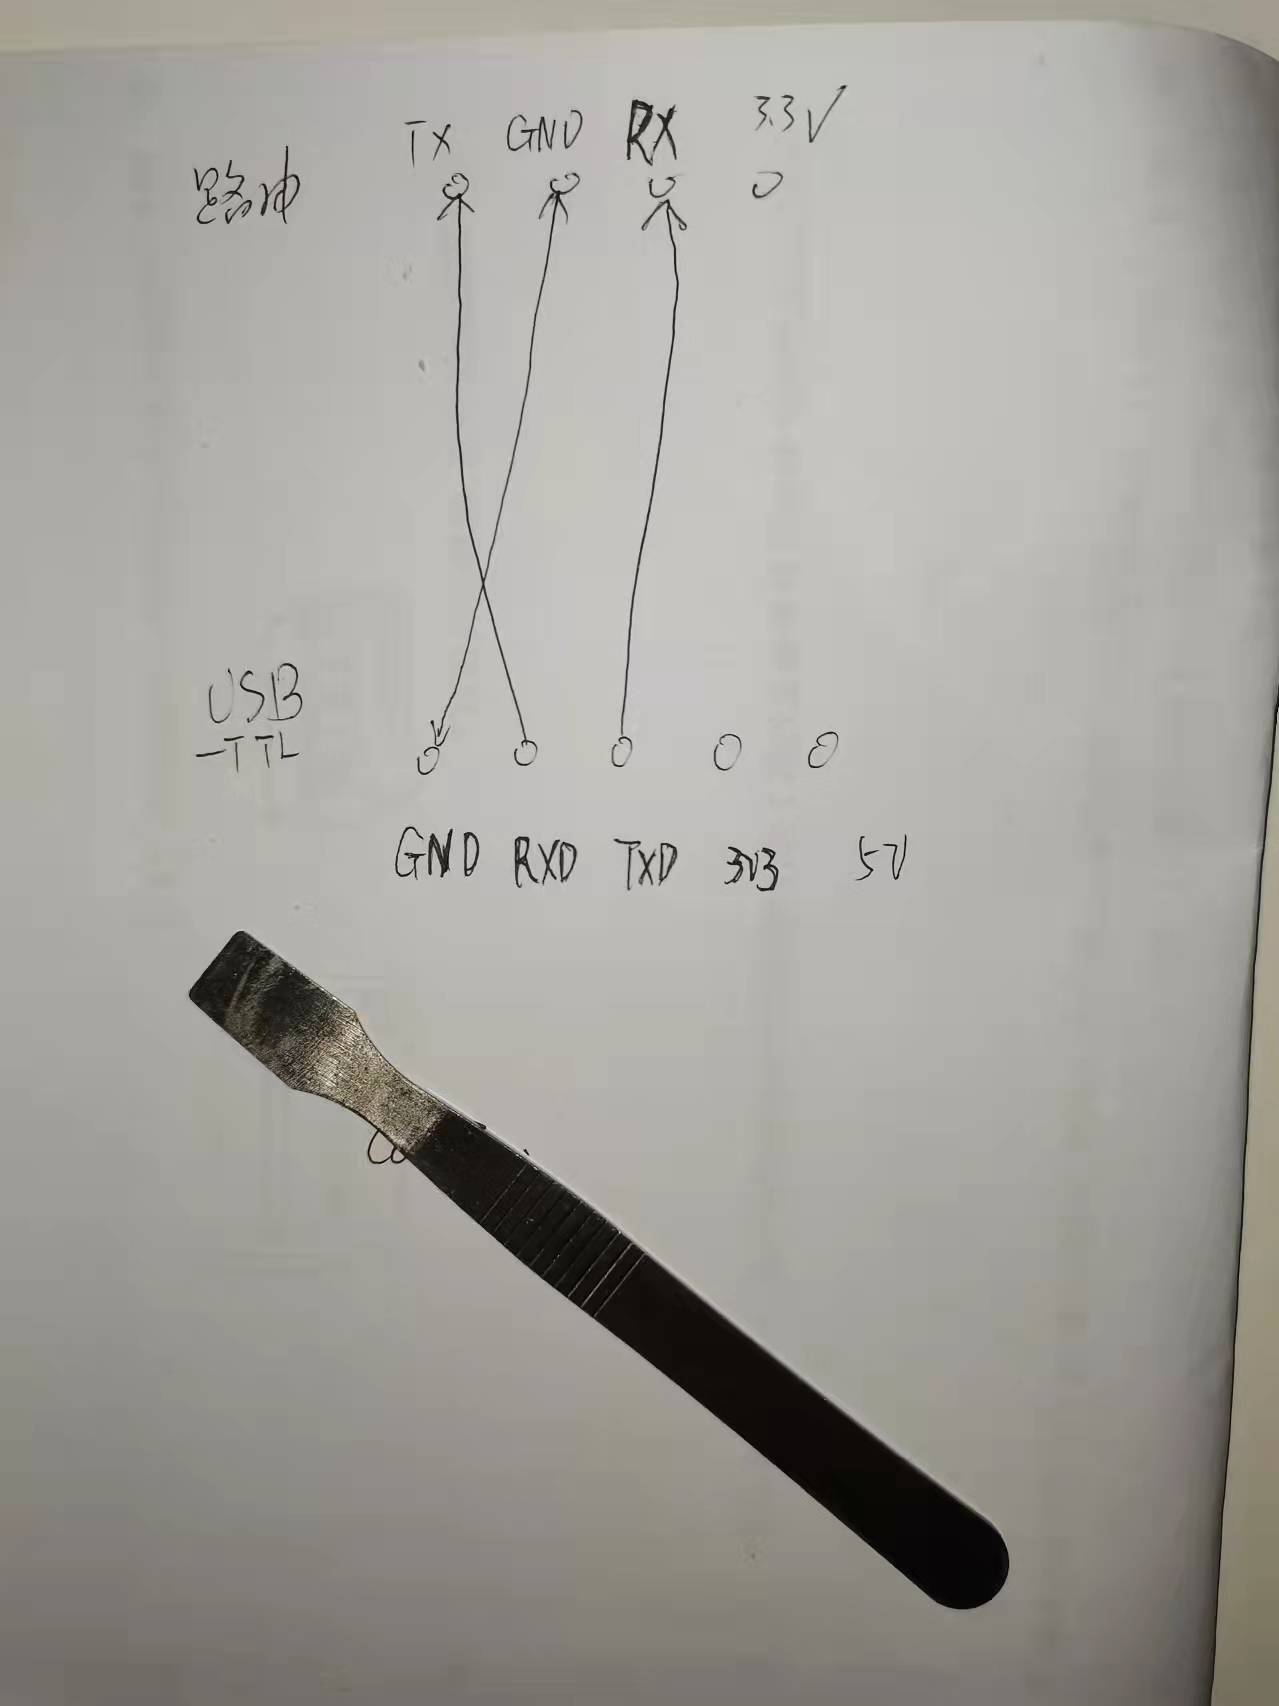
TTL terminal RX is connected to router TX, TTL terminal TX is connected to router RX, GND is connected to GND, and the remaining one is not connected
Borrow map 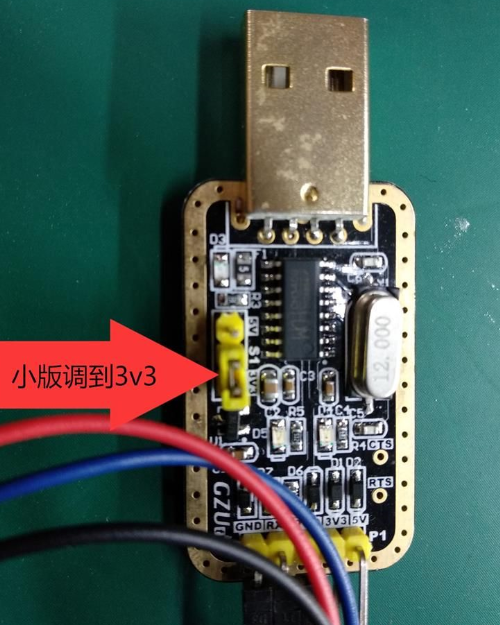
Plug the USB port into the U port of the computer. Note (it's best to plug it into the U port on the computer motherboard to prevent power problems; it's best to plug a port. Don't change it at will. If you change it, remember to change it when the software behind fills in the port.)
ttl can be inserted on the board. It's best to weld. When purchasing ttl to usb download cable, remember to ask the store to give it as a gift. One end is male and the other is female. If both ends are female, pins should be inserted into the corresponding holes of the router, preferably in a row of four.
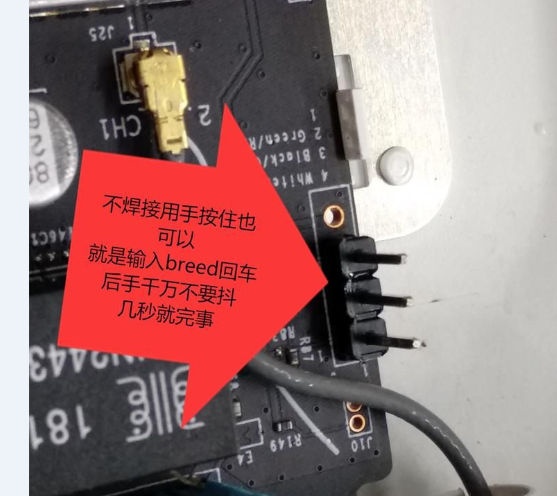
Borrow map
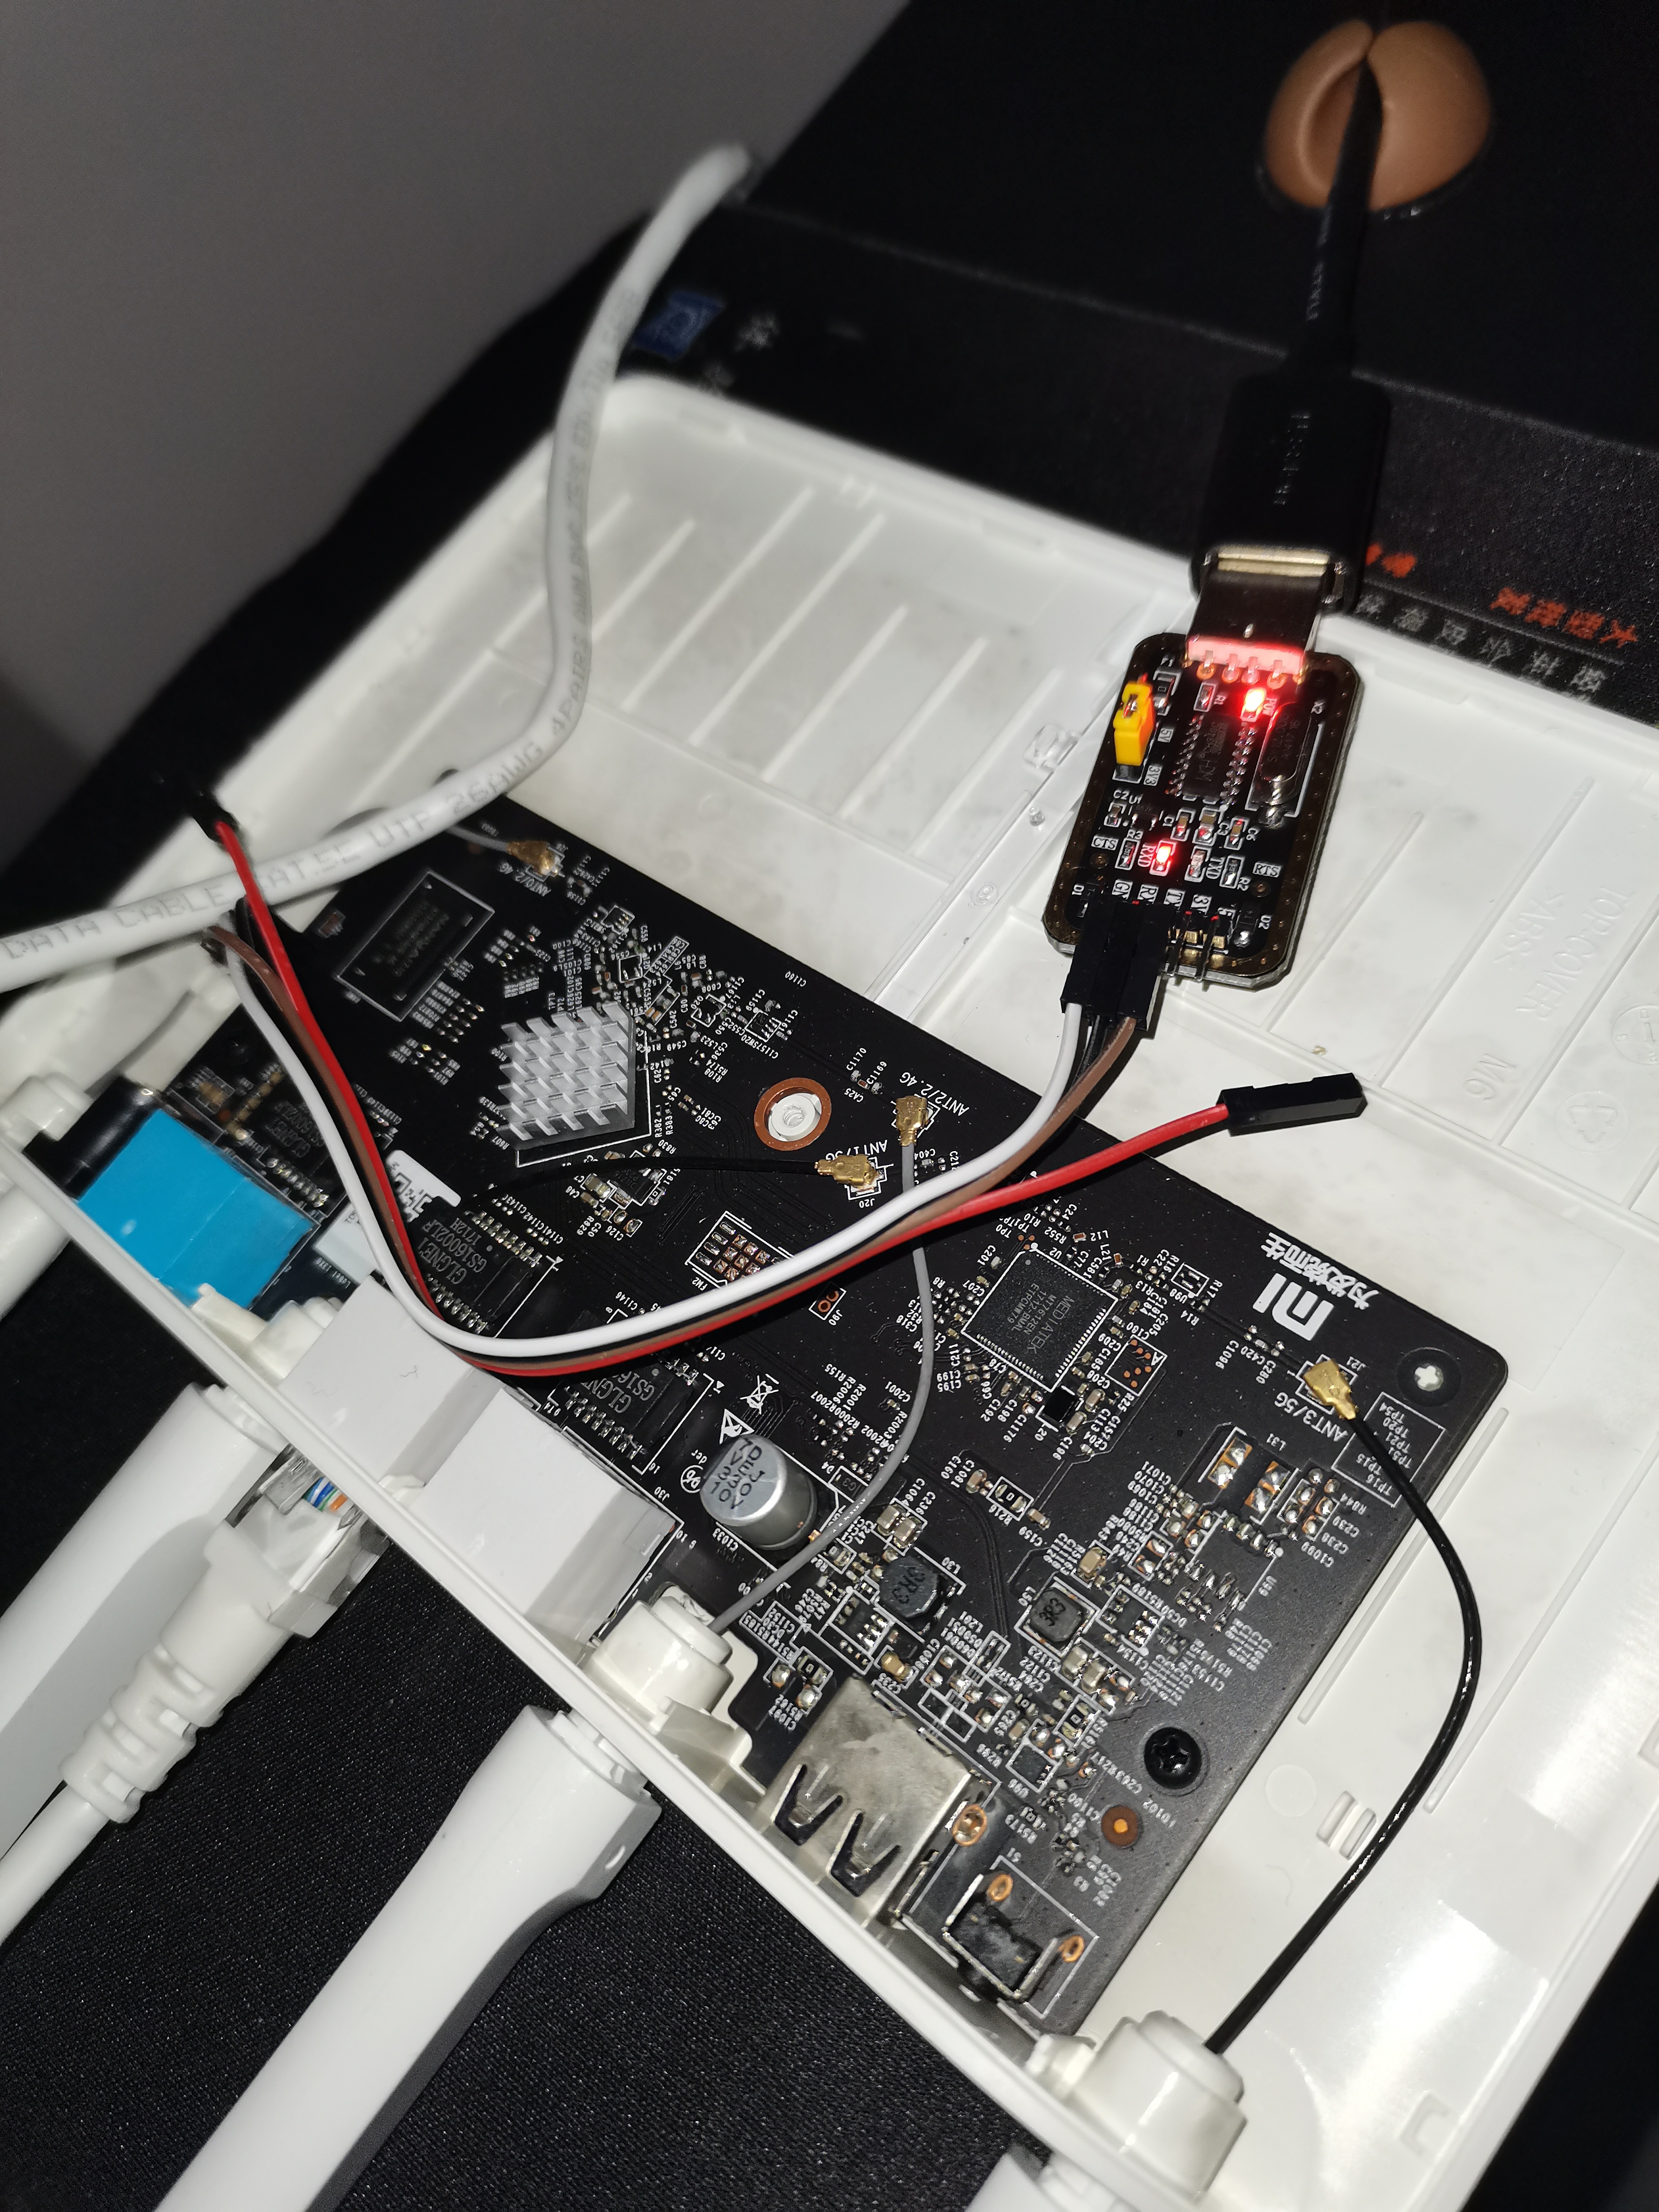
When the computer is turned on (the router is not powered on), the U port is powered on. This circuit will display two red lights, one large and one small. This shows that the contact is normal (the pin connected to the motherboard is resisted by Professor Wang's accounting calculator. As long as the contact is tight, it's OK. At this time, the small red light connected to the circuit board is always on), leaving a 3.3V port without inserting.
2. Drive installation
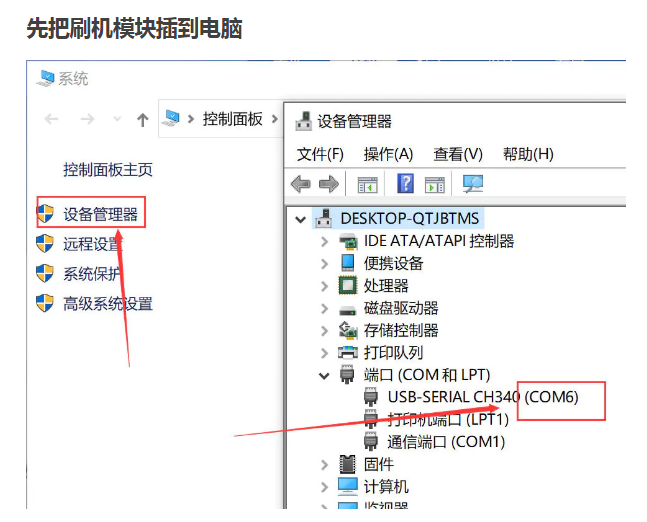
usb to ttl is the necessary software, otherwise the router cannot be connected through ttl to write commands. The system above win7 will be installed automatically. When you buy this small board, the seller directly sends the driver connection. After installation, check the port number in the device manager. This is COM4
 Borrow map
- Change the computer ip. In the network and sharing center, change the Ethernet ip to 192.168.1.3. Press tab to automatically fill in the subnet mask. The gateway and dns are not filled in (it doesn't matter if the default gateway is filled in)
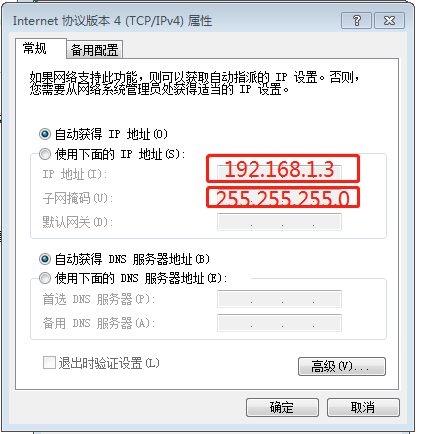
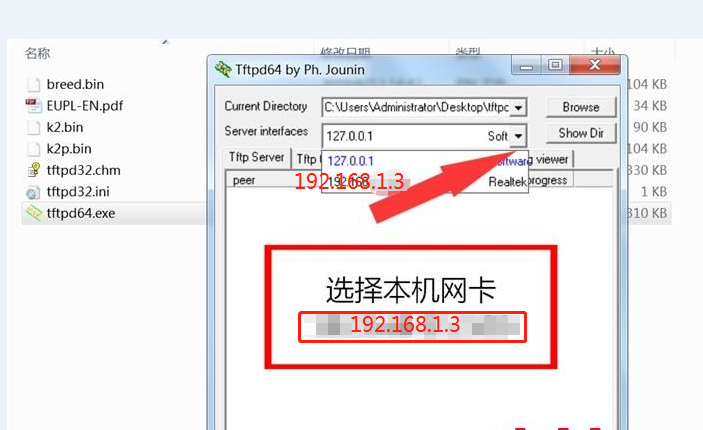
- Install and start the TFTP software. After installing TFTP, copy the firmware file mi.trx to the installation path of TFTP, or directly replace the file path of current directory with the path where the firmware (mi.trx) is located. Then, through the ttl command, the router downloads the firmware through the network cable of LAN port (like WAN port, I think it's best to use LAN port). The purpose of ttl to serial port is only to write commands.
After modifying the ip address, select server interfaces 192.168.1.3 in the tftp software option
- Then connect the power supply of the router. Don't power on, don't power on, don't power on. (here's a trick. It's best to connect the power supply of the router to a row with a switch. I'll talk about it later in seconds.)
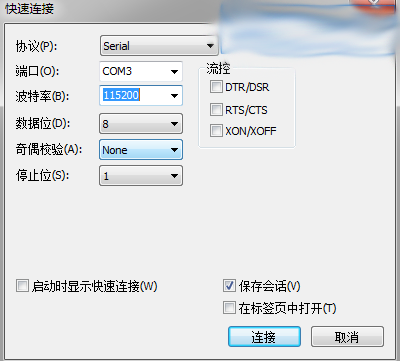
- Then, open the putty software,
Borrow the picture, Chinese version.
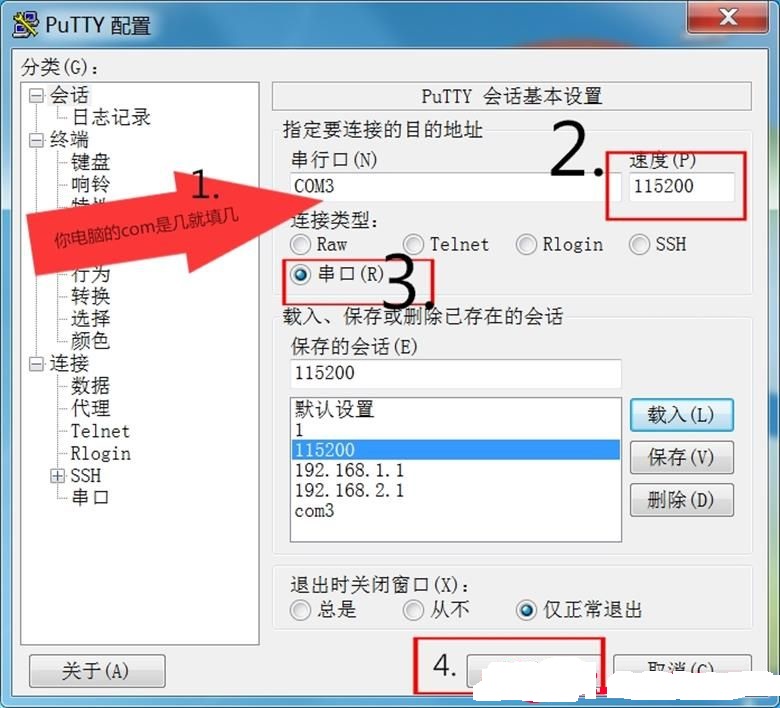
I use the English version.
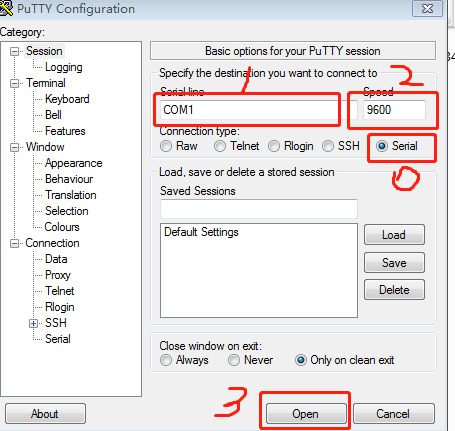
Attention here
- Select the port number displayed in your device management. Mine is COM4;
- Generally, the refresh frequency is 115200. However, all the adapter circuit boards I bought with 115200 are garbled. For this reason, I foolishly experimented N times and restarted. Later, after checking the data, I saw a word from a great God. Some manufacturers have technical standards. The port may be 117200; It is also said that 117500 can be used. When the brush is successful, I use 117500,; The 117200 can also display normal scrolling information.
(because of this non-standard frequency, I recommend using this PUTTY software. According to the tutorial, other software can't input this non-standard frequency, only 115200 can choose)
For example:
Serial port assistant software
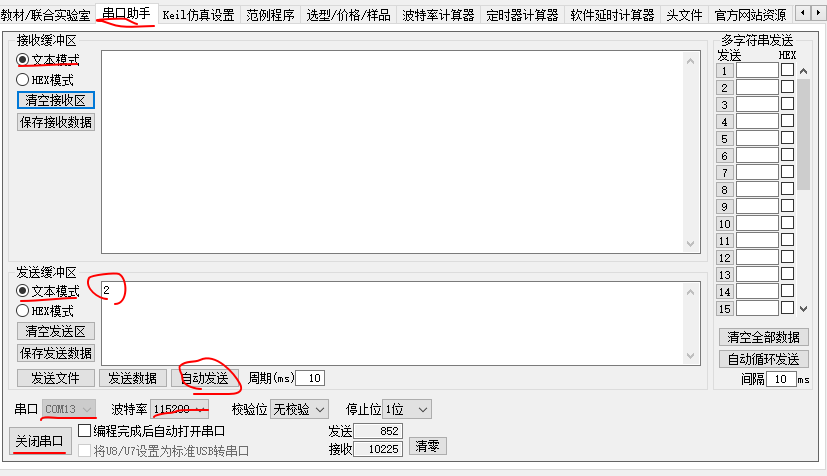
When you need to fight hand speed, you can use this, but you should ensure that the baud rate can be up, or you don't know what to do with a pile of random codes displayed
- Click the open button of putty to open putty. At this time, the router is not powered on, so only a large white screen is displayed. That's right. When you see the search and rescue brick scheme, you can see the large white screen when you see the response of netizens. It is estimated that this is the reason.

As shown in the figure above.
Officially start brick rescue:
Before that, let's talk about Professor Wang's painful experience. After turning on the power supply, we saw a group of characters rolling down quickly, and then paused for a while to appear "..........................................." at this time, the keys are useless, and then a screen of feedback information comes out and scrolls. Finally, when the cursor is fixed, it still cannot be used and cannot be entered. The information displayed is:
"                                                                -KKKKKK?????jjjj                                                                                                                                                             jj-------KKKKKK??¥on jj"5aμ.'?2¥?       a±¥1-?¨??Veò3Z?é 4?2i??R           ?.===                                                                                                                                                             Fì?.ì?[Y[K?é 128 M?1W?)¥?a5}====??OOOOOR  HHHr...1' page?3Zˉê'?¢8, ad?.b?1?4?

    ?μá?¢??CP??–??=?M?j!i#### ?Y.W?+?? memorù?¥é??±&j‰??eso...ys:4, ì??íéé32b¢??...±                                                                                                                                                             é32768 ?OOêê= test.?íY[K?ó?ˉV?'?jM?     1..OK...reìk...??}           ?é ?·–á000?

Pì¥X???ose the?o...ys:4, lé?Y./§&b¢??...±é?μM&"¨?

               ?é...?¥?n:

 ??L'b?...'3^.Wμ???to?""5vé?¢QA1??C'òb?...'syó′Y[?'?then wré?Y¢?Flá?1

   9o?ê+'B?ˉb?...'?é code ?¨YYV?±?¥??C¢ò*1?ébo?′?μμ...1'line i?′Y.V 2¥...???R

??chooó??R                 oé¥?? to Flaó¨2¥...T???R                              ?                                                                                                                                                               ??C&'??í??#£?¨??¥1?[XV[?'??ZX2±...í?1

.Don?????1?)μ2??..rá+1'}?¢,????rr.?'z??íé′???b?unt:20°°R

   Imá§Yr...μ?é?  í‰K&Jμ...Tù°Y'j%AM Linux??Y.?±IíXVBbéμ... compreó?VI"...?...SéoY''??4930                                                                                                                                                                L??=?&&ij    )

      ''é?ss: 80°?000?*1?é? Poin?o??'...440

..........?..?...?...?.....?.....?...?........?..?.........?...??............?.?                                                                                                                                                             ..?.?..?........?..?........???....?.....??............?.?....?.?..?.?....?..?.?                                                                                                                                                             .......?.¤$¢é...1í?erring?£??é?±?ˉb¥1?á¨X..??.....?.?.?.......?.??........?....?.?                                                                                                                                                             ## Givé?b¥1?á-Y[?K!*9Uastarte??é?HLinux version 3.4.113 (padavan@hms) (gcc versi                                                                                                                                                             on 7.4.0 (crosstool-NG 1.24.0) ) #1 Tue Jul 6 00:25:11 UTC 2021?a1


MediaTek SoC: MT7620A, RevID: 0206, RAM: DDR2, XTAL: 20MHz

CPU/OCP/SYS frequency: 580/193/193 MHz

prom memory:128MB

CPU revision is: 00019650 (MIPS 24KEc)

Determined physical RAM map:

 memory: 08000000 @ 00000000 (usable)

Zone PFN ranges:

  Normal   0x00000000 -> 0x00008000

Movable zone start PFN for each node

Early memory PFN ranges

    0: 0x00000000 -> 0x00008000

Primary instruction cache 64kB, VIPT, 4-way, linesize 32 bytes.

Primary data cache 32kB, 4-way, PIPT, no aliases, linesize 32 bytes

Built 1 zonelists in Zone order, mobility grouping on.  Total pages: 32512

Kernel command line: console=ttyS0,115200n8 root=/dev/mtdblock4 rootfstype=squas                                                                                                                                                             hfs

PID hash table entries: 512 (order: -1, 2048 bytes)

Dentry cache hash table entries: 16384 (order: 4, 65536 bytes)

Inode-cache hash table entries: 8192 (order: 3, 32768 bytes)

Writing ErrCtl register=00060cfa

Readback ErrCtl register=00060cfa

Memory: 126236k/131072k available (2827k kernel code, 4836k reserved, 562k data,                                                                                                                                                              192k init, 0k highmem)

NR_IRQS:40

console [ttyS0] enabled

Calibrating delay loop... 385.02 BogoMIPS (lpj=770048)

pid_max: default: 32768 minimum: 301

Mount-cache hash table entries: 512

NET: Registered protocol family 16

bio: create slab <bio-0> at 0

SCSI subsystem initialized

usbcore: registered new interface driver usbfs

usbcore: registered new interface driver hub

usbcore: registered new device driver usb

PCI host bridge to bus 0000:00

pci_bus 0000:00: root bus resource [mem 0x20000000-0x2fffffff]

pci_bus 0000:00: root bus resource [io  0x10160000-0x1016ffff]

pci 0000:00:00.0: bridge configuration invalid ([bus 00-00]), reconfiguring

pci 0000:00:00.0: BAR 0: can't assign mem (size 0x80000000)

pci 0000:00:00.0: BAR 8: assigned [mem 0x20000000-0x200fffff]

pci 0000:00:00.0: BAR 9: assigned [mem 0x20100000-0x201fffff pref]

pci 0000:01:00.0: BAR 0: assigned [mem 0x20000000-0x200fffff 64bit]

pci 0000:01:00.0: BAR 6: assigned [mem 0x20100000-0x2010ffff pref]

pci 0000:00:00.0: PCI bridge to [bus 01-01]

pci 0000:00:00.0:   bridge window [mem 0x20000000-0x200fffff]

pci 0000:00:00.0:   bridge window [mem 0x20100000-0x201fffff pref]

PCI: Enabling device 0000:00:00.0 (0000 -> 0002)

Switching to clocksource MIPS

NET: Registered protocol family 2

IP route cache hash table entries: 1024 (order: 0, 4096 bytes)

TCP established hash table entries: 4096 (order: 3, 32768 bytes)

TCP bind hash table entries: 4096 (order: 2, 16384 bytes)

TCP: Hash tables configured (established 4096 bind 4096)

TCP: reno registered

UDP hash table entries: 256 (order: 0, 4096 bytes)

NET: Registered protocol family 1

squashfs: version 4.0 (2009/01/31) Phillip Lougher

msgmni has been set to 246

io scheduler noop registered (default)

Serial: 8250/16550 driver, 1 ports, IRQ sharing disabled

serial8250: ttyS0 at MMIO 0x10000c00 (irq = 20) is a 16550A

Ralink GPIO driver initialized. Number of GPIO: 73, GPIO mode: 00101B1D

loop: module loaded

!!! nand page size=2048, addr len=4

Creating 9 MTD partitions on "ra_nfc":

0x000000000000-0x000000040000 : "Bootloader"

0x000000040000-0x0000000c0000 : "BootEnv"

0x0000000c0000-0x000000600000 : "Factory"

0x000000600000-0x000000740000 : "Kernel"

0x000000740000-0x000001600000 : "RootFS"

0x000001600000-0x000001680000 : "Config"

0x000001680000-0x000001700000 : "Storage"

0x000001700000-0x000008000000 : "RWFS"

0x000000600000-0x000001600000 : "Firmware_Stub"

tun: Universal TUN/TAP device driver, 1.6

tun: (C) 1999-2004 Max Krasnyansky <maxk@qualcomm.com>

Ralink APSoC Ethernet Driver v3.2.4 (raeth)

raeth: PDMA RX ring 256, PDMA TX ring 512. Max packet size 1536

raeth: NAPI support, weight 32

raeth: Byte Queue Limits (BQL) support

PPP generic driver version 2.4.2

PPP MPPE Compression module registered

NET: Registered protocol family 24

PPTP driver version 0.8.5

usbcore: registered new interface driver libusual

nf_conntrack version 0.5.0 (16384 buckets, 32768 max)

xt_time: kernel timezone is -0000

Bridge firewalling registered

gre: GRE over IPv4 demultiplexor driver

ip_tables: (C) 2000-2006 Netfilter Core Team

TCP: cubic registered

NET: Registered protocol family 10

ip6_tables: (C) 2000-2006 Netfilter Core Team

IPv6 over IPv4 tunneling driver

NET: Registered protocol family 17

L2TP core driver, V2.0

PPPoL2TP kernel driver, V2.0

8021q: 802.1Q VLAN Support v1.8

ASUS NVRAM, v0.08. Available space: 131072. Integrity: Signature FAILED!

List of all partitions:

1f00             256 mtdblock0  (driver?)

1f01             512 mtdblock1  (driver?)

1f02            5376 mtdblock2  (driver?)

1f03            1280 mtdblock3  (driver?)

1f04           15104 mtdblock4  (driver?)

1f05             512 mtdblock5  (driver?)

1f06             512 mtdblock6  (driver?)

1f07          107520 mtdblock7  (driver?)

1f08           16384 mtdblock8  (driver?)

No filesystem could mount root, tried:  squashfs

Kernel panic - not syncing: VFS: Unable to mount root fs on unknown-block(31,4)"
The cursor stops here.
Especially in the last two lines, I found a lot of information and didn't study it.
I wanted to give up. Later, I found the problem of baud rate, so I looked at the problem from a different angle.
A post of a great God "note: if the serial port is printed with garbled code and cannot enter the startup mode, it may be caused by the baud rate error of some USB to TTL chips (such as CH340). You can change the baud rate to 117200 or other baud rates. It is recommended to use FT232R USB to TTL chips."
I changed the baud rate to 117200. The router was powered off, and then there was no random code. The normal startup information was displayed.
"U-Boot 1.1.3 (VORTEX)


Board: Ralink APSoC DRAM:  128 MB

Power on memory test. Memory size= 128 MB...OK!

relocate_code Pointer at: 87fb8000

enable ephy clock...done. rf reg 29 = 5

SSC disabled.

!!! nand page size = 2048, addr len=4

..============================================

Ralink UBoot Version: 4.2.S.1

--------------------------------------------

ASIC 7620_MP (Port5<->None)

DRAM_CONF_FROM: Auto-detection

DRAM_TYPE: DDR2

DRAM component: 1024 Mbits

DRAM bus: 16 bit

Total memory: 128 MBytes

Flash component: NAND Flash

Date:Apr 15 2016  Time:17:46:32

============================================

icache: sets:512, ways:4, linesz:32 ,total:65536

dcache: sets:256, ways:4, linesz:32 ,total:32768


 ##### The CPU freq = 580 MHZ ####

 estimate memory size =128 Mbytes


Please choose the operation:

   1: Load system code to SDRAM via TFTP.

   2: Load system code then write to Flash via TFTP.

   3: Boot system code via Flash (default).

   4: Entr boot command line interface.

   9: Load Boot Loader code then write to Flash via TFTP.                     0


3: System Boot system code via Flash.

Booting System 2

..ranand_erase_write: offs:40000, count:20000

.Done!

done

## Booting image at bc600000 ...

   Image Name:          MI-3

   Image Type:   MIPS Linux Kernel Image (lzma compressed)

   Data Size:    23349307 Bytes = 22.3 MB

   Load Address: 80000000

   Entry Point:  802ba440

................................................................................                                                   ............................................"
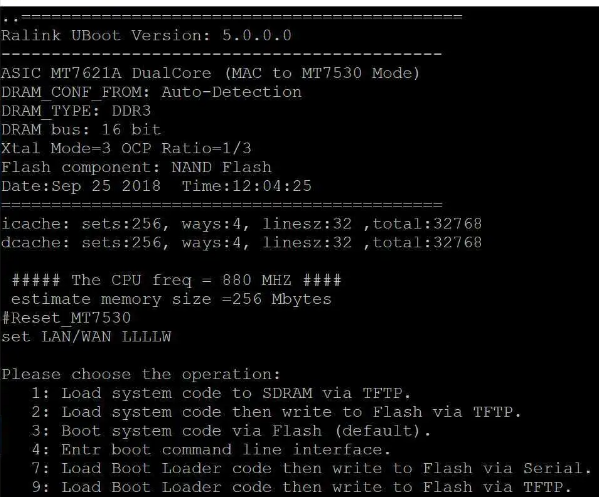
Borrow map
These options basically flash by without giving you a chance to choose. I thought of various methods. For example, I kept pressing the 2 key to turn on the power, but I found that it was effective. At least 2 options were selected and displayed (Y/N), but I didn't have a chance to press and hold them. Anyway, all methods are futile. I won't say more, It's tears to say more.
Then, once doubted life and considered cheap to take out the router or dismantle the machine parts.
All kinds of methods, such as "enter tpl three letters to interrupt startup at this time" and "Ctrl+C", are useless.
The next day, I checked the information and found out what these options meant, so I had another idea.
Explanation of each option:
[1] Brush the brush package (initramfs version) into RAM with TFTP and start it (the system brushed in this way will lose power)
[2] Brush the brush package (factory version) into ROM with TFTP to start (generally use this brush firmware)
[3] Direct start system
[4] Command line mode is generally used to set the environment for U SB flash disk brushing
[7] Replace current uboot with TTL
[9] Replace current uboot with TFTP
[note]
- [7] [9] it is used to brush the feed or PD boot. It will replace the current uboot. After brushing the uboot, it will be very troublesome to brush the router into bricks
- initramfs factory sysupgrade is the firmware generated after openwrt firmware is compiled
Initramfs version is used to brush into ram
The factory version is used to brush openwrt for the first time (this is used to brush uboot)
The sysupgrade version is used to update openwrt
Author: Ming Bai
Link: https://www.jianshu.com/p/646c98a0a1b4
Source: Jianshu
The copyright belongs to the author. For commercial reprint, please contact the author for authorization, and for non-commercial reprint, please indicate the source.
The router defaults to 3, so it starts directly. Because our system has problems, so the problem comes. Can't get into the system. Keep the yellow light.
I started experimenting with other options, then referred to several great God's brick saving methods and found some solutions.
"
Enter the router uboot command line through TTL
When the Xiaomi router is started for the first time, UART will be written into the uboot configuration (nvram)_ EN = 0, so after uboot boot, it does not accept ttl input and can only be viewed, so it is impossible to brush the machine from ttl.
resolvent:
If the Xiaomi router can still be used normally, power on the Xiaomi router, enter the router management interface, and select to restore the factory settings.
SecureCRT should be able to see the data. During uboot boot, keep pressing the 4 keys on the keyboard (that is, enter the uboot command line), as follows:
--------
Copyright notice: This is the original article of CSDN blogger "dafengge's blog", which follows the CC 4.0 BY-SA copyright agreement. Please attach the original source link and this notice for reprint.
Original link: https://blog.csdn.net/flyhorstar/article/details/95729059 ”
Since 4 is the command line, I'll try, and then follow the following operations. Finally, I see some hope.
Key methods to solve the problem 1
When the router is powered off, configure it and open the operation window of putty. Then, the key step is: press and hold the number key 4 and don't let go. The other hand presses the power switch inserted in the row, and the router is powered on. Then, it enters the command line in less than one second.
(thank God, there's hope for a turnaround at last)

Borrow the picture. It's not Xiaomi 3. It's similar.
Then, the enter command window appears
VORTEX # green cursor block.
input
After power on, press 4 and enter:
setenv uart_en 1
saveenv
Split into two lines
After typing,
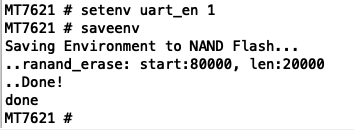
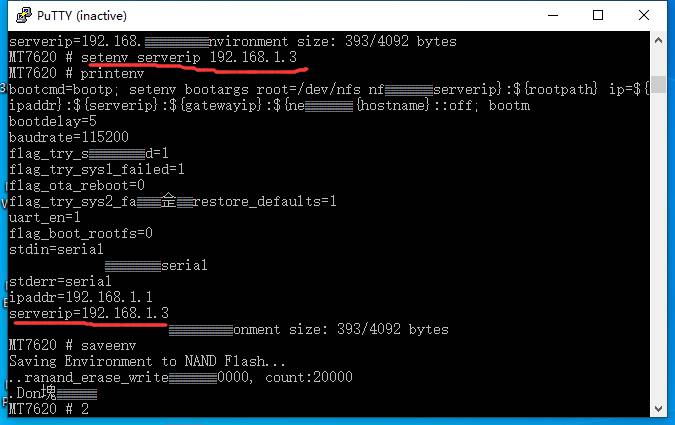
Enter printenv to view the environment variable settings
See if there's any
The expression serverip=192.168.1.3
Many other information is the router information set.
It's inconvenient to post it.
When I was in TTL, the connection icon in the lower right corner of the computer was always a small red fork.
If not, continue typing the command
setenv serverip 192.168.1.3
Enter printenv to view the environment variable settings
The above operation of setting IP may be a mistake. The result is that when I don't pay attention to the TFTP upload firmware, it always changes. As a result, when I enter the brush program, I forget to check the TFTP settings, and it is also transmitted (every time the router is powered off, the TFTP IP will change)
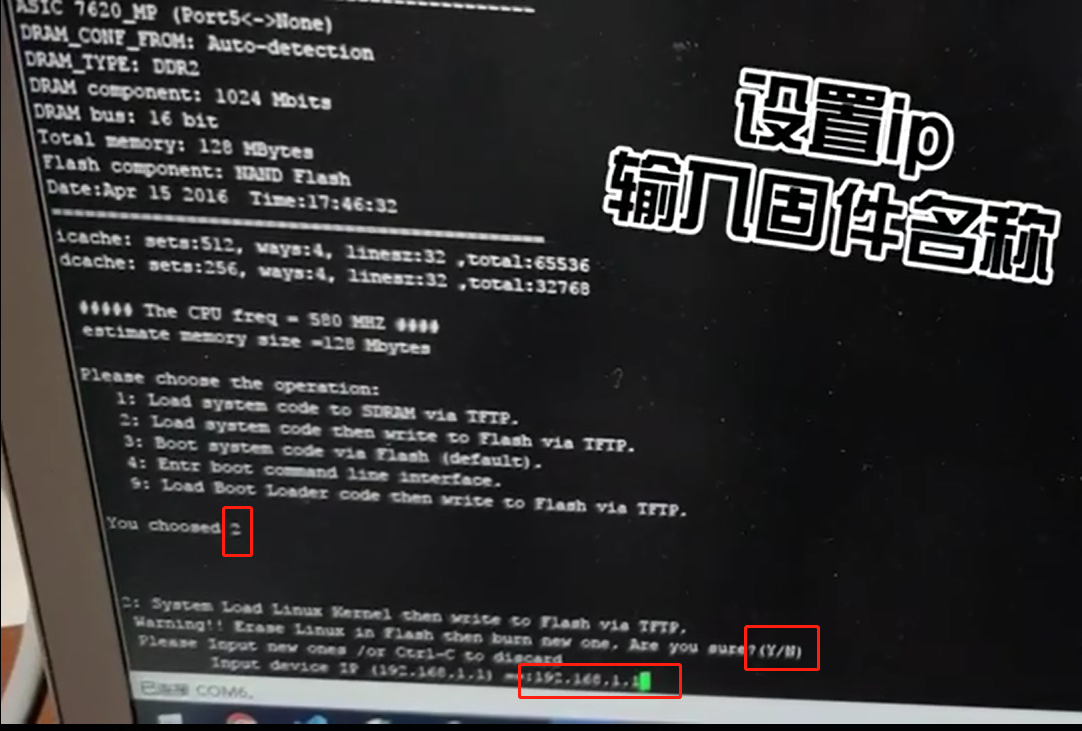
Key methods to solve problems 2
When the router is powered off, the PUTTY does not need to be turned off in the whole process. Then, press and hold the number key 2 to send power to the router. Then you can see the command line that needs you to enter (Y/N).
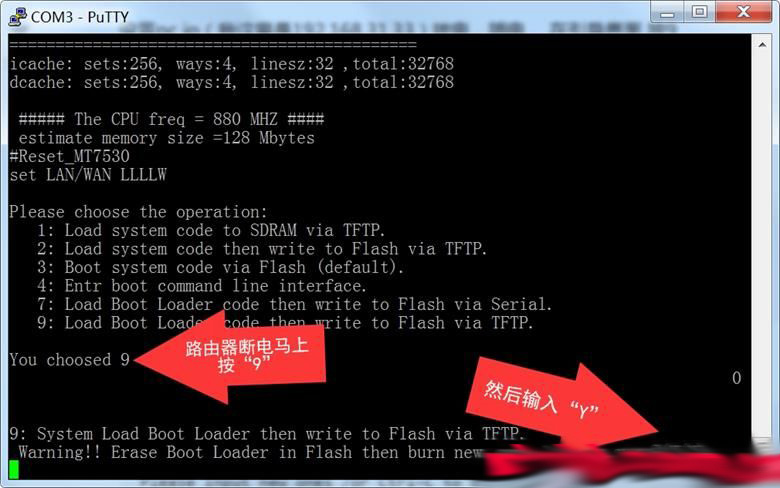
Of course, there are also those who choose 9. I don't understand the difference between 2 and 9, but the commands entered later are the same,
The following is the brushing information of a great God. My information was submerged in the flood and disappeared.
"

hornet> setenv ipaddr 192.168.1.1        /*Set local address*/

hornet> setenv serverip 192.168.1.4        /*Set tftp server address*/

hornet> tftpboot 0x80000000 abc.bin        /*Download brush firmware*/

eth1 link down

dup 1 speed 100

Using eth0 device

TFTP from server 192.168.1.4; our IP address is 192.168.1.1

Filename 'abc.bin'.

Load address: 0x80000000

Loading: #################################################################

         #################################################################

         #################################################################

         #################################################################

         #################################################################

         #################################################################

         #################################################################

         #################################################################

         #################################################################

         #################################################################

         #################################################################

         ######################################################

done


Bytes transferred = 3932160 (3c0000 hex)        /*Download the firmware successfully. Remember the size of the file in brackets. What I brush here is official*/

hornet> erase 0x9f020000 +0x3c0000                        /*Erase Flash, starting from 0x9f020000, and then 0x3c0000 memory units. Note that there is a space in front of the + sign*/

First 0x2 last 0x3d sector size 0x10000                                       61

Erased 60 sectors

hornet> cp.b 0x80000000 0x9f020000 0x3c0000        /*Write firmware from 0x80000000 to 0x9f020000 with size of 0x3c0000*/

Copy to Flash... write addr: 9f020000

done                                                                                /*Brush successfully!*/

/*The above is the TTL information of the whole process when brushing the machine*/

--------

Copyright notice: This article is CSDN Blogger「Zizhan 1992」Original articles, follow CC 4.0 BY-SA Copyright agreement, please attach the original source link and this statement.

Original link: https://blog.csdn.net/u012567926/article/details/44281279
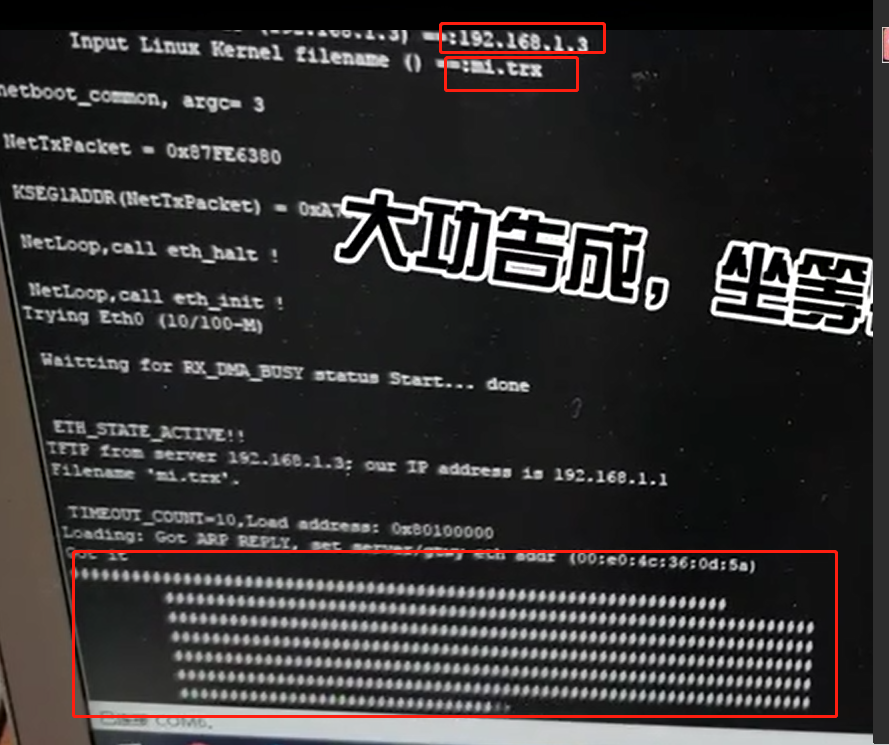
Borrow map
Looking at this picture, it is basically a successful brick rescue, and the firmware is being brushed in.
Then, wait patiently. Don't get excited about all kinds of scrolling subtitles. There will be a slight pause in some places until the cursor doesn't move at last. Then you can look at the light of the router and turn blue. You can search the WIFI signal. It's finished.
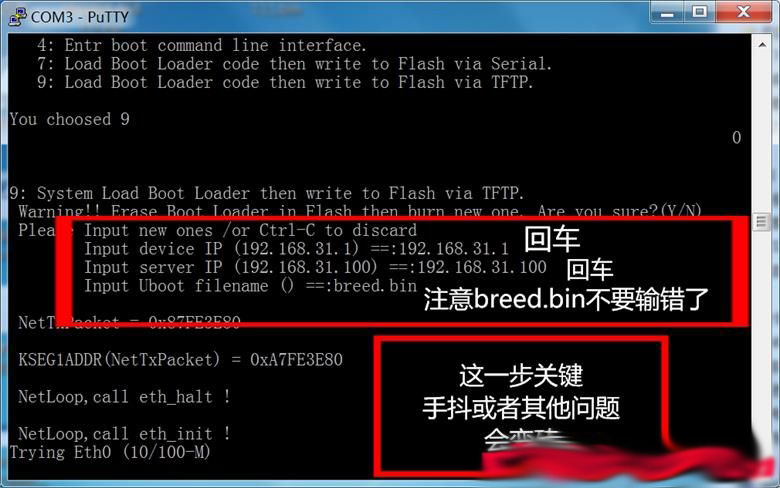
The following figure shows the selected 9 (borrow image)
The following is a link to the brick rescue tutorial. Some memoirs borrow pictures to thank you.
[UBOOT-TTL] brick rescue or brush guide for Xiaomi router (R3P as an example) - brief book
Xiaomi router 3/3G/4 brushes Tanabata boy's blog CSDN blog through serial port (ttl)
OpenWrt learning notes brush machine, save brick Zizhan - CSDN blog
Feixun Fir302b brick rescue tutorial _weixin_30455365 blog - CSDN blog
Finally, save brick hasn't tried to brush PB-BOOT, and I haven't seen this tutorial yet.
Just come back if you feel you can. Don't think so much.
Supplement and summarize the second brick rescue.
The video starts to miss an important step. Select 2. Before setting the brush, be sure to open the TFTP software, select the appropriate brush firmware, put it in the program directory after TFTP installation, and name it as a short file name.
- When recording the tutorial, the first failure was to forget to open the TFPT software. After the power was re supplied, the options could not be selected, and the setting command could only be repeated.
Press the 4 key to power up the router without letting go, and then enter:
setenv uart_en 1
setenv serverip 192.168.1.3
saveenv
Don't worry, you can enter printenv to view the environment variable settings
Then, the router is powered off, press and hold the 2 key to send power. It should be all right.
If you still can't choose, flash past, close the putty software, reconfigure the login, and remember to set the TFTP software. (once the power is off, the software is easy to recover to 127.0.0.1, note!)
Repeat the above actions more. As long as it's yellow, it should be all right.
- Choose a good firmware, brush the machine. I first used a Pandora firmware, but it didn't start successfully, and the yellow light was always on. Therefore, I experimentally re brushed Lao maozi's firmware, and the brush was successful.
- If you can't input your choice all the time, you can try changing an excuse or a computer
- When running the brick rescue program, it is recommended to exit the anti-virus software and firewall and disconnect the external network (especially the TFTP software transfer file)