Environmental Science
-
maven3.6.1
-
Development tool idea
-
jdk1.8
Content of this article
-
Introduction to private clothes
-
Installing nexus private server in windows
-
Installing nexus private server in linux
-
Details of various warehouses in nexus private server
-
Configure local Maven to download components from nexus
-
Two ways to publish local components to private server
-
summary
The last article mentioned private server. Let's review the content of private server.
Private clothes
Private server is also a kind of remote warehouse. Why do we need private server?
If there are hundreds of people in our team who are developing some projects, all of them use maven to organize the projects, then each of us needs to download the components we need to rely on from the remote warehouse to the local warehouse, which also has high requirements on the company's network. In order to save this broadband and speed up the download, we can set up a This server acts as an agent. All developers in the company visit this server, and this server will return the required components to us. If there are no required components in this server, this proxy server will go to the remote warehouse to find them, download them to the proxy server first, and then return them to open The sender's local warehouse.
There are also many projects within the company that will depend on each other. You may be an architecture group. You need to develop some jars for other groups to use. At this time, we can publish our jars to private servers for other colleagues to use. If there is no private server, we may need to manually send them to others or upload them to shared machines, but it is not very convenient to manage.
Generally speaking, private service has the following advantages:
-
Accelerate the download speed of maven components
-
Save broadband and speed up project construction
-
Easy to deploy your own artifacts for others to use
-
To improve the stability of maven, the central warehouse needs the local machine to be able to access the external network. If the private server is used, only the local machine can access the internal network private server
There are three kinds of specialized maven warehouse management software to help us build private servers:
-
archiva of the Apache Foundation
http://archiva.apache.org/
-
JFrog's artifact
https://jfrog.com/artifactory/
-
Nexus of Sonatype
https://my.sonatype.com/
These are all open-source private server software, which can be used freely. The most commonly used is the third type of Nexus. In this article, we mainly explain it. Other two kinds of interested friends can study it.
Installing Nexus private server in Windows 10
nexus is developed by java, so it needs the support of java environment when running.
Install jdk
For the installation of jdk1.8, please refer to Maven Series Part 2: installation, configuration, mvn operation process details This article introduces
Download nexus
Here are two ways to download: official website download, baidu online disk download, baidu online disk speed will be faster.
The official website and Baidu network disk contain the nexus installation files of windows, linux and mac versions.
It is recommended that you use the resources in the network disk to keep consistent with the environment of this article, so as to avoid errors.
nexus download address
https://help.sonatype.com/repomanager3/download
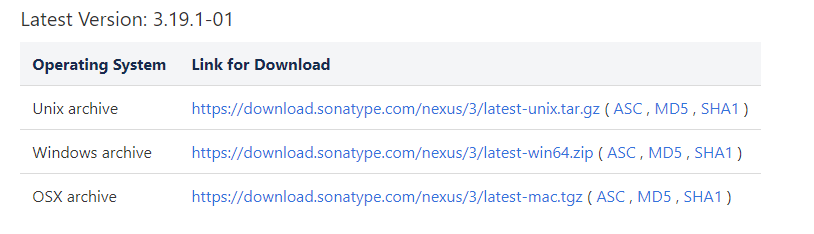
Baidu online disk download address
Link: https://pan.baidu.com/s/1N8A4JH1Ykvetn3xs05LszA
 Extraction code: vig6
 It's more convenient to open Baidu online mobile App after copying this content
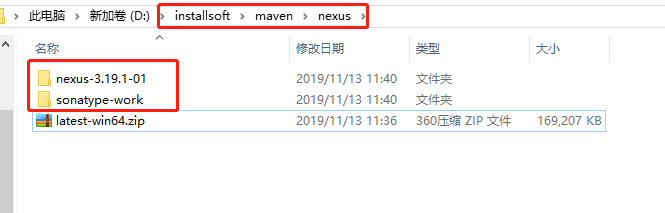
Unzip latest-win64.zip
After extracting latest-win64.zip, two file directories, nexus-3.19.1-01 and sonatyp work, will be generated
Start nexus
Run nexus-3.19.1-01/bin/nexus.exe /run directly in cmd, as follows:
D:\installsoft\maven\nexus\nexus-3.19.1-01\bin>nexus.exe /run
Ignore the following exception in the output
java.io.UnsupportedEncodingException: Encoding GBK is not supported yet (feel free to submit a patch)
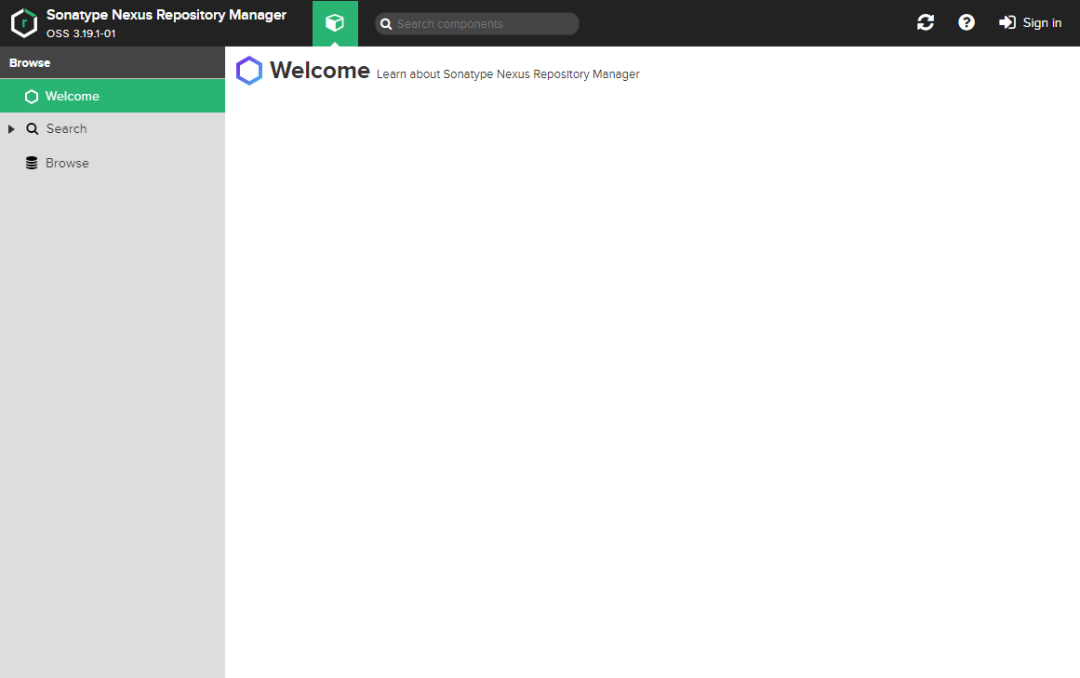
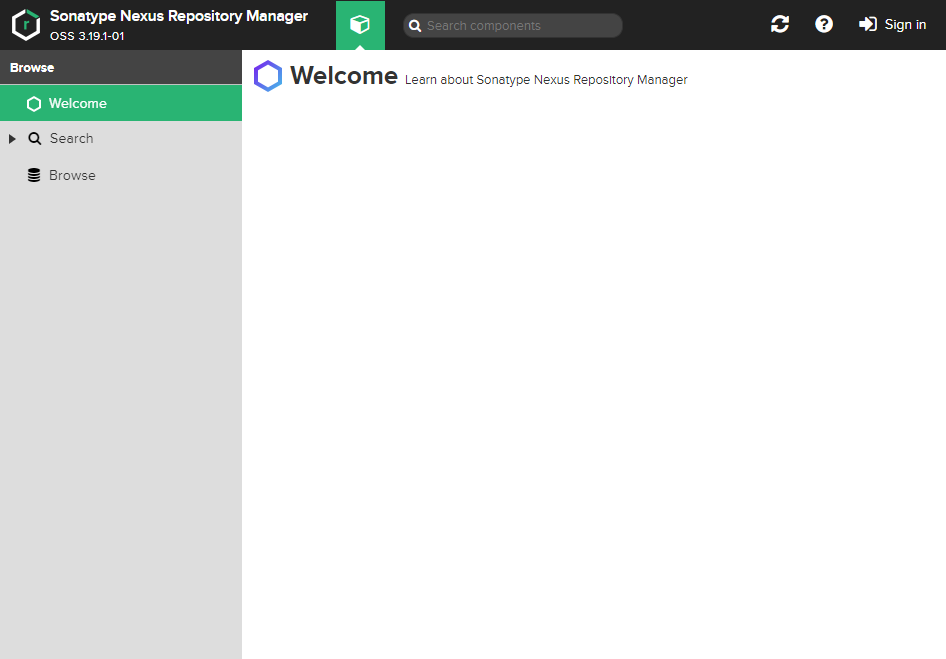
Open in browser
http://localhost:8081/
The effect is as follows:
Login Nexus
Click Sign in in the upper right corner of the figure above, and enter the user name and password. The default user name of nexus is admin
The password of nexus is generated when it is first started. The password is located in the following file:
Installation directory / sonatype work / nexus3 / admin.password
After successful login, some settings will pop up, as follows:
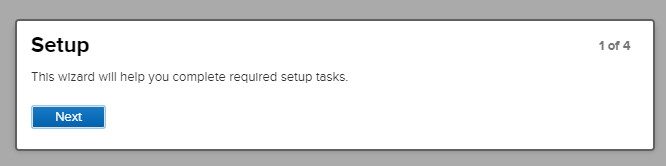
Click Next to set a new login password (the new password should be saved), as follows:
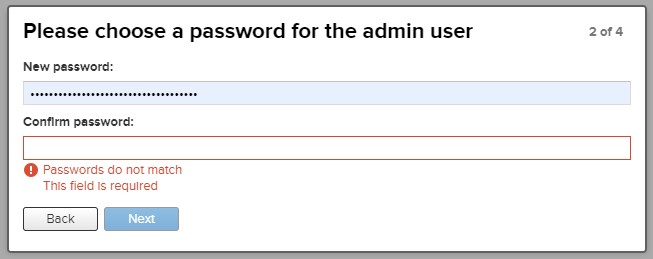
Click Next - > finish to complete the setup.
Other common operations
Stop Nexus command
Press: ctrl+c in the start cmd window to stop Nexus.
Modify start port
The default port is 8081. If there is a conflict with this computer, you can modify it in the following file:
nexus-3.19.1-01\etc\nexus-default.properties
nexus uses the web project developed by java and has built-in jetty web container, so it can run directly.
Linux Installation of Nexus private server
Download the installation package
Download the nexus installation package of linux version from Baidu online disk, and select the latest-unix.tar.gz file. The download address is as follows:
Link: https://pan.baidu.com/s/1N8A4JH1Ykvetn3xs05LszA
 Extraction code: vig6
 After copying this content, open Baidu online mobile App, which is more convenient
Place the above installation package in the / opt/nexus / directory.
decompression
[root@test1117 nexus]# tar -zvxf latest-unix.tar.gz
[root@test1117 nexus]# ls
latest-unix.tar.gz  nexus-3.19.1-01  sonatype-work
start-up
[root@test1117 bin]# /opt/nexus/nexus-3.19.1-01/bin/nexus start
WARNING: ************************************************************
WARNING: Detected execution as "root" user.  This is NOT recommended!
WARNING: ************************************************************
Starting nexus
I used the root user operation above. For security, you'd better create a user to operate.
Open port
Add the following to the / etc/sysconfig/iptables file:
-A INPUT -p tcp -m state --state NEW -m tcp --dport 8081 -j ACCEPT
Execute the following command for the above configuration to take effect:
[root@test1117 bin]# service iptables restart
Redirecting to /bin/systemctl restart  iptables.service
Validation effect
Visit
http://ip:8081/
The following effect indicates that everything is ok.
Sign in
The user name is admin, and the password is in
/opt/nexus/sonatype-work/nexus3/admin.password
Please change your password immediately after login.
Warehouse classification in Nexus
As we said before, users can access remote warehouses through nexus and publish local components to nexus. How does nexus support these operations?
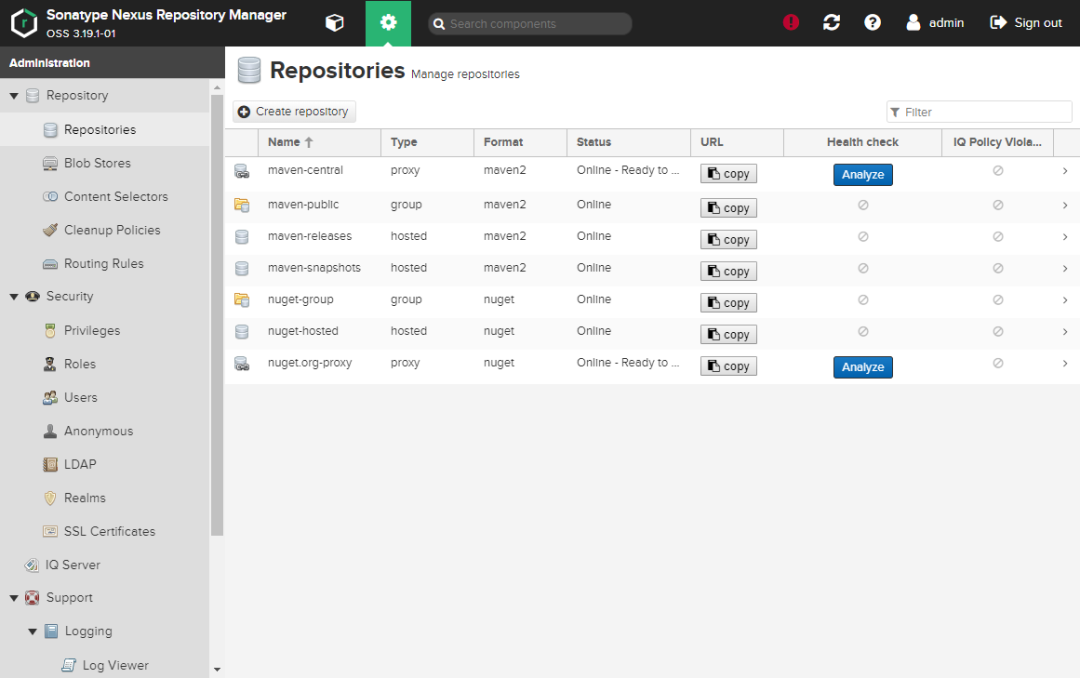
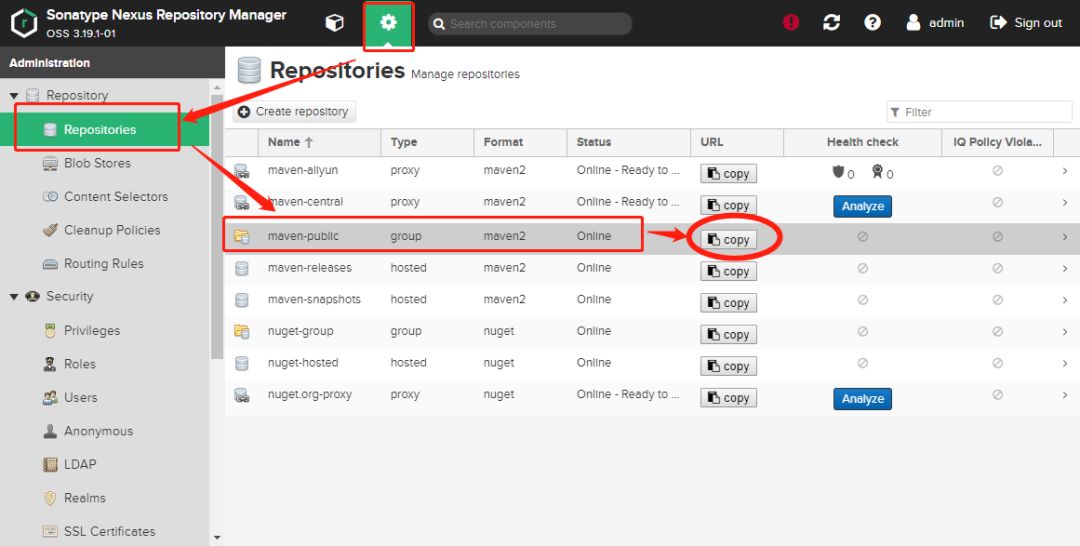
There is a warehouse list in nexus, which contains all kinds of warehouses, including the third-party remote warehouse we call the agent, as shown in the following figure:

The above figure shows the default warehouse list of nexus installed. There are three types:
-
Agency warehouse
-
Host repository
-
Warehouse group
Agency warehouse
Agent warehouse mainly allows users to indirectly access external third-party remote warehouse through agent warehouse, such as accessing maven central warehouse and Alibaba maven warehouse through agent warehouse. The agent warehouse will download components from the agent warehouse and cache them in the agent warehouse for maven users.
We create an Alibaba cloud maven agent warehouse in nexus. The process is as follows.
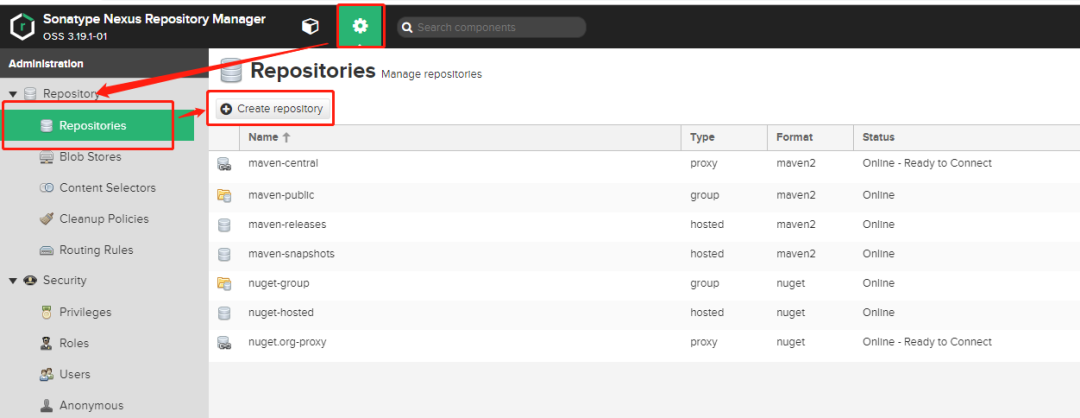
Click Create repository in Nexus warehouse list, as shown below:
Enter the add page and select maven2(proxy), which represents the proxy warehouse, as shown below:
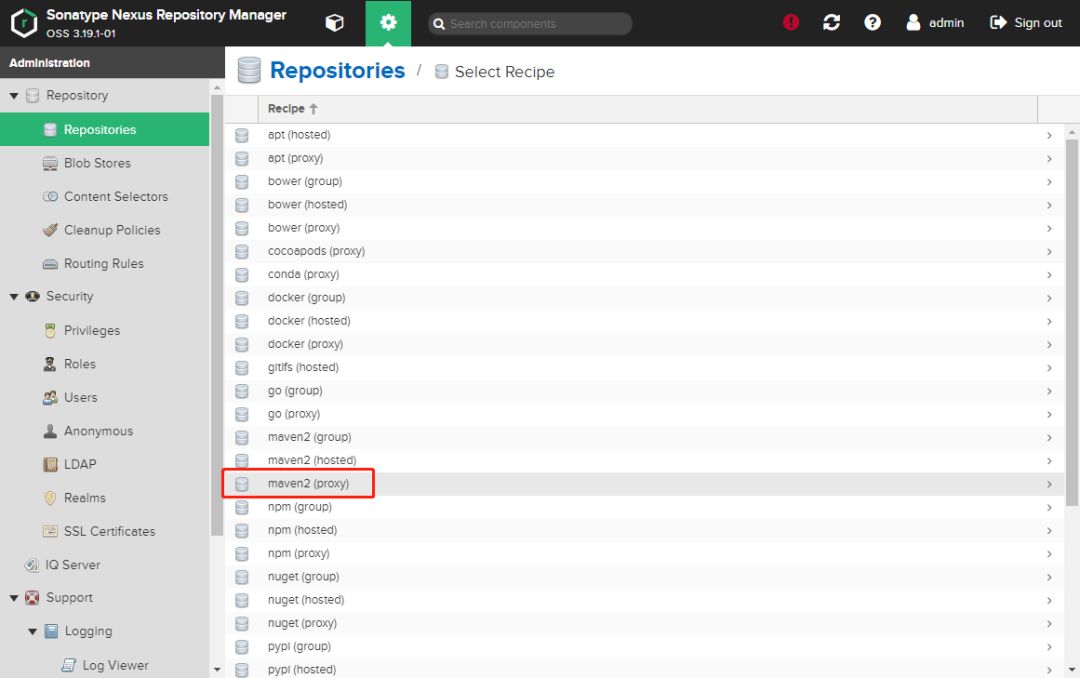
Enter the information of the remote warehouse, as shown below:
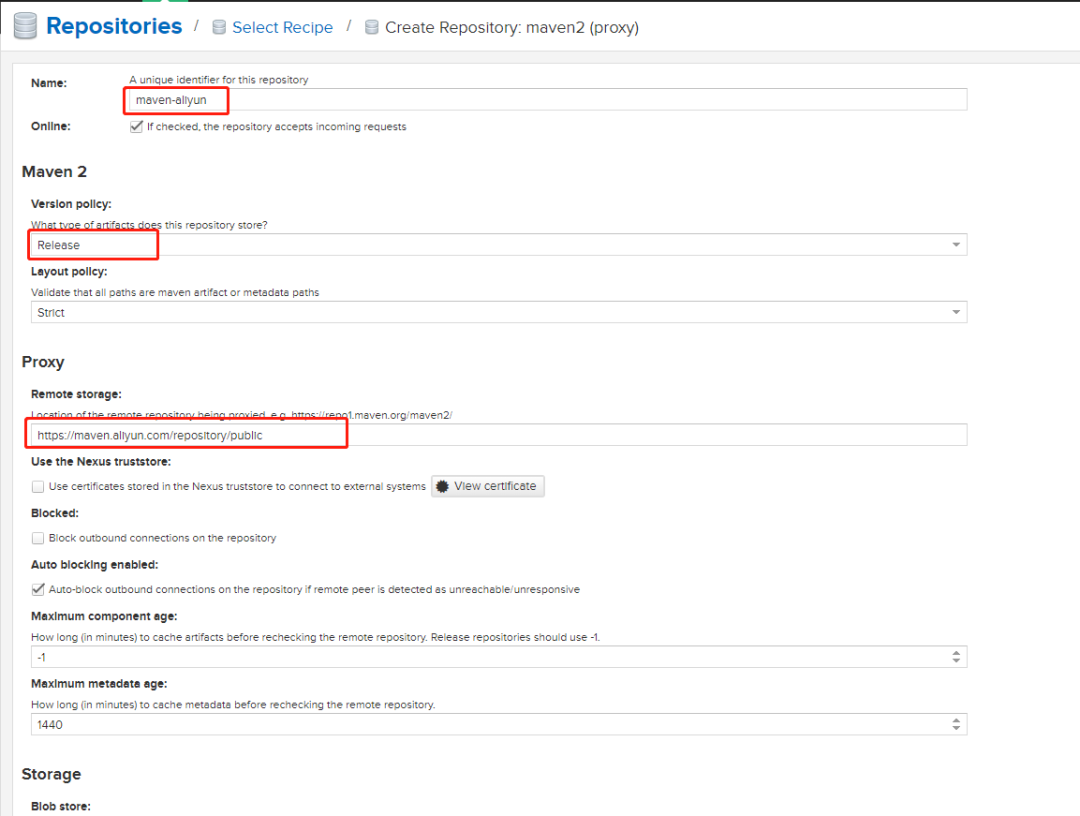
Enter the warehouse name in the first red box: maven aliyun

The second red box selection: Release, which means downloading stable components from this warehouse

In the third red box, enter the Alibaba cloud warehouse address: https://maven.aliyun.com/repository/public
Click the Create repository button at the bottom to finish the creation, as shown below:

Host repository
The host warehouse is mainly for our own use and has two main functions
-
Upload some private components to the host warehouse through the web page in nexus for other colleagues to use
-
Publish some self-developed components to nexus's hosting repository for use by other colleagues
The above two operations will be explained and demonstrated later.
Warehouse group
maven users can download components from agent warehouse and host warehouse to local warehouse. In order to facilitate downloading components from multiple agent warehouses and host warehouses, maven provides a warehouse group. There can be multiple agent warehouses and host warehouses in the warehouse group, while maven users can indirectly access all the warehouses in the group by accessing only one warehouse group. Multiple warehouses in the warehouse group are In order, when maven users download components from the warehouse group, the warehouse group will look for components in the warehouse in the group in order, and return to the local warehouse immediately after finding them. Therefore, in general, we will put the fast ones in front.
In fact, there is no component content in the warehouse group. It just acts as a request forwarding function, forwarding the requests of maven users downloading components to other warehouses in the group for processing.
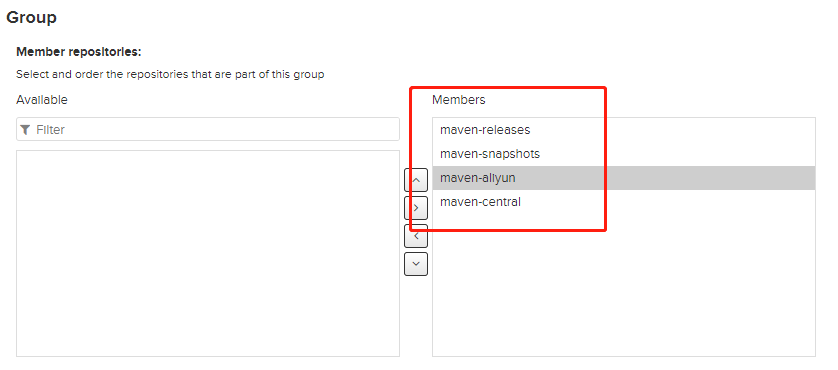
nexus has a warehouse group Maven public by default, as follows:
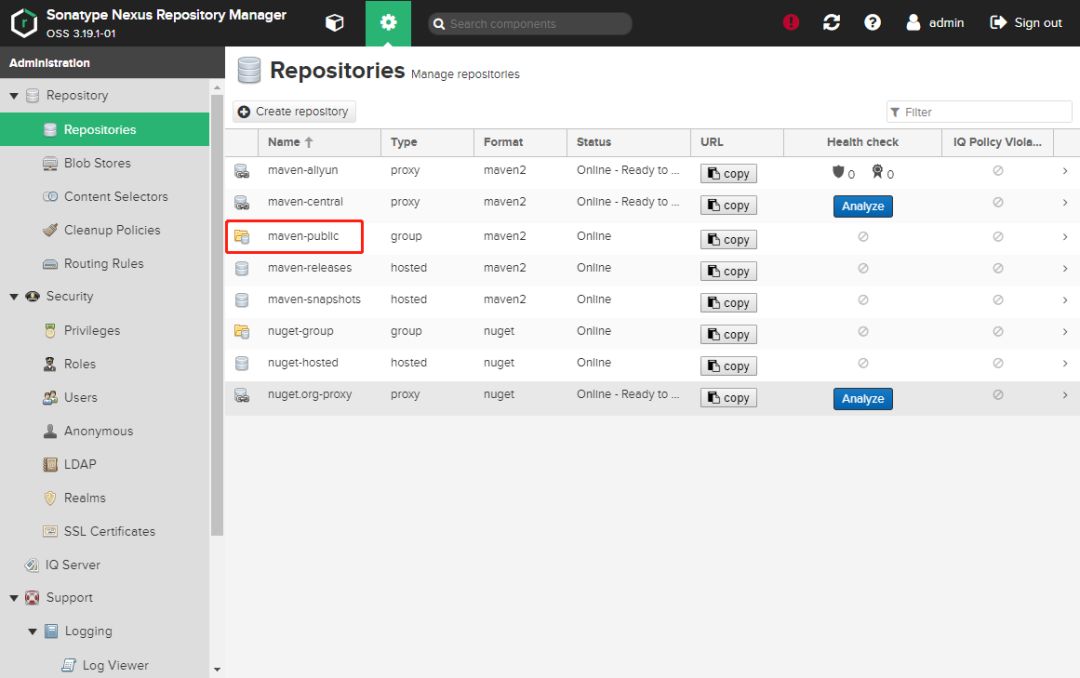
Click the record of Maven public to go in and have a look, as shown below:
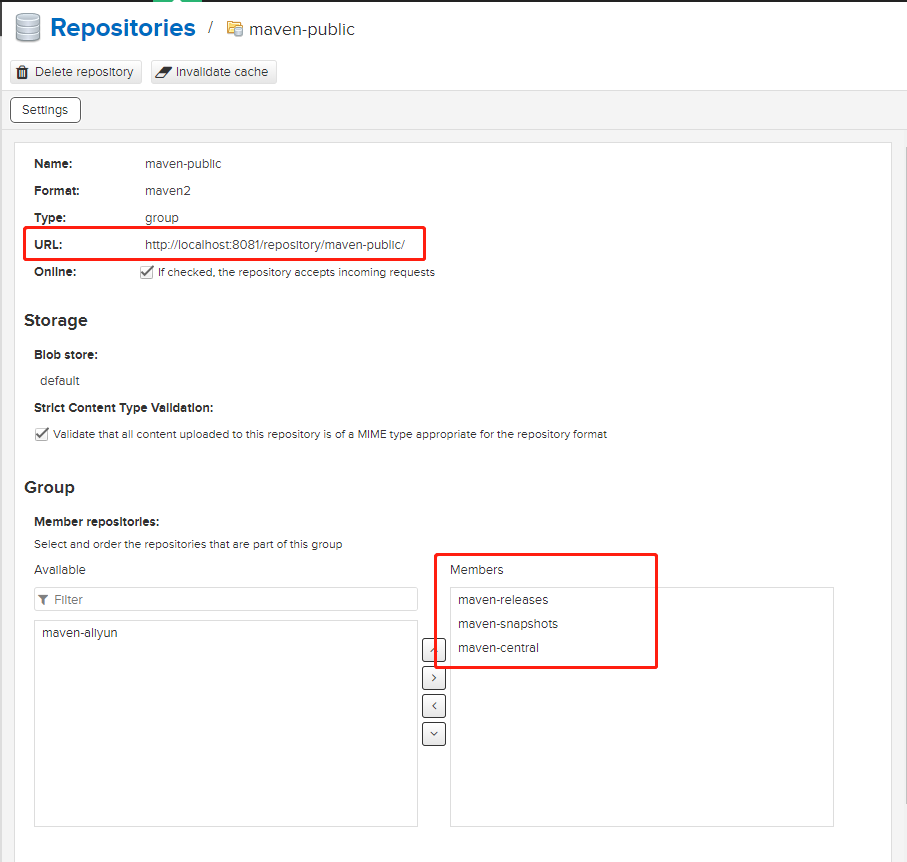
The first red box in the above figure is a url outside the warehouse group. Our local maven can download components from the warehouse group to the local warehouse through this url.
The second red box is a member of this warehouse group, which currently contains three warehouses. The first is the release version warehouse of the host, the first is the snapshot version warehouse of the host, and the third is the agent warehouse (the agent of the central warehouse of the maven community).
The newly added maven aliyun is on the left. We add it to the Members list of the warehouse on the right, and then put the maven aliyun warehouse in the third position. The speed of this warehouse is faster than that of Maven central, which can accelerate the speed of downloading Maven components, as shown in the following figure:
Configure local Maven to download components from nexus
Introduce 2 ways
Mode 1: pom.xml
This time, we download components from the nexus default warehouse group, first get the external address of the warehouse group, and click the copy button in the figure below to get the address of the warehouse group:

Modify pom.xml and add the following:
Note that the address of the url below is the address copied above.
<repositories>
    <repository>
        <id>maven-nexus</id>
        <url>http://localhost:8081/repository/maven-public/</url>
        <releases>
            <enabled>true</enabled>
        </releases>
        <snapshots>
            <enabled>true</enabled>
        </snapshots>
    </repository>
</repositories>
Because the nexus private server needs to have a user name and password to access, it needs to have a certificate. The certificate needs to be configured in the settings.xml file. Add the following content in the servers element of the ~ /. m2/settings.xml file:
<server>
  <id>maven-nexus</id>
  <username>admin</username>
  <password>admin123</password>
</server>
Note that the value of server - > id above is consistent with the value of repository - > id in pom.xml, and the credentials can be found through this id Association.
You can edit the username and password in the server element according to your own. The password in my side is admin123
Example of mode 1
Create a maven project, open idea, click file - > New - > project, and select Maven as follows:
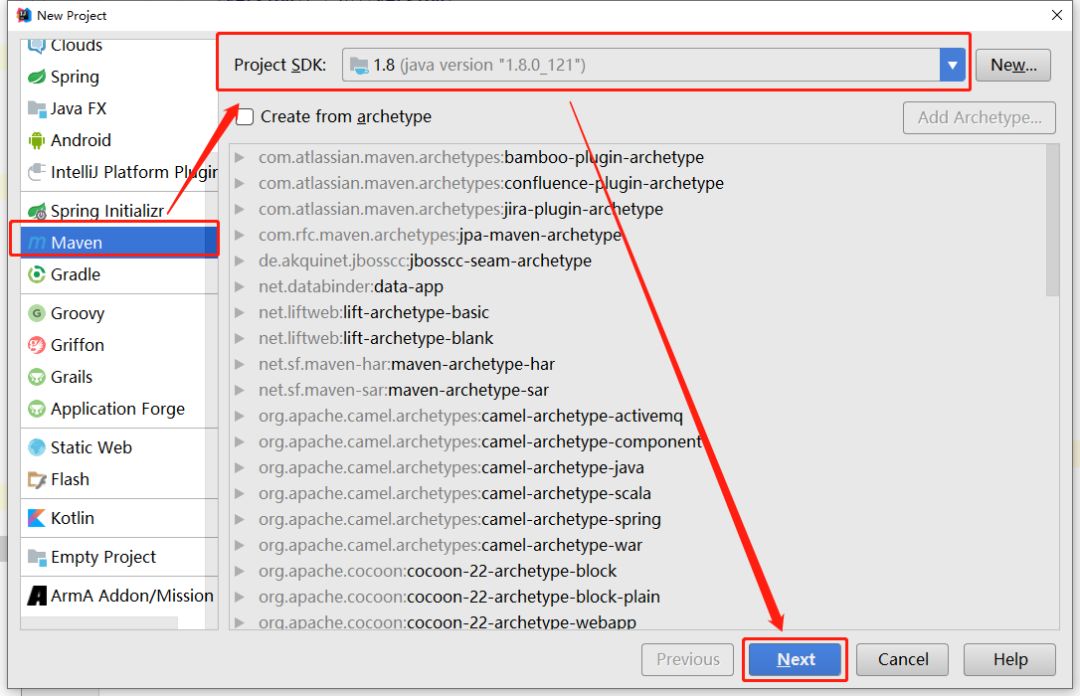
Click Next and enter the project coordinate information as follows:

Click Next, and enter Project name as maven-chat05, as follows:
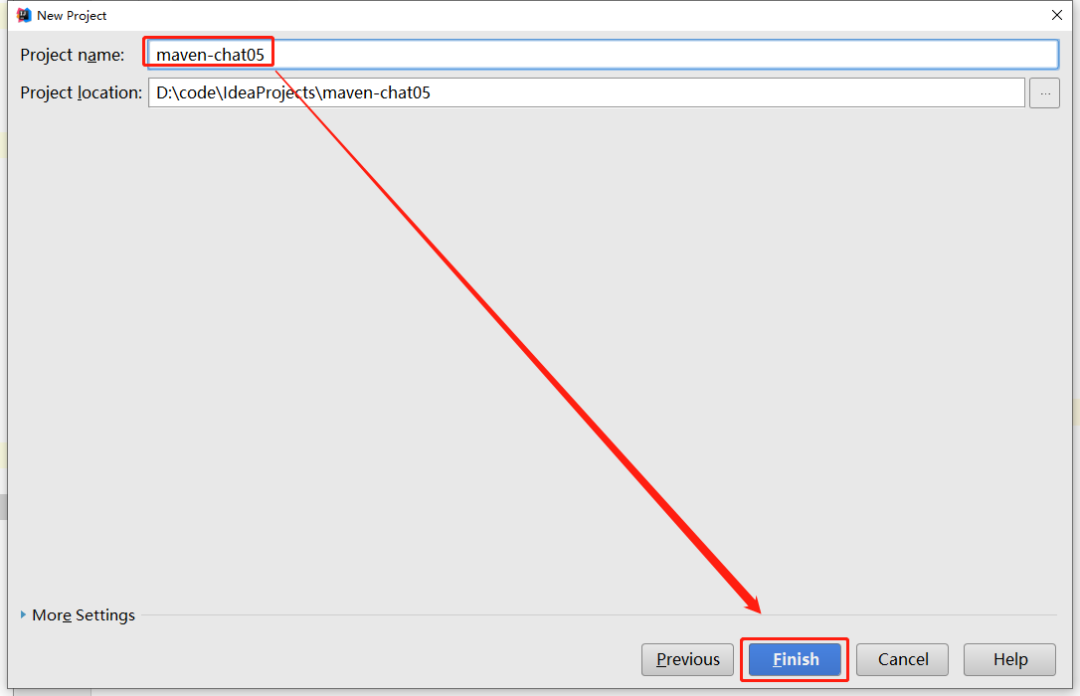
Click Finish to create successfully, as follows:
Configure the maven environment of idea, click file - > settings, as shown below:
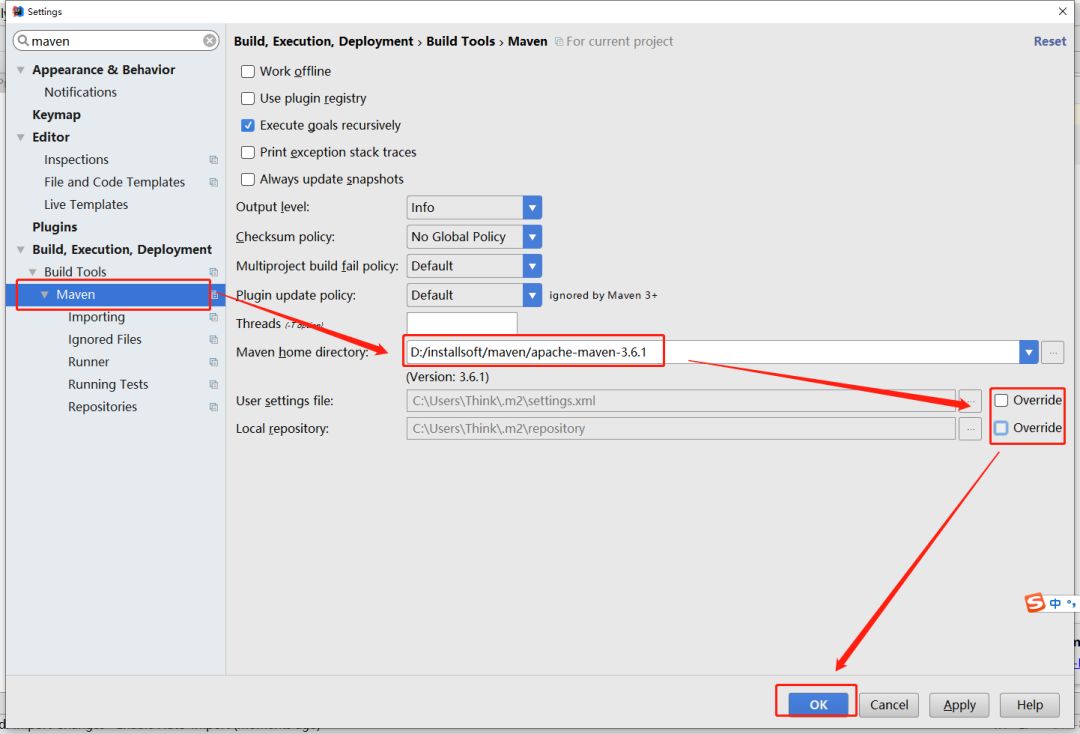
Click OK above to complete the configuration.
Restore the configuration of ~ /. m2/settings.xml to the initial state, as follows:
Copy M2 home / conf / settings.xml to ~ /. m2/settings.xml directory. If there is one, backup it first, and then overwrite it.
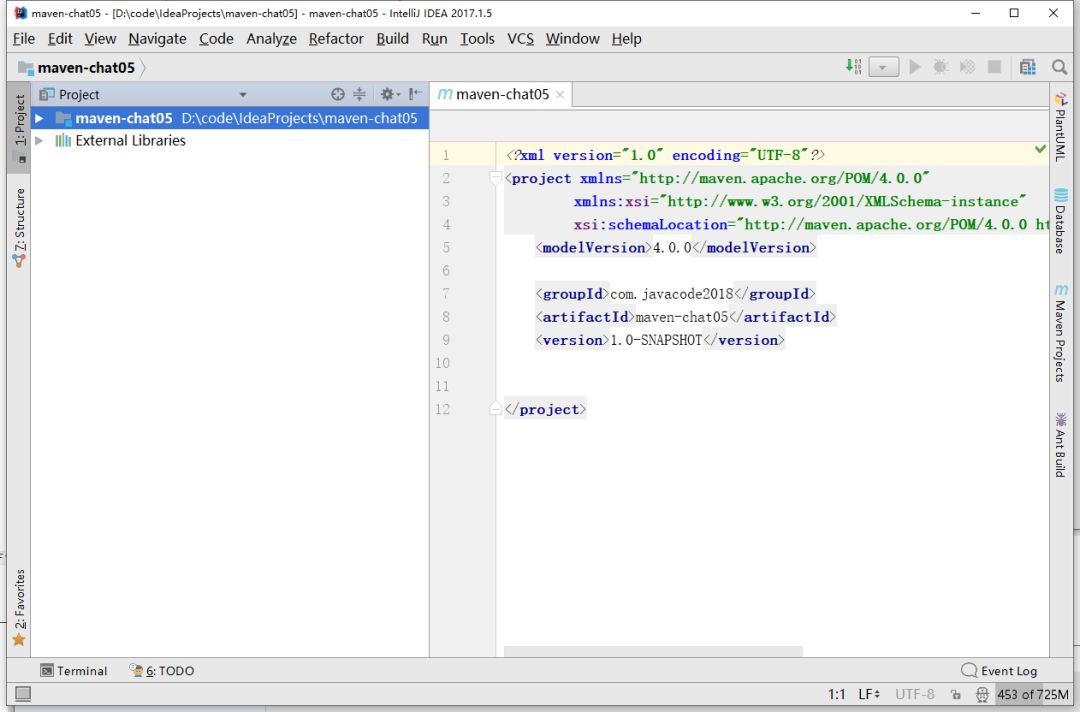
Modify the pom.xml file in the idea project as follows:
<?xml version="1.0" encoding="UTF-8"?>
<project xmlns="http://maven.apache.org/POM/4.0.0"
         xmlns:xsi="http://www.w3.org/2001/XMLSchema-instance"
         xsi:schemaLocation="http://maven.apache.org/POM/4.0.0 http://maven.apache.org/xsd/maven-4.0.0.xsd">
    <modelVersion>4.0.0</modelVersion>

    <groupId>com.javacode2018</groupId>
    <artifactId>maven-chat05</artifactId>
    <version>1.0-SNAPSHOT</version>

    <dependencies>
        <dependency>
            <groupId>com.alibaba</groupId>
            <artifactId>fastjson</artifactId>
            <version>1.2.62</version>
        </dependency>
    </dependencies>

    <repositories>
        <repository>
            <id>maven-nexus</id>
            <url>http://localhost:8081/repository/maven-public/</url>
            <releases>
                <enabled>true</enabled>
            </releases>
            <snapshots>
                <enabled>true</enabled>
            </snapshots>
        </repository>
    </repositories>

</project>
Delete the following directories in the local warehouse:
~\.m2\repository\com\alibaba
Open cmd to run in maven-chat05 project directory:
mvn compile
When witnessing miracles, the output is as follows:
D:\code\IdeaProjects\maven-chat05>mvn compile
[INFO] Scanning for projects...
[INFO]
[INFO] -------------------< com.javacode2018:maven-chat05 >--------------------
[INFO] Building maven-chat05 1.0-SNAPSHOT
[INFO] --------------------------------[ jar ]---------------------------------
Downloading from maven-nexus: http://localhost:8081/repository/maven-public/com/alibaba/fastjson/1.2.62/fastjson-1.2.62.pom
Downloaded from maven-nexus: http://localhost:8081/repository/maven-public/com/alibaba/fastjson/1.2.62/fastjson-1.2.62.pom (9.7 kB at 5.1 kB/s)
Downloading from maven-nexus: http://localhost:8081/repository/maven-public/com/alibaba/fastjson/1.2.62/fastjson-1.2.62.jar
Downloaded from maven-nexus: http://localhost:8081/repository/maven-public/com/alibaba/fastjson/1.2.62/fastjson-1.2.62.jar (658 kB at 70 kB/s)
[INFO]
[INFO] --- maven-resources-plugin:2.6:resources (default-resources) @ maven-chat05 ---
[WARNING] Using platform encoding (GBK actually) to copy filtered resources, i.e. build is platform dependent!
[INFO] Copying 0 resource
[INFO]
[INFO] --- maven-compiler-plugin:3.1:compile (default-compile) @ maven-chat05 ---
[INFO] Nothing to compile - all classes are up to date
[INFO] ------------------------------------------------------------------------
[INFO] BUILD SUCCESS
[INFO] ------------------------------------------------------------------------
[INFO] Total time:  16.083 s
[INFO] Finished at: 2019-11-13T15:45:44+08:00
[INFO] ------------------------------------------------------------------------
From the output, we can see that the fastjson jar package has been downloaded from Maven nexus. The download address is exactly the one in our nexus private server.
Mode 2: mirror mode
As for what is a mirror image, I will not explain it here. I introduced it in the previous article. You can take a look at it step by step: Warehouse details
The image mode mainly modifies the ~ /. m2/setting.xml file, which needs to be modified for 2 processing.
Place 1: add the following configuration to the mirrors element of setting.xml:
<mirror>
  <id>mirror-nexus</id>
  <mirrorOf>*</mirrorOf>
  <name>nexus image</name>
  <url>http://localhost:8081/repository/maven-public/</url>
</mirror>
The * configured by mirrorOf above indicates that all remote warehouses download components through the image.
url: This is the address of the warehouse group in nexus, as mentioned in method 1 above.
Place 2: since the url of nexus can only be accessed by user name and password, you need to configure the access credentials. Add the following content to the 'servers' element of the file' ~ /. m2/settings.xml ':
<server>
  <id>mirror-nexus</id>
  <username>admin</username>
  <password>admin123</password>
</server>
Note that the values of server - > ID and mirror - > ID above need to be consistent so that the corresponding credentials can be found.
Example of mode 2
Take Maven project maven-chat05 in mode 1 as an example.
Modify pom.xml as follows:
<?xml version="1.0" encoding="UTF-8"?>
<project xmlns="http://maven.apache.org/POM/4.0.0"
         xmlns:xsi="http://www.w3.org/2001/XMLSchema-instance"
         xsi:schemaLocation="http://maven.apache.org/POM/4.0.0 http://maven.apache.org/xsd/maven-4.0.0.xsd">
    <modelVersion>4.0.0</modelVersion>

    <groupId>com.javacode2018</groupId>
    <artifactId>maven-chat05</artifactId>
    <version>1.0-SNAPSHOT</version>

    <dependencies>
        <dependency>
            <groupId>com.alibaba</groupId>
            <artifactId>fastjson</artifactId>
            <version>1.2.62</version>
        </dependency>
    </dependencies>

</project>
~/Add the following to the servers element of.m2/settings.xml:
<server>
  <id>mirror-nexus</id>
  <username>admin</username>
  <password>admin123</password>
</server>
Note that the above username and password are configured according to your own.
~/Add the following to the mirrors element of.m2/settings.xml:
<mirror>
  <id>mirror-nexus</id>
  <mirrorOf>*</mirrorOf>
  <name>nexus image</name>
  <url>http://localhost:8081/repository/maven-public/</url>
</mirror>
Delete the following directories in the local warehouse:
~\.m2\repository\com\alibaba
Open cmd to run in maven-chat05 project directory:
mvn compile
When witnessing miracles, the output is as follows:
D:\code\IdeaProjects\maven-chat05>mvn compile
[INFO] Scanning for projects...
[INFO]
[INFO] -------------------< com.javacode2018:maven-chat05 >--------------------
[INFO] Building maven-chat05 1.0-SNAPSHOT
[INFO] --------------------------------[ jar ]---------------------------------
Downloading from mirror-nexus: http://localhost:8081/repository/maven-public/org/apache/maven/plugins/maven-resources-plugin/2.6/maven-resources-plugin-2.6.pom
Downloaded from mirror-nexus: http://localhost:8081/repository/maven-public/org/apache/maven/plugins/maven-resources-plugin/2.6/maven-resources-plugin-2.6.pom (0 B at 0 B/s)
Downloading from mirror-nexus: http://localhost:8081/repository/maven-public/org/apache/maven/plugins/maven-plugins/23/maven-plugins-23.pom
Downloaded from mirror-nexus: http://localhost:8081/repository/maven-public/org/apache/maven/plugins/maven-plugins/23/maven-plugins-23.pom (0 B at 0 B/s)
Downloading from mirror-nexus: http://localhost:8081/repository/maven-public/org/apache/maven/maven-parent/22/maven-parent-22.pom
Downloaded from mirror-nexus: http://localhost:8081/repository/maven-public/org/apache/maven/maven-parent/22/maven-parent-22.pom (0 B at 0 B/s)
Downloading from mirror-nexus: http://localhost:8081/repository/maven-public/org/apache/apache/11/apache-11.pom
Downloaded from mirror-nexus: http://localhost:8081/repository/maven-public/org/apache/apache/11/apache-11.pom (0 B at 0 B/s)
Downloading from mirror-nexus: http://localhost:8081/repository/maven-public/org/apache/maven/plugins/maven-resources-plugin/2.6/maven-resources-plugin-2.6.jar
Downloaded from mirror-nexus: http://localhost:8081/repository/maven-public/org/apache/maven/plugins/maven-resources-plugin/2.6/maven-resources-plugin-2.6.jar (0 B at 0 B/s)
Downloading from mirror-nexus: http://localhost:8081/repository/maven-public/org/apache/maven/plugins/maven-compiler-plugin/3.1/maven-compiler-plugin-3.1.pom
Downloaded from mirror-nexus: http://localhost:8081/repository/maven-public/org/apache/maven/plugins/maven-compiler-plugin/3.1/maven-compiler-plugin-3.1.pom (0 B at 0 B/s)
[INFO] Nothing to compile - all classes are up to date
[INFO] ------------------------------------------------------------------------
[INFO] BUILD SUCCESS
[INFO] ------------------------------------------------------------------------
[INFO] Total time:  02:23 min
[INFO] Finished at: 2019-11-13T16:05:43+08:00
[INFO] ------------------------------------------------------------------------
There are many output contents, only part of the output is intercepted. From the output, we can see that the fastjson jar package has been downloaded from mirror nexus. The download address is exactly the address in our nexus private server. The way of image works. Does it feel very cool? Ha ha!
Publish local components to private server
There are two kinds of frequently used
-
Using maven to deploy components to nexus private server
-
Manually deploy the third-party components to the nexus private server: for example, a package sent to us by our third party, such as the jar package of the SMS sender, does not exist in the remote warehouse. We need to upload this package to the private server for all development purposes.
Let's take a look at how these two operations work.
Using maven to deploy components to nexus private server
When we create a maven project, there will be a pom.xml file with a version element in it. This is the version number of this component. You can take a look at the maven-chat05 we just created, which is 1.0-SNAPSHOT by default. The end of - SNAPSHOT indicates a SNAPSHOT version, which is called SNAPSHOT version. The SNAPSHOT version is generally unstable, and will be repeatedly published, tested Modify and publish. In the end, there will be a stable version that can be released without the - SNAPSHOT suffix. This is called release version.
The component storing users in the nexus private server is the host warehouse used. As we mentioned above, two default host warehouses are provided in the nexus private server to store SNAPSHOT version and release version, as shown in the following figure:
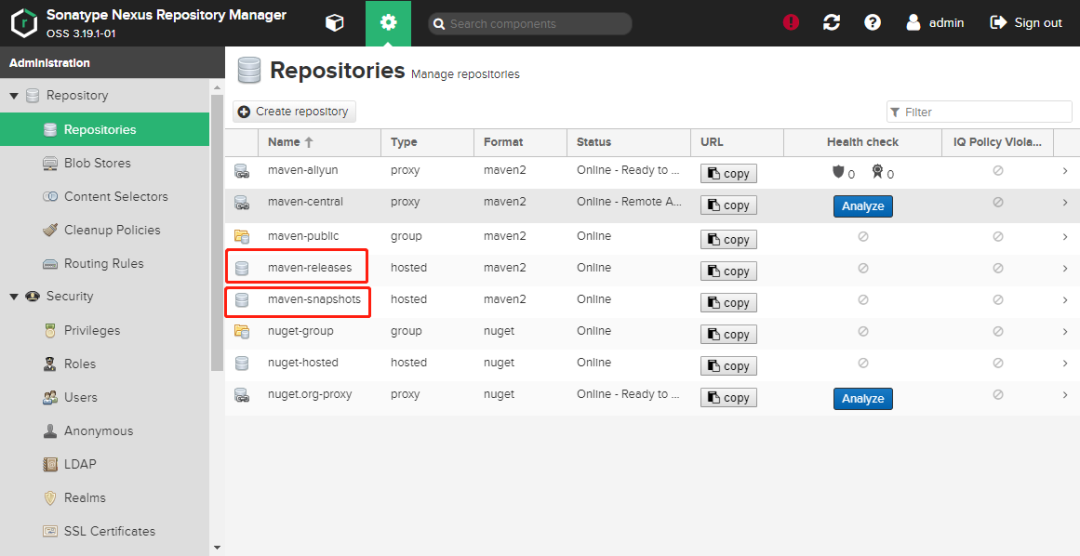
The Maven releases host warehouse in the first red box in the above figure is used to store the components of the release version.
The second red box Maven snapshots host warehouse is used to store the components of the user snapshot version.
The addresses of the above two warehouses can be obtained by clicking the copy button.
The operation is divided into three steps
Step 1: modify pom.xml configuration
We need to publish the components of the local maven project to the above host warehouse, modify the configuration of pom.xml in the project, and add the following content:
<distributionManagement>
    <repository>
        <id>release-nexus</id>
        <url>http://localhost:8081/repository/maven-releases/</url>
        <name>nexus Host warehouse in private server->Deposit/Download a stable version of the component</name>
    </repository>
    <snapshotRepository>
        <id>snapshot-nexus</id>
        <url>http://localhost:8081/repository/maven-snapshots/</url>
        <name>nexus Host warehouse in private server->Deposit/Download components for snapshot version</name>
    </snapshotRepository>
</distributionManagement>
The above two URLs are the addresses of the two host warehouses in the above figure.
Step 2: modify settings.xml
The above address needs to be logged in to be accessible, so the credentials need to be configured. This needs to be configured in ~ /. m2/settings.xml. In the servers element of this file, add:
<server>
  <id>release-nexus</id>
  <username>admin</username>
  <password>admin123</password>
</server>

<server>
  <id>snapshot-nexus</id>
  <username>admin</username>
  <password>admin123</password>
</server>
Note that the value of the first server - > ID above needs to be consistent with the value of distribution management - > Repository - > ID in pom.xml.
The value of the second server - > ID needs to be consistent with the value of distribution management - > snapshot Repository - > ID in pom.xml.
Step 3: execute the 'mvn deploy' command
When executing this command, the component will be packaged and then uploaded to the private server.
The principle of this command will be described in the following article.
Example effect
Let's feel the effect.
Modify the maven-chat03/pom.xml file and the local ~ /. m2/settings.xml file according to the above configuration.
Open cmd to run in maven-chat05 project directory:
mvn deploy
When witnessing miracles, the output is as follows:
D:\code\IdeaProjects\maven-chat05>mvn deploy
[INFO] Scanning for projects...
[INFO]
[INFO] -------------------< com.javacode2018:maven-chat05 >--------------------
[INFO] Building maven-chat05 1.0-SNAPSHOT
[INFO] --------------------------------[ jar ]---------------------------------
[INFO]
[INFO] --- maven-resources-plugin:2.6:resources (default-resources) @ maven-chat05 ---
[WARNING] Using platform encoding (GBK actually) to copy filtered resources, i.e. build is platform dependent!
[INFO] Copying 0 resource
[INFO]
[INFO] --- maven-compiler-plugin:3.1:compile (default-compile) @ maven-chat05 ---
[INFO] Nothing to compile - all classes are up to date
[INFO]
[INFO] --- maven-resources-plugin:2.6:testResources (default-testResources) @ maven-chat05 ---
[WARNING] Using platform encoding (GBK actually) to copy filtered resources, i.e. build is platform dependent!
[INFO] skip non existing resourceDirectory D:\code\IdeaProjects\maven-chat05\src\test\resources
[INFO]
[INFO] --- maven-compiler-plugin:3.1:testCompile (default-testCompile) @ maven-chat05 ---
[INFO] Nothing to compile - all classes are up to date
[INFO]
[INFO] --- maven-surefire-plugin:2.12.4:test (default-test) @ maven-chat05 ---
[INFO] No tests to run.
[INFO]
[INFO] --- maven-jar-plugin:2.4:jar (default-jar) @ maven-chat05 ---
[INFO]
[INFO] --- maven-install-plugin:2.4:install (default-install) @ maven-chat05 ---
[INFO] Installing D:\code\IdeaProjects\maven-chat05\target\maven-chat05-1.0-SNAPSHOT.jar to C:\Users\Think\.m2\repository\com\javacode2018\maven-chat05\1.0-SNAPSHOT\maven-chat05-1.0-SNAPSHOT.jar
[INFO] Installing D:\code\IdeaProjects\maven-chat05\pom.xml to C:\Users\Think\.m2\repository\com\javacode2018\maven-chat05\1.0-SNAPSHOT\maven-chat05-1.0-SNAPSHOT.pom
[INFO]
[INFO] --- maven-deploy-plugin:2.7:deploy (default-deploy) @ maven-chat05 ---
Downloading from snapshot-nexus: http://localhost:8081/repository/maven-snapshots/com/javacode2018/maven-chat05/1.0-SNAPSHOT/maven-metadata.xml
Uploading to snapshot-nexus: http://localhost:8081/repository/maven-snapshots/com/javacode2018/maven-chat05/1.0-SNAPSHOT/maven-chat05-1.0-20191113.083820-1.jar
Uploaded to snapshot-nexus: http://localhost:8081/repository/maven-snapshots/com/javacode2018/maven-chat05/1.0-SNAPSHOT/maven-chat05-1.0-20191113.083820-1.jar (1.8 kB at 11 kB/s)
Uploading to snapshot-nexus: http://localhost:8081/repository/maven-snapshots/com/javacode2018/maven-chat05/1.0-SNAPSHOT/maven-chat05-1.0-20191113.083820-1.pom
Uploaded to snapshot-nexus: http://localhost:8081/repository/maven-snapshots/com/javacode2018/maven-chat05/1.0-SNAPSHOT/maven-chat05-1.0-20191113.083820-1.pom (1.2 kB at 10 kB/s)
Downloading from snapshot-nexus: http://localhost:8081/repository/maven-snapshots/com/javacode2018/maven-chat05/maven-metadata.xml
Uploading to snapshot-nexus: http://localhost:8081/repository/maven-snapshots/com/javacode2018/maven-chat05/1.0-SNAPSHOT/maven-metadata.xml
Uploaded to snapshot-nexus: http://localhost:8081/repository/maven-snapshots/com/javacode2018/maven-chat05/1.0-SNAPSHOT/maven-metadata.xml (772 B at 9.2 kB/s)
Uploading to snapshot-nexus: http://localhost:8081/repository/maven-snapshots/com/javacode2018/maven-chat05/maven-metadata.xml
Uploaded to snapshot-nexus: http://localhost:8081/repository/maven-snapshots/com/javacode2018/maven-chat05/maven-metadata.xml (286 B at 3.4 kB/s)
[INFO] ------------------------------------------------------------------------
[INFO] BUILD SUCCESS
[INFO] ------------------------------------------------------------------------
[INFO] Total time:  6.156 s
[INFO] Finished at: 2019-11-13T16:38:20+08:00
[INFO] ------------------------------------------------------------------------
The output content includes uploading to snapshot nexus and uploaded to snapshot nexus. Snapshot nexus is the address of the snapshot version we configured in pom.xml. The output content has a specific address, which is the same as the snapshot address. The upload is successful.
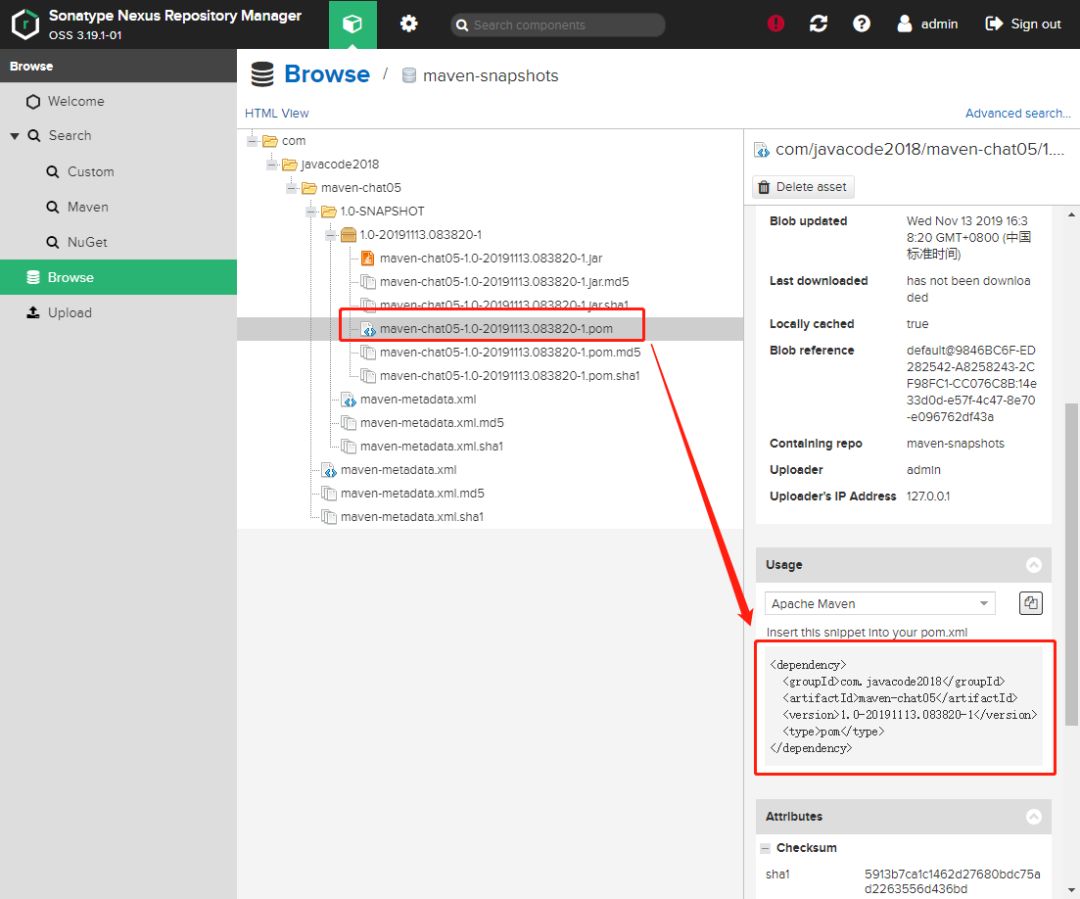
Let's go to the nexus private server to see the address of the snapshot version warehouse in the nexus private server:
http://localhost:8081/repository/maven-snapshots/
The following page appears:
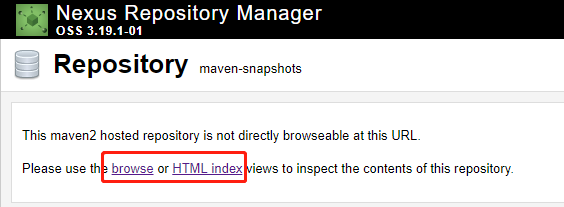
Click the above link, as shown in the figure below, and our component is uploaded successfully:
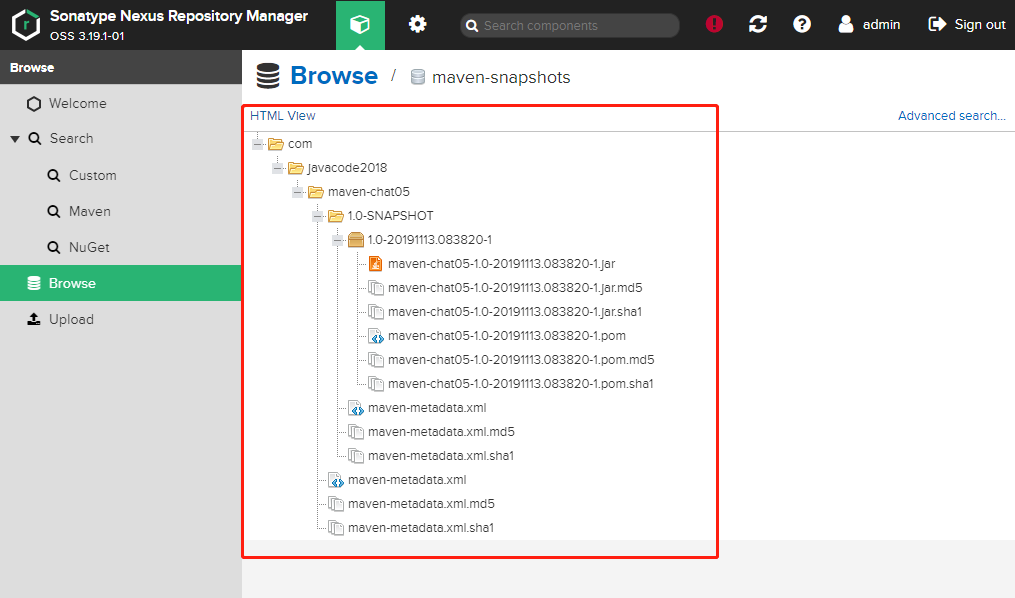
If other colleagues need to use the above component, just click the pom file in the figure below, the coordinates of the component will be displayed on the right, and then they can use it, as shown below:
The above is to publish the snapshot version to the snapshot host warehouse of nexus private server. Next, we will publish the stable release version to nexus private server, as follows:
Modify the version number of pom.xml file, and remove the - SNAPSHOT suffix. After removal, it means that the version is release, as follows:
<version>1.0</version>
Execute in cmd command:
mvn deploy
Output:
D:\code\IdeaProjects\maven-chat05>mvn deploy
[INFO] Scanning for projects...
[INFO]
[INFO] -------------------< com.javacode2018:maven-chat05 >--------------------
[INFO] Building maven-chat05 1.0
[INFO] --------------------------------[ jar ]---------------------------------
[INFO]
[INFO] --- maven-resources-plugin:2.6:resources (default-resources) @ maven-chat05 ---
[WARNING] Using platform encoding (GBK actually) to copy filtered resources, i.e. build is platform dependent!
[INFO] Copying 0 resource
[INFO]
[INFO] --- maven-compiler-plugin:3.1:compile (default-compile) @ maven-chat05 ---
[INFO] Nothing to compile - all classes are up to date
[INFO]
[INFO] --- maven-resources-plugin:2.6:testResources (default-testResources) @ maven-chat05 ---
[WARNING] Using platform encoding (GBK actually) to copy filtered resources, i.e. build is platform dependent!
[INFO] skip non existing resourceDirectory D:\code\IdeaProjects\maven-chat05\src\test\resources
[INFO]
[INFO] --- maven-compiler-plugin:3.1:testCompile (default-testCompile) @ maven-chat05 ---
[INFO] Nothing to compile - all classes are up to date
[INFO]
[INFO] --- maven-surefire-plugin:2.12.4:test (default-test) @ maven-chat05 ---
[INFO] No tests to run.
[INFO]
[INFO] --- maven-jar-plugin:2.4:jar (default-jar) @ maven-chat05 ---
[INFO] Building jar: D:\code\IdeaProjects\maven-chat05\target\maven-chat05-1.0.jar
[INFO]
[INFO] --- maven-install-plugin:2.4:install (default-install) @ maven-chat05 ---
[INFO] Installing D:\code\IdeaProjects\maven-chat05\target\maven-chat05-1.0.jar to C:\Users\Think\.m2\repository\com\javacode2018\maven-chat05\1.0\maven-chat05-1.0.jar
[INFO] Installing D:\code\IdeaProjects\maven-chat05\pom.xml to C:\Users\Think\.m2\repository\com\javacode2018\maven-chat05\1.0\maven-chat05-1.0.pom
[INFO]
[INFO] --- maven-deploy-plugin:2.7:deploy (default-deploy) @ maven-chat05 ---
Uploading to release-nexus: http://localhost:8081/repository/maven-releases/com/javacode2018/maven-chat05/1.0/maven-chat05-1.0.jar
Uploaded to release-nexus: http://localhost:8081/repository/maven-releases/com/javacode2018/maven-chat05/1.0/maven-chat05-1.0.jar (1.7 kB at 9.6 kB/s)
Uploading to release-nexus: http://localhost:8081/repository/maven-releases/com/javacode2018/maven-chat05/1.0/maven-chat05-1.0.pom
Uploaded to release-nexus: http://localhost:8081/repository/maven-releases/com/javacode2018/maven-chat05/1.0/maven-chat05-1.0.pom (1.2 kB at 12 kB/s)
Downloading from release-nexus: http://localhost:8081/repository/maven-releases/com/javacode2018/maven-chat05/maven-metadata.xml
Uploading to release-nexus: http://localhost:8081/repository/maven-releases/com/javacode2018/maven-chat05/maven-metadata.xml
Uploaded to release-nexus: http://localhost:8081/repository/maven-releases/com/javacode2018/maven-chat05/maven-metadata.xml (304 B at 4.3 kB/s)
[INFO] ------------------------------------------------------------------------
[INFO] BUILD SUCCESS
[INFO] ------------------------------------------------------------------------
[INFO] Total time:  5.646 s
[INFO] Finished at: 2019-11-13T16:48:44+08:00
[INFO] ------------------------------------------------------------------------
The output contains release nexus, indicating that the value of distribution management - > Repository - > ID in pom.xml is used. The upload address is http: / / localhost: 8081 / repository / Maven releases.
Open the release address in the nexus private server:
http://localhost:8081/repository/maven-releases/
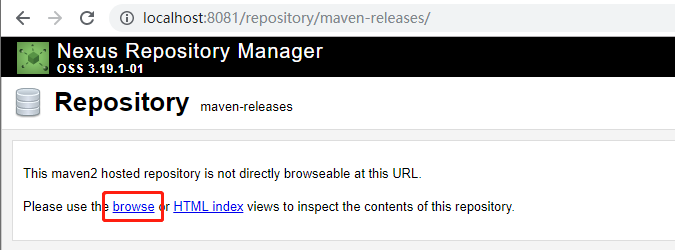
Click the browse connection above, as follows:
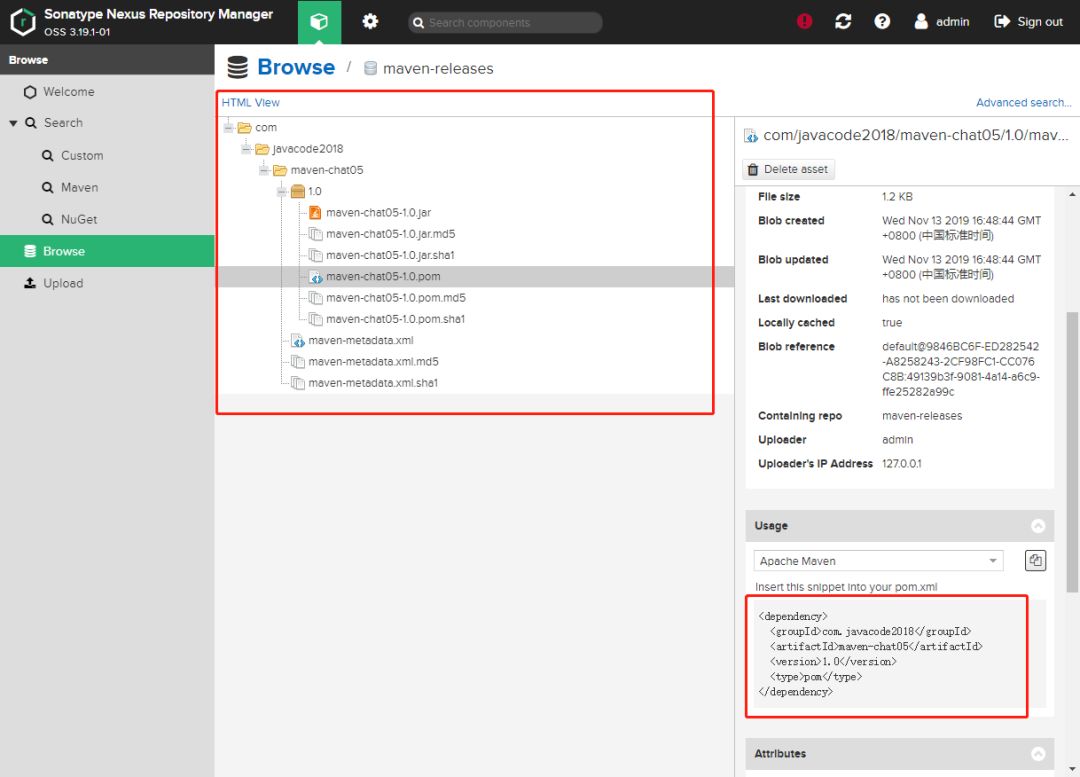
It's a success. Does it feel good.
Manually deploy components to nexus private server
Operation steps
Manual upload only supports the release of stable components. The operation process is as follows:
Log in to nexus, and click as follows:
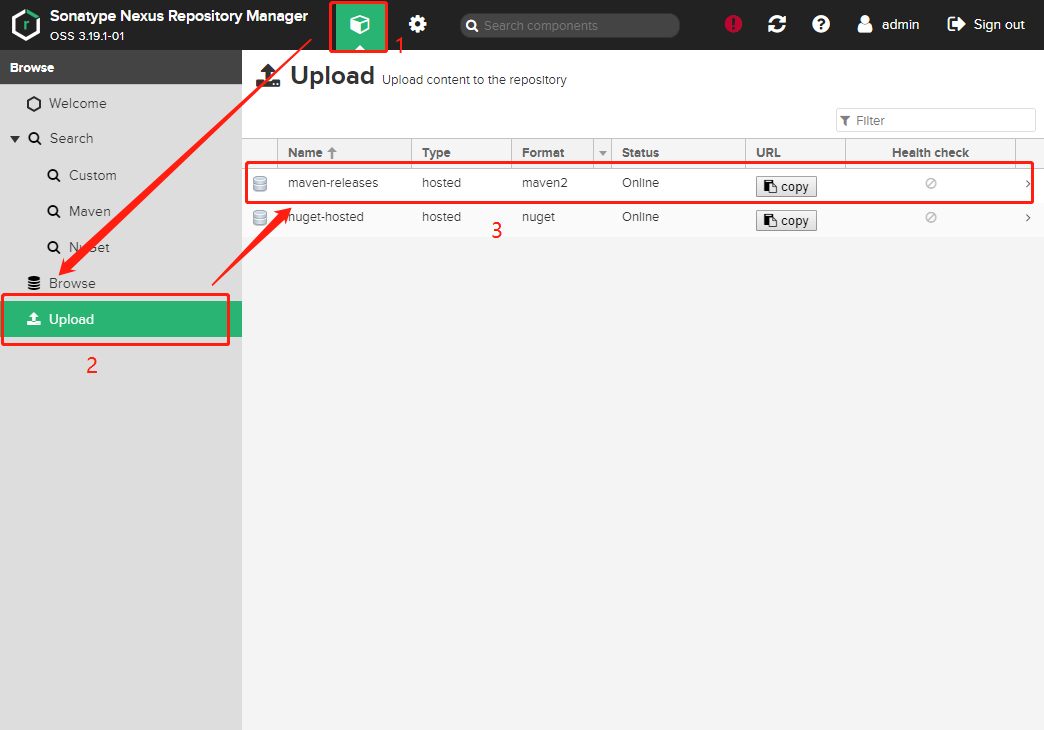
In the first line of the figure, the Maven releases host warehouse is the warehouse where the user's own components are stored. Click the first line in the list above to enter the upload page, as shown in the following figure:
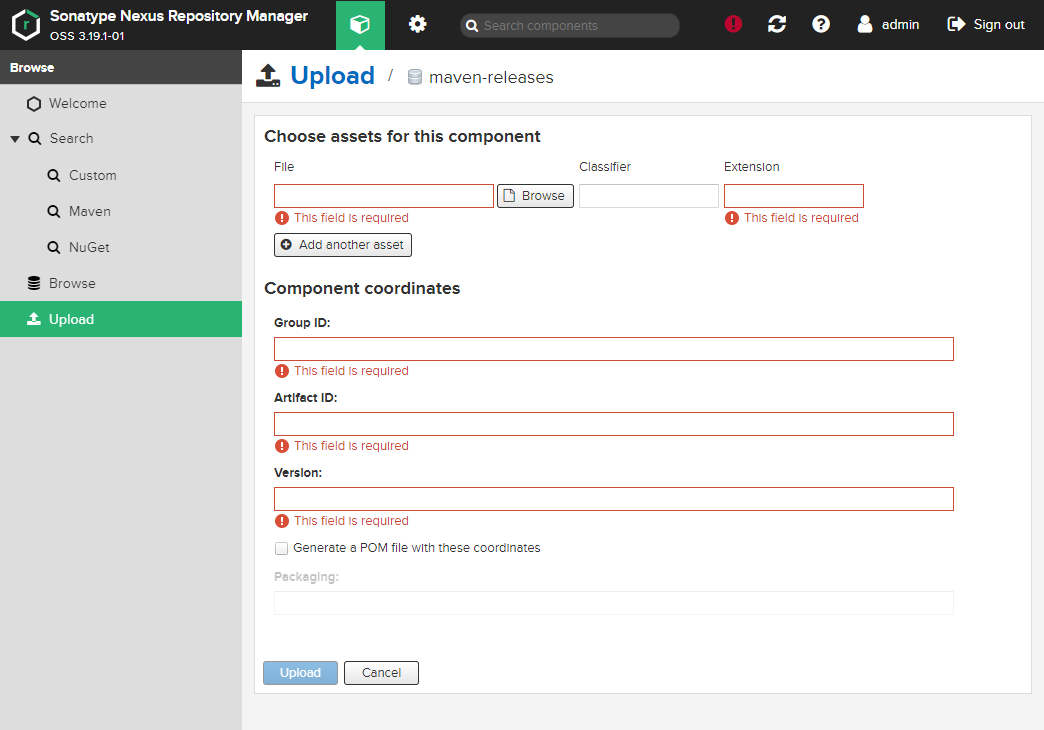
On the above page, click Browse to select the local component, enter other coordinate information, and click Upload to complete the Upload operation.
Example effect
We will upload maven-chat05\target\maven-chat05-1.0.jar as follows:
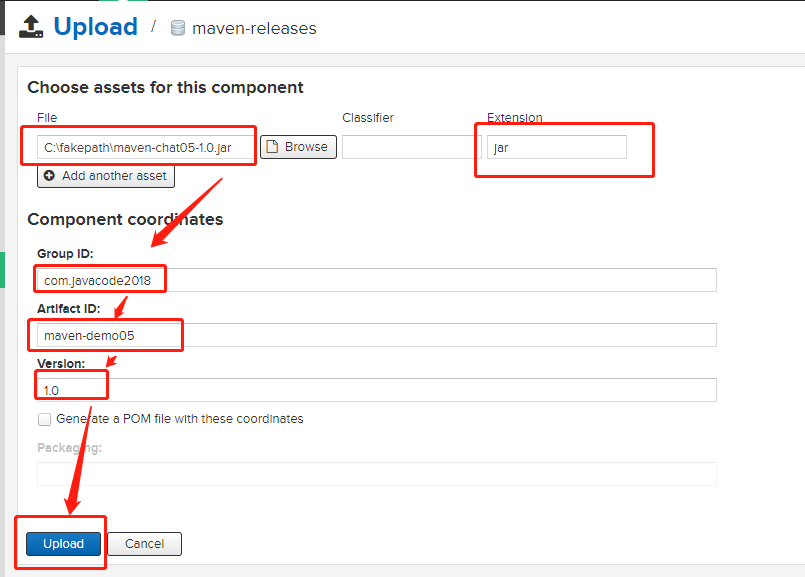
Click Upload to complete the Upload operation.
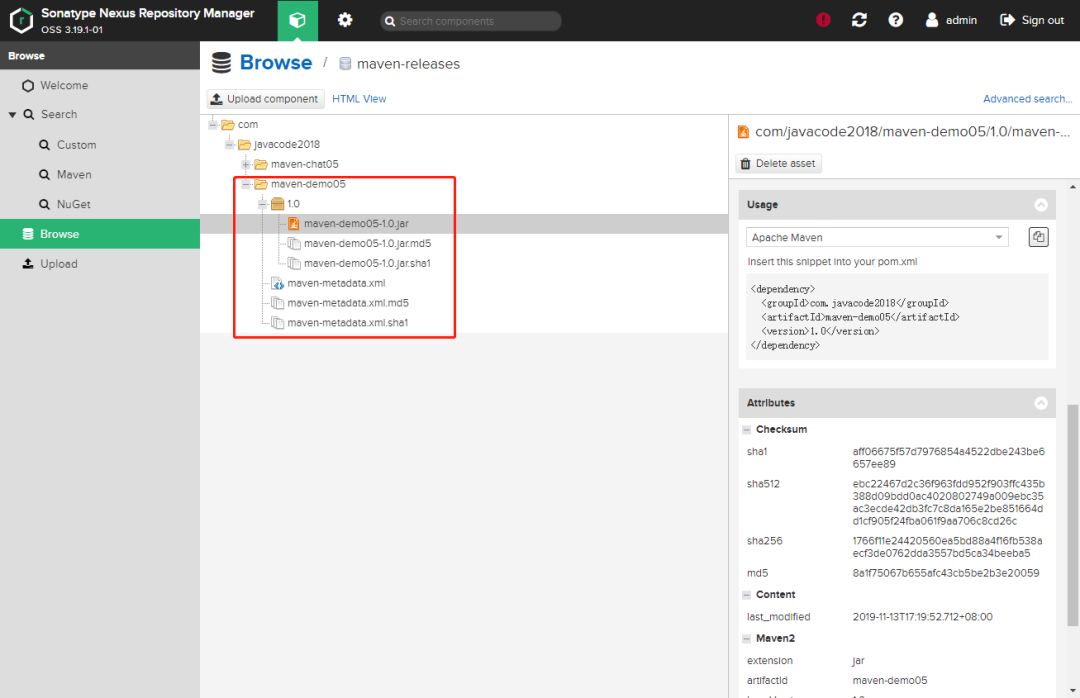
Visit the following address:
http://localhost:8081/#browse/browse:maven-releases
You can see the uploaded components, as shown in the following figure:
summary
90% of this paper is the practical part. It is strongly recommended that you operate it once to deepen your understanding. If you can share the harvest, your support is also a driving force that I continuously output. I hope you can learn something!

