The notes of this article are from the dark horse video https://www.bilibili.com/video/BV1Ah411S7ZE
1. Introduction to maven
(1) State analysis of traditional project management
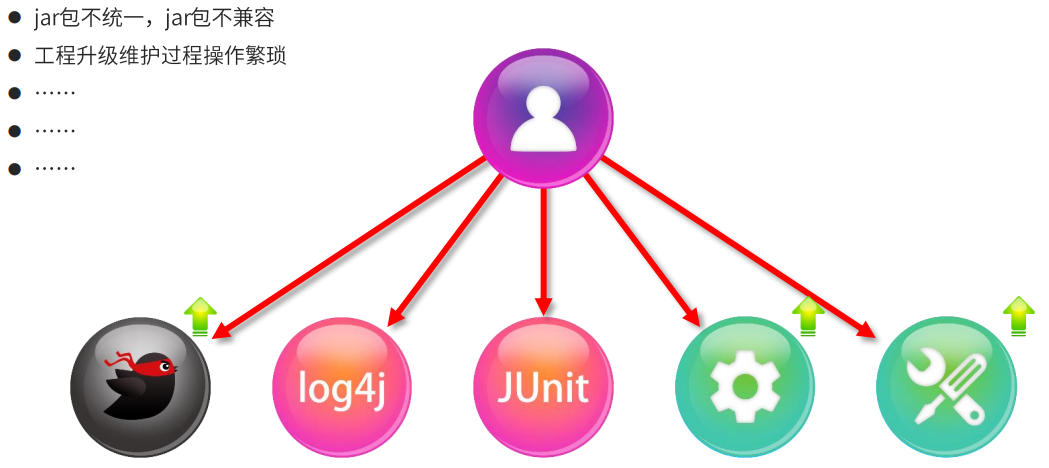
(2) Maven introduction
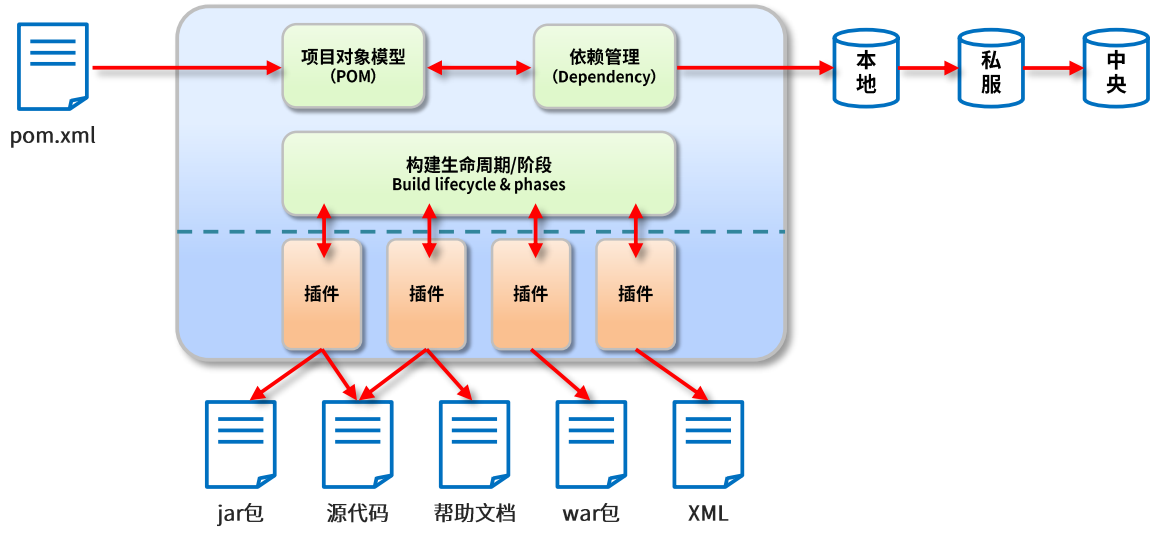
Maven is essentially a project management tool, which abstracts the project development and management process into a project object model
(POM), where POM (Project Object Model) refers to the project object model.
(3) Maven's role
① Project construction: provide standard and cross platform automated project construction methods.
② Dependency management: manage project dependent resources (jar packages) conveniently and quickly to avoid version conflicts between resources.
③ Unified development structure: provide a standard and unified project structure.
2. Download and installation of maven
(1) Download Maven for Windows
① Maven's official website is https://maven.apache.org/.
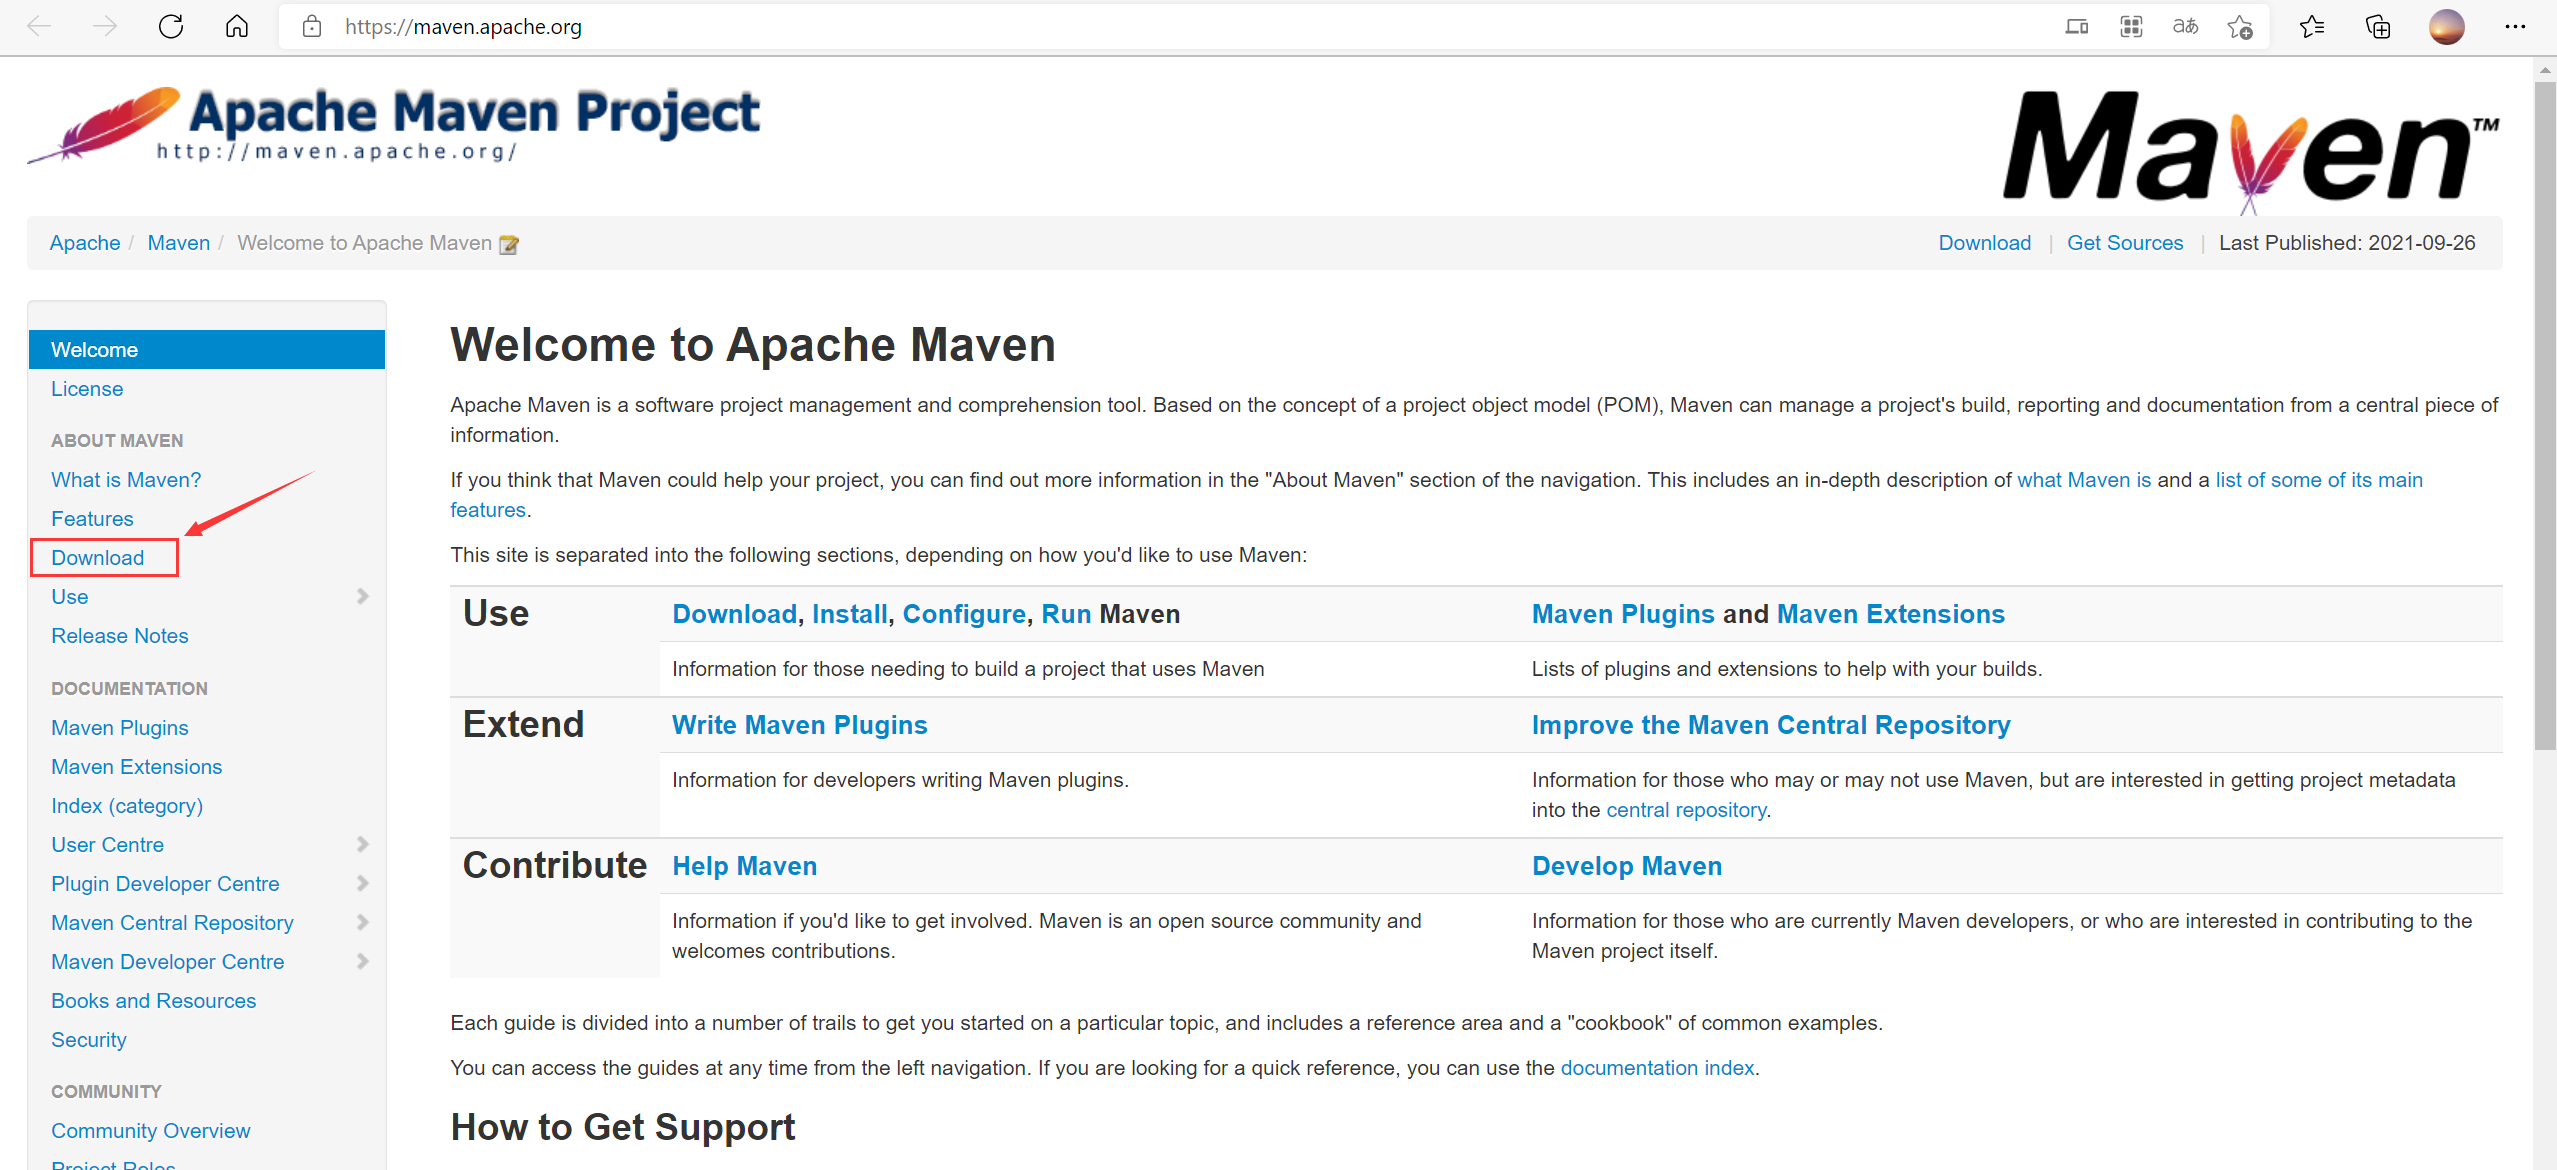
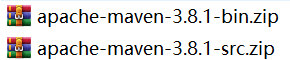
② Download the installation package and source code of Windows version.
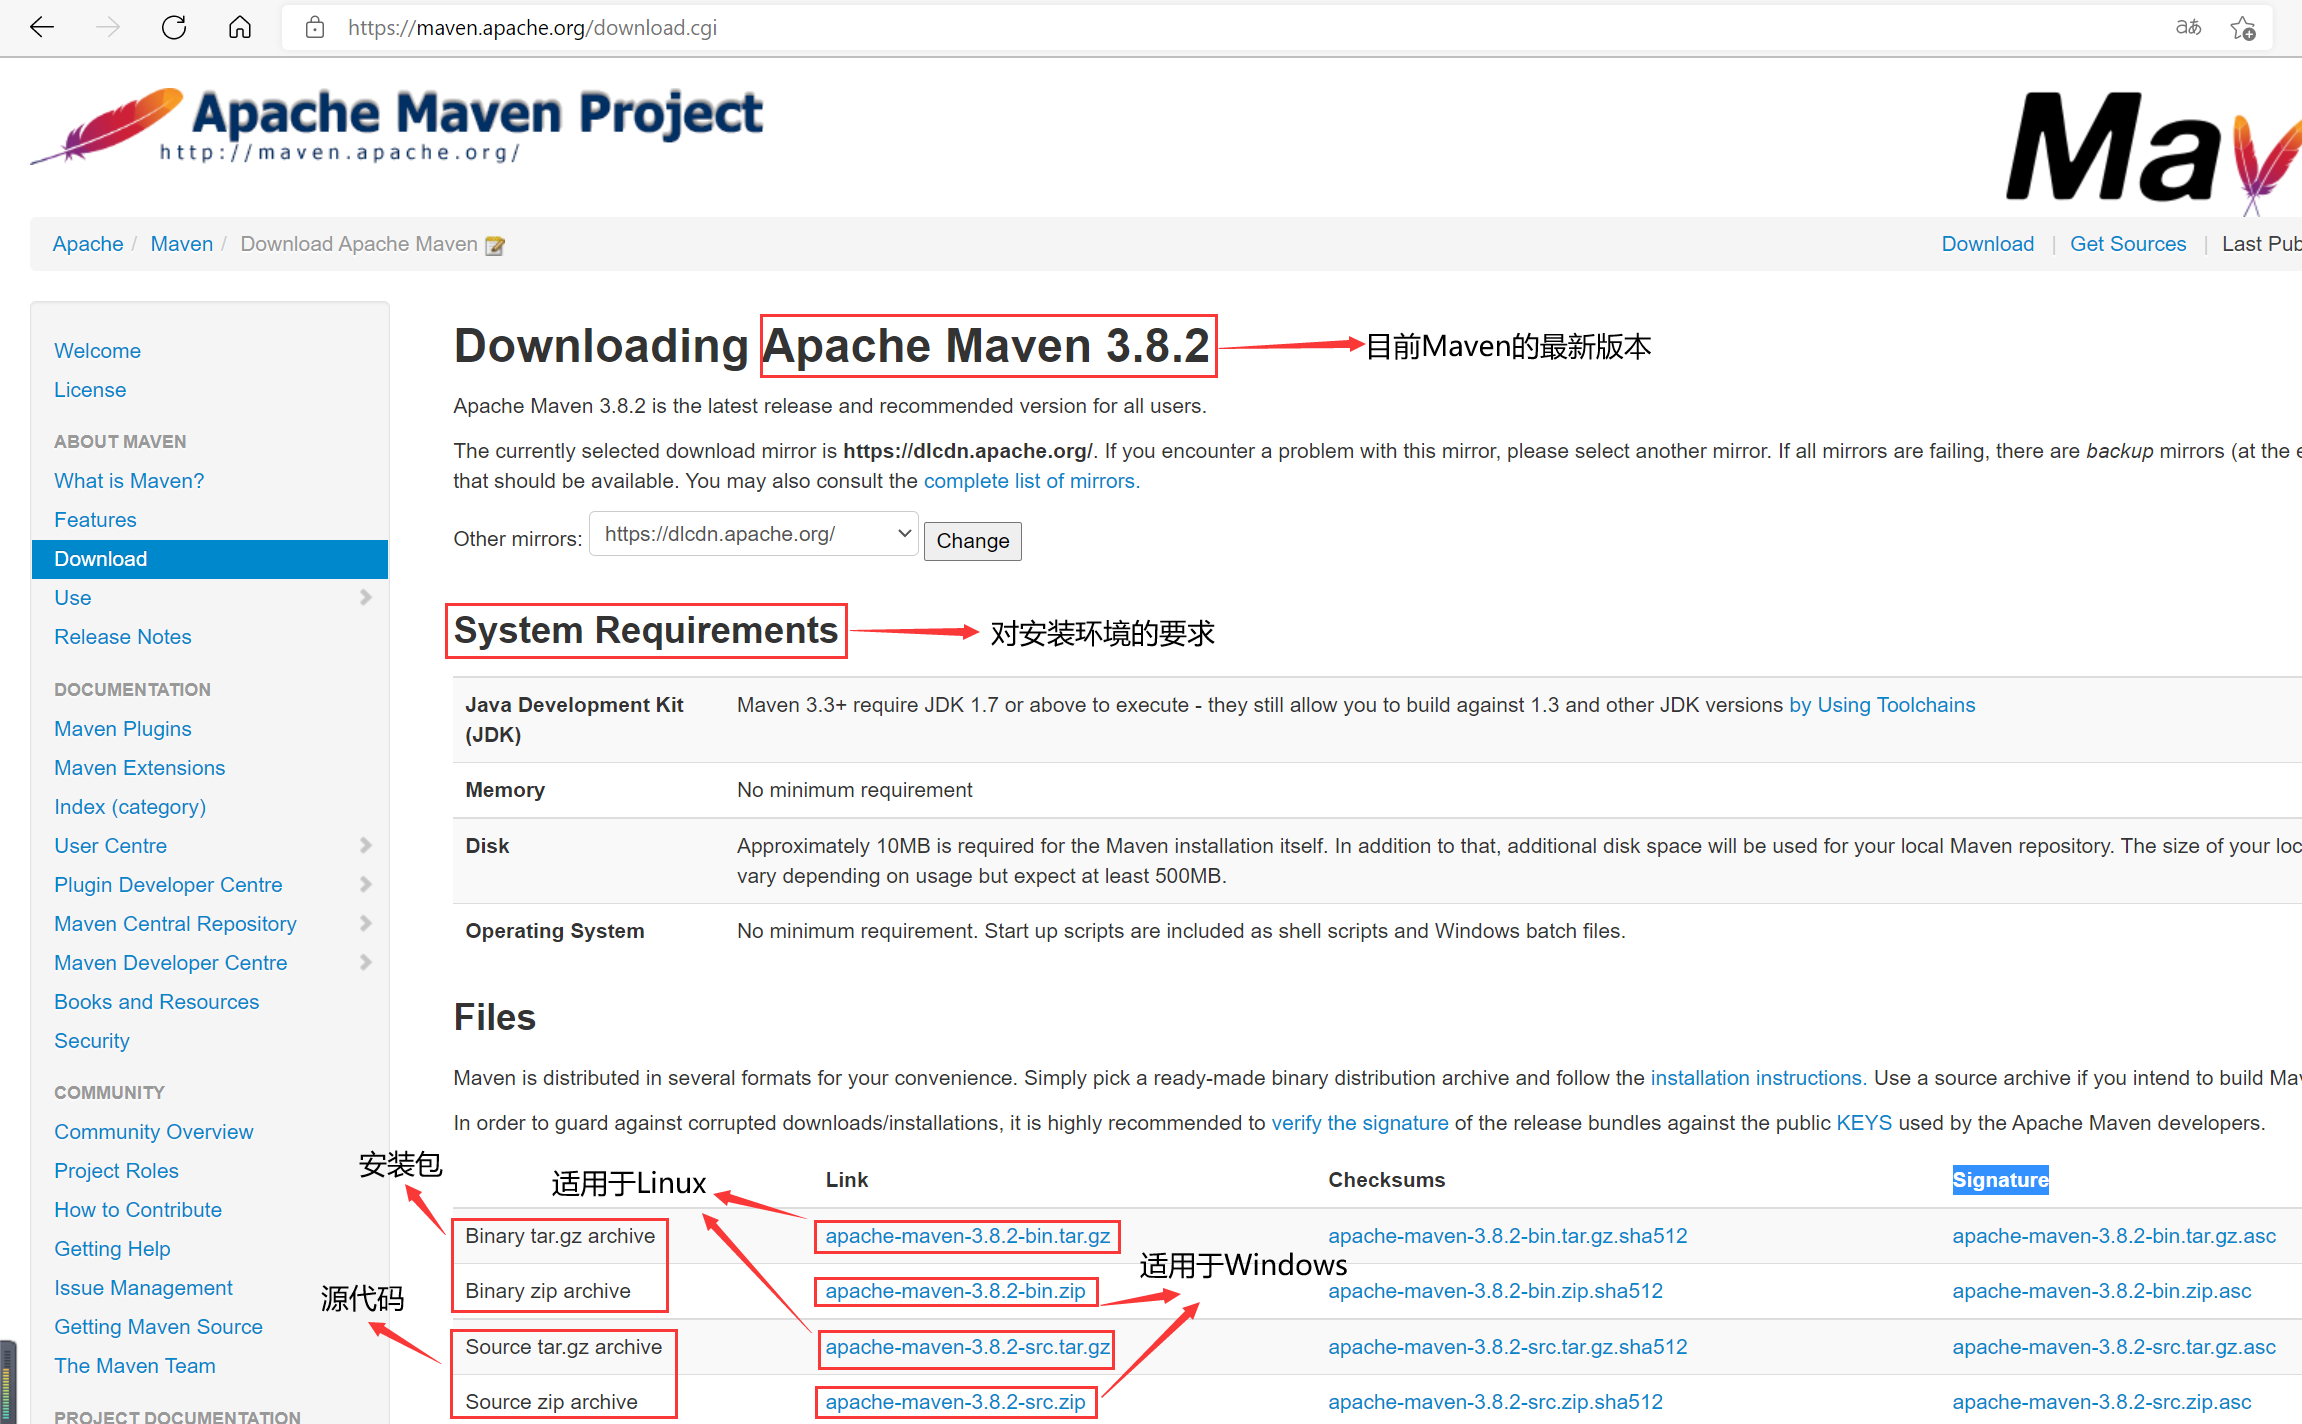
Or go straight to https://archive.apache.org/dist/maven/maven-3 Select the appropriate version for download. Here I download version 3.8.1 (as shown in the figure below).
(2) Install Maven
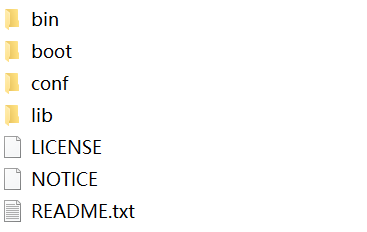
① Put the installation package downloaded above into the appropriate directory (the path name should preferably not have Chinese or other special characters), decompress it (Maven belongs to the green version software, decompress and install it), and then decompress it, as shown in the following figure.
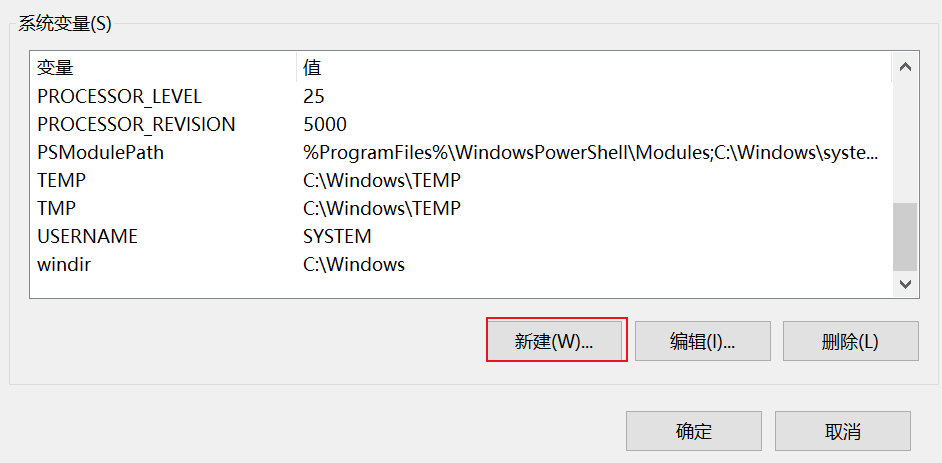
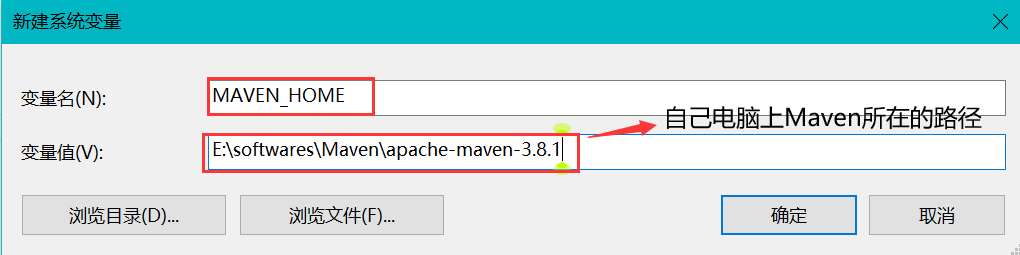
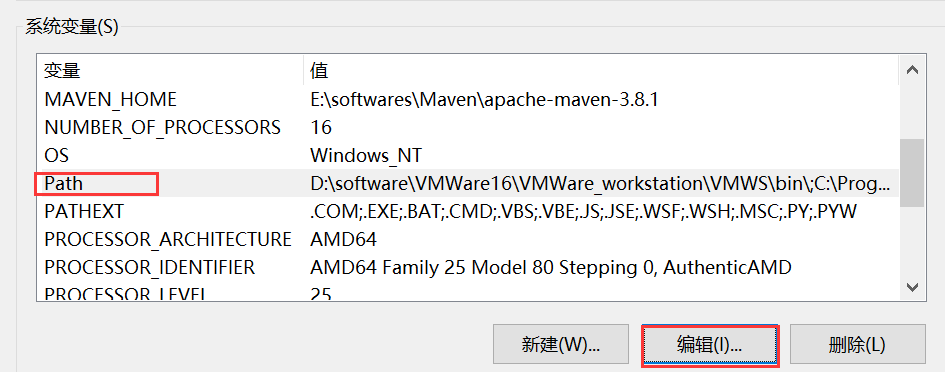
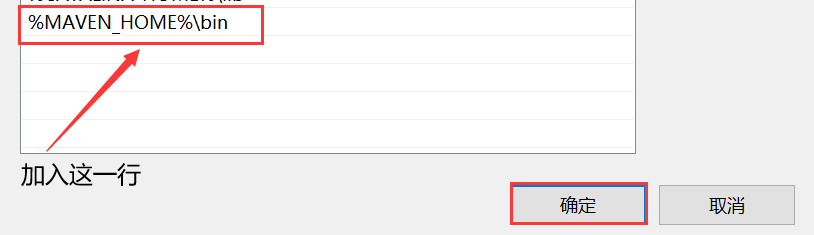
② Configure environment variables (JDK needs to be installed and configured in advance, and the version is 1.7 or above)


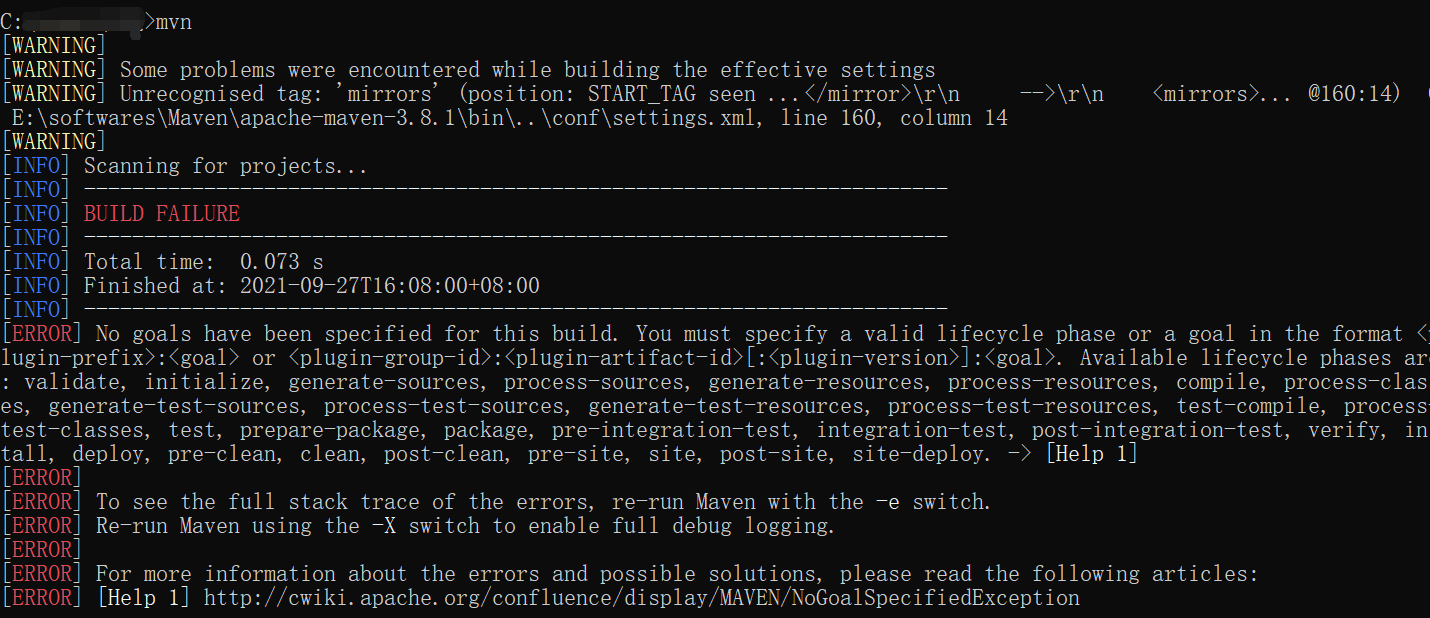
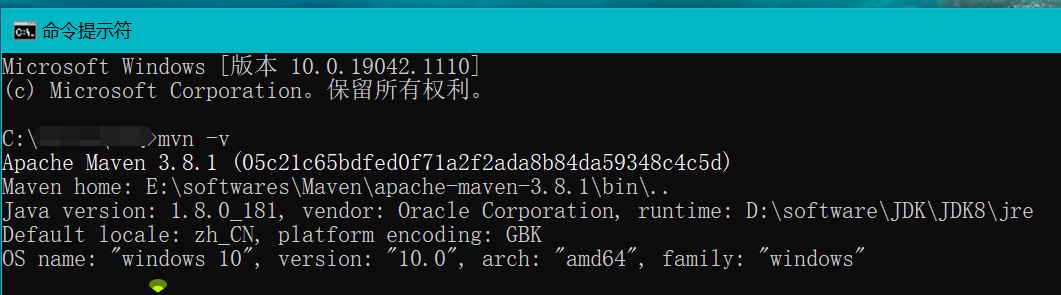
③ To test whether Maven is successfully installed, you only need to enter the command mvn or mvn -v in the command line window. If the following information appears, Maven has been successfully installed.
3.Maven basic concept
(1) Warehouse
① Warehouse: used to store resources, including various jar packages
② Warehouse classification:
| Local warehouse | Store resources on your own computer and connect to the remote warehouse to obtain resources |
|---|---|
| Remote warehouse | The warehouse on a non local computer provides resources for the local warehouse |
In addition, remote warehouses are divided into the following two types:
| Central warehouse | A warehouse maintained by the Maven team that stores all resources |
|---|---|
| Private service | The warehouse that stores resources within the Department / company and obtains resources from the central warehouse |
③ Role of private server:
1) Save copyrighted resources, including purchased or self-developed jars (jars in the central warehouse are open source and cannot store copyrighted resources).
2) Share resources within a certain range, which is only open to the inside and not to the outside.
(2) Coordinates
① Coordinates are used to describe the location of resources in the warehouse (see website) https://repo1.maven.org/maven2/).
② Maven coordinates are mainly composed of:
| groupld | Define the name of the organization to which the current Maven project belongs (usually the domain name is backfilled, for example: org.mybatis) |
|---|---|
| artifactld | Define the name of the current Maven project (usually the module name, such as CRM, SMS) |
| version | Defines the version number of the current project |
③ Function of Maven coordinates:
The unique identification is used to uniquely locate the resource location. Through this identification, the resource identification and download can be completed by the machine.
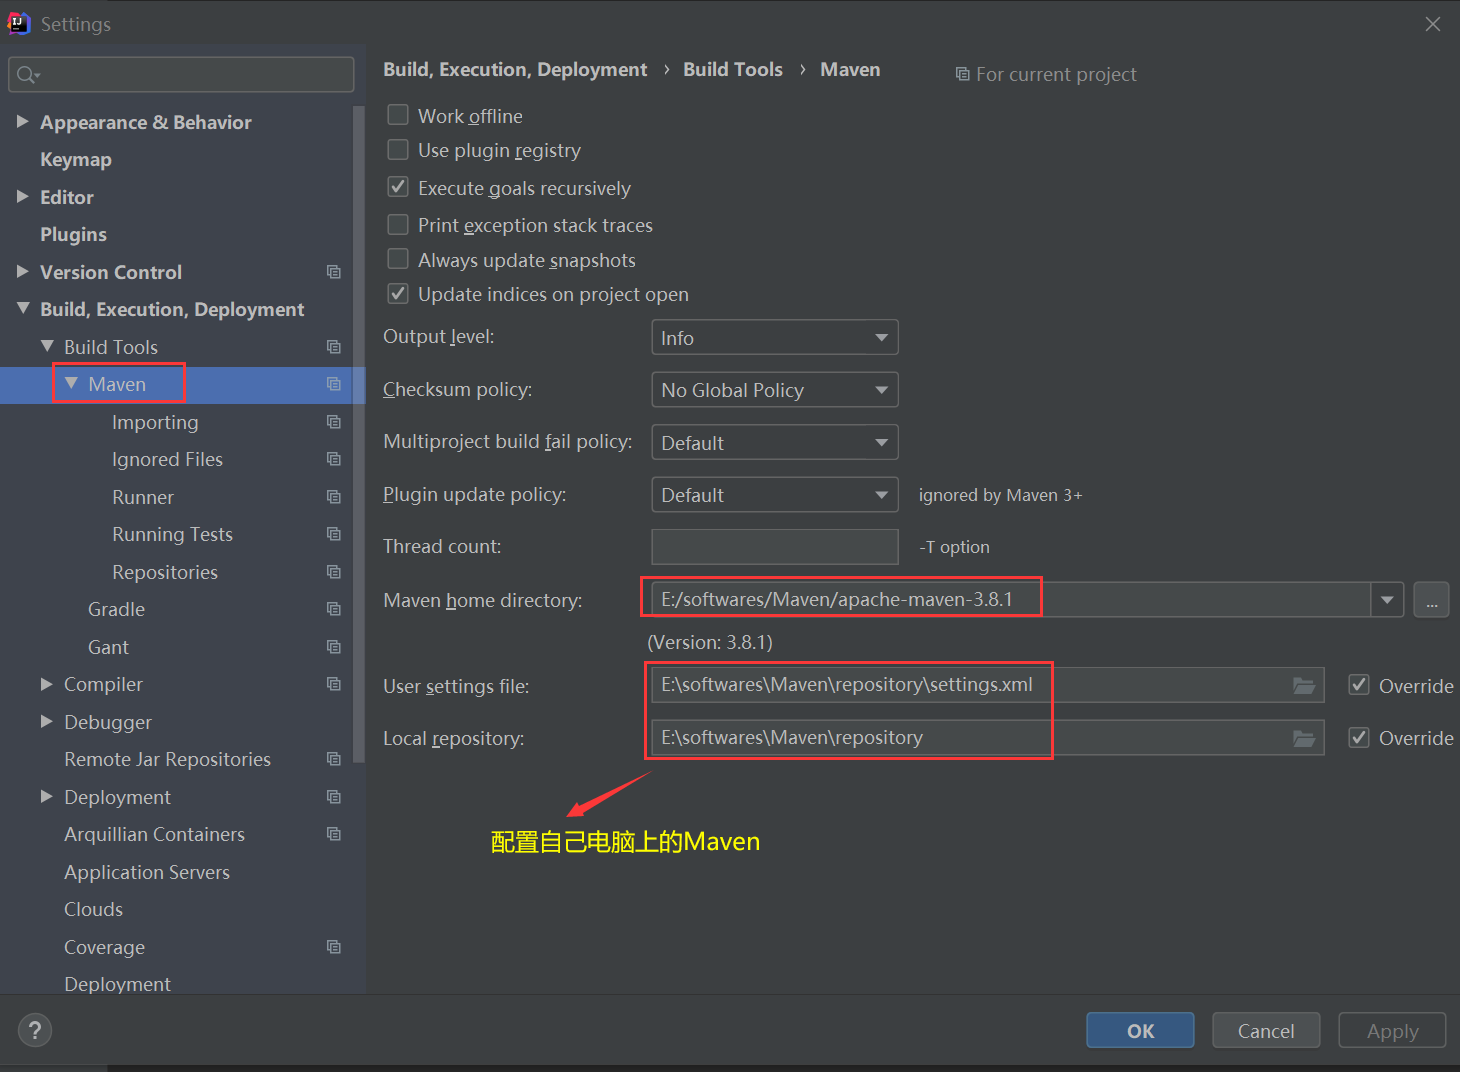
(3) Local warehouse configuration
① After Maven starts, it will automatically save the downloaded resources to the local warehouse.
② The settings.xml file in the conf directory is Maven's global configuration file. The default location described in it is as follows:
<!-- The current directory location is under the directory where the login user name is located.m2 Folder -->
<localRepository>${user.home}/.m2/repository</localRepository>
This location is located in Disk C, but generally speaking, the location of resource saving should be customized in other disks. For example, the location can be customized in the settings.xml file (the following configuration should be in the Settings tab):
<localRepository>E:\softwares\Maven\repository</localRepository>
(4) Remote warehouse configuration
The warehouse location of Maven's default connection is as follows:
<repositories>
	<repository>
		<id>central</id>
		<name>Central Repository</name>
		<ur1>https://repo.maven.apache.org/maven2</ur1>
		<layout>default</ layout>
		<snapshots>
			<enabled>false</enabled>
		</snapshots>
	</repository>
</repositories>
(5) Mirror warehouse configuration
However, since the default warehouse is located on a foreign server, if you access it in China, the speed will generally be very slow. Therefore, you can use a domestic image warehouse, such as Alibaba cloud image warehouse, and configure Alibaba cloud image warehouse in setting.xml:
<mirrors>
	<!--Configure the download image of the specific warehouse-->
	<mirror>
		<!--Unique identifier of this image to distinguish between different images mirror element-->
		<id>nexus-aliyun</id>
		<!--What kind of warehouse to mirror is simply to replace which warehouse-->
		<mirrorOf>central</mirrorOf>
		<!--Image name-->
		<name>Nexus aliyun</name>
		<!--image URL-->
		<url>http://maven.aliyun. com/nexus/content/groups/public</url>
	</mirror>
</mirrors>
(6) Global setting and user setting
① Global setting defines the public configuration of Maven in the current calculator (settings.xml file in conf directory).
② User setting defines the current user's configuration (you can copy the settings.xml file in the conf directory, put it in other locations, and customize and modify it). When the user setting is inconsistent with the global setting, the former will overwrite the latter.
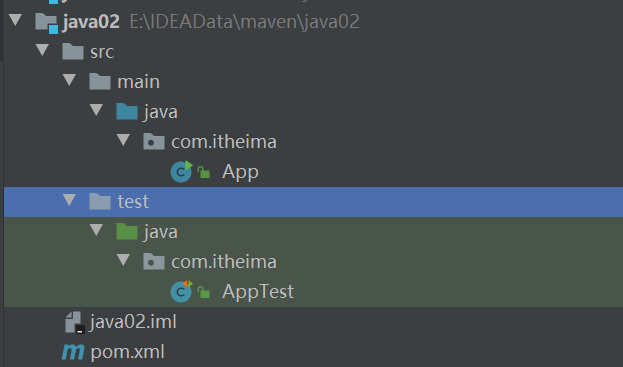
4.Maven project creation
(1) Create manually
Manually create a maven project according to the following Maven project directory structure (you can watch the video p6 for the specific creation process).

(2) Plug in creation
① Create project
mvn archetype:generate
	-DgroupId={project-packaging}
	-DartifactId={project-name}
	-DarchetypeArtifactId=maven-archetype-quickstart
	-DinteractiveMode=false
② Create java project
mvn archetype:generate -DgroupId=com.itheima -DartifactId=java-project -
DarchetypeArtifactId=maven-archetype-quickstart -Dversion=0.0.1-snapshot -
DinteractiveMode=false
③ Create web project
mvn archetype:generate -DgroupId=com.itheima -DartifactId=web-project -
DarchetypeArtifactId=maven-archetype-webapp -Dversion=0.0.1-snapshot -
DinteractiveMode=false
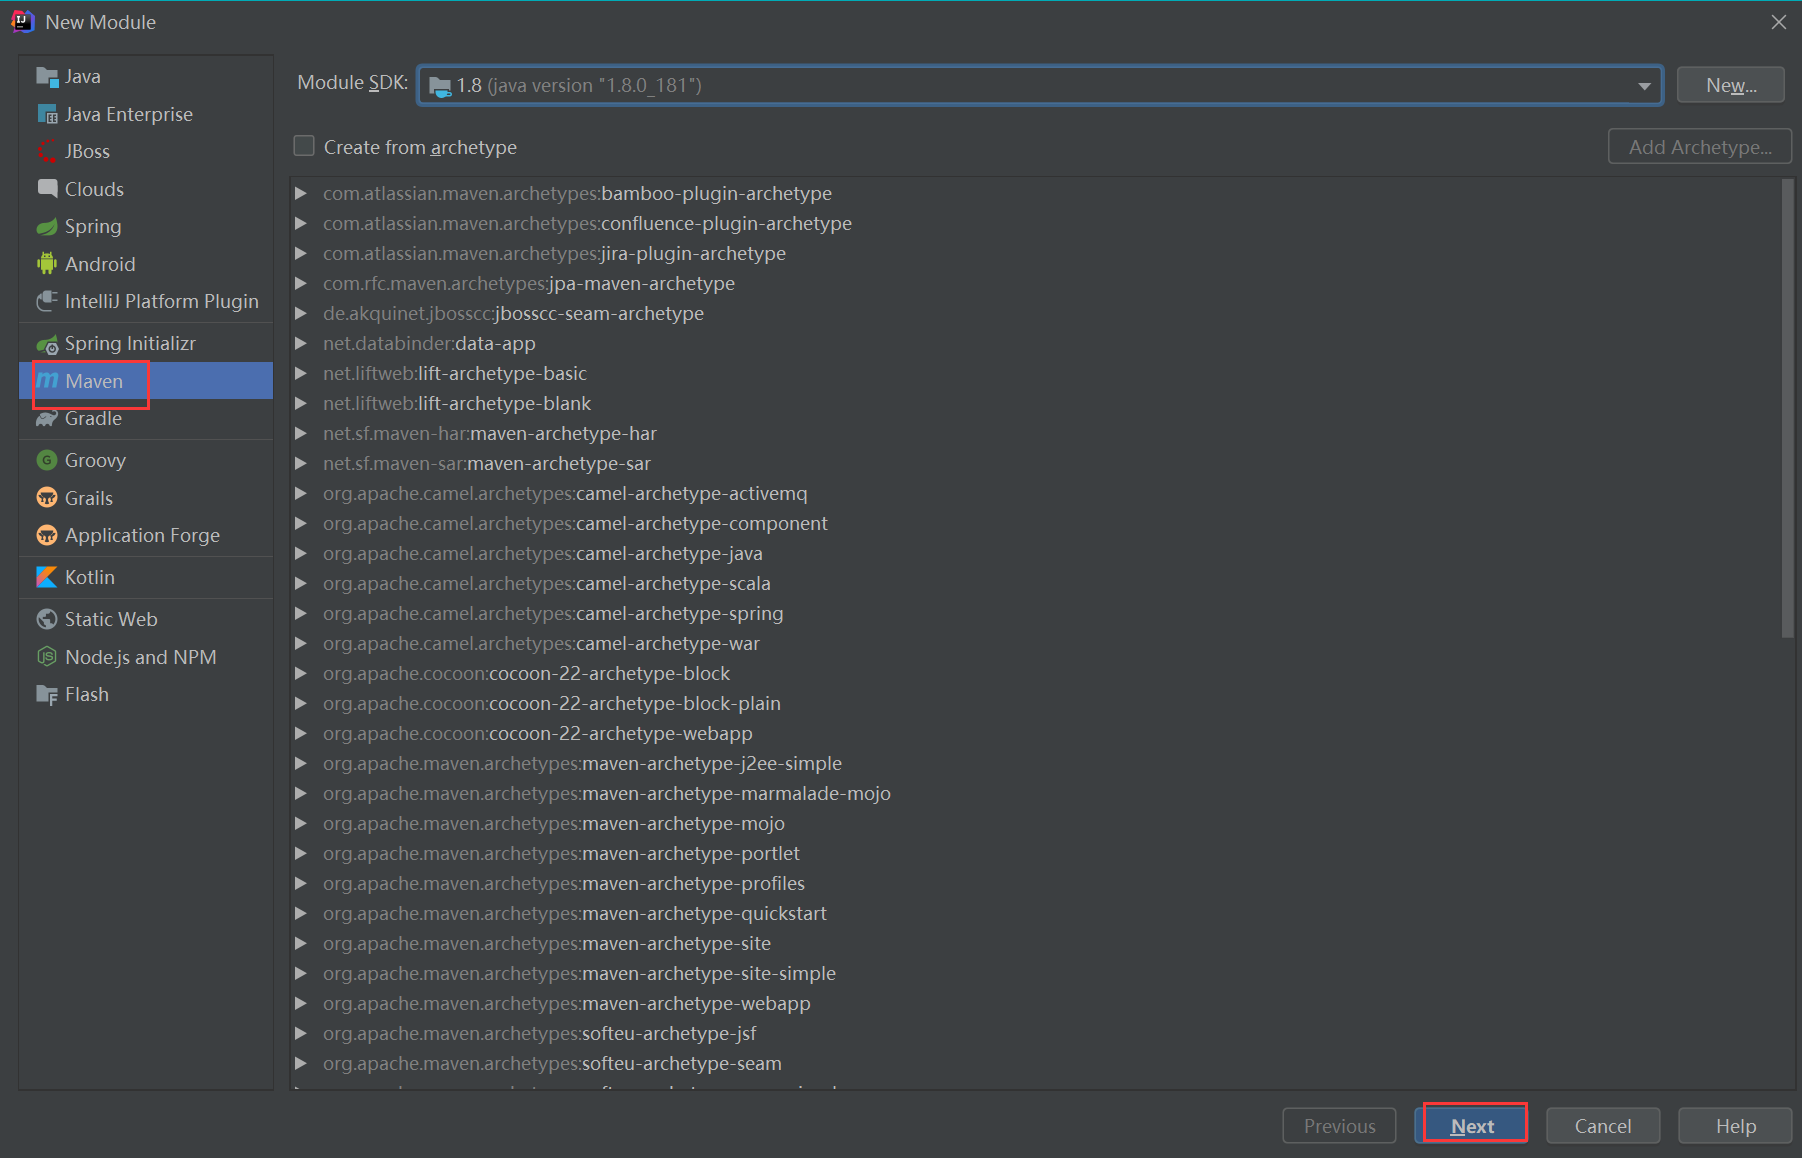
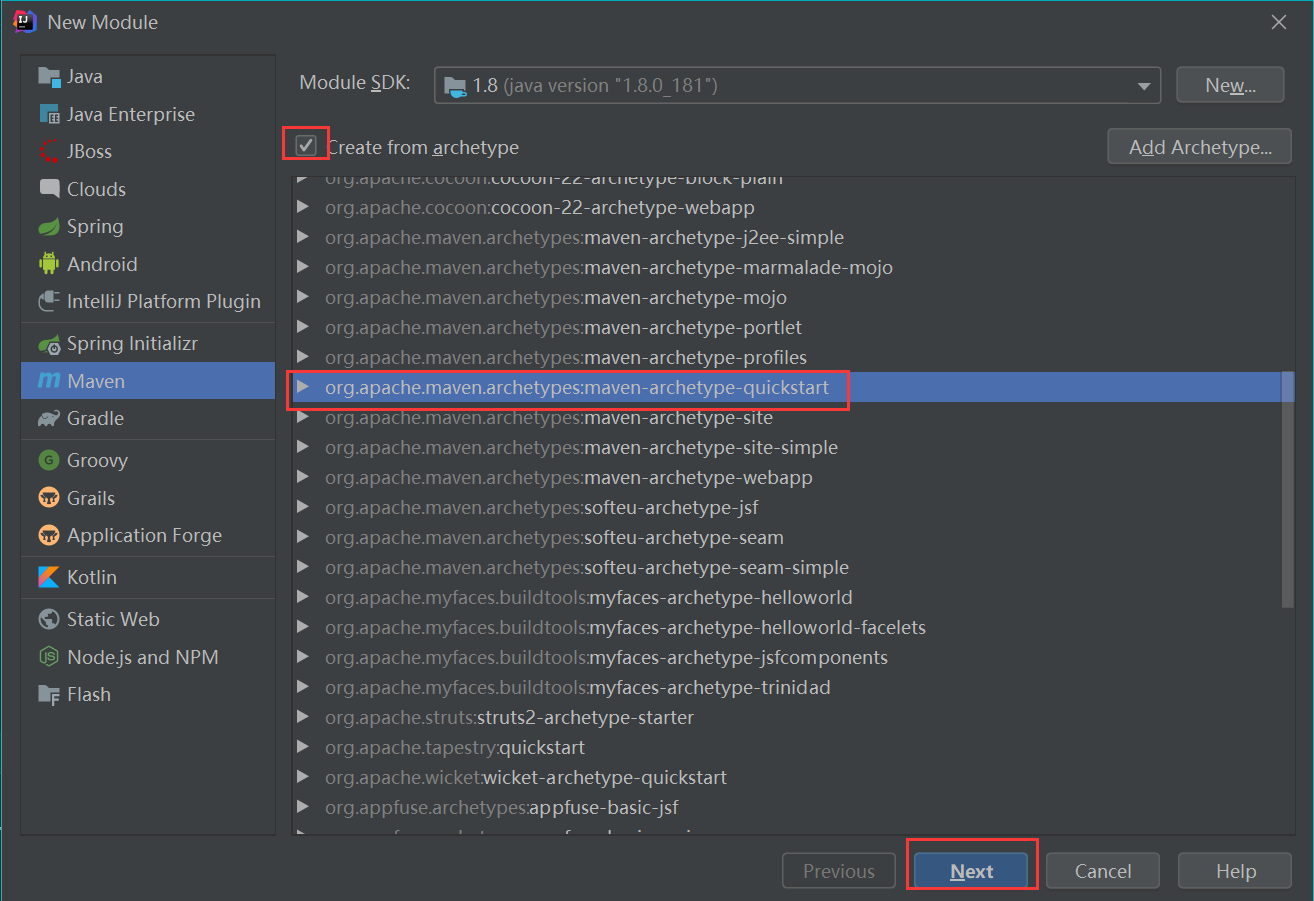
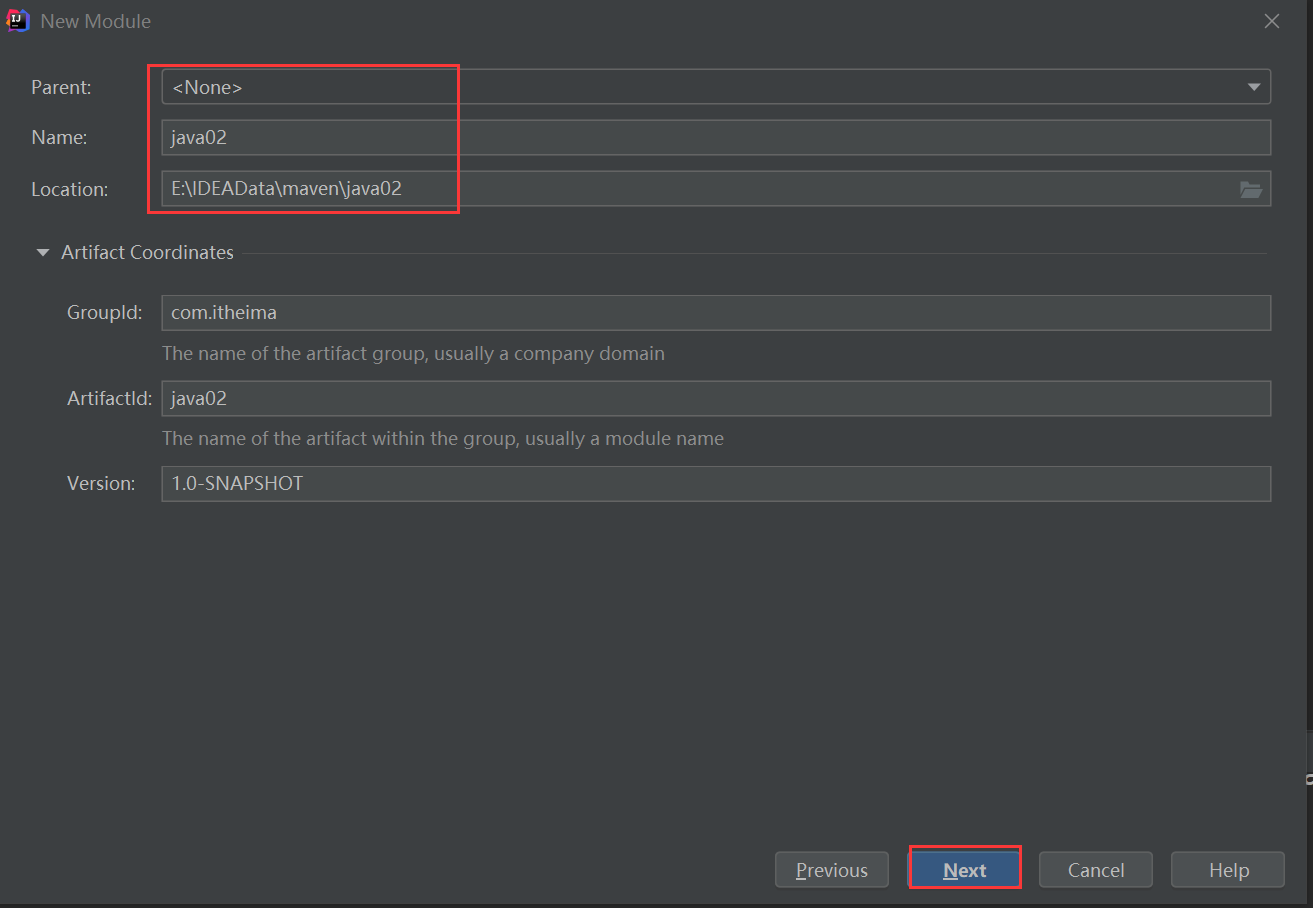
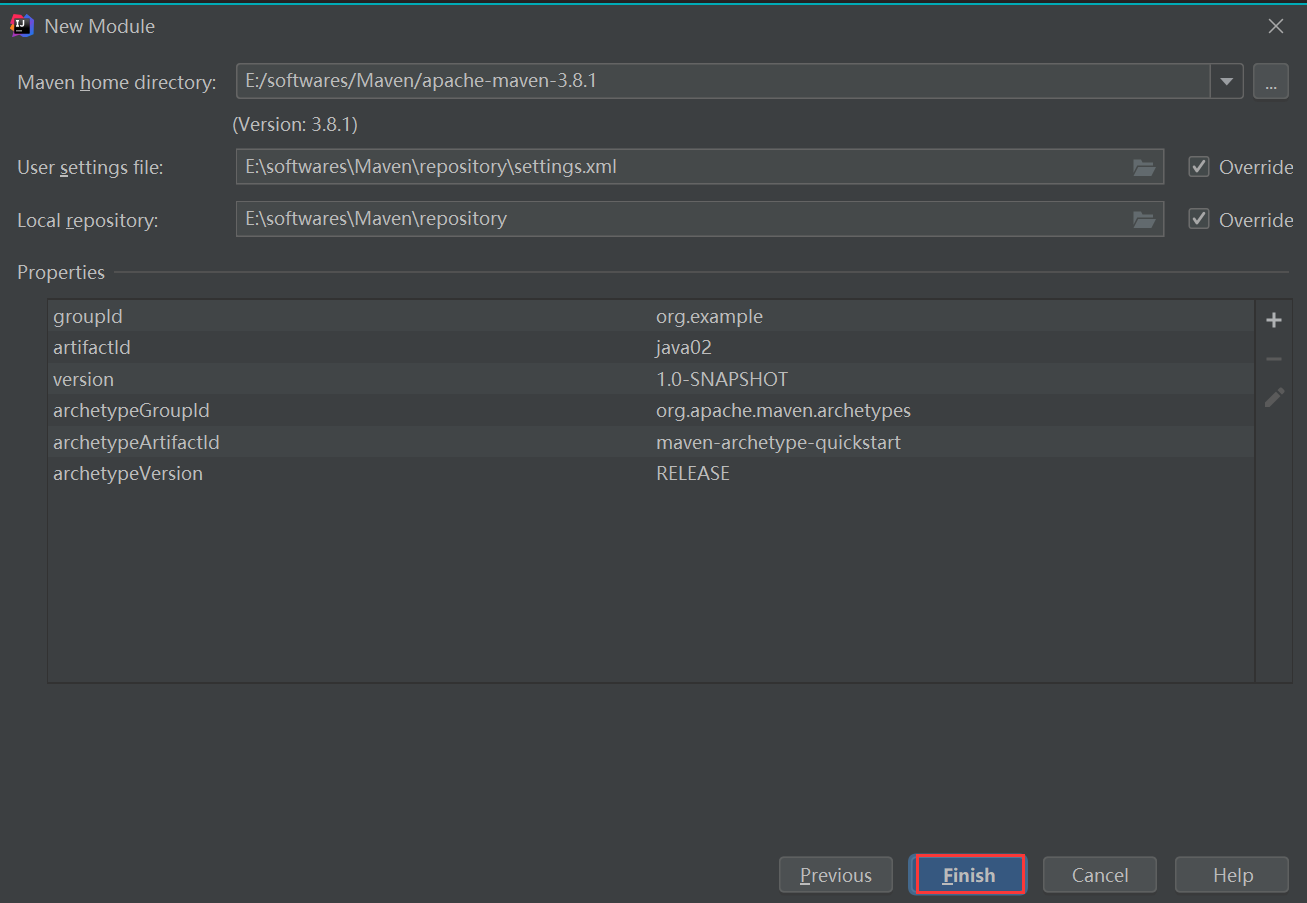
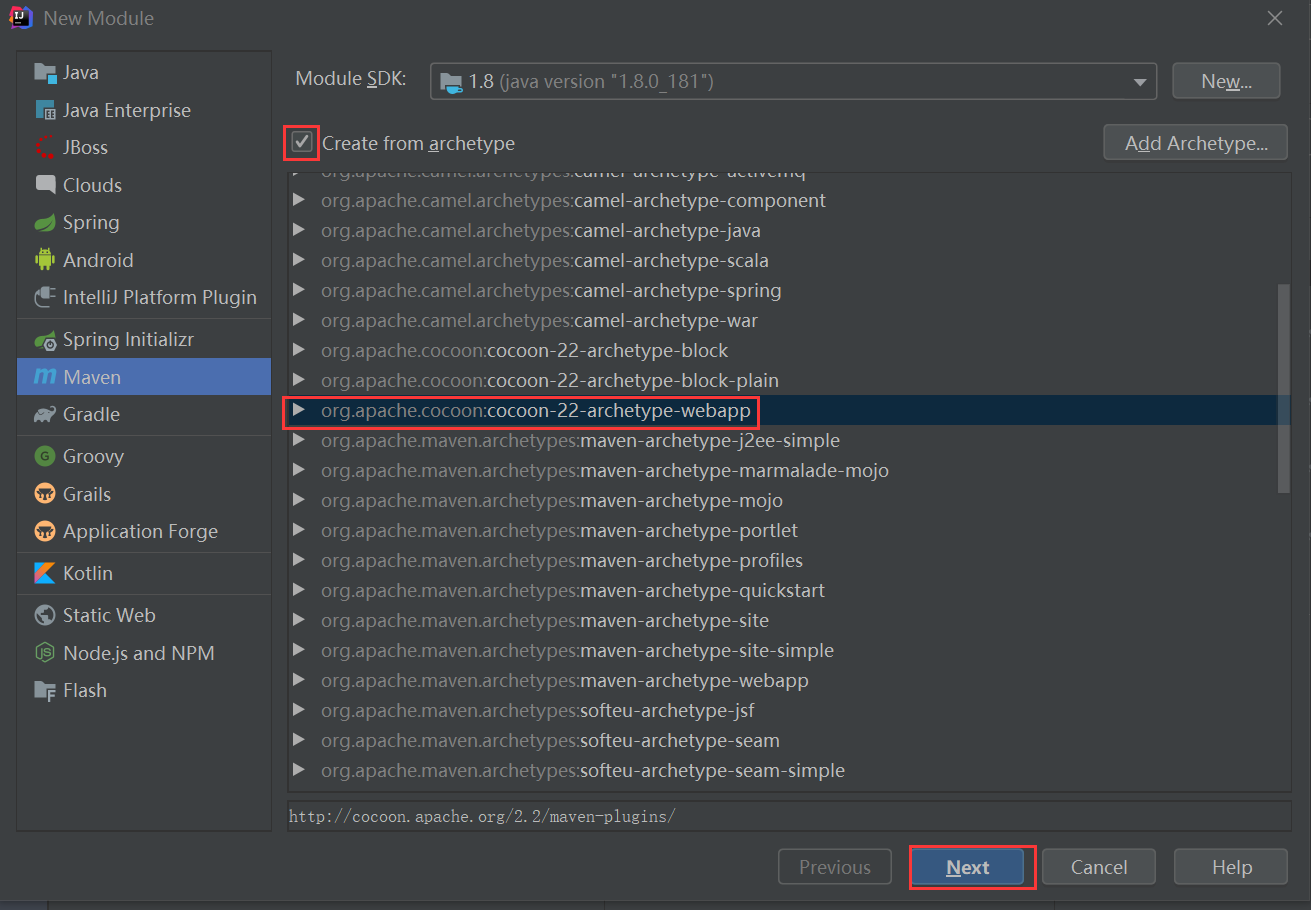
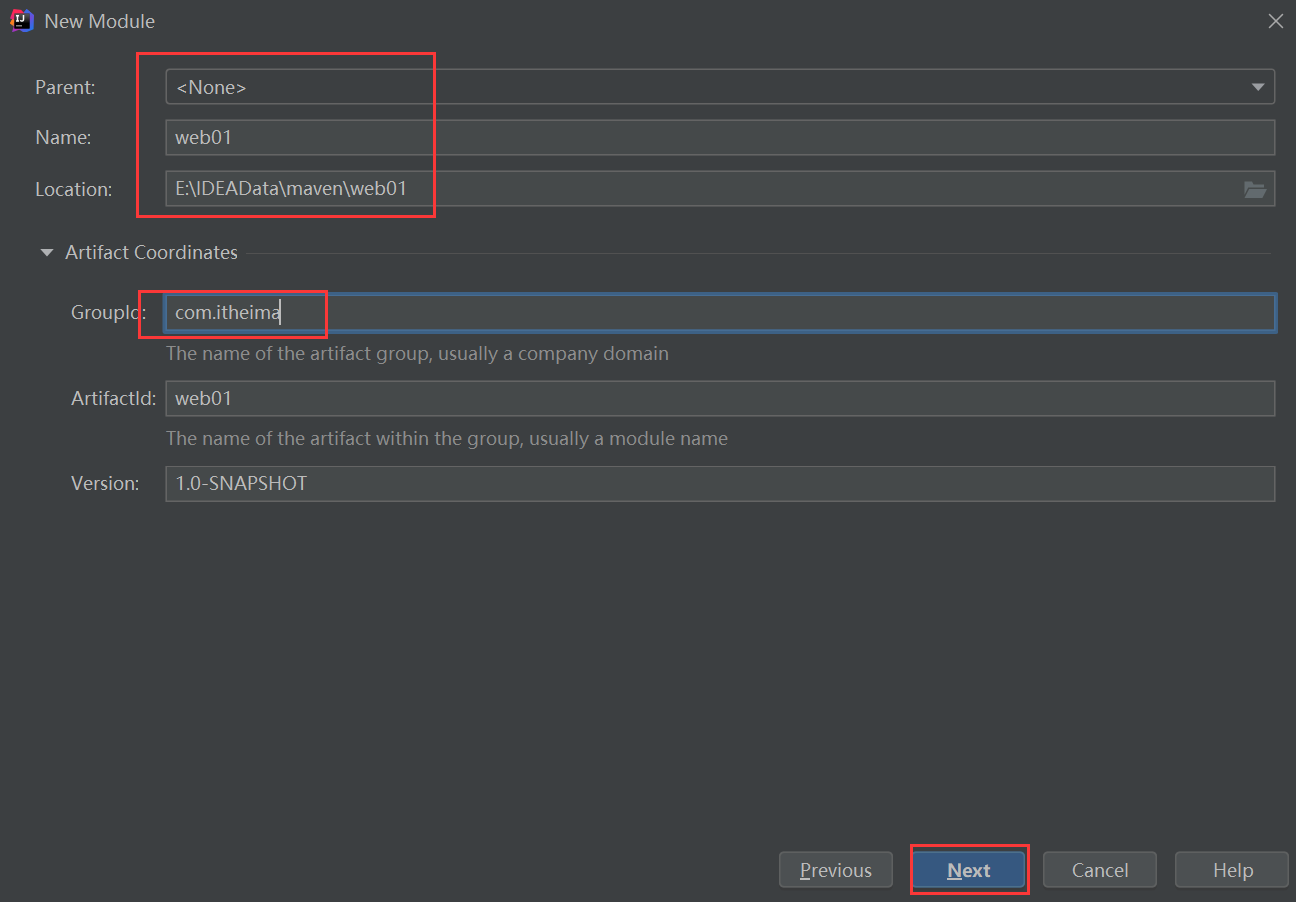
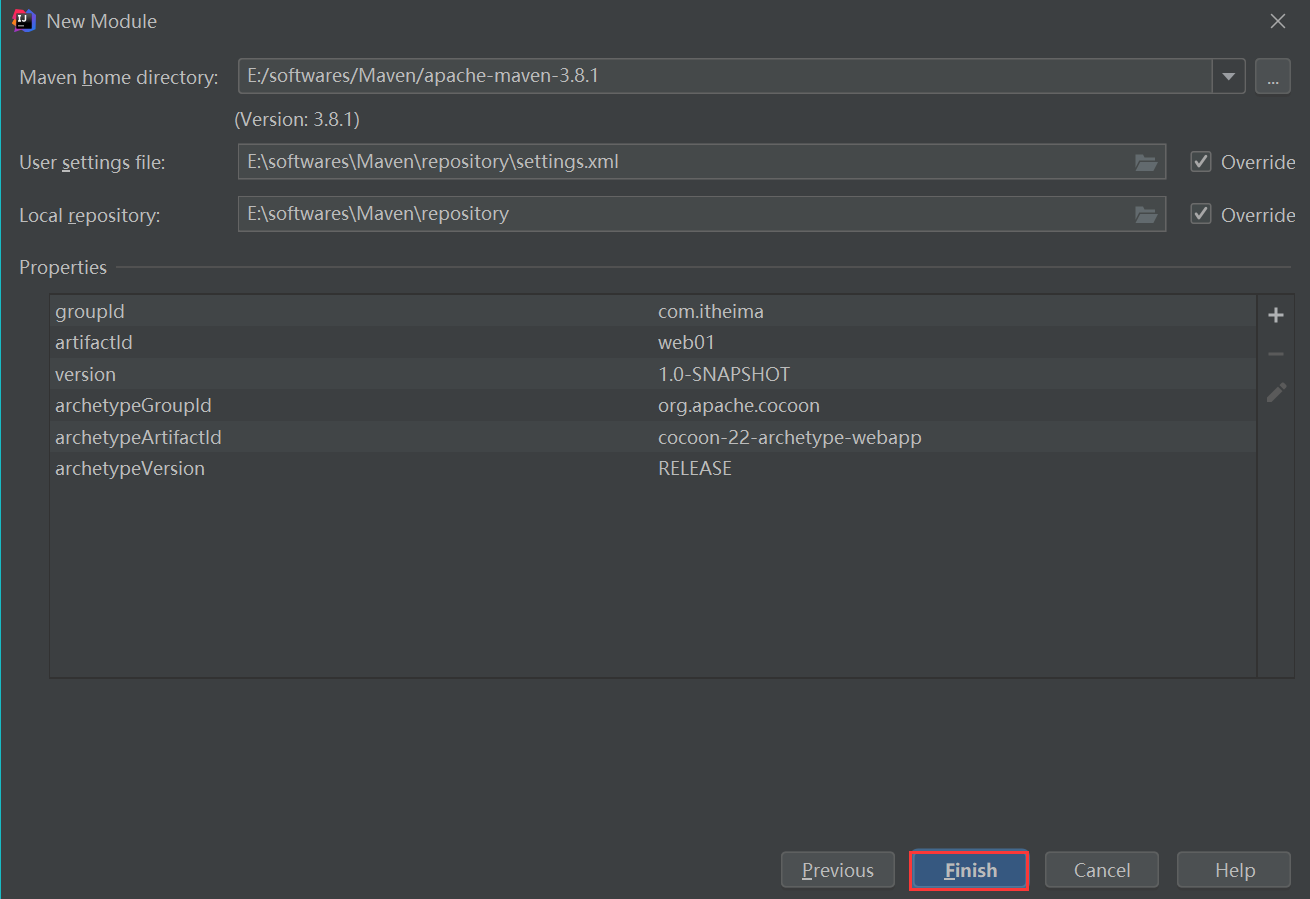
(3) IDEA creation
① Configure Maven environment in IDEA
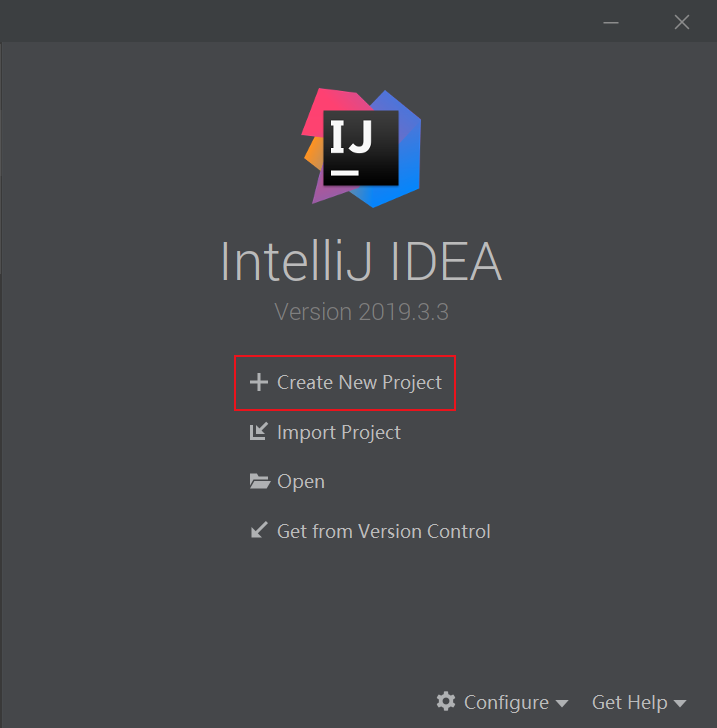
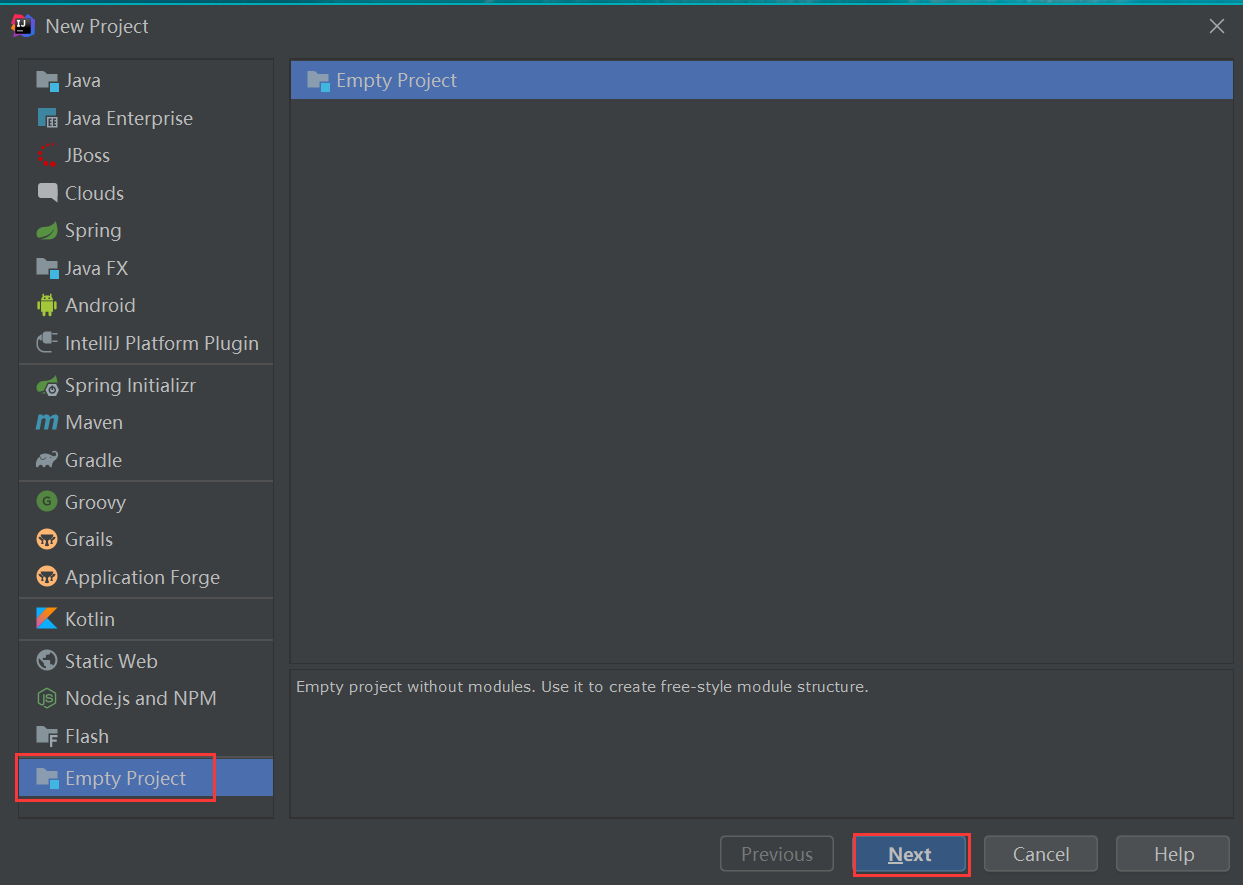
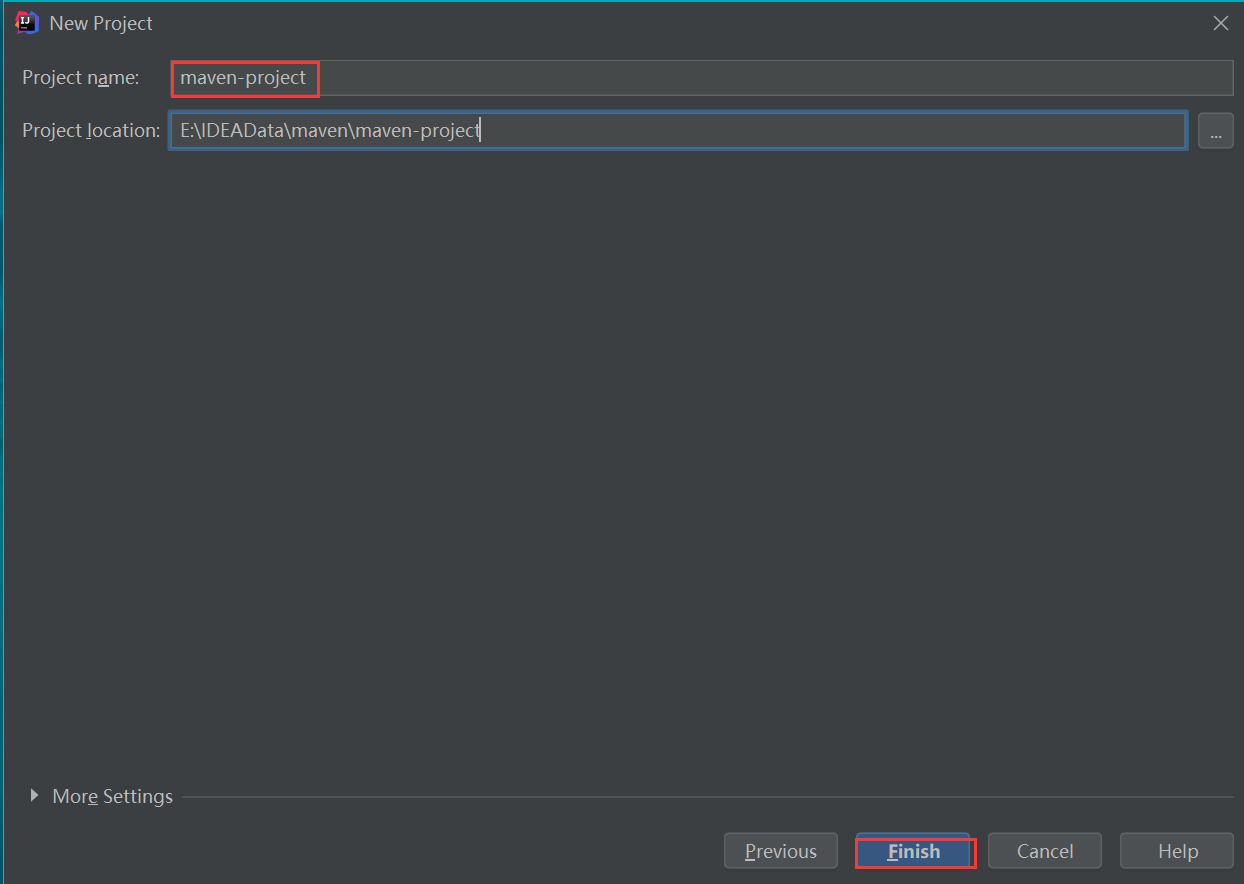
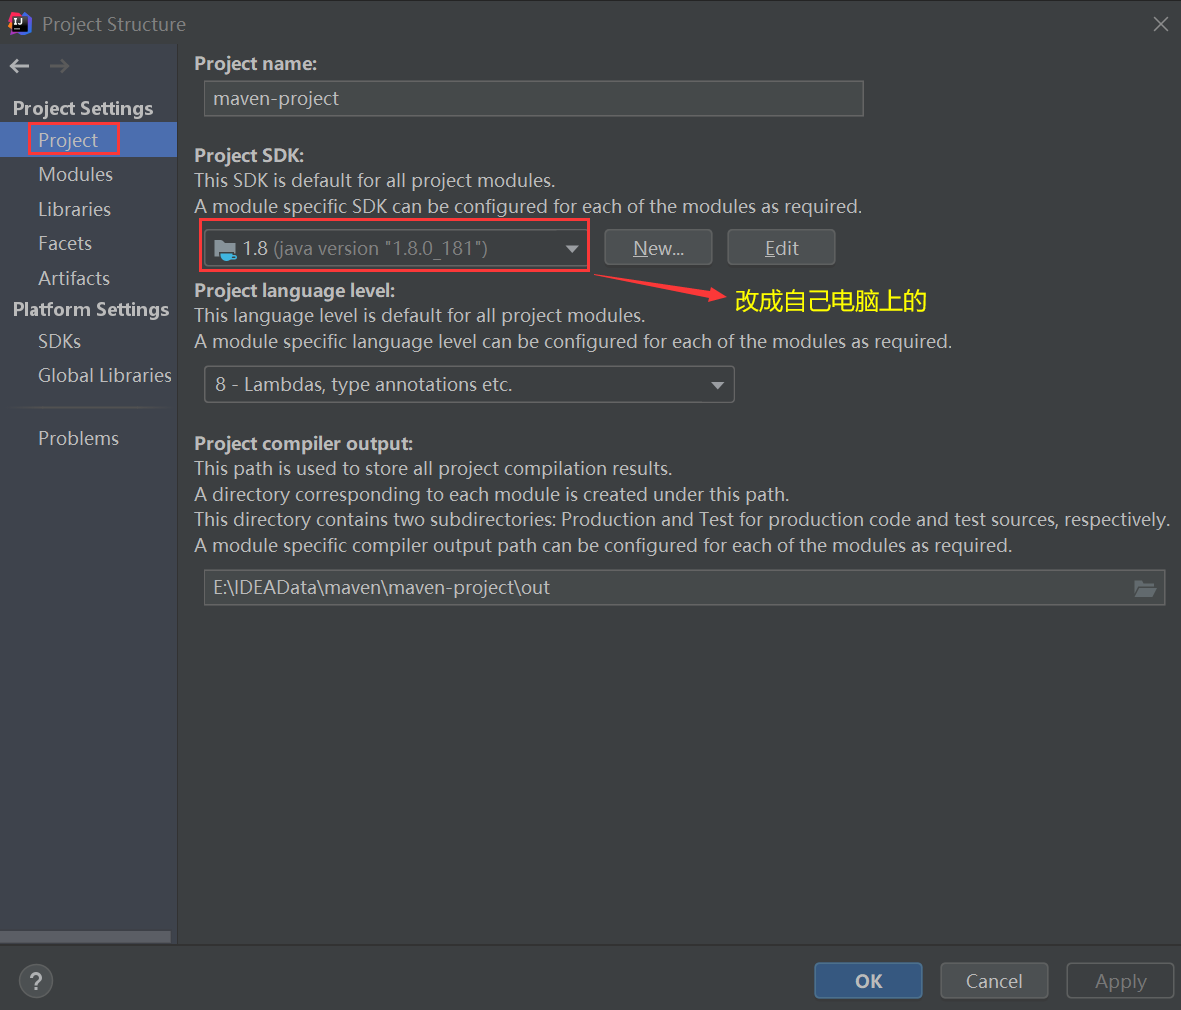
② Create Maven project

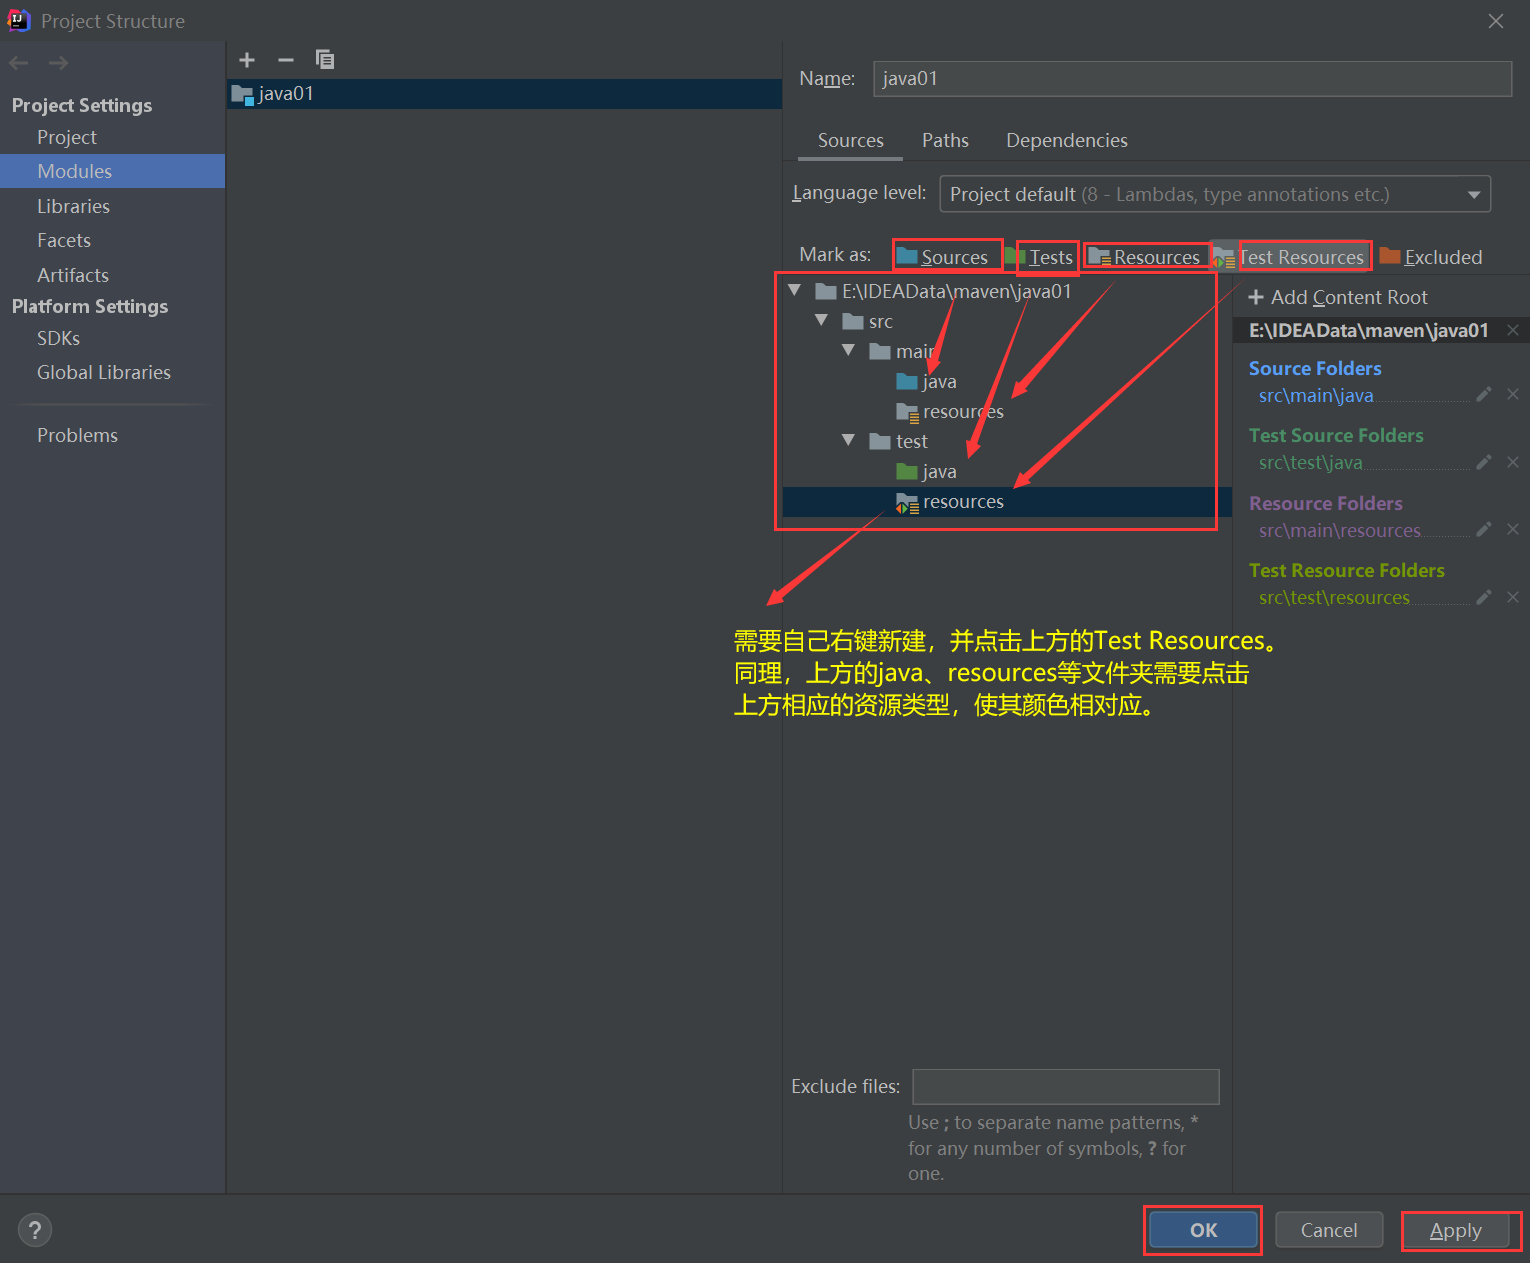
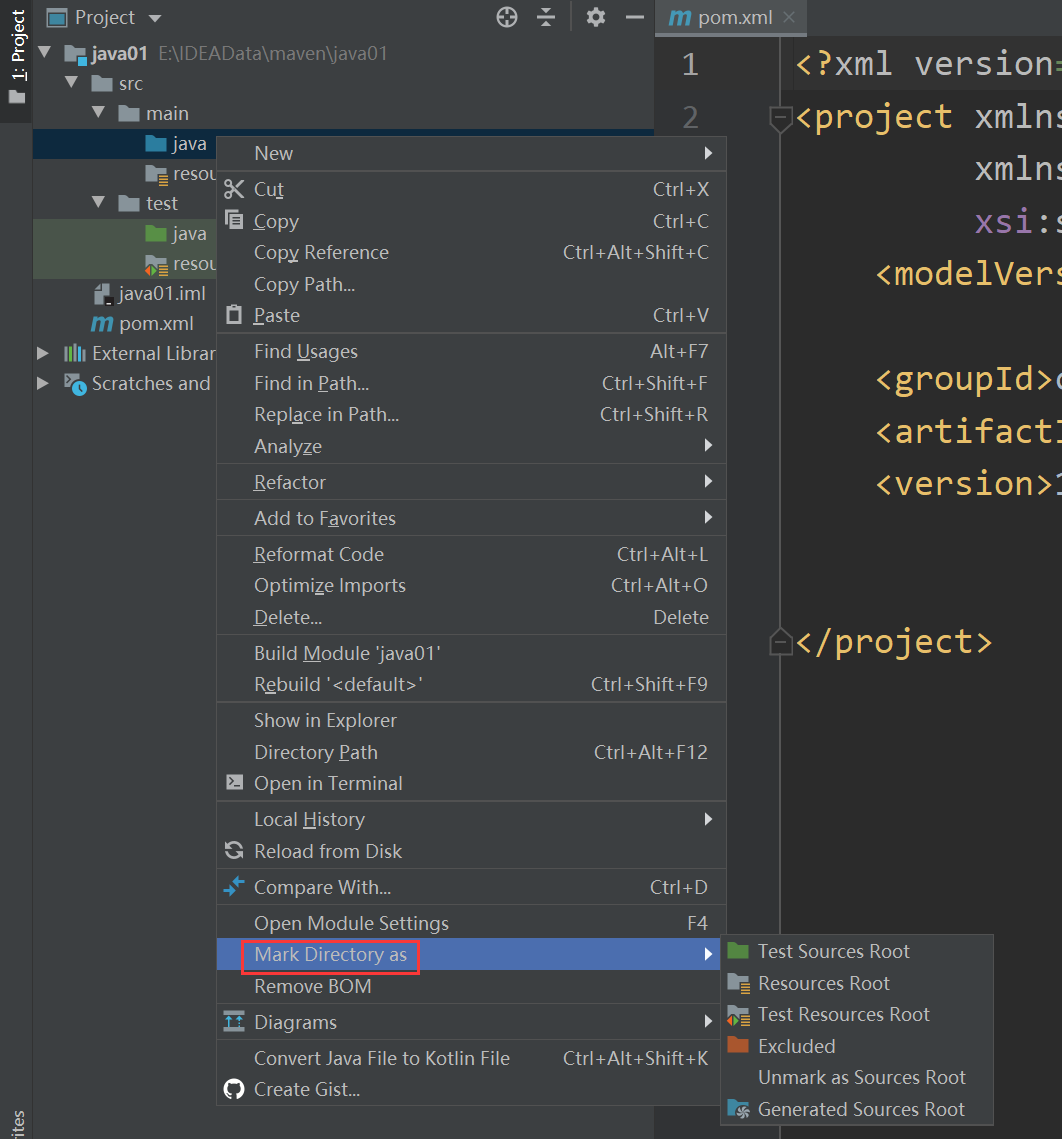
At this point, a maven project is created. In addition, if you want to change the resource type of the folder, you can also right-click and select Mark Directory as to modify it (generally keep Maven's default).
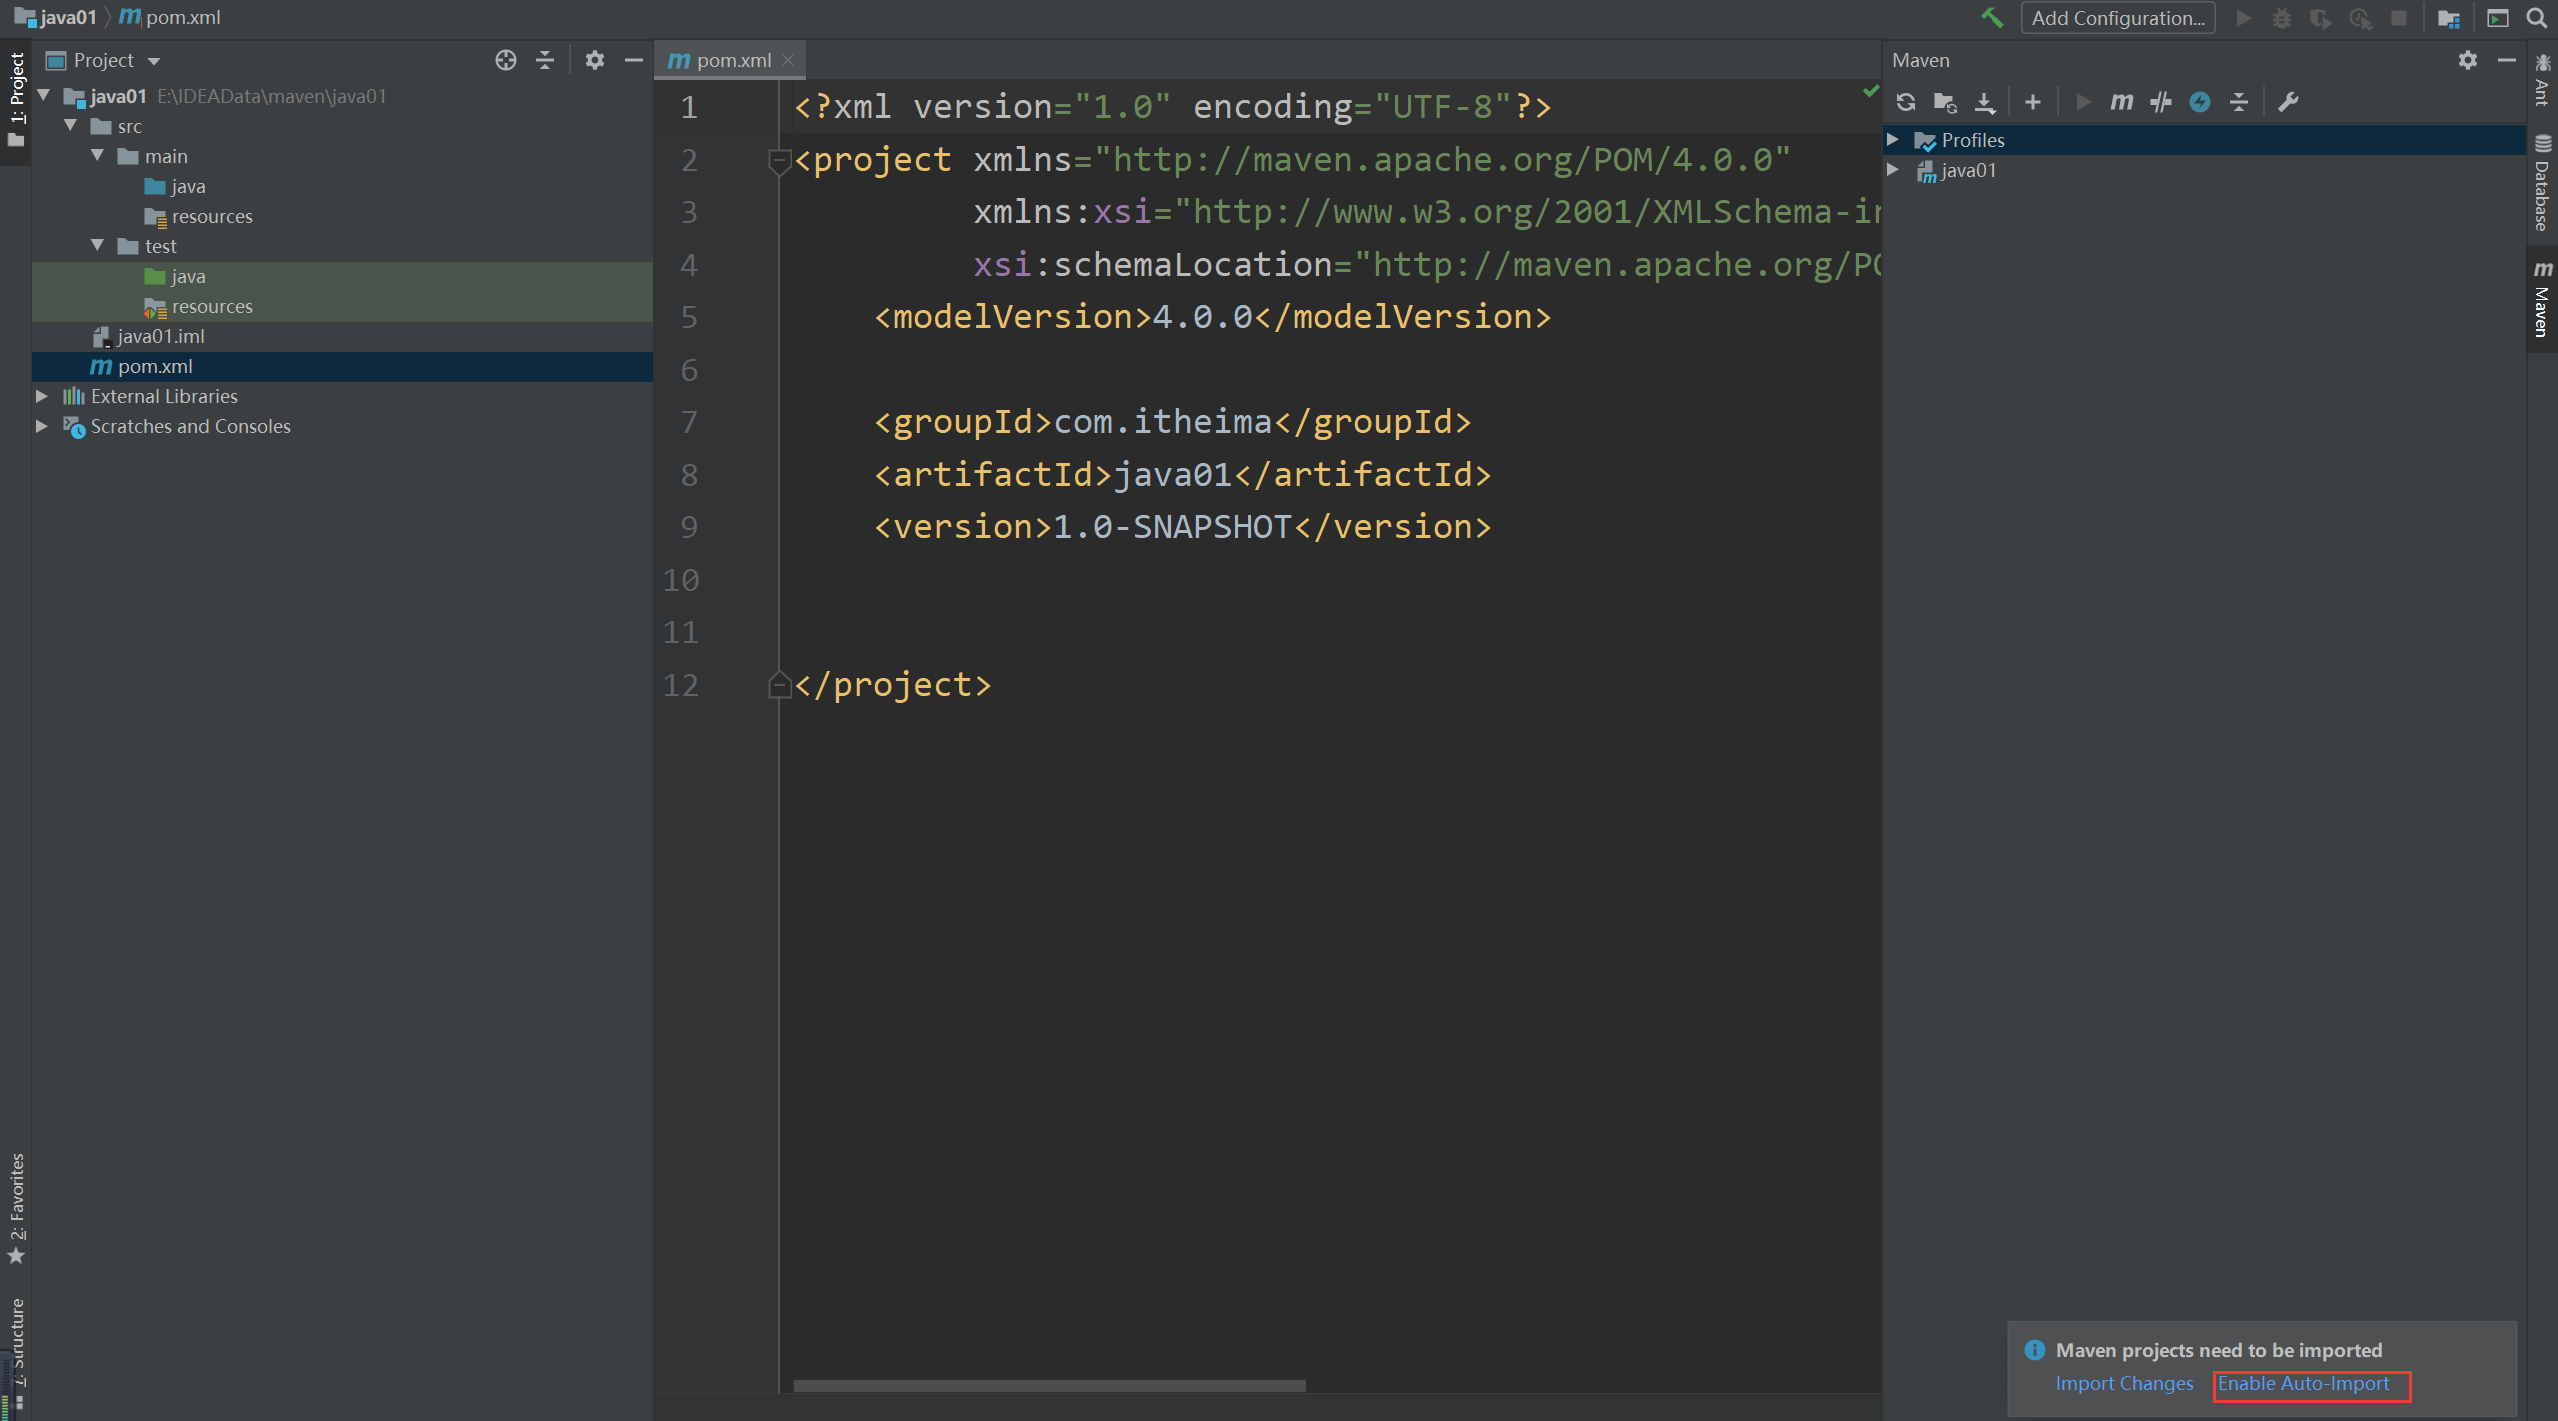
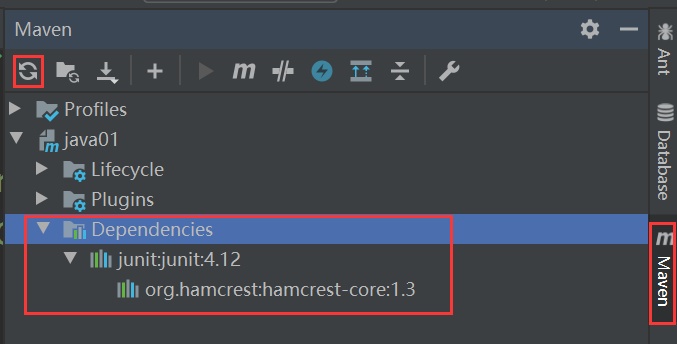
Introduce the required dependencies in pom.xml. Here, take Junit's jar as an example (you need to download it online during the initial introduction. If the code reports an error, you can click Maven on the right and select refresh in it). Then Junit's jar package will be imported into the project.
<?xml version="1.0" encoding="UTF-8"?>
<project xmlns="http://maven.apache.org/POM/4.0.0"
         xmlns:xsi="http://www.w3.org/2001/XMLSchema-instance"
         xsi:schemaLocation="http://maven.apache.org/POM/4.0.0 http://maven.apache.org/xsd/maven-4.0.0.xsd">
    <modelVersion>4.0.0</modelVersion>

    <groupId>com.itheima</groupId>
    <artifactId>java01</artifactId>
    <version>1.0-SNAPSHOT</version>

    <dependencies>
        <dependency>
            <groupId>junit</groupId>
            <artifactId>junit</artifactId>
            <version>4.12</version>
        </dependency>
    </dependencies>
</project>
See the website for the representation of resource coordinates in pom.xml https://mvnrepository.com/.
③ Write test code
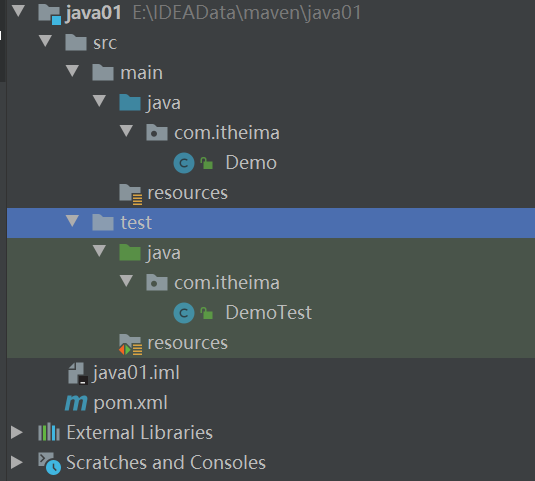
package com.itheima;

public class Demo {

    public String say(String name){
        System.out.println("Hello "+name);
        return "Hello "+name;
    }
}
package com.itheima;

import org.junit.Assert;
import org.junit.Test;

public class DemoTest {

    //unit testing
    @Test
    public void testSay(){
        Demo d = new Demo();
        String ret = d.say("itheima");
        Assert.assertEquals("Hello itheima",ret);
    }
}
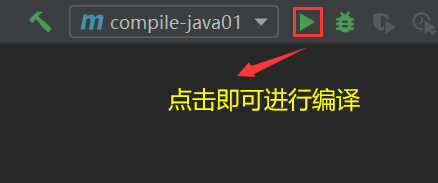
④ Operating projects with Maven
Or use another method:
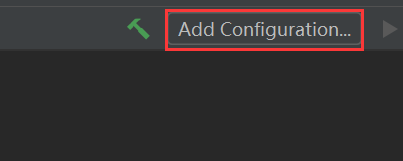
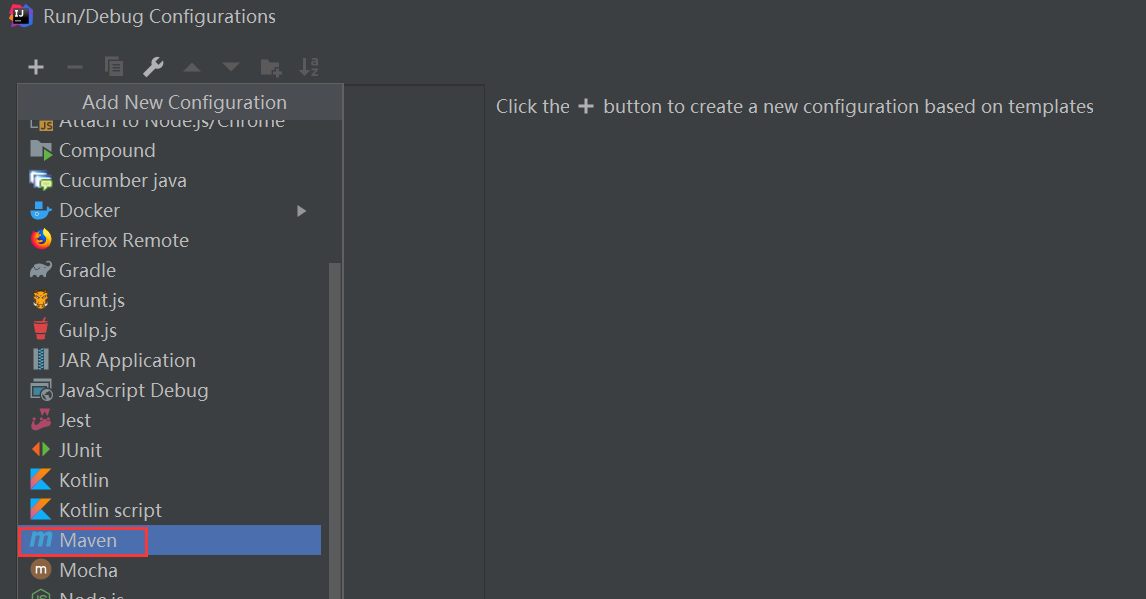
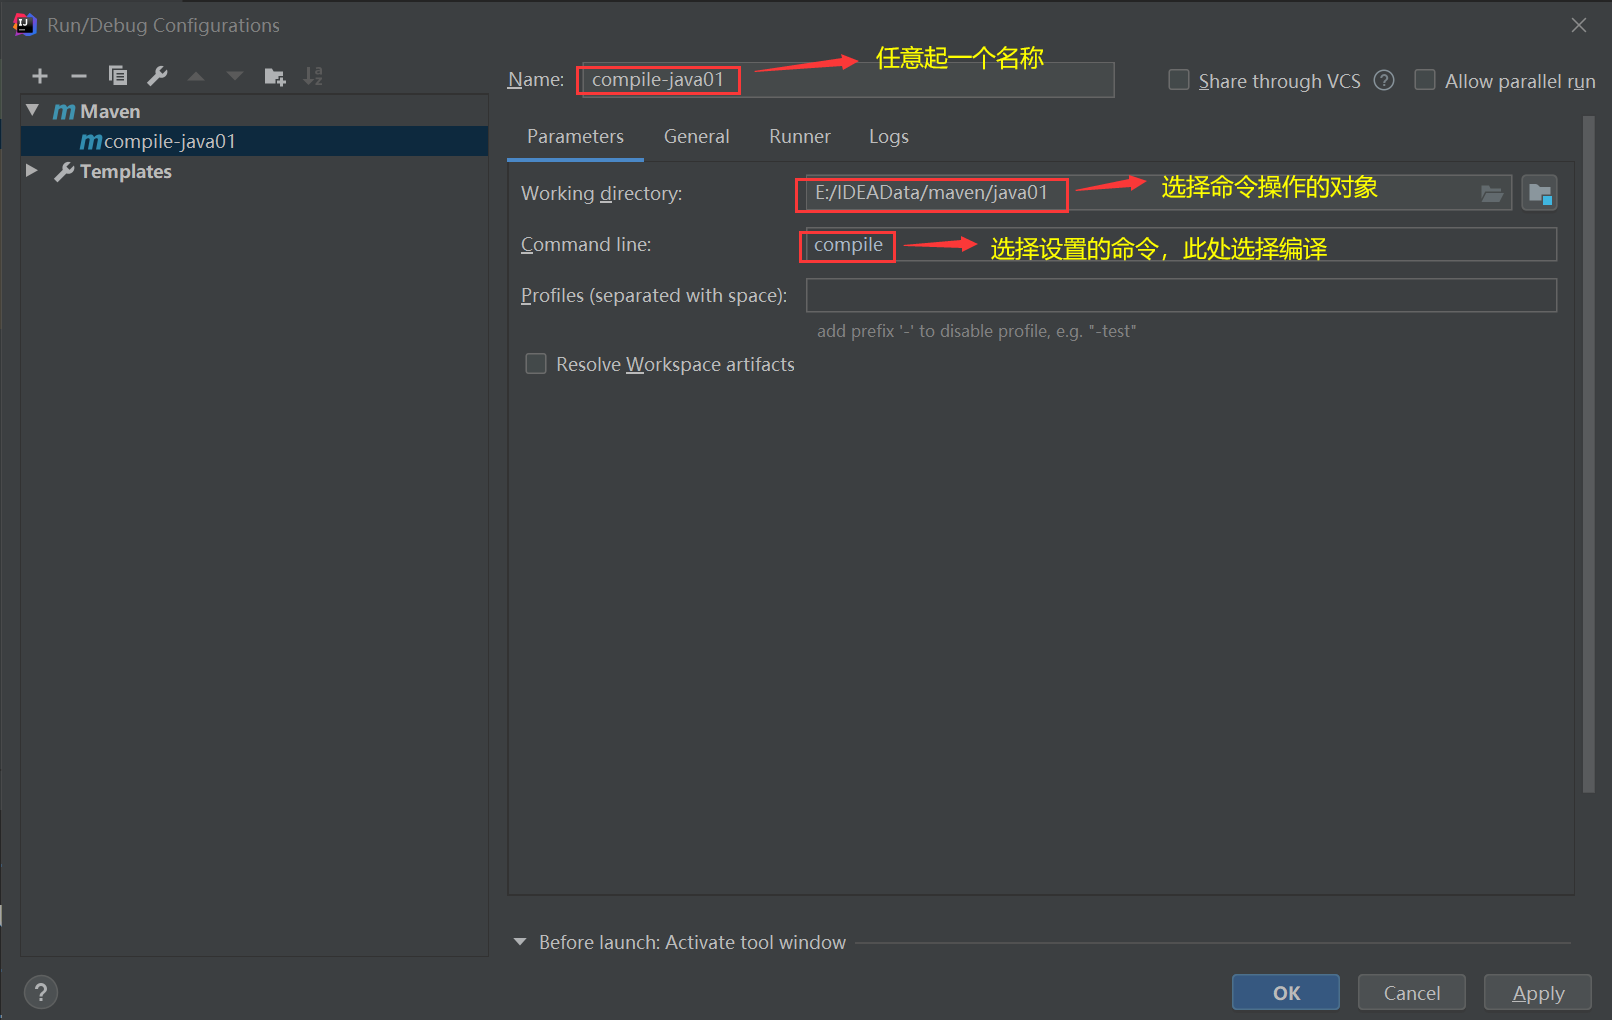
④ Creating projects using Maven templates
1) Create a normal Java project
Note: the resources directory needs to be added manually and marked as the same resource type as above.
2) Create a Java Web project
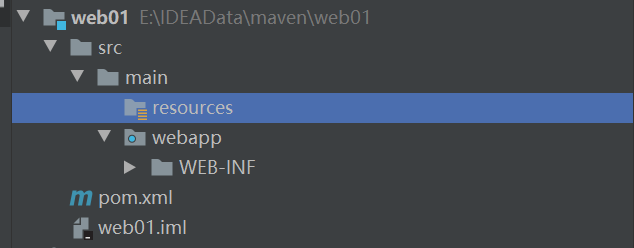
Configure pom.xml:
<?xml version="1.0" encoding="UTF-8"?>
<project xmlns="http://maven.apache.org/POM/4.0.0"
		xmlns:xsi="http://www.w3.org/2001/XMLSchema-instance"
		xsi:schemaLocation="http://maven.apache.org/POM/4.0.0 http://maven.apache.org/maven-v4_0_0.xsd">

  <!--appoint pom Model version for-->
  <modelVersion>4.0.0</modelVersion>
  <!--Packaging method, web The project is packaged as war,java The project is packaged as jar-->
  <packaging>war</packaging>

  <!--organization id-->
  <groupId>com.itheima</groupId>
  <!--project id-->
  <artifactId>web01</artifactId>
  <!--Version number:release,snapshot-->
  <version>1.0-SNAPSHOT</version>

  <!--Set all dependencies of the current project-->
  <dependencies>
    <!--Specific dependencies-->
    <dependency>
      <groupId>junit</groupId>
      <artifactId>junit</artifactId>
      <version>4.12</version>
    </dependency>
  </dependencies>

  <!--structure-->
  <build>
    <!--Setting plug-ins-->
    <plugins>
      <!--Specific plug-in configuration-->
      <plugin>
        <groupId>org.apache.tomcat.maven</groupId>
        <artifactId>tomcat7-maven-plugin</artifactId>
        <version>2.1</version>
        <configuration>
          <port>80</port>
          <path>/</path>
        </configuration>
      </plugin>
    </plugins>
  </build>
</project>
Note: the missing directory needs to be added manually and marked as the same resource type as above.
5. Dependency management
(1) Dependency configuration
① Dependency refers to the jar s required for the current project to run. A project can set multiple dependencies.
② Format:
<!--Sets all the properties that the current project depends on jar-->
<dependencies>
	<!--Set specific dependencies-->
	<dependency>
		<!--Dependent group id-->
		<groupId>junit</groupId>
		<!--Dependent items id-->
		<artifactrd>junit<lartifactid>
		<!--Dependent version number-->
		<version>4.12</version>
	</dependency>
</dependencies>
(2) Dependency delivery
① Dependency is transitive
1) Direct dependency: the dependency relationship established through dependency configuration in the current project.
2) Indirect dependency: if a resource is dependent on other resources, the current project indirectly depends on other resources.
② Dependency delivery conflict
Path priority: when the same resource appears in the dependency, the deeper the level, the lower the priority, and the shallower the level, the higher the priority.
Declaration priority: when resources are dependent at the same level, the top configuration order overrides the bottom configuration order.
Special priority: when different versions of the same resource are configured at the same level, the later configured version overrides the first configured version.
③ If project-1 wants to use project-2, it needs to configure project-2 as a resource in project-1, that is, copy the coordinates corresponding to project-2 (including groupId, artifactId and version) to pom.xml in project-1 in the form of dependency (i.e. using the dependency tag).
(3) Optional dependency
Optional dependency refers to hiding the currently dependent resources externally - opaque
<dependency>
	<groupId>junit</groupid>
	<artifactrd>junit</ artifactrd>
	<version>4.12</version>
	<optional>true</optional>
</dependency>
(4) Exclude dependencies
Excluding dependencies refers to actively disconnecting dependent resources. The excluded resources do not need to specify a version - No
<dependeney>
	<groupId>junit</groupid>
	<artifactId>junit</artifactid>
	<version>4.12</version>
	<exclusions>
		<exclusion>
			<groupId>org.hamcrest</groupid>
			<artifactId>hamerest-core</artifactId>
		</exelusion>
	</exclusions>
</dependency>
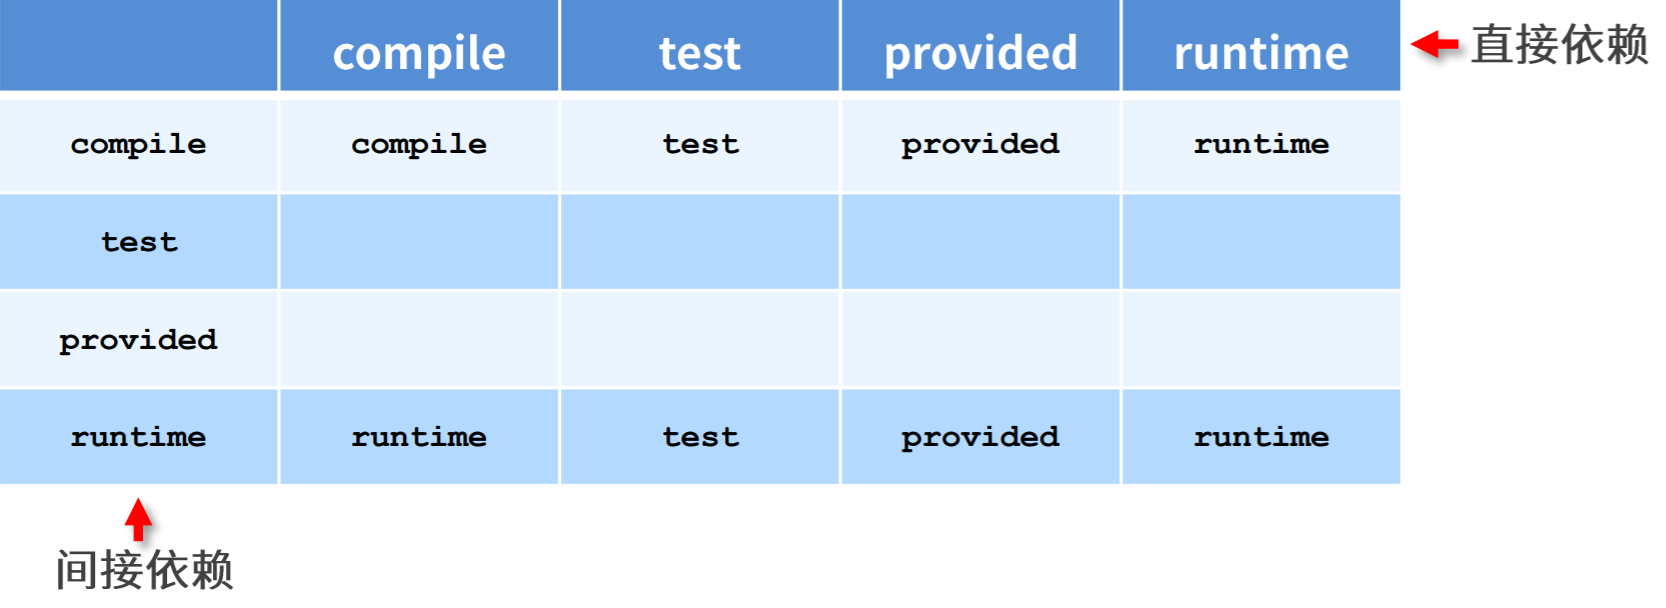
(5) Dependency range
① Dependent jar s can be used anywhere by default, and their scope can be set through the scope tag
② Scope of action
1) The main program range is valid (within the main folder range)
2) The scope of test program is valid (within the scope of test folder)
3) Whether to participate in packaging (within the scope of package instruction)

③ Dependency scope transitivity
When a resource with a dependency scope is passed, the scope will be affected
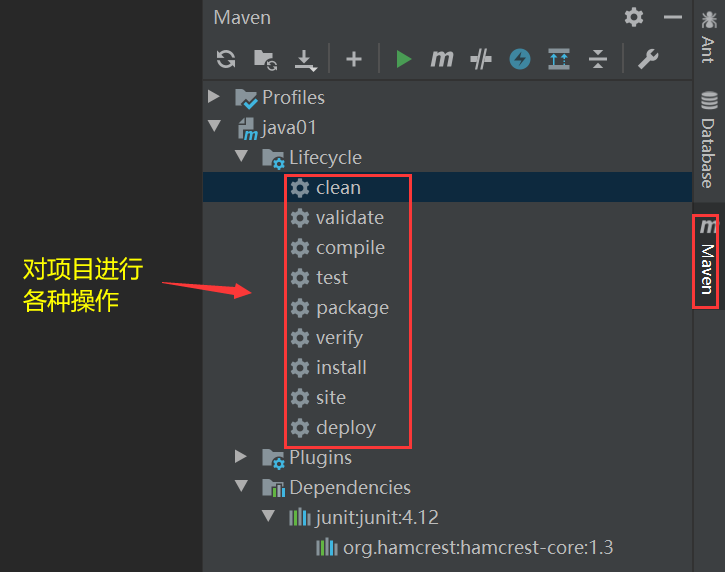
6. Life cycle and plug-ins
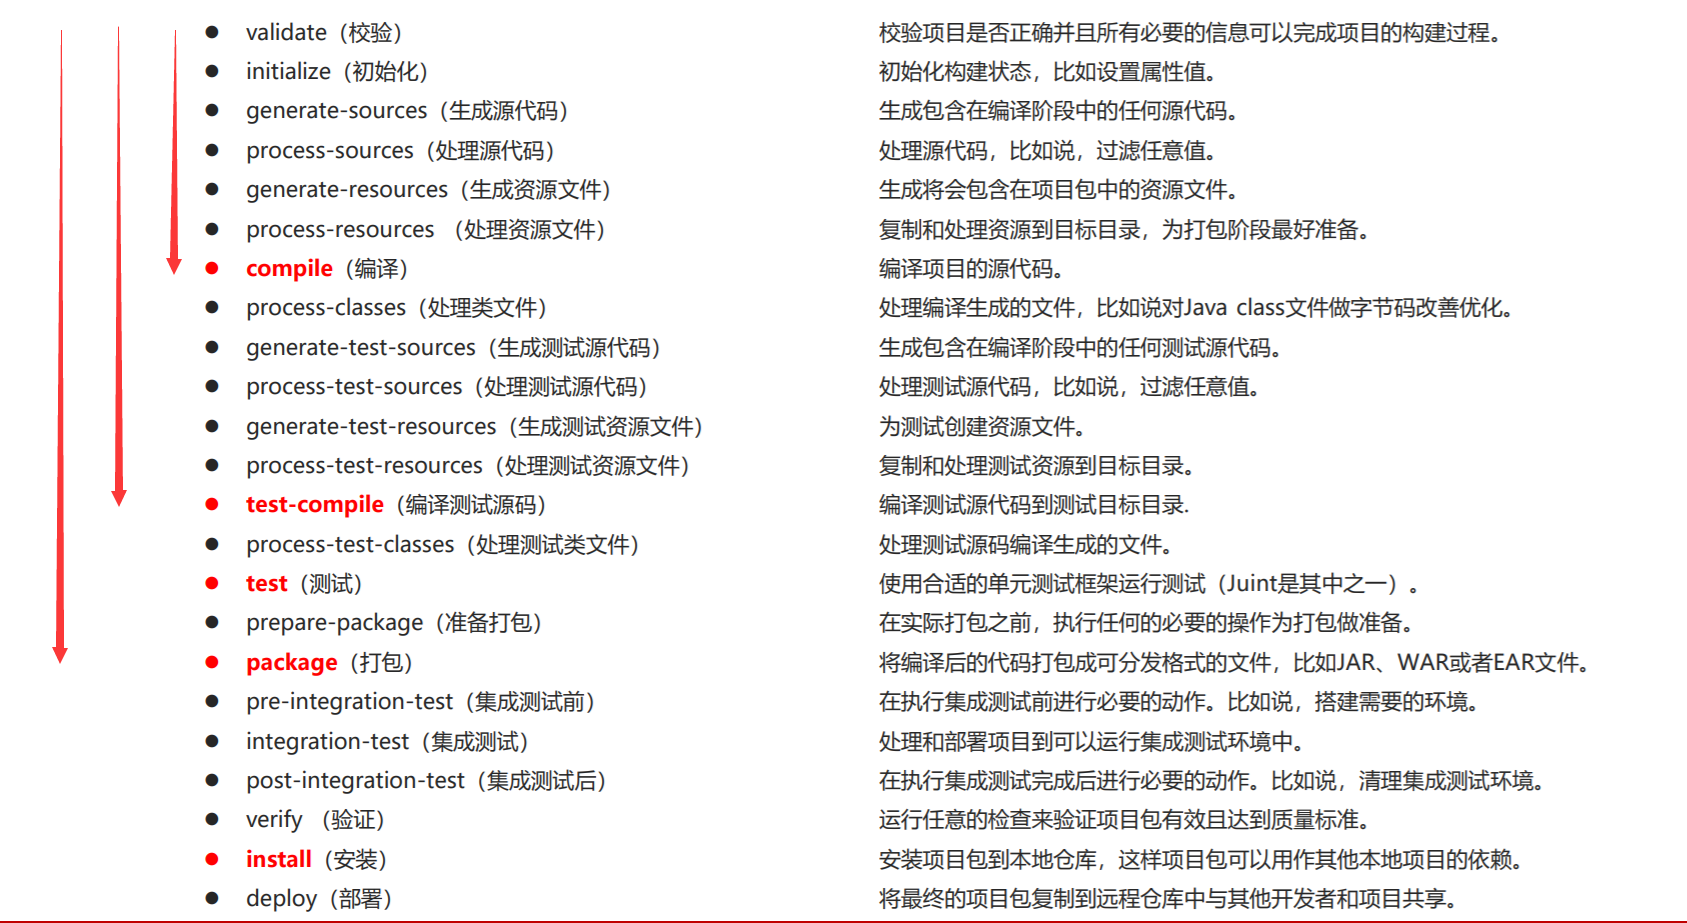
(1) Life cycle
① The Maven build lifecycle describes how many events a build process goes through

② Maven divides the life cycle of project construction into the following three sets:
| clean | Clean up work |
|---|---|
| default | Core work, such as compilation, testing, packaging, deployment, etc |
| site | Generate reports, publish sites, etc |
The life cycle of clean is as follows:
| pre-clean | Perform some work that needs to be done before clean |
|---|---|
| clean | Remove all files generated by the last build |
| post-clean | Perform some work that needs to be done immediately after clean |
The life cycle of the default build is as follows:
The life cycle of site construction is as follows:
| pre-site | Perform some work that needs to be done before generating site documents |
|---|---|
| site | Generate site documents for the project |
| post-site | Do some work that needs to be done after the site document is generated, and prepare for deployment |
| site-deploy | Deploy the generated site documents to a specific server |
(2) Plug in
① The plug-in is bound to the stage in the life cycle and executes the corresponding plug-in function when it is executed to the corresponding life cycle.
② By default, maven is bound with preset functions in each life cycle.
③ Other functions can be customized through plug-ins.
<!--structure-->
<build>
	<!--Setting plug-ins-->
	<plugins>
		<!--Specific plug-in configuration-->
		<plugin>
			<!--Coordinates of the plug-in-->
			<groupId>org.apache.maven.plugins</groupId>
			<artifactId>maven-source-plugin</artifactId>
			<version>2.2.1</version>
			<!--Actions performed by the plug-in-->
			<executions>
				<!--Specific operations performed by the plug-in-->
				<execution>
					<goals>
						<!--
                            jar:Package the source code
                            test-jar:Package test code
                        -->
						<goal>jar</goal>
						<goal>test-jar</goal>
					</goals>
					<phase>generate-test-resources</phase>
				</execution>
			</executions>
		</plugin>
	</plugins>
</build>
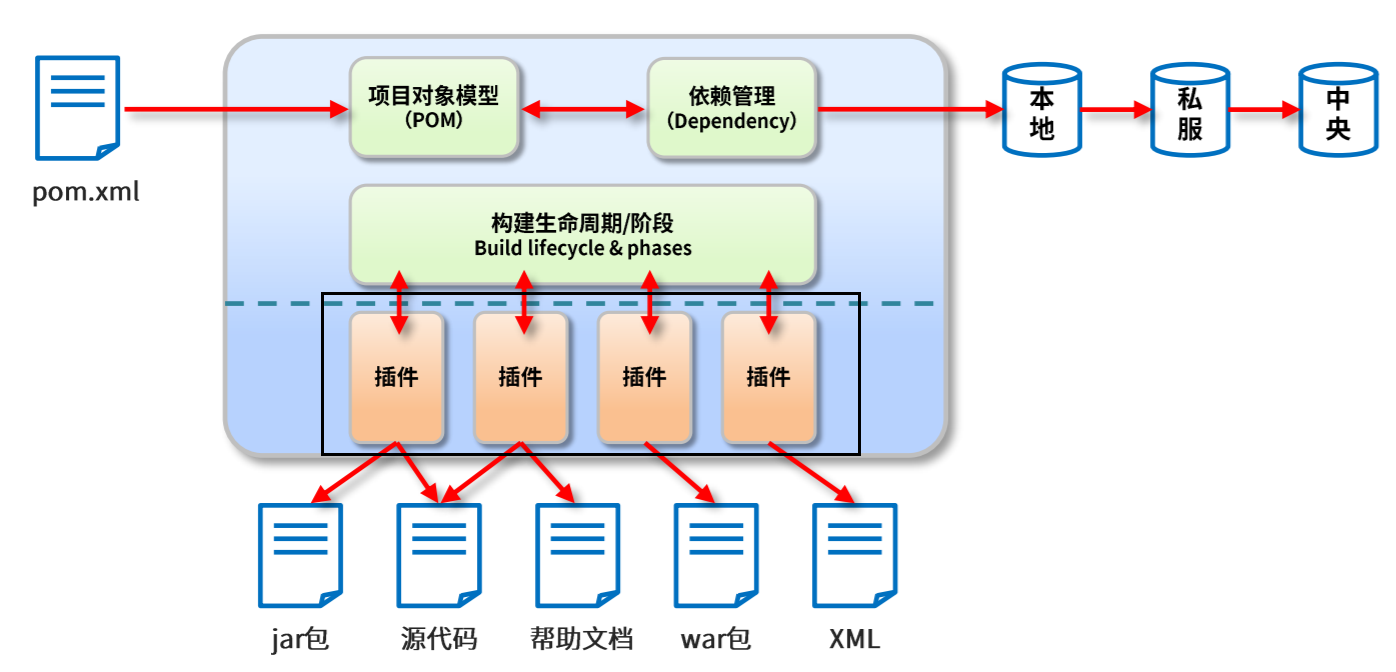
At this point, you should have a deeper understanding of the following figure.
7. Sub module development and design
First, you need to prepare a Maven based SSM project in advance (the function can be very simple), and then split the module according to the following figure.
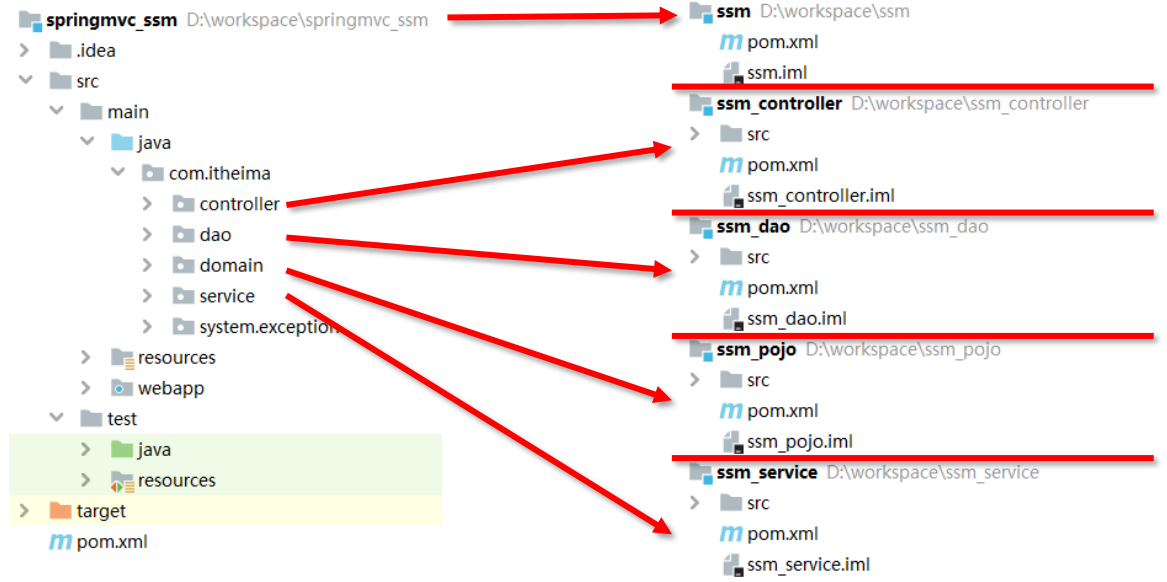
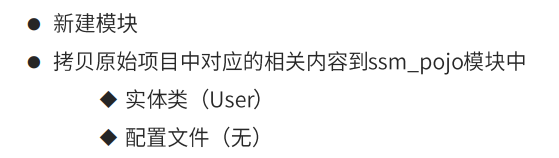
(1) POJO module splitting
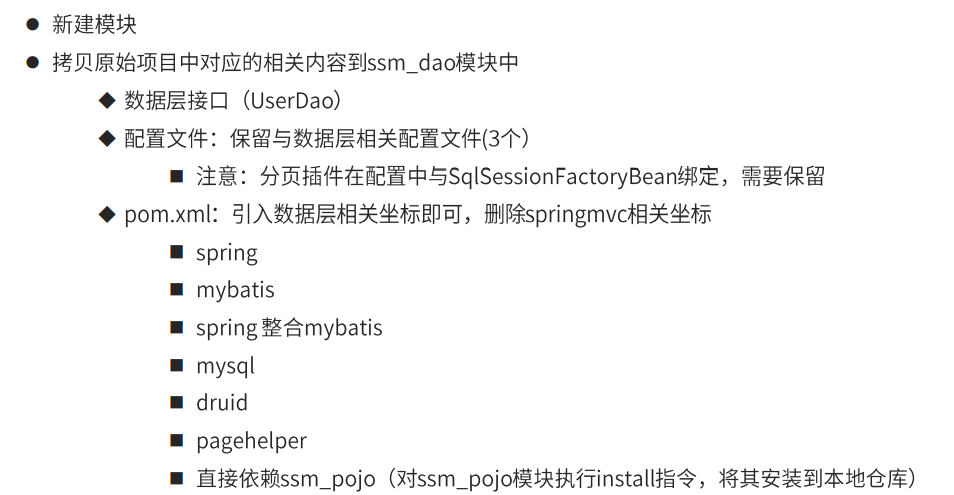
(2) Dao module splitting
(3) service module splitting
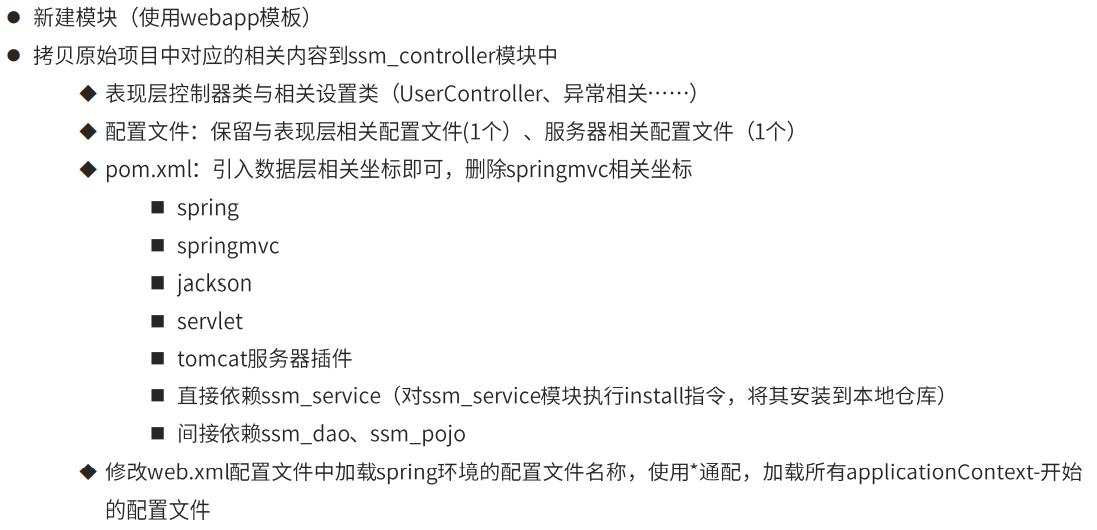
(4) controller module split
(5) Summary
(1) The module only contains the function classes and configuration files corresponding to the current module.
(2) spring core configuration is made independently according to different module functions.
(3) The modules that the current module depends on can be used only after they are added to the current module in the form of imported coordinates.
(4) web.xml needs to load all spring core configuration files.
8. Polymerization
(1) Function
Aggregation is used to quickly build maven projects and build multiple projects / modules at one time.
(2) Production method
① Create an empty module with the packaging type defined as pom
<packaging>pom</packaging>
② Defines the names of other modules associated with the current module during the build operation
<modules>
	<module>../ssm_controller</module>
	<module>../ssm_service</module>
	<module>../ssm_dao</module>
	<module>../ssm_pojo</module>
</modules>
Note: the final execution order of the modules participating in the aggregation operation is related to the dependencies between modules, not the configuration order.
9. Succession
(1) Module dependency maintenance
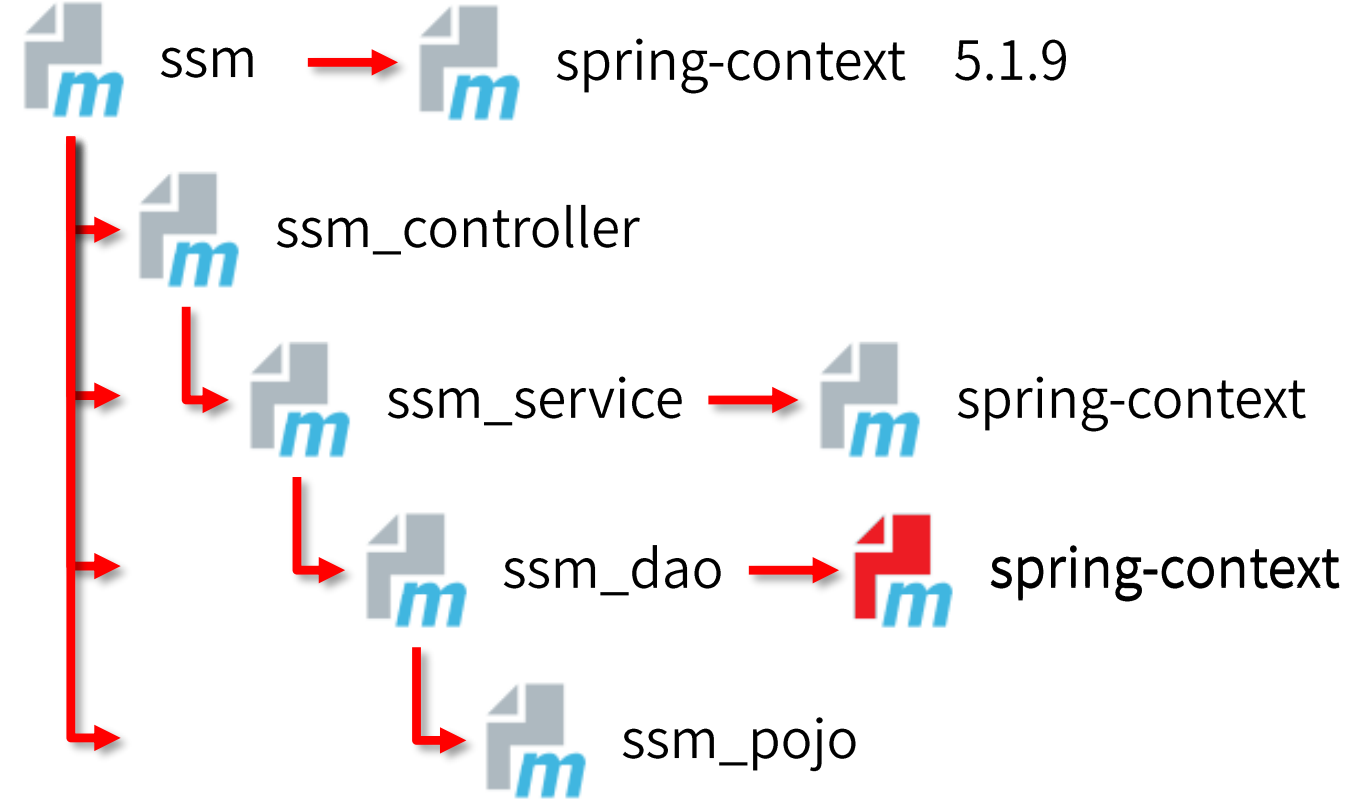
(2) Inheritance function and production mode
① Function: through inheritance, the configuration in the parent project can be used in the child project (inheritance in Maven is similar to inheritance in java, and the inheritance relationship can be configured in the child project)
② Manufacturing method: declare the coordinates and corresponding positions of the parent project in the child project
<!--Define the parent project of the project-->
<parent>
	<groupId>com.itheima</groupId>
	<artifactId>ssm</artifactId>
	<version>1.0-SNAPSHOT</version>
	<!--Fill in the parent project pom.xml File path-->
	<relativePath>../ssm/pom.xml</relativePath>
</parent>
(3) Inheritance dependency definition and dependency usage
① Define dependency management in parent project
<!--Declare dependency management here-->
<dependencyManagement>
	<!--Specific dependencies-->
	<dependencies>
		<!--spring environment-->
		<dependency>
			<groupId>org.springframework</groupId>
			<artifactId>spring-context</artifactId>
			<version>5.1.9.RELEASE</version>
		</dependency>
	<dependencies>
<dependencyManagement>
② The dependency relationship is defined in the child project without declaring the dependent version. The version refers to the dependent version in the parent project
<dependencies>
	<!--spring environment-->
	<dependency>
		<groupId>org.springframework</groupId>
		<artifactId>spring-context</artifactId>
	</dependency>
</dependencies>
In addition, it should be noted that the inherited resources are as follows:
(4) Comparison of inheritance and aggregation
| inherit | polymerization | |
|---|---|---|
| effect | For quick configuration | For quick build projects |
| Same point | The pom.xml files of aggregation and inheritance are packaged in POM, and the two relationships can be made into the same POM file | Aggregation and inheritance belong to design modules, and there is no actual module content |
| difference | Aggregation is to configure relationships in the current module. Aggregation can sense which modules participate in aggregation | Inheritance is to configure relationships in sub modules. The parent module cannot perceive which sub modules inherit itself |
10. Attribute version management
(1) Attribute category
Custom attribute, built-in attribute, Setting attribute, Java system attribute, environment variable attribute
(2) Attribute category: custom attribute
① Function: equivalent to defining variables to facilitate unified maintenance
② Define format:
<!--Custom properties-->
<properties>
	<spring.version>5.1.9.RELEASE</spring.version>
	<junit.version>4.12</junit.version>
</properties>
③ Call format:
<dependency>
	<groupId>org.springframework</groupId>
	<artifactId>spring-context</artifactId>
	<version>${spring.version}</version>
</dependency>
<dependency>
	<groupId>junit</groupId>
	<artifactId>junit</artifactId>
	<version>${junit.version}</version>
</dependency>
(3) Attribute category: built in attribute
① Function: use Maven built-in properties to quickly configure
② Call format:
${basedir}
${version}
(4) Attribute category: Setting attribute
① Function: use the tag attribute in Maven configuration file setting.xml for dynamic configuration
② Call format:
${settings.localRepository}
(5) Attribute category: Java system attributes
① Function: read Java system properties
② Call format:
${user.home}
③ System attribute query method:
mvn help;system
(6) Attribute category: environment variable attribute
① Function: use the label attribute of the system environment variable for dynamic configuration
② Call format:
${env.JAVA_HOME}
③ Environment variable attribute query method:
mvn help;system
11. Version management
(1) Project version differentiation
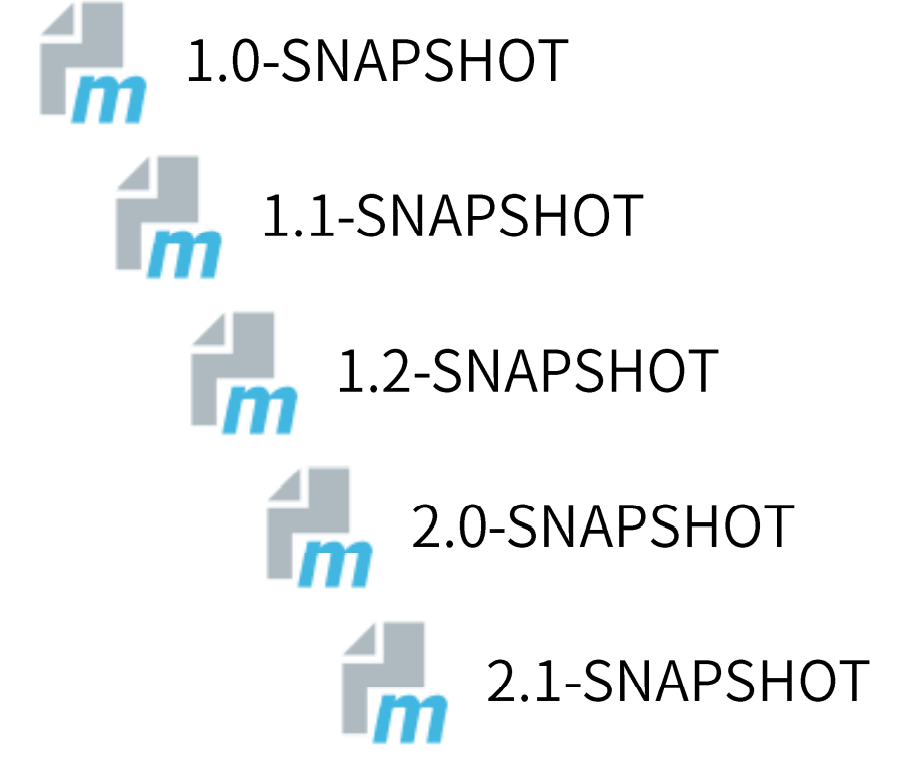
(2) Project version classification
| SNAPSHOT (SNAPSHOT version) | In the process of project development, in order to facilitate the cooperation of team members and solve the problems of interdependence and constant updating between modules, when developers build each module, the output temporary version is called snapshot Version (test phase version). In addition, the snapshot version will be updated continuously with the progress of development. |
|---|---|
| RELEASE (RELEASE version) | After the project development reaches the stage milestone, a relatively stable version is released to the outside of the team. The component file corresponding to this version is stable. Even if the subsequent development of functions will not change the content of the current release version, this version is called the release version. |
(3) Project version number agreement
Agreed specifications:
① < major version >, < minor version >, < incremental version >, < milestone version >
② Major version: indicates major architectural changes of the project, such as the iteration of spring 5 compared with spring 4.
③ Minor version: indicates that there are major function additions and changes, or vulnerabilities are repaired comprehensively and systematically
④ Incremental version: indicates the repair of major vulnerabilities..
⑤ Milestone version: indicates the milestone of a version (internal version). Compared with the next formal version, this version is relatively unstable and needs more testing.
Example:
5.1.9.RELEASE
12. Resource allocation
(1) Function
Load the properties defined in the pom.xml file in any configuration file (take the database configuration file jdbc.properties as an example here).
(2) Call format:
jdbc.url=${jdbc.url}
(3) Open the configuration file to load the properties in pom.xml
<!--Custom properties-->
<properties>
	<jdbc.url>jdbc:mysql://localhost:3306/ssm_db</jdbc.url>
</properties>

<build>
    <!--Information corresponding to the configuration resource file-->
    <resources>
        <resource>
            <!--Set the location directory corresponding to the configuration file, and support the dynamic setting of the directory using attributes-->
            <directory>${project.basedir}/src/main/resources</directory>
            <!--Turn on resource loading filtering for configuration files-->
            <filtering>true</filtering>
        </resource>
    </resources>
</build>
12. Multi environment development configuration
(1) Multi environment compatibility
(2) Multi environment configuration in pom.xml
<!--Create multi environment-->
<profiles>
    <!--Define specific environment: production environment-->
    <profile>
        <!--Defines the unique name of the environment-->
        <id>pro_env</id>
        <!--Define attribute values that are specific to the environment-->
        <properties>
            <jdbc.url>jdbc:mysql://127.1.1.1:3306/ssm_db</jdbc.url>
        </properties>
        <!--Set default startup-->
        <activation>
            <activeByDefault>true</activeByDefault>
        </activation>
    </profile>
    <!--Define specific environment: development environment-->
    <profile>
        <!--Defines the unique name of the environment-->
        <id>dep_env</id>
        <!--Define attribute values that are specific to the environment-->
        <properties>
            <jdbc.url>jdbc:mysql://127.2.2.2:3306/ssm_db</jdbc.url>
        </properties>
    </profile>
</profiles>
(3) Load specified environment
① Function: load the specified environment configuration
② Call format:
mvn instructions -P Environment definition id
③ Example:
mvn install -P pro_env
13. Skip test
(1) Application scenarios that skip the test phase
① The overall module function is not developed
② A function in the module has not been developed
③ Single function update debugging leads to failure of other functions
⑤ Need quick packaging
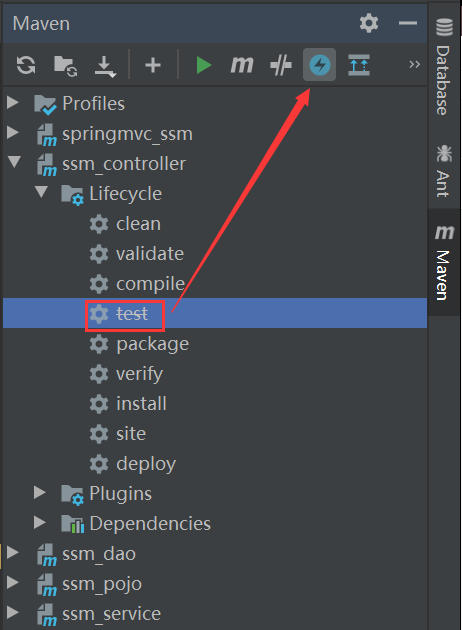
(2) Skip test with command
① Command:
mvn instructions -D skipTests
② Note: the executed instruction life cycle must include a test phase
(3) Skip test using interface operation
(4) Skip test using configuration
<plugin>
	<artifactId>maven-surefire-plugin</artifactId>
	<version>2.22.1</version>
	<configuration>
		<!--Set skip test-->
		<skipTests>true</skipTests>
		<!--Contains the specified test case-->
		<includes>
			<include>** /User*Test.java</include>
		</includes>
		<!--Exclude specified test cases-->
		<excludes>
			<exclude>**/User*TestCase.java</exclude>
		</exeludes>
	</configuration>
</plugin>
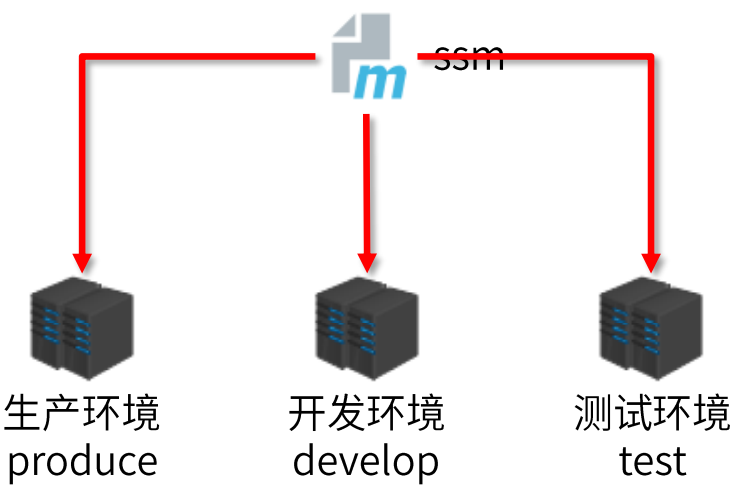
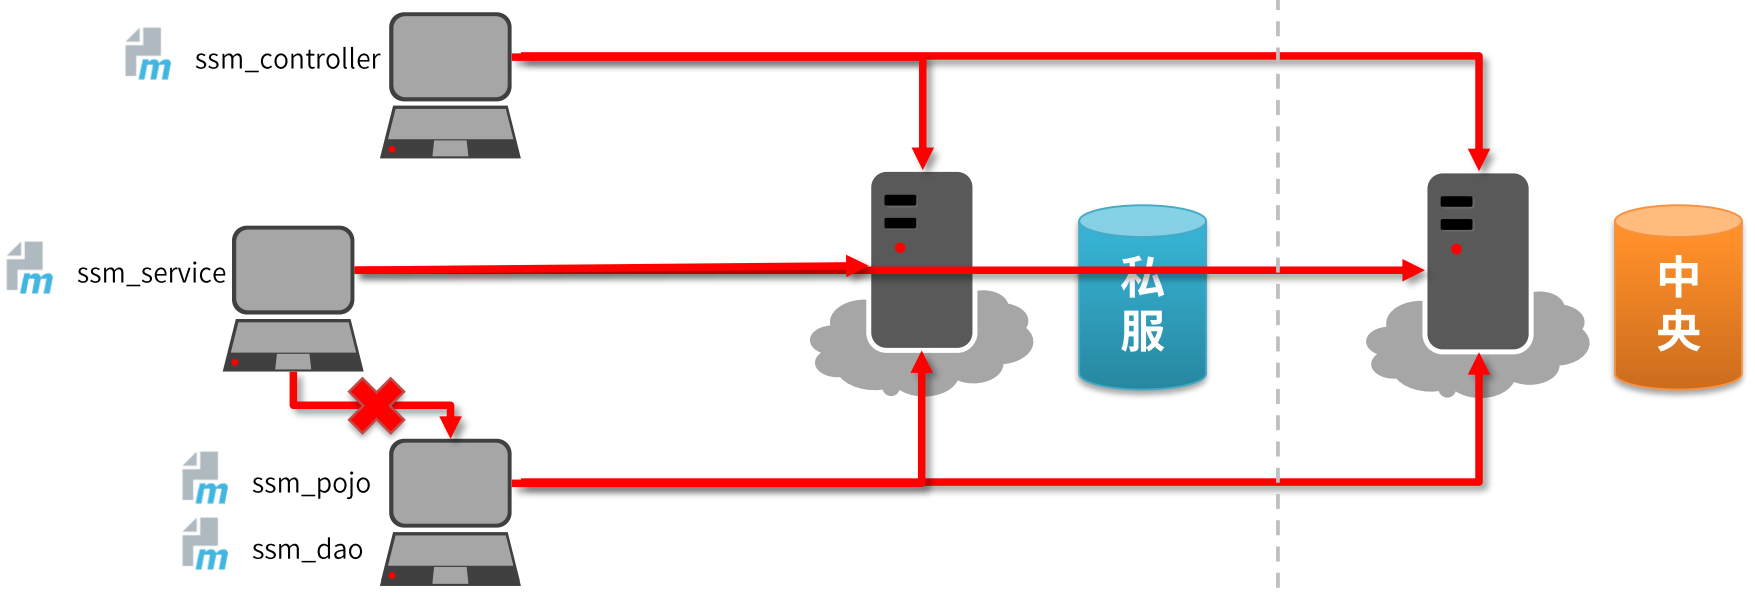
14. Private service
(1) Sub module development cooperation
(2) Download, install, start and configure Nexus
Nexus is a maven private service product of Sonatype company.
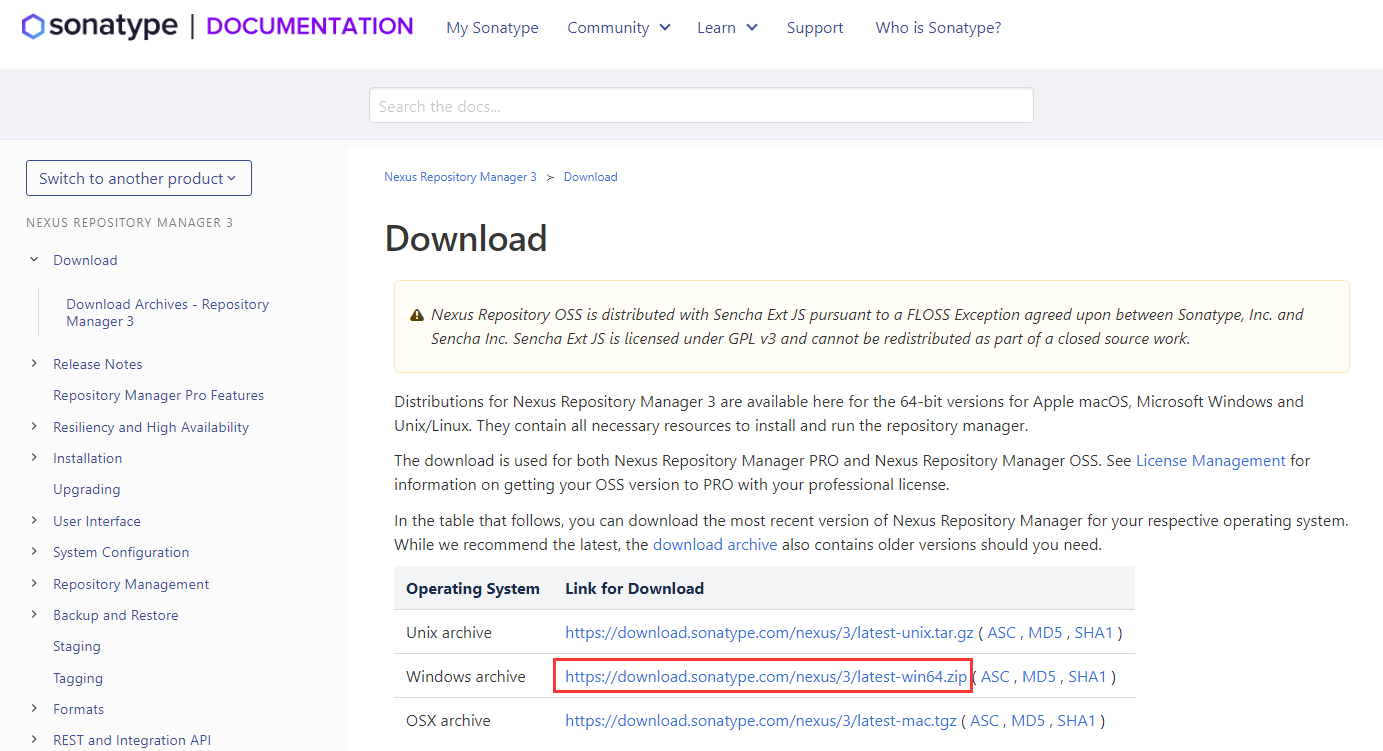
① Download
The download address is: https://help.sonatype.com/repomanager3/download
② Installation
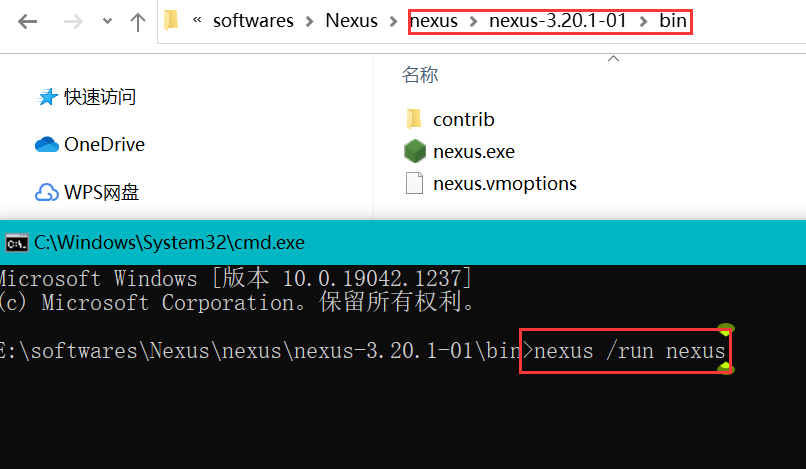
After downloading, unzip it and rename it nexus.

③ Start
The startup command is: nexus /run nuxus
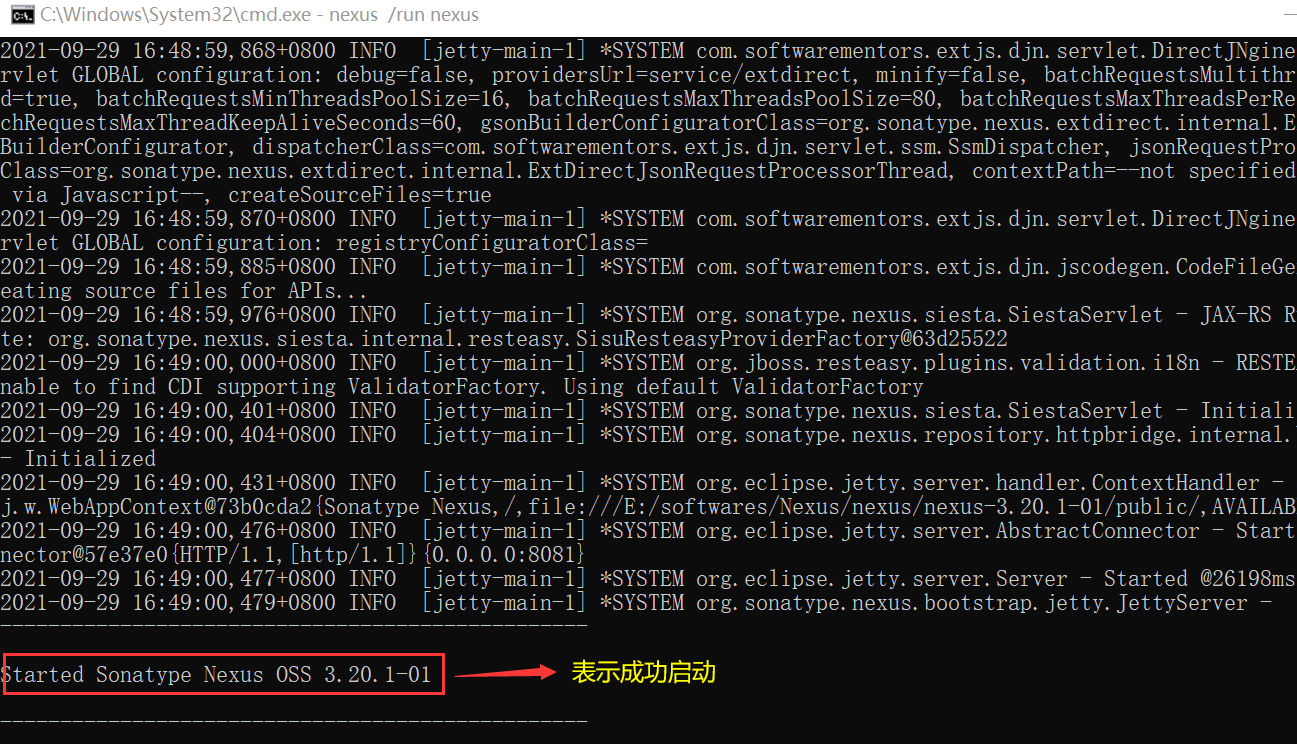
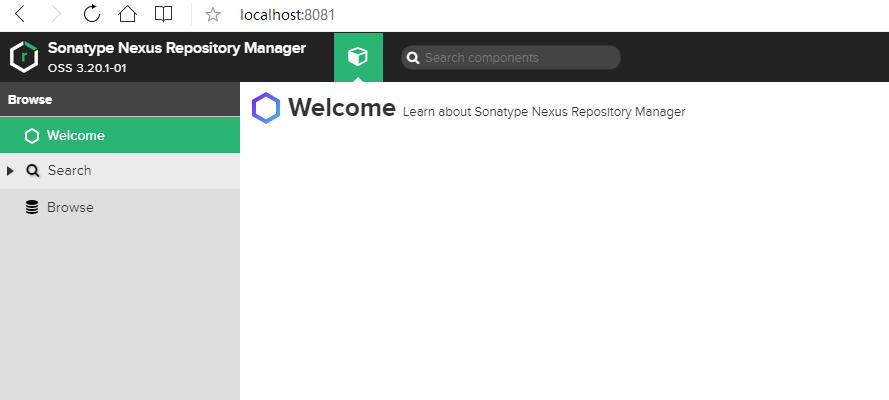
The access address is: http://localhost:8081/
④ Disposition
1) Modify basic configuration information
The nexus-default.properties file in the etc directory under the installation path stores the basic nexus configuration information, such as the default access port
2) Modify server running configuration information
The nexus.vmoptions file in the bin directory under the installation path stores the configuration information corresponding to the startup of the nexus server, such as the memory space occupied by default
(3) Obtain private server resources
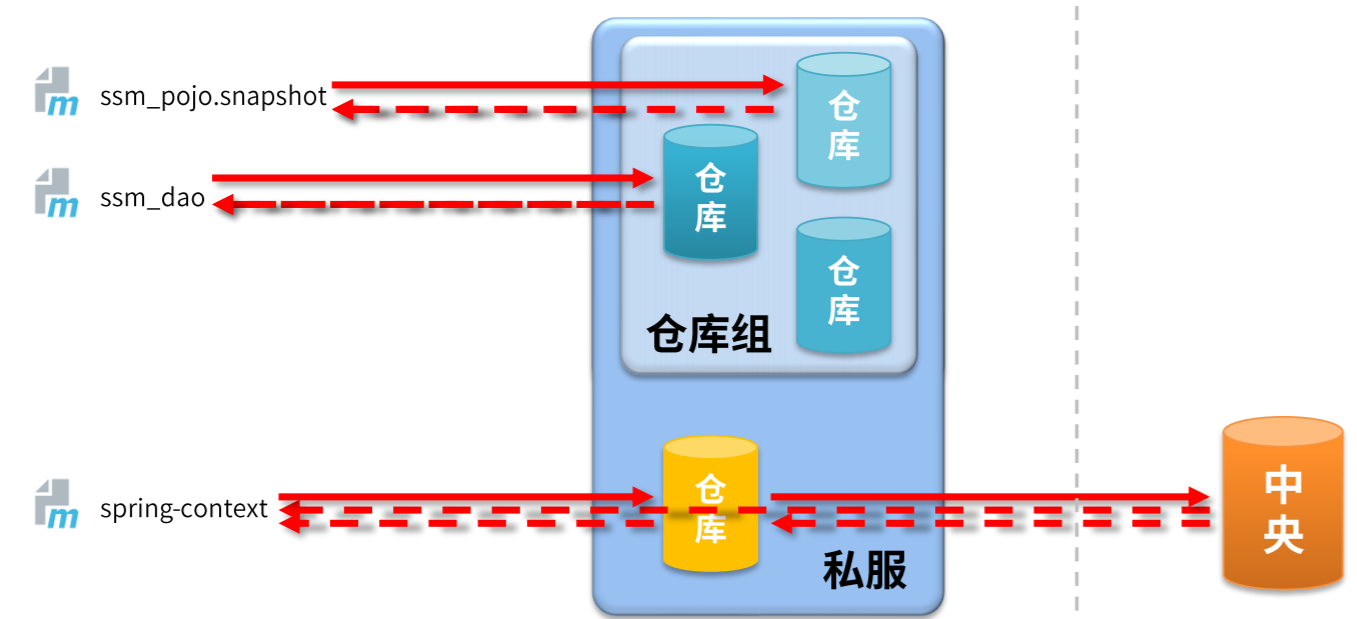
(4) Warehouse classification
① Hosted warehouse hosted
Save resources that cannot be obtained from the central warehouse (generally from independent research and development or third-party non open source projects).
② Proxy warehouse proxy
Agent remote warehouse to access other public warehouses, such as central warehouse, through nexus.
③ Warehouse group
Several warehouses form a group to simplify the configuration. In addition, a warehouse group cannot save resources. It is a design warehouse.
(5) Resource upload and download in IDEA environment
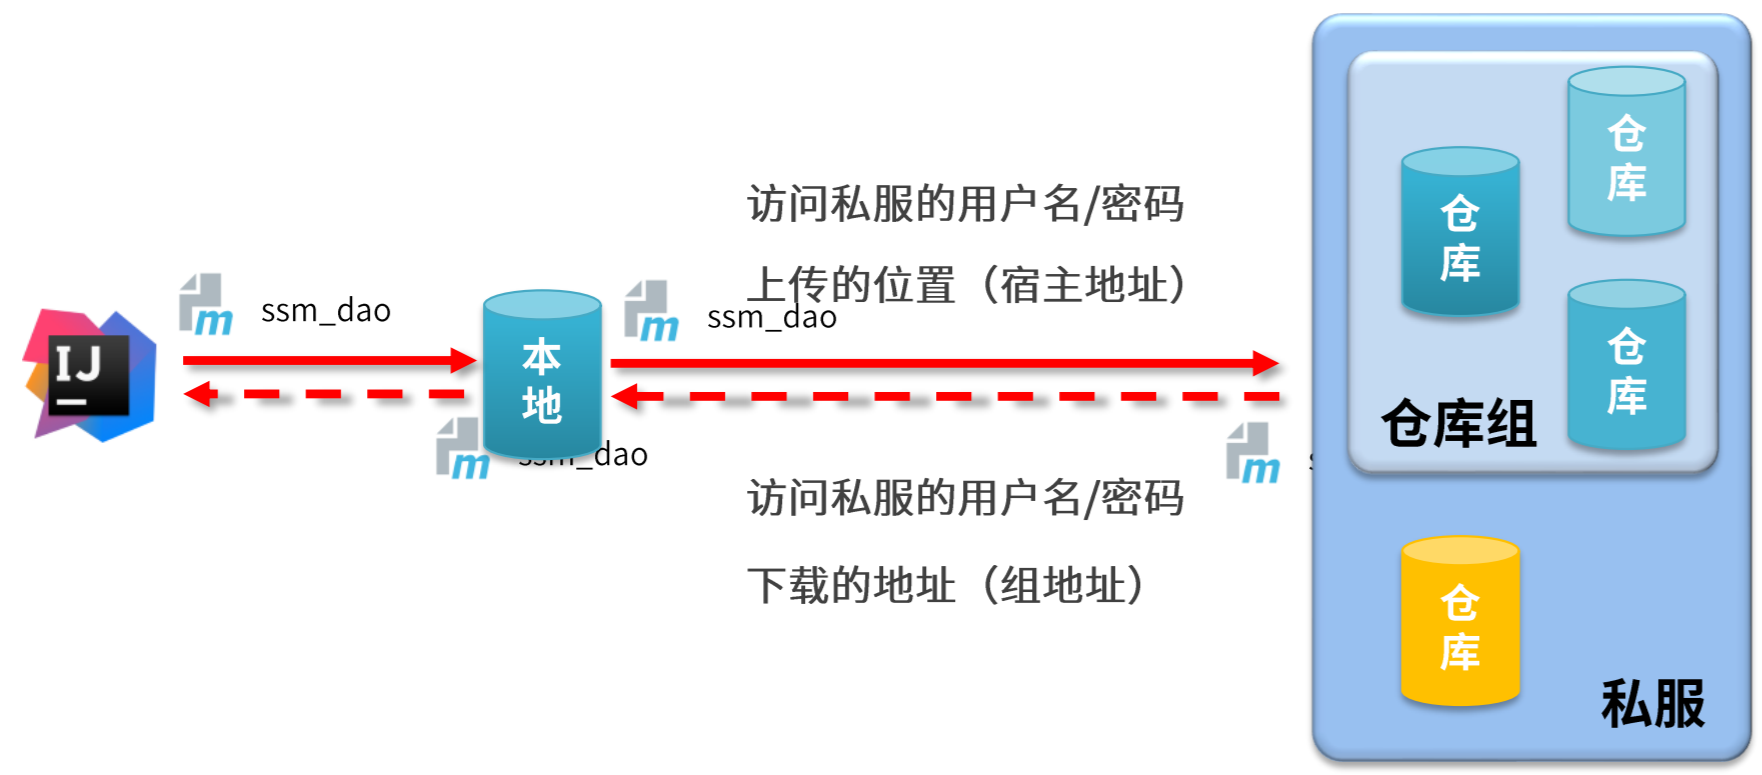
(6) Access private server configuration
① Local warehouse access private server
1) Configure the permissions of the local warehouse to access the private server (setting.xml)
<servers>
	<server>
		<id>heima-release</id>
		<username>admin</username>
		<password>admin</password>
	</server>
	<server>
		<id>heima-snapshots</id>
		<username>admin</username>
		<password>admin</password>
	</server>
</servers>
2) Configure local warehouse resource source (setting.xml)
<mirrors>
	<mirror>
		<id>nexus-heima</id>
		<mirrorOf>*</mirrorOf>
		<url>http://localhost:8081/repository/maven-public/</url>
	</mirror>
</mirrors>
② Project access server
1) Configure the save location (pom.xml) of the private server upload resources accessed by the current project
<distributionManagement>
	<repository>
		<id>heima-release</id>
		<url>http://localhost:8081/repository/heima-release/</url>
	</repository>
	<snapshotRepository>
		<id>heima-snapshots</id>
		<url>http://localhost:8081/repository/heima-snapshots/</url>
	</snapshotRepository>
</distributionManagement>
2) Command to publish resources to private server
mvn deploy