I. Preface
Reaction.js and vue.js are undoubtedly the most popular JS frameworks nowadays. They provide strong support for component-based development of traditional front-end pages, SPA pages, front-end and back-end separation, etc. Reaction. JS source code implementation is more complex (it is said that FaceBook's react team is currently fully rewriting react implementation). It is still difficult to understand the principle directly by reading the react source code. Therefore, by manually implementing the core concept of react, you can avoid the complexity of react source code and add more. Deeply understand yourself. Actually, there are not many react core concepts:
- Virtual dom Object (Virtual DOM)
- diff algorithm for virtual dom
- Data Flow
- Component life cycle
- event processing
Statement:
- This article assumes that you already know something about reactjs, if you don't at least look at Mr. ruanyifeng's Introduction demo.
- jsx is beyond the scope of this article, and all the examples are based on native javascript.
- The server-side reactjs are not covered by this article (server-side rendering).
- For the convenience of demonstration, this paper takes jQuery as the basic tool library.
- In order to demonstrate the principle more clearly, this article will ignore a lot of details, do not use in the production environment.
All instance source code is hosted in github. Click here. There are step-by-step examples, you can see while running the examples.
II. Introduction Examples
Start by rendering a "hello world" text to div:
<script type="text/javascript">
React.render('hello world',document.getElementById("container"))
</script>

<div id="container"></div>

/**
The generated html is:

<div id="container">
    <span data-reactid="0">hello world</span>
</div>

*/
As you can see, the most critical code above is React.render. Let's look at its implementation below.
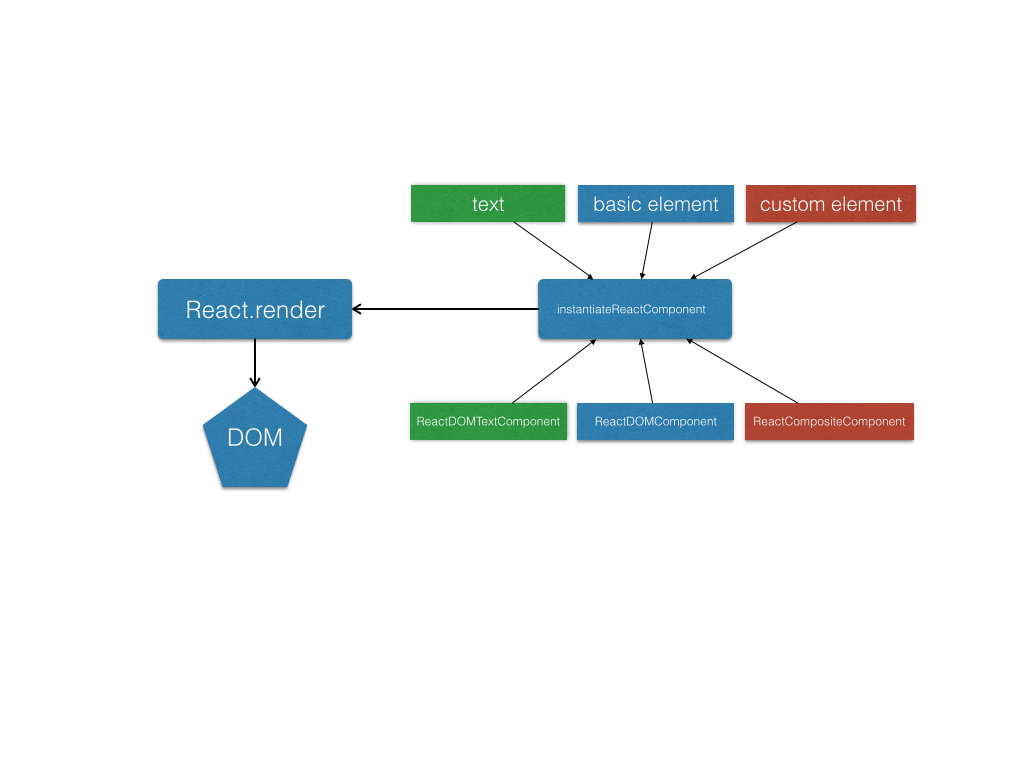
// component class, used to express what text should do when rendering, updating, deleting
function ReactDOMTextComponent(text) {
    // Save the current string (element of the component binding)
    this._currentElement = '' + text;
    // Id used to identify the current component
    this._rootNodeID = null;
}

//dom structure generated by component rendering
ReactDOMTextComponent.prototype.mountComponent = function(rootID) {
    this._rootNodeID = rootID;
    // Generating dom
    return '<span data-reactid="' + rootID + '">' + this._currentElement + '</span>';
}


//The component factory is used to return a corresponding component instance according to the element type
function instantiateReactComponent(node){
    // If the incoming node is a string or a numerical value
    if(typeof node === 'string' || typeof node === 'number'){
        // Create and return a text component
        return new ReactDOMTextComponent(node)
    }
}


React = {
    nextReactRootIndex:0,
    render:function(element,container){
        // Return a component based on element
        var componentInstance = instantiateReactComponent(element);
        // Rendering generates dom structure
        var markup = componentInstance.mountComponent(React.nextReactRootIndex++);
        // Insert into container
        $(container).html(markup);
        // Triggering the event that completes mount
        $(document).trigger('mountReady');    }
}
The code is divided into three parts:
1. React.render as the entrance to rendering
2. The concept of component class is introduced. ReactDOMTextComponent is a component class definition, which is a component of text type. Component provides what to do with element when rendering, updating and deleting, because only rendering is currently used, the other two can be ignored first.
3. The instantiateReactComponent is used to return an instance of a component based on the type of element (there is only one string type now). In fact, it is a kind of factory.
Next ReactRootIndex is used as the identity id of each component, adding 1 continuously to ensure uniqueness. So we can find this element through this logo later.
We can see that we divide the logic into several parts, and the main rendering logic is defined in the concrete component class (only the component itself knows how to render itself best). React.render is responsible for scheduling the entire process. In this case, instantiateReactComponent is called to generate an instance object corresponding to the component type, and mountComponent of this object is called to obtain the generated content (dom structure). Finally, it is inserted into the corresponding container node.
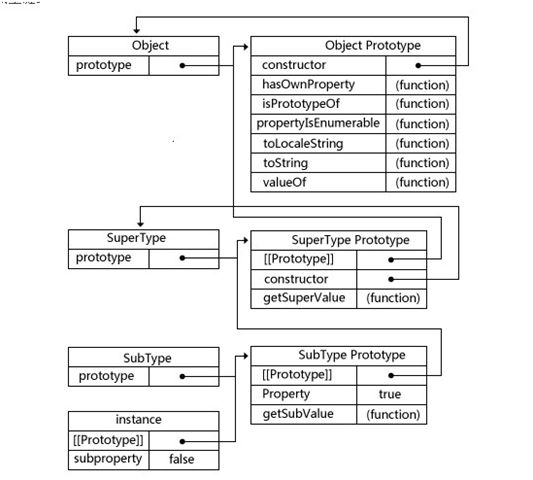
Interpolation: The code above uses the javascript prototype chain. If you are not familiar with the prototype chain, you can see the following picture:
3. element of Basic element Type
React.createElement is commonly used to create a virtual DOM element. There are two kinds of virtual DOM elements, one is the basic elements of the browser, such as div p input form, and the other is the self-defined elements. In theory, text nodes are not virtual dom, but reacjs, in order to maintain rendering consistency, wraps a span tag outside the text node and also gives it a simplified component (ReactDOMText Component).
This section only discusses the basic element s.
In reactjs, when we want to wrap a div outside hello world with some attributes, or even events, we can write as follows:
//Demonstrate how event monitoring works
function hello(){
    alert('hello')
}


var element = React.createElement('div',{id:'test',onclick:hello},'click me')

React.render(element,document.getElementById("container"))


/**

The generated html is:

<div data-reactid="0" id="test">
    <span data-reactid="0.0">click me</span>
</div>


Click on the text to pop up the hello dialog box

*/
Above, a basic element is created using React.createElement. Next, let's look at the implementation of the simplified version of React.createElement:
//ReactElement is the concept of virtual dom, with a type attribute representing the current node type and a props attribute of the node.
//For example, a node type like div is div, and props are attributes.
//In addition, the key here can be used to identify this element and to optimize later updates. It's good to know that there is such a thing.
function ReactElement(type,key,props){
  this.type = type;
  this.key = key;
  this.props = props;
}


React = {
    nextReactRootIndex:0,
    // createElement Function Definition
    createElement:function(type,config,children){
        var props = {},propName;
        config = config || {}
        // See if there is a key that identifies the type of element for efficient updates in the future.
        var key = config.key || null;

        // Copy the content in config to props
        for (propName in config) {
            if (config.hasOwnProperty(propName) && propName !== 'key') {
                props[propName] = config[propName];
            }
        }

        // Handling children, all mounted on the child attribute of props
        // Supports two ways of writing. If there is only one parameter, assign it directly to children, or merge it.
        var childrenLength = arguments.length - 2;
        if (childrenLength === 1) {
            props.children = $.isArray(children) ? children : [children] ;
        } else if (childrenLength > 1) {
            var childArray = Array(childrenLength);
            for (var i = 0; i < childrenLength; i++) {
                childArray[i] = arguments[i + 2];
            }
            props.children = childArray;
        }

        // Create a new ReactElement
        return new ReactElement(type,key,props);

    },
    render:function(element,container){
        var componentInstance = instantiateReactComponent(element);
        var markup = componentInstance.mountComponent(React.nextReactRootIndex++);
        $(container).html(markup);
        //Triggering the event that completes mount
        $(document).trigger('mountReady');
    }
}
createElement simply modifies the parameters and eventually returns a ReactElement instance object, which is what we call an instance of a virtual element. Note the definition of key here, mainly to optimize efficiency in future updates, which can be ignored first.
With an element instance, you have to render it, when render accepts a ReactElement instead of text, first modify the instantiate ReactComponent:
function instantiateReactComponent(node){
    //The case of text nodes
    if(typeof node === 'string' || typeof node === 'number'){
        return new ReactDOMTextComponent(node);
    }
    //Browser basic element, note that the type of basic element must be a string, which can be compared with the custom element.
    if(typeof node === 'object' && typeof node.type === 'string'){
        //Notice here that a new component is used
        return new ReactDOMComponent(node);
    }
}
A judgment is added here, so that when render is not text but the basic element of the browser. Another component (ReactDOMComponent) is used to handle what it should return when rendering. This shows the benefits of the factory method instantiate React Component, which is responsible for producing a rendered component instance regardless of the type of node that comes in. In this way, render does not need any modification at all, just a corresponding component type (in this case, ReactDOMComponent) is needed.
So let's focus on the implementation of ReactDOMComponent:
//component class, used to express what text should do when rendering, updating, deleting
function ReactDOMComponent(element){
    //Save the current element object reference
    this._currentElement = element;
    this._rootNodeID = null;
}

//dom structure generated by component rendering
ReactDOMComponent.prototype.mountComponent = function(rootID){
    // Identification
    this._rootNodeID = rootID;
    // element attribute
    var props = this._currentElement.props;
    // Start to construct start and end tags for dom structures
    var tagOpen = '<' + this._currentElement.type;
    var tagClose = '</' + this._currentElement.type + '>';

    // Add the reactid identifier, reactid=_rootNodeID
    tagOpen += ' data-reactid=' + this._rootNodeID;

    // Put together attributes
    for (var propKey in props) {
        // Here we need to do event monitoring, which is to parse the event attributes from the property props and extract the corresponding event monitoring of the event attributes at the beginning of on.
        if (/^on[A-Za-z]/.test(propKey)) {
            // Event type
            var eventType = propKey.replace('on', '');
            // Adding event proxies for current nodes proxies events for reactid=_rootNodeID child nodes
            $(document).delegate('[data-reactid="' + this._rootNodeID + '"]', eventType + '.' + this._rootNodeID, props[propKey]);
        }

        // String splicing is not required for child and event attributes
        // Events are proxied to the global. You can't spell it on the dom or you'll have native event monitoring
        // The child attribute is handled recursively below
        if (props[propKey] && propKey != 'children' && !/^on[A-Za-z]/.test(propKey)) {
            tagOpen += ' ' + propKey + '=' + props[propKey];
        }
    }
    // Get the rendered content of the child node
    var content = '';
    var children = props.children || [];

    // Compoonet instances used to save all child nodes will be used later
    var childrenInstances = [];
    var that = this;
    $.each(children, function(key, child) {
        // Once again, instantiateReactComponent is called to instantiate the component class of the child node, which is stitched together and returned.
        var childComponentInstance = instantiateReactComponent(child);
        childComponentInstance._mountIndex = key;
        // Caching child node instances to child ren Instances
        childrenInstances.push(childComponentInstance);
        // The rootId of the child node is the new value of the parent node's rootId combined with the new key, that is, the sequential value.
        var curRootId = that._rootNodeID + '.' + key;
        // Get the rendering content of the child node
        var childMarkup = childComponentInstance.mountComponent(curRootId);
        // Stitching together
        content += ' ' + childMarkup;
    })

    // Leave this side unused for future updates
    this._renderedChildren = childrenInstances;

    // Spell out the whole html content
    return tagOpen + '>' + content + tagClose;
}
The definition of virtual dom reactElement was added, and a new component class ReactDOMComponent was added. In this way, we have realized the function of rendering the basic elements of the browser.
For virtual dom rendering logic, which is essentially a recursive rendering, reactElement renders its own child nodes recursively. You can see that we shield the differences of sub-nodes through instantiateReactComponent by using different component classes, so that the rendered content can be guaranteed through mountComponent eventually.
In addition, the events on this side also need to be mentioned. When props are passed in, parameters like {onClick:function(){}} can be passed in, so that events can be added to the current element and proxied to the document. Because reactjs itself is all about js, the transfer of monitored functions becomes particularly simple.
There are many things that are not considered here, such as some special types of input select ion, etc., and img does not need a corresponding tagClose, etc. Here, in order to keep it simple, it is no longer extended. In addition, the event handling of reactjs is very complex, and a set of standard w3c events is implemented. This is where you lazy and use jQuery's event proxy directly to document.
4. Custom Type element
This section looks at the rendering principles of the custom type element.
Let's first look at how to define a custom element in React:
var HelloMessage = React.createClass({
  getInitialState: function() {
    return {type: 'say:'};
  },
  componentWillMount: function() {
    console.log('I'm about to start rendering...')
  },
  componentDidMount: function() {
    console.log('I've rendered it...')
  },
  render: function() {
    return React.createElement("div", null,this.state.type, "Hello ", this.props.name);
  }
});


React.render(React.createElement(HelloMessage, {name: "John"}), document.getElementById("container"));

/**
The results are as follows:

html:
<div data-reactid="0">
    <span data-reactid="0.0">say:</span>
    <span data-reactid="0.1">Hello </span>
    <span data-reactid="0.2">John</span>
</div>

console:
I'm about to start rendering...
I've rendered it...

*/
As you can see, the type of the first parameter of the createElement function here is no longer a string, but a class.
React.createClass generates a custom tag class with a basic lifecycle:
- getInitialState: Get the original attribute value this.state
- CompoonentWillmount: Called when the component is ready to render
- CompoonentDidMount: Called after component rendering is complete
Next, let's look at the implementation of React.createClass.
// Define ReactClass classes, all custom super-parent classes
var ReactClass = function(){
}
// Leave subclasses to inherit and override
ReactClass.prototype.render = function(){}


React = {
    nextReactRootIndex:0,
    // Create custom classes
    createClass:function(spec){
        // Generate a subclass
        var Constructor = function (props) {
            this.props = props;
            this.state = this.getInitialState ? this.getInitialState() : null;
        }
        // Prototype inheritance, super parent inheritance
        Constructor.prototype = new ReactClass();
        Constructor.prototype.constructor = Constructor;
        // Mix spec s into prototypes
        $.extend(Constructor.prototype,spec);
        return Constructor;

    },
    createElement:function(type,config,children){
        ...
    },
    render:function(element,container){
        ...
    }
}
You can see that createClass generates a subclass that inherits ReactClass and calls this.getInitialState in the constructor to get the original state.
For the convenience of demonstration, ReactClass on our side is quite simple. In fact, the original code deals with a lot of things, such as the combination inheritance support for mixin s of classes, such as component DidMount, which can be defined many times, need to merge calls, and so on. Interesting to flip the source code is not the main purpose of this article, but it is not detailed here. It's unfolding.
We've just returned a definition of inheritance classes, so where are these life cycle functions invoked in the concrete component Willmount?
Looking at the two types above, we know that it's time to provide a componet class for custom elements, where we instantiate ReactClass and manage the lifecycle, as well as parent-child component dependencies.
Well, our old rule is to transform instantiate React Component first.
function instantiateReactComponent(node){
    //The case of text nodes
    if(typeof node === 'string' || typeof node === 'number'){
        return new ReactDOMTextComponent(node);
    }
    //The default node of the browser
    if(typeof node === 'object' && typeof node.type === 'string'){
        //Notice here that a new component is used
        return new ReactDOMComponent(node);

    }
    //Custom Element Nodes
    if(typeof node === 'object' && typeof node.type === 'function'){
        //Note here, using the new component, specifically for custom elements
        return new ReactCompositeComponent(node);

    }
}
Simply, we added a judgment that uses the new component class to handle custom nodes. Let's look at the implementation of React Composite Component:
function ReactCompositeComponent(element){
    //Store element element element object
    this._currentElement = element;
    //Store Unique Identification
    this._rootNodeID = null;
    //Store instances of the corresponding ReactClass
    this._instance = null;
}

//Used to return what should be returned when the current custom element is rendered
ReactCompositeComponent.prototype.mountComponent = function(rootID){
    this._rootNodeID = rootID;
    //Get the attribute value corresponding to the current element
    var publicProps = this._currentElement.props;
    //Get the corresponding ReactClass
    var ReactClass = this._currentElement.type;
    // Initialize the public class
    var inst = new ReactClass(publicProps);
    this._instance = inst;
    //Keep a reference to the current comonent, which will be used in the updates below
    inst._reactInternalInstance = this;

    if (inst.componentWillMount) {
        inst.componentWillMount();
        //In fact, there is another layer of processing in the original reactjs, that is, component WillMount calls setstate, which does not trigger rerender but automatically merges ahead of time. In order to keep it simple, it is omitted here.
    }
    //Call the render method of the instance of ReactClass to return an element or a text node
    var renderedElement = this._instance.render();
    //Get an instance of component class corresponding to renderedElement
    var renderedComponentInstance = instantiateReactComponent(renderedElement);
    this._renderedComponent = renderedComponentInstance; //Save it for later use

    //Get the rendered string content and pass the current _rootNodeID to the render node
    var renderedMarkup = renderedComponentInstance.mountComponent(this._rootNodeID);

    //Previously, we finally triggered mountReady events in the React.render method, so we can listen here and trigger them when the rendering is complete.
    $(document).on('mountReady', function() {
        //Call inst.componentDidMount
        inst.componentDidMount && inst.componentDidMount();
    });

    return renderedMarkup;
}
Realization is not difficult, ReactClass render must return a virtual node (including element and text), at this time we use instantiate ReactComponent to get the instance, and then use mountComponent to get the result as the result of the current custom element.
It should be said that the custom element itself is not responsible for the specific content, it is more responsible for the life cycle. The specific content is rendered by the virtual node returned by its render method.
Essentially, it is also a recursive process of rendering content. At the same time, because of this recursive feature, the component WillMount of the parent component must be invoked before the component WillMount of a child component, while the component DidMount of the parent component must be after the child component, because listening for mountReady events must be the first listening for the child component.
It is important to note that the custom element does not handle the child nodes we pass in when we create Element, it only processes the node returned by its render as its own child node. However, we can use this.props.children to get those incoming child nodes when render, which can be handled by ourselves. Actually, it's a little like shadow dom in Web components.
There are three types of elements implemented above. In fact, we find that there is not much difference in essence. They all have their own component classes to handle their own rendering process.
The source code implementation and references in this paper are from: http://purplebamboo.github.io/2015/09/15/reactjs_source_analyze_part_one/