Actually, this article is not original, because I put the code in the book directly here and gave a simple explanation.
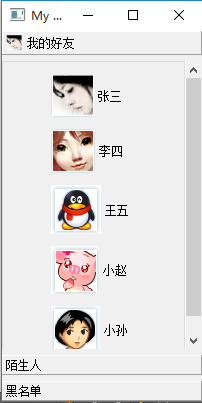
QQ interface is a typical toolbox class.
First, we create a new project, cancel the interface options, and create a new drawer class:
Draer.h reads as follows:
#include <QToolBox>
#include <QToolButton>
class Drawer : public QToolBox
{
    Q_OBJECT
public:
    Drawer(QWidget *parent=0,Qt::WindowFlags f=0);
private:
    QToolButton *toolBtn1_1;
    QToolButton *toolBtn1_2;
    QToolButton *toolBtn1_3;
    QToolButton *toolBtn1_4;
    QToolButton *toolBtn1_5;
    QToolButton *toolBtn2_1;
    QToolButton *toolBtn2_2;
    QToolButton *toolBtn3_1;
    QToolButton *toolBtn3_2;
};
The QToolButton is used here because only such buttons can be resolved and implemented. This will be reflected in the following code.
The contents of drawer.cpp are as follows:
#include "drawer.h"
#include <QGroupBox>
#include <QVBoxLayout>

Drawer::Drawer(QWidget *parent, Qt::WindowFlags f)
    :QToolBox(parent,f)
{
    setWindowTitle(tr("My QQ"));                   //Setting the title of the main form

    toolBtn1_1 =new QToolButton;
    toolBtn1_1->setText(tr("Zhang San"));
    toolBtn1_1->setIcon(QPixmap("11.png"));
    toolBtn1_1->setIconSize(QPixmap("11.png").size());
    toolBtn1_1->setAutoRaise(true);
    toolBtn1_1->setToolButtonStyle(Qt::ToolButtonTextBesideIcon);

    toolBtn1_2 =new QToolButton;
    toolBtn1_2->setText(tr("Li Si"));
    toolBtn1_2->setIcon(QPixmap("12.png"));
    toolBtn1_2->setIconSize(QPixmap("12.png").size());
    toolBtn1_2->setAutoRaise(true);
    toolBtn1_2->setToolButtonStyle(Qt::ToolButtonTextBesideIcon);

    toolBtn1_3 =new QToolButton;
    toolBtn1_3->setText(tr("Wang Wu"));
    toolBtn1_3->setIcon(QPixmap("13.png"));
    toolBtn1_3->setIconSize(QPixmap("13.png").size());
    toolBtn1_3->setAutoRaise(true);
    toolBtn1_3->setToolButtonStyle(Qt::ToolButtonTextBesideIcon);

    toolBtn1_4 =new QToolButton;
    toolBtn1_4->setText(tr("Xiao Zhao"));
    toolBtn1_4->setIcon(QPixmap("14.png"));
    toolBtn1_4->setIconSize(QPixmap("14.png").size());
    toolBtn1_4->setAutoRaise(true);
    toolBtn1_4->setToolButtonStyle(Qt::ToolButtonTextBesideIcon);

    toolBtn1_5 =new QToolButton;
    toolBtn1_5->setText(tr("Little grandson"));
    toolBtn1_5->setIcon(QPixmap("155.png"));
    toolBtn1_5->setIconSize(QPixmap("155.png").size());
    toolBtn1_5->setAutoRaise(true);
    toolBtn1_5->setToolButtonStyle(Qt::ToolButtonTextBesideIcon);

    QGroupBox *groupBox1=new QGroupBox;
    QVBoxLayout *layout1=new QVBoxLayout(groupBox1);    //(groupBox1);
    layout1->setMargin(10);                             //Display Spacing of Forms in Layout
    layout1->setAlignment(Qt::AlignHCenter);            //Display position of forms in layout
    layout1->addWidget(toolBtn1_1);
    layout1->addWidget(toolBtn1_2);
    layout1->addWidget(toolBtn1_3);
   layout1->addWidget(toolBtn1_4);
    layout1->addWidget(toolBtn1_5);
   layout1->addStretch();                             //Insert a placeholder

    toolBtn2_1 =new QToolButton;
    toolBtn2_1->setText(tr("Xiao Wang"));
    toolBtn2_1->setIcon(QPixmap("21.png"));
    toolBtn2_1->setIconSize(QPixmap("21.png").size());
    toolBtn2_1->setAutoRaise(true);
    toolBtn2_1->setToolButtonStyle(Qt::ToolButtonTextBesideIcon);

    toolBtn2_2 =new QToolButton;
    toolBtn2_2->setText(tr("Xiao Zhang"));
    toolBtn2_2->setIcon(QPixmap("22.png"));
    toolBtn2_2->setIconSize(QPixmap("22.png").size());
    toolBtn2_2->setAutoRaise(true);
    toolBtn2_2->setToolButtonStyle(Qt::ToolButtonTextBesideIcon);

    QGroupBox *groupBox2=new QGroupBox;
    QVBoxLayout *layout2=new QVBoxLayout(groupBox2);
    layout2->setMargin(10);
    layout2->setAlignment(Qt::AlignHCenter);
    layout2->addWidget(toolBtn2_1);
    layout2->addWidget(toolBtn2_2);

    toolBtn3_1 =new QToolButton;
    toolBtn3_1->setText(tr("Xiao Chen"));
    toolBtn3_1->setIcon(QPixmap("31.png"));
    toolBtn3_1->setIconSize(QPixmap("31.png").size());
    toolBtn3_1->setAutoRaise(true);
    toolBtn3_1->setToolButtonStyle(Qt::ToolButtonTextBesideIcon);

    toolBtn3_2 =new QToolButton;
    toolBtn3_2->setText(tr("petty thief"));
    toolBtn3_2->setIcon(QPixmap("32.png"));
    toolBtn3_2->setIconSize(QPixmap("32.png").size());
    toolBtn3_2->setAutoRaise(true);
    toolBtn3_2->setToolButtonStyle(Qt::ToolButtonTextBesideIcon);

    QGroupBox *groupBox3=new QGroupBox;
    QVBoxLayout *layout3=new QVBoxLayout(groupBox3);
    layout3->setMargin(10);
    layout3->setAlignment(Qt::AlignHCenter);
    layout3->addWidget(toolBtn3_1);
    layout3->addWidget(toolBtn3_2);

    this->addItem((QWidget*)groupBox1,tr("My good friend"));
    this->addItem((QWidget*)groupBox2,tr("Stranger"));
    this->addItem((QWidget*)groupBox3,tr("Blacklist"));
}
Drawer :: Drawer ( QWidget * parent , Qt :: WindowFlags f )
The parentheses of the QToolBox(parent,f) should be written by themselves. In addition, the need for interface, generally including Q_OBJECT class, which has signal slots and other things, the specific has not yet been fully understood.
Of course, the final layout also needs to add these sub-layouts to the window layout.
The example here uses the additem method. It should be noted here that the drawer class inherits the QToolBox class, so this method is suitable. It's added at the bottom.
The additem function provides three parameters: int QToolBox:: addItemtem( QWidget * widget, const QIcon& iconSet, const QString & text)
So we can also add pictures: this - > addItem ((QWidget*) groupBox 1, QIcon ("11.png"), tr ("my friend"); slightly change, you can see the effect of running:
The first one is with pictures, and the others are without pictures.
Reproduced in: https://my.oschina.net/u/2505464/blog/542371