Python+OpenCV+dlib for face recognition
IDE: Jupyter Notebook(Anaconda3)
Python version: Python 3.8
Native environment: Windows 10
Principle overview
Call dlib library for face recognition, call predictor "shape_predictor_68_face_landmarks.dat" for 68 point face calibration, and use opencv library function for simple image processing
I. installation of OpenCV and dlib libraries for Windows system
- Open Anaconda Prompt command box and enter python -V to get the current python version


-
Install opencv using the command: pip install opencv_python
-
stay dlib official website Download the corresponding python version of dlib
Here are two popular dlib packages
Python 3.8 link:
https://pan.baidu.com/s/1kLn0uEqO5xinuTMZzk3fFA
Extraction code: kh99Python 3.7 link:
https://pan.baidu.com/s/14cxfDkC2dODyncLAZ3bwaQ
Extraction code: w8hpThis connection is from https://blog.csdn.net/weixin_56102526/article/details/121119472 Parallel leaf blog
-
Enter pip install dlib - Version Registration. whl to install dlib. For example, I want to install the dlib package of Python 3.8 downloaded above:
pip install dlib-19.19.0-cp38-cp38-win_amd64.whl
2, Face recognition
Use Jupiter notebook to create a new project. Enter the following code to realize the most basic face recognition
# -*- coding: utf-8 -*-
"""
Created on Wed Oct 27 03:15:10 2021

@author: GT72VR
"""
import numpy as np
import cv2
import dlib
import os
import sys
import random

# dlib predictor
detector = dlib.get_frontal_face_detector()
predictor = dlib.shape_predictor('shape_predictor_68_face_landmarks.dat')

ok = True
# Open the camera parameter as the input stream, which can be a camera or video file
camera = cv2.VideoCapture(0)
#If you can't turn on the camera, you can use the following function to collect faces from the video
#camera = cv2.VideoCapture('video.mp4')
while ok:
    # Read the image in the camera. ok is the judgment parameter for whether the reading is successful
    ok, img = camera.read()

    # Convert to grayscale image
    img_gray = cv2.cvtColor(img, cv2.COLOR_BGR2GRAY)

    rects = detector(img_gray, 0)
    for i in range(len(rects)):
        landmarks = np.matrix([[p.x, p.y] for p in predictor(img, rects[i]).parts()])
 # Draw feature points
        for idx, point in enumerate(landmarks):
            # Coordinates of 68 points
            pos = (point[0, 0], point[0, 1])

            # Use cv2.circle to draw a circle for each feature point, a total of 68
            cv2.circle(img, pos, 1, color=(0, 255, 0))

            # Output 1-68 with cv2.putText
            font = cv2.FONT_HERSHEY_SIMPLEX
            cv2.putText(img, str(idx + 1), pos, font, 0.3, (0, 0, 255), 1, cv2.LINE_AA)
    cv2.imshow('video', img)
    k = cv2.waitKey(1)
    if k == 27:  # Press ESC to exit
        break
camera.release()
cv2.destroyAllWindows()
Click Run. After a while, a new window will appear in the menu bar. Click open to get:

People are not handsome enough. Here we use the cv2.rectangle function to simply type a code for ourselves
3, Mosaic
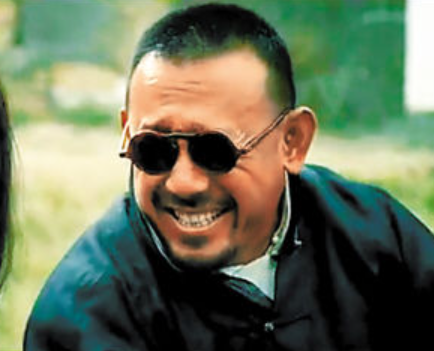
It's not fun enough to realize face recognition. We need the whole program effect. Just like the dynamic filters of some beauty cameras on the market, we can add a pair of sunglasses to ourselves
- Add the following drawing code to the source file, which can be placed after defining the point coordinates
# Draw glasses
cv2.circle(img, (point_list[41][0], point_list[41][1]), int(3 * size), (0, 0, 0), -1) #-1 indicates a solid circle, and sunglasses are primed
cv2.circle(img, (point_list[41][0], point_list[41][1]), int(3 * size), (255, 255, 255), 10) #10 indicates the border width. There are 10 pixels to draw the border
cv2.circle(img, (point_list[46][0], point_list[46][1]), int(3 * size), (0, 0, 0), -1)
cv2.circle(img, (point_list[46][0], point_list[46][1]), int(3 * size), (255, 255, 255), 10)
# Draw eyeglass frame
cv2.line(img, point_39, point_42, (0, 0, 0), 4)
- Run and get the following results

-
All codes:
# -*- coding: utf-8 -*-
"""
Created on Wed Oct 27 03:15:10 2021

@author: GT72VR
"""
import numpy as np
import cv2
import dlib
import os
import sys
import random

# dlib predictor
detector = dlib.get_frontal_face_detector()
predictor = dlib.shape_predictor('shape_predictor_68_face_landmarks.dat')

ok = True
# Open the camera parameter as the input stream, which can be a camera or video file
camera = cv2.VideoCapture(0)
#camera = cv2.VideoCapture('video.mp4')
while ok:
    # Read the image in the camera. ok is the judgment parameter for whether the reading is successful
    ok, img = camera.read()

    # Convert to grayscale image
    img_gray = cv2.cvtColor(img, cv2.COLOR_BGR2GRAY)

    rects = detector(img_gray, 0)
    for i in range(len(rects)):
        landmarks = np.matrix([[p.x, p.y] for p in predictor(img, rects[i]).parts()])
        # Matrix to list
        point_list=landmarks.getA()

        # Point coordinates
        point_37 = (point_list[37][0],point_list[37][1])
        point_38 = (point_list[38][0], point_list[38][1])

        # Scale factor, 37,38 two-point distance
        size = (pow(pow(point_38[1] - point_37[1], 2) + pow(point_38[0] - point_37[0], 2), 0.5))

        # Point coordinates
        point_39 = (point_list[39][0], point_list[39][1])
        point_42 = (point_list[42][0], point_list[42][1])

        # Draw glasses
        cv2.circle(img, (point_list[41][0], point_list[41][1]), int(3 * size), (0, 0, 0), -1)
        cv2.circle(img, (point_list[41][0], point_list[41][1]), int(3 * size), (255, 255, 255), 10)
        cv2.circle(img, (point_list[46][0], point_list[46][1]), int(3 * size), (0, 0, 0), -1)
        cv2.circle(img, (point_list[46][0], point_list[46][1]), int(3 * size), (255, 255, 255), 10)
        # Draw eyeglass frame
        cv2.line(img, point_39, point_42, (0, 0, 0), 4)


        # Draw feature points
        for idx, point in enumerate(landmarks):
            # Coordinates of 68 points
            pos = (point[0, 0], point[0, 1])

            # Use cv2.circle to draw a circle for each feature point, a total of 68
            cv2.circle(img, pos, 1, color=(0, 255, 0))

            # Output 1-68 with cv2.putText
            font = cv2.FONT_HERSHEY_SIMPLEX
            cv2.putText(img, str(idx + 1), pos, font, 0.3, (0, 0, 255), 1, cv2.LINE_AA)
    cv2.imshow('video', img)
    k = cv2.waitKey(1)
    if k == 27:  # Press ESC to exit
        break
camera.release()
cv2.destroyAllWindows()
4, Summary
By learning database shape_predictor_68_face_landmarks.dat, python can use only dozens of lines of code to complete a simple face data acquisition. Combined with Opencv image programming, it can present the collected content more intuitively in front of us. It can also use cv2's drawing function to carry out simple image processing on the collected face for the whole work.
5, Reference articles
A maverick pig: face recognition with python+opencv+dlib
Intoxication and Thousand Layer dream: simple face data acquisition based on OpenCv+Python+Dlib