1. NAT mode topology and working principle
There is a scheduler in front of a group of servers, which are connected through Switch/HUB. These servers provide the same network service and content, that is, no matter which server the request is sent to, the execution result is the same. The content of the service can be copied to the local hard disk of each server, shared through a network file system (such as NFS), or provided through a distributed file system.
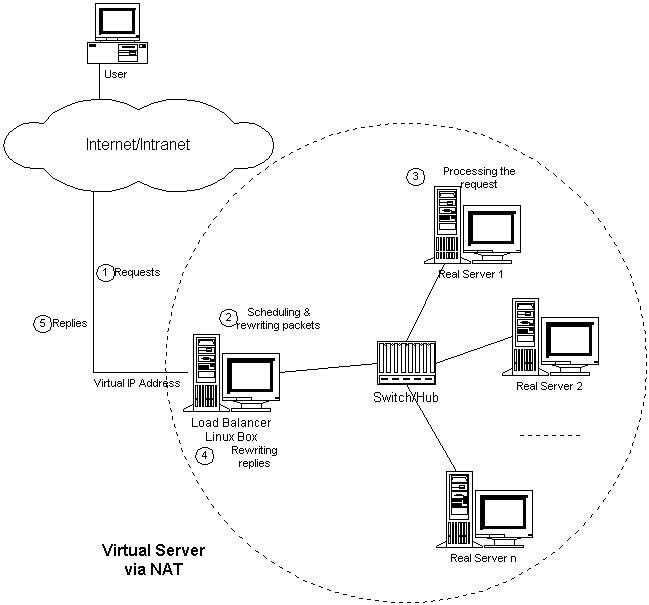
When the client accesses the network service through the Virtual IP Address, the request message arrives at the dispatcher. The dispatcher selects a server from a group of real servers according to the connection scheduling algorithm, and the destination address of the message is virtual IP The address is rewritten as the address of the selected server, the destination port of the message is rewritten as the corresponding port of the selected server, and finally the modified message is sent to the selected server. At the same time, the dispatcher records the connection in the connection Hash table. When the next message of the connection arrives, the address and port of the original selected server can be obtained from the connection Hash table, and the same rewriting operation can be carried out, and the message will be transmitted to the original selected server. When the response message from the real server passes through the dispatcher, the dispatcher changes the source address and source port of the message to Virtual IP Address and corresponding port, and then sends the message to the user. We introduce a state machine into the connection, different messages will make the connection in different states, different states have different timeout values. In TCP connection, state migration is performed according to the standard TCP finite state machine; in UDP, we only set one UDP state. The timeout values of different states can be set. By default, the timeout of SYN state is 1 minute, that of ESTABLISHED state is 15 minutes, that of FIN state is 1 minute, and that of UDP state is 5 minutes. When the connection terminates or times out, the scheduler removes the connection from the connection Hash table.
In this way, what the customer sees is only the services provided on the Virtual IP Address, and the structure of the server cluster is transparent to the user. For the rewritten message, the incremental adjustment Checksum algorithm is applied to adjust the value of TCP Checksum, avoiding the cost of scanning the whole message to calculate Checksum.
2. Types of scheduling algorithms
Round Robin
Weighted Round Robin
Least Connections
Weighted Least Connections
Locality based least connections
Locality based least connections with replication
Destination Hashing
Source Hashing
Shortest expected delay
No queue
3. Case implementation
Objective:
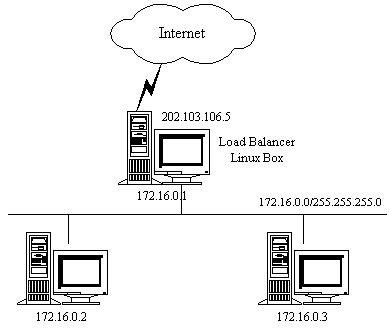
All the traffic with the IP address of 202.103.106.5 and the port of 80 for client access is on the real servers 172.16.0.2:80 and 172.16.0.3:80, which are scheduled by load balancing
Round Robin, polling algorithm, the first to 2, the second to 3, the third to 2, the fourth to 3
This test machine: Centos Linux 8.1.1911
1. Address configuration (install software first)
The network card of 172.16.0.0/24 is host only;
202.103.106.0/24 is NAT;
The scheduler requires a dual network card.
Note: in real server NAT mode, the gateway should point to the internal address of the scheduler, which is 172.16.0.1 in the figure.
2. Turn off firewall and selinux
All virtual machines are executed, and the real environment needs to be treated in a real way. When doing experiments, they will be shut down.
vim /etc/selinux/config
modify SELINUX=permissive
setenforce 0
Turn off firewall
systemctl stop firewalld
systemctl disable firewalld
3. Clock synchronization
Time for all real server s to synchronize the scheduler.
Configuration reference
Chronyd synchronization time (Server/Client) configuration
4. Software installation
View kernel modules
modprobe ip_vs
lsmod | grep ip_vs
Installation management tools
yum install ipvsadm
real server installs httpd service
real server 1
[root@node1 ~]# echo "this is real server node1" >> /var/www/html/index.html
 [root@node1 ~]# systemctl start httpd
 [root@node1 ~]# systemctl enable httpd
 Created symlink /etc/systemd/system/multi-user.target.wants/httpd.service → /usr/lib/systemd/system/httpd.service.
 [root@node1 ~]#
real server 2
[root@node2 ~]# echo "this is real server node2" >> /etc/httpd/index.html
 [root@node2 ~]# systemctl start httpd
 [root@node2 ~]# systemctl enable httpd
 Created symlink /etc/systemd/system/multi-user.target.wants/httpd.service → /usr/lib/systemd/system/httpd.service.
 [root@node2 ~]#
4. Configure scheduler
view help
man ipvsadm
SYNOPSIS
       ipvsadm -A|E virtual-service [-s scheduler]
               [-p [timeout]] [-M netmask] [-b sched-flags]
       ipvsadm -D virtual-service
       ipvsadm -C
       ipvsadm -R
       ipvsadm -S [-n]
       ipvsadm -a|e virtual-service -r server-address
               [-g|i|m] [-w weight] [-x upper] [-y lower]
       ipvsadm -d virtual-service -r server-address
       ipvsadm -L|l [virtual-service] [options]
       ipvsadm -Z [virtual-service]
       ipvsadm --set tcp tcpfin udp
       ipvsadm --start-daemon state [daemon-options]
               [--syncid syncid]
       ipvsadm --stop-daemon state
       ipvsadm -h
This parameter is missing in addition and modification. The old version has Oh.
-t|u|f
-t: TCP protocol
-u: UDP protocol
Add a cluster service
ipvsadm -A -t 202.103.106.5:80 -s rr
Add real server
ipvsadm -a -t 202.103.106.5:80 -r 172.16.0.2:80 -m
ipvsadm -a -t 202.103.106.5:80 -r 172.16.0.3:80 -m
see
[root@filesystem ~]# ipvsadm -l -n
IP Virtual Server version 1.2.1 (size=4096)
Prot LocalAddress:Port Scheduler Flags
  -> RemoteAddress:Port           Forward Weight ActiveConn InActConn
TCP  202.103.106.5:80 rr
  -> 172.16.0.2:80                Masq    1      0          0
  -> 172.16.0.3:80                Masq    1      0          0
[root@filesystem ~]#
Rule save
[root@filesystem ~]# ipvsadm-save > /root/ipvsadm.bak
[root@filesystem ~]# cat ipvsadm.bak
-A -t filesystem.server.com:http -s rr
-a -t filesystem.server.com:http -r 172.16.0.2:http -m -w 1
-a -t filesystem.server.com:http -r 172.16.0.3:http -m -w 1
[root@filesystem ~]#
Rule import
[root@filesystem ~]# ipvsadm -C
# -C is the meaning of the empty rule
[root@filesystem ~]# ipvsadm -R < ipvsadm.bak
[root@filesystem ~]# ipvsadm
IP Virtual Server version 1.2.1 (size=4096)
Prot LocalAddress:Port Scheduler Flags
  -> RemoteAddress:Port           Forward Weight ActiveConn InActConn
TCP  filesystem:http rr
  -> 172.16.0.2:http              Masq    1      0          0
  -> 172.16.0.3:http              Masq    1      0          0
[root@filesystem ~]#
5. Testing
As we can see from the figure, access to our scheduler (that is, the address to provide external services, and switch back and forth on the internal real server). Load sharing)
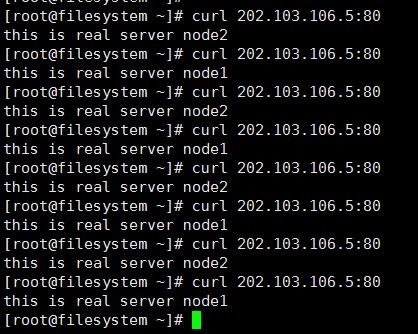
In this way, the customer thinks that they get the correct response from the 202.103.106.5:80 service, without knowing whether the request is processed by server 172.16.0.2 or server 172.16.0.3.
There is always one on the way to study and keep fit