LVS load balancing - DR mode
1: Definition of DR mode
-
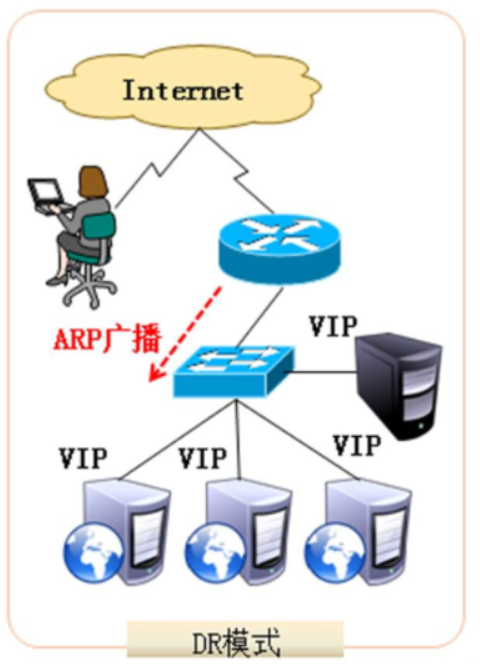
Direct routing
-
Referred to as DR mode, the semi open network structure is adopted, which is similar to the structure type of TUN mode, but each node is not scattered in different places, but is located in the same physical network with the scheduler; the load scheduler is connected with each node server through the local network, and there is no need to establish a dedicated IP tunnel.
2: ARP problem in LVS-DR
-
In LVS-DR load balancing cluster, both the load balancer and the node server should be configured with the same VIP address
-
Having the same IP address in LAN will cause the ARP communication disorder of each server
-
When an ARP broadcast is sent to LVS-DR cluster, because load balancer and node server are connected to the same network, they will receive ARP broadcast
-
At this time, only the front-end load balancer responds, and other node servers should not respond to ARP broadcast
-
Process the node server so that it does not respond to ARP requests for VIP s
-
Use virtual interface lo:0 to host VIP address
-
Set the kernel parameter arp_ignore=1: the system only responds to ARP requests with the destination IP being the local IP
-
The real server return message (source IP is VIP) is forwarded by the router. When repacking the message, you need to obtain the MAC address of the router first
-
When sending ARP request, Linux uses the source IP address (VIPs) of IP package as the source IP address of ARP request package by default, instead of the IP address of sending interface (such as ens33)

-
At this time, the router will forward the new request message to the
RealServer, leading to VIP failure of Director -
resolvent:
● process the node server, and set the kernel parameter ARP uuannounce = 2: the system does not use the source address of IP packet to set the source address of ARP request, but selects the IP address of the sending interface
3: Experimental configuration
1. Experimental environment
(1) Four centos7 virtual machines, two as lvs and two as web
(2) The client host can access the Web page of the backstage Web server through the virtual ip address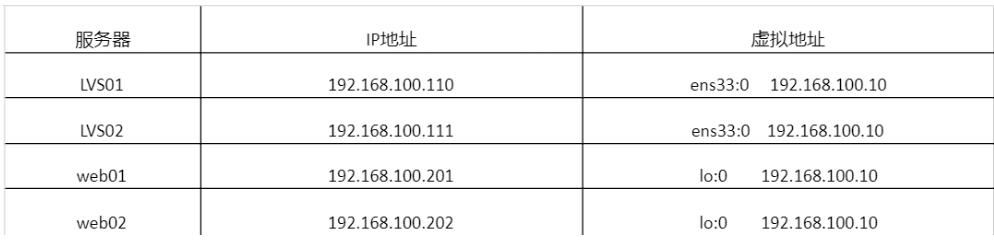
2. Experimental steps
(same configuration, different IP address)
(1) Modify the host name and install the package
[root@localhost ~]# hostnamectl set-hostname lvs01
[root@localhost ~]# su
[root@lvs01 ~]#
[root@lvs01 ~]# yum install keepalived ipvsadm -y
(2) Modify parameter kernel file
[root@lvs01 ~]# vim /etc/sysctl.conf
'Last line add'
net.ipv4.ip_forward=1      'Start route forwarding function'
net.ipv4.conf.all.send_redirects = 0
net.ipv4.conf.default.send_redirects = 0       'Turn off redirection'
net.ipv4.conf.ens33.send_redirects = 0

[root@lvs01 ~]# sysctl -p "let the above configuration take effect"
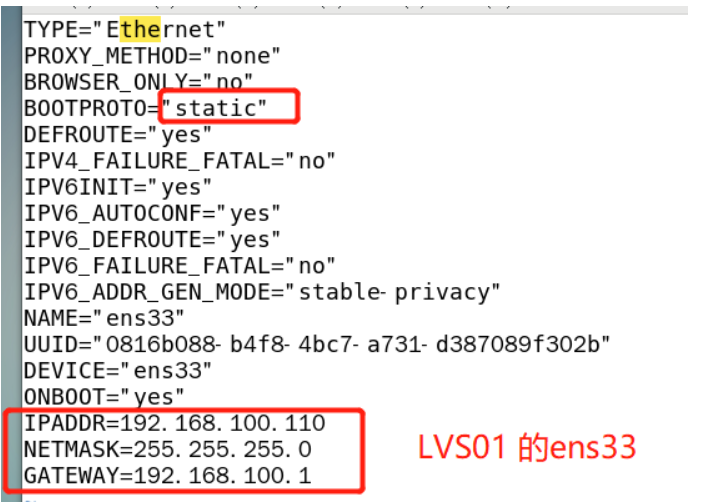
(3) Set virtual address
[root@lvs01 ~]# cd /etc/sysconfig/network-scripts/
[root@lvs01 network-scripts]# ls
[root@lvs01 network-scripts]# cp -p ifcfg-ens33 ifcfg-ens33:0
[root@lvs01 network-scripts]# vim ifcfg-ens33:0
'Delete original content and add virtual address'
DEVICE=ens33:0
ONBOOT=yes
IPADDR=192.168.100.10
NETMASK=255.255.255.0
(4) LVS server create script for service management
[root@lvs01 network-scripts]# cd /etc/init.d/
[root@lvs01 init.d]# ls
functions  netconsole  network  README
[root@lvs01 init.d]# vim dr.sh
#!/bin/bash
GW=192.168.100.1
VIP=192.168.100.10      'fictitious ip'
RIP1=192.168.100.201     'real web The server IP address'
RIP2=192.168.100.202
case "$1" in
start)
     /sbin/ipvsadm --save > /etc/sysconfig/ipvsadm     'Save configuration'
     systemctl start ipvsadm       'Boot configuration'
     /sbin/ifconfig ens33:0 $VIP broadcast $VIP netmask    255.255.255.255 broadcast $VIP up
     /sbin/route add -host $VIP dev ens33:0     'Add routing segment information'
     /sbin/ipvsadm -A -t $VIP:80 -s rr      'Specify virtual service access portal, specify polling algorithm'
     /sbin/ipvsadm -a -t $VIP:80 -r $RIP1:80 -g    'Specify the real server, dr Pattern'
     /sbin/ipvsadm -a -t $VIP:80 -r $RIP2:80 -g
     echo "ipvsadm starting ---- ------[ok]"
     ;;
stop)
   /sbin/ipvsadm -C      'wipe cache'
   systemctl stop ipvsadm      'Shut down service'
   ifconfig ens33:0 down     'Close interface'
   route del $VIP      'Delete route information'
   echo "ipvsamd stoped--------------[ok]"
   ;;
status)
     if [ ! -e /var/lock/subsys/ipvsadm ]; then      'Judge the existence and decision status of documents'
        echo "ipvsadm stoped----------------------"
        exit 1
     else
        echo "ipvsamd Runing------------[ok]"
     fi
   ;;
*)
  echo "Usage: $0 {start I stop I status }"
  exit 1
esac
exit 0

[root@lvs01 init.d]# chmod +x dr.sh 'give permission', do not execute script first
(5) Change NAT mode of network card to host only mode, modify IP address and restart network
[root@lvs01 init.d]# vim /etc/sysconfig/network-scripts/ifcfg-ens33

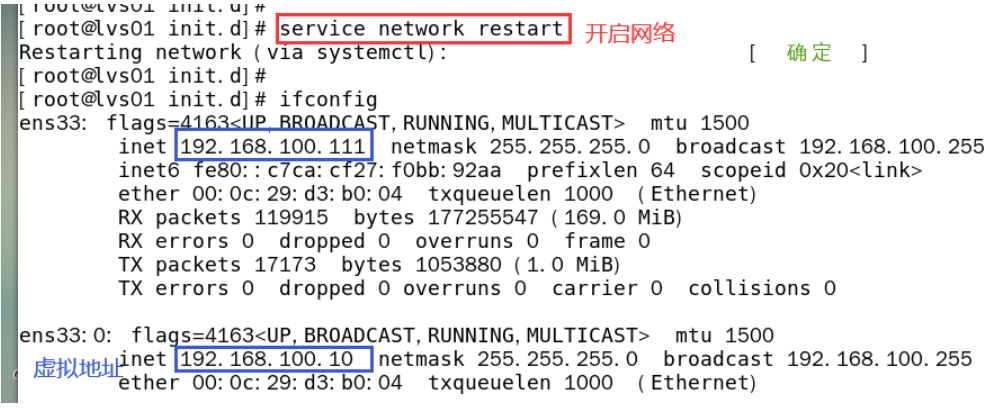
[root@lvs01 init.d]# service dr.sh start "start Dr script"
(the configuration is basically the same, the content and IP address of the web page need to be changed)
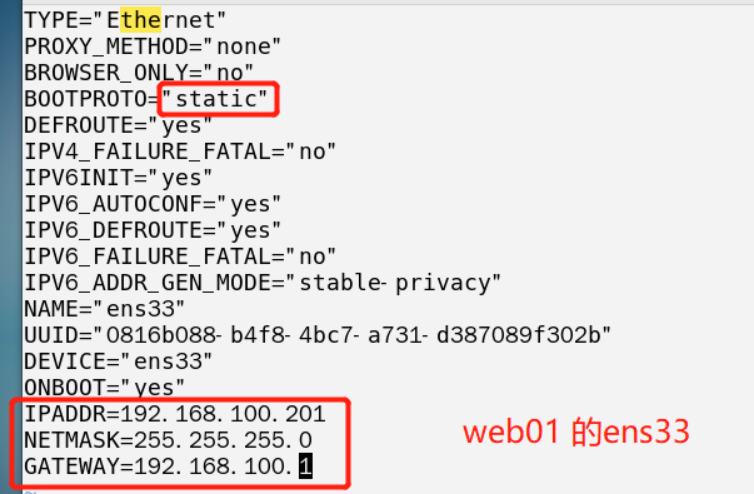
(1) Modify the host name and install httpd
[root@localhost ~]# hostnamectl set-hostname web01
[root@localhost ~]# su
[root@web01 ~]# systemctl stop firewalld.service
[root@web01 ~]# setenforce 0
[root@web01 ~]# yum install httpd -y
(2) Add Web content for later validation
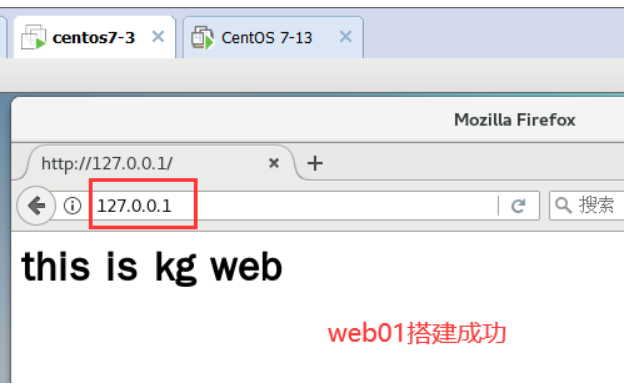
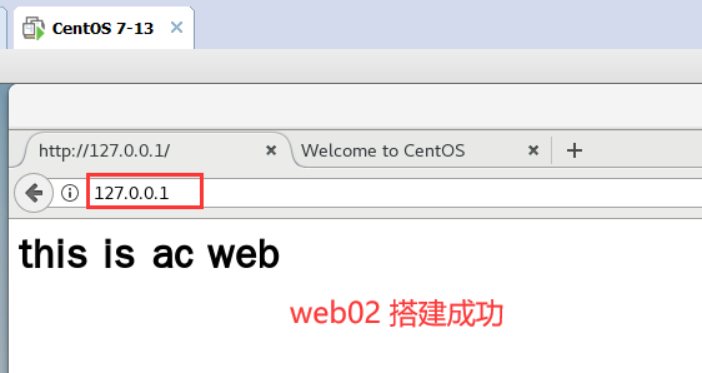
[root@web01 ~]# cd /var/www/html
[root@web01 html]# vim index.html
'to web01 Add 1 line of web content'
<h1>this is kg web</h>

'to web02 Add 1 line of web content'
<h1>this is ac web</h1>
(3) Set loopback address and specify virtual IP address
[root@web01 html]# cd /etc/sysconfig/network-scripts/
[root@web01 network-scripts]# cp -p ifcfg-lo ifcfg-lo:0
[root@web01 network-scripts]# vim ifcfg-lo:0
'Delete the original content and add 4 lines of content'
DEVICE=lo:0
IPADDR=192.168.100.10     'Appoint VIP'
NETMASK=255.255.255.0
ONBOOT=yes
(4) Script web Services
[root@web01 network-scripts]# cd /etc/init.d
[root@web01 init.d]# vim web.sh
#!/bin/bash
VIP=192.168.100.10
case "$1" in
start)
ifconfig lo:0 $VIP netmask 255.255.255.255 broadcast $VIP
/sbin/route add -host $VIP dev lo:0
echo "1" >/proc/sys/net/ipv4/conf/lo/arp_ignore
echo "2" >/proc/sys/net/ipv4/conf/lo/arp_announce
echo "1" >/proc/sys/net/ipv4/conf/all/arp_ignore
echo "2" >/proc/sys/net/ipv4/conf/all/arp_announce
sysctl -p >/dev/null 2>&1
echo "RealServer Start OK"
;;
stop)
ifconfig lo:0 down
route del $VIP /dev/null 2>&1
echo "0" >/proc/sys/net/ipv4/conf/lo/arp_ignore
echo "0" >/proc/sys/net/ipv4/conf/lo/arp_announce
echo "0" >/proc/sys/net/ipv4/conf/all/arp_ignore
echo "0" >/proc/sys/net/ipv4/conf/all/arp_announce
echo "RealServer Stopd"
;;
*)
echo "Usage: $0 {start|stop}"
exit 1
esac
exit 0
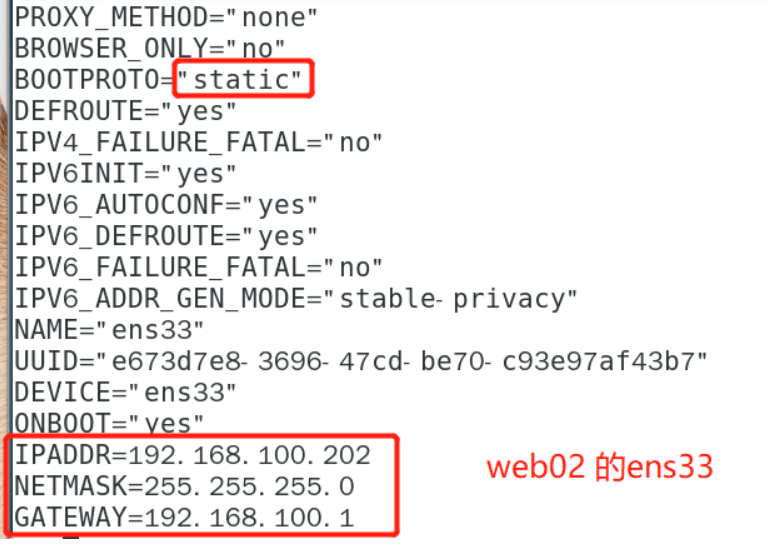
[root@web01 init.d]# scp /etc/init.d/web.sh root@192.168.34.184:/etc/init.d / "remote copy web.sh script to another web server '" save configuration for another web "
Go to another web server and see the following:
(5) Set the network card to host only mode and modify the IP address
[root@web01 init.d]# vim /etc/sysconfig/network-scripts/ifcfg-ens33
[oot@web02 network-scripts]# service network restart "open network"
[root@web02 network-scripts]# ifconfig 'view address'
(6) Give permission, execute web.sh script
root@web01 init.d]# cd /etc/init.d
[root@web01 init.d]# chmod +x web.sh "give web.sh permission"
[root@web01 init.d]# service web.sh start 'execute script'
(7) Enter 127.0.0.1 validation on two web server browsers