LVM Logical Volume Manager
The purpose is to solve two problems:
1. Use many small hard disks with combined capacity;
2. Usually, it is difficult to adjust partition size after partition is completed. To dynamically adjust (enlarge or shrink) the disk partition, you can use LVM.
3.xfs file format does not support zooming out
4. When RAID+LVM, it is recommended to build RAID first
LVM's disk read and write performance is relatively low. Do not use LVM if disk read and write performance is required.
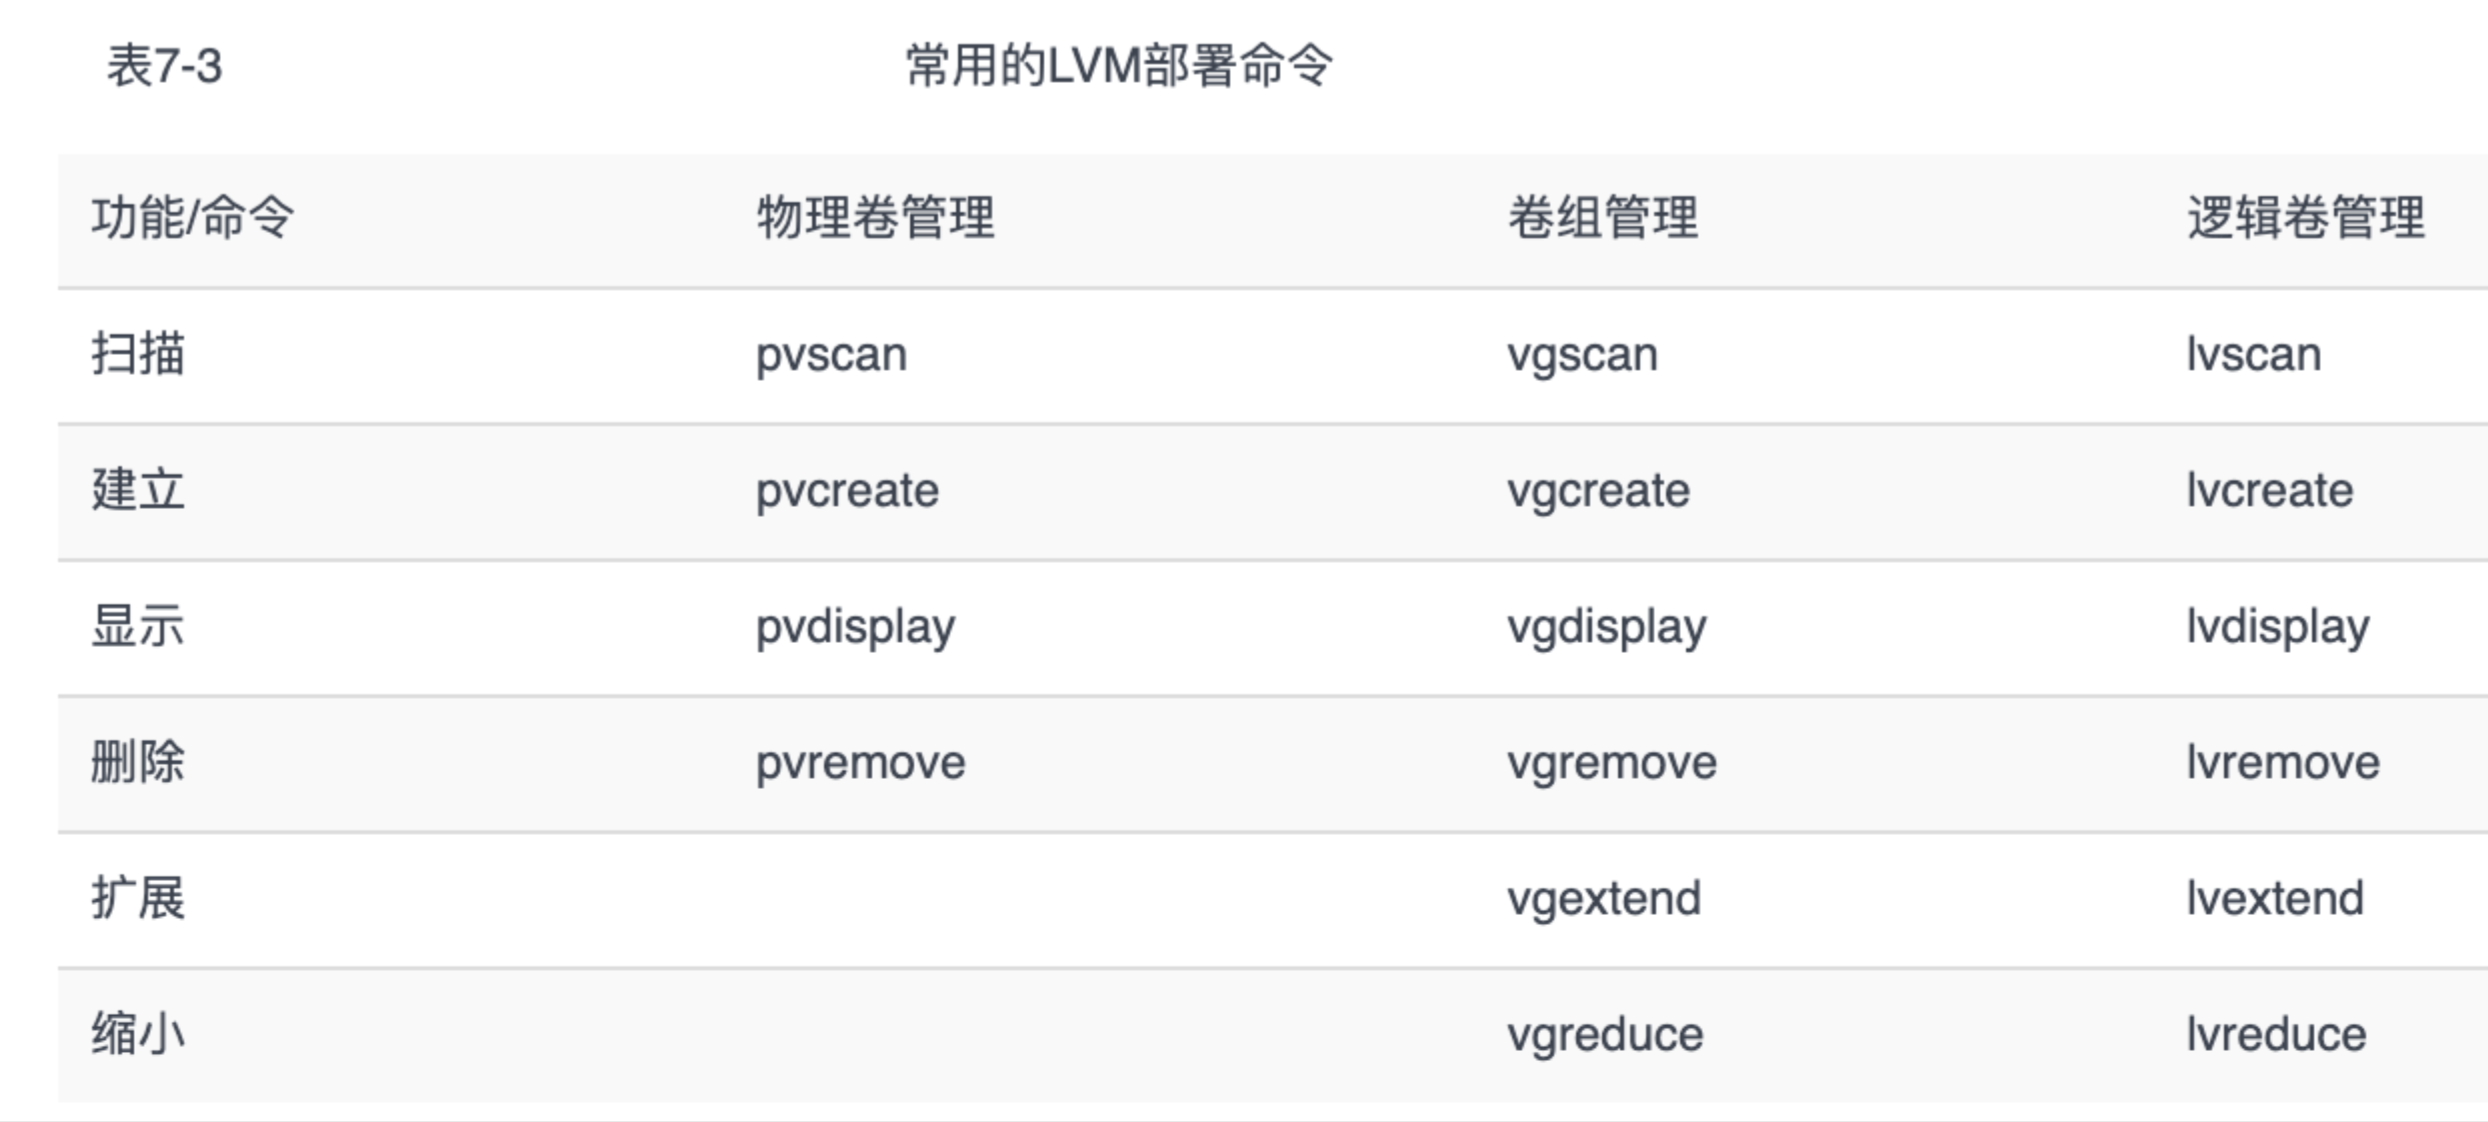
Common LVM deployment commands
0 Create LV process
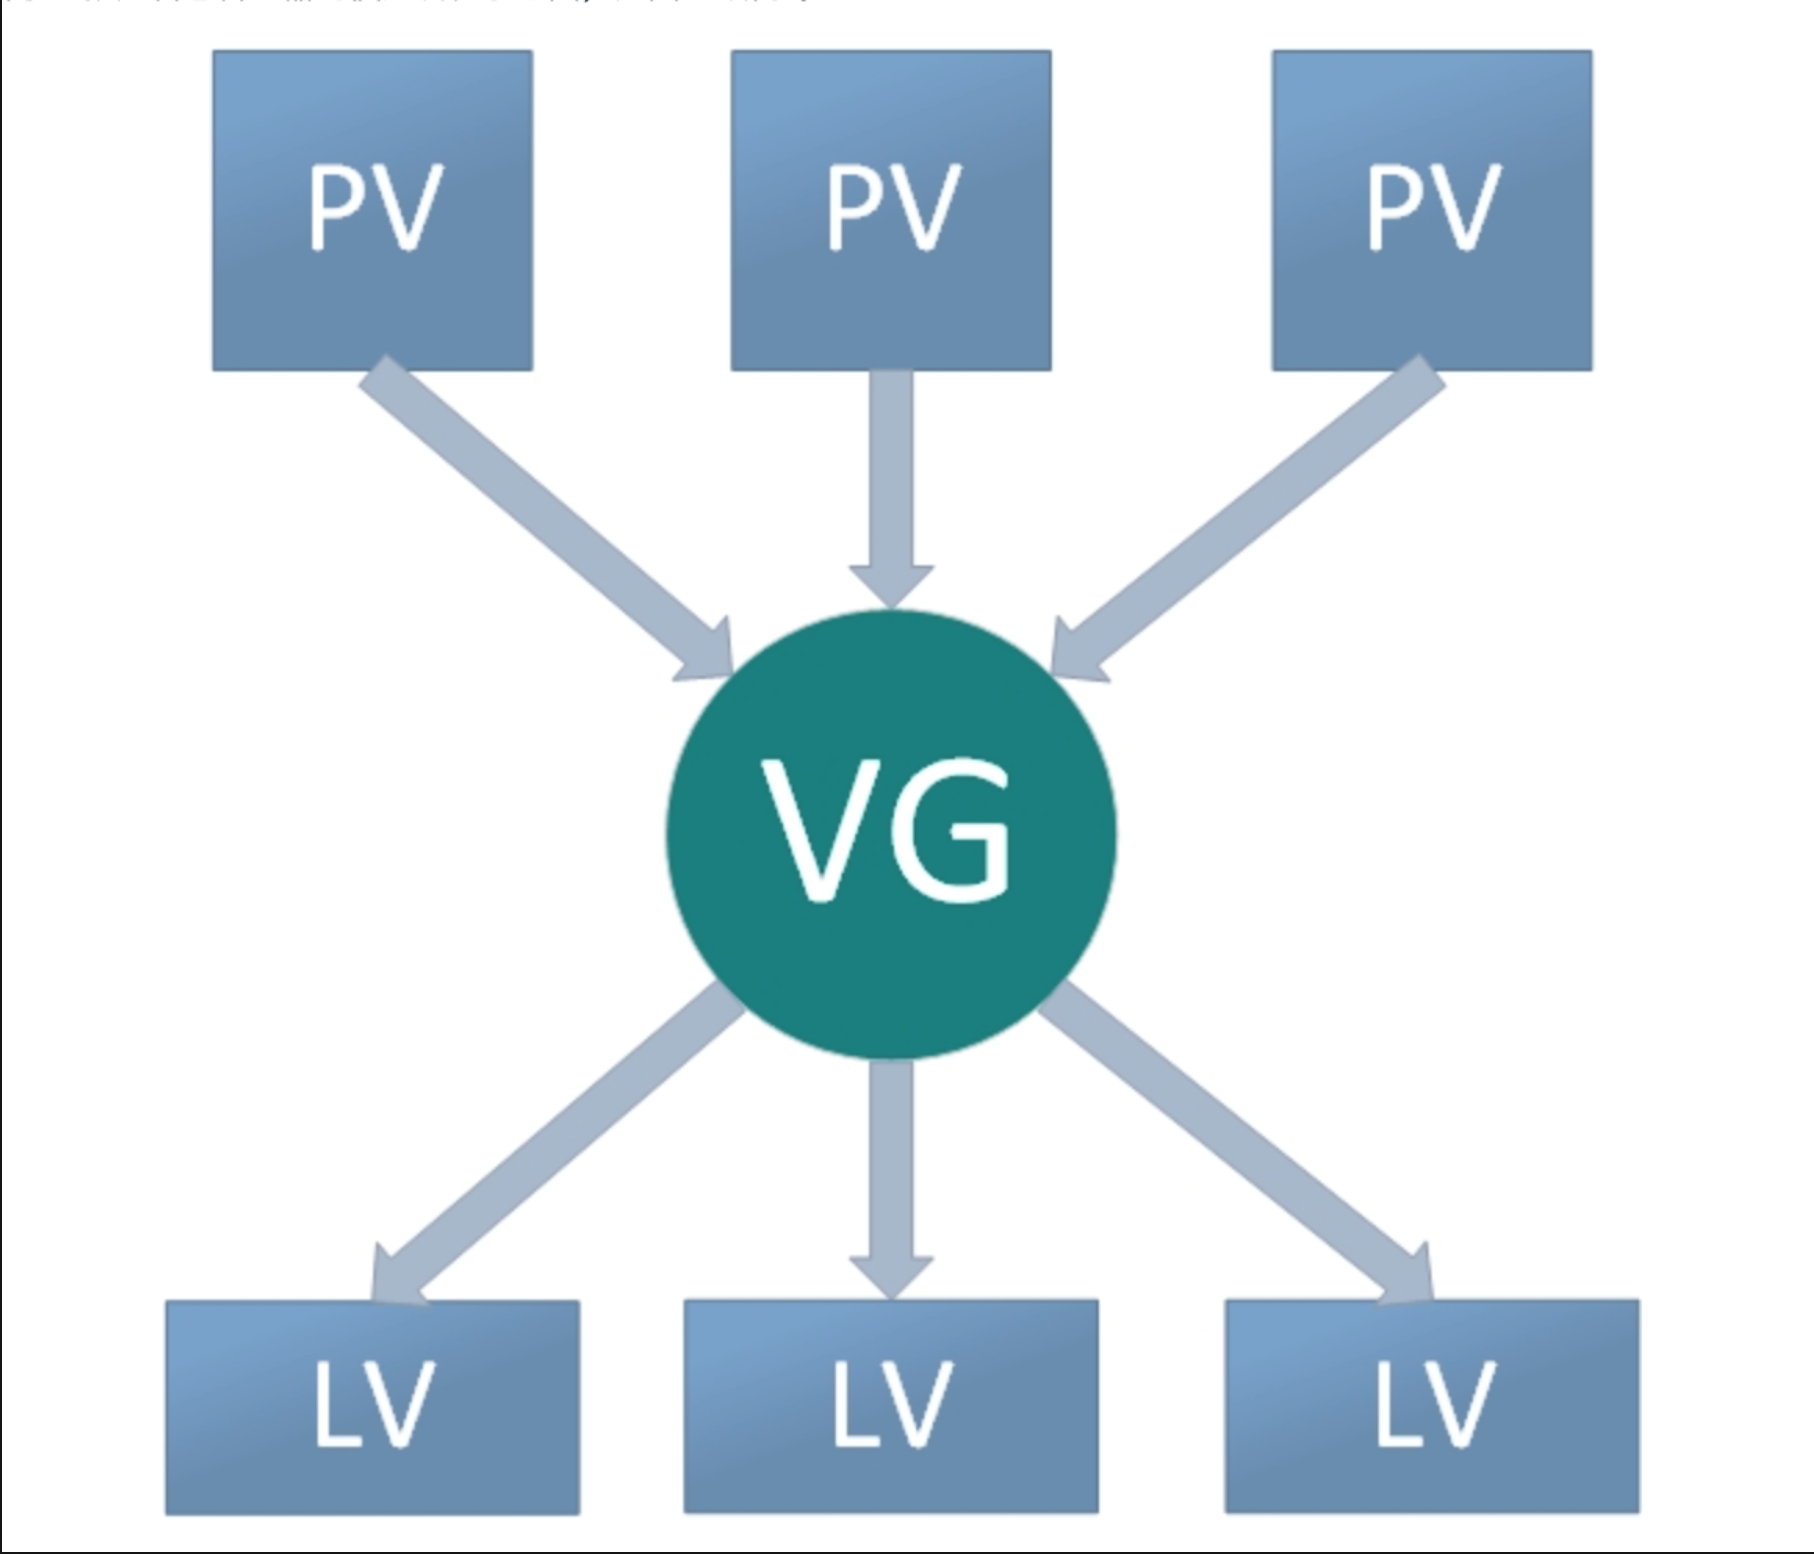
Summary of Logical Volume Creation:
Create a PV (physical volume) first.
Create a VG (Volume Group) on a PV (Physical Volume),
Create LV (Logical Volume) on VG (Volume Group),
Format LV (Logical Volume),
Mount LV (Logical Volume),
Write LV (Logical Volume) to/etc/fastab for automount
PE(physical extent)
Each physical volume is divided into basic units called PE(Physical Extents), and PE with a unique number is the smallest unit that can be addressed by the LVM.The PE size is configurable and defaults to 4 MB (memory size can only be a multiple of 4 MB).

1 Create PV (physical volume)
# PV Correspondence Command
#Scan - View Status
pvscan
#establish
pvcreate
#display
pvdisplay
#delete
pvremove
Start creating PV (physical volume)
Prepare four hard disks:
/dev/sda2
/dev/sdb1
/dev/sdc1
/dev/sdd1

Execute the Create PV (Physical Volume) command
#Execute separately
pvcreate /dev/sda2
pvcreate /dev/sdb1
pvcreate /dev/sdc1
pvcreate /dev/sdd1
# One-time Execution
pvcreate /dev/sda2 /dev/sdb1 /dev/sdc1 /dev/sdd1

Support expression

View PV (Physical Volume)
# View PV (Physical Volume)
pvs

2: Join VG (Volume Group)
Merge PV s together
Add PV (physical volume) to VG (volume group)
# Add PV (physical volume) to VG (volume group)
## vgcreate VG Name PV
vgcreate vg1 /dev/sda2 /dev/sdb1 /dev/sdc1 /dev/sdd1

View PVS (physical volume information)

View VGS (Volume Group Information)

3: Create LV (Logical Volume), format Logical Volume Partitions, and mount
LV is cutting VG
Create LV Logical Volume
# Parameter Interpretation
-L Specified size(MB,GB)
-l pe Number of(1 individual pe Is 4 M)

# Create LV (Logical Volume) --Method 1
lvcreate -L 100M -n lv1 vg1
## Lvcreate-L Logical Volume Size-n Logical Volume Name Cuts Space From Which VG (Volume Group)

# # Create LV (Logical Volume) --Method 2
lvcreate -n lv1 -l 1000 vg1
## Number of lvcreate-n logical volume names-l pe (1 pe is 4M) from which VG (volume group) to cut space
| #Create LV (Logical Volume) - Method 1 | |||||
|---|---|---|---|---|---|
| lvcreate | Specify Logical Volume Capacity | Capacity (MB,GB) | Specify Logical Volume Name | Logical Volume Name | From which VG (Volume Group) to cut space |
| lvcreate | -L | 100M | -n | lv1 | vg1 |
| #Create LV (Logical Volume) - Method 2 | |||||
| lvcreate | Specify Logical Volume Name | Logical Volume Name | Specify the number of PE logical volumes | Number of PES (1 pe is 4M) | From which VG (Volume Group) to cut space |
| lvcreate | -n | lv1 | -l | 1000 | vg1 |

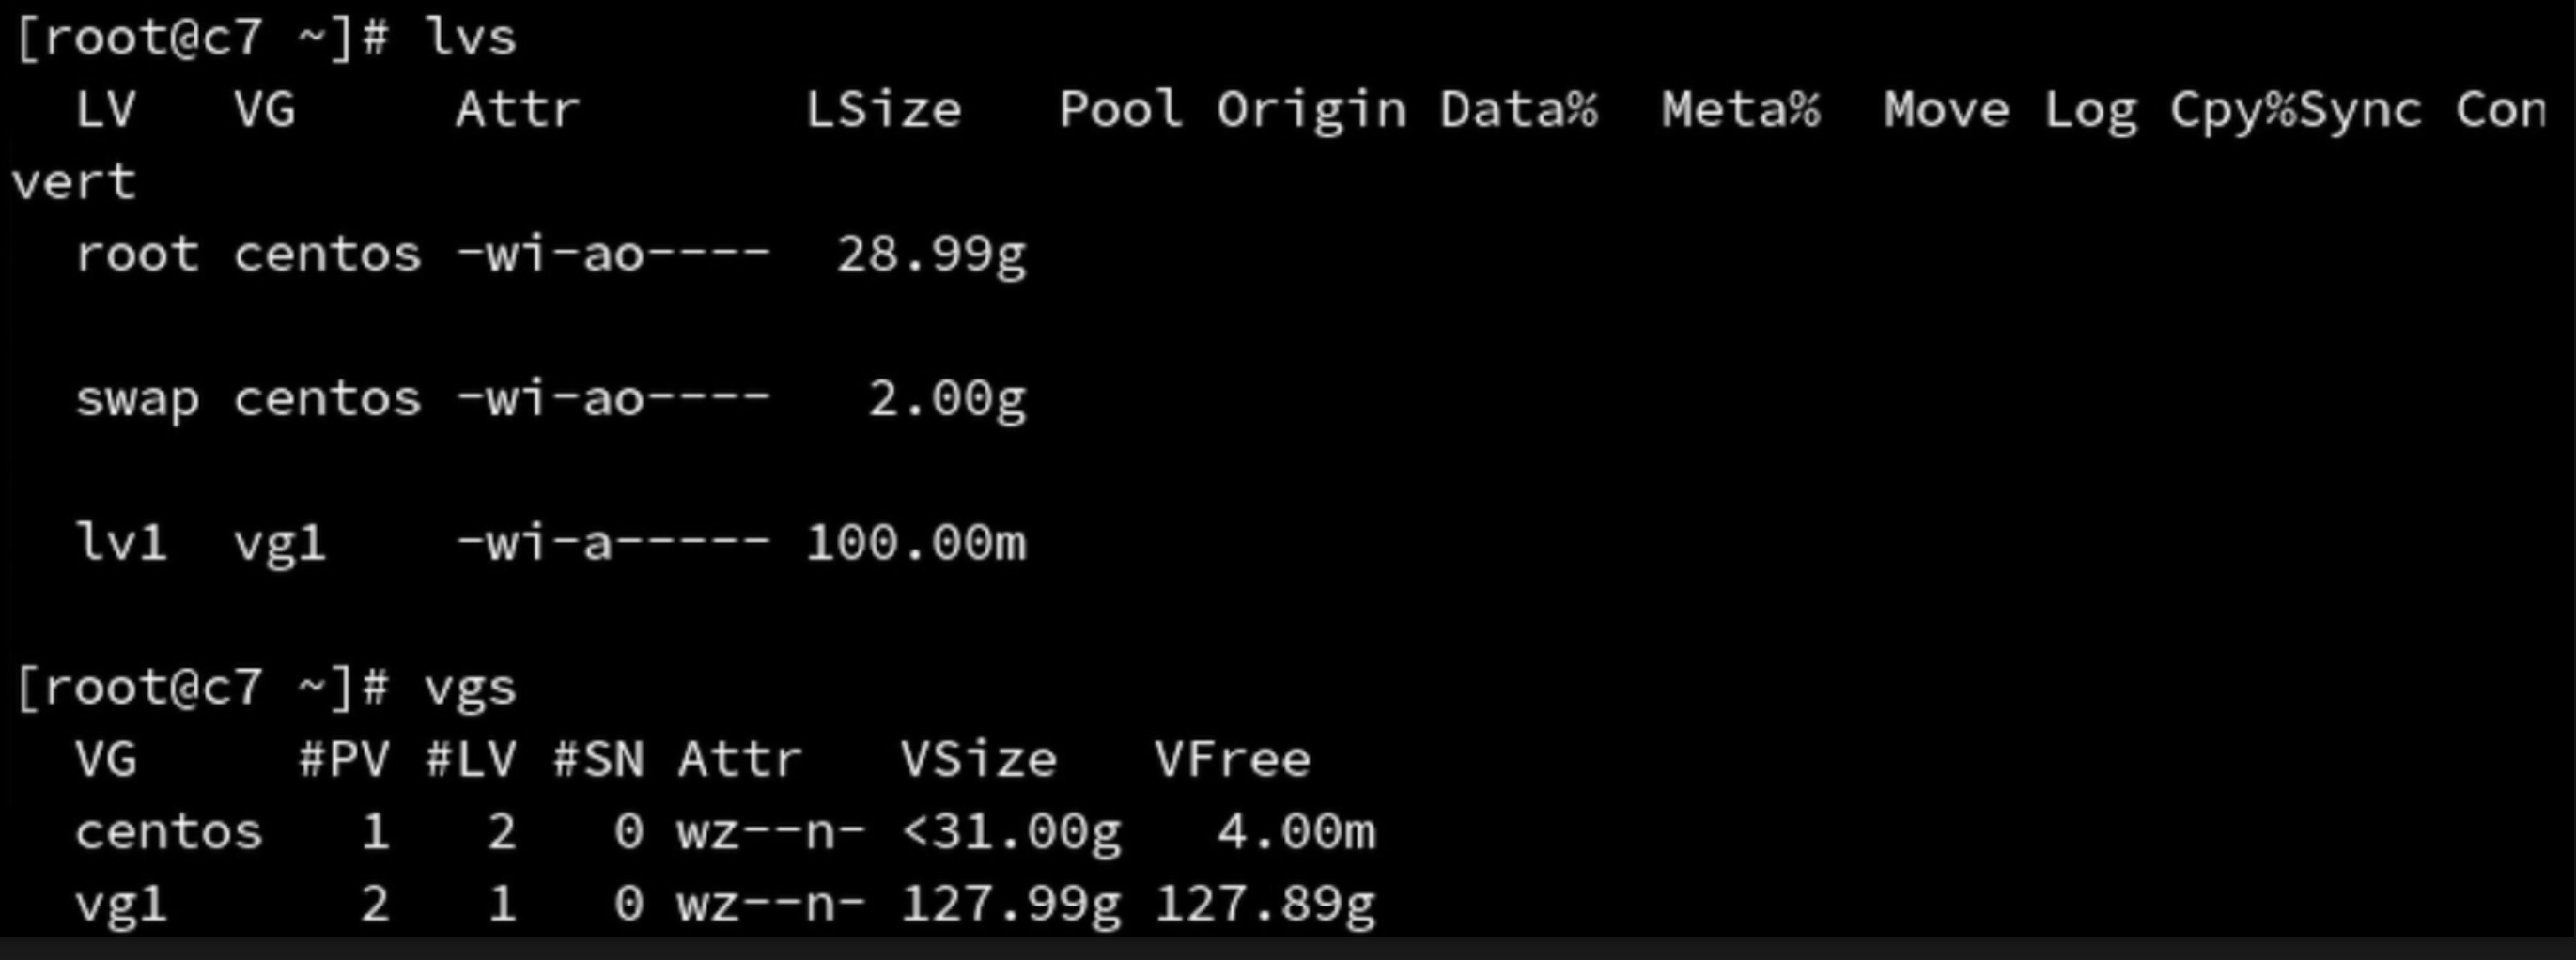
View LV (Logical Volume) and VG (Volume Group)
# View LV (Logical Volume)
lvs
# View VG (Volume Group)
vgs
Create mount point, format logical volume
# Create mount point
mkdir /mnt/lv1
# Format logical volume lv1 as xfs
mkfs.xfs /dev/vg1/lv1

Mount logical volume lv1 to mount point
# Mount device path mount point
mount /dev/vg1/lv1 /mnt/lv1
Write lv1 to/etc/fstab
# Write lv1 to/etc/fstab
vim /etc/fstab

# Fast Write to/etc/fstab
echo "/dev/vg1/lv1 /mnt/lv1 xfs defaults 0 0" >> /etc/fstab

# Automount/etc/fstab Disk
mount -a

# View partition mount status
df -h
LE(logical extent)
Logical volumes are also divided into addressable basic units called LE(Logical Extents).In the same volume group, LE and PE are the same size and one-to-one correspondence.
4 Extended LV (Logical Volume)
4.1 Check the original capacity of LV
# Check LV (Logical Volume) original capacity
df -h
4.2 Uninstall lv mount
#Unmount lv mount
umount /mnt/lv1
4.3 Expand VG first
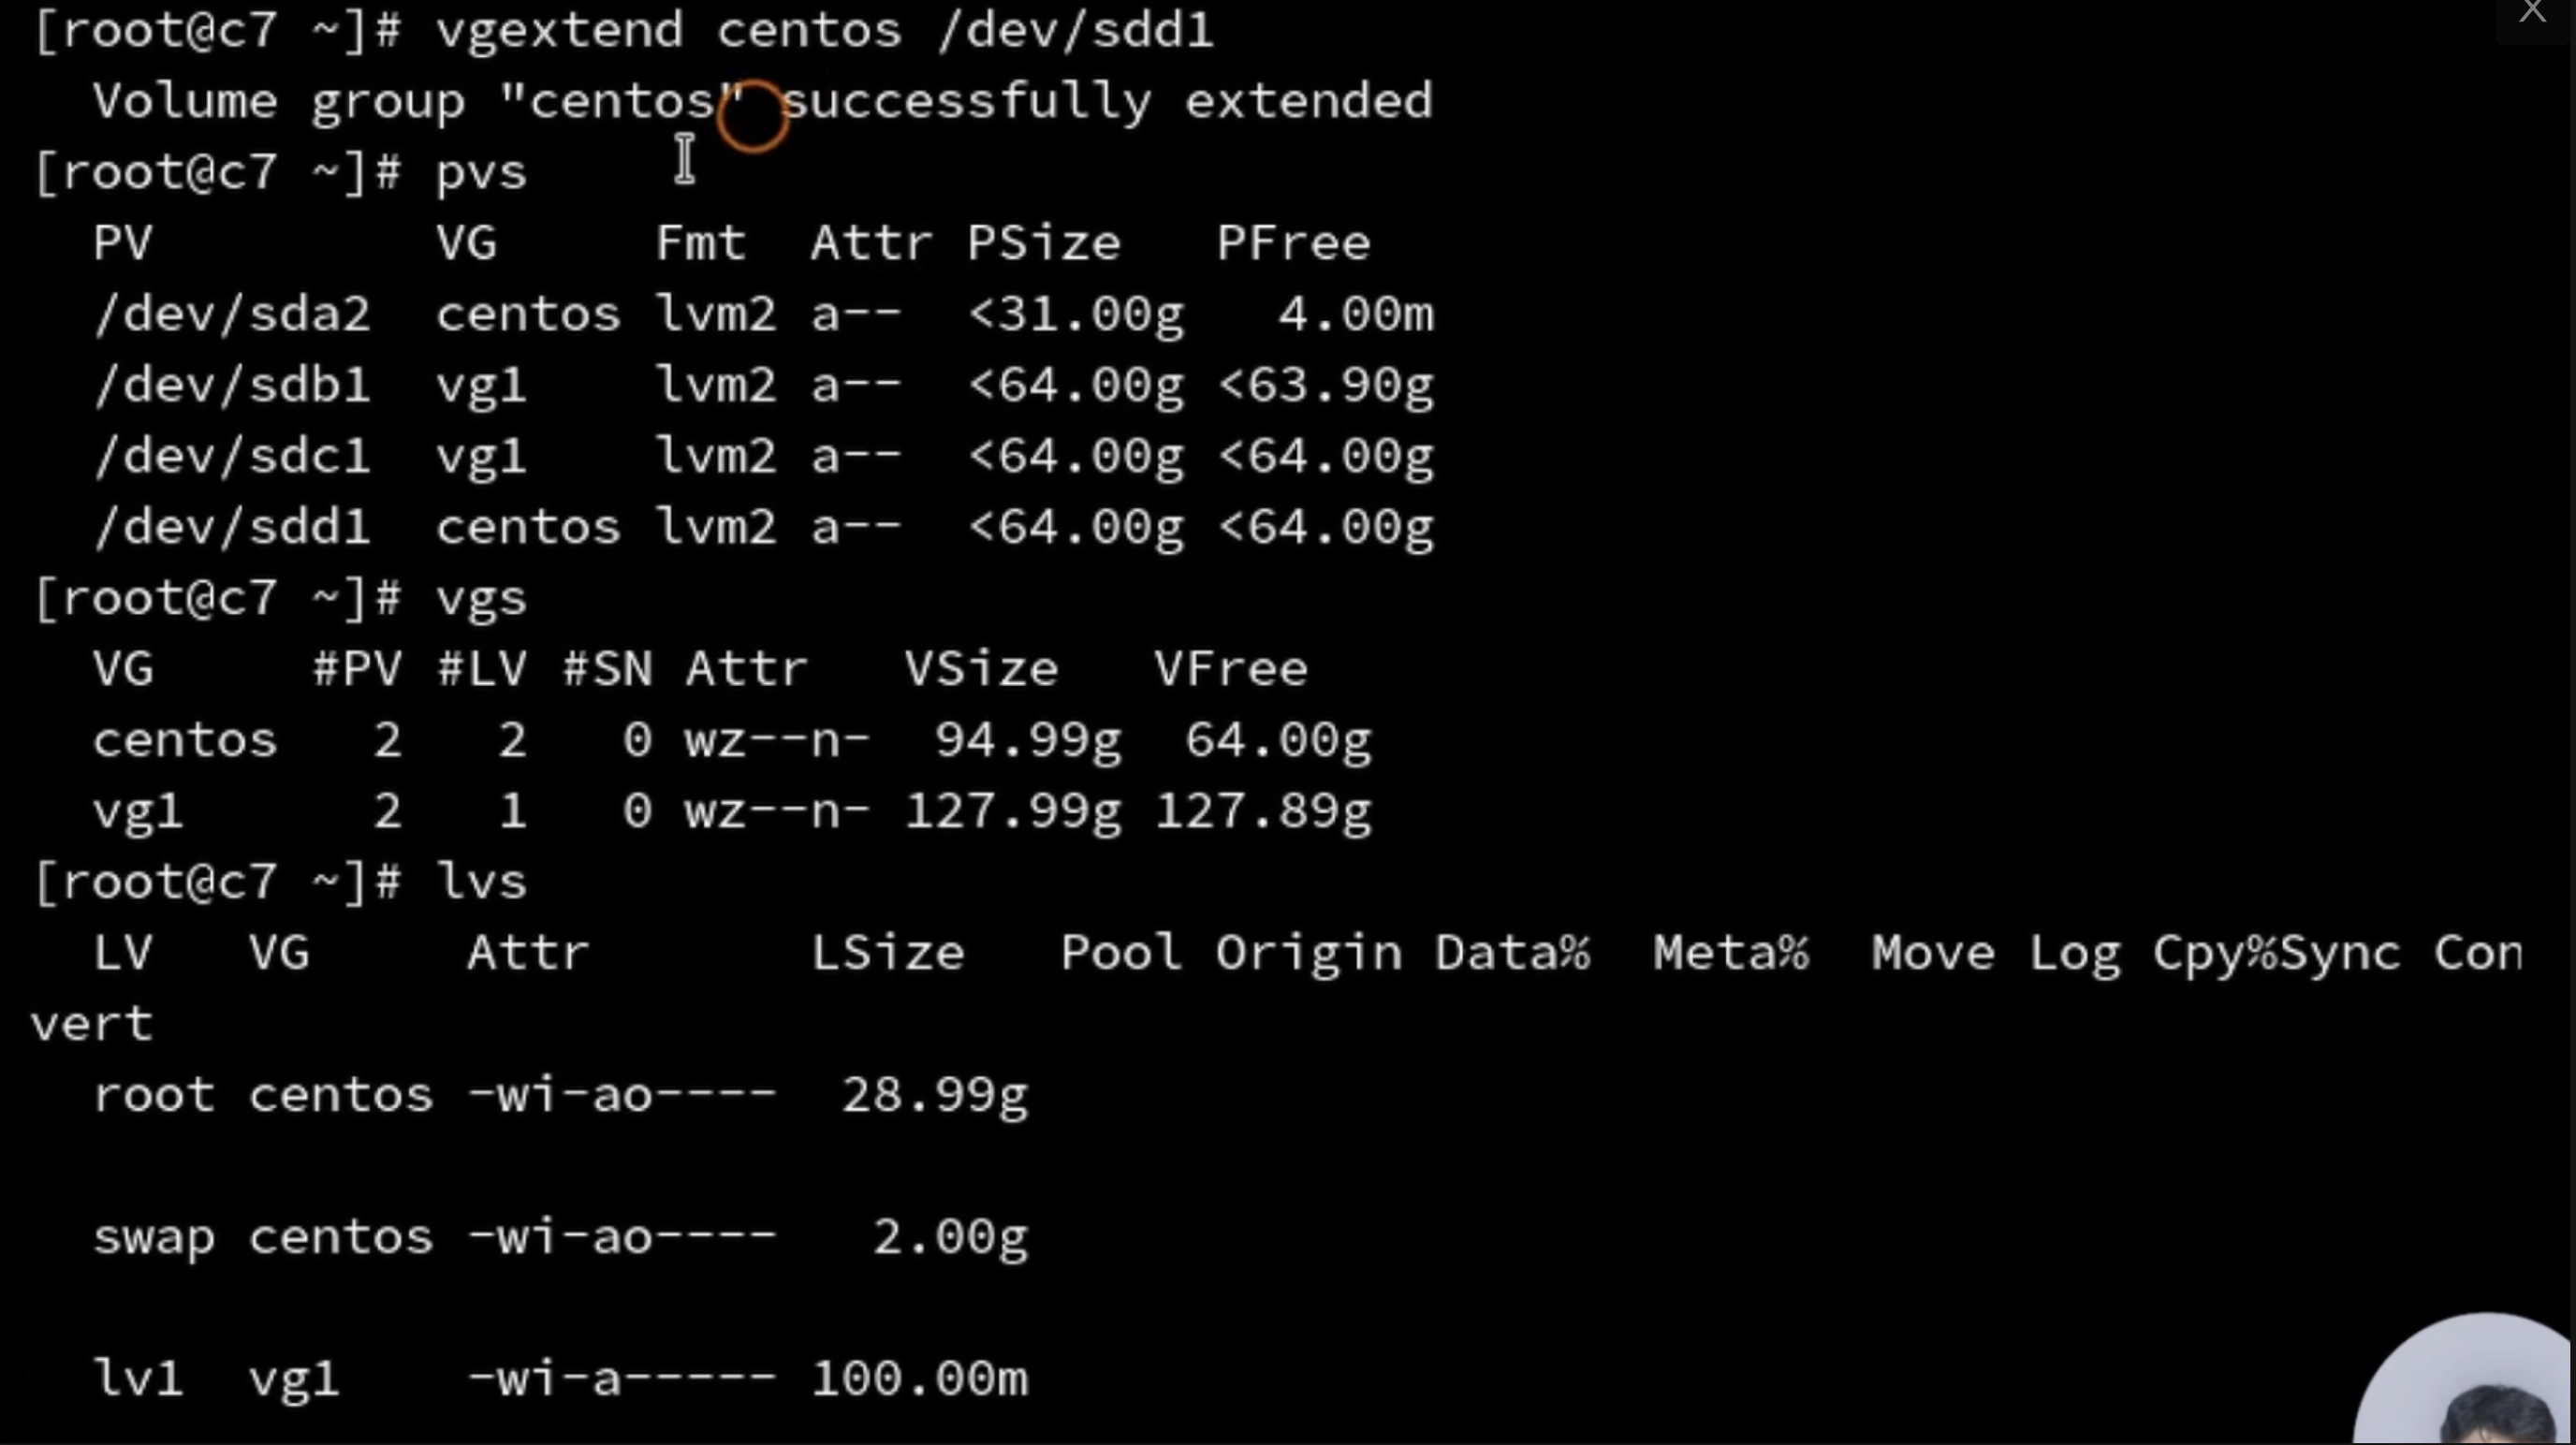
In case of insufficient capacity of VG, VG should be expanded first, then LV should be expanded after VG expansion is completed.
# First look at the VGS to see the status of the volume group
vgs
# Volume Group Expansion First
vgextend vg1 /dev/sdd1
## vgextend vg name Hard disk to add (hard disk created PV'Physical volume')
# After VG expands, check VGS again
vgs
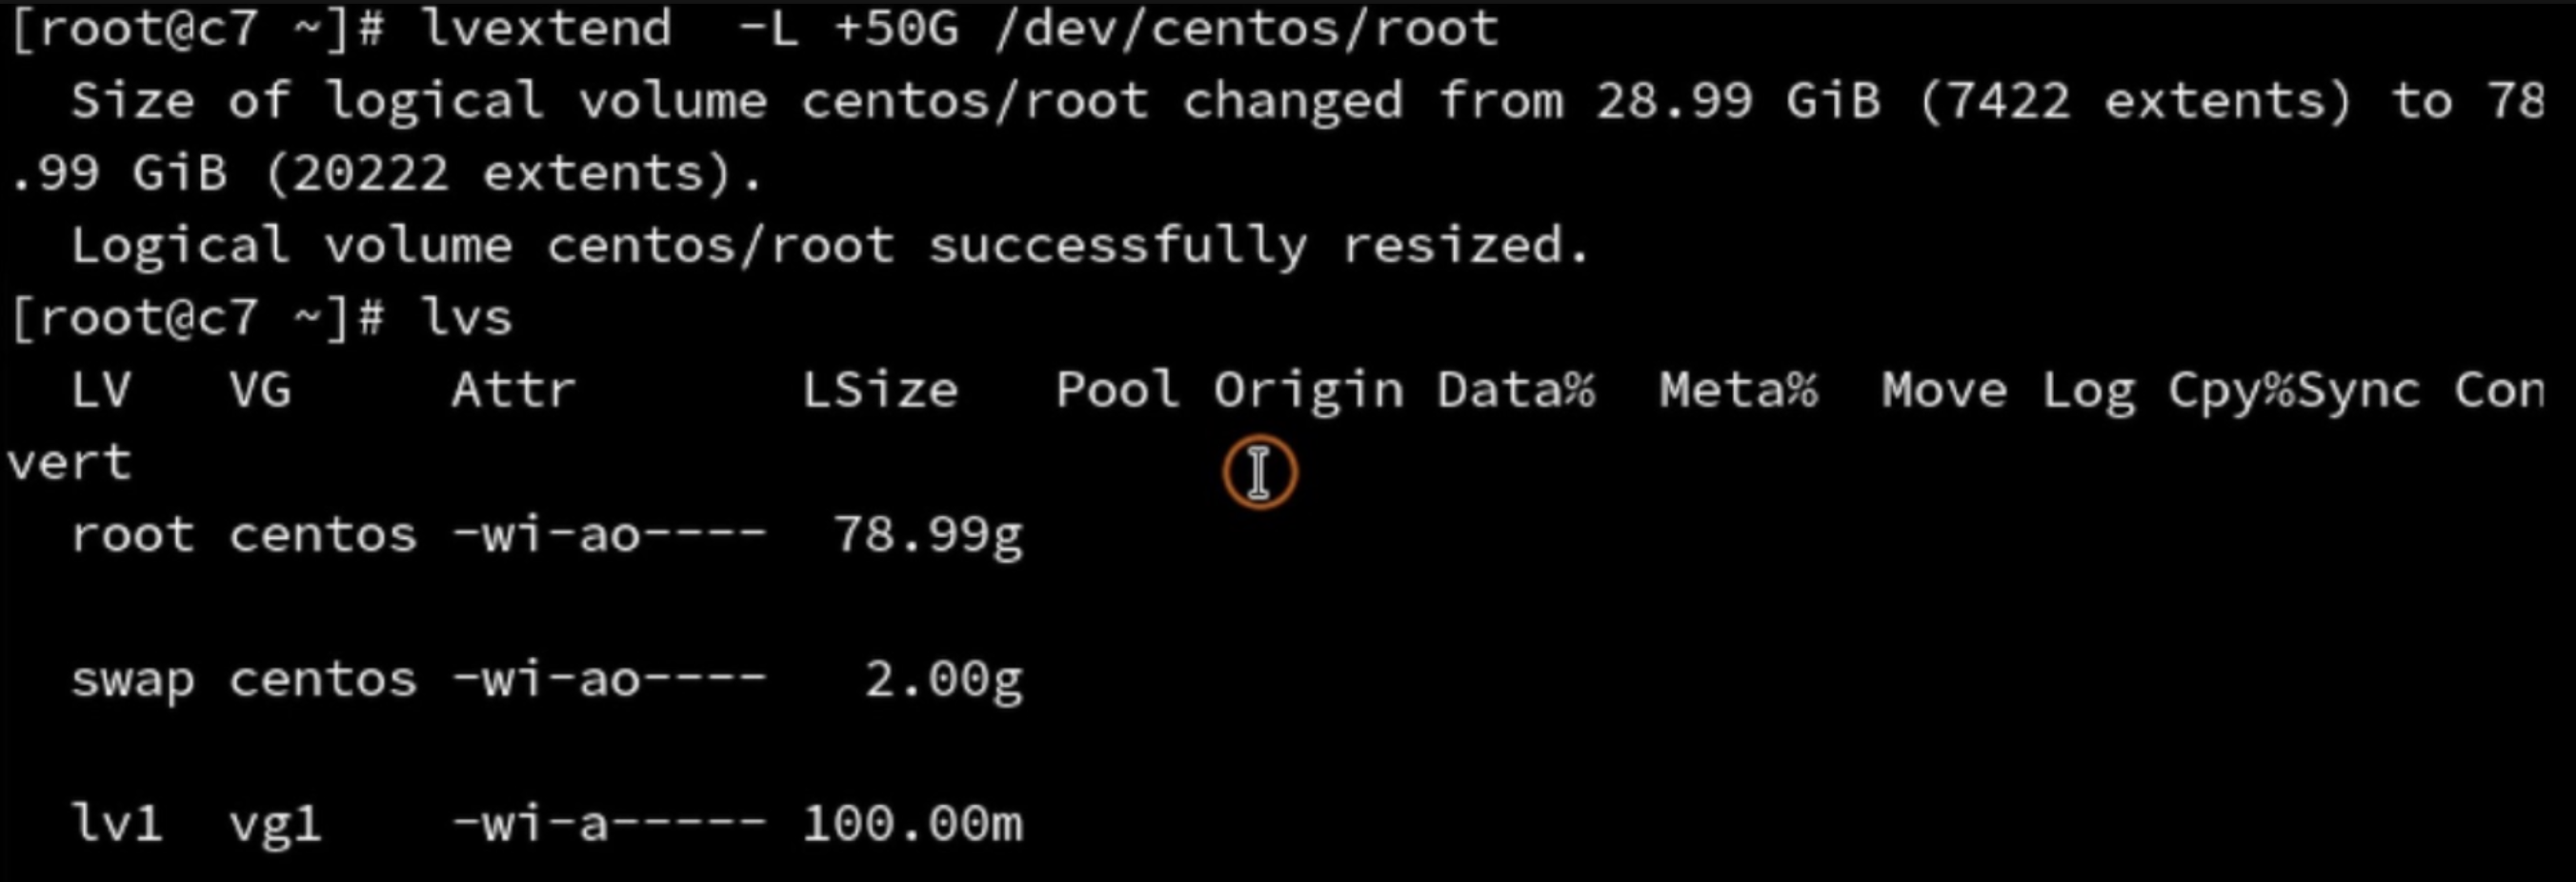
4.4 Extended LV
Expand the specified lv
# Expand the specified lv
lvextend -L 10G /dev/vg1/lv1
4.5 Updating the file system will increase the capacity of the LV
The partition size does not change after expanding lv, it will not be displayed until the file system is updated
Check file system for errors
# Check file system for errors
e2fsck -f /dev/vg1/lv1
# E2fsck-f Logical Volume Path
Update File System
# Update File System - Notify the system that the logical volume has changed, please refresh capacity
resize2fs /dev/vg1/lv1
# resize2fs Logical Volume Path
View updated LV capacity
# View updated LV capacity
lvs
Mount LV
# Mount devices in/etc/fstab
mount -a
View partition capacity
# View partition capacity
df -h
Compact
lv can be scaled, but operation in production environment is not recommended.
Uninstall the device first
# Uninstall Device
umount /dev/vg1/lv1
Check if the device is scaled down
# Check if the device is scaled down
e2fsck -f /dev/vg1/lv1
Notify the system that the LV (Logical Volume) capacity needs to be reduced
# Notify the system that the LV (Logical Volume) capacity needs to be reduced
resize2fs /dev/vg1/lv1 300MB

## If an error occurs, the system does not allow shrinking;
## If there are no errors, you can zoom out
Reduce LV (Logical Volume) Capacity
# Reduce LV (Logical Volume) Capacity
lvreduce -L 300M /dev/vg1/lv1
## The system will pop up a reminder: zooming out is dangerous, please confirm
 input y
## Shrinking is done when y is entered
Mount LV
# Mount devices in/etc/fstab
mount -a
View capacity
# View partition capacity
df -h
snapshot
A snapshot is a data backup of the specified LV.
!The capacity of the snapshot volume must be the same size as the data to be backed up.
The snapshot is valid once, and will be deleted automatically after welcome.
A snapshot is a single valid backup of the LV.
Create Snapshot
# Create Snapshot
lvcreate -L 300M -s -n snap_lv1 /dev/vg1/lv1
## Lvcreate-L Logical Volume Capacity-s Snapshot Volume Name The lv name to back up
| Create Snapshot | ||||||
|---|---|---|---|---|---|---|
| lvcreate | -L | 300M | -s | -n | snap_lv1 | /dev/vg1/lv1 |
| lvcreate | Specify Logical Volume Capacity | Capacity of logical volumes | Snapshot Volume | Specify a snapshot volume name | Snapshot Volume Name | logical volume |
View information about logical volumes
# View information about logical volumes
lvdisplay
## All LVs (Logical Volume Information) will be displayed
### Let's look at the information for the snapshot volume / dev/vg1/snap_lv1
Direct Violent Deletion of LV1 Logical Volumes
Direct Violent Removal of lv1 Logical Volume in Experiment
Restore snapshot
Restore snapshot does not need to specify lv, snapshot volume and backed up LV are the corresponding relationships
# Restore Snapshot Volume
lvcomver --merge /dev/vg1/snap_lv1
## Lvcomver--merge snapshot volume path
See if the snapshot volume disappears
# View information about logical volumes
lvdisplay
## All LVs (Logical Volume Information) will be displayed
### We see that the snapshot volume is gone
Delete LV/VG/PV
The order in which LVM s are deleted is to uninstall the LV mount point first, remove the LV, remove the VG, and remove the PV
Uninstall LV and clear LV mount information in/etc/fstab
# Uninstall LV
mount /mnt/lv1
# Remove mount information for lv1 from/etc/fstab
Remove LV (Logical Volume)
# Remove specified LV
lvremove /dev/vg1/lv1
## System Tip yes/no
 input y
Remove VG Volume Group
# Remove corresponding VG volume group
vgremove vg1
Remove PV (physical volume)
# View the PV corresponding to vg1 (physical volume)
pvs
# Remove the PV corresponding to vg1 (physical volume)
## Remove corresponding PV at once
pvremove /dev/sda2 /dev/sdb1 /dev/sdc1 /dev/sdd1
## Remove corresponding PV s one by one
pvremove /dev/sda2
pvremove /dev/sdb1
pvremove /dev/sdc1
pvremove /dev/sdd1