1 LTP Introduction and Internal Mechanisms
1.1 Introduction to LTP
LTP(Linux Test Project) is an open source community cooperation project based on GPL protocol. Initiated by SGI in 2000, IBM, OSDL and Bull jointly participated. After 2001, they were jointly developed and maintained by SUSE, Fujitsu, Red Hat and Oracle.
The reliability, stability and robustness of Linux system are verified by functional test, stress test and regression test. There are about 4000 test cases in the whole project, most of which use C+Shell.
LTP not only tests the kernel, but also the overall system environment. The return and processing of failed function execution are also tested.
1.1.1 Functional Test
This paper mainly verifies the functions described by 1, 8 commands and 2 system calls in man pages.
1.1.2 Regression Test
After modifying the old code, re-testing has confirmed that the modification did not introduce new errors or lead to errors in other code.
1.1.3 Pressure Test
Test the stability and reliability of the system under heavy load pressure.
1.2 LTP environment deployment
1.2.1 Download LTP
The LTP project is currently located in GitHub at the project address: https://github.com/linux-test-project/ltp . To get the latest version, you can execute the following commands: git clone https://github.com/linux-test-project/ltp.git
1.2.2 Deployment of LTP
First, execute the following command to install the relevant packages (installed and skipped):
#CentOS
sudo yum install autoconf  automake  autotools-dev m4

#Ubuntu
sudo apt-get install autoconf  automake  autotools-dev m4
In section 1.2.1, I downloaded the ltp project to the WXS user's home directory (/ home/wxs), as shown below:
[wxs@bogon ~]$ cd ltp/
[wxs@bogon ltp]$ ls
aclocal.m4      configure.ac  INSTALL           pan                   testcases
autom4te.cache  confLkNw6U    install-sh        README.kernel_config  testscripts
confc20wzw      COPYING       lib               README.md             TODO
config.guess    doc           ltpmenu           runltp                tools
config.log      execltp       m4                runltplite.sh         utils
config.status   execltp.in    Makefile          runtest               ver_linux
config.sub      IDcheck.sh    Makefile.release  scenario_groups       Version
configure       include       missing           scripts               VERSION
Enter ltp directory: cd ltp
Generating Autotools: make autotools
System environment configuration:. / configure
Compilation: make-j$(getconf_NPROCESSORS_ONLN)
Installation: sudo make install
After executing the above commands in turn, LTP has been installed correctly in your Linux system, and the default installation is located in / opt/ltp /.
[wxs@bogon ltp]$ cd /opt/ltp/
[wxs@bogon ltp]$ ls
bin         runltp         runtest          share      testscripts  Version
IDcheck.sh  runltplite.sh  scenario_groups  testcases  ver_linux
It should be noted that the ltp folder downloaded through the git clone command under the home directory is the ltp source folder, which I will refer to as the source package later.
By executing a series of commands to install the ltp folder in the / opt directory as the ltp installation folder, I will refer to it as the installation package later.
1.3 Test Framework
1.3.1 Overall testing process
The runltp script in the LTP installation package root directory is the entrance of the LTP automatic test system. It provides a series of parameter options. It allows users to set test environment to formulate test sets, control the output mode and path of test results, etc. Running runltp generates the specified test list and calls the test driver PAN to start the test. After execution, the report is generated according to the results returned by PAN.
PAN is a group of LTP test drivers, responsible for the execution of the actual test. According to the parameters and test list passed by runltp, the test is executed sequentially. Detailed information in the execution process is output, the execution results of each test case are counted, and the overall test results are returned to runltp.

1.3.2 Test Case Execution Flow
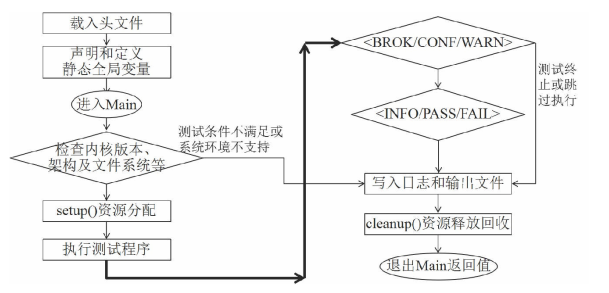
The output types of test results are as follows:
| Type | Description |
|---|---|
| BROK | Testing is compromised by an error in the middle of program execution |
| CONF | Skip execution when the test environment is not satisfied |
| WARN | An exception occurred in the middle of the test |
| INFO | Output General Test Information |
| PASS | Test success |
| FAIL | Test failure |
1.3.3 Test Library
At present, LTP test inventory alternates between old and new test libraries. In this paper, the framework of new test libraries is adopted.

| Old Library | New Library |
|---|---|
| Test cases call API s of test libraries at execution time | Callback test cases in sub-processes of test library maintenance |
| Call API s one by one in setup() to complete test preparation | Test attributes in setup() are defined as structural variables |
| main() is defined in each test case | main() is defined in the test library |
| SAFE function cannot be called in cleanup() | SAFE functions are allowed to be called in cleanup() |
Examples of the new framework can refer to the following code:
//Example using the new LTP library
#include <errno.h>
#include <string.h>
#include <sys/mount.h>
#include "tst_test.h"

#define MNTPOINT        "mntpoint"

static char long_path[PATH_MAX + 2];
static int mount_flag;
static int fd;

static struct tcase {
        const char *err_desc;
        const char *mntpoint;
        int exp_errno;
} tcases[] = {
        {"Already mounted/busy", MNTPOINT, EBUSY},
        {"Invalid address", NULL, EFAULT},
        {"Directory not found", "nonexistent", ENOENT},
        {"Invalid  device", "./", EINVAL},
        {"Pathname too long", long_path, ENAMETOOLONG}
};

static void verify_umount(unsigned int n)
{
        struct tcase *tc = &tcases[n];

        TEST(umount(tc->mntpoint));

        if (TEST_RETURN != -1) {
                tst_res(TFAIL, "umount() succeeds unexpectedly");
                return;
        }

        if (tc->exp_errno != TEST_ERRNO) {
                tst_res(TFAIL | TTERRNO, "umount() should fail with %s",
                        tst_strerrno(tc->exp_errno));
                return;
        }

        tst_res(TPASS | TTERRNO, "umount() fails as expected: %s",
                tc->err_desc);
}

static void setup(void)
{
        memset(long_path, 'a', PATH_MAX + 1);

        SAFE_MKFS(tst_device->dev, tst_device->fs_type, NULL, NULL);
        SAFE_MKDIR(MNTPOINT, 0775);
        SAFE_MOUNT(tst_device->dev, MNTPOINT, tst_device->fs_type, 0, NULL);
        mount_flag = 1;

        fd = SAFE_CREAT(MNTPOINT "/file", 0777);
}

static void cleanup(void)
{
        if (fd > 0 && close(fd))
                tst_res(TWARN | TERRNO, "Failed to close file");

        if (mount_flag)
                tst_umount(MNTPOINT);
}

static struct tst_test test = {
        .tid = "umount02",
        .tcnt = ARRAY_SIZE(tcases),
        .needs_root = 1,
        .needs_tmpdir = 1,
        .needs_device = 1,
        .setup = setup,
        .cleanup = cleanup,
        .test = verify_umount,
};
1.4 Test Execution
1.4.1 Overall Test
We can test all test sets and run the runltp command directly to test all test sets in ltp/scenario_groups/default.
[wxs@bogon ltp]$ cd /opt/ltp
[wxs@bogon ltp]$ sudo ./runltp
Of course, we can test only one test set, which can be viewed under ltp/runtest/.
[wxs@bogon ltp]$ ls runtest/
admin_tools         ipc                    net_stress.ipsec_udp
can                 kernel_misc            net_stress.multicast
cap_bounds          ltp-aiodio.part1       net_stress.route
commands            ltp-aiodio.part2       net.tcp_cmds
connectors          ltp-aiodio.part3       net.tirpc_tests
containers          ltp-aiodio.part4       network_commands
controllers         ltp-aio-stress.part1   nptl
cpuhotplug          ltp-aio-stress.part2   numa
crashme             ltplite                pipes
cve                 lvm.part1              power_management_tests
dio                 lvm.part2              power_management_tests_exclusive
dma_thread_diotest  math                   pty
fcntl-locktests     mm                     quickhit
filecaps            modules                sched
fs                  net.features           scsi_debug.part1
fs_bind             net.ipv6               securebits
fs_ext4             net.ipv6_lib           smack
fs_perms_simple     net.multicast          stress.part1
fs_readonly         net.nfs                stress.part2
fsx                 net.rpc                stress.part3
hugetlb             net.rpc_tests          syscalls
hyperthreading      net.sctp               syscalls-ipc
ima                 net_stress.appl        timers
input               net_stress.broken_ip   tpm_tools
io                  net_stress.interface   tracing
io_cd               net_stress.ipsec_icmp
io_floppy           net_stress.ipsec_tcp
[wxs@bogon ltp]$ sudo ./runltp -f modules
Note that if we test a test set, runltp needs to specify the - f parameter.
1.4.2 Individual test
If we don't want to test a test suite, but want to test a separate test, we can use installation package test or source package test. Take access 01 as an example to illustrate individual testing.
1.4.2.1 Installation Package Test
Enter the installation package and execute the following commands.
[wxs@bogon ltp]$ cd /opt/ltp/
[wxs@bogon ltp]$ sudo ./runltp -s access01
Note that if we test a test, runltp needs to specify the - s parameter.
1.4.2.2 Source Packet Testing
Enter the source package, find the location of access 01, and execute. / access 01 directly.
[wxs@bogon access]$ cd ~/ltp/testcases/kernel/syscalls/access/
[wxs@bogon access]$ sudo ./access01
We see that access 01 is located in the testcases directory. In fact, every file in the testcases directory is a complete executable program, which can be executed directly in the compiled source path.
1.5 Project Practice
The projects involved in this section are located in the demoA folder built by ourselves under the source package testcases. Testing methods are all based on test set testing (source code testing and test set testing can be used for c-implemented test cases, while shell-implemented test cases can only be based on test set testing).
[wxs@bogon ~]$ cd ~/ltp/testcases/
[wxs@bogon testcases]$ mkdir demoA
[wxs@bogon testcases]$ cd demoA/
[wxs@bogon demoA]$ pwd
/home/wxs/ltp/testcases/demoA
1.5.1 Verification of sqrt() function
Refer to the sample code given in Section 1.3.3 to write the test case sqrt.c:
#include <errno.h>
#include <string.h>
#include <sys/mount.h>
#include "tst_test.h"

static struct tcase {
    const int input;
    const int output;
} tcases[] = {
        {-1,1},
        {9,3}
};

static void testSqrt(unsigned int n){
    struct tcase *tc = &tcases[n];

    TEST(sqrt(tc->input));

    if (TEST_RETURN != tc->output) {
        tst_res(TFAIL, "sqrt() failed");
        return;
    }
    tst_res(TPASS, "sqrt() succeeds");
}

static struct tst_test test = {
        .tid = "testSqrt",
        .tcnt = ARRAY_SIZE(tcases),
        .test = testSqrt,
};
Refer to other Makefile files in the testcases directory and write Makefile:
top_srcdir ?= ../..

include $(top_srcdir)/include/mk/testcases.mk

include $(top_srcdir)/include/mk/generic_leaf_target.mk

sqrt:  LDLIBS += -lm
It should be noted that top_srcdir here refers to the ltp directory, because the demoA directory is located in the inner two layers of the ltp directory, so the use of. /..
It should also be noted that the use of sqrt commands must be accompanied by - lm parameters, which are already reflected in Makefile.
Execute make command to generate executable file sqrt:
[wxs@bogon demoA]$ make
make -C "/home/wxs/ltp/lib" -f "/home/wxs/ltp/lib/Makefile" all
make[1]: Enter the catalogue“/home/wxs/ltp/lib"
make[2]: Enter the catalogue“/home/wxs/ltp/lib/newlib_tests"
make[2]: Yes. all"No need to do anything.
make[2]: Get out of the catalogue“/home/wxs/ltp/lib/newlib_tests"
make[2]: Enter the catalogue“/home/wxs/ltp/lib/tests"
make[2]: Yes. all"No need to do anything.
make[2]: Get out of the catalogue“/home/wxs/ltp/lib/tests"
make[1]: Get out of the catalogue“/home/wxs/ltp/lib"
gcc -g -O2 -g -O2 -fno-strict-aliasing -pipe -Wall -W -Wold-style-definition -D_FORTIFY_SOURCE=2 -I../../include -I../../include -I../../include/old/   -L../../lib  sqrt.c   -lltp -lm -o sqrt
sqrt.c: In function'testSqrt'in:
sqrt.c:17:2: Warning: Implicit declaration function'sqrt' [-Wimplicit-function-declaration]
  TEST(sqrt(tc->input));
  ^
In file included from sqrt.c:4:0:
sqrt.c:17:7: Warning: Implicit declarations and built-in functions'sqrt'Incompatible [Default enabled]
  TEST(sqrt(tc->input));
       ^
../../include/tst_test.h:176:17: Note appended:in definition of macro 'TEST'
   TEST_RETURN = SCALL; \
                 ^
The command. / sqrt can be executed directly here to run the test case, but it cannot be done for the shell test case in the next section, so we write it in the custom test set.
First copy the executable sqrt to the testcases/bin/directory of the installation package:
[wxs@bogon demoA]$ sudo cp sqrt /opt/ltp/testcases/bin/Then enter the runtest directory of the installation package and write a custom test case set demoA:
[wxs@bogon runtest]$ cat demoA
sqrt sqrt
Each test case in the test case set consists of two parts: the nickname in the first part and the file name in the testcases/bin/directory in the second part, separated by spaces in the middle.
Enter the upper directory and execute the overall test command:
[wxs@bogon runtest]$ cd ..
[wxs@bogon ltp]$ sudo ./runltp -f demoA
After execution the program will output a large section, we only need to care about the most important part. I define the content in the middle of <test_output> to <test_end> as test body, which is hereinafter referred to as:
...
<<<test_start>>>
tag=sqrt stime=1506106767
cmdline="sqrt"
contacts=""
analysis=exit
<<<test_output>>>
tst_test.c:915: INFO: Timeout per run is 0h 05m 00s
incrementing stop
sqrt.c:20: FAIL: sqrt() failed
sqrt.c:23: PASS: sqrt() succeeds

Summary:
passed   1
failed   1
skipped  0
warnings 0
<<<execution_status>>>
initiation_status="ok"
duration=0 termination_type=exited termination_id=1 corefile=no
cutime=0 cstime=0
<<<test_end>>>
...
As you can see, two test points are FAIL and PASS. Comparing with the test data given in sqrt.c file, we found that there was no problem in the test. So far, a simple LTP test case has been completed.
1.5.2 Verify the echo command
Return to the demoA folder and write the echo.sh file. The code can refer to the test cases / commands completed in the source package:
#Number of times a test function is executed
TST_CNT=1
#Test case startup function
TST_TESTFUNC=do_test
. tst_test.sh

echo_test()
{
    local std_in=$1
    local echo_cmd=$(echo $std_in > a.out)
    local echo_res=$std_in
    local cat_res=$(cat a.out)

    if [ $echo_res = $cat_res ]
    then
        tst_res TPASS "$echo_cmd sucessed"
    else
        tst_res TFAIL "$echo_cmd failed"
    fi
}

do_test()
{
    echo_test "hello\tworld"
}

tst_run
Add execution permissions for echo.sh and copy them to the testcases/bin / directory in the installation package. It's important to note here that test cases can't be executed directly on the current path. / echo.sh! !
[wxs@bogon demoA]$ pwd
/home/wxs/ltp/testcases/demoA
[wxs@bogon demoA]$ sudo chmod +x echo.sh
[wxs@bogon demoA]$ sudo cp echo.sh /opt/ltp/testcases/bin/
Modify the demoA test case set written in the previous section and add echo.sh test cases:
[wxs@bogon demoA]$ cd /opt/ltp/runtest/
[wxs@bogon runtest]$ cat demoA
sqrt sqrt
echo echo.sh
Note that at this point the test case set contains two test cases, and running the test case set later will execute these two test cases.
Enter the upper directory and execute the overall test command:
[wxs@bogon runtest]$ cd ..
[wxs@bogon ltp]$ sudo ./runltp -f demoA
The output of the results is still a lot, but we still only look at the most critical part:
...
<<<test_output>>>
tst_test.c:915: INFO: Timeout per run is 0h 05m 00s
sqrt.c:20: FAIL: sqrt() failed
sqrt.c:23: PASS: sqrt() succeeds

Summary:
passed   1
failed   1
skipped  0
warnings 0
<<<execution_status>>>
initiation_status="ok"
duration=1 termination_type=exited termination_id=1 corefile=no
cutime=0 cstime=0
<<<test_end>>>
<<<test_start>>>
tag=echo stime=1506107663
cmdline="echo.sh"
contacts=""
analysis=exit
<<<test_output>>>
incrementing stop
 1 TPASS:  sucessed

Summary:
passed   1
failed   0
skipped  0
warnings 0
<<<execution_status>>>
initiation_status="ok"
duration=0 termination_type=exited termination_id=0 corefile=no
cutime=2 cstime=5
<<<test_end>>>
...
The output of this test consists of two test bodies. The first test body, as we said in the previous section, looks directly at the second test body. There is a total of one test point in the body and the state is TPASS.
Yes, you have finished this section! So far you've learned the most basic ways to create C and Shell test cases and overall testing.
Reference
[1] ltp[EB/OL]. https://github.com/linux-test-project/ltp.
[2] Example using the new LTP library[EB/OL]. https://lwn.net/Articles/708251/.