I. CAT introduction

CAT (Central Application Tracking) is an open-source distributed real-time monitoring system developed by meituan reviews based on Java. The Infrastructure Department of meituan reviews hopes to provide industry-leading and unified solutions in the fields of basic storage, high-performance communication, large-scale online access, service governance, real-time monitoring, containerization and cluster intelligent scheduling. At present, CAT's product positioning in meituan reviews is the unified monitoring component of the application layer, which is obtained in the framework of Middleware (RPC, database, cache, MQ, etc.). To a wide range of applications, for each business line to provide system performance indicators, health status, real-time alarm and other services.
II. Deployment environment
- Windows 7
- CAT 3.0
- Java 8
- Tomcat 8.5
- Maven 3
- MySQL 5.7
- Intranet IP: 192.168.1.111
III. start deployment
1. Download CAT source code
git clone https://github.com/dianping/cat.git
2. Initialize database
Create the cat database in MySQL and execute the SQL statement in script/Cat.sql.
3. Create profile
Create the / data / appdata / cat folder in the disk where Tomcat is located, and then create the / data / appdata / cat / client.xml file, and write the following contents:
<?xml version="1.0" encoding="utf-8"?>
<config mode="client">
    <servers>
        <server ip="192.168.1.111" port="2280" http-port="8080"/>
    </servers>
</config>
Among them, 192.168.1.111 is changed to the intranet IP of your computer. 2280 is the default port for CAT server to accept data, which is not allowed to be modified. HTTP port is the port started by Tomcat, which is 8080 by default. It is recommended to use the default port.
Then create the / data / appdata / cat / datasources.xml file and write the following contents:
<?xml version="1.0" encoding="utf-8"?>
<data-sources>
    <data-source id="cat">
        <maximum-pool-size>3</maximum-pool-size>
        <connection-timeout>1s</connection-timeout>
        <idle-timeout>10m</idle-timeout>
        <statement-cache-size>1000</statement-cache-size>
        <properties>
            <driver>com.mysql.jdbc.Driver</driver>
            <url><![CDATA[jdbc:mysql://192.168.1.111:3306 / cat]] >
            <user>root</user>  <!-- Please replace with real database user name  -->
            <password>root</password>  <!-- Please replace with the real database password  -->
            <connectionProperties><![CDATA[useUnicode=true&characterEncoding=UTF-8&autoReconnect=true&socketTimeout=120000]]></connectionProperties>
        </properties>
    </data-source>
</data-sources>
Among them, the ones that need to be replaced are: database IP, port, user name and password.
4. war deployment of cat
Build AT's war using Maven:
mvn clean install -DskipTests
After the successful construction, rename cat-home/target/cat-alpha-3.0.0.war to cat.war, copy it to webapps of tomcat, and start Tomcat.
5. Modify route configuration
Visit http://192.168.1.111:8080/cat/s/config?op=routerConfigUpdate, default user name: admin, default password: admin, modify the client routing configuration:
<?xml version="1.0" encoding="utf-8"?>
<router-config backup-server="192.168.1.111" backup-server-port="2280">
   <default-server id="192.168.1.111" weight="1.0" port="2280" enable="true"/>
   <network-policy id="default" title="default" block="false" server-group="default_group">
   </network-policy>
   <server-group id="default_group" title="default-group">
      <group-server id="192.168.1.111"/>
   </server-group>
   <domain id="cat">
      <group id="default">
         <server id="192.168.1.111" port="2280" weight="1.0"/>
      </group>
   </domain>
</router-config>
Configuration Description:
- Backup server property: set to the external IP address of the current server, and the port is fixed to 2280.
- Default server property: defines the route addresses that can be skipped. Multiple can be set. The id attribute of the default server configures the IP address of the routable cat home service, with the port fixed at 2280; if you need to disable the routing address, set enable to false.
- Multiple different network segments can be configured in network policy, which means that this network segment uses the cat node of server group. The main function of this is to divide cat into multiple sub clusters when multiple computer rooms deploy cat, and then multiple sub clusters process different clients to avoid cross leased line access.
- domain id=cat is mainly a customized route. When it is found that the data volume of some projects is particularly large, or in other scenarios, the monitoring requests of these domains can be isolated and processed separately.
6. Modify the server configuration
Visit http://192.168.1.111:8080/cat/s/config?op=serverConfigUpdate to modify the server configuration:
<?xml version="1.0" encoding="utf-8"?>
<server-config>
   <server id="default">
      <properties>
         <property name="local-mode" value="false"/>
         <property name="job-machine" value="true"/>
         <property name="send-machine" value="false"/>
         <property name="alarm-machine" value="true"/>
         <property name="hdfs-enabled" value="false"/>
         <property name="remote-servers" value="192.168.1.111:8080"/>
      </properties>
      <storage local-base-dir="/data/appdatas/cat/bucket/" max-hdfs-storage-time="15" local-report-storage-time="2" local-logivew-storage-time="1" har-mode="true" upload-thread="5">
         <hdfs id="dump" max-size="128M" server-uri="hdfs://127.0.0.1/" base-dir="/user/cat/dump"/>
         <harfs id="dump" max-size="128M" server-uri="har://127.0.0.1/" base-dir="/user/cat/dump"/>
         <properties>
            <property name="hadoop.security.authentication" value="false"/>
            <property name="dfs.namenode.kerberos.principal" value="hadoop/dev80.hadoop@testserver.com"/>
            <property name="dfs.cat.kerberos.principal" value="cat@testserver.com"/>
            <property name="dfs.cat.keytab.file" value="/data/appdatas/cat/cat.keytab"/>
            <property name="java.security.krb5.realm" value="value1"/>
            <property name="java.security.krb5.kdc" value="value2"/>
         </properties>
      </storage>
      <consumer>
         <long-config default-url-threshold="1000" default-sql-threshold="100" default-service-threshold="50">
            <domain name="cat" url-threshold="500" sql-threshold="500"/>
            <domain name="OpenPlatformWeb" url-threshold="100" sql-threshold="500"/>
         </long-config>
      </consumer>
   </server>
   <server id="192.168.1.111">
      <properties>
         <property name="job-machine" value="true"/>
         <property name="send-machine" value="false"/>
         <property name="alarm-machine" value="true"/>
      </properties>
   </server>
</server-config>
Configuration Description:
Server node: represents the configuration of a machine. If id is default, it represents the default configuration; if id is ip, it represents the configuration of this server.
- Local mode: defines whether the service is in the local mode (development mode). In the production environment, set it to false to start the remote listening mode. The default value is false.
- HDFS machine: defines whether to enable HDFS storage mode. The default value is false.
- Job machine: defines whether the current service is a report machine (only one server is required to enable the task of generating summary report and statistical report), which is false by default;
- Alarm machine: defines whether the current service is an alarm machine (only one service machine needs to enable this function when all kinds of alarm monitoring are enabled). The default value is false.
- Send machine: defines whether the current service alarm is sent (in order to solve the problem that the alarm thread is enabled in the test environment, but the alarm is not notified at last, this configuration will be gradually removed later. It is recommended that when the alarm machine is enabled to true, this synchronization is true)
Storage node: define data storage configuration information
- Local report storage time: defines the storage time of local reports in days.
- Local logivew storage time: defines the local log storage time in days.
- Local base dir: define local data store directory
- HDFS: define HDFS configuration information for direct login
- Server URI: define HDFS service address
- Console: define service console information
- Remote servers: defines the HTTP service list (this value is taken when the remote listener synchronously updates the server information)
- LDAP: define LDAP configuration information (this can be ignored)
- ldapUrl: define LDAP service address (this can be ignored)
Restart Tomcat.
Four, validation
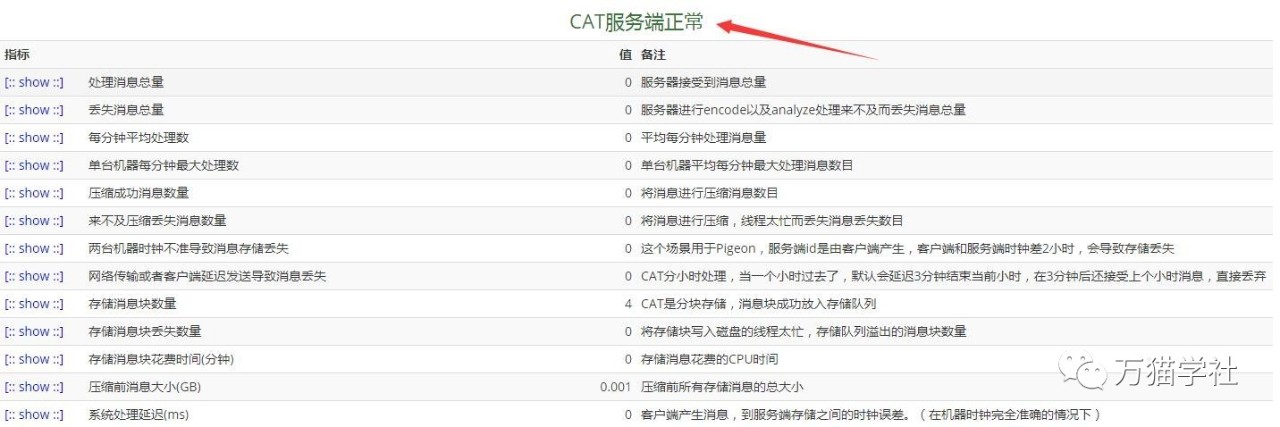
Visit http://192.168.1.111:8080/cat/r and click "State" to see "CAT server is normal" and some basic CAT states, as shown in the following figure:

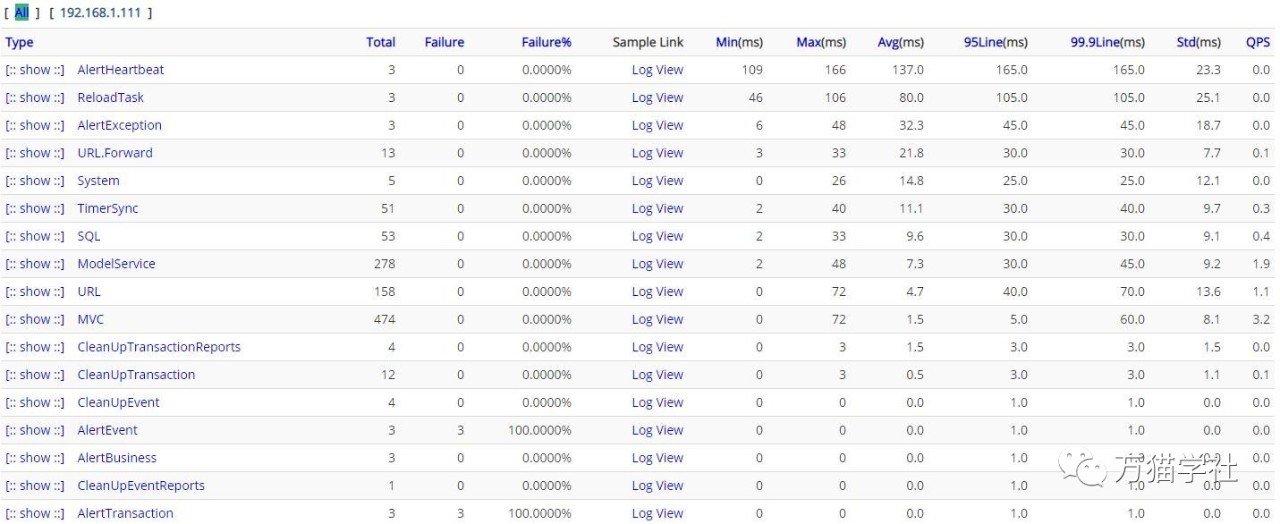
Click "Transaction" and the monitoring information of CAT itself is shown as follows:
