Author: Li Hongxun, Front End Engineer, GE Digital Group
scene
Because of security considerations, data services do not have external IPS and ports on Predix, so we can only access app s deployed on Predix, which can cause some development inconvenience.For example, we may need to import local data into postgres, or we may want to look at the data in redis, which can be cumbersome.
Local access through proxy
Although we can't access postgres and redis directly locally, the app s we deploy on predix are accessible, so we can deploy a proxy on predix to proxy locally (locally referring to our own computer) so that we can access it locally.
There is an existing proxy ph-connectivity-node-service that can be used directly with minimal modifications to the configuration and deployment.This app is short for pH.
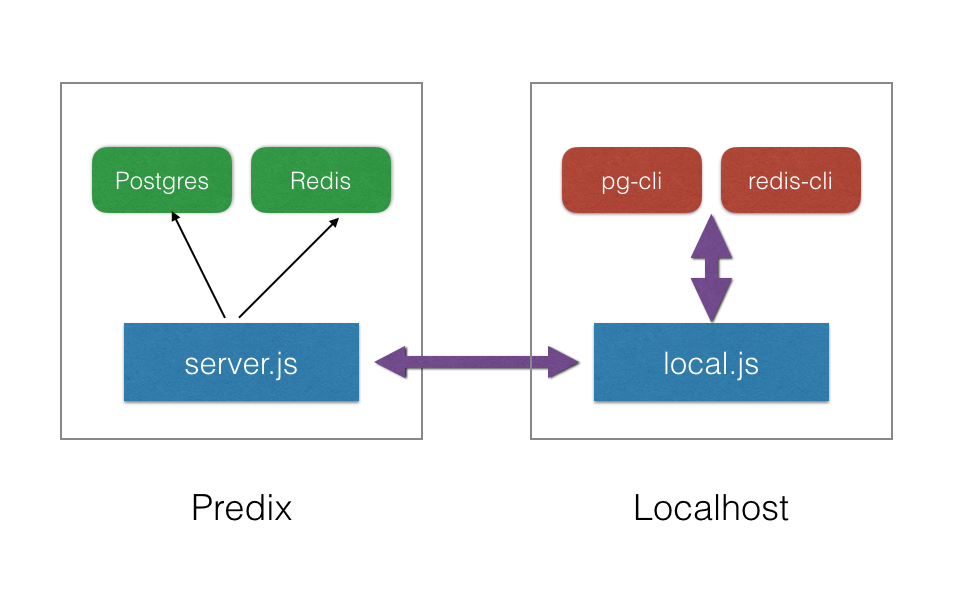
The basic working principle of ph is shown in the following figure. It contains two parts, server and client. We need to deploy server on predix. It will connect postgres and redis directly. Then we start the client locally. Client will connect through socket and server, and then open ports 7999 and 7998 locally.Instead of postgres and redis, we can use the client locally to connect the ports directly.
Here's how to configure redis
Get redis configuration
First, we need to create a redis service and bind it to our own app. See the predix documentation for details.
The configuration information for redis can then be obtained from the cf env appname.
{
 "VCAP_SERVICES": {
  "redis": [
   {
    "credentials": {
     "host": "10.120.x.xx",
     "password": "xxx-xxx-xxx",
     "port": 8888
    },
    "label": "redis",
    "name": "apphub-redis",
    "plan": "shared-vm",
    "provider": null,
    "syslog_drain_url": null,
    "tags": [
     "pivotal",
     "redis"
    ],
    "volume_mounts": []
   }
  ]
 }
}
All we need are the three fields host, port, and password in credential.
Configure server
First open the manifest.yml file.
---
applications:
  - name: ph-proxy-server
    buildpack: https://github.com/cloudfoundry/buildpack-nodejs.git
    memory: 128M
    disk_quota: 128M
    command: DEBUG=ph:server node example/server
    stack: cflinuxfs2
Change the name field to the one we need, or leave it unchanged.
Then open example/server.js:
var PHServer=require('./../ph-server');

//localPort 9898 represents the listener on the amazon host whereas remoteAddress/remotePort indicate the destination of the forwarding
var phs=new PHServer({
  localPort: process.env.PORT || 443,
  clients: {
    'postgres':{
      secret: '1234',
      remoteHost: 'x.x.x.x',
      remotePort: 8888
    },
    'redis':{
      secret: '1234',
      remoteHost: 'x.x.x.x',
      remotePort: 9999
    }
  }
});
There are two connections created by default, so let's just look at redis and change the remoteHost and remotePort values to those of host and port in the previous step.Note that secret here is not the password for redis. It is the password for server-authenticated clients, as long as it is consistent with the corresponding secret in client.js, this will prevent others from connecting to your server.
Then we can deploy the server to predix and execute cf push directly.
Configure client
After deploying the server, we configure the client.Open the example/client.js file:
var PHClient=require('./../ph-client');
//port# 7999 is making the websocket call to amazon. the remote address is assigned to amazon with the remote port 3001
const serviceHost = 'ph-proxy-server.run.aws-jp01-pr.ice.predix.io'
var postgres = new PHClient({
    localPort: 7999,
    serviceHost: serviceHost,
    servicePort: 443,
    clientId: 'postgres',
    secret: '1234',
    // proxy: 'http://3.20.128.6:88'  // you can config proxy here, it will read env.http_proxy by default
});
var redis = new PHClient({
    localPort: 7998,
    serviceHost: serviceHost,
    servicePort: 443,
    clientId: 'redis',
    secret: '1234'
});
Once the server is deployed, there will be a url. Make sure the serviceHost in the code above is the same as the URL deployed.Here we just need to change the clientId and secret to the same value as in server.js.
Then execute npm run client to start a proxy locally.
Connect redis using redis-cli
Then you can connect redis locally using redis-cli with the following commands
redis-cli -p 7998 -a xxxxxWhere xxxx is the password for redis, we see the following message to indicate that we connected successfully: 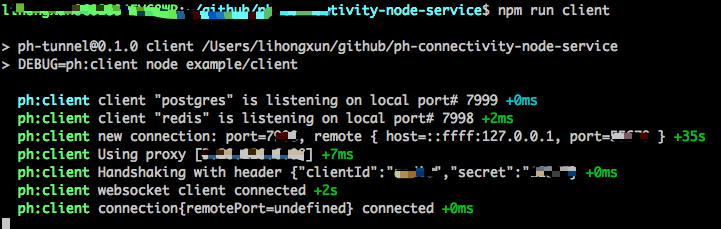
You can then test in redis-cli:

Get ph
ph is an application developed by GE engineers. There is no open source for now. Kids shoes in need can contact hongxun.li@ge.com. Any other questions can be exchanged by email. Thank you.