This paper mainly understands the compilation process of LLVM and the development of clang plug-in
LLVM
LLVM is a framework system of architecture compiler, which is written in C + +. It is used to optimize the compile time, link time, run time and idle time of programs written in any programming language. Remain open to developers and compatible with existing scripts
Traditional compiler design
Source Code + front-end Frontend + Optimizer + back-end (code generator) + Machine Code, as shown in the figure below

Traditional compiler design
Compiler architecture of ios
The compiler used by OC, C and C + + is Clang in the front end, swift in the swift, and LLVM in the back end
Module description
-
Front end Frontend: the task of the front end of the compiler is to parse the source code (compilation stage), which will Lexical analysis, syntax analysis, semantic analysis, check the source code for errors, and then build an Abstract Syntax Tree AST), the front end of llvm also generates intermediate representation (IR). It can be understood that llvm is a compiler + optimizer. It receives IR intermediate code and outputs IR to the back end, which is translated into the target instruction set through the back end
-
Optimizer optimizer: the optimizer is responsible for various optimizations to improve the running time of the code, such as eliminating redundant calculations
-
Back end (Code Generator): map the code to the target instruction set, generate machine code, and optimize the code related to machine code
Design of LLVM
The most important aspect of LLVM design is to use the general code representation (IR), which is used to represent the code in the compiler. All llvms can independently write the front end for any programming language and the back end for any hardware architecture, as shown below
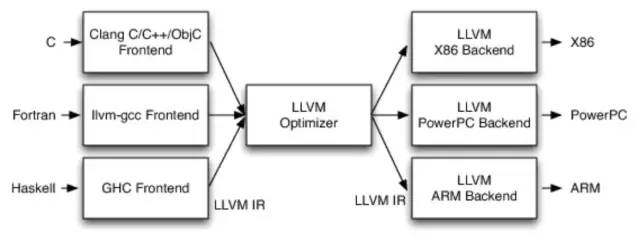
In a popular word, the design of LLVM is separated from the front end and the back end. No matter the front end or the back end changes, it will not affect the other end
About Clang
Clang is a sub project of LLVM project. It is a lightweight compiler based on LLVM architecture diagram. At the beginning of its birth, it was designed to replace GCC and provide faster compilation speed. It is a compiler responsible for C, C + +, OC languages and belongs to the whole LLVM architecture Compiler front-end, for developers, studying clang can bring us a lot of benefits
LLVM compilation process
-
Create a new file and write the following code
int test(int a,int b){
    return a + b + 3;
}


int main(int argc, const char * argv[]) {
    int a = test(1, 2);
    printf("%d",a);
    return 0;
}
-
You can print the compilation process of the source code through the command
//************Command************
 clang -ccc-print-phases main.m

 //************Compilation process************
 //0 - input file: source file found
+- 0: input, "main.m", objective-c

//1 - preprocessing stage: this process includes macro replacement and header file import
+- 1: preprocessor, {0}, objective-c-cpp-output

//2 - compilation stage: perform lexical analysis, syntax analysis, check whether the syntax is correct, and finally generate IR
+- 2: compiler, {1}, ir

//3 - back end: here, LLVM will optimize one pass by one. Each pass will do something and finally generate assembly code
+- 3: backend, {2}, assembler

//4 - assembly code generation object file
+- 4: assembler, {3}, object

//5 - link: link the required dynamic library and static library to generate executable files
+- 5: linker, {4}, image((mirror file)

//6 - binding: generate corresponding executable files through different architectures
6: bind-arch, "x86_64", {5}, image

LLVM compilation process
The following explains the above processes respectively, where 0 is mainly the input file, that is, find the source file. There is not much explanation here
1, Preprocessing compilation phase
This stage mainly deals with the replacement of macros and the import of header files. You can execute the following commands. After execution, you can see the import of header files and the replacement of macros
//Directly view the replacement results on the terminal
clang -E main.m

//Generate the corresponding file and view the replaced source code
clang -E main.m >> main2.m
It should be noted that:
-
typedef When aliasing a data type, it is not replaced in the preprocessing phase
-
define will be replaced in the preprocessing stage, so it is often used for code confusion. The purpose is to ensure app security. The implementation logic is to alias the core classes and core methods in the app with system similar names, and then be replaced in the preprocessing stage to achieve the purpose of code confusion
2, Compilation phase
The compilation stage is mainly to analyze and check the morphology and syntax, and then generate the intermediate code IR
1. Lexical analysis
After preprocessing, lexical analysis will be carried out. Here, the code will be cut into token s, such as size brackets, equals sign and string,
-
You can view it through the following command
clang -fmodules -fsyntax-only -Xclang -dump-tokens main.m
-
If the header file cannot be found, specify the sdk
clang -isysroot (own SDK (path) -fmodules -fsyntax-only -Xclang -dump-tokens main.m

 clang -isysroot /Applications/Xcode.app/Contents/Developer/Platforms/iPhoneSimulator.platform/Developer/SDKs/iPhoneSimulator14.1.sdk/ -fmodules -fsyntax-only -Xclang -dump-tokens main.m
2. Syntax analysis
After lexical analysis is completed, syntax analysis is the task. Its task is to verify whether the syntax is correct. On the basis of lexical analysis, word sequences are combined into various phrases, such as programs, statements, expressions, etc., and then all nodes form an Abstract Syntax Tree (AST). The syntax analysis program judges whether the program is correct in structure
-
You can view the results of parsing through the following command
clang -fmodules -fsyntax-only -Xclang -ast-dump main.m
-
If the import header file cannot be found, you can specify the SDK
 clang -isysroot (own SDK (path) -fmodules -fsyntax-only -Xclang -ast-dump main.m

 clang -isysroot /Applications/Xcode.app/Contents/Developer/Platforms/iPhoneSimulator.platform/Developer/SDKs/iPhoneSimulator14.1.sdk/ -fmodules -fsyntax-only -Xclang -ast-dump main.m
The following is the result of syntax analysis

Among them, it mainly explains the meaning of several keywords
-
-FunctionDecl function
-
-ParmVarDecl parameter
-
-CallExpr calls a function
-
-BinaryOperator operator operator
3. Generate intermediate code IR
After completing the above steps, the intermediate code IR is generated. The Code Generation will traverse the syntax tree from top to bottom and gradually translate it into LLVM IR,
-
You can generate a. ll text file through the following command to view the IR code. In this step, OC code will perform runtime bridging, such as property synthesis, ARC processing, etc
clang -S -fobjc-arc -emit-llvm main.m

//The following is the basic syntax of IR
@ Global identity
% Local identification
alloca Open up space
align memory alignment
i32 32bit,4 Bytes
store Write memory
load Read data
call Call function
ret return
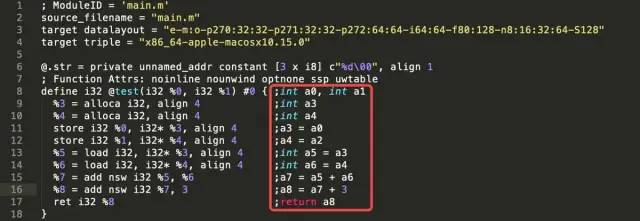
The following is the generated intermediate code. ll file

The parameters of the test function are interpreted as
Compilation phase-4
-
Of course, IR files can be optimized in OC. The general settings are set in target - Build Setting - Optimization Level. The optimization levels of LLVM are - o0 - O1 - O2 - O3 - OS (the first is the capital letter O). The following is the command to generate intermediate code IR with optimization
clang -Os -S -fobjc-arc -emit-llvm main.m -o main.ll
This is the optimized intermediate code
-
After xcode7, start bitcode. Apple will further optimize it to generate. bc intermediate code. We generate. bc code through the optimized IR code
clang -emit-llvm -c main.ll -o main.bc
3, Back end
LLVM is mainly optimized through one Pass at the back end. Each Pass does something and finally generates assembly code
Generate assembly code
-
We generate assembly code from the final. bc or. ll code
clang -S -fobjc-arc main.bc -o main.s clang -S -fobjc-arc main.ll -o main.s
-
Generating assembly code can also be optimized
clang -Os -S -fobjc-arc main.m -o main.s
At this time, the format of the generated main.s file is assembly code

Generate assembly code
4, Generate target file
The generation of object file is that the assembler inserts the assembly code, converts the assembly code into machine code, and finally outputs the object file
clang -fmodules -c main.s -o main.o
You can view the symbols in main.o through the nm command
$xcrun nm -nm main.o
The following are the symbols in main.o in the file format Target file
Generate target file
-
_ The printf function is an undefined, external of
-
undefined means that the symbol cannot be found in the current file_ printf
-
external indicates that the symbol is externally accessible
5, Link
Link mainly links the required dynamic library and static library to generate executable files, where
-
Static libraries are merged with executables
-
Dynamic libraries are independent
The connector links the compiled. O file with the. Dyld. A file to generate a mach-o file
clang main.o -o main
View symbols after links
$xcrun nm -nm main
undefined means that dynamic binding will be performed at run time
-
View by command What is the format of main? In this case mach-o executable
6, Bind
Binding mainly generates the corresponding mach-o executable file through different architectures
Clang plug-in development
1. Preparatory work
Due to domestic network restrictions, you need to download the source code of llvm with the help of image. Here is the image link
-
Download LLVM project
git clone https://mirrors.tuna.tsinghua.edu.cn/git/llvm/llvm.git
-
Download compiler RT, libcxx and libcxxabi in the projects directory of LLVM
cd ../projects

git clone https://mirrors.tuna.tsinghua.edu.cn/git/llvm/compiler-rt.git

git clone https://mirrors.tuna.tsinghua.edu.cn/git/llvm/libcxx.git

git clone https://mirrors.tuna.tsinghua.edu.cn/git/llvm/libcxxabi.git
-
Install the extra tool under Clang's tools
cd ../tools/clang/tools

git clone https://mirrors.tuna.tsinghua.edu.cn/git/llvm/clang-tools-extra.git
2. LLVM compilation
Since the latest LLVM only supports cmake to compile, you need to install cmake
Installing cmake
-
Check whether cmake is installed in brew. If it is already installed, skip the following steps
brew list
-
Install cmake through brew
brew install cmake
Compile LLVM
There are two compilation methods:
-
Compiling LLVM with xcode
-
Compiling LLVM through ninja
Compiling LLVM with xcode
-
Compile cmake into Xcode project
mkdir build_xcode

cd build_xcode

cmake -G Xcode ../llvm
-
Compiling Clang using xcode
-
Select Create Schemes automatically

Compile LLVM-1
-
Compile (CMD + B), select ALL_BUILD Secheme for compilation, estimated 1 + hours
-
Note: all is used here_ The i386 architecture is deprecated. You should update your arch build setting to remove the i386 architecture, but no good solution has been found (to be added later)
Alternative: select Create Schemes manually, and then compile Clang + ClangTooling
Compiling LLVM through ninja
-
If you use Ninja to compile, you also need to install ninja. Use the following command to install ninja
brew install ninja
-
Create a new build in the root directory of LLVM source code_ The Ninja directory will eventually be in build_ Generate ` ` build.ninja under Ninja directory`
-
Create a new LLVM in the root directory of LLVM source code_ Release directory, and the final compiled file will be in LLVM_ Under the release folder path
cd llvm_build

//Pay attention to dcmake_ INSTALL_ There must be no spaces after prefix
cmake -G Ninja ../llvm -DCMAKE_INSTALL_PREFIX= Installation path (local)/ Users/xxx/xxx/LLVM/llvm_release)
-
Execute compilation and installation instructions at one time
ninja

ninja install
3. Create plug-in
-
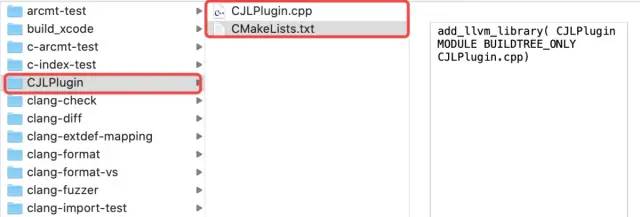
Create a new plug-in CJLPlugin under / llvm/tools/clang/tools
-
In the CMakeLists.txt file in the / llvm / tools / Lang / Tools Directory, add _lang_subdirectory (CJLPlugin), where CJLPlugin is the plug-in name created in the previous step
-
Create two new files in the CJLPlugin directory, CJLPlugi.cpp And CMakeLists.txt, and add the following code to CMakeLists.txt
//1. Create in CJLPlugin directory through terminal
touch CJLPlugin.cpp

touch CMakeLists.txt

//2. Add the following code to CMakeLists.txt
add_llvm_library( CJLPlugin MODULE BUILDTREE_ONLY
    CJLPlugin.cpp
)
Create plug-in-3
-
Next, use cmake to rebuild the Xcode project, and execute the following command in the build_xcode directory
cmake -G Xcode ../llvm
-
Finally, you can see the customized CJLPlugin directory under the Loadable modules directory in the xcode project of LLVM, and then you can write plug-in code in it
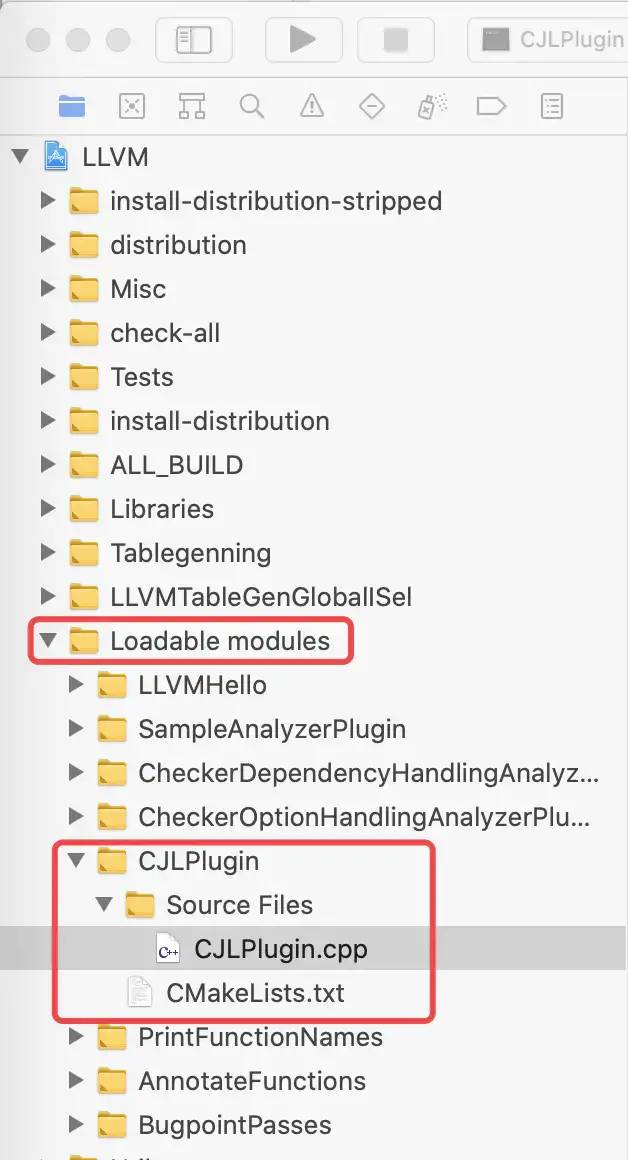
Create plug-in-4
Write plug-in code
In the CJLPlugin.cpp file in the CJLPlugin directory, add the following code
// create by CJL
// 2020/11/15

#include <iostream>
#include "clang/AST/AST.h"
#include "clang/AST/DeclObjC.h"
#include "clang/AST/ASTConsumer.h"
#include "clang/ASTMatchers/ASTMatchers.h"
#include "clang/Frontend/CompilerInstance.h"
#include "clang/ASTMatchers/ASTMatchFinder.h"
#include "clang/Frontend/FrontendPluginRegistry.h"

using namespace clang;
using namespace std;
using namespace llvm;
using namespace clang::ast_matchers;
//Namespace with the same name as the plug-in
namespace CJLPlugin {

//Step 3: callback function after scanning
//4. Custom callback class, inherited from MatchCallback
class CJLMatchCallback: public MatchFinder::MatchCallback {

private:
    //CI delivery path: CreateASTConsumer method parameter in CJLASTAction class - constructor of CJLConsumer - private property of CJLMatchCallback, which is obtained from CJLASTConsumer constructor through constructor
    CompilerInstance &CI;

    //Determine whether it is a user source file
    bool isUserSourceCode(const string filename) {
        //File name is not empty
        if (filename.empty()) return  false;
        //The source code in non xcode is considered to be the user's
        if (filename.find("/Applications/Xcode.app/") == 0) return false;
        return  true;
    }

    //Judge whether it should be modified with copy
    bool isShouldUseCopy(const string typeStr) {
        //Judge whether the type is NSString | NSArray | NSDictionary
        if (typeStr.find("NSString") != string::npos ||
            typeStr.find("NSArray") != string::npos ||
            typeStr.find("NSDictionary") != string::npos/*...*/)
        {
            return true;
        }

        return false;
    }

public:
    CJLMatchCallback(CompilerInstance &CI) :CI(CI) {}

    //Override run method
    void run(const MatchFinder::MatchResult &Result) {
        //Obtain relevant nodes through result -- obtain according to the node tag (the tag needs to be consistent with the CJLASTConsumer construction method)
        const ObjCPropertyDecl *propertyDecl = Result.Nodes.getNodeAs<ObjCPropertyDecl>("objcPropertyDecl");
        //Judge that the node has a value and is a user file
        if (propertyDecl && isUserSourceCode(CI.getSourceManager().getFilename(propertyDecl->getSourceRange().getBegin()).str()) ) {
            //15. Get node description information
            ObjCPropertyDecl::PropertyAttributeKind attrKind = propertyDecl->getPropertyAttributes();
            //Gets the type of the node and converts it to a string
            string typeStr = propertyDecl->getType().getAsString();
//            Cout < - --------- got it: "< < typestr < - ---------" < < endl;

            //Judge that copy should be used, but copy is not used
            if (propertyDecl->getTypeSourceInfo() && isShouldUseCopy(typeStr) && !(attrKind & ObjCPropertyDecl::OBJC_PR_copy)) {
                //Use CI to send warning messages
                //Get diagnostic engine through CI
                DiagnosticsEngine &diag = CI.getDiagnostics();
                //An error is reported through the diagnostic engine report, that is, an exception is thrown
                /*
                Error location: getBeginLoc node start location
                Error: getCustomDiagID (level, prompt)
                 */
                diag.Report(propertyDecl->getBeginLoc(), diag.getCustomDiagID(DiagnosticsEngine::Warning, "%0 - This place is recommended copy!!"))<< typeStr;
            }
        }
    }
};


//Step 2: scan configuration completed
//3. Custom CJLASTConsumer, inherited from ASTConsumer, is used to listen to the information of AST nodes -- filters
class CJLASTConsumer: public ASTConsumer {
private:
    //Lookup filter for AST nodes
    MatchFinder matcher;
    //Define callback class object
    CJLMatchCallback callback;

public:
    //Create matcherFinder object in constructor
    CJLASTConsumer(CompilerInstance &CI) : callback(CI) {
        //Add a MatchFinder, and each objcPropertyDecl node is bound with an objcPropertyDecl ID (to match the objcPropertyDecl node)
        //Callback is actually rewriting the run method in CJLMatchCallback (the real callback is the callback run method)
        matcher.addMatcher(objcPropertyDecl().bind("objcPropertyDecl"), &callback);
    }

    //Implement two callback methods HandleTopLevelDecl and HandleTranslationUnit
    //After parsing a top-level declaration, call back once (the top-level node is equivalent to a global variable and function declaration)
    bool HandleTopLevelDecl(DeclGroupRef D){
//        Cout < < "parsing..." < < endl;
        return  true;
    }

    //The entire file parses the completed callback
    void HandleTranslationUnit(ASTContext &context) {
//        Cout < < "file parsing completed!" < < endl;
        //Give the context (i.e. AST syntax tree) of the parsed file to the matcher
        matcher.matchAST(context);
    }
};

//2. Inherit PluginASTAction to implement our custom Action, that is, custom AST syntax tree behavior
class CJLASTAction: public PluginASTAction {

public:
    //Overloading ParseArgs and CreateASTConsumer methods
    bool ParseArgs(const CompilerInstance &ci, const std::vector<std::string> &args) {
        return true;
    }

    //Returns an object of type ASTConsumer, where ASTConsumer is an abstract class, the base class
    /*
     Resolve the given plug-in command line parameters.
     - param CI Compiler instance for reporting diagnostics.
     - return true if the resolution is successful; otherwise, the plug-in will be destroyed and no action will be taken. The plug-in is responsible for reporting errors using the Diagnostic object of CompilerInstance.
     */
    unique_ptr<ASTConsumer> CreateASTConsumer(CompilerInstance &CI, StringRef iFile) {
        //Returns the custom CJLASTConsumer, that is, the subclass object of ASTConsumer
        /*
         CI be used for:
         - Determine whether the file enables the user's
         - Throw warning
         */
        return unique_ptr<CJLASTConsumer> (new CJLASTConsumer(CI));
    }

};

}

//Step 1: register the plug-in and customize the AST syntax tree Action class
//1. Register plug-ins
static FrontendPluginRegistry::Add<CJLPlugin::CJLASTAction> CJL("CJLPlugin", "This is CJLPlugin");
Its principle is mainly divided into three steps
-
Step 1: register the plug-in and customize the AST syntax tree Action class
-
Used to determine whether the file is the user's
-
Used to throw a warning
-
Inherited from PluginASTAction and customized ASTAction, two methods ParseArgs and CreateASTConsumer need to be overloaded. The key method is CreateASTConsumer. There is a parameter CI in the method, that is, the compiled instance object, which is mainly used in the following two aspects
-
To register a plug-in through FrontendPluginRegistry, you need to associate the plug-in name with the custom ASTAction class
-
-
[step 2] the scanning configuration is completed
-
HandleTopLevelDecl: call back once after parsing a top-level declaration
-
HandleTranslationUnit: a callback that parses the entire file and gives the context (i.e. AST syntax tree) after the file is parsed matcher
-
It inherits from the ASTConsumer class and implements the custom subclass CJLASTConsumer. It has two parameters: MatchFinder object matcher and CJLMatchCallback custom callback object callback
-
Implement the constructor, mainly to create the MatchFinder object and give the CI bed to the callback object
-
Implement two callback methods
-
-
Step 3: callback function after scanning
-
1. Through result, obtain the corresponding node according to the node tag. At this time, the tag needs to be consistent with that in the CJLASTConsumer construction method
-
2. Judge that the node has a value and is a user file, that is, the private method of isUserSourceCode
-
3. Get node description information
-
4. Gets the type of the node and converts it to a string
-
5. Judge that copy should be used, but copy is not used
-
6. Get diagnostic engine through CI
-
7. Reporting errors through the diagnostic engine
-
Inherited from MatchFinder::MatchCallback, custom callback class CJLMatchCallback
-
Defines the private property of CompilerInstance, which is used to receive CI information passed by ASTConsumer class
-
Override run method
-
Then test the plug-in in the terminal
//Command format
 Self compiled clang File path  -isysroot /Applications/Xcode.app/Contents/Developer/Platforms/iPhoneSimulator.platform/Developer/SDKs/iPhoneSimulator14.1.sdk/ -Xclang -load -Xclang plug-in unit(.dyld)route -Xclang -add-plugin -Xclang Plug in name -c Source path

//example
/Users/XXX/Desktop/build_xcode/Debug/bin/clang -isysroot /Applications/Xcode.app/Contents/Developer/Platforms/iPhoneSimulator.platform/Developer/SDKs/iPhoneSimulator14.1.sdk/ -Xclang -load -Xclang /Users/XXXX/Desktop/build_xcode/Debug/lib/CJLPlugin.dylib -Xclang -add-plugin -Xclang CJLPlugin -c /Users/XXXX/Desktop/XXX/XXXX/test demo/testClang/testClang/ViewController.m

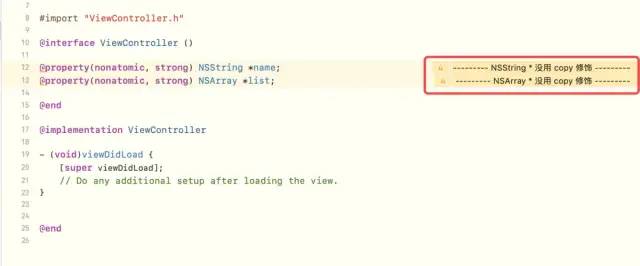
Test plug-in
4. Xcode integration plug-in
Loading plug-ins
-
Open the test project in target - > build settings - > other C flags Add the following
-Xclang -load -Xclang (.dylib)Dynamic library path -Xclang -add-plugin -Xclang CJLPlugin

Loading plug-ins
Set compiler
-
Because the clang plug-in needs to use the corresponding version to load, if the versions are inconsistent, the compilation will fail
-
Add two user-defined settings in the Build Settings column, CC and CXX
-
CC The corresponding is the absolute path of the clang compiled by yourself
-
CXX The corresponding is the absolute path of the clang + + compiled by yourself
-

Set compiler-2
-
Next, search index in Build Settings and change the Default of enable index wihle building functionality to NO

Finally, recompile the test project and the following results will appear
-