Introduction
In large-scale Linux applications, servers are often not equipped with CD-ROM drives. In this case, how can you quickly install the system for tens or hundreds of bare-metal servers?Let me introduce how to install the system remotely through PXE technology and to perform unattended installation.
1. Deploy PXE Remote Installation Service
PXE is a network boot technology developed by Intel Corporation that works in Client/Server mode, allowing clients to download boot images from remote servers over the network and load installation files or the entire operating system.
1. Prerequisites for batch deployment
-
The client's network card supports the PXE protocol (integrated BOOTROM chip), and the motherboard supports network booting.
-
There is a DHCP server on the network that automatically assigns addresses to clients and specifies boot file locations.
-
The server provides bootstrapping image file downloads via TFTP (Trivial File Transfer Protocol).
The first condition is actually a hardware requirement, which is currently supported by most servers and most PC s, simply by allowing boot from Network or LAN in the BIOS settings.
2. Advantages of batch deployment
-
Scaling: assembling multiple servers at the same time
-
Automation: Install systems, configure services
-
Remote implementation: no installation media such as CD, U disk, etc.
3. The process of building PXE services
- The PXE server and client work as follows:
(1) A PXE client sends a DHCP request and requests an IP address from the DHCP server.
(2) In response to requests from PXE clients, the DHCP server automatically assigns an IP address from the IP address pool to the PXE clients, and informs the PXE clients of the IP address of the TFTP server and the PXE bootstrapper file pxelinux.0, which defaults to the TFTP shared directory/var/lib/tftpboot/
(3) The PXE client initiates a request to the TFTP server for the pxelinux.0 bootstrapper file.
(4) The TFTP server responds to the request of the PXE client and transfers its shared pxelinux.0 file to the PXE client.
The PXE client starts up to the main interface of the system installation through the network.
The PXE client initiates a request to the file sharing server (ftp, http, nfs, etc.) for centos or windows system installation files.
File Sharing Service transfers shared system installation files to PXE clients in response to requests from PXE clients.
The PXE client enters the installation prompt wizard interface and the user needs to manually complete the installation of the system
4. Set up PXE remote installation server
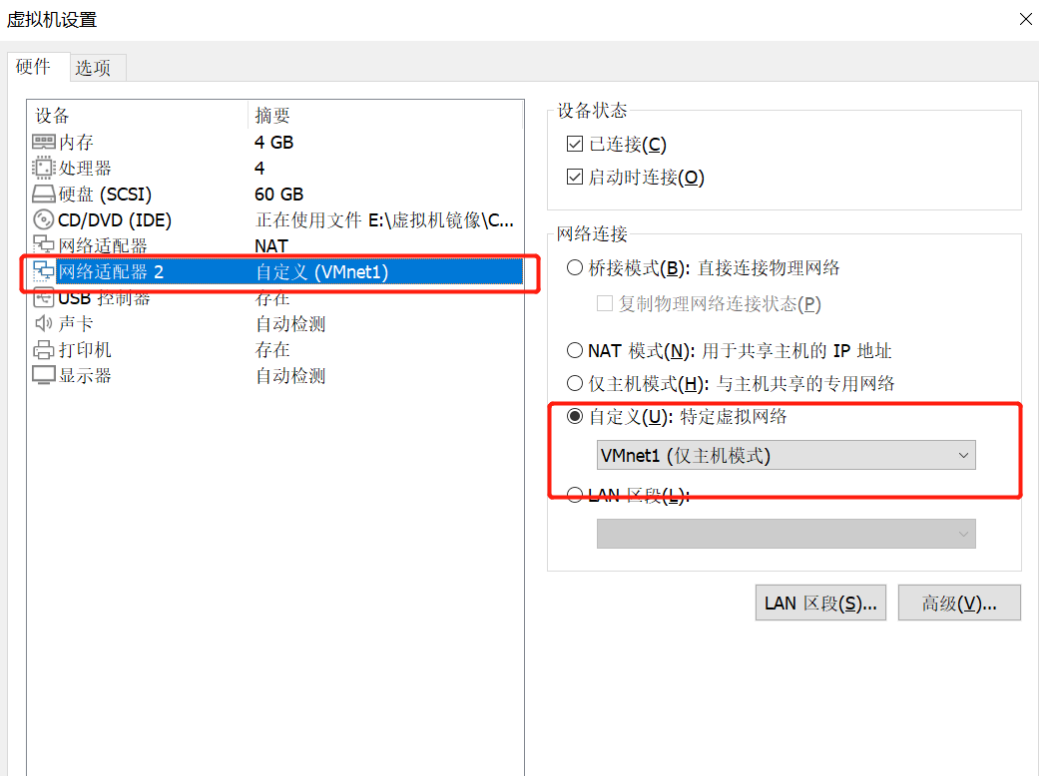
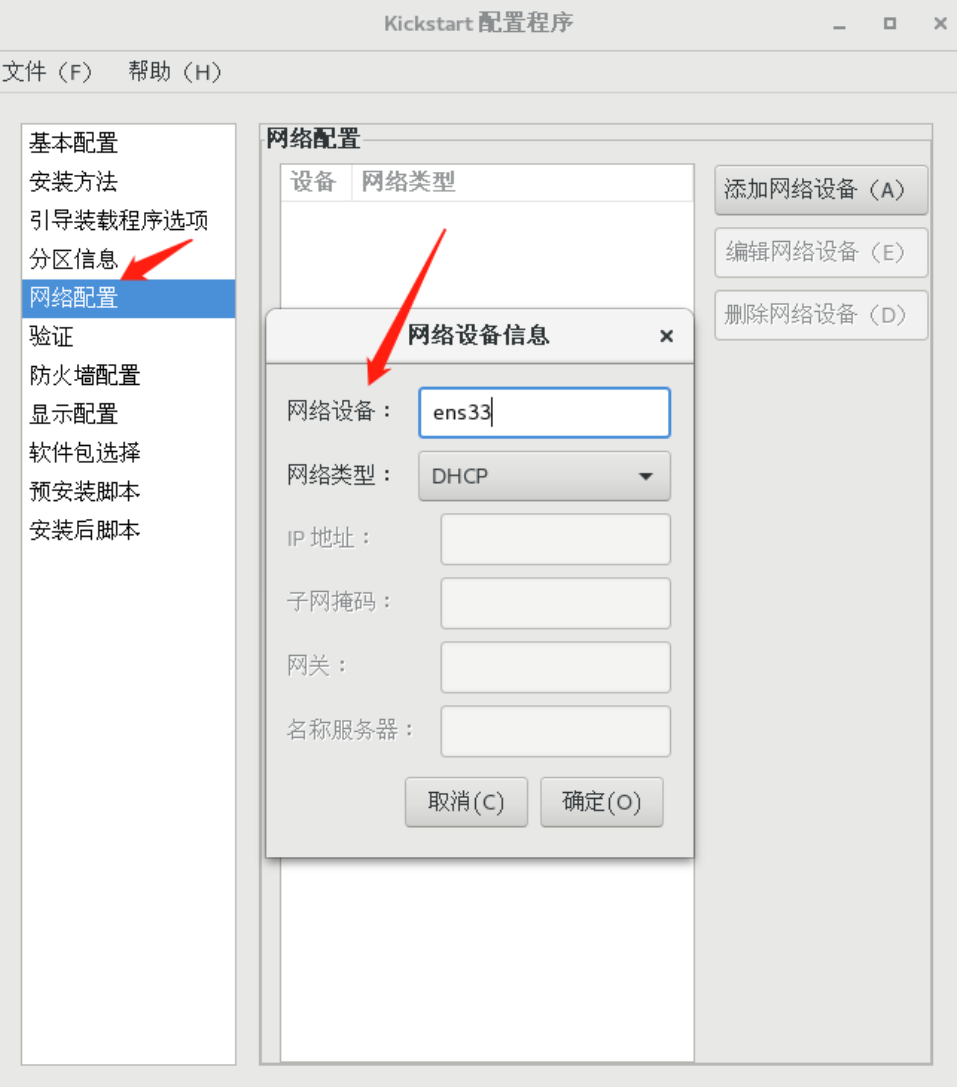
4.1 Add network card and configure network card information
[root@localhost ~]#cd /etc/sysconfig/network-scripts/
[root@localhost /etc/sysconfig/network-scripts]#ifconfig
ens33: flags=4163<UP,BROADCAST,RUNNING,MULTICAST>  mtu 1500
        inet 192.168.8.128  netmask 255.255.255.0  broadcast 192.168.8.255

ens37: flags=4163<UP,BROADCAST,RUNNING,MULTICAST>  mtu 1500
        ether 00:0c:29:d2:bb:cf  txqueuelen 1000  (Ethernet)

[root@localhost /etc/sysconfig/network-scripts]#cp ifcfg-ens33 ifcfg-ens37
[root@localhost /etc/sysconfig/network-scripts]#vim ifcfg-ens37
  1 TYPE=Ethernet
  2 PROXY_METHOD=none
  3 BROWSER_ONLY=no
  4 BOOTPROTO=static
  5 DEFROUTE=yes
  6 IPV4_FAILURE_FATAL=no
  7 IPV6INIT=yes
  8 IPV6_AUTOCONF=yes
  9 IPV6_DEFROUTE=yes
 10 IPV6_FAILURE_FATAL=no
 11 IPV6_ADDR_GEN_MODE=stable-privacy
 12 NAME=ens37
 13 DEVICE=ens37
 14 ONBOOT=yes
 15 IPADDR=192.168.100.100

16 NETMASK=255.255.255.0
 17 GATEWAY=192.168.100.1

wq Save Exit

[root@localhost /etc/sysconfig/network-scripts]#systemctl restart network
[root@localhost /etc/sysconfig/network-scripts]#ifconfig
ens33: flags=4163<UP,BROADCAST,RUNNING,MULTICAST>  mtu 1500
        inet 192.168.8.128  netmask 255.255.255.0  broadcast 192.168.8.255
                                 ......
ens37: flags=4163<UP,BROADCAST,RUNNING,MULTICAST>  mtu 1500
        inet 192.168.100.100  netmask 255.255.255.0  broadcast 192.168.100.255
                                 ......
4.2 Install and enable the TFTP service
[root@localhost /etc/sysconfig/network-scripts]#yum install tftp-server.x86_64 -y
[root@localhost /etc/sysconfig/network-scripts]#vim /etc/xinetd.d/tftp
service tftp
{
        socket_type             = dgram
        protocol                = udp
        wait                    = no     #no means that clients can connect together, yes means that clients can only connect one connection at a time
        user                    = root
        server                  = /usr/sbin/in.tftpd
        server_args             = -s /var/lib/tftpboot  #Specify the TFTP root directory, -c allows uploads
        disable                 = no
        per_source              = 11                    #Limit maximum number of connections to a host to prevent exclusive services from a host
        cps                     = 100 2                 #Represents that the server can start up to 100 connections and stop for 2s
        flags                   = IPv4
}
~
wq Save Exit
Start and set boot-up self-start
[root@localhost /mnt/images/pxeboot]#systemctl start tftp.socket
[root@localhost /mnt/images/pxeboot]#systemctl status tftp.socket
● tftp.socket - Tftp Server Activation Socket
   Loaded: loaded (/usr/lib/systemd/system/tftp.socket; disabled; vendor preset: disabled)
   Active: active (listening) since 3 2021-09-01 23:04:40 CST; 7s ago
   Listen: [::]:69 (Datagram)

9 Month 01 23:04:40 localhost.localdomain systemd[1]: Listening on Tftp Server Activation Socket.
9 Month 01 23:04:40 localhost.localdomain systemd[1]: Starting Tftp Server Activation Socket.

[root@localhost /mnt/images/pxeboot]#systemctl enable tftp
Created symlink from /etc/systemd/system/sockets.target.wants/tftp.socket to /usr/lib/systemd/system/tftp.socket.
4.3 Install and enable DHCP services
[root@localhost /etc/sysconfig/network-scripts]#yum install dhcp -y
[root@c7-1 network-scripts]# cp -rfp /usr/share/doc/dhcp-4.2.5/dhcpd.conf.example /etc/dhc
p/dhcpd.conf cp: Whether to Overwrite"/etc/dhcp/dhcpd.conf"? yes
[root@c7-1 network-scripts]# vim /etc/dhcp/dhcpd.conf

subnet 192.168.100.0 netmask 255.255.255.0 {        #Configure Segments
  range 192.168.100.40 192.168.100.50;              #Configure Address Pool
  option routers 192.168.100.100;                   #configure gateway
  next-server 192.168.100.100;                      #Specify tftp server address
  filename "pxelinux.0";                           #Specify the file name of the PXE bootstrapper
}
wq Keep Exiting

#Turn on DHCP service and set boot-up self-start
[root@localhost /etc/sysconfig/network-scripts]#systemctl start dhcpd
[root@localhost /etc/sysconfig/network-scripts]#systemctl enable dhcpd
Created symlink from /etc/systemd/system/multi-user.target.wants/dhcpd.service to /usr/lib/systemd/system/dhcpd.service.
[root@localhost /etc/sysconfig/network-scripts]#systemctl is-enabled dhcpd
enabled
4.4 Preparing the Linux kernel, initializing the mirror file
[root@localhost /etc/sysconfig/network-scripts]#mount /dev/sr0 /mnt/
mount: /dev/sr0 Write protected, mounted read-only
[root@localhost /etc/sysconfig/network-scripts]#df -h
 file system                 Capacity used Available Used% mount point
/dev/mapper/centos-root   56G  3.7G   52G    7% /
devtmpfs                 1.9G     0  1.9G    0% /dev
tmpfs                    1.9G     0  1.9G    0% /dev/shm
tmpfs                    1.9G  9.1M  1.9G    1% /run
tmpfs                    1.9G     0  1.9G    0% /sys/fs/cgroup
/dev/sda1                497M  172M  326M   35% /boot
tmpfs                    378M   40K  378M    1% /run/user/0
/dev/sr0                 4.3G  4.3G     0  100% /mnt
Copy Linux system kernel files and initialization mirror files
[root@localhost /etc/sysconfig/network-scripts]#cd /mnt/images/pxeboot/
[root@localhost /mnt/images/pxeboot]#ls
initrd.img  TRANS.TBL  vmlinuz
[root@localhost /mnt/images/pxeboot]#cp initrd.img vmlinuz /var/lib/tftpboot/
[root@localhost /mnt/images/pxeboot]#ls /var/lib/tftpboot/
initrd.img  vmlinuz
4.5 Prepare the PXE bootstrapper
[root@localhost /mnt/images/pxeboot]#yum -y install syslinux
[root@localhost ~]#cd /mnt/images/pxeboot/
[root@localhost /mnt/images/pxeboot]#ls                      #Find PXE Bootstrapper Location
initrd.img  TRANS.TBL  vmlinuz                               #Copy to the root directory of tftp.System boot file
[root@localhost /mnt/images/pxeboot]#cp /usr/share/syslinux/pxelinux.0 /var/lib/tftpboot/
[root@localhost /mnt/images/pxeboot]#ls /var/lib/tftpboot/
initrd.img  pxelinux.0  vmlinuz
4.6 Install FTP service, prepare CentOS 7 installation source
[root@localhost /mnt/images/pxeboot]#yum install -y vsftpd
[root@localhost /mnt/images/pxeboot]#mkdir /var/ftp/centos7
[root@localhost /mnt/images/pxeboot]#cp -rf /mnt/* /var/ftp/centos7/
Start the service and set boot-up self-start
[root@localhost /mnt/images/pxeboot]#systemctl start vsftpd
[root@localhost /mnt/images/pxeboot]#systemctl enable vsftpd
Created symlink from /etc/systemd/system/multi-user.target.wants/vsftpd.service to /usr/lib/systemd/system/vsftpd.service.
4.7 Configuration Startup Menu File
[root@localhost ~]# cd /var/lib/tftpboot
[root@localhost tftpboot]# ls
initrd.img  pxelinux.0  vmlinuz
[root@localhost tftpboot]# mkdir pxelinux.cfg
[root@localhost /var/lib/tftpboot]#vim pxelinux.cfg/default

default auto
prompt 1
label auto
      kernel vmlinuz
      append initrd=initrd.img method=ftp://192.168.100.100/centos7

label linux text
      kernel vmlinuz
      append text initrd=initrd.img method=ftp://192.168.100.100/centos7

label linux rescue
      kernel vmlinuz
      append rescue initrd=initrd.img method=ftp://192.168.100.100/centos7
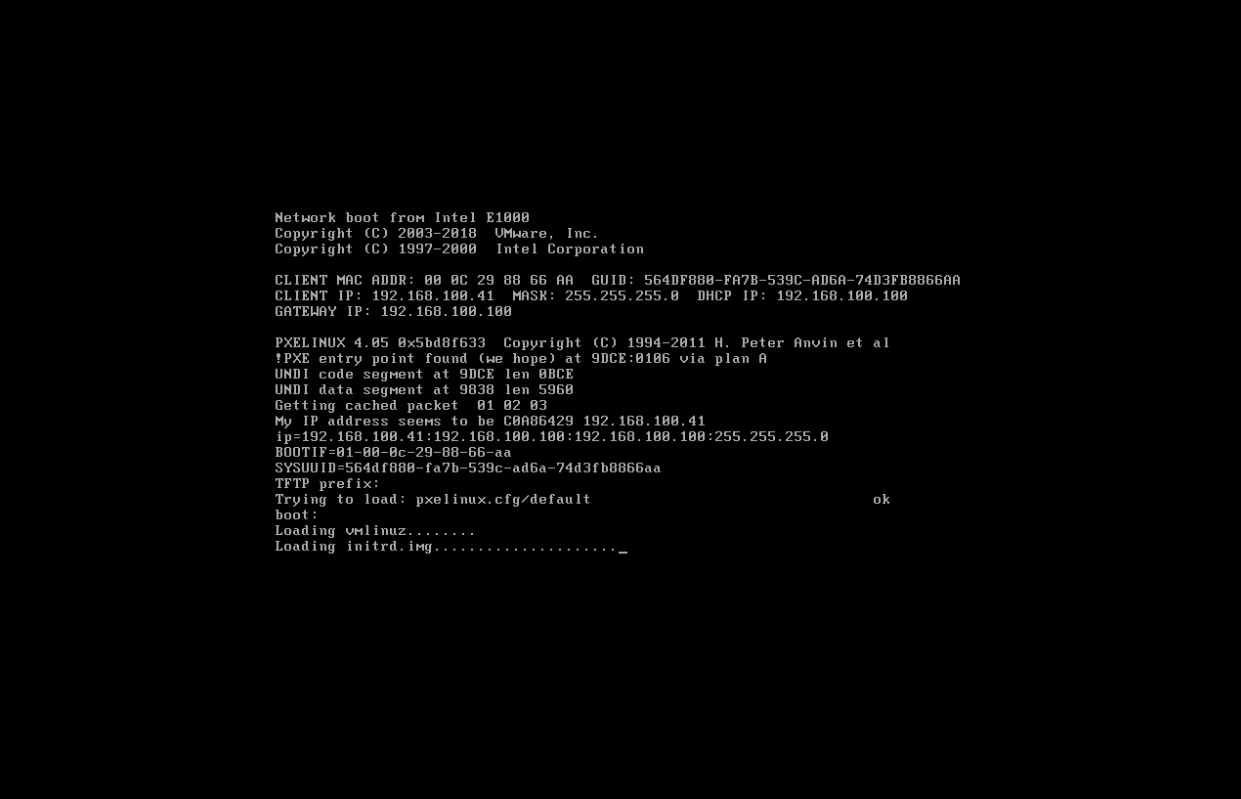
4.8 Verify PXE Network Installation
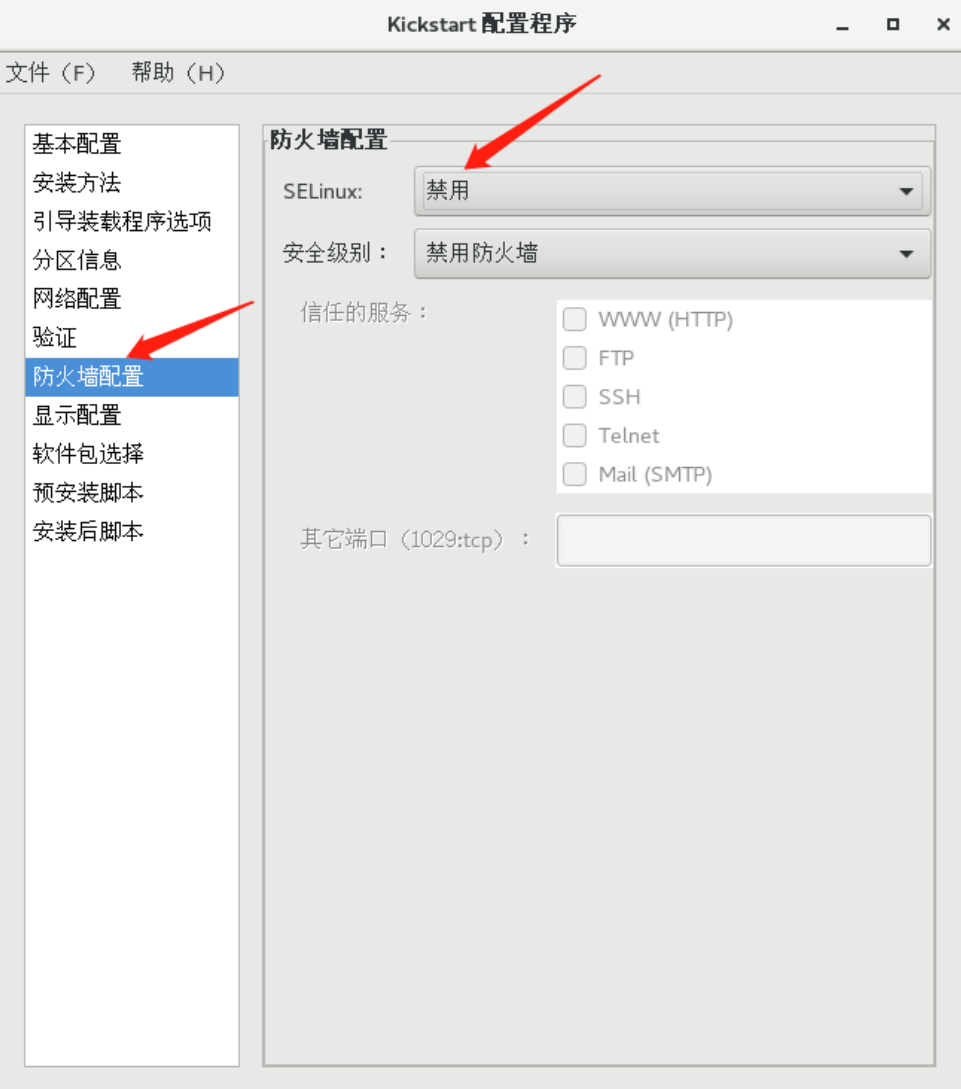
Close firewall first
[root@localhost ~]# systemctl stop firewalld
[root@localhost ~]# setenforce 0
setenforce: SELinux is disabled
Then tap directly to start
Pressing Enter directly after prompting "boot:" in the character interface will automatically download the installation file over the network and enter the default graphical installation entry
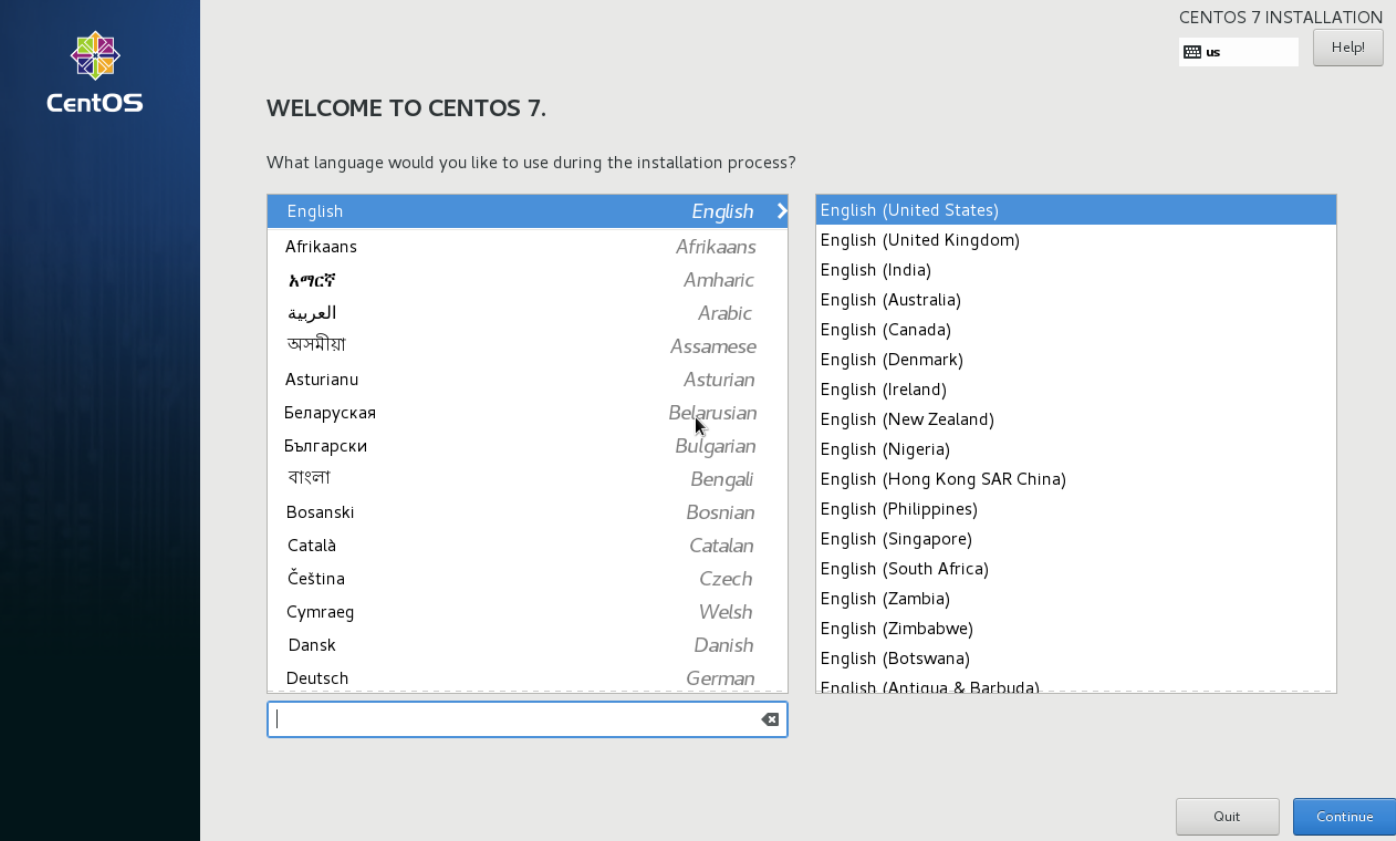
Successfully entered the system setup interface
2. Implement unattended installation of Kickstart
1. Overview of Kickstart
- KickStart is an unattended installation.
- KickStart works by recording parameters that are filled in with manual intervention during a typical installation and generating a file called ks.cfg.During subsequent installations (not limited to the machine that generated the KickStart installation file), when a parameter is required, the installer first looks for the file generated by KickStart, takes the parameters found when the appropriate parameters are found, and manual intervention is required when no appropriate parameters are found.
- If the KickStart file covers all the parameters that need to be filled in during the installation process, the installer can simply tell the installer where to get the ks.cfg file and get busy with his or her work.When the installation is complete, the installer will restart the system based on the restart options set in ks.cfg and end the installation.
2. Preparing to install the answer file
2.1 Installation Tools
[root@localhost ~]# mount /dev/cdrom /mnt/
mount: /dev/sr0 Write protected, mounted read-only
[root@localhost /var/lib/tftpboot]#yum install -y system-config-kickstart.noarch
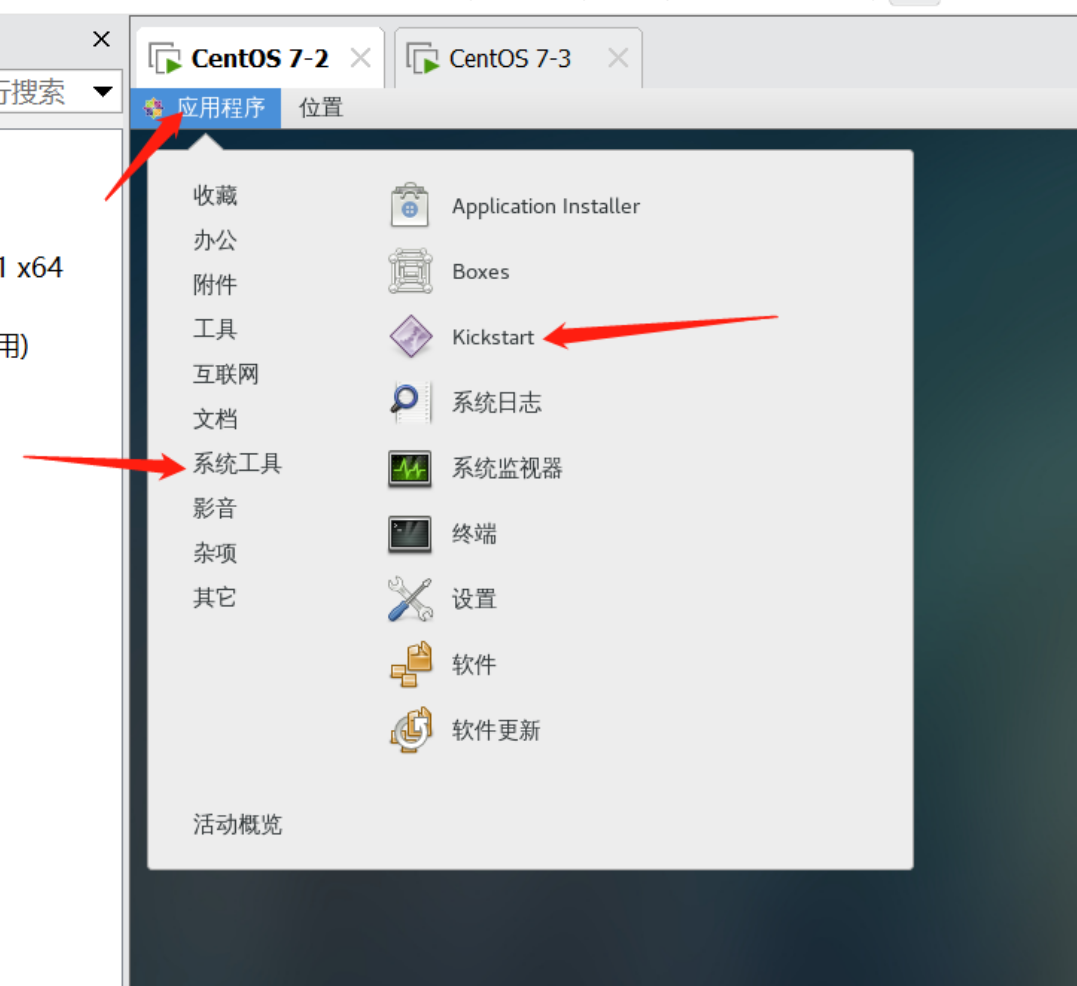
2.2 Open the Configurator window
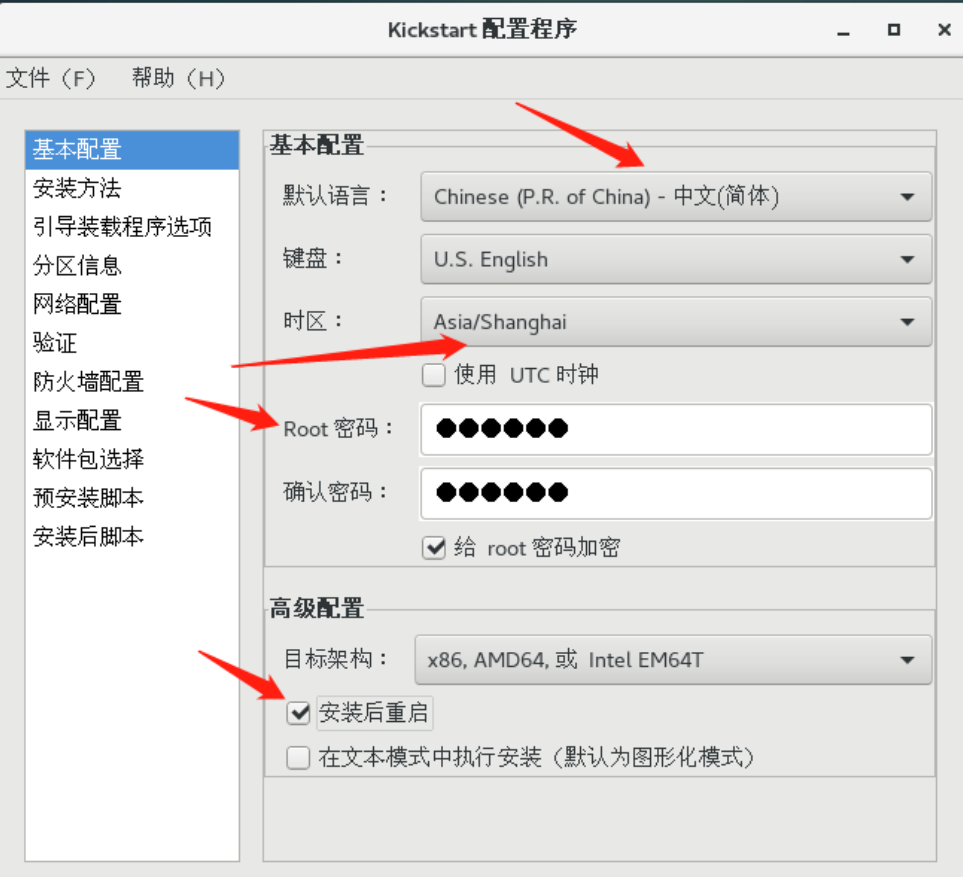
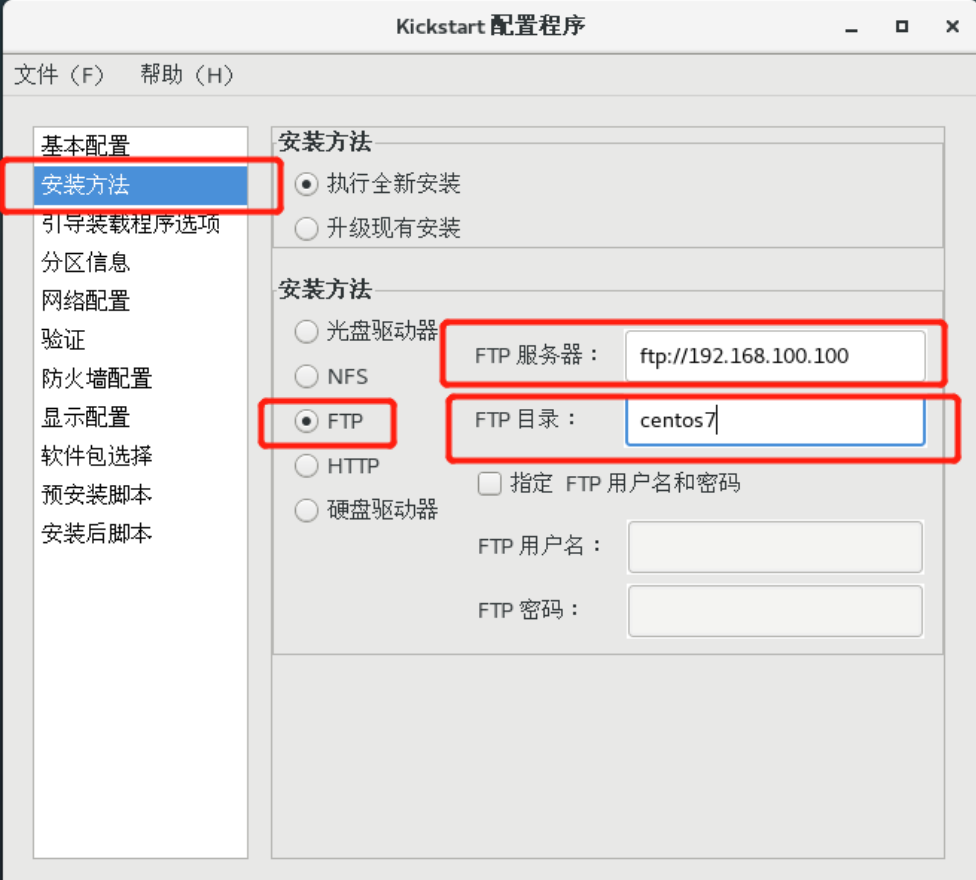
2.3 Basic Configuration and Installation Method
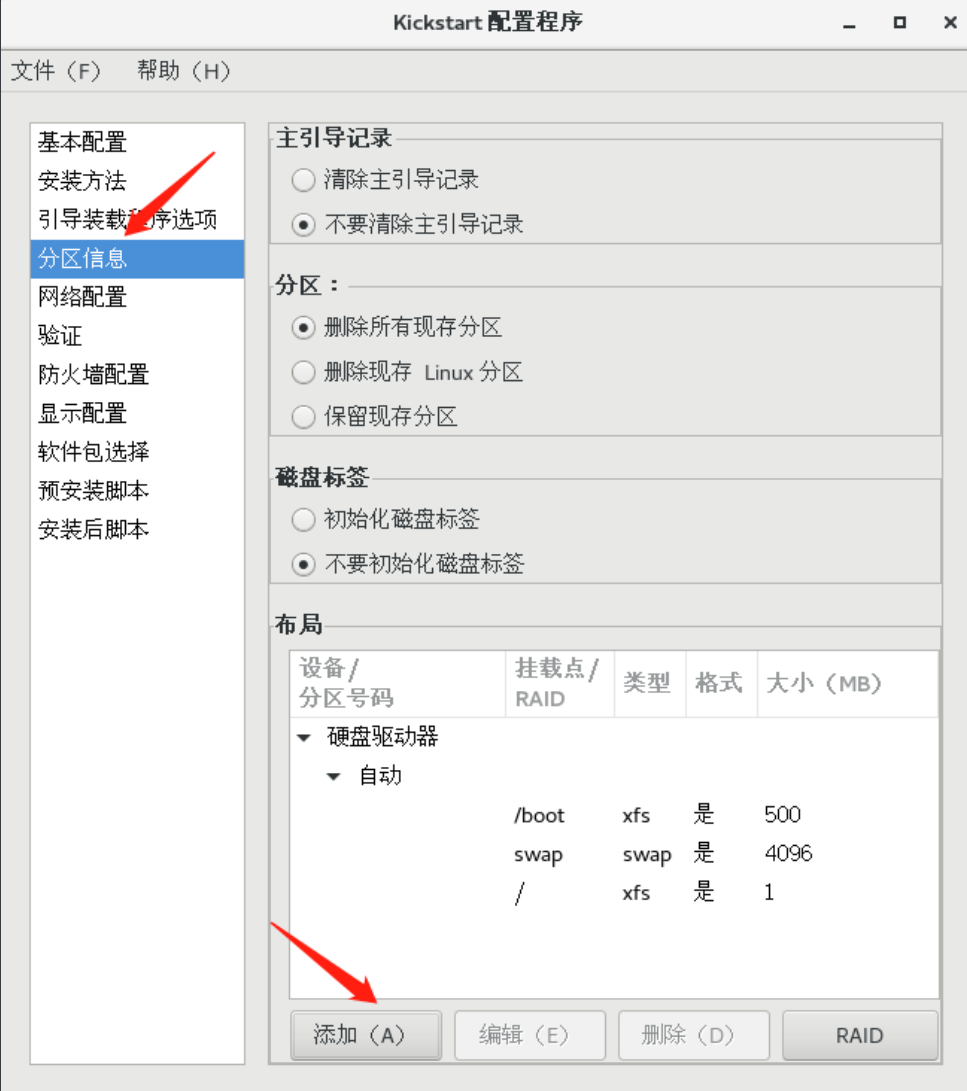
2.4 Partitioning
2.5 Network Configuration
2.6 Firewall Settings
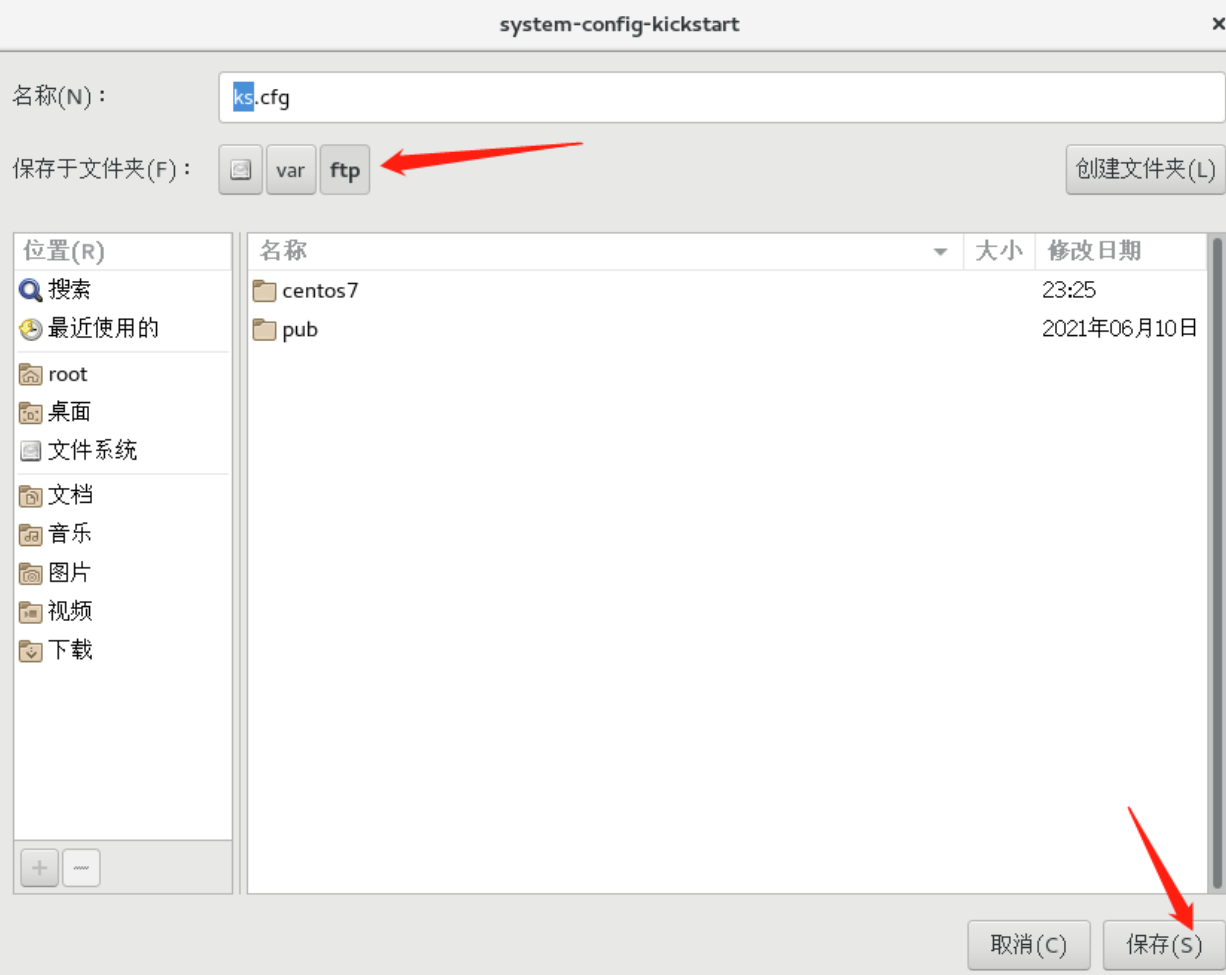
2.7 Specify the location of the saved directory
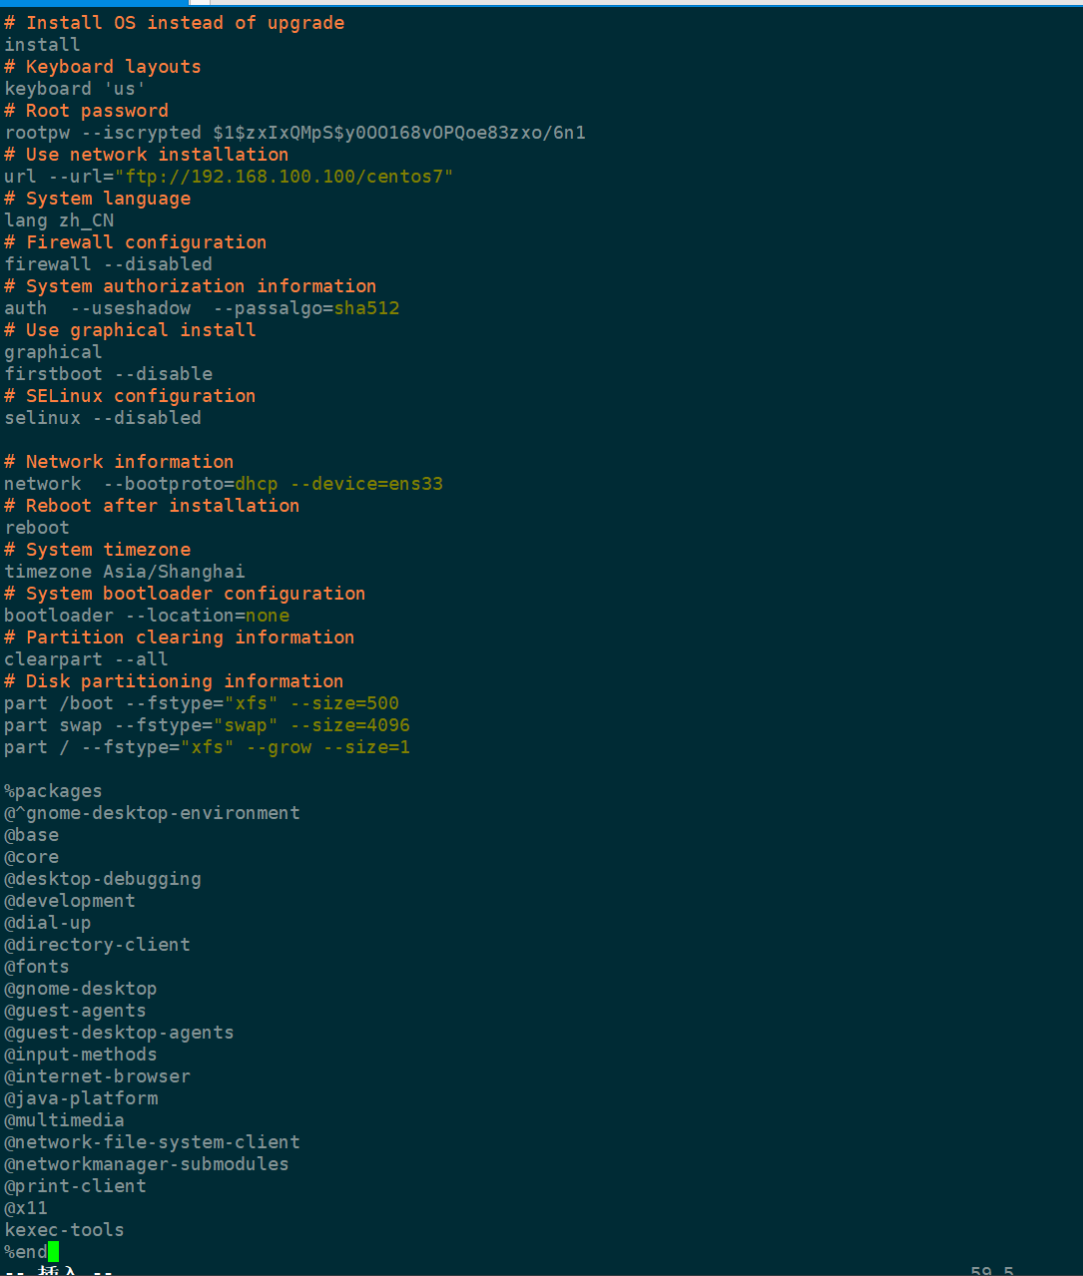
2.8 ks.cfg Answer File Configuration
[root@localhost /var/lib/tftpboot]#cd /var/ftp/
[root@localhost /var/ftp]#ls
centos7  ks.cfg  pub
[root@localhost /var/ftp]#vim ks.cfg
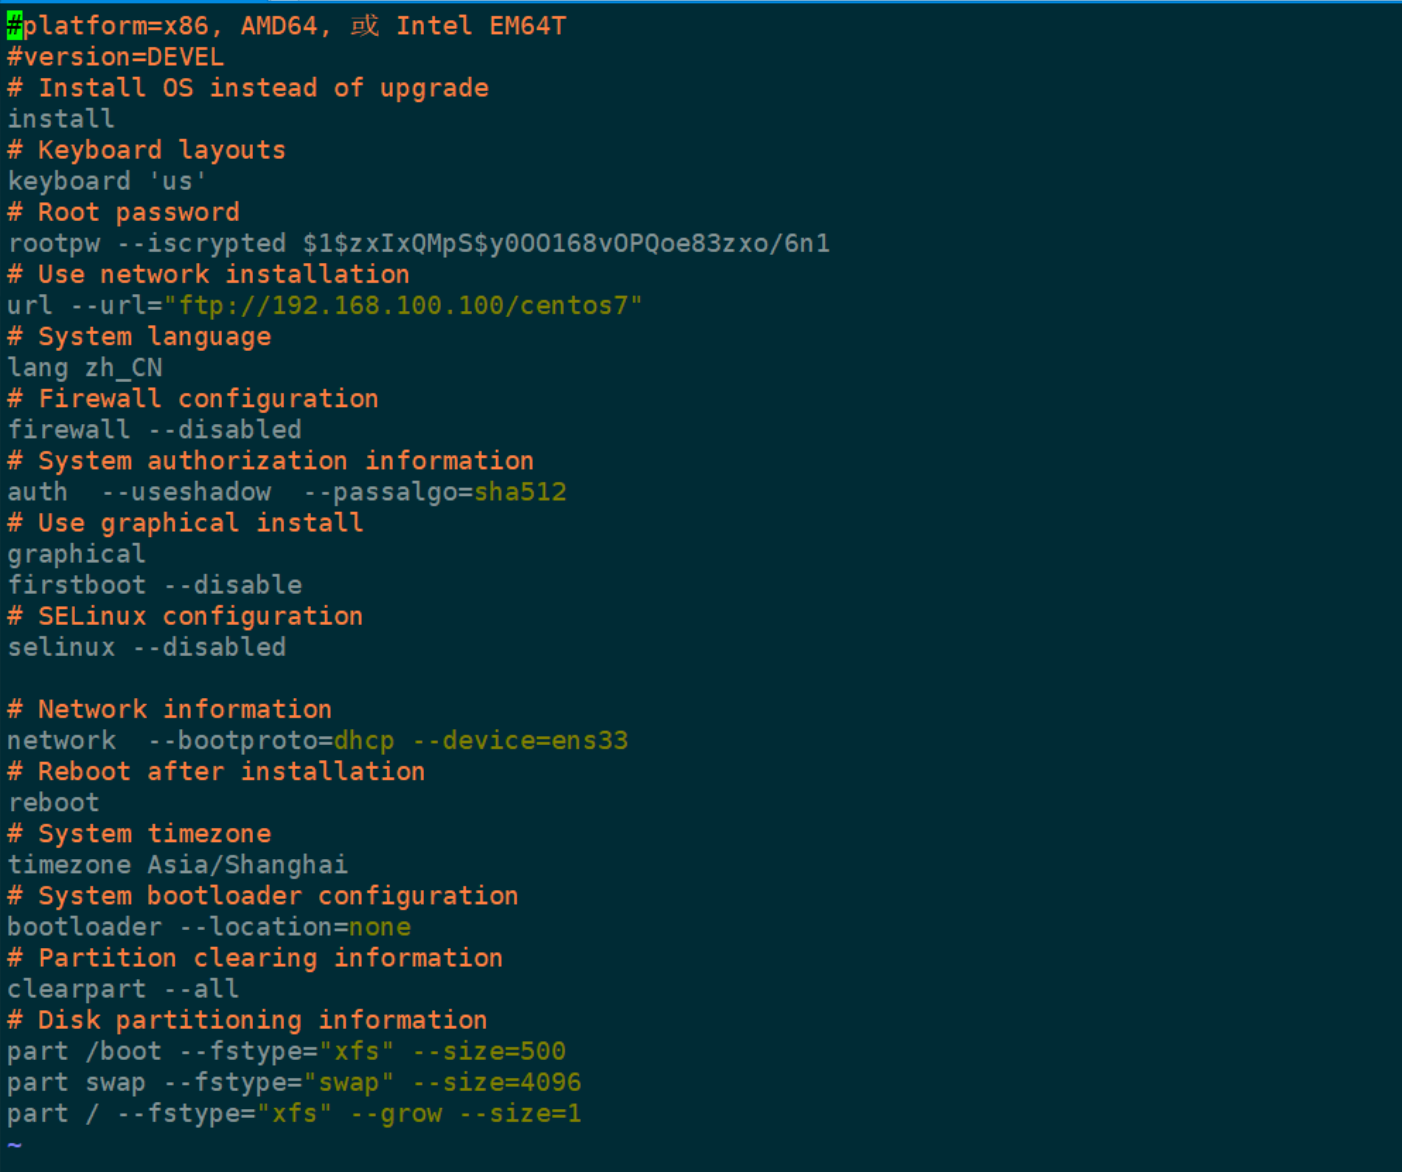
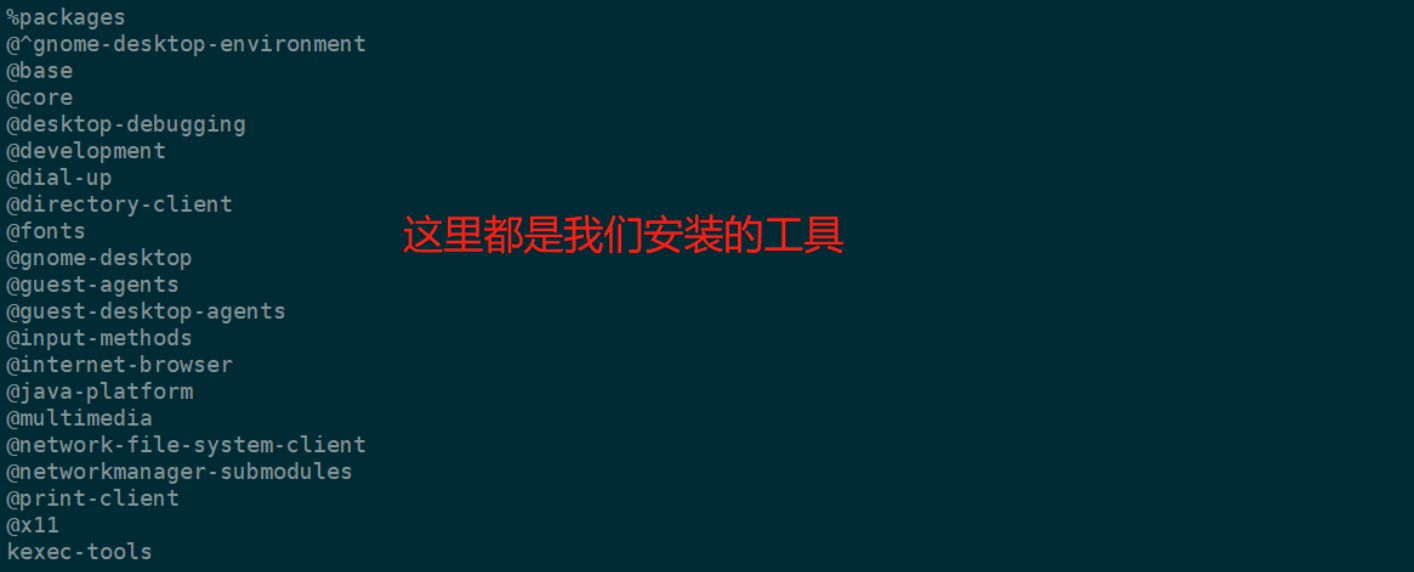
If you need to configure the package yourself, you need to edit the ks.cfg file vim ks.cfg to add it to the end.
[root@localhost /var/ftp]#cd /root/
[root@localhost ~]#ls
anaconda-ks.cfg  initial-setup-ks.cfg  Public Template Video Picture Document Download Music Desktop
[root@localhost ~]#vim anaconda-ks.cfg
[root@localhost ~]#vim /var/ftp/ks.cfg
Restart pending automatic installation.
summary
-
Implementing PXE remote installation requires network card support and must have a Linux installation source and available TFTP, DHCP servers.
-
The unattended answer file can be completed through the Kickstart configurator, which is provided by the system-config-kickstart software.