0. Download Code using Git
- Installation and use of Git:
https://blog.csdn.net/qq_44747572/article/details/121006841 - Clone Code:
Pytorch version 1.0.0 source code: https://github.com/jwyang/faster-rcnn.pytorch/tree/pytorch-1.0
Download the zip and unzip it in the specified folder:
1. Data preparation
-
Switch the path to fast-rcnn.pytorch and create a data folder in its directory:
xiaoxie@xiaoxie-Z10PE-D8-WS:~/data/yx/python/$ cd faster-rcnn && mkdir data
-
Download data to the data folder:
Switch the path to dataxiaoxie@xiaoxie-Z10PE-D8-WS:~/data/yx/python$ cd faster-rcnn xiaoxie@xiaoxie-Z10PE-D8-WS:~/data/yx/python/faster-rcnn$ cd data xiaoxie@xiaoxie-Z10PE-D8-WS:~/data/yx/python/faster-rcnn/data$
Start downloading the compressed file and execute the following command to download the relevant data of VOV2007 standard dataset.
wget http://host.robots.ox.ac.uk/pascal/VOC/voc2007/VOCtrainval_06-Nov-2007.tar
wget http://host.robots.ox.ac.uk/pascal/VOC/voc2007/VOCtest_06-Nov-2007.tar
wget http://host.robots.ox.ac.uk/pascal/VOC/voc2007/VOCdevkit_08-Jun-2007.tar
Execute the following command to decompress the data to data/VOCdevkit
tar xvf VOCtrainval_06-Nov-2007.tar
tar xvf VOCtest_06-Nov-2007.tar
tar xvf VOCdevkit_08-Jun-2007.tar
cd go to the data folder and create a soft link
xiaoxie@xiaoxie-Z10PE-D8-WS:~/data/yx/python/faster-rcnn/data$ pwd
/home/xiaoxie/data/yx/python/faster-rcnn/data
xiaoxie@xiaoxie-Z10PE-D8-WS:~/data/yx/python/faster-rcnn/data$ ln -s /home/xiaoxie/data/yx/python/faster-rcnn/data/VOCdevkit VOCdevkit2007
Detailed explanation of data set:
https://blog.csdn.net/qq_38273984/article/details/90749314
https://blog.csdn.net/weixin_42782150/article/details/109820615
2. Model loading
-
Download the pre training model:
First, create the subfolder / data / pre trained under / data /_ model; Then, download the pre training model to / data / pre trained_ Model, such as VGG16, ResNet101, etc.xiaoxie@xiaoxie-Z10PE-D8-WS:~/data/yx/python/faster-rcnn/data$ sudo mkdir pretrained_model
VGG16: Dropbox VT Server
ResNet101: Dropbox VT Server
Note: after downloading, put the two models into / data / pre trained_ In the model / folder. -
compile:
Use pip to install all python dependency packages, and cd to the path where the requirements.txt file is located:xiaoxie@xiaoxie-Z10PE-D8-WS:~/data/yx/python/faster-rcnn$ pip install -r requirements.txt
When downloading with pip is unsuccessful, you can use the following command:
xiaoxie@xiaoxie-Z10PE-D8-WS:~/data/yx/python/faster-rcnn$ pip install -r requirements.txt -i http://pypi.douban.com/simple/ --trusted-host pypi.douban.com
Compile CUDA dependent environment:
Here is the compilation settings for pytroch 1.0. After editing the required cuda environment, return to the home directory.cd lib xiaoxie@xiaoxie-Z10PE-D8-WS:~/data/yx/python/faster-rcnn/lib$ sudo python setup.py build develop # Do not use sh make.sh
3. Model training
Before training, you need to train according to your own environment_ Net.py and test_net.py_ Dir and load_dir.
-
VGG16 in Pascal_ Training fast r-cnn on VOC uses the following commands (specific parameters can be modified according to your own needs):
CUDA_VISIBLE_DEVICES=$GPU_ID python trainval_net.py \ --dataset pascal_voc --net vgg16 \ --bs $BATCH_SIZE --nw $WORKER_NUMBER \ --lr $LEARNING_RATE --lr_decay_step $DECAY_STEP \ --cuda -
RES101 training command line example:
CUDA_VISIBLE_DEVICES=0 python trainval_net.py --dataset pascal_voc --net res101 --bs 4 --nw 0 --lr 0.001 --lr_decay_step 5 --cuda
perhaps
CUDA_VISIBLE_DEVICES=0,1 python trainval_net.py --dataset pascal_voc --net res101 --cuda
The following command is used here:
xiaoxie@xiaoxie-Z10PE-D8-WS:~/data/yx/python/faster-rcnn/lib$ cd ..
xiaoxie@xiaoxie-Z10PE-D8-WS:~/data/yx/python/faster-rcnn$
xiaoxie@xiaoxie-Z10PE-D8-WS:~/data/yx/python/faster-rcnn$ CUDA_VISIBLE_DEVICES=0 python trainval_net.py --dataset pascal_voc --net res101 --bs 4 --nw 0 --lr 0.001 --lr_decay_step 5 --cuda
Parameters:
  - CUDA_VISIBLE_DEVICES: finger gpu of id,It depends on your lab server gpu It's idle.
  - dataset: Refers to the name of the training dataset. Here pascal-voc For example.
  - net: The pre training model you want to use can be changed to resnet101.
  - bs: Refers to batch size.
  - epoch: Refers to the number of rounds to be trained.
  - nw: refer to worker number,It's up to you Gpu Ability, I use Titan Xp
  - 12G,So choose 4. Slightly worse gpu You can choose a smaller value.
  - lr: Refers to the learning rate
  - cuda: Refers to the use of gpu.
  - BATCH_SIZE and WORKER_NUMBER According to your GPU Set according to the situation.
  - Trained model Will save to models Under the folder, the default training parameters are temporarily used here.
A problem occurred: ImportError: cannot import name '_mask'
solve the problem: https://blog.csdn.net/qq_44747572/article/details/121020895
A problem occurred: ImportError: cannot import name 'imread'
solve the problem: xiaoxie@xiaoxie -Z10PE-D8-WS:~/data/yx/python/faster-rcnn$ pip install scipy==1.2.1 -i http://pypi.douban.com/simple/ --trusted-host pypi.douban.com
4. Model test
Evaluate res101 pre training model in Pascal_ For the performance on the VOC test set, use the following command:
python test_net.py --dataset pascal_voc --net res101 \
                   --checksession $SESSION --checkepoch $EPOCH --checkpoint $CHECKPOINT \
                   --cuda
Setting example:
python test_net.py --dataset pascal_voc --net res101 --checksession 1 --checkepoch 20 --checkpoint 2504 --cuda
Note that the three check parameters here define the name of the trained detection model. My trained name is fast_ rcnn_ 1_ 20_ 2504 represents checksession = 1, checkepoch = 20 and checkpoint = 2504. Only in this way can the model "fast_rcnn_1_20_2504" be read. During the training, the epoch set by the source code is 20 by default, so selecting 20 for checkepoch, that is, selecting the last model with good rotation training, should be the best in theory. The following figure is my 20 epochs model.
During the test, a Segmentation fault (core dumped) appears
Switch to anaconda management environment
-
Create a new anaconda environment
https://blog.csdn.net/anpwu/article/details/110290310
Problem: condahttpererror: http 000 connection failed
solve: https://blog.csdn.net/anniaxie/article/details/107197513 -
Install various libraries
requirements.txt contains the libraries required by the project(TargetDetect) xiaoxie@xiaoxie-Z10PE-D8-WS:~/data/yx/python/faster-rcnn$ pip install -r requirements.txt
Compile CUDA dependent environment:
Here is the compilation settings for pytroch 1.0. After editing the required cuda environment, return to the home directory.cd lib xiaoxie@xiaoxie-Z10PE-D8-WS:~/data/yx/python/faster-rcnn/lib$ sudo python setup.py build develop # Do not use sh make.sh
pytorch installation: https://blog.csdn.net/mao_hui_fei/article/details/112078113

Install the specified version of torch / torch vision (download the corresponding version of torch / torch vision offline, save it to the running path, and import it using pip)
torch/torchvision: https://download.pytorch.org/whl/torch_stable.html(yx_env) xiaoxie@xiaoxie-Z10PE-D8-WS:~/data/yx/python/faster-rcnn$ pip install torch-1.5.0+cu101-cp36-cp36m-linux_x86_64.whl (yx_env) xiaoxie@xiaoxie-Z10PE-D8-WS:~/data/yx/python/faster-rcnn$ pip install torchvision-0.6.0+cu101-cp36-cp36m-linux_x86_64.whl

-
Run the fast RCNN program
(TargetDetect) xiaoxie@xiaoxie-Z10PE-D8-WS:~/data/yx/python/faster-rcnn$ python test_net.py --dataset pascal_voc --net res101 --checksession 1 --checkepoch 20 --checkpoint 2504 --cuda
Question:
ImportError: /home/xiaoxie/data/yx/python/faster-rcnn/lib/model/_C.cpython-36m-x86_64-linux-gnu.so: undefined symbol: _ZN3c104cuda20getCurrentCUDAStreamEa
solve:
conda install pytorch==1.0.0 torchvision==0.2.1 cuda100 -c pytorch
Question:
ImportError: libtorch_cpu.so: cannot open shared object file: No such file or directory
solve:
(yx_env) xiaoxie@xiaoxie-Z10PE-D8-WS:~/data/yx/python/faster-rcnn$ cd lib
(yx_env) xiaoxie@xiaoxie-Z10PE-D8-WS:~/data/yx/python/faster-rcnn/lib$ rm -r build
(yx_env) xiaoxie@xiaoxie-Z10PE-D8-WS:~/data/yx/python/faster-rcnn/lib$ python setup.py develop
Question:
TypeError: load() missing 1 required positional argument: 'Loader'
solve:
yaml_cfg = edict(yaml.load(f, Loader=yaml.FullLoader))
Question:
_pickle.UnpicklingError: A load persistent id instruction was encountered,
but no persistent_load function was specified.
solve:
The pytorch version is inconsistent when saving the model and merging the model. When merging models, switch to the pytorch version of the saved model.
Retraining. (here I chose to retrain)
5. Run demo.py
If you want to run the pre training model to detect new test images, you should first download the pre training model or train your own model, then put the images in the images folder under the working directory (example path: ~ / images), and then run the following command:
python demo.py --net vgg16 \
               --checksession $SESSION --checkepoch $EPOCH --checkpoint $CHECKPOINT \
               --cuda --load_dir + Model storage folder
Example:
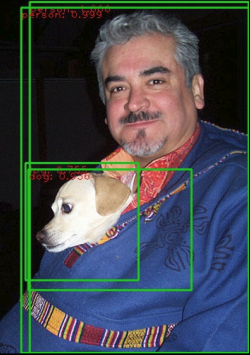
python demo.py --net res101 --checksession 1 --checkepoch 20 --checkpoint 2504 --cuda --load_dir models
result:
6. Train the user-defined Images file and the model of the corresponding XML file
https://blog.csdn.net/weixin_42782150/article/details/109820615
(code first and learn later)
reference resources:
https://blog.csdn.net/weixin_42782150/article/details/109820615
https://blog.csdn.net/ThunderF/article/details/100294913