Preface
linux operation and maintenance management is generally managed by remote mode. When hundreds of server hosts need to be managed from a workstation, the remote maintenance mode will be more advantageous.
I. SSH Remote Management
SSH is a secure channel protocol, which is mainly used to realize the remote management, remote replication and other functions of character interface. SSH protocol encrypts the data transmission between the two sides of communication, including the user password when the user logs in.
Compared with the earlier TELNET (remote login), RSH (Remote Shell), RCP (Remote File Copy), SSH protocol provides better security.
SSH protocol
- Provides a secure shell environment for clients for remote management
- Default port: TCP 22
OpenSSH - Service Name: sshd
- Server main program / usr/sbin/sshd
- Server configuration file / etc / SSH / sshd? Config
- Client configuration file: SSH? Config
Service listening options - Port number, protocol version, listening IP address
- Disable reverse resolution
#Port 22 / / port number
#AddressFamily any
#Listenaddress 0.0.0.0 / / IPv4 listening address
#Listenaddress:: / / IPv6 listening address
User login control
- Prohibit root user and empty password user
- Login time, retries
- AllowUsers, DenyUsers (black and white list, only allowed and only denied)
#LoginGraceTime 2m / / session time
 #PermitRootLogin yes / / whether to log in as root
 #StrictModes yes / / verify access
 #MaxAuthTries 6 / / 6 validations
 #MaxSessions 10 / / maximum number of links accessed
 #PubkeyAuthentication yes / / verify public key
Login authentication object
Local user accounts in the server
Login authentication method
Password verification: check whether the user name and password match
Key pair verification: check whether the client's private key and server's public key match
Using SSH client
ssh command -- remote secure login
scp command -- remote secure replication
sftp command -- download on Secure FTP
get Download
put upload
bye exit
Using SSH services
1. Enter the SSH master server configuration file in tast01, change the configuration file entry, and start the SSH service.[root@tast01 ~]# vim /etc/ssh/sshd_config / / enter to edit the server configuration file information Port 22 //Open port #AddressFamily any #ListenAddress 0.0.0.0 #ListenAddress :: :wq //Save exit [root@tast01 ~]# systemctl restart sshd / / restart SSH service
2. Log in to tast01 Using SSH service in tast02.
[root@tast02 ~]# ssh root@192.168.144.133 / / log in to tast01 Server Using SSH service
The authenticity of host '192.168.144.133 (192.168.144.133)' can't be established.
ECDSA key fingerprint is SHA256:B8IsZOFG7FbtVkIK+dMILmo0iA4OEIeVGY0GnnCbXhk.
ECDSA key fingerprint is MD5:c2:d8:09:17:de:6e:ec:07:06:1b:ac:b6:1e:bd:62:09.
Are you sure you want to continue connecting (yes/no)? yes          //Ask if you want to establish a session
Warning: Permanently added '192.168.144.133' (ECDSA) to the list of known hosts.
root@192.168.144.133's password:             //Input password
Last login: Mon Sep  9 13:59:09 2019
[root@tast01 ~]#                           //Successfully logged in to tast01
[root@tast01 ~]# Exit / / exit
//Logout
Connection to 192.168.144.133 closed.
[root@tast02 ~]#                        //Back to port tast02
3. Return to the tast01 server, change the SSH server configuration file, and forbid the root user to log in. Then create the siti user
[root@tast01 ~]# vim /etc/ssh/sshd_config / / enter and edit the main configuration file
#LoginGraceTime 2m
PermitRootLogin no                              //Enable disable root login, change yes to no, disable root login
#StrictModes yes
#MaxAuthTries 6
#MaxSessions 10
:wq                                            //Save exit
[root@tast01 ~]# systemctl restart sshd / / restart the service
[root@tast01 ~]# useradd siti / / create a siti normal user
[root@tast01 ~]# passwd siti / / set user password
//Change the password of user siti.
//New password:
//Invalid password: password is less than 8 characters
//Reenter new password:
passwd: All authentication tokens have been successfully updated.
[root@tast01 ~]# id siti / / view the new user's siti information
uid=1001(siti) gid=1001(siti) group=1001(siti)
[root@tast01 ~]# id sun / / view user sun Information
uid=1000(sun) gid=1000(sun) group=1000(sun),10(wheel)
4. Log in to the root user of tast01 with tast02 to see if the changed service is effective
[root @ tast02 ~] (SSH root @ 192.168.144.133 / / log in to the root user of tast01 Server Using SSH service
 root@192.168.144.133's password: / / enter the password to log in
 Permission denied, please try again
root@192.168.144.133's password:
Permission denied, please try again.
root@192.168.144.133's password:
Permission denied (public key, GSSAPI keyex, GSSAPI with MIC, password). / / after three attempts to enter the password, it will pop up and refuse to log in.
[root @ tast02 ~] (SSH siti @ 192.168.144.133 / / log in to the siti user using SSH service
siti@192.168.144.133's password:
[siti@tast01 ~] $/ / successfully log in to the siti user of the tast01 server
 [siti @ tast01 ~] $su - root / / then use su to switch root under siti user
 ]Password: / / enter the password
 Last login: 1 September 9 15:16:00 CST 2019 from 192.168.144.135pts/1
 Last failed login: 1 September 9 15:33:03 CST 2019 from 192.168.144.135ssh:notty
 There are 3 failed login attempts after the most successful login.
[root@tast01 ~] ා / / log in to root successfully.
[root @ tast01 ~] (exit / / exit
 Logout
[Siti @ tast01 ~] $exit / / exit
 Logout
Connection to 192.168.144.133 closed.
[root@tast02 ~] (return to tast02 user)
5. Through the above operation, we have forbidden the remote login to root, but can switch the login through the ordinary user. At this time, we can start the pam authentication in the tast01 system to improve the security of the system.
[root@tast01 ~]# vim /etc/pam.d/su / / enter and edit the pam configuration file
#%PAM-1.0
auth            sufficient      pam_rootok.so
# Uncomment the following line to implicitly trust users in the "wheel" group.
#auth           sufficient      pam_wheel.so trust use_uid
# Uncomment the following line to require a user to be in the "wheel" group.
auth            required        pam_wheel.so use_uid              //Enable pam authentication
auth            substack        system-auth
auth            include         postlogin
account         sufficient      pam_succeed_if.so uid = 0 use_uid quiet
account         include         system-auth
password        include         system-auth
session         include         system-auth
session         include         postlogin
session         optional        pam_xauth.so
~
~
~
:wq                                                           //Save exit
6. Check whether it can switch to root through siti user
[root@tast02 ~]# ssh siti@192.168.144.133 / / log in to the siti user
siti@192.168.144.133's password:                        //Input password
Last failed login: Mon Sep  9 16:09:32 CST 2019 from 192.168.144.135 on ssh:notty
There was 1 failed login attempt since the last successful login.
Last login: Mon Sep  9 15:47:20 2019 from 192.168.144.135
[siti@tast01 ~]$ su - root                  //Log in to the siti user and switch the root user
//Password: / / enter the password
su: Deny authority                                 //Permission denied, unable to switch
[siti@tast01 ~]$
7. Because the permissions are set and the siti user is not in the wheel group, it is not possible to use the siti user to switch the root user. Can we use the siti user to switch the sun user in the wheel group, and then use the sun user to switch the root to see if it is possible.
[Siti @ tast01 ~] $Su - Sun / / switch sun user
 Password: / / enter the password
 su: permission denied / / permission denied, unable to switch
[siti@tast01 ~]$
8. Go back to tast01 and start SSH service to configure password authentication times service
[root@tast01 ~]# vim /etc/ssh/sshd_config / / enter the server configuration file
#LoginGraceTime 2m
PermitRootLogin no
#StrictModes yes
MaxAuthTries 6                          //Number of password verification on
#MaxSessions 10
:wq                                      //Save exit
9. Enter tast02 to verify whether the password is successfully opened
[root@tast02 ~]# ssh sun@192.168.144.133 / / log in to the sun user
sun@192.168.144.133's password:                   //Enter wrong password
Permission denied, please try again.              //Wrong input once, login denied
sun@192.168.144.133's password:                   //Enter wrong password
Permission denied, please try again.              //2 wrong entries, login denied
sun@192.168.144.133's password:                   //Enter wrong password
Permission denied (publickey,gssapi-keyex,gssapi-with-mic,password).   //3 input errors and log out directly
10. Through the above experiment, it is found that the password does not pop up after six times, but three times by default. At this time, we use the command to increase the default password times to set the password times.
[root@tast02 ~]# ssh -o NumberofPasswordPrompts=8 sun@192.168.144.133 / / use the command to increase the number of password entries
sun@192.168.144.133's password:
Permission denied, please try again.
sun@192.168.144.133's password:
Permission denied, please try again.
sun@192.168.144.133's password:
Permission denied, please try again.
sun@192.168.144.133's password:
Permission denied, please try again.
sun@192.168.144.133's password:
Permission denied, please try again.
sun@192.168.144.133's password:
Received disconnect from 192.168.144.133 port 22:2: Too many authentication failures
Authentication failed.            //After entering the password 6 times, it will pop up and the setting will take effect
Black and white list settings (AllowUsers, DenyUsers)
Add another Linux client (tast03IP address: 192.168.144.132) in VMware 15 to connect to the server remotely.
1. Configure the ssh server configuration file in tast01, add the AllowUsers entry, and add the clients only allowed to log in
[root @ tast01 ~] ා VIM / etc / SSH / sshd_config / / enter and edit the ssh server configuration file
#LoginGraceTime 2m
PermitRootLogin no
#StrictModes yes
MaxAuthTries 6
#MaxSessions 10
 AllowUsers sun@192.168.144.135 stii / / add an entry here. Only clients with IP address 192.168.144.135 are allowed to log in to sun user
                                         Allow clients to log in to stii users only
#PubkeyAuthentication yes

: wq / / save exit
 [root @ tast01 ~] (useradd stii / / add stii user
 [root @ tast01 ~] (passwd stii / / set stii user password
 Change the password for user stii.
New password:
Invalid password: password is less than 8 characters
 Reenter new password:
passwd: all authentication tokens have been successfully updated.
[root @ tast01 ~] (systemctl restart sshd / / restart ssh service
2. Log in to tast01 server remotely Using ssh service on tast02 and tast03 clients respectively
[root@tast02 ~]# ssh sun@192.168.144.133 / / log in to the sun user in the tast02 client
sun@192.168.144.133's password:                //Input password
Last failed login: Mon Sep  9 17:24:32 CST 2019 from 192.168.144.135 on ssh:notty
There were 6 failed login attempts since the last successful login.
Last login: Mon Sep  9 17:21:47 2019 from 192.168.144.133
[sun@tast01 ~]$                     //Successful login
[sun@tast01 ~]$ exit                //Exit user
//Logout
Connection to 192.168.144.133 closed.
[root@tast02 ~]# ssh siti@192.168.144.133 / / log in to the server siti user using ssh
siti@192.168.144.133's password:                  //Input password
Permission denied, please try again.              //Refused to log in
[root@tast02 ~]# ssh stii@192.168.144.133 / / log in to stii user
stii@192.168.144.133's password:                  //Input password
[stii@tast01 ~]$                                  //Successful login
[root@tast03 ~]# ssh sun @ 192.168.144.133 / / tast03 client uses ssh service to log in to server sun user
The authenticity of host '192.168.144.133 (192.168.144.133)' can't be established.
ECDSA key fingerprint is SHA256:B8IsZOFG7FbtVkIK+dMILmo0iA4OEIeVGY0GnnCbXhk.
ECDSA key fingerprint is MD5:c2:d8:09:17:de:6e:ec:07:06:1b:ac:b6:1e:bd:62:09.
Are you sure you want to continue connecting (yes/no)? yes       //Ask if you want to set up a session. Enter yes to set up a session
Warning: Permanently added '192.168.144.133' (ECDSA) to the list of known hosts.
sun@192.168.144.133's password:                     //Input password
Permission denied, please try again.                //Refused to log in
[root@tast03 ~]# ssh siti @ 192.168.144.133 / / tast03 client logs in server siti user using ssh service
siti@192.168.144.133's password:                    //Input password
Permission denied, please try again.                //Refused to log in
[root@tast03 ~]# ssh stii @ 192.168.144.133 / / tast03 client logs in server stii user using ssh service
stii@192.168.144.133's password:                    //Input password
Last login: Mon Sep  9 21:55:49 2019 from 192.168.144.135
[stii@tast01 ~]$                                     //Successful login
3. Go back to tast01 server and edit ssh server configuration file
[root@tast01 ~]# vim /etc/ssh/sshd_config / / edit the ssh server configuration file
#LoginGraceTime 2m
PermitRootLogin no
#StrictModes yes
MaxAuthTries 6
#MaxSessions 10
DenyUsers sun@192.168.144.135 stii             //Delete only allowed entries, add rejected entries

#PubkeyAuthentication yes
:wq                                            //Save exit
[root@tast01 ~]# systemctl restart sshd / / restart the ssh service
4. Log in to tast01 server remotely Using ssh service on tast02 and tast03 clients respectively
[root@tast02 ~]# ssh sun@192.168.144.133 / / log in to the sun user in the tast02 client
sun@192.168.144.133's password:                   //Input password
Permission denied, please try again.              //Refused to log in
[root@tast02 ~]# ssh stii@192.168.144.133 / / log in to the server stii user in the tast02 client
stii@192.168.144.133's password:                  //Input password
Permission denied, please try again.              //Refused to log in
[root@tast02 ~]# ssh siti@192.168.144.133 / / log in to the server siti user in the tast02 client
siti@192.168.144.133's password:                  //Input password
Last failed login: Mon Sep  9 22:02:00 CST 2019 from 192.168.144.132 on ssh:notty
There were 2 failed login attempts since the last successful login.
Last login: Mon Sep  9 21:53:53 2019 from 192.168.144.135
[siti@tast01 ~]$                                  //Successful login
[root@tast03 ~]# ssh stii @ 192.168.144.133 / / tast03 client logs in server stii user using ssh service
stii@192.168.144.133's password:                    //Input password
Permission denied, please try again.                //Refused to log in
[root@tast03 ~]# ssh sun @ 192.168.144.133 / / tast03 client uses ssh service to log in to server sun user
sun@192.168.144.133's password:                     //Input password
Last failed login: Mon Sep  9 22:30:55 CST 2019 from 192.168.144.135 on ssh:notty
There was 1 failed login attempt since the last successful login.
Last login: Mon Sep  9 22:24:51 2019 from 192.168.144.133
[sun@tast01 ~]$                                     //Successful login
[root@tast03 ~]# ssh siti @ 192.168.144.133 / / tast03 client logs in server siti user using ssh service
siti@192.168.144.133's password:                    //Input password
Last login: Mon Sep  9 22:32:16 2019 from 192.168.144.135
[siti@tast01 ~]$                                     //Successful login
Use key pair to verify login
1. First, enter and edit the ssh configuration file in the tast01 server, and open the key verification entry
[root@tast01 ~]# vim /etc/ssh/sshd_config / / edit the ssh configuration file
#LoginGraceTime 2m
PermitRootLogin no
#StrictModes yes
MaxAuthTries 6
#MaxSessions 10
DenyUsers sun@192.168.144.135 stii

PubkeyAuthentication yes                      //Enable key pair verification

# The default is to check both .ssh/authorized_keys and .ssh/authorized_keys2
# but this is overridden so installations will only check .ssh/authorized_keys
AuthorizedKeysFile      .ssh/authorized_keys    //Key storage location

:wq                                      //Save exit
2. Enter the client tast02 client and configure the key
[root@tast02 ~]# useradd siaa / / create a user in the tast02 client
[root@tast02 ~]# passwd siaa / / set user directory
//Change the password for user siaa.
//New password:
//Invalid password: password is less than 8 characters
//Reenter new password:
passwd: All authentication tokens have been successfully updated.
[root@tast02 ~]# su - siaa / / switch to user siaa
[siaa@tast02 ~]$ ssh-keygen -t ecdsa      //Make ecdsa type key
Generating public/private ecdsa key pair.
Enter file in which to save the key (/home/siaa/.ssh/id_ecdsa):     //Key storage location, keep unchanged, enter directly
Created directory '/home/siaa/.ssh'.
Enter passphrase (empty for no passphrase):            //Enter the password to set
Enter same passphrase again:                           //Enter password again
Your identification has been saved in /home/siaa/.ssh/id_ecdsa.
Your public key has been saved in /home/siaa/.ssh/id_ecdsa.pub.
The key fingerprint is:
SHA256:5mTvLU19q7uUUXECnEmNldB3S4gUiNZdvm1zupFUf0Y siaa@tast02
The key's randomart image is:
+---[ECDSA 256]---+
|        o +=B@+o.|
|       o o o*.+o=|
|      .      ..oE|
|              ++.|                           //Generate ecdsa key
|        S    +.+=|
|       = .  ..=+=|
|        . .o o+..|
|         ...o  + |
|          ...+=  |
+----[SHA256]-----+
[siaa@tast02 ~]$ ls -a            //View hidden files in user's home directory
.  ..  .bash_logout  .bash_profile  .bashrc  .cache  .config  .mozilla  .ssh
[siaa@tast02 ~]$ cd .ssh           //Enter the generated. ssh directory
[siaa@tast02 .ssh]$ ls              //View catalog contents
id_ecdsa  id_ecdsa.pub              //Generated private and public key files
[siaa@tast02 .ssh]$ ssh-copy-id -i id_ecdsa.pub siti@192.168.144.133  //Specifies that the generated public key file is pushed to the server siti user
/bin/ssh-copy-id: INFO: Source of key(s) to be installed: "id_ecdsa.pub"
The authenticity of host '192.168.144.133 (192.168.144.133)' can't be established.
ECDSA key fingerprint is SHA256:B8IsZOFG7FbtVkIK+dMILmo0iA4OEIeVGY0GnnCbXhk.
ECDSA key fingerprint is MD5:c2:d8:09:17:de:6e:ec:07:06:1b:ac:b6:1e:bd:62:09.
Are you sure you want to continue connecting (yes/no)? yes         //Inquiry is push, enter yes
/bin/ssh-copy-id: INFO: attempting to log in with the new key(s), to filter out any that are already installed
/bin/ssh-copy-id: INFO: 1 key(s) remain to be installed -- if you are prompted now it is to install the new keys
siti@192.168.144.133's password:      //Enter server siti user password

Number of key(s) added: 1         //File added successfully

Now try logging into the machine, with:   "ssh 'siti@192.168.144.133'"
and check to make sure that only the key(s) you wanted were added.
[siaa@tast02 .ssh]$ ls           //View catalog information
id_ecdsa  id_ecdsa.pub  known_hosts       //Create the file known hosts
[siaa@tast02 .ssh]$ vim known_hosts        //View file information
192.168.144.133 ecdsa-sha2-nistp256      AAAAE2VjZHNhLXNoYTItbmlzdHAyNTYAAAAIbmlzdHAyNTYAAABBBC6sBj5BEqQkEIXTdcRDCzDlQRfhaoaY7OvyWzxcNxt+n6ZjbA1PSYK2SeTW3MAhUZOry7T6gNDFL7YyfMfXOGo=        //Successfully push the key generated by ecdsa to the server
3. Go back to the tast01 server and check whether there are pushed files in the siti home directory
[root@tast01 ~]# cd /home/siti / / enter the siti home directory
[root@tast01 siti]# ls -a / / view hidden files
.   .bash_history  .bash_profile  .cache   .mozilla
..  .bash_logout   .bashrc        .config  .ssh
[root@tast01 siti]# CD. ssh / / enter the added. ssh directory
[root@tast01 .ssh]# ls / / view information
authorized_keys
[root@tast01 .ssh]# cat authorized_keys / / view the information content
ecdsa-sha2-nistp256 AAAAE2VjZHNhLXNoYTItbmlzdHAyNTYAAAAIbmlzdHAyNTYAAABBBD6B4elJHibp7lYDfogSfd7krTUPyKzvLHZNk75GTm1oibrA0aMirgtwxxfUEOi+9+ZGU2V0C3+zH6vQpjvvPoo= siaa@tast02      //ecdsa encrypted file of siaa@tast02
4. Use siaa user in tast02 client to verify and log in to siti user in tast01 server
[siaa@tast02 .ssh]$ whoami    //Use the command to view the currently logged in user
siaa                          //Confirm that the current login user is siaa
[siaa@tast02 .ssh]$ ssh siti@192.168.144.133     //Using ssh service to log in server siti user
Enter passphrase for key '/home/siaa/.ssh/id_ecdsa':       //Enter the ecdsa password set
Last login: Mon Sep  9 22:37:19 2019 from 192.168.144.132
[siti@tast01 ~]$                                           //Successfully logged in server siti user
5. Set the client trusted user to log in to the server without authentication
[siti@tast01 ~]$ exit           //Exit current user
//Logout
Connection to 192.168.144.133 closed.
[siaa@tast02 .ssh]$ ssh-agent bash   //Back to the siaa user in tast02, use the command agent bash environment
[siaa@tast02 .ssh]$ ssh-add           //Use command to add authentication password
Enter passphrase for /home/siaa/.ssh/id_ecdsa:  //Enter authentication password
Identity added: /home/siaa/.ssh/id_ecdsa (/home/siaa/.ssh/id_ecdsa)  //Password added successfully
[siaa@tast02 .ssh]$ ssh siti@192.168.144.133          //Login server siti user
Last login: Mon Sep  9 23:31:28 2019 from 192.168.144.135
[siti@tast01 ~]$                            //Login successful, password free
SSH client
1. Enter the tast01 server, edit the SSH configuration file, and open the root login. Because some paths in the Linux system do not have the root permission, the replication function cannot be realized
[root@tast01 ~]# vim /etc/ssh/sshd_config
...//Omit parts
# Authentication:

#LoginGraceTime 2m
PermitRootLogin yes       //Enable login root
#StrictModes yes
MaxAuthTries 6
#MaxSessions 10

PubkeyAuthentication yes

# The default is to check both .ssh/authorized_keys and .ssh/authorized_keys2
:wq                         //Save exit
[root@tast01 ~]# systemctl restart sshd / / restart SSH service
2. In tast02, verify whether the login permission of root user is opened successfully.
[root@tast02 ~]# ssh root@192.168.144.133 / / log in to server root Using ssh service
root@192.168.144.133's password:                 //Enter user password
Last login: Wed Sep 11 22:56:28 2019 from 192.168.144.135
[root@tast01 ~]#                                 //Successfully logged in
3. Log out of the server root user login in tast02, create files in opt directory, and push them to tast01 user with scp command.
[root@tast01 ~]# Exit / / exit
//Logout
Connection to 192.168.144.133 closed.
[root@tast02 ~]# cd /opt / / / enter the opt directory
[root@tast02 opt]# ls / / view
rh
[root@tast02 opt]# Echo "this is SSH client" > ssh_client.txt / / create a. TXT file
[root@tast02 opt]# mkdir -p tast/si11 / / recursively create the tast directory and create the si11 directory under the tast directory
[root@tast02 opt]# ls / / view
rh  ssh_client.txt  tast                                          //Files and directories created successfully
[root@tast02 opt]# scp ssh_client.txt root@192.168.144.133:/home / / / push the created. TXT file to the server root user's home directory
root@192.168.144.133's password:           //Input password
ssh_client.txt                                                100%   19     6.0KB/s   00:00    //Successful push
4. Go back to the tast01 server and check whether there are pushed files in the home directory.
[root@tast01 ~]# ls /home / / / view the files in the home directory
ssh_client.txt  sun                 //File added successfully
[root@tast01 ~]# cat /home/ssh_client.txt / / view the contents of the file
this is ssh-client                           //Show file contents
5. Push the newly created folder to tast01 server in tast02, and check whether it is pushed successfully in tast01 server
[root@tast02 opt]# scp -r tast/ root@192.168.144.133:/home / / push folder
root@192.168.144.133's password:                                //Input password
[root@tast02 opt]#                                             //Push succeeded
[root@tast01 ~]# ls /home / / / view the home directory
ssh_client.txt  sun  tast                           //Show pushed folders
[root@tast01 ~]# ls /home/tast / / / view folder contents
si11                                                //Show si11 directory created
Using sftp command to realize remote upload and download
1. Delete the created files and folders in tast02
[root@tast02 opt]# ls / / view information
rh  ssh_client.txt  tast                  //show contents
[root@tast02 opt]# rm -rf ssh_client.txt / / delete the txt file
[root@tast02 opt]# rm -rf tast / / / delete folder
[root@tast02 opt]# ls / / view
rh                                        //Deleted successfully
2. Use sftp command to download files from tast01 server
[root@tast02 opt]# sftp root@192.168.144.133 / / log in to the root user of tast01 server with the sftp command
root@192.168.144.133's password:                   //Input password
Connected to 192.168.144.133.
sftp> ls                                      //Log in and view directory information successfully
anaconda-ks.cfg         initial-setup-ks.cfg    download                  public
//Picture document desktop template / / at this time, it is in the root user's home directory
//Video Music
sftp> cd /home/                      //Enter home directory
sftp> ls                             //See
ssh_client.txt  sun             tast       //show contents
sftp> get ssh_client.txt                    //Download the txt file using the get command
Fetching /home/ssh_client.txt to ssh_client.txt
/home/ssh_client.txt                                          100%   19    19.3KB/s   00:00
sftp> bye                        //Sign out
[root@tast02 opt]# ls / / check whether there is any content in the directory
rh  ssh_client.txt                //Successful download
3. Change the name of the downloaded file, use the sftp command to upload the file to the home directory of the tast01 server, and return to the tast01 server to view the information
[root@tast02 opt]# mv ssh_client.txt ssh_server.txt / / change the file name
[root@tast02 opt]# ls / / view
rh  ssh_server.txt                                     //Changed
[root@tast02 opt]# sftp root@192.168.144.133 / / log in to tast01root using the sftp command
root@192.168.144.133's password:                       //Input password
Connected to 192.168.144.133.
sftp> cd /home/                                          //Enter home directory
sftp> ls                                               //View content
ssh_client.txt  sun             tast
sftp> put ssh_server.txt                               //Upload the file to the home directory of tast01 server
Uploading ssh_server.txt to /home/ssh_server.txt
ssh_server.txt                                                100%   19    15.6KB/s   00:00
sftp> bye                //Sign out
[root@tast02 opt]#
[root@tast01 ~]# ls /home / / / view the contents of the home directory
ssh_client.txt  ssh_server.txt  sun  tast    //File uploaded successfully
TCP wrappers access control
Overview of TCP wrappers
Protection principle
TCP wrappers package other TCP service programs and add a secure detection process. External connection requests must pass this layer of security detection before they can access the real service program. TCP wrappers can also record all attempts to access the protected services and provide administrators with rich security analysis data. The access of TCP wrappers is an application service based on TCP protocol.
How to realize the protection mechanism
Mode 1: package other service programs through tcpd main program
Mode 2: other service programs call libwrap.os. * connection Library
Profile for access control policy
/etc/hosts.allow
/etc/hosts.deny
TCP Wrappers policy application
Set access control policy
- Policy format: service list: client address list
- Service list
Multiple services are separated by commas, and ALL represents ALL services - Client address list
Multiple addresses are separated by commas, and ALL indicates ALL addresses
Allow wildcards? And *
Network segment address, such as 192.168.4.0 or 192.168.4.0 / 255.255.255.0
Regional address, such as. benet.com
Application order of policies - Check hosts.allow first, and access is allowed if a match is found
- Otherwise, check hosts.deny again. If found, access will be denied
- If there is no matching policy in both files, access is allowed by default
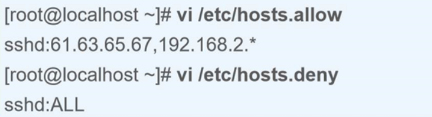
Example of policy application
Access to the sshd service is only allowed from
Main engine 61.63.65.67
Network segment 192.168.2.0/24
Disable all other addresses from accessing protected services