1.1 introduction to Linux
Unix is a powerful multi-user and multi task operating system developed in Bell Labs of at & T in 1969.
The trademark right of UNIX is owned by The Open Group.
UNIX operating system is commercial and charged, and the price is a little more expensive than Microsoft Windows.
Linux is a UNIX like operating system that is free to use and freely spread. It is a multi-user, multi task and
Support multithreading and multi CPU operating system.
The Linux kernel was originally developed by Finnish Linus Torvalds when he went to Helsinki University in 1991
Written for your hobby.
1.2 Linux version
There are two versions of Linux: kernel version and distribution version.
Kernel version refers to the version number of the system kernel developed and maintained by the kernel team led by Linus.
The distribution version is determined by some organizations and companies according to their own distribution version. The simple point is to integrate the Linux kernel and application software
Make a package.
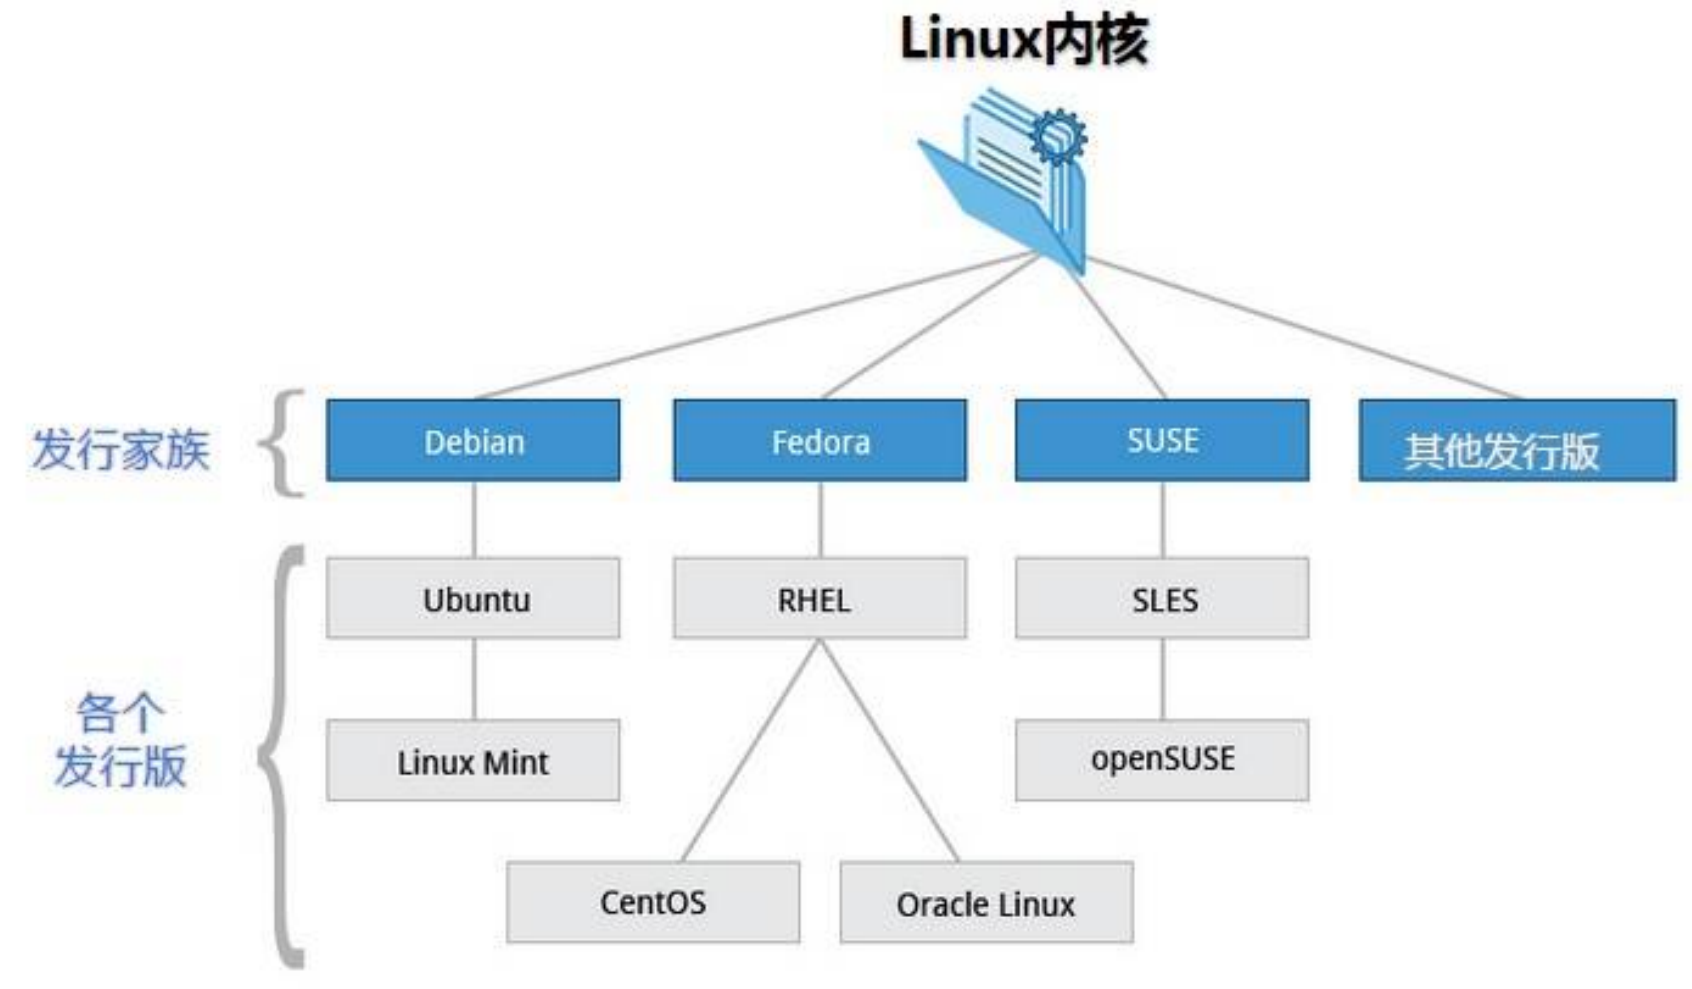
At present, the well-known distribution versions on the market include Ubuntu, RedHat, CentOS, Debian, Fedora, SuSE, OpenSUSE
Arch Linux, SolusOS, etc.

1.3 application of Linux
The system we commonly use now is the Windows operating system, which is simple and easy to use. But it is not very suitable to be a server. Linux is very important in this regard
Very advantageous.
Linux is widely used in server system, embedded system, desktop application system, mobile handheld system and so on.
2. Linux Installation
2.1 virtual machine installation
2.1.1 what is a virtual machine?
A virtual machine can be considered a virtual computer. Is a virtual computer with software.
There are many kinds of virtual machine software, such as free virtualBox and charged VMware.
2.1.2 introduction to VMWare
VMware is a "Virtual pc" software company that provides solutions for server and desktop virtualization. Its products can be implemented in one computer
Two or more Windows, DOS and LINUX systems are running on the machine at the same time. Compared with the multi boot system, VMware adopts a completely different approach
The same concept. The multi boot system can only run one system at a time, and the computer needs to be restarted during system switching. VMware can implement
Now it really runs "at the same time", and multiple operating systems can be switched on the main system platform like standard windows applications. Every operation
Virtual partition and configuration can be carried out without affecting the data of real hard disk. Several virtual machines can even be connected into one through virtual network card
LAN, and its convenience. The performance of the operating system installed in VMware is much higher than that of the system directly installed on the hard disk
It is more suitable for learning and testing.
2.1.3 VMware installation
Refer to VMware's installation documentation for the installation process.
Status settings for virtual machines
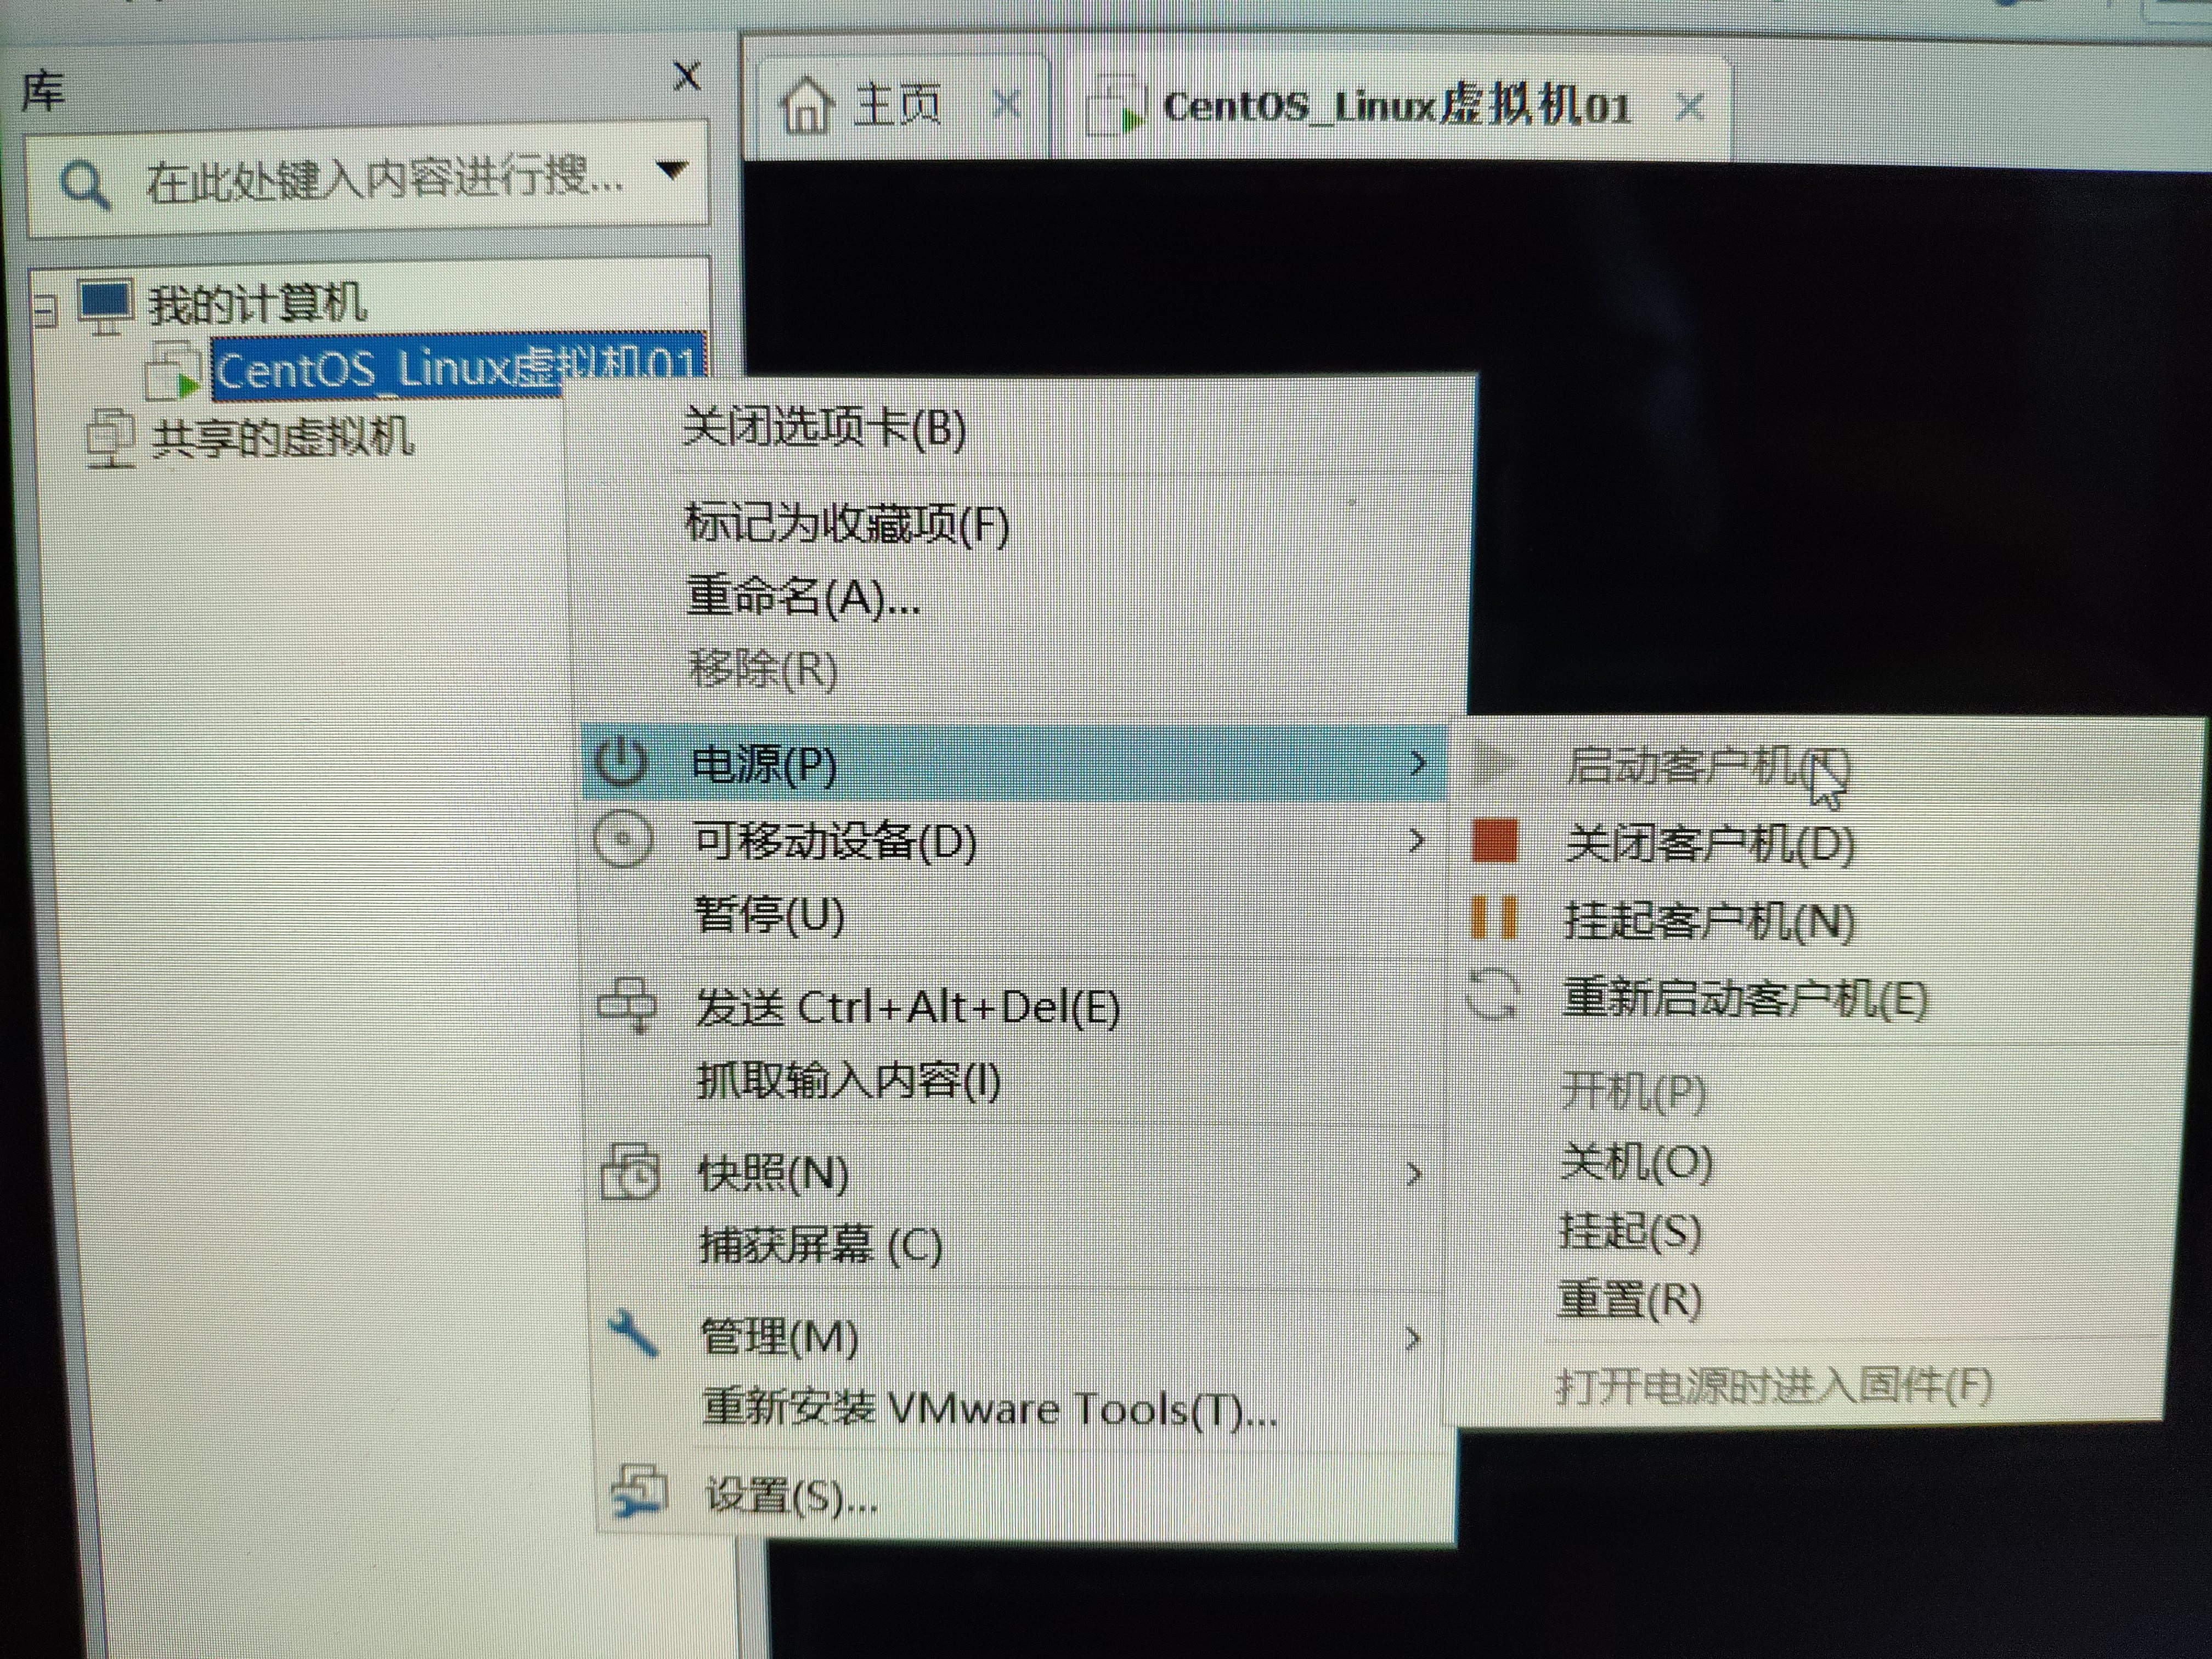
2.2 CentOS installation (installed in virtual machine)
The virtual machine software has just been installed. Next, we can virtual a computer and install the Linux operating system. We
The operating system chosen in our course is CentOS 7.
Refer to the installation documentation of CentOS-7 for the installation process.
How do I log in to the root account after installation?
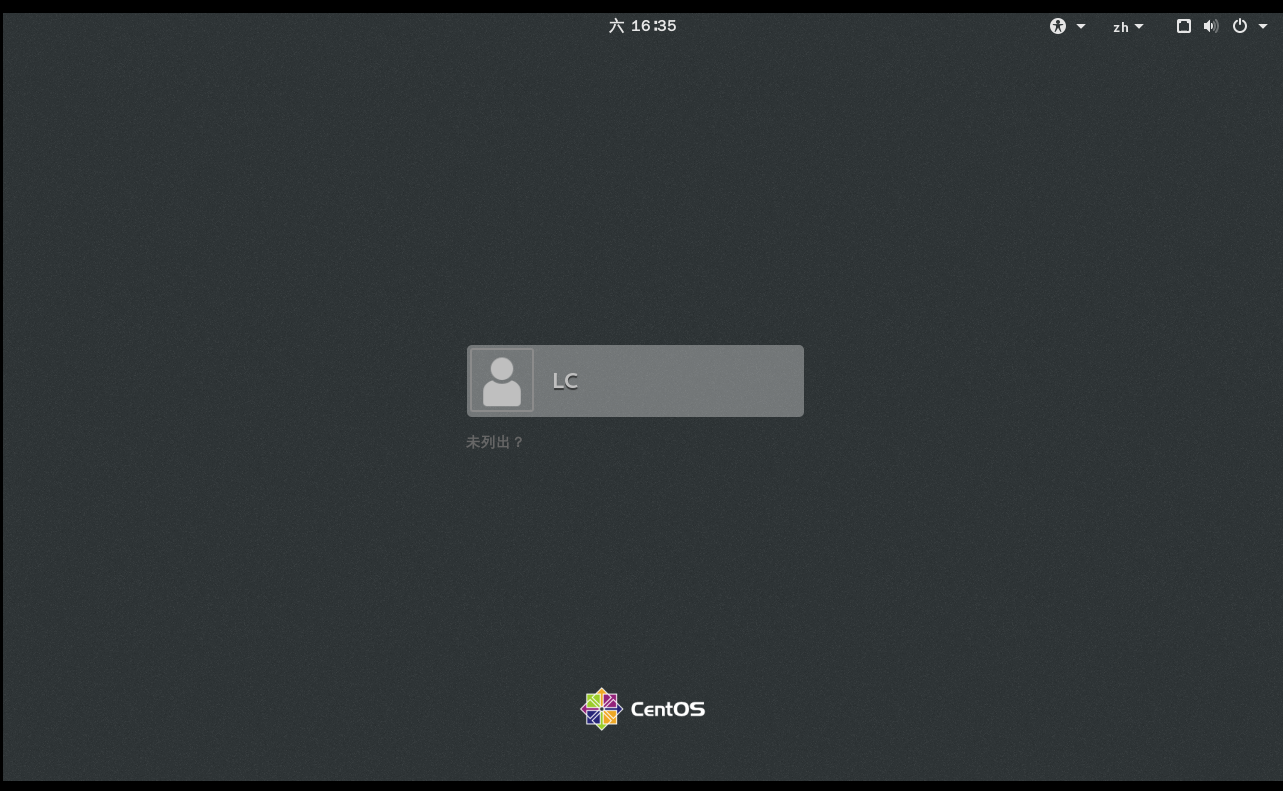
There is an ordinary user LC in the figure above. Click "not listed" at the bottom? And enter the user name (root) and the corresponding password to log in to the root account.
3. Remote access for Linux
Because the server will not be installed on your personal computer in actual development, it needs to be accessed with remote access tools.
3.1 install remote access tools (SecureCTR, Xshell, etc.)
There are many remote access tools, basically the same. The tool selected here is securecr
The installation process is carried out according to the installation document of SecureCRT.
Test whether the virtual machine IP can be accessed
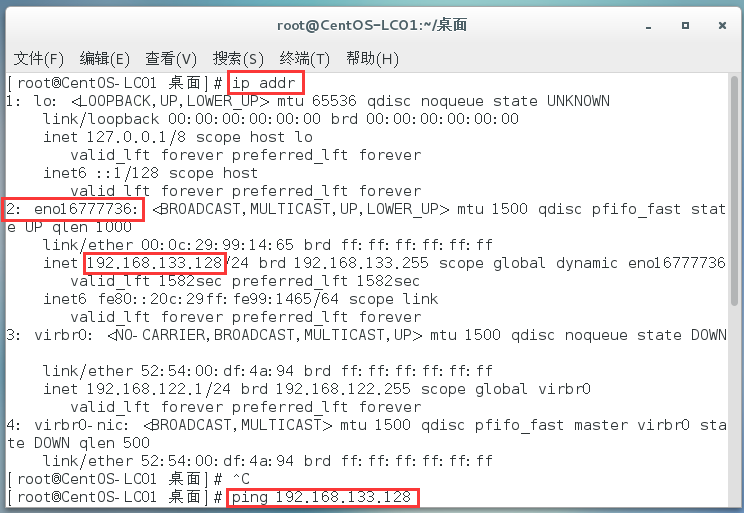
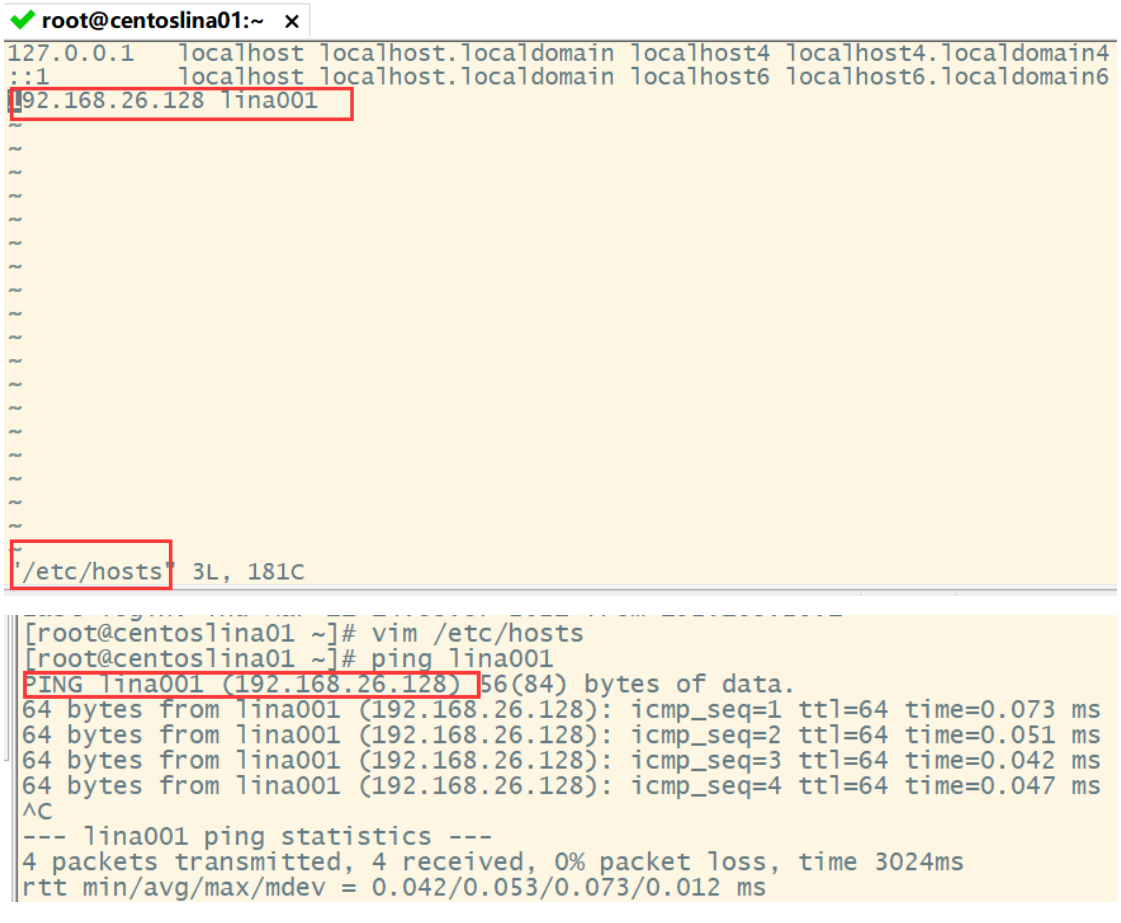
First, use the ip addr command in the virtual machine to view the IP of the current virtual machine, which is 192.168.133.128
Then execute the ping command. If the following output appears, the link is available:
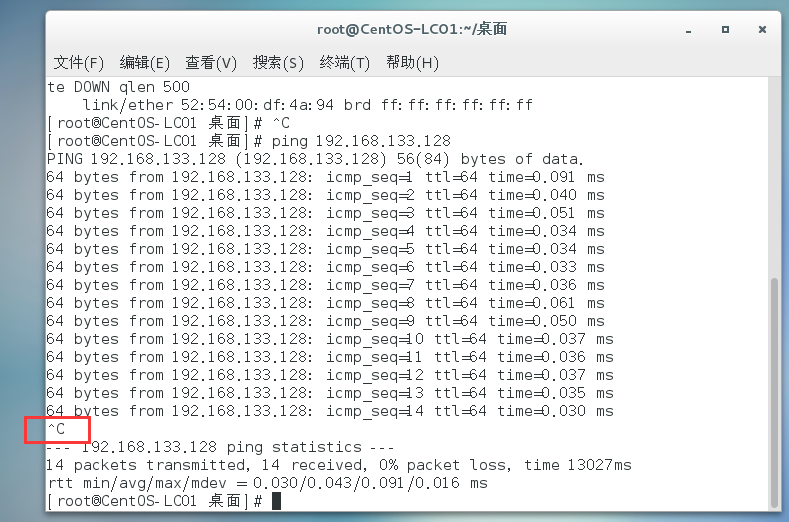
You can terminate the output by Ctrl+c.
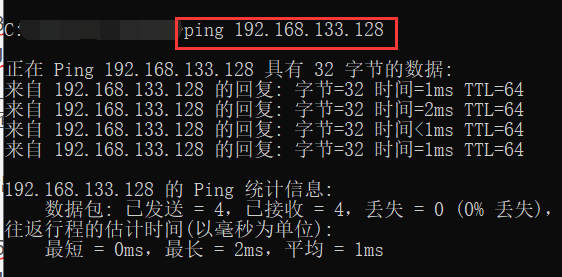
In windows, we can also use the ping command to test:
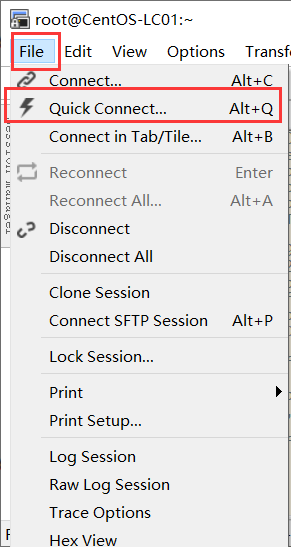
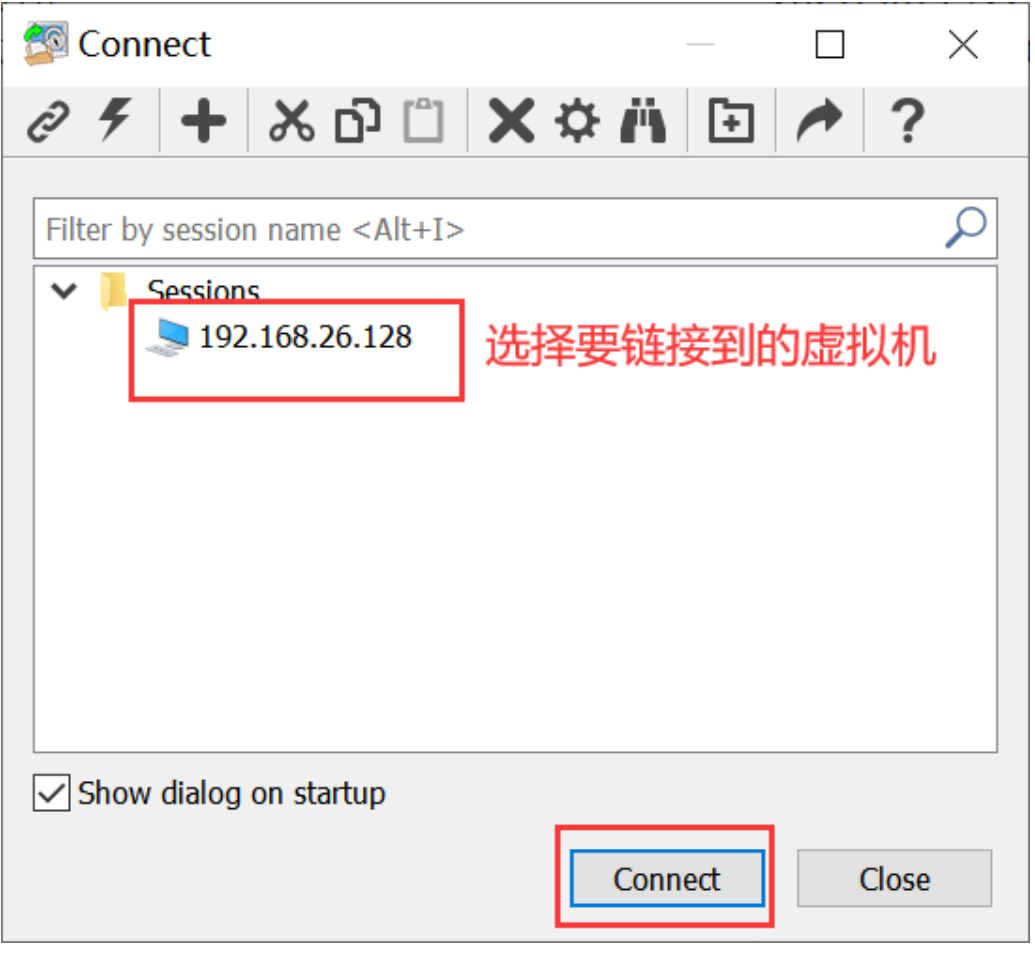
3.2 connecting remote tools to Linux
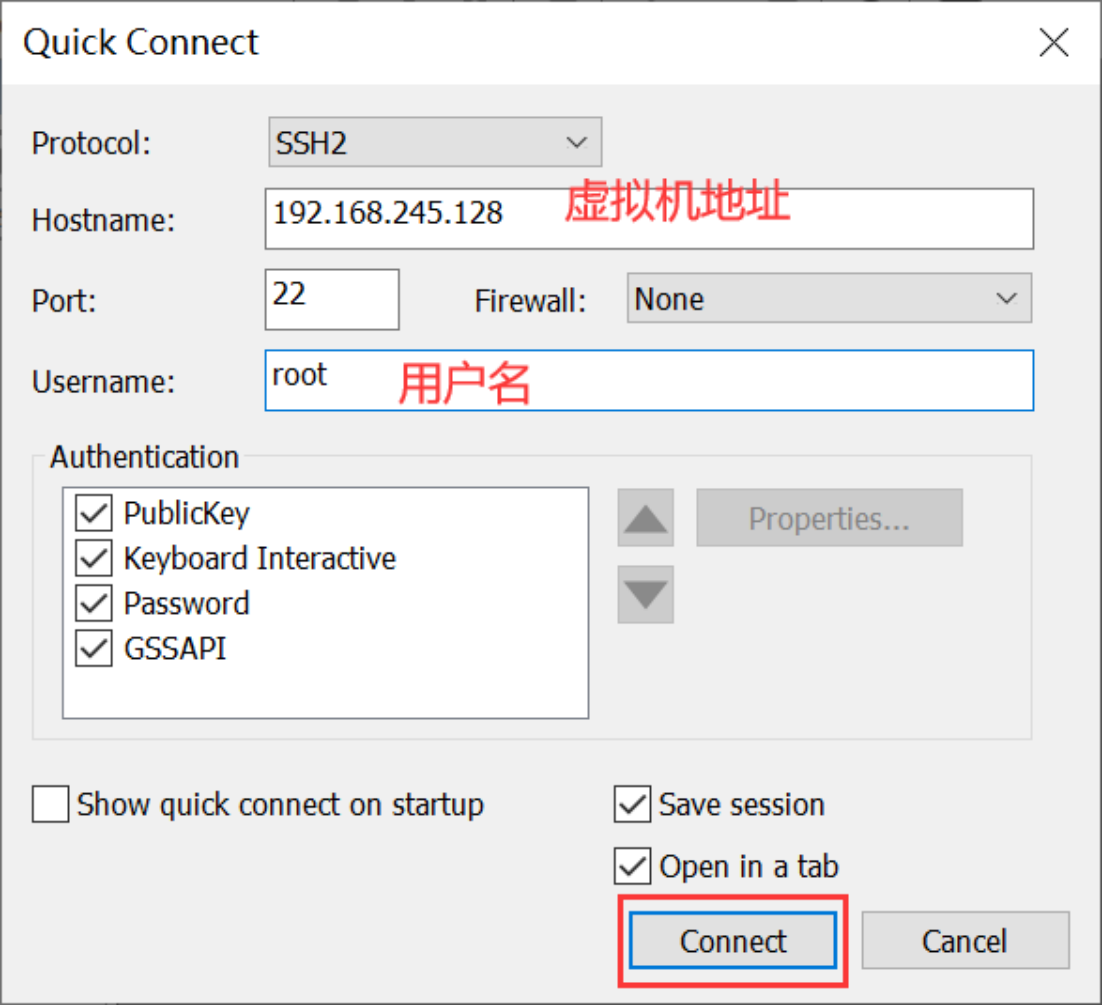
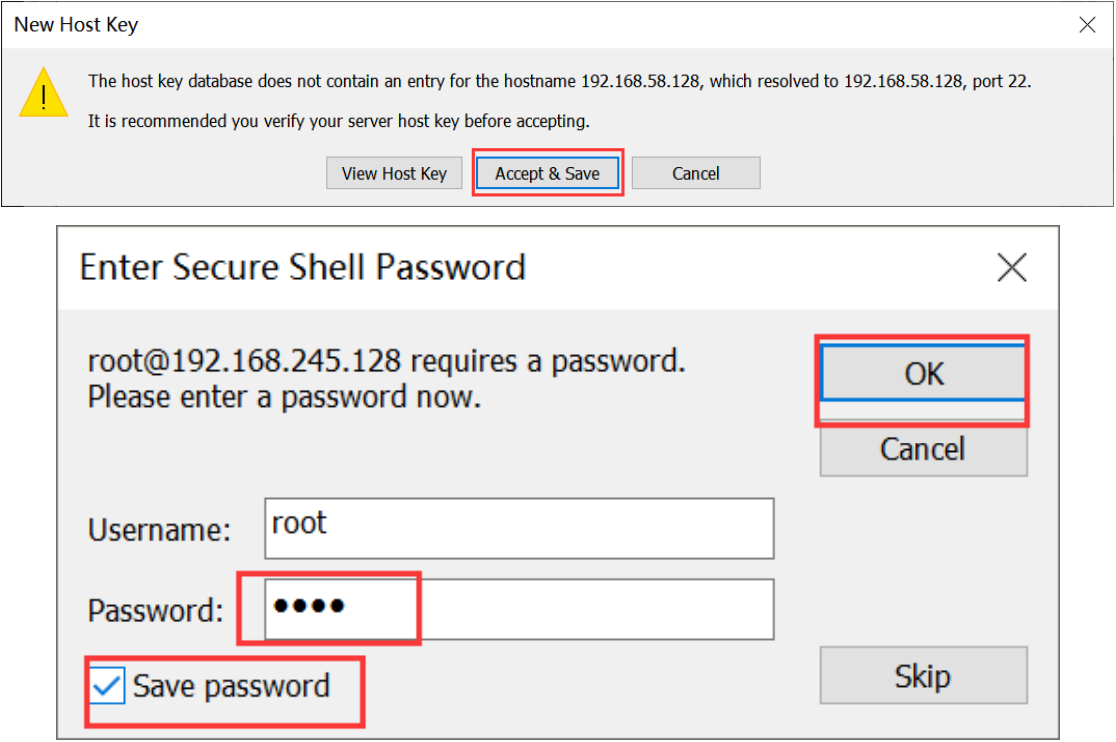

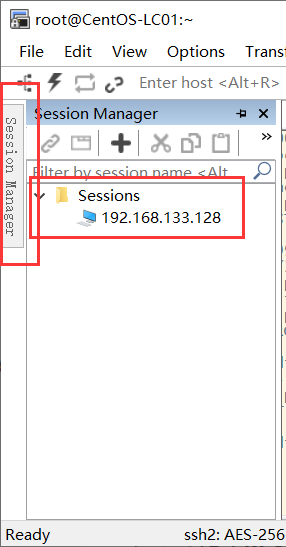
The connected server records can be viewed in the directory on the left:
You can create a new link or change the current link information by:
4. Linux directory structure

To view the directory structure in the CRT tool:
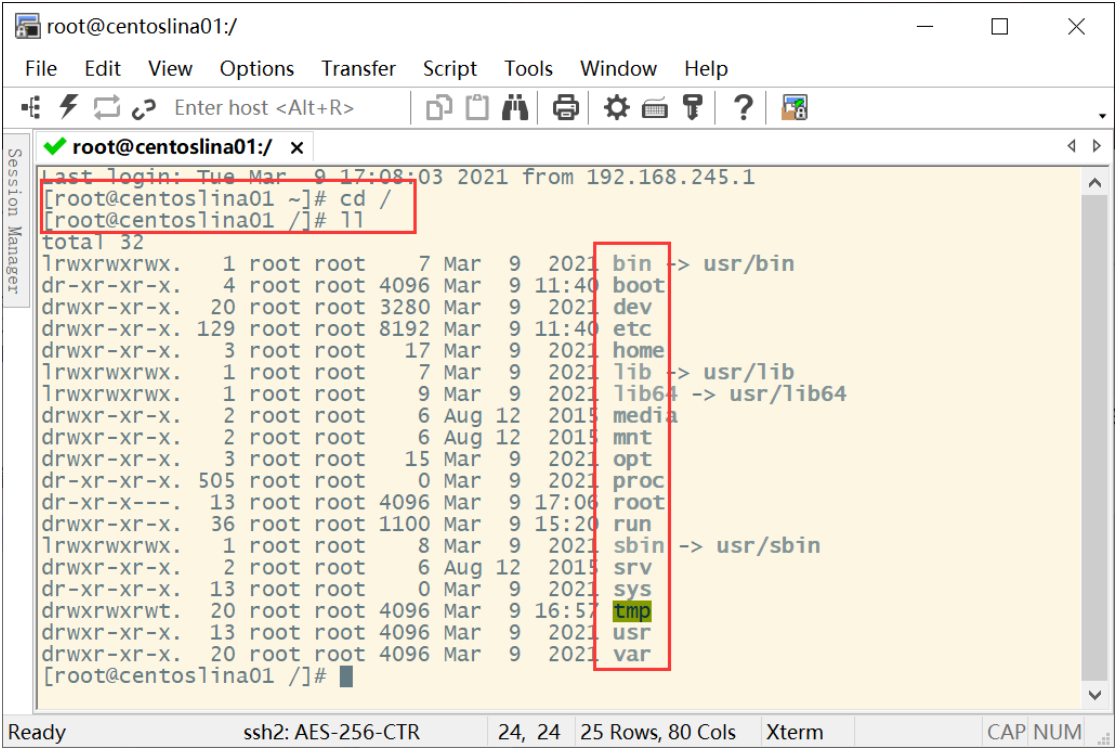
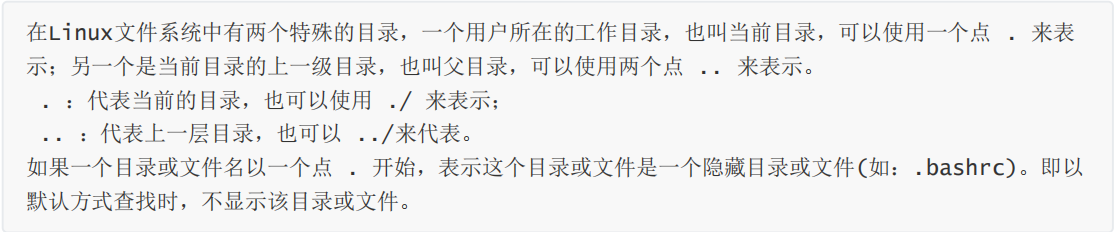
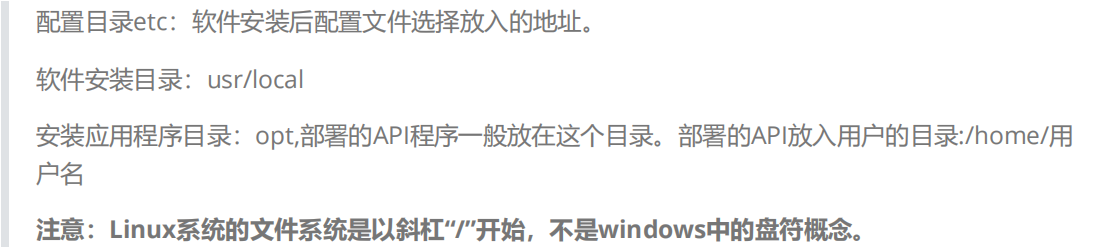
bin (binaries)Store binary executable
sbin (super user binaries)Store binary executable files, only root To access
etc (etcetera)Store system configuration files
usr (unix shared resources)Used to store shared system resources
home Root directory where user files are stored
root Superuser directory
dev (devices) Used to store equipment files
lib (library)Store shared libraries and kernel modules required for running programs in the file system
mnt (mount)The system administrator installs the mount point for the temporary file system
boot Store various files used for system boot
tmp (temporary)It is used to store various temporary documents
var (variable)Files used to store data that needs to be changed at run time
Developer attention Directory:
5. Linux users
Linux system is a multi-user and multi task time-sharing operating system. Any user who wants to use system resources must first report to the system manager
The manager applies for an account and then enters the system as this account.
On the one hand, the user's account can help the system administrator track the users using the system and control their access to system resources; another
On the one hand, it can also help users organize files and provide security protection for users.
Each user account has a unique user name and their own password.
Users can enter the system and their home directory after entering the correct user name and password when logging in.
5.1 user account
User accounts generally fall into two categories: Super administrator and ordinary user.
Super administrator: represented by root, the root user has the highest authority in the system.
Ordinary users: users other than root. For example, the lina user we created earlier is an ordinary user.
5.2 viewing user information
#Syntax cat /etc/passwd
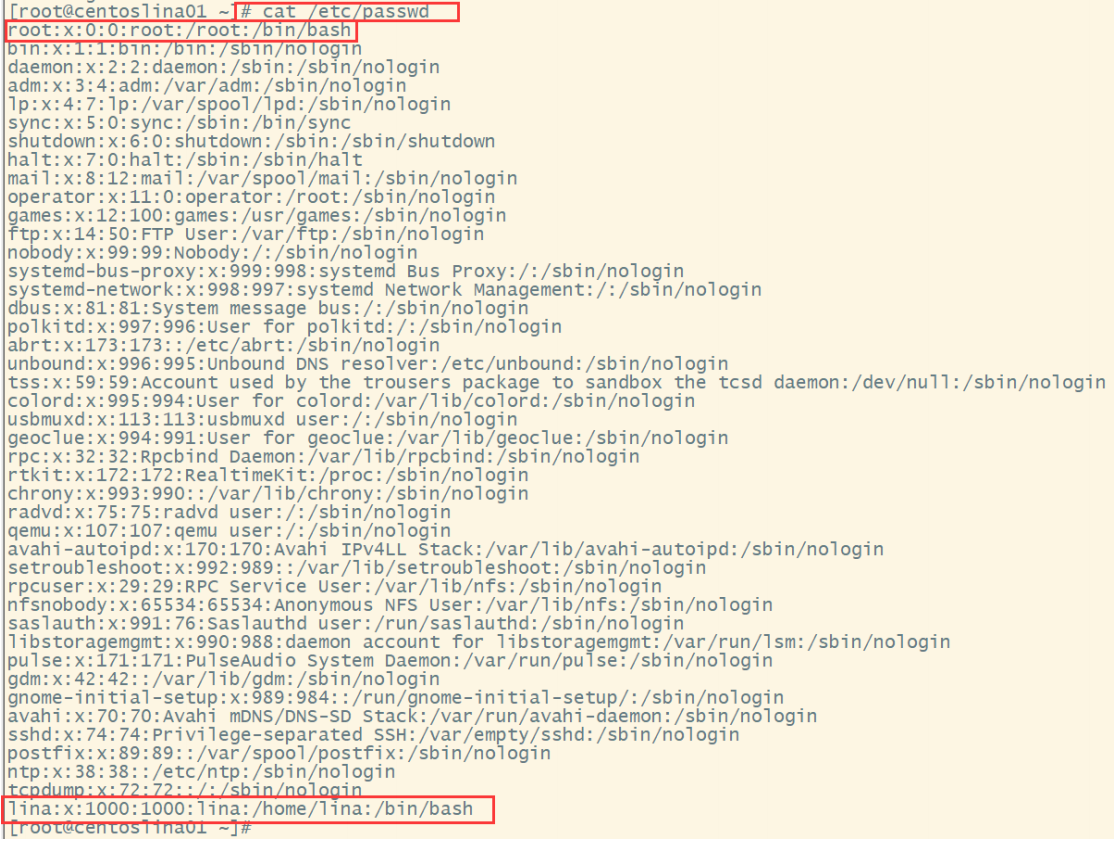
Take the first one in the picture root For example:
- root:user name
- x : Password: it has been encrypted and stored in vi /etc/shadow Password file
- 0: account number id ,userId
- 0:  group id ,group id
5.2.1 create a user
# Create a user
	#Syntax: useradd option username
		#Options: 	- c comment specifies an annotative description.
				-d Directory specifies the user's home directory. If this directory does not exist, it will be used at the same time-m Option to create a home directory.
				-g User group specifies the user group to which the user belongs.
				-G User group. User group specifies the additional group to which the user belongs.
				-s Shell File specifies the user's login Shell.
				-u User number specifies the user number of the user, if both exist-o Option, you can reuse the identification numbers of other users.

#Case 1:
useradd lina02
5.2.2 delete a user
# Delete a user
	#Syntax: userdel option user name; Where - r is a common option, which means to delete the user's home directory together.

#Case: userdel -r lina02
5.3 user password management
The management of user password is actually the management of user password. The user account has no password when it was first created, but it is locked by the system and cannot be used,
You must specify a password for it before you can use it, even if you specify an empty password.
The command to specify and modify the user password is passwd. Super users can specify passwords for themselves and other users. Ordinary users can only use it
Change your password.
# User password management
	#Syntax: passwd option username
	Available options:
		-l Lock the password, that is, disable the account.
		-u Password unlock.
		-d Make the account no password.
		-f Force the user to change the password at the next login.
If the default user name is, modify the password of the current user.
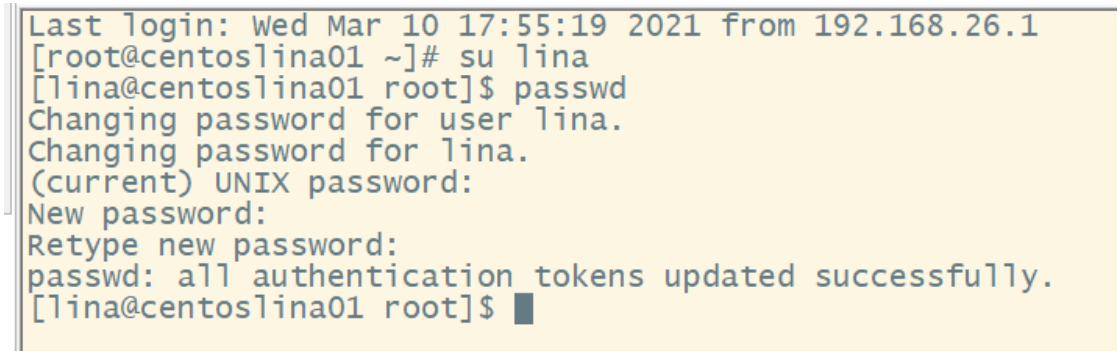
For example, if you switch to user lina, you can modify the user's own password with the following command:
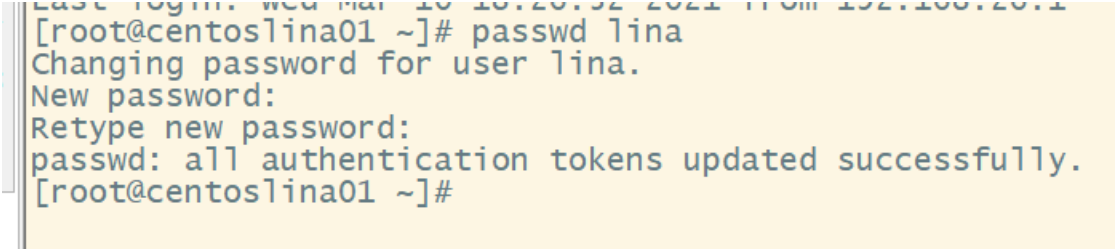
If you are a super user, you can specify the password of any user in the following form:
When an ordinary user changes his password, the passwd command requires the user to enter the original password first, and then require the user to enter the new password twice after verification, such as
If the passwords entered twice are the same, assign the password to the user; When the super user specifies the password for the user, he does not need to know the original port
Order.
For the sake of system security, the user should choose a more complex password. For example, it is best to use an 8-bit password, which includes uppercase and small
Write letters and numbers, and they should be different from names, birthdays, etc.
PS: the password part of the Linux operating system is not displayed, so it looks blank. In fact, the password has been entered.
6. Common commands for Linux (key points)
6.1 Linux directory management
The directory structure of Linux is a tree structure, and the top-level directory is the root directory /.
Other directories can be added to the tree by mounting and removed by unmounting

6.1.1 view directory
In Linux system, ls command is probably the most frequently run command.
Syntax:
	ls :View the file name under the current path
	ls -a :All files, together with hidden files( Start with . File) List them together(Commonly used)
	ls -d : Only the directory itself is listed, not the file data in the directory(Commonly used)
	ls -l : Long data list, including file attributes, permissions and other data;(Commonly used)
	ll: Equivalent to ls -l
	ls -al :List all files in the directory(Including properties and hidden files)
6.1.2 switching directories
cd is the abbreviation of Change Directory, which is the command used to change the working directory.
Syntax:
cd [Relative path or absolute path]
#Switch to the local directory using the absolute path
cd /usr/local/
# It means to go back to your home directory, that is, the directory / root
cd ~
# It means to go to the current upper level directory, that is, the upper level directory of / root;
cd ..
6.1.3 display current directory
pwd is the abbreviation of Print Working Directory, that is, the command to display the current directory.
Syntax: pwd
6.1.4 create directory
mkdir (make directory) is used to create a new directory.
Syntax: mkdir [-mp] Directory name
	-m : The permissions of the configuration file! You can configure it directly without looking at the default permissions
	-p : Direct the required directory(Include upper level directory)Create recursively!
view help mkdir --help
Example:/tmp Try to create several new directories below:
	cd /tmp
mkdir kkb <==Create a file named kkb New directory for
mkdir test1/test2/test3/test4
	mkdir: cannot create directory `test1/test2/test3/test4':
	No such file or directory <== There is no way to create this directory directly!
mkdir -p test1/test2/test3/test4
Add this -p Can help you create multi-layer directories!
6.1.5 delete directory
The rmdir command is used to delete empty directories.
Syntax: rmdir [-p] Directory name
	-p : Together with the upper level『Empty』The directory is also deleted
6.2 document operation
6.2.1 viewing file content
6.2.1.1 cat view all contents
Function: display the file content from the first line
 Syntax: cat File name or file path
6.2.1.2 more page by page display file content
Page by page
Syntax: more File name or file path
For example: more /etc/man_db.config
....(Middle ellipsis)....
--More--(28%) <== Focus on this line! Your cursor will also be here waiting for your command
	stay more During the operation of this program, you have several keys to press:
	Blank key (space): Represents turning down a page;
	Enter : Represents turning down『a line』;
	:f : Immediately display the file name and the number of lines currently displayed;
	q : The representative left at once more ,Don't show the contents of this file again.
6.2.1.3 less page by page
Syntax: less File name or file path
For example: less /etc/man.config
	....(Middle ellipsis)....
	: <== Here you can wait for your command!
less Commands that can be entered at runtime are:
	Blank key: turn down one page;
	[pagedown]: Turn down a page;
	[pageup] : Turn up a page;
	q : leave less This procedure;
6.2.2 creating files
Function: create a blank ordinary file
 Syntax: touch File name (with suffix)

#Example:
[root@centoslina01 /]# cd kkb
[root@centoslina01 kkb]# touch lina01.txt
[root@centoslina01 kkb]# ll
total 0
-rw-r--r--. 1 root root 0 Mar 11 10:08 lina01.txt
[root@centoslina01 kkb]#
6.2.3 written content
echo redirects the content to the specified file. If yes, it will be opened and if no, it will be created
Syntax:
echo 'content'>File name override mode
echo 'content'>>File name append mode

#Example:
[root@centoslina01 kkb]# echo 'jiaobaoyu'>lina01.txt
[root@centoslina01 kkb]# echo 'jiaobaoyu'>lina01.txt
[root@centoslina01 kkb]# cat lina01.txt
jiaobaoyu
[root@centoslina01 kkb]# echo 'jiaobaoyu'>>lina02.txt
[root@centoslina01 kkb]# echo 'jiaobaoyu'>>lina02.txt
[root@centoslina01 kkb]# cat lina02.txt
jiaobaoyu
jiaobaoyu
[root@centoslina01 kkb]#
6.2.4 copying / copying files
Syntax: cp [-adfilprsu] Source file (file name or address)(source) Target file (directory name or directory address)(destination)
	-a: Equivalent to -pdr As for pdr Please refer to the following instructions;(Commonly used)
	-d: If the source file is a linked file attribute(link file),Copy the link file attribute instead of the file itself;
	-f: For mandatory(force)If the target file already exists and cannot be opened, remove it and try again;
	-i: If target file(destination)If it already exists, you will first ask about the progress of the action when overwriting(Commonly used)
	-l: Hard link(hard link)Create a link file instead of copying the file itself;
	-p: Copy the past with the file's properties instead of using the default properties(Backup common);
	-r: Recursive continuous replication is used for directory replication behavior;(Commonly used)
	-s: Copy as symbolic link file (symbolic link),or『shortcut』Documents;
	-u: if destination than source Old talent upgrade destination !
6.2.5 moving files
mv can move files and directories, or change names.
When the source and target are at the same level, the name is modified (like a file or a directory); Different levels are moved (only files are moved to the directory, not vice versa)
Syntax:
	mv [-fiu] source destination
		-f : force Mandatory means that if the target file already exists, it will not be queried but directly overwritten;
		-i : If target file (destination) If it already exists, you will be asked whether to overwrite it!
		-u : If the target file already exists, and source It will be upgraded only if it is relatively new (update)

Example:
stay LcTest There are two files in the directory: lc01.txt and lc02.txt And a directory LcInner
 Now will lc02.txt copy to LcInner Directory, the command is(Note: the current working directory is LcTest):
	cp lc02.txt LcInner
 Then we will LcInner Under directory lc02.txt File renamed lc03.txt(Note: the current working directory is LcTest):
	#First switch the working directory to the LcInner directory
	cd LcInner
	#Then use the features of mv command to modify the file name
	mv lc02.txt lc03.txt
6.2.6 deleting files
rm can remove files or directories.
Syntax: rm [-fir] File or directory
	-f : namely force Ignore nonexistent files and no warning message will appear;
	-i : In interactive mode, the user will be asked whether to move before deletion
	-r : Recursive deletion! Most commonly used in directory deletion! This is a very dangerous option!!!
6.3 packing and unpacking
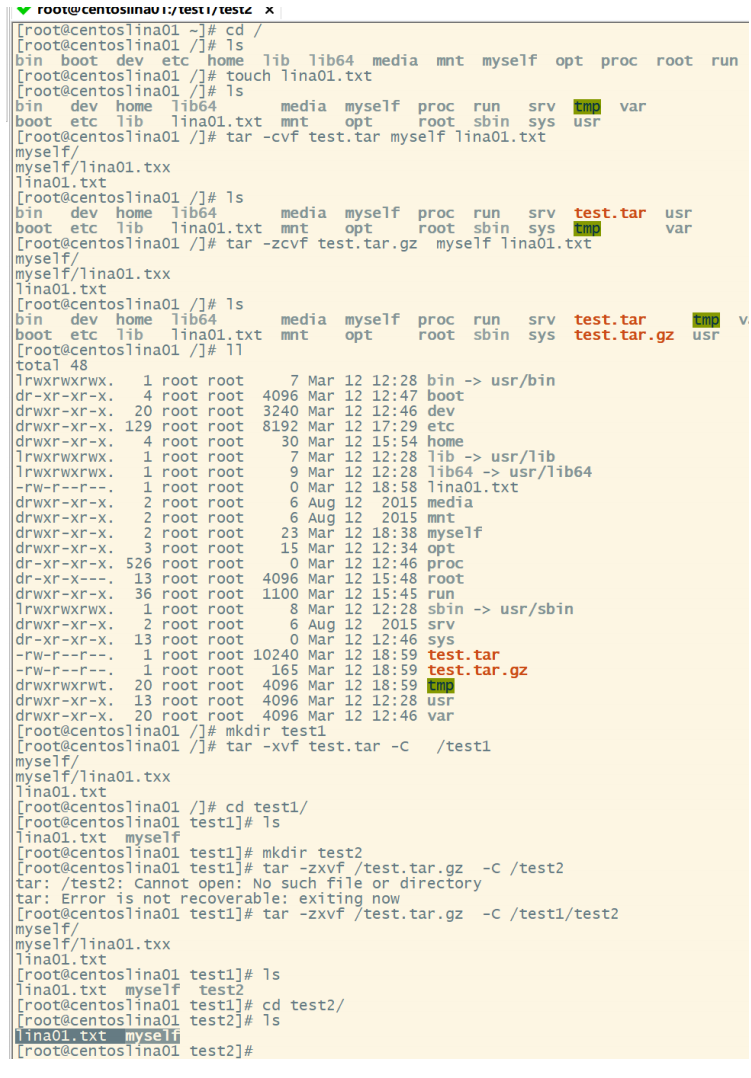
commonly Linux The commonly used compression method is to select tar Package many files into one file, and then gzip Compress command compress to compact
xxx.tar.gz(perhaps xxx.tgz)File.
	Common parameters:
		-c:Create a new tar file
		-v:Displays information about the running process
		-f:specify a filename
		-z:call gzip Compress with the compress command
		-t:View the contents of the compressed file
		-x:Untie tar file
pack:tar -cvf xxx.tar A list of files or directories to package, separated by spaces
 For example, to file lc01.txt And directory LC Package as file lc.tar Then use the command:
	tar -cvf  lc.tar lc01.txt LC

Pack and compress:tar -zcvf xxx.tar.gz A list of files or directories to package, separated by spaces
For example, to file lc01.txt And directory LC Package and compress into a file lc.tar Then use the command:
	tar -zcvf  lc.tar.gz lc01.txt LC

decompression:tar -xvf xx.tar
	tar -zxvf xx.tar.gz -C /usr/kkb
	Add when unpacking or decompressing the file package to the specified path-C Parameters, note C Uppercase to prevent unpacking and decompression. The path cannot be found.
6.4 other commands
6.4.1 viewing process snapshot
ps -axu Displays a snapshot of the current process
see Java Process (pipeline mechanism): ps -axu | grep java
see MySQL Process (pipeline mechanism): ps -axu | grep mysql
6.4.2 piping|
Pipeline is an important and commonly used content in Linux. Its function is to combine the output of one command as the input of another command
Use.
ls --help | more #Page to view help information, press q to exit
7. VIM editor - important
7.1 VIM mode
vim is divided into three modes: Command mode, Insert mode and baseline command
Last line mode.
7.1.1 command mode:
As soon as the user starts vi/vim, he enters the command mode.
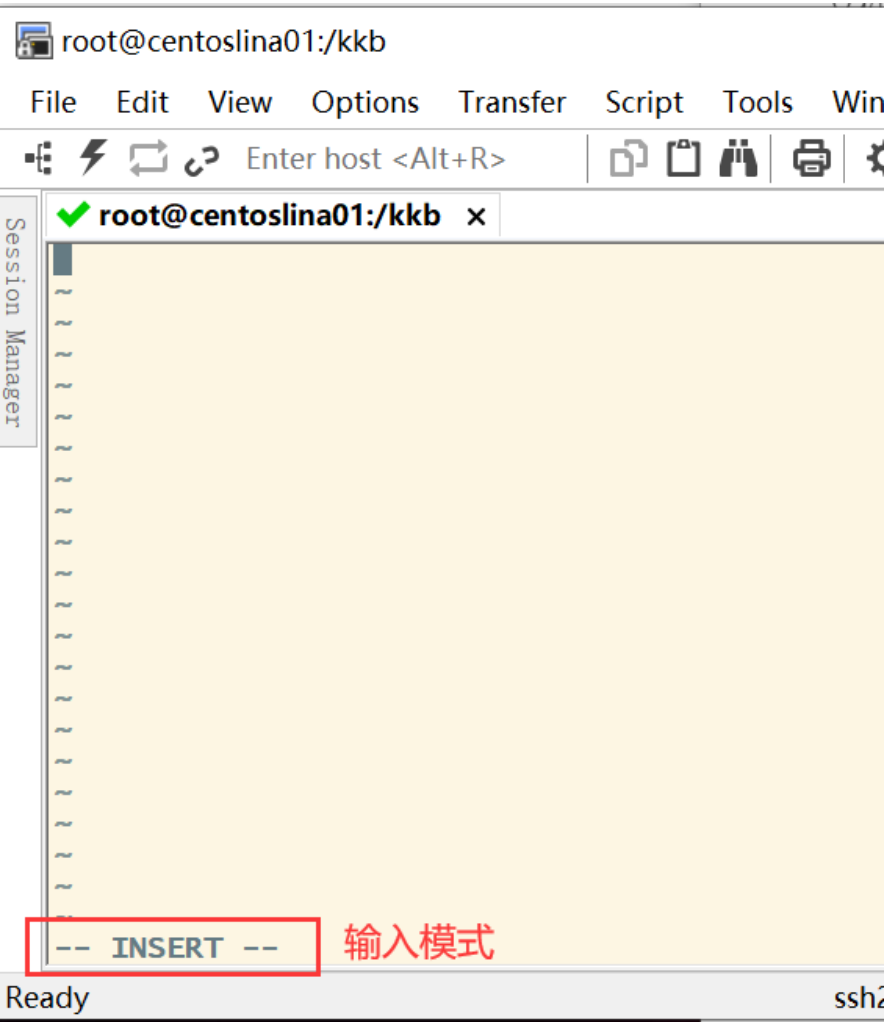
In this state, keyboard tapping will be ignored Vim Recognized as a command, not an input character. For example, we press at this time i,It does not enter a character, i cover
As an order.

Here are some common commands:
	i Switch to input mode to enter characters.
	x Deletes the character at the current cursor. i
	: Switch to the bottom line command mode to enter commands on the bottom line.
To edit text: start Vim,After entering command mode, press i,Switch to input mode.
Command mode has only some basic commands, so you still have to rely on the bottom line command mode to enter more commands.
7.1.2 input mode
In the command mode, press i to enter the input mode.
In input mode, the following keys can be used:
	Character keys and Shift Combination, enter characters
	ENTER,Enter, line feed
	BACK SPACE,Backspace key to delete the previous character of the cursor
	DEL,Delete key to delete one character after the cursor
	Direction keys to move the cursor in the text
	HOME/END,Move the cursor to the beginning of the line/End of line
	Page Up/Page Down,upper/Page down
	Insert,Switch cursor to input/When you replace the mode, the cursor changes to a vertical bar/Underline
	ESC,Exit the input mode and switch to the command mode
7.1.3 baseline command mode
In the command mode, press: (English colon) to enter the bottom line command mode.
The bottom line command mode can input single or multiple character commands, and there are many available commands.
In the baseline command mode, the basic commands are (colon has been omitted):
	q Exit program
	w Save file
	wq Save and exit
Press ESC Key to exit the bobbin thread command mode at any time.
7.2 example
Create a new file named lina03.txt:
vim lina03.txt
Directly entering the VIM file name will directly enter the command mode of vim.
PS: vim must be followed by the file name, whether the file exists or not!

Press i to enter the input mode (also known as edit mode) and start editing text
In the command mode, just press i, o, a and other characters to enter the input mode!
In the input mode, you can find the word - INSERT - in the status bar in the lower left corner, that is, you can input any character
Tips.
At this time, all keys on the keyboard except Esc can be regarded as general input buttons, so you can enter
Edit any line.
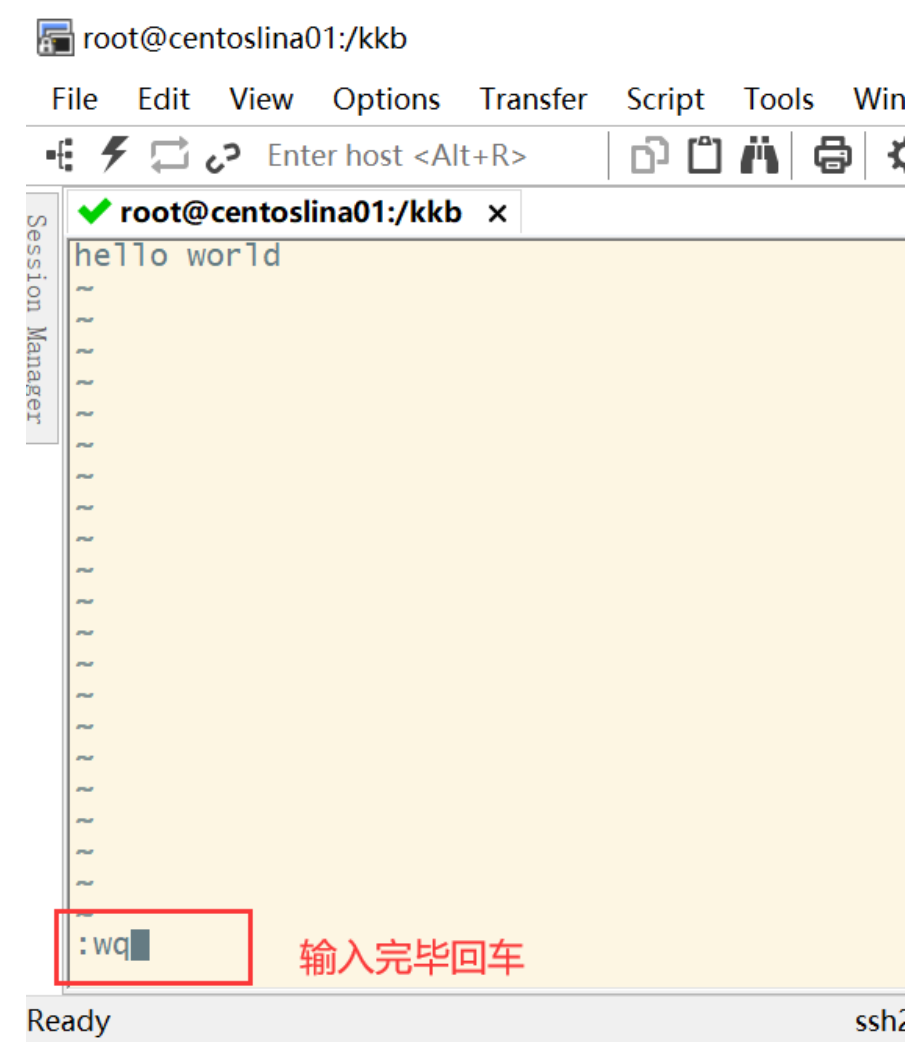
Enter Hello worked, press ESC button to return to command mode, and – INSERT – in the lower left corner of the screen disappears.
Enter: wq in the command mode to keep the document and leave vim
| instructions | explain |
|---|---|
| :w | Write the edited data to the hard disk file (common) |
| :w! | If the file attribute is "read only", the file is forced to be written. However, whether it can be written or not depends on your file permissions for the file! |
| :q | Leave vi (common) |
| :q! | use! Do not save files for forced exit. |
| :wq | Leave after storage, if: wq! Leave after forced storage (common) |
| :set number | set number |
| :set nonumber | Cancel line number display |
8. File permissions for Linux
The management of permissions in Linux operating system is very strict. Linux system not only manages users and groups according to uid and GID, but also
Files in the Linux system are classified according to users and groups, and permission management is carried out for different groups to determine who can pass what
Two ways to access and operate files and directories.
8.1 file permissions
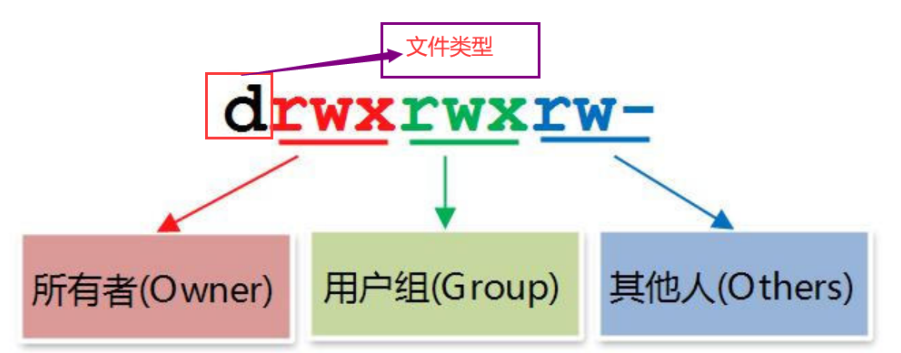
Permission has 10 characters in total. We divide it into four parts to understand:
- --- --- ---
Part 1. Indicates the type of document
	- Represents a file
	d Indicates a directory
	l Represents a connection (understood as a shortcut)
Part 2. Permissions of the current user on the file( owner Owner, abbreviation u)
Part 3. Permissions of other users in the current group on this file( group Genus group, abbreviation g)
Part 4. Permissions of users in other groups on this file( other Others, abbreviations o)
	r: Read read
	w: Write write
	x: eXecute implement
		Add execution permission to the directory, but not to the file (because the file has execution permission, there is a potential safety hazard)

	For files and directories, r,w,x It has different functions and meanings:
		For files: r: Read file contents
				w: Modify file content
				x: Execution permissions have little meaning for files other than binaries
		For directory: the directory can be regarded as a file storing file list, node number, etc
				r: View the list of files in the directory
				w: Delete and create files in the directory
				x: sure cd After entering the directory, you can view the detailed properties of the files in the directory and access the contents of the files in the directory (basic permissions)
PS: root The account is not restricted by the file permissions, and the execution permissions are restricted

The order in which a user obtains file permissions: first, check whether it is the owner; if so, the subsequent permissions will not be viewed; then, check whether it is the group to which it belongs; if not
If yes, the following permissions will not be viewed.
8.2 modify file permissions
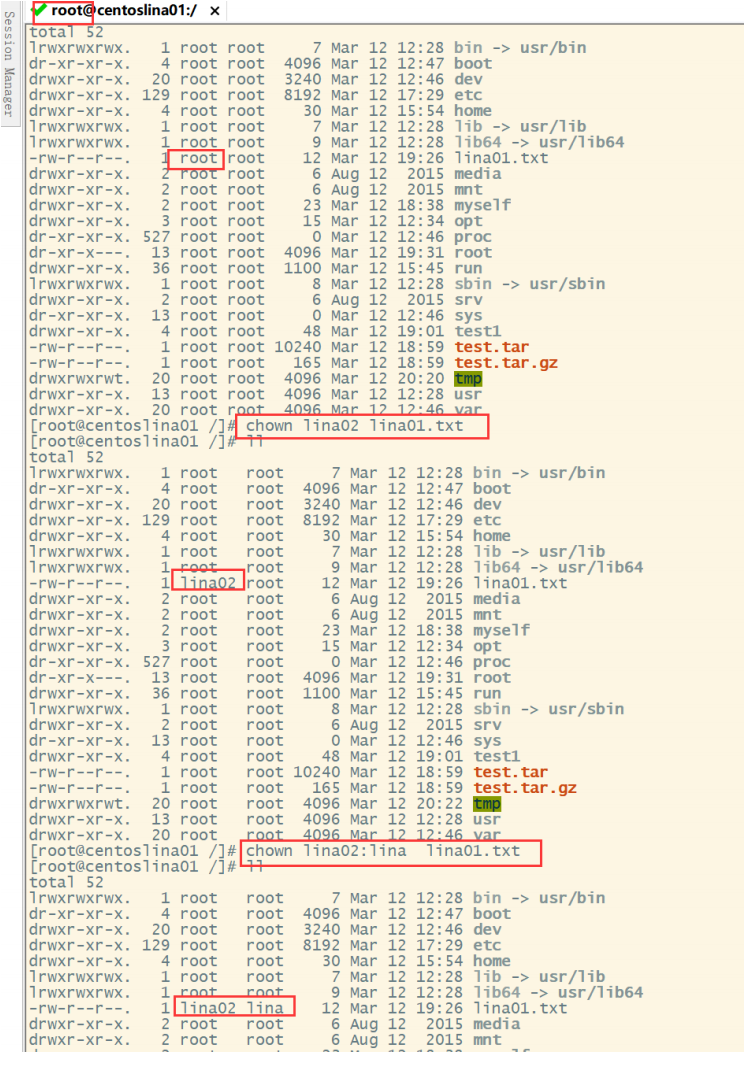
chown yes change owner The main function is to change the file or directory owner (only root (user has permission).(Specific examples are as follows)

chmod Modify file and folder read / write execution properties. Use permissions:All users
chown Modify the user and user group properties of files and folders. Use permissions:root
8.2.1 mode mode
Syntax: chmod who opt per file(File name to modify (last)
	who: u g o a(all)(u user user ,g User group group,o Other users,a All users default)
	opt: +Append a permission –Cancel a permission =Re grant permissions
	per: r w x X
Example:
	chmod u=rwx,g=r lina03.txt
	chmod u+x,g+w,o+w test.log //r read, w write, x execute
8.2.2 digital mode
Syntax: chmod XXX file
	rwx rw- r–-
	421 420 400
	7 	6 	4
	0 No permission,1 Table executable=x,2 Table write permission=w,4 Table readable permissions=r
For example:-rwxr--r--. 1 root root 10 Oct 16 02:55 yhp.log
	User rights=rwx=4+2+1=7
	Group permissions=r--=4+0+0=4
	Other user permissions=r--=4+0+0=4
	combination:744
	Therefore, the modified statement becomes: chmod 744 file name
 Modify permissions:
	Add write permission to all:+2
	Add write permission to user group:+2
	Add executable permissions to other users:+1
	chmod 765 yhp.log
Modify userId (file owner) and groupId (file group) instances:
9. Linux common network operations
9.1 hostname operation
hostname :Display host name
hostname XXX : Modifying the host name is not recommended and takes effect temporarily
The host name that is permanently effective needs to be modified/etc/sysconfig/network file
9.2 query the complete information of the system
uname -a : Display complete system information
9.3 IP address operation (modify the IP address of the current virtual machine)
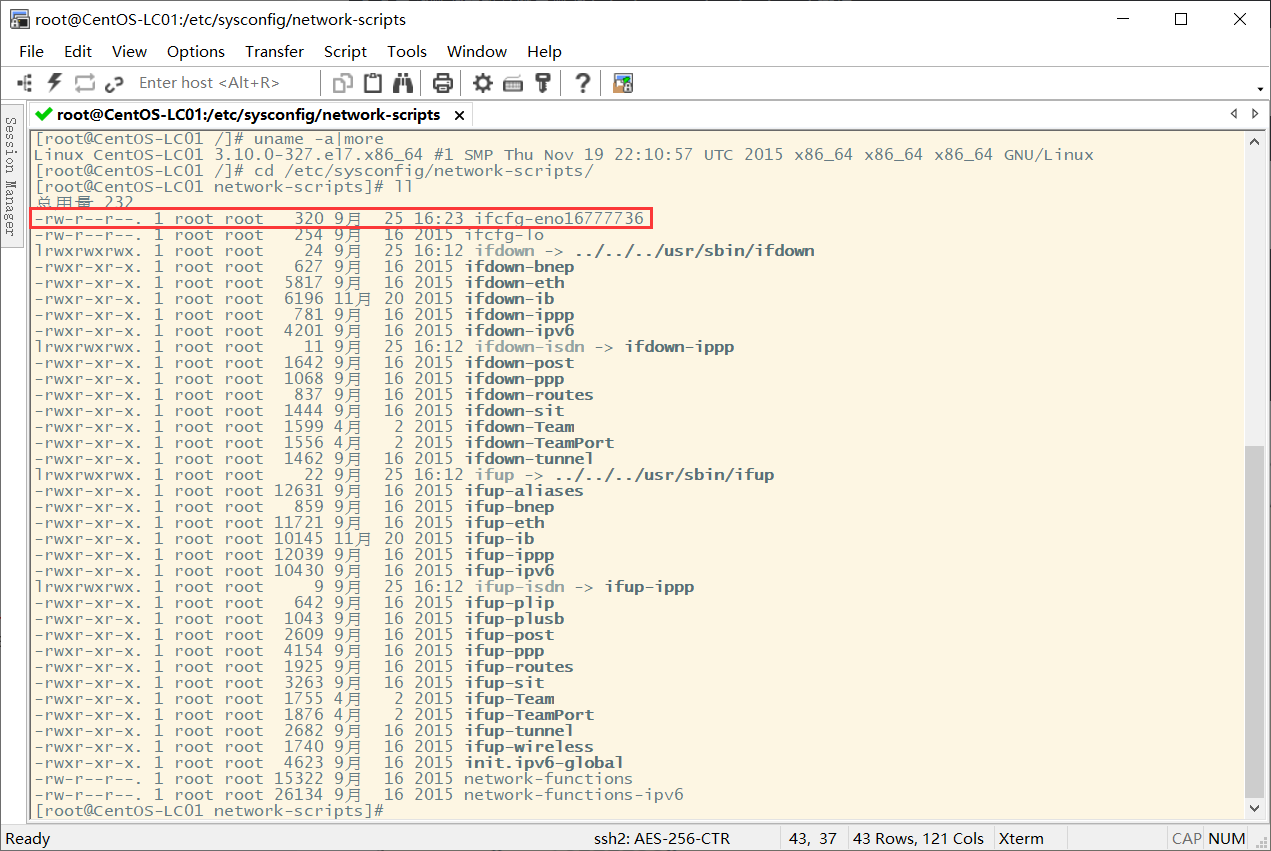
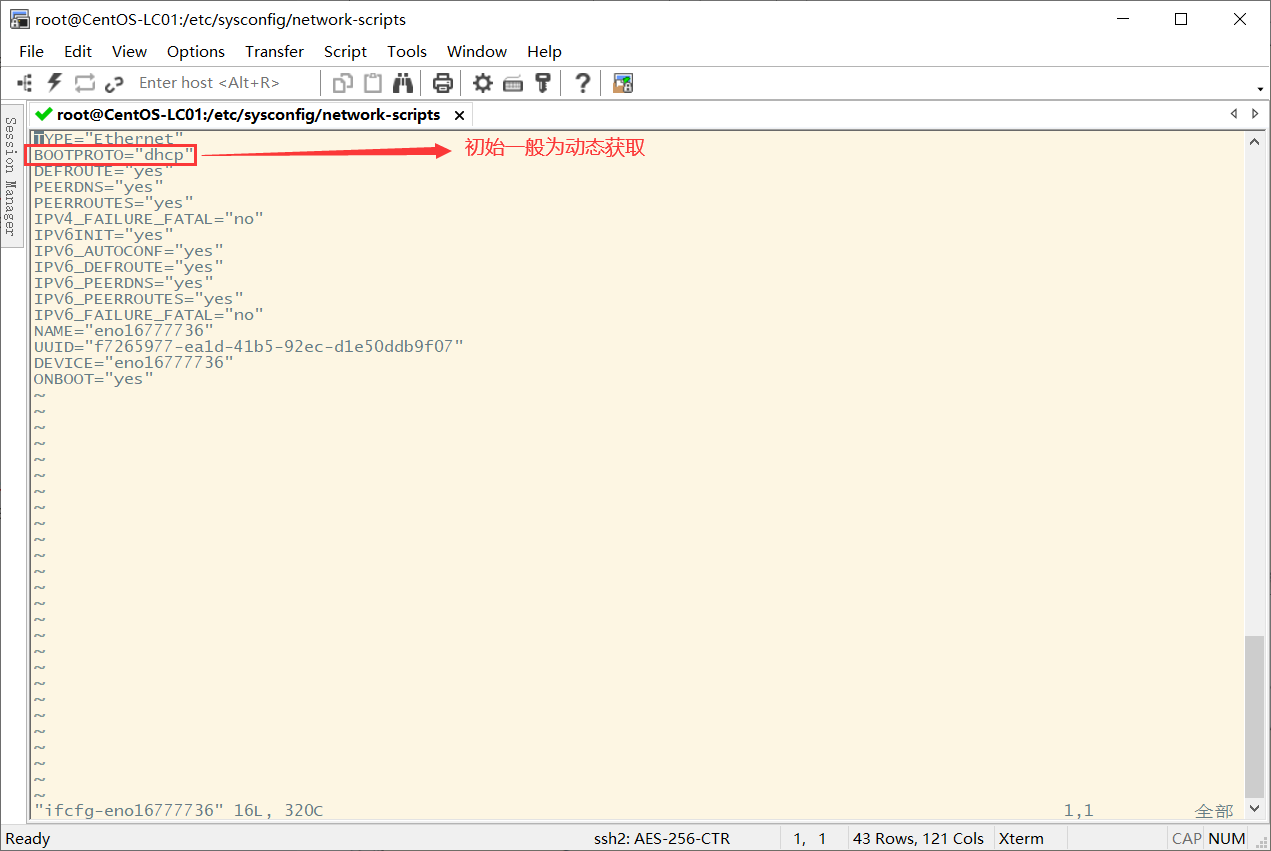
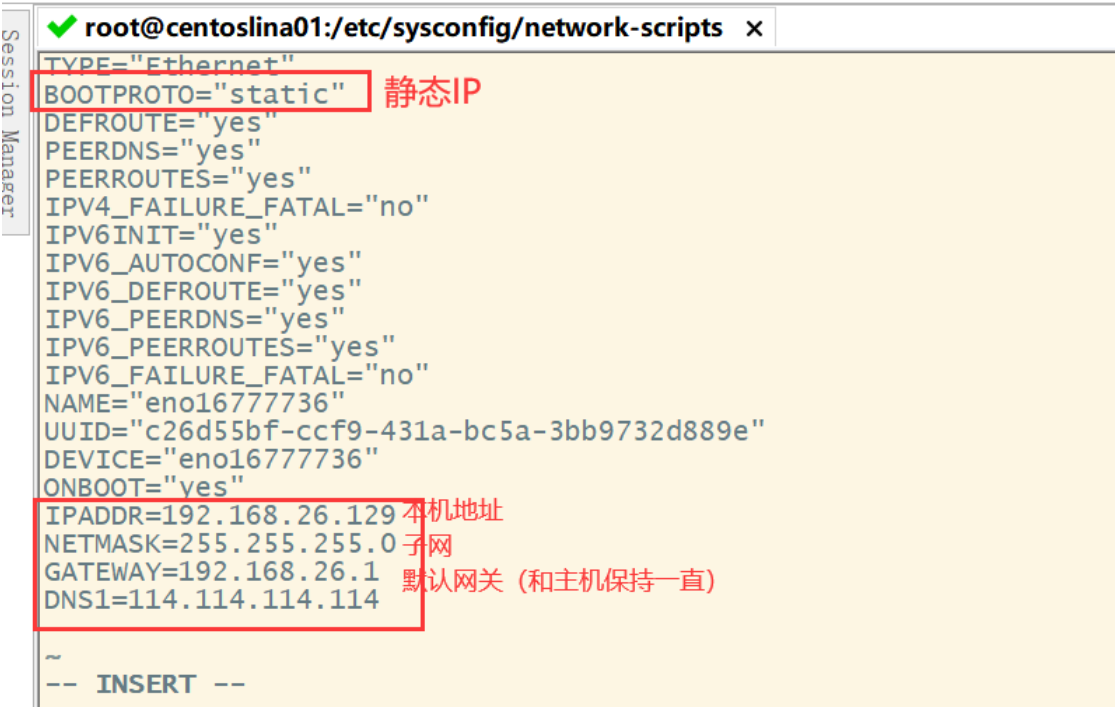
see IP Address: ip addr
modify IP Address:
First go to the following directory
cd /etc/sysconfig/network-scripts/
Then edit the corresponding contents in the file in the following figure:
vim ifcfg-eno16777736
The second attribute needs to be changed to static
Then add the following after the last line of the original file
After modifying the IP address, restart the network service with the following command:
service network restart
After restart, the IP address connected to the original remote tool should also be modified.
9.4 domain name mapping
Modify the / etc/hosts file
9.5 network service management
To view network service status: systemctl status network
Start network service: systemctl start network
Stop network service: systemctl stop network (This will cause the remote tool to be unable to connect to the virtual machine)
Restart network service: systemctl restart network
Set startup: systemctl enable network
9.6 firewall settings
View firewall status: systemctl status firewalld
Start firewall: systemctl start firewalld
Turn off the firewall: systemctl stop firewalld
Query whether the firewall service is started: systemctl is-enabled firewalld
Enable firewall service at power on: systemctl enable firewalld
Disable firewall service at power on: systemctl disable firewalld
Query the list of started services: systemctl list-unit-files|grep enabled
Query the list of services that failed to start: systemctl --failed
10. Deploying Web projects on Linux
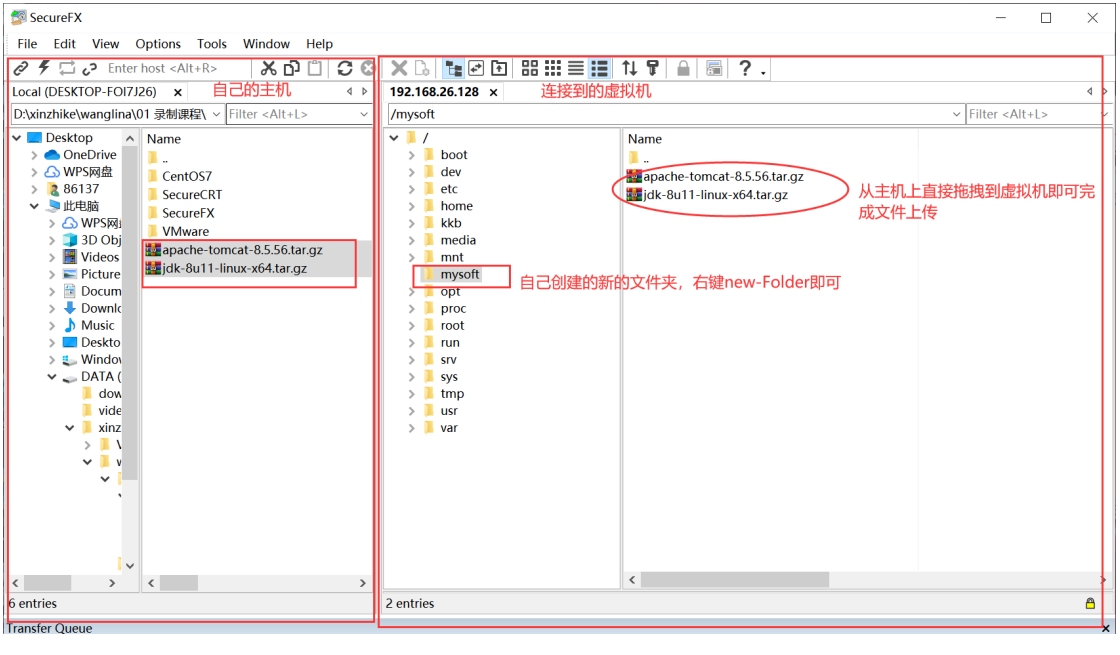
10.1 use of remote upload tools (SecureFX, Xftp, etc.)
The SecureFX remote upload tool is used here
After opening the software:
10.2 installing JDK
1. Upload jdk files to linux
After using SecureFX to connect to linux, upload the JDK compressed package to the new mysoft folder. The steps are above
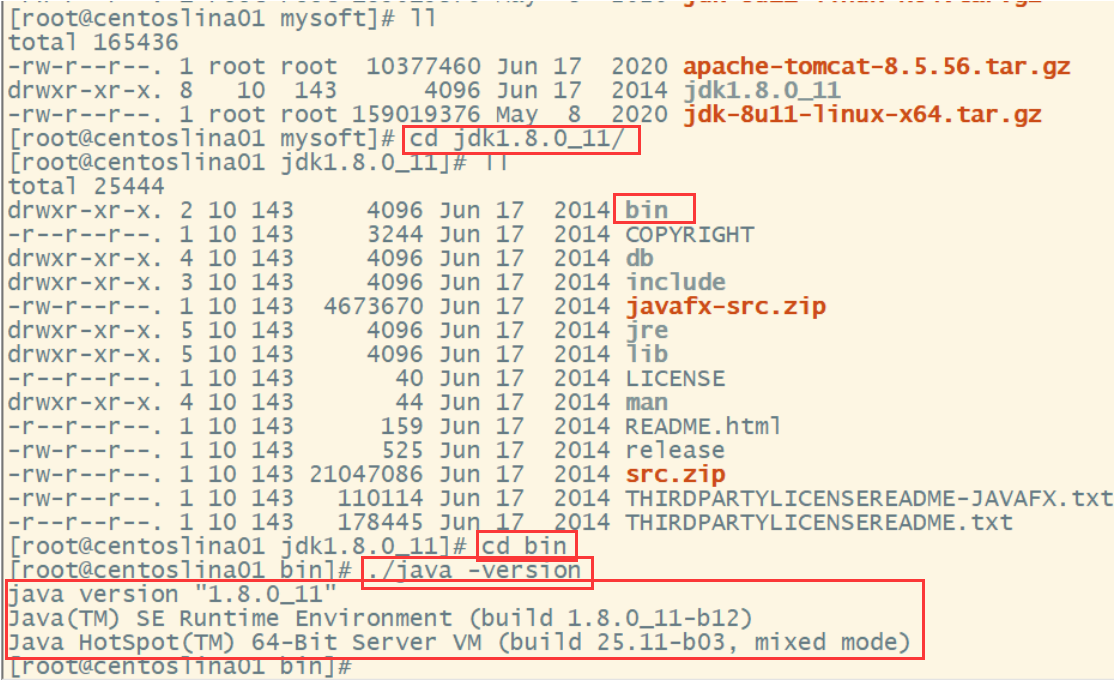
2. Unzip the package

After decompression, one more jdk file will appear in the original directory

3. Test whether the jdk is installed successfully
Note: This is run in the bin directory of the jdk. And the java command is preceded by '. /'
4. Configure environment variables
(1) Edit profile file:

(2) Add java to the profile file_ Home variable (from root / index to jdk file):

(3) Make environmental variables effective in time

(4) Check whether the variable is successfully updated:

(5) Test whether the environment is successfully configured in any directory

10.3 install Tomcat (available after decompression)
Before installing Tomcat, ensure that the JDK installation is successful!
1. Upload the Tomcat compressed package to the mysoft folder in the root directory. The steps are above
2. Unzip: tar -xzvf apache-tomcat-8.5.11.tar.gz

After decompression, the corresponding file appears:

3. Start Tomcat

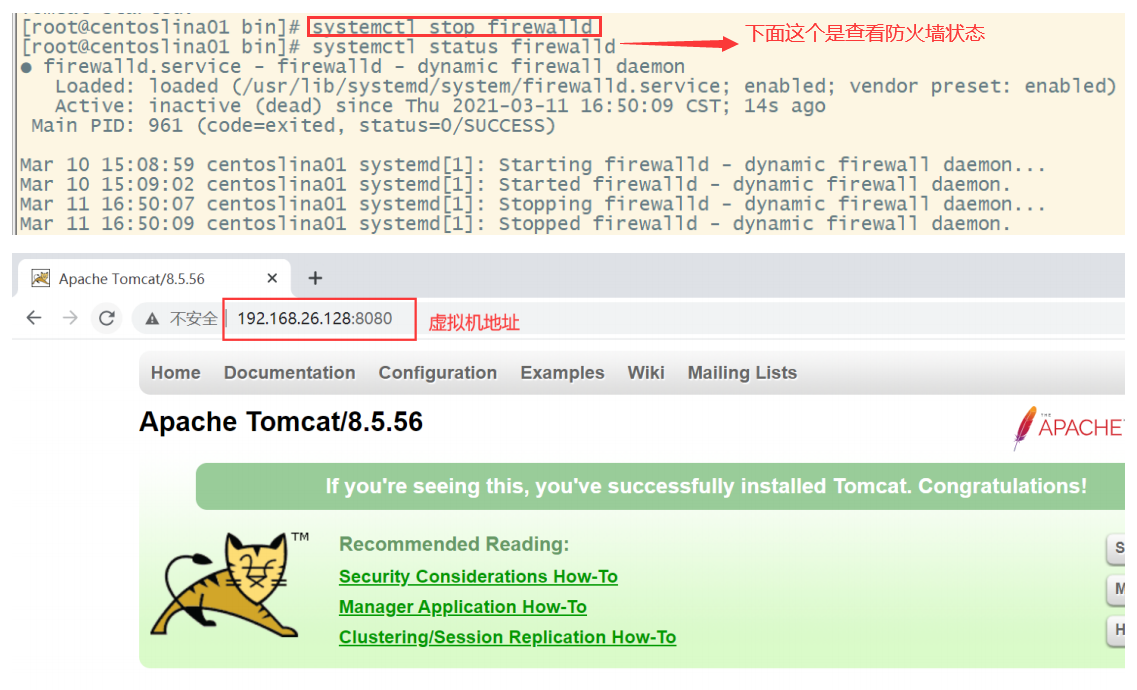
4. Test access after turning off the firewall (the firewall may prevent Tomcat from accessing the port it wants to use)
Note that it is accessed locally, not in the virtual machine (Port 8080 is accessed by default)
5. Close Tomcat

10.3.1 deploying projects on Tomcat
First, print the project into a war package, and then upload the war package to the webapps directory in the Tomcat file (the upload steps are the same as before):

Then you can access it locally or elsewhere through IP address + path (Tomcat has to be started first).
10.4 installing MySQL
YUM (Yellow dog Updater, Modified) is a Shell front-end package manager in Fedora, RedHat and CentOS.
Based on RPM package management, it can automatically download and install RPM packages from the specified server, and can automatically handle dependencies without complexity
Easily download and install again and again.
Step 1: check whether mysql is installed in the system
[root@centoslina01 ~]# yum list installed | grep mysql

Step 2: if mysql is installed in the system, you can delete mysql and its dependencies (to prevent conflicts in subsequent installations)
[root@centoslina01 ~]# yum -y remove mysql-libs.x86_64

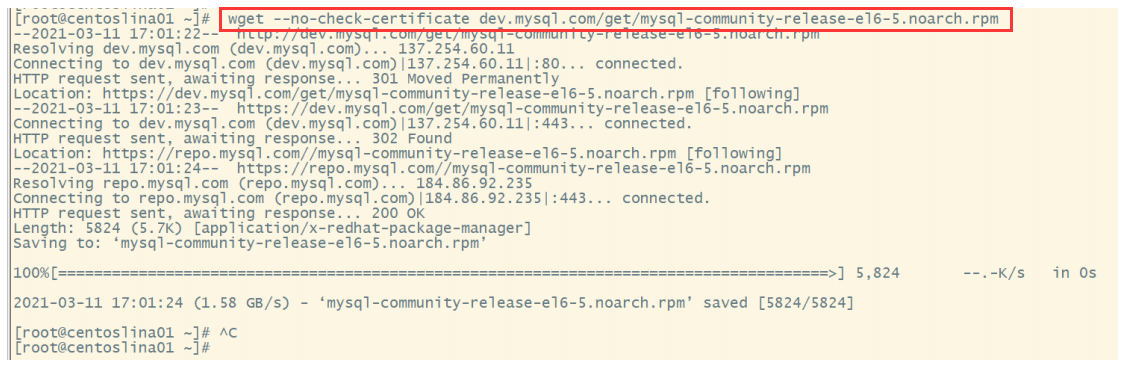
Step 3: add RPM source to CentOS, and select a newer source, abbreviated as RPM package manager
[root@centoslina01 ~]# wget --no-check-certificate dev.mysql.com/get/mysql-community-release-el6-5.noarch.rpm
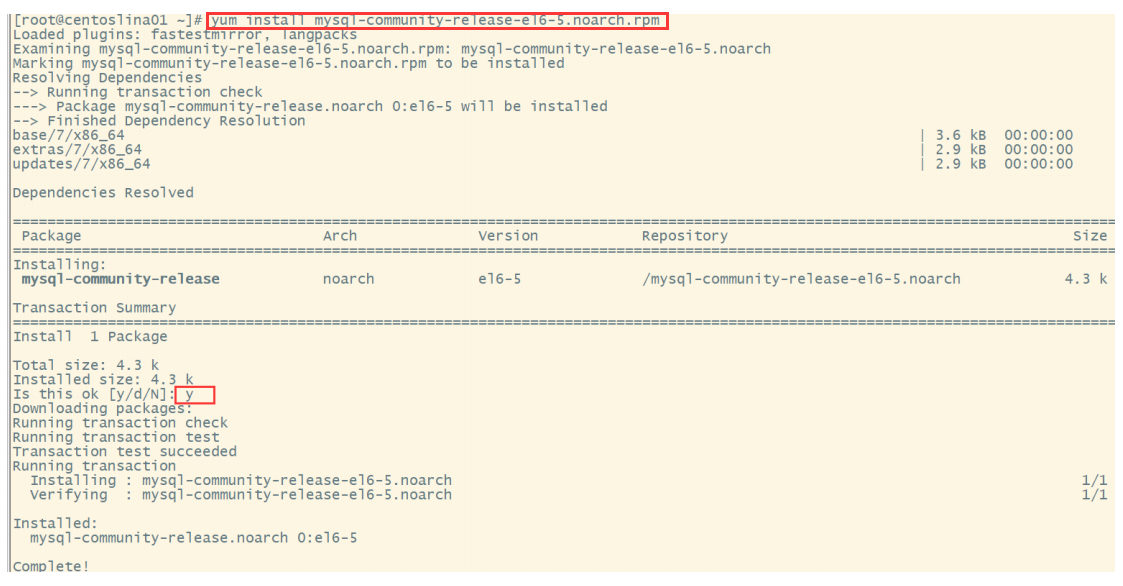
Step 4: install the rpm file downloaded in step 1
[root@centoslina01 ~]# yum install mysql-community-release-el6-5.noarch.rpm
You need to enter "y" here
[ root@centoslina01 ~]#Yum repolist enabled | grep MySQL / / list all your yum repo files

Step 5: install mysql using yum or up2date
[root@centoslina01 ~]# yum install mysql-community-server
Enter "y" here 3 times
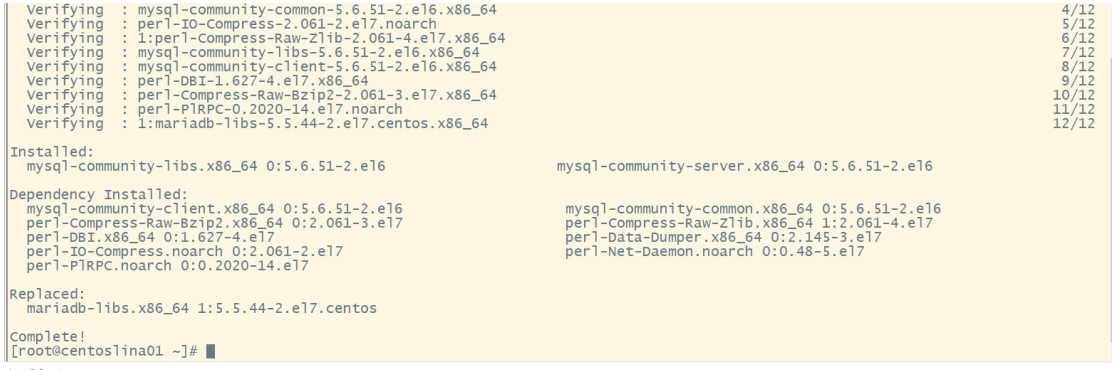
Installation complete
Step 6: start mysql service
[root@centoslina01 ~]# service mysqld start

Step 7: check whether mysql starts automatically, and set to start automatically
[root@centoslina01 ~]# chkconfig --list | grep mysqld
0 1 2 3 4 5 6 represents centOS startup status
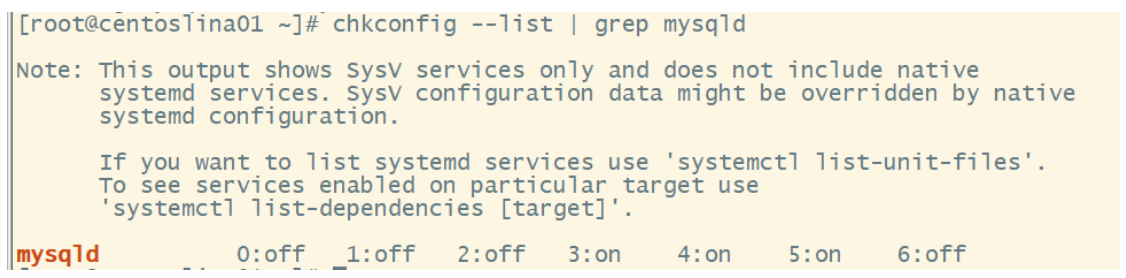
[root@centoslina01 ~]# chkconfig mysqld on

Step 8: modify the character set to UTF-8
[root@centoslina01 ~]# vim /etc/my.cnf
In the [mysqld] section, add:
character-set-server=utf8
Add a new [client] paragraph at the end of the file, and add in the [client] paragraph:
default-character-set=utf8
esc exit edit: wq save exit
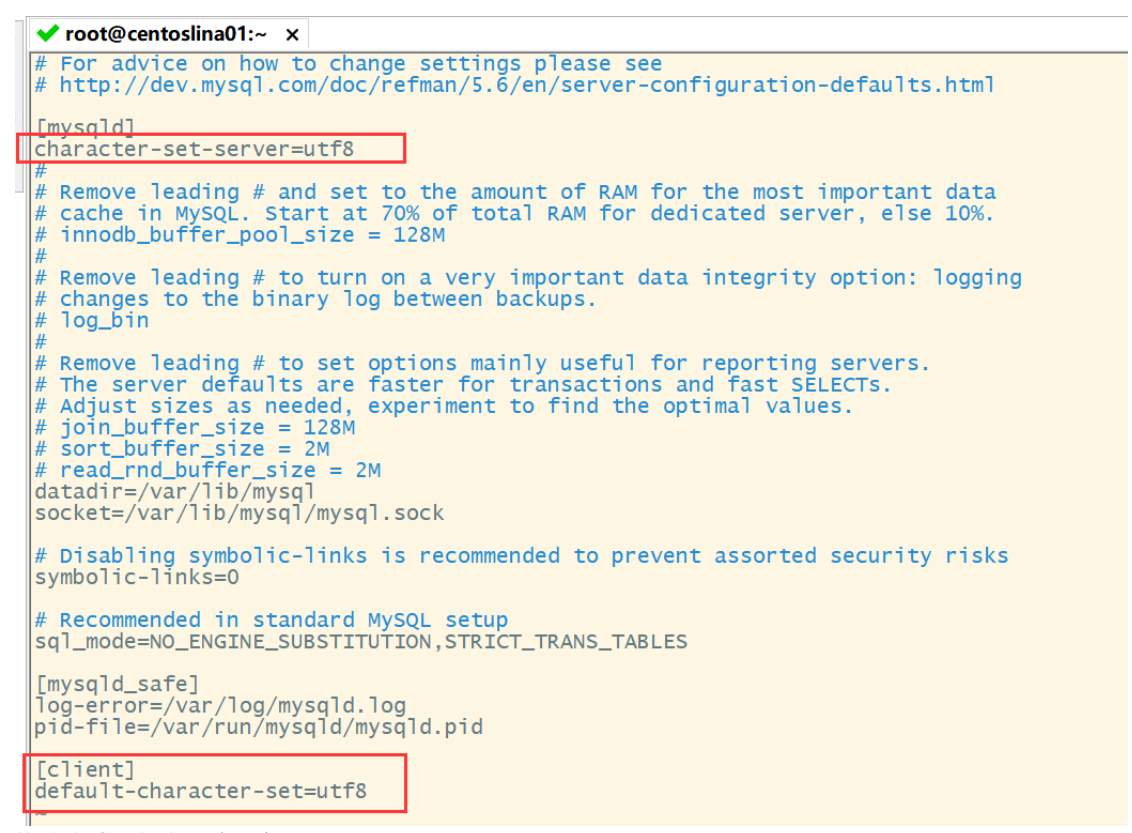
Save and restart the service after modification
[root@centoslina01 ~]# service mysqld restart
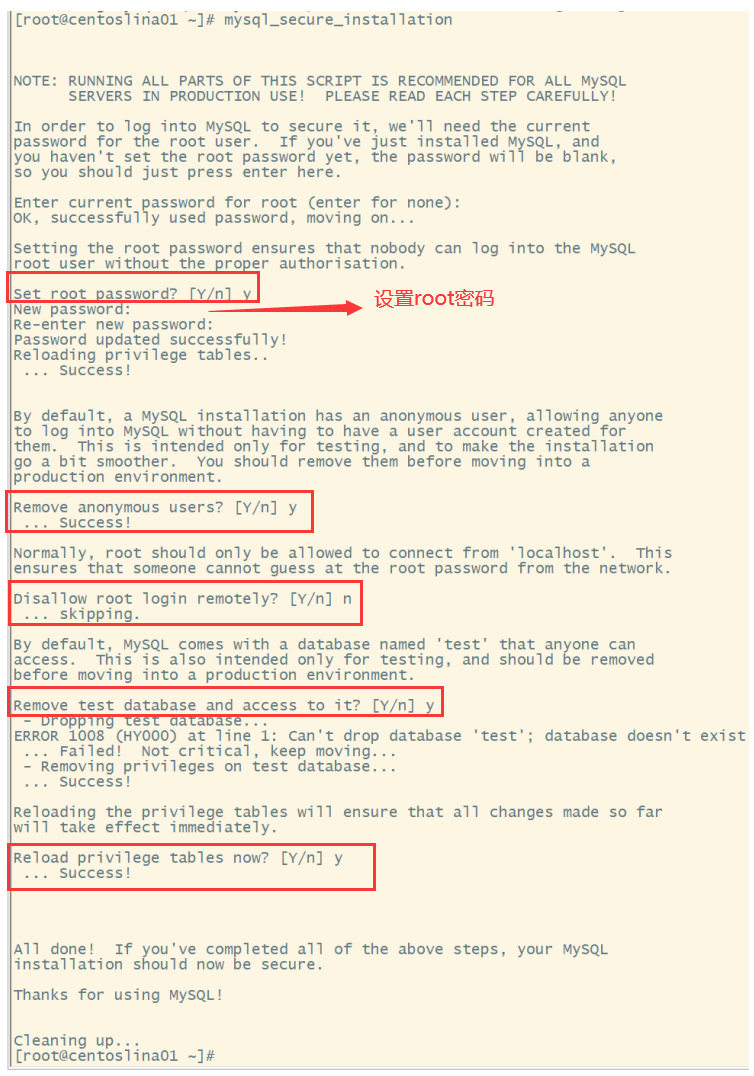
Step 9: modify the default configuration
[root@centoslina01 ~]# mysql_secure_installation
Configure according to the prompts. The default password of root user here is blank. Just press enter. Enter here: "y", "y", "n", "y", "y"
Step 10: authorize remote login (for example, access the database on the virtual machine with Navicat on the local machine)
Implement remote connection (this table + authorization) - change the permission to ALL PRIVILEGES
[root@centoslina01 ~]# mysql -uroot -p
mysql> use mysql;
Database changed
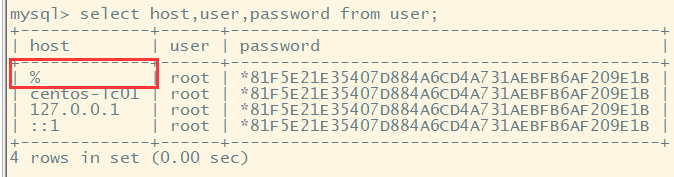
mysql> select host,user,password from user;
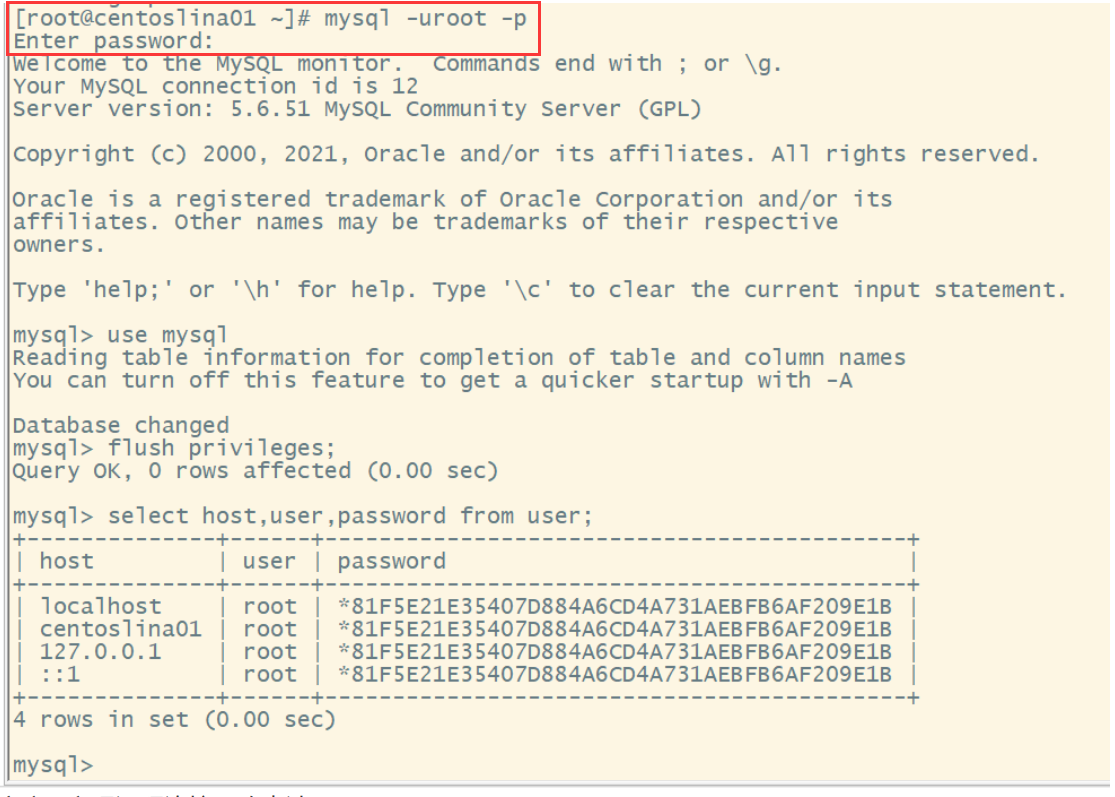
The above table specifies the hostname that can remotely access the current database. It can be found that only the specified hostname can be accessed. Let's expand the accessible hostname.
Note that the permission is changed to be accessible to all hosts, because it is changed to%
use mysql;
update user set host = '%' where user = 'root' and host='localhost';

Contents of expanded user table:
After expanding the accessible host name, we give it permission (here is to give permission to%):
GRANT ALL PRIVILEGES ON *.* TO 'username'@'%' IDENTIFIED BY 'password' WITH GRANT OPTION;
Last refresh:
flush privileges;
//After MySQL newly sets the user or changes the password, flush privileges is required to refresh the system permission related table of MySQL, otherwise rejection will occur
visit
In this way, Mysql can be accessed remotely through the root user
10.4.1Mysql solutions to problems in remote connection:
Check whether the firewall is closed (including local and virtual machines);
Is it an authorization issue:
GRANT ALL PRIVILEGES ON *.* TO 'username'@'%' IDENTIFIED BY 'password' WITH GRANT OPTION;
Whether flush privileges;
Shortcut summary
1. Enter some file names (or directory names) in a directory, and then press Tab to automatically fill the fuzzy matching file names (or directory names) into the input.