Linux journey 19: startup process, module management and loader

Source: pexels
Linux startup process analysis
Start up process list
Generally, the startup process of the operating system can be divided into the following steps:
- Load BIOS to get hardware information and perform self-test, so that you can get the first bootable device.
- Read and execute the boot boot program (grub2, spfdisk, etc.) in the MBR of the first bootable device.
- Load the Kernel according to the settings of the boot program. The Kernel performs hardware detection and loads the required drivers and modules.
- The Kernel starts the system D process and prepares the operating system environment in the default.target mode:
- systemd executes systeminit.target to initialize the system
- systemd executes basic.target to prepare the basic operating system environment
- systemd starts the local and server services under multi-user.target
- systemd executes the / etc/rc.d/rc.local file under multi-user.target
- systemd executes getty.target and login services under multi-user.target
- systemd services required to execute graphical
BIOS, boot loader and Kernel loading
BIOS, startup self detection and MBR/GPT
After the operating system starts, the first thing is to load BIOS (Basic Input Output System), load CMOS information through BIOS, and read various hardware information of the host from the information set in CMOS.
Detailed information about BIOS and CMOS can be read What are BIOS and CMOS? Teach you about BIOS and CMOS!.
The first available boot device can be obtained from CMOS (that is, the boot sequence list that will be modified in BIOS when we reinstall the system), and then the boot loader (boot loader) will be obtained from the MBR partition of the first boot device. If it is a multi-system, the boot loader in MBR may also be used to load the boot loader in other partitions, Then start the specific operating system.
boot loader
If only one operating system is installed on a disk, its boot loader is in the MBR of the disk, that is, the first sector of the whole disk. In case of multiple systems, the boot loader of each system will be saved in the first sector (boot sector) of the partition where the system is located, while the boot loader in MBR is only used to transfer the boot work. After the user selects which system to start, the system boot work will be transferred to the boot loader of the corresponding system for execution. The whole process can be represented by the following figure:
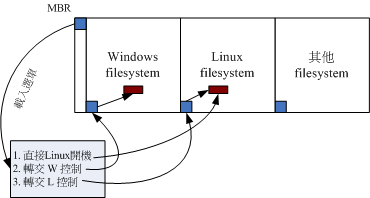
Source: Bird's private dishes
Therefore, the boot loader has the following functions:
- Provide menu: the user can choose which option to start (for single system, startup items such as rescue mode can also be provided)
- Load kernel file: directly load kernel related files into memory
- Transfer the startup work to other loaders: if it is a multi system, the boot loader in MBR will transfer the specific startup work to the boot loader of the corresponding operating system.
Different operating systems use different file systems. For example, Linux uses xfs and windows uses fat, so the boot loader used will be different. However, the boot loader behavior of windows is relatively simple and does not have the function of transferring startup work to the boot loader of non Windows systems. Moreover, no options are provided when installing windows, and the boot loader will be written to the MBR. As a result, as long as windows is installed, no matter whether other operating systems are installed in other partitions, it can no longer be started by boot loader, and only windows can be started. Therefore, if you want to install multiple systems, such as windows and Linux, you'd better install windows first and then Linux. Use the boot loader of Linux to provide loading options for multiple operating systems.
Loading kernel detection hardware and initramfs functions
The Linux kernel related files are placed in / boot and are generally saved in / boot/vmlinuz:
[icexmoon@xyz ~]$  ls --format=single-column -F /boot
config-3.10.0-1160.el7.x86_64 # Related configuration when compiling kernel
efi/
grub/
grub2/ # Related files of boot loader grub2
initramfs-0-rescue-f5a85e92d51e4d40975fd956fd775f9c.img # Virtual file system used during rescue
initramfs-3.10.0-1160.el7.x86_64.img # A virtual file system that is normally used when booting
symvers-3.10.0-1160.el7.x86_64.gz
System.map-3.10.0-1160.el7.x86_64
testing.img
vmlinuz-0-rescue-f5a85e92d51e4d40975fd956fd775f9c* # Kernel file for rescue
vmlinuz-3.10.0-1160.el7.x86_64* # Kernel file
After the kernel file is loaded, you can only directly use the relevant functions in the kernel. The functions not in the kernel should be loaded in the form of "kernel modules", which are saved in the / lib/modules directory.
It is quite troublesome to directly add or modify the functions in the kernel, and the kernel needs to be recompiled. Therefore, generally speaking, the functions that can be made into "kernel modules" will be made into modules. In this way, it will be much simpler to add or modify. As long as the kernel mounts the corresponding modules, there is no need to recompile the kernel. However, there will be a new problem, that is, the directory / lib/modules where the kernel module is located is in the same partition as the root directory / and Linux will only mount the partition where the kernel is located after loading the kernel. What's more, the file system drivers currently mainly used such as xfs are provided in the form of modules and are not directly compiled in the kernel, The kernel needs to load the root directory partition using the xfs file system before it can read the module, which becomes a problem of chicken and egg.
Fortunately, Linux provides something called virtual file system (Initial RAM Disk or initial ram file system). This is a compressed file saved in / boot, which contains some necessary modules for the kernel, such as file system or disk driver. The kernel will first decompress the virtual file system into memory and use it as the root directory to load the necessary modules, and then you can load the file system where the "real" root directory is located. After loading, it will replace the virtual file system.
Next, actually decompress the virtual file system in the system to see its composition. Because the compressed package format of CentOS 7 virtual file system is relatively special, please refer to it here centos7 initramfs unpacking Write a unpacking script:
initramfs_file=$(ls -a /boot/initramfs-$(uname -r).img)
tmp_home='/tmp/initramfs'
if [ ! -d $tmp_home ]
then
        mkdir $tmp_home
fi
initramfs_tmp="${tmp_home}/initramfs_file"
if [ ! -f $initramfs_tmp ]
then
        cp $initramfs_file ${initramfs_tmp}
fi
/usr/lib/dracut/skipcpio $initramfs_tmp | zcat | cpio -id
Run this script to unpack:
[root@xyz initramfs]# sh unzip_initramfs.sh
128811 block
[root@xyz initramfs]# ll
 Total consumption 31352
lrwxrwxrwx.  1 root root        7 9 July 22:00 bin -> usr/bin
drwxr-xr-x.  2 root root       45 9 July 22:00 dev
drwxr-xr-x. 12 root root     4096 9 July 22:00 etc
lrwxrwxrwx.  1 root root       23 9 July 22:00 init -> usr/lib/systemd/systemd
-rw-------.  1 root root 32089078 9 July 22:00 initramfs_file
lrwxrwxrwx.  1 root root        7 9 July 22:00 lib -> usr/lib
lrwxrwxrwx.  1 root root        9 9 July 22:00 lib64 -> usr/lib64
drwxr-xr-x.  2 root root        6 9 July 22:00 proc
drwxr-xr-x.  2 root root        6 9 July 22:00 root
drwxr-xr-x.  2 root root        6 9 July 22:00 run
lrwxrwxrwx.  1 root root        8 9 July 22:00 sbin -> usr/sbin
-rwxr-xr-x.  1 root root     3117 9 July 22:00 shutdown
drwxr-xr-x.  2 root root        6 9 July 22:00 sys
drwxr-xr-x.  2 root root        6 9 July 22:00 sysroot
drwxr-xr-x.  2 root root        6 9 July 22:00 tmp
-rw-r--r--.  1 root root      302 9 July 21:59 unzip_initramfs.sh
drwxr-xr-x.  7 root root       66 9 July 22:00 usr
drwxr-xr-x.  2 root root       29 9 July 22:00 var
systemd
systemd is the first service process started after the system kernel is started. Its function is to prepare a basic operating system running environment, including host name, network setting, language setting, file system format, etc. all of these are realized through a default startup service set, default.target.
target and runlevel
As we said before, the current service management mechanism systemd is different from the previous system V. previously, runlevel was used to distinguish system modes, but now target is used. For compatibility reasons, systemd maps some previous runlevels to some targets:
[icexmoon@xyz ~]$ ll -d /usr/lib/systemd/system/runlevel*.target | cut -c 41-
/usr/lib/systemd/system/runlevel0.target -> poweroff.target
/usr/lib/systemd/system/runlevel1.target -> rescue.target
/usr/lib/systemd/system/runlevel2.target -> multi-user.target
/usr/lib/systemd/system/runlevel3.target -> multi-user.target
/usr/lib/systemd/system/runlevel4.target -> multi-user.target
/usr/lib/systemd/system/runlevel5.target -> graphical.target
/usr/lib/systemd/system/runlevel6.target -> reboot.target
Therefore, the previous command init x for operating system mode conversion can still be used, and its corresponding relationship with systemctl command is:
| SystemV | systemd |
|---|---|
| init 0 | systemctl poweroff |
| init 1 | systemctl rescue |
| init [234] | systemctl isolate multi-user.target |
| init 5 | systemctl isolate graphical.target |
| init 6 | systemctl reboot |
Processing flow of systemd
systemd will prepare a basic operating system environment by starting default.target Linux journey 17: system services (daemons) We already know that default.target can have two options: graphical.target and multi-user.target. In fact, default.target is an alias to one of them.
Graphical.target is commonly used, and it contains multi-user.target. Therefore, it is assumed that the default.target used by the current Linux host is graphical.target.
Let's look at what graphical.target will do:
[root@xyz ~]# cat /usr/lib/systemd/system/graphical.target | grep -v '^#'

[Unit]
Description=Graphical Interface
Documentation=man:systemd.special(7)
Requires=multi-user.target
Wants=display-manager.service
Conflicts=rescue.service rescue.target
After=multi-user.target rescue.service rescue.target display-manager.service
AllowIsolate=yes
The more important settings are requirements and Wants. The former refers to the services to be started before starting graphical.target, and the latter refers to the services to be started after starting graphical.target.
It can be seen from here that the start order of related services is multi-user.target - > graphical. Target - > display-manager.service. Of course, the first two are targets, which are service sets, and the last one is simple services.
Now let's see what multi-user.target will do:
[root@xyz ~]# cat /usr/lib/systemd/system/multi-user.target | grep -v '^#'

[Unit]
Description=Multi-User System
Documentation=man:systemd.special(7)
Requires=basic.target
Conflicts=rescue.service rescue.target
After=basic.target rescue.service rescue.target
AllowIsolate=yes
You can see that to start multi-user.target, you need to start basic.target first.
Finally, let's take a look at the services installed by default that need to be loaded by multi-user.target:
[root@xyz ~]# ls /usr/lib/systemd/system/multi-user.target.wants/
dbus.service  plymouth-quit.service       systemd-ask-password-wall.path  systemd-update-utmp-runlevel.service
getty.target  plymouth-quit-wait.service  systemd-logind.service          systemd-user-sessions.service
User defined services that need to be loaded by multi-user.target include:
[root@xyz ~]# ls /etc/systemd/system/multi-user.target.wants/
abrt-ccpp.service    crond.service                          libstoragemgmt.service  postfix.service         sshd.service
abrtd.service        firewalld.service                      libvirtd.service        remote-fs.target        sysstat.service
abrt-oops.service    initial-setup-reconfiguration.service  mcelog.service          rhel-configure.service  tuned.service
abrt-vmcore.service  irqbalance.service                     mdmonitor.service       rngd.service            vdo.service
abrt-xorg.service    kdump.service                          ModemManager.service    rpcbind.service         vmtoolsd.service
atd.service          ksm.service                            NetworkManager.service  rsyslog.service         vsftpd2.service
auditd.service       ksmtuned.service                       nfs-client.target       smartd.service          vsftpd.service
In fact, if you set up a startup and self startup service, it will be added here in the form of soft connection, otherwise it will be deleted from here.
On the whole, the startup process of systemd is as follows:
- Start local-fs.target and swap.target: these two targets are mainly used to mount the file system and swap partition in the local / etc/fstab.
- Start sysinit.target: this target is used to detect the hardware and load the required kernel modules.
- Start basic.target: this target is used to set the basic operating system environment, including loading peripheral hardware drivers and firewalls.
- Start multi-user.target: this target is used to load other general systems or network services.
- Start the services related to the graphical interface, such as gdm.service.
sysinit.target
The main work of sysinit.target includes the following parts:
- Mounting of special file system devices: including dev-hugepages.mount, dev-mqueue.mount and other mounting services, which are mainly used for memory paging or message queuing.
- Enable special file systems: including disk array, network drive (iscsi), LVM file system, file system comparison service (multipath), etc.
- Information transfer and animation execution during startup: use plymouth service with plymouth command to transfer animation and information.
- The use of log files is the activation of the system D-JOURNAL service.
- Load additional kernel modules: let the kernel load additional kernel modules required by the administrator through the settings of / etc / modules load. D / *. Conf file.
- Load additional kernel parameter settings: including settings in / etc/sysctl.conf and / etc/sysctl.d/*.conf.
- Start the random number generator of the service: the random number generator can help the system perform some cryptographic operations.
- Set the font of the console.
- Start the dynamic device manager: udevd.
It mainly includes basic kernel functions, file system, file system, device driver, etc.
basic.target
basic.target mainly includes the following functions:
- Load alsa sound driver
- Load firewalld firewall: CentOS 7.x replaces iptables with firewalld
- Load CPU microinstructions
- Start and set the security context of SELinux.
- Write the information generated during the current startup process to / var/log/dmesg.
- The modules specified by the administrator are loaded in / etc/sysconfig/modules/*.modules and / etc/rc.modules.
- Load the timer function supported by systemd.
After basic.target is started, you will have a basic operating system, except for login services, network services, authentication services and other services.
multi-user.target
In fact, most of the daemon s running on the Linux host are powered on by multi-user.target, which can be confirmed by the following tests:
[root@xyz ~]# systemctl disable vsftpd.service
Removed symlink /etc/systemd/system/multi-user.target.wants/vsftpd.service.
[root@xyz ~]# systemctl enable vsftpd.service
Created symlink from /etc/systemd/system/multi-user.target.wants/vsftpd.service to /etc/systemd/system/vsftpd.service.
As you can see, it is realized by adding or deleting links in the multi-user.target.wants directory.
rc-local.service compatible with SystemV
In the past System V, the self startup program was implemented by directly modifying the file / etc/rc.d/rc.local, which is different from the new system D implementation.
In order to be compatible with the program self startup mode of SystemV, there is a rc-local.service service in systemd, which can execute the self startup program set in the rc.local file. The best thing is that although the service is not started by default, its startup mode is static, that is, whether to start or not depends on the results of some events:
[root@xyz ~]# systemctl status rc-local.service
● rc-local.service - /etc/rc.d/rc.local Compatibility
   Loaded: loaded (/usr/lib/systemd/system/rc-local.service; static; vendor preset: disabled)
   Active: inactive (dead)
In fact, rc-local.service will detect the rc.local file. If the file has execution permission, it will start automatically:
[root@xyz ~]# ll /etc/rc.d/rc.local
-rw-r--r--. 1 root root 473 10 February 2020 /etc/rc.d/rc.local
[root@xyz ~]# chmod a+x /etc/rc.d/rc.local
[root@xyz ~]# systemctl list-dependencies multi-user.target | grep rc-local
● ├─rc-local.service
graphical.target
graphical.target is easy to understand, which means that there are more graphics related services and programs than multi-user.target, such as window display manager (WDM, graphical interface manager), etc.
To learn more, you can view its dependencies:
[root@xyz ~]# systemctl list-dependencies graphical.target | head
graphical.target
● ├─accounts-daemon.service
● ├─gdm.service
● ├─initial-setup-reconfiguration.service
● ├─network.service
● ├─rtkit-daemon.service
● ├─systemd-readahead-collect.service
● ├─systemd-readahead-replay.service
● ├─systemd-update-utmp-runlevel.service
● ├─udisks2.service
One of the more important is gdm.service, which enables users to log in using the graphical interface.
Main configuration files used during startup
As for the additional modules that the kernel needs to load, there are two important configurations:
- /Etc / modules load. D / *. Conf: determines which modules the kernel should load
- /etc/modprobe.d/*.conf: determines which additional parameters to use when loading the module
For example, because we installed the FTP service vsftpd before, we may need to add an additional firewall module nf_conntrack_ftp:
[root@xyz ~]# ll /etc/modules-load.d/
Total consumption 0
[root@xyz ~]# vim /etc/modules-load.d/vsftpd.conf
[root@xyz ~]# cat /etc/modules-load.d/vsftpd.conf
nf_conntrack_ftp
Because we have added a special port 555 to the vsftpd service, we need to specify additional parameters when loading the module:
[root@xyz ~]# vim /etc/modprobe.d/vsftpd.conf
[root@xyz ~]# cat /etc/modprobe.d/vsftpd.conf
options nf_conntrack_ftp ports=555
Finally, test:
[root@xyz ~]# lsmod | grep nf_conntrack_ftp
[root@xyz ~]# systemctl restart systemd-modules-load.service
[root@xyz ~]# lsmod | grep nf_conntrack_ftp
nf_conntrack_ftp       18478  0
nf_conntrack          139264  8 nf_nat,nf_nat_ipv4,nf_nat_ipv6,xt_conntrack,nf_nat_masquerade_ipv4,nf_conntrack_ftp,nf_conntrack_ipv4,nf_conntrack_ipv6
Kernel and kernel module
In Linux, kernel related files or directories include:
- /boot/vmlinuz or / boot/vmlinuz version: Linux kernel file.
- /boot/initramfs or / boot/initramfs version: the packaged virtual file system.
- /lib/modules/version/kernel or / lib/modules/$(uname -r)/kernel: kernel module.
- /usr/src/linux or / usr/src/kernels: kernel source code (not installed by default)
- /proc/version: kernel version
- /proc/sys/kernel: system kernel functions
Kernel modules and dependencies
There are dependencies between kernel modules. In order to better manage these relationships, the file / lib/modules/$(uname -r)/modules.dep in Linux saves the dependencies between kernel modules.
This file does not need to be maintained manually. You can automatically check the module dependencies and generate the file by using the depmod command:
[root@study ~]# cp a.ko /lib/modules/$(uname -r)/kernel/drivers/net
[root@study ~]# depmod
Because I haven't learned the content of module compilation and can't load modules at will (which may lead to serious consequences), I don't practice here. I directly excerpted the examples in bird's private Linux dishes.
View kernel modules
Use lsmod to view the loaded modules in the kernel:
[root@xyz ~]# lsmod | head
Module                  Size  Used by
nf_conntrack_ftp       18478  0
xt_CHECKSUM            12549  1
ipt_MASQUERADE         12678  3
nf_nat_masquerade_ipv4    13463  1 ipt_MASQUERADE
tun                    36164  1
devlink                60067  0
ip6t_rpfilter          12595  1
ip6t_REJECT            12625  2
nf_reject_ipv6         13717  1 ip6t_REJECT
The output information has three fields:
- Module: module name
- Size: module size
- Used by: module dependencies (used by other modules)
To view module specific information:
[root@xyz ~]# modinfo tun
filename:       /lib/modules/3.10.0-1160.el7.x86_64/kernel/drivers/net/tun.ko.xz
alias:          devname:net/tun
alias:          char-major-10-200
license:        GPL
author:         (C) 1999-2004 Max Krasnyansky <maxk@qualcomm.com>
description:    Universal TUN/TAP device driver
retpoline:      Y
rhelversion:    7.9
srcversion:     E26A36A927427B2BAE3FB17
depends:
intree:         Y
vermagic:       3.10.0-1160.el7.x86_64 SMP mod_unload modversions
signer:         CentOS Linux kernel signing key
sig_key:        E1:FD:B0:E2:A7:E8:61:A1:D1:CA:80:A2:3D:CF:0D:BA:3A:A4:AD:F5
sig_hashalgo:   sha256
In addition to the above, you can use modinfo to view the specific information of the loaded kernel module, you can also directly view the unloaded module file, such as modinfo a.ko.
Loading and deleting kernel modules
You can manually load kernel modules using insmod:
[root@study ~]# insmod /lib/modules/$(uname -r)/kernel/fs/fat/fat.ko
[root@study ~]# lsmod | grep fat
fat                    65913  0
To remove a module:
[root@study ~]# rmmod fat
[root@study ~]# insmod /lib/modules/$(uname -r)/kernel/fs/fat/vfat.ko.xz
insmod: ERROR: could not insert module /lib/modules/3.10.0-229.el7.x86_64/kernel/fs/fat/
 vfat.ko.xz: Unknown symbol in module
Here I also have no practice and directly use the example in brother bird's private dishes.
It can be seen that because the module is dependent, it may fail due to the lack of dependent modules when loading the module. At this time, you can use the modprobe command to load the module. This command will check the module dependency in the modules.dep file, then load the dependent module first, and then load the specified module:
[root@xyz ~]# modprobe vfat
[root@xyz ~]# lsmod | grep vfat
vfat                   17461  0
fat                    65950  1 vfat
[root@xyz ~]# modprobe -r vfat
[root@xyz ~]# lsmod | grep vfat
modprove -r can delete modules.
Boot Loader:Grub2
boot loader
boot loader consists of two parts: program ontology and configuration file. The program ontology is saved in the MBR, but the configuration file is stored separately because the space in the MBR is limited. The configuration file of grub2 is saved in / boot/grub2:
[root@xyz ~]# ls -l /boot/grub2
 Total consumption 32
-rw-r--r--. 1 root root   84 7 June 24-14:45 device.map
drwxr-xr-x. 2 root root   25 7 June 24-14:45 fonts # Font file
-rw-r--r--. 1 root root 4309 7 June 24-14:47 grub.cfg # Main profile for grub2
-rw-r--r--. 1 root root 1024 7 June 24-14:47 grubenv
drwxr-xr-x. 2 root root 8192 7 June 24-14:45 i386-pc # grub2 module required for x86 computers
drwxr-xr-x. 2 root root 4096 7 June 24-14:45 locale # Language and coding
[root@xyz ~]# ls -l /boot/grub2/i386-pc/
Total consumption 2388
-rw-r--r--. 1 root root   9936 7 June 24-14:45 acpi.mod
-rw-r--r--. 1 root root   1316 7 June 24-14:45 adler32.mod
-rw-r--r--. 1 root root   5696 7 June 24-14:45 affs.mod
-rw-r--r--. 1 root root   6632 7 June 24-14:45 afs.mod
-rw-r--r--. 1 root root  15764 7 June 24-14:45 ahci.mod
-rw-r--r--. 1 root root    492 7 June 24-14:45 all_video.mod
-rw-r--r--. 1 root root   1028 7 June 24-14:45 aout.mod
-rw-r--r--. 1 root root   2932 7 June 24-14:45 archelp.mod
-rw-r--r--. 1 root root   5588 7 June 24-14:45 ata.mod
-rw-r--r--. 1 root root   4212 7 June 24-14:45 at_keyboard.mod
-rw-r--r--. 1 root root   1628 7 June 24-14:45 backtrace.mod
-rw-r--r--. 1 root root   7212 7 June 24-14:45 bfs.mod
-rw-r--r--. 1 root root   4556 7 June 24-14:45 biosdisk.mod
-rw-r--r--. 1 root root   2336 7 June 24-14:45 bitmap.mod
-rw-r--r--. 1 root root   3636 7 June 24-14:45 bitmap_scale.mod
-rw-r--r--. 1 root root   2160 7 June 24-14:45 blocklist.mod
...ellipsis
grub.cfg
grub2 has the following advantages:
- Multiple file systems can be recognized and supported
- You can edit and modify the startup setting options at startup
- You can dynamically find the configuration file, that is, after modifying the configuration file of grub2, you do not need to recompile and install grub2, and it will be loaded automatically after restarting
Codes of disks and partitions in grub2
The codes for locating disks and partitions in grub2 are different from those in Linux. Linux uses numbers such as sda1, while grub2 uses the following codes:
(hd0,1)         # General default syntax, and grub2 automatically determines the segmentation format
(hd0,msdos1)    # This disk is split into traditional MBR mode
(hd0,gpt1)      # The partition of this disk is in GPT mode
It should be noted that the disk number starts from 0. For example, the first disk is HD0, the second disk is hd1, and so on. The partition number on the disk starts from 1. For example, the first partition of the first disk is (hd0,1), the second partition is (hd0,2), and so on.
grub.cfg is the main configuration file of grub2:
[root@xyz ~]# cat /boot/grub2/grub.cfg | grep -v '^#' | grep -v '^$'
set pager=1
if [ -s $prefix/grubenv ]; then
  load_env
fi
if [ "${next_entry}" ] ; then
   set default="${next_entry}"
   set next_entry=
   save_env next_entry
   set boot_once=true
else
   set default="${saved_entry}"
fi
if [ x"${feature_menuentry_id}" = xy ]; then
  menuentry_id_option="--id"
else
  menuentry_id_option=""
fi
export menuentry_id_option
if [ "${prev_saved_entry}" ]; then
  set saved_entry="${prev_saved_entry}"
  save_env saved_entry
  set prev_saved_entry=
  save_env prev_saved_entry
  set boot_once=true
fi
function savedefault {
  if [ -z "${boot_once}" ]; then
    saved_entry="${chosen}"
    save_env saved_entry
  fi
}
function load_video {
  if [ x$feature_all_video_module = xy ]; then
    insmod all_video
  else
    insmod efi_gop
    insmod efi_uga
    insmod ieee1275_fb
    insmod vbe
    insmod vga
    insmod video_bochs
    insmod video_cirrus
  fi
}
terminal_output console
if [ x$feature_timeout_style = xy ] ; then
  set timeout_style=menu
  set timeout=5
else
  set timeout=5
fi
set tuned_params=""
set tuned_initrd=""
if [ -f ${prefix}/user.cfg ]; then
  source ${prefix}/user.cfg
  if [ -n "${GRUB2_PASSWORD}" ]; then
    set superusers="root"
    export superusers
    password_pbkdf2 root ${GRUB2_PASSWORD}
  fi
fi
menuentry 'CentOS Linux (3.10.0-1160.el7.x86_64) 7 (Core)' --class centos --class gnu-linux --class gnu --class os --unrestricted $menuentry_id_option 'gnulinux-3.10.0-1160.el7.x86_64-advanced-9cfac9d8-a7d6-46e5-86ff-5843cc384ae6' {
        load_video
        set gfxpayload=keep
        insmod gzio
        insmod part_gpt
        insmod xfs
        set root='hd0,gpt2'
        if [ x$feature_platform_search_hint = xy ]; then
          search --no-floppy --fs-uuid --set=root --hint-bios=hd0,gpt2 --hint-efi=hd0,gpt2 --hint-baremetal=ahci0,gpt2 --hint='hd0,gpt2'  3a6bd73c-8f36-4955-b079-b1e2501efc31
        else
          search --no-floppy --fs-uuid --set=root 3a6bd73c-8f36-4955-b079-b1e2501efc31
        fi
        linux16 /vmlinuz-3.10.0-1160.el7.x86_64 root=/dev/mapper/centos-root ro crashkernel=auto spectre_v2=retpoline rd.lvm.lv=centos/root rd.lvm.lv=centos/swap rhgb quiet LANG=zh_CN.UTF-8
        initrd16 /initramfs-3.10.0-1160.el7.x86_64.img
}
menuentry 'CentOS Linux (0-rescue-f5a85e92d51e4d40975fd956fd775f9c) 7 (Core)' --class centos --class gnu-linux --class gnu --class os --unrestricted $menuentry_id_option 'gnulinux-0-rescue-f5a85e92d51e4d40975fd956fd775f9c-advanced-9cfac9d8-a7d6-46e5-86ff-5843cc384ae6' {
        load_video
        insmod gzio
        insmod part_gpt
        insmod xfs
        set root='hd0,gpt2'
        if [ x$feature_platform_search_hint = xy ]; then
          search --no-floppy --fs-uuid --set=root --hint-bios=hd0,gpt2 --hint-efi=hd0,gpt2 --hint-baremetal=ahci0,gpt2 --hint='hd0,gpt2'  3a6bd73c-8f36-4955-b079-b1e2501efc31
        else
          search --no-floppy --fs-uuid --set=root 3a6bd73c-8f36-4955-b079-b1e2501efc31
        fi
        linux16 /vmlinuz-0-rescue-f5a85e92d51e4d40975fd956fd775f9c root=/dev/mapper/centos-root ro crashkernel=auto spectre_v2=retpoline rd.lvm.lv=centos/root rd.lvm.lv=centos/swap rhgb quiet
        initrd16 /initramfs-0-rescue-f5a85e92d51e4d40975fd956fd775f9c.img
}
if [ -f  ${config_directory}/custom.cfg ]; then
  source ${config_directory}/custom.cfg
elif [ -z "${config_directory}" -a -f  $prefix/custom.cfg ]; then
  source $prefix/custom.cfg;
fi
set default="${next_entry}" at the beginning is to set the default startup item, and set timeout=5 is to set the number of seconds to wait on the startup item selection page.
The startup item at startup corresponds to the configuration item menuentry in grub2.cfg. Menuentry 'CentOS Linux (3.10.0-1160. EL7. X86_64) 7 (core)' -- class CentOS -- class GNU Linux -- class GNU -- class OS -- unrestricted $menuentry_ id_ option 'gnulinux-3.10.0-1160.el7.x86_ 64-advanced-9cfac9d8-a7d6-46e5-86ff-5843cc384ae6 'contains the name of the startup item and command line parameters.
The following insmod gzio is the module required to load the launcher.
set root='hd0,gpt2 ', this is the root directory when setting the startup item. The relevant file paths in the startup item are relative to this root directory. For example, set root='hd0,gpt2', the root directory is the second partition (sda2) of the first disk, which is the GPT partition. initrd16 /initramfs-3.10.0-1160.el7.x86_64.img, which indicates that the image of the virtual file system used by the boot entry is located in / initramfs-3.10.0-1160.el7.x86 of sda2 partition_ 64.img, we know that sd2 is actually mounted to / boot after the system is fully started, so the actual corresponding here is / boot/initramfs-3.10.0-1160.el7.x86_64.img this file.
linux16 /vmlinuz-3.10.0-1160.el7.x86_64 this line of configuration is a Linux kernel file, which also needs to be located in combination with the subsequent setting of root=xxx.
grub2 profile
Although grub.cfg is the main configuration file of grub2, we'd better not modify it directly, because the modified file is usually generated automatically by reading the corresponding configuration file and directory through grub2 mkconfig. If we modify it directly in this file, it may be overwritten when it is generated automatically through grub2 mkconfig. Therefore, the normal way is to modify or add custom configuration in the specified configuration file and directory, and then use grub2 mkconfig to generate grub.cfg.
Let's look at these configuration files and directories.
/etc/default/grub
/etc/default/grub is the main environment configuration file of grub2:
[root@xyz ~]# cat /etc/default/grub
GRUB_TIMEOUT=5
GRUB_DISTRIBUTOR="$(sed 's, release .*$,,g' /etc/system-release)"
GRUB_DEFAULT=saved
GRUB_DISABLE_SUBMENU=true
GRUB_TERMINAL_OUTPUT="console"
GRUB_CMDLINE_LINUX="crashkernel=auto spectre_v2=retpoline rd.lvm.lv=centos/root rd.lvm.lv=centos/swap rhgb quiet"
GRUB_DISABLE_RECOVERY="true"
Some main environment variables in grub2 are set in this configuration file:
-
GRUB_TIMEOUT
This parameter is used to set the number of seconds to wait for the startup item selection page after startup. If you want to count down to 30 seconds, you can GRUB_TIMEOUT=30. If you don't want to wait, you can GRUB_TIMEOUT=0. If the user must manually select a startup item and start it manually, grub can be used_ TIMEOUT=-1.
-
GRUB_TIMEOUT_STYLE
This parameter is used to set whether the startup item selection page displays the menu:
- Menu: display menu
- Countdown: the menu is not displayed, but the countdown is displayed
- hidden: no menu or countdown is displayed
-
GRUB_TERMINAL_OUTPUT
This parameter sets which terminal is used to output grub2 interface. The optional values are console, serial, gfxterm and VGA_ Text, etc., usually console.
-
GRUB_DEFAULT
This parameter determines the default startup item. The available values include saved, number, title name, ID name, etc.
Suppose the current startup item setting is as follows:
menuentry '1st linux system' --id 1st-linux-system { ...}
menuentry '2nd linux system' --id 2nd-linux-system { ...}
menuentry '3rd win system' --id 3rd-win-system { ...}
GRUB_DEFAULT=1 means that the default startup item is the second (the number starts from 0), that is, the startup item 2nd linux system. GRUB_ Default = 3rd win system indicates that the default startup item is the third, that is, 3rd win system. Here, the id is used to specify the startup item. GRUB_DEFAULT=saved means that the default startup item is set through the Grub2 set default command. The default value of this command is 0.
-
GRUB_CMDLINE_LINUX
If your Linux kernel needs additional parameters during startup, you can specify them through this environment variable, such as:
GRUB_CMDLINE_LINUX="..... crashkernel=auto rhgb quiet elevator=deadline"
The function of elevator=deadline is to adjust the I/O scheduling algorithm of Linux.
Let's practice:
[root@xyz ~]# cp /etc/default/grub /etc/default/gurb.bak
[root@xyz ~]# vim /etc/default/grub
[root@xyz ~]# diff /etc/default/grub /etc/default/gurb.bak
1c1
< GRUB_TIMEOUT=30
---
> GRUB_TIMEOUT=5
3,4c3
< GRUB_DEFAULT=0
< GRUB_TIMEOUT_STYLE=menu
---
> GRUB_DEFAULT=saved
7c6
< GRUB_CMDLINE_LINUX="crashkernel=auto spectre_v2=retpoline rd.lvm.lv=centos/root rd.lvm.lv=centos/swap rhgb quiet elevator=deadline"
---
> GRUB_CMDLINE_LINUX="crashkernel=auto spectre_v2=retpoline rd.lvm.lv=centos/root rd.lvm.lv=centos/swap rhgb quiet"
In this way, you can modify / etc/default/grub. Of course, after modification, you need to use the tool to regenerate grub.cfg:
[root@xyz ~]# grub2-mkconfig -o /boot/grub2/grub.cfg
Generating grub configuration file ...
Found linux image: /boot/vmlinuz-3.10.0-1160.el7.x86_64
Found initrd image: /boot/initramfs-3.10.0-1160.el7.x86_64.img
Found linux image: /boot/vmlinuz-0-rescue-f5a85e92d51e4d40975fd956fd775f9c
Found initrd image: /boot/initramfs-0-rescue-f5a85e92d51e4d40975fd956fd775f9c.img
done
[root@xyz ~]# grep timeout /boot/grub2/grub.cfg
if [ x$feature_timeout_style = xy ] ; then
  set timeout_style=menu
  set timeout=30
# Fallback normal timeout code in case the timeout_style feature is
  set timeout=30
[root@xyz ~]# grep default /boot/grub2/grub.cfg
# from /etc/grub.d and settings from /etc/default/grub
   set default="${next_entry}"
   set default="0"
function savedefault {
[root@xyz ~]# grep linux16 /boot/grub2/grub.cfg
        linux16 /vmlinuz-3.10.0-1160.el7.x86_64 root=/dev/mapper/centos-root ro crashkernel=auto spectre_v2=retpoline rd.lvm.lv=centos/root rd.lvm.lv=centos/swap rhgb quiet elevator=deadline
        linux16 /vmlinuz-0-rescue-f5a85e92d51e4d40975fd956fd775f9c root=/dev/mapper/centos-root ro crashkernel=auto spectre_v2=retpoline rd.lvm.lv=centos/root rd.lvm.lv=centos/swap rhgb quiet elevator=deadline
You can see that after the grub.cfg is regenerated, the relevant configurations have changed.
/etc/grub.d/*
In addition to directly modifying and adding environment variables in the / etc/default/grub environment configuration file to indirectly affect the main configuration file of grub2, you can also directly create configuration scripts in the / etc/grub.d directory. In fact, there are some configuration scripts in this directory by default, which are used to generate the main configuration file related information of the corresponding part:
[root@xyz ~]# ll /etc/grub.d
 Total consumption 72
-rwxr-xr-x. 1 root root  8702 7 June 29, 2020 00_header
-rwxr-xr-x. 1 root root  1043 3 June 22, 2019 00_tuned
-rwxr-xr-x. 1 root root   232 7 January 29, 2020_users
-rwxr-xr-x. 1 root root 10781 7 October 29, 2020_linux
-rwxr-xr-x. 1 root root 10275 7 June 29, 2020 20_linux_xen
-rwxr-xr-x. 1 root root  2559 7 June 29, 2020 20_ppc_terminfo
-rwxr-xr-x. 1 root root 11169 7 June 29, 2020 30_os-prober
-rwxr-xr-x. 1 root root   214 7 April 29, 2020 40_custom
-rwxr-xr-x. 1 root root   216 7 April 29, 2020 41_custom
-rw-r--r--. 1 root root   483 7 June 29, 2020 README
Here are the purposes of several main configuration scripts:
-
00_header
Relevant settings of startup items, including display format of screen terminal, countdown time of startup item menu, whether to hide startup items, etc.
-
10_linux
Try to find the Linux kernel file under / boot and the modules and parameters required to start the kernel.
-
30_os-prober
Scan all disk partitions. If there is an operating system not in grub2 that can be used as a startup item in the partition, add it to the startup item menu.
-
40_custom
Users have their own defined configuration scripts, which can be added here.
Let's practice:
[root@xyz ~]# cd /etc/grub.d
[root@xyz grub.d]# vim 40_custom
[root@xyz grub.d]# cat 40_custom
#!/bin/sh
exec tail -n +3 $0
# This file provides an easy way to add custom menu entries.  Simply type the
# menu entries you want to add after this comment.  Be careful not to change
# the 'exec tail' line above.
menuentry 'My graphical CentOS Linux (3.10.0-1160.el7.x86_64) 7 (Core)' --class centos --class gnu-linux --class gnu --class os --unrestricted --id 'mygraphical' {
        load_video
        set gfxpayload=keep
        insmod gzio
        insmod part_gpt
        insmod xfs
        set root='hd0,gpt2'
        if [ x$feature_platform_search_hint = xy ]; then
          search --no-floppy --fs-uuid --set=root --hint-bios=hd0,gpt2 --hint-efi=hd0,gpt2 --hint-baremetal=ahci0,gpt2 --hint='hd0,gpt2'  3a6bd73c-8f36-4955-b079-b1e2501efc31
        else
          search --no-floppy --fs-uuid --set=root 3a6bd73c-8f36-4955-b079-b1e2501efc31
        fi
        linux16 /vmlinuz-3.10.0-1160.el7.x86_64 root=/dev/mapper/centos-root ro crashkernel=auto spectre_v2=retpoline rd.lvm.lv=centos/root rd.lvm.lv=centos/swap rhgb quiet elevator=deadline systemd.unit=graphical.target
        initrd16 /initramfs-3.10.0-1160.el7.x86_64.img
}
[root@xyz grub.d]# grub2-mkconfig -o /boot/grub2/grub.cfg
Generating grub configuration file ...
Found linux image: /boot/vmlinuz-3.10.0-1160.el7.x86_64
Found initrd image: /boot/initramfs-3.10.0-1160.el7.x86_64.img
Found linux image: /boot/vmlinuz-0-rescue-f5a85e92d51e4d40975fd956fd775f9c
Found initrd image: /boot/initramfs-0-rescue-f5a85e92d51e4d40975fd956fd775f9c.img
done
The content added here is copied from grub.cfg and slightly modified.
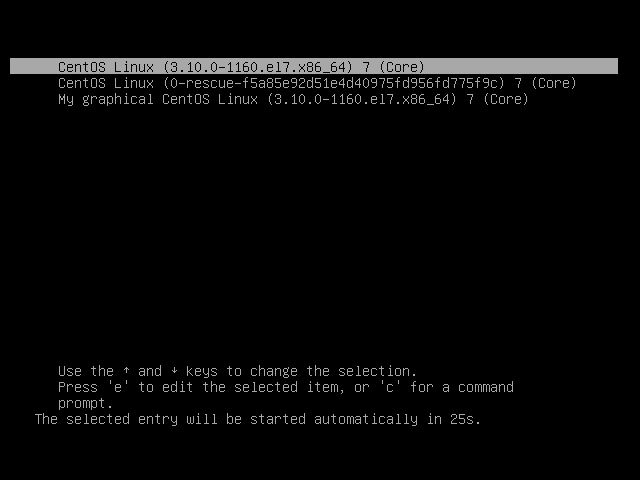
After restarting, you can see such startup items:
The third startup item is added through the configuration script.
Transfer control of loader
As mentioned earlier, for hosts with multiple systems installed, grub2 will transfer the responsibility of guiding the system startup to the corresponding loader after the user selects a system startup item. This function is realized through chain loader.
The chain loader can be translated as "boot chain", which can be simply regarded as "boot program strung together in a certain order", and grub2 can transfer the responsibility of boot system startup to a loader on the chain loader as needed.
To configure the chain loader in grub2 is simple:
menuentry "Windows" {
        insmod chain      # You have to load the chainloader module first, right?
        insmod ntfs       # It is recommended to add the file system module where windows is located!
        set root=(hd0,1)  # Which partition slot is the most important item!
        chainloader +1    # Please go to the boot sector to read the meaning of the loader software!
}
Suppose the disk partition on the host is as follows:
[root@study ~]# fdisk -l /dev/vda
   Device Boot      Start         End      Blocks   Id  System
/dev/vda1            2048    10487807     5242880   83  Linux
/dev/vda2   *    10487808   178259967    83886080    7  HPFS/NTFS/exFAT
/dev/vda3       178259968   241174527    31457280   83  Linux
MBR partition is adopted for disk vda, and the first partition and the third partition are Linux system and the second partition is Windows system. If you want to manually create chain loader for Windows partition:
[root@study ~]# vim /etc/grub.d/40_custom
menuentry 'Go to Windows 7' --id 'win7' {
        insmod chain
        insmod ntfs
        set root=(hd0,msdos2)
        chainloader +1
}
menuentry 'Go to MBR' --id 'mbr' {
        insmod chain
        set root=(hd0)
        chainloader +1
}

[root@study ~]# grub2-mkconfig -o /boot/grub2/grub.cfg
The above example is excerpted from brother bird's Linux private dishes
Here, the Go to MBR chain loader is used to return the startup item selection interface of grub2, so root=(hd0) does not specify a specific partition.
Package initramfs
The role of the virtual file system initramfs has been explained earlier. Similarly, it is said that initramfs is saved on the disk as a packaged file (image file) and will be automatically unpacked into memory when used.
Generally, the initramfs file is included with the Linux distribution and does not need to be created manually. However, if it needs to be created manually, it needs to be packaged with corresponding tools. dracut is used in CentOS 7:
[icexmoon@xyz ~]$ cd /tmp
[icexmoon@xyz tmp]$ dracut -v initramfs_test.img $(uname -r)
Executing: /usr/bin/dracut -v initramfs_test.img 3.10.0-1160.el7.x86_64
/usr/bin/dracut: line 1174: /etc/crypttab: Permission denied
dracut module 'busybox' will not be installed, because command 'busybox' could not be found!
dracut module 'dmsquash-live-ntfs' will not be installed, because command 'ntfs-3g' could not be found!
dracut module 'cifs' will not be installed, because command 'mount.cifs' could not be found!
*** Including module: bash ***
*** Including module: nss-softokn ***
...ellipsis
It should be noted that the initramfs file format used by different Linux distributions may be different and may not be universal, so it needs to be packaged according to the packaging method of the corresponding distribution (that is, different tools may need to be used).
As long as you specify the generated file name and kernel version, you can create the initramfs file, which is easy.
In addition to generating the initramfs file by default, you can manually add additional drivers or file system support to the initramfs file through other parameters:
[icexmoon@xyz tmp]$ sudo dracut -v --add-drivers "e1000e" --filesystems 'ext4 nfs' initramfs_test3.img $(uname -r)
Executing: /sbin/dracut -v --add-drivers e1000e --filesystems "ext4 nfs" initramfs_test3.img 3.10.0-1160.el7.x86_64
...ellipsis
*** Including module: bash ***
*** Including module: nss-softokn ***
*** Including module: i18n ***
*** Including module: network ***
*** Including module: ifcfg ***
*** Including module: drm ***
*** Including module: plymouth ***
*** Including module: dm ***
...ellipsis
Testing and installation grub2
If the boot program used by the current Linux host is not grub2 and grub2 needs to be installed:
[root@xyz ~]# grub2-install /dev/sda
Installing for i386-pc platform.
Installation finished. No error reported.
Doing so will only install the grub2 program ontology on the MBR of the / dev/sda disk, and will not install the corresponding configuration file.
If you want to write grub2 in the boot sector of the partition, it may be a little troublesome:
[root@xyz ~]# df -T | grep xfs
/dev/mapper/centos-root xfs      10475520 7864560 2610960   76% /
/dev/sda4               xfs       1038336   32992 1005344    4% /srv/myproject
/dev/sda2               xfs       1038336  185940  852396   18% /boot
/dev/mapper/centos-home xfs       5232640 1191744 4040896   23% /home
[root@xyz ~]# grub2-install /dev/sda4
Installing for i386-pc platform.
grub2-install: Error: hd0 Appears to contain a non DOS Boot reserved space xfs File system. Install here GRUB May cause grub-setup Overwrite important data to reduce data loss
 Bad file system(--skip-fs-probe Parameter can disable this check at your own risk).
[root@xyz ~]# grub2-install --skip-fs-probe /dev/sda4
Installing for i386-pc platform.
grub2-install: warning: File system `xfs' doesn't support embedding.
grub2-install: warning: Cannot embed. In this installation GRUB Can only be installed by using the block list. However, block lists are not trusted and are not recommended..
grub2-install: Error: will not proceed with blocklists.
[root@xyz ~]# grub2-install --force --recheck --skip-fs-probe /dev/sda4
Installing for i386-pc platform.
grub2-install: warning: File system `xfs' doesn't support embedding.
grub2-install: warning: Cannot embed. In this installation GRUB Can only be installed by using the block list. However, block lists are not trusted and are not recommended..
Installation finished. No error reported.
Writing will be blocked unless you add the relevant parameters of forced writing, such as -- force -- check -- skip FS probe.
grub2 has a small detail. If multiple partitions on a disk are equipped with Linux system and are booted with grub2, which partition will the grub2 boot program on the MBR read the configuration file? The answer is the last installed Linux system. Because the grub2 program in the MBR will be overwritten during Linux Installation, the naturally overwritten grub2 will read the configuration file of the partition where the last installed Linux is located. If you want to change this, of course, you don't need to reinstall Linux. Just start Linux on the partition where you want to read the configuration file, and then use grub2 install to overwrite the boot program in the disk MBR.
Modify startup item
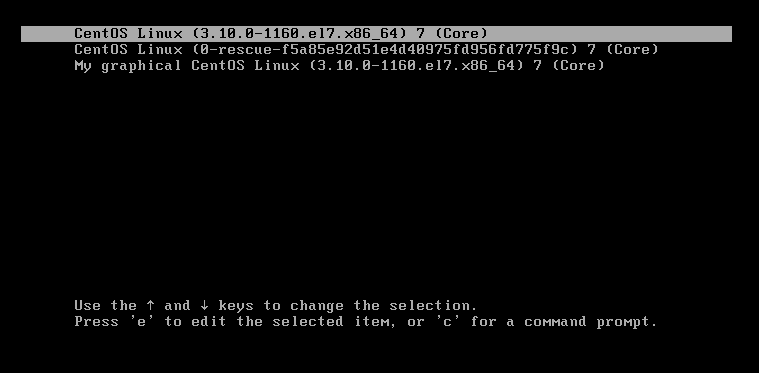
As we said before, one advantage of grub2 is that you can edit the startup item when the system starts:
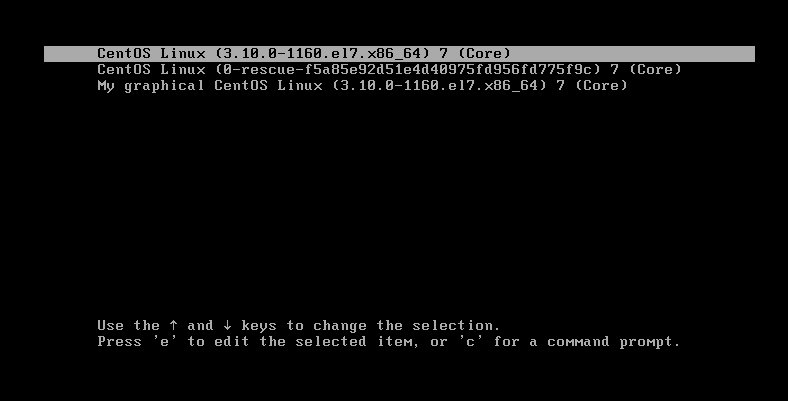
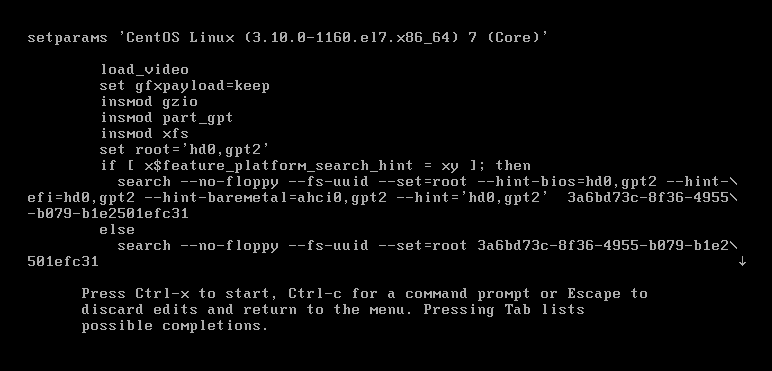
Press e on any startup item in the Startup menu to enter the editing mode of startup item:
The output content of this interface is divided into two parts. The upper part is the actual content of the startup item and the lower part is the operation description of the interface.
After editing the contents of the startup item, if you want to cancel editing and return to the startup item menu interface, you can press Ctrl+c or ESC. If you want to start by editing the contents, you can press Ctrl+x.
Let's actually test that if we want to use the default startup item to enter the rescue mode (rescue.target):
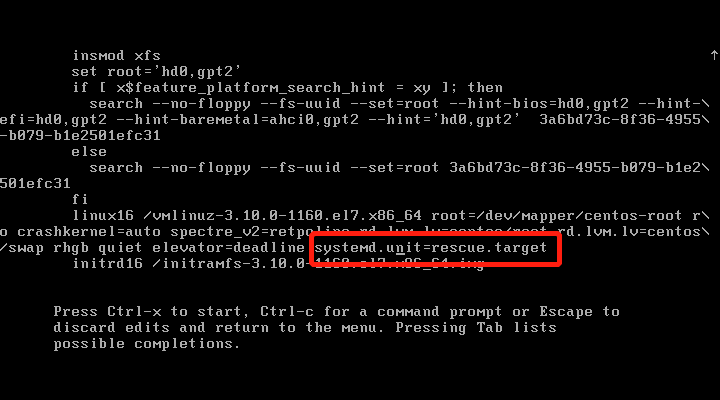
Find the line of linux16 representing the kernel command line parameters, and add the parameter systemd.unit=rescue.target at the end.
Then press Ctrl+x to execute the startup item:
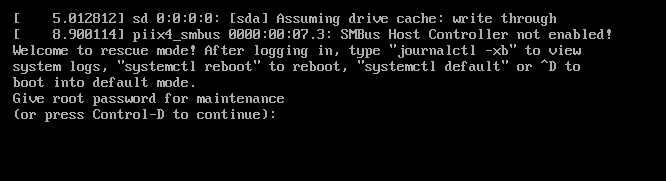
It can be seen that the rescue mode is indeed entered, and the root password is required.
Not surprisingly, even in rescue mode, CentOS 7 requires a root password for authentication.
Startup item and terminal display
Some of grub2's configuration environment variables are related to startup items and terminal display:
[root@xyz ~]# cp /etc/default/grub /etc/default/grub2.bak
[root@xyz ~]# vim /etc/default/grub
[root@xyz ~]# diff /etc/default/grub /etc/default/grub2.bak
9,11d8
< GRUB_TERMINAL=gfxterm       # Set the main terminal display as graphical interface!
< GRUB_GFXMODE=1024x768x24    # X, Y and chromaticity data of graphical interface
< GRUB_GFXPAYLOAD_LINUX=keep  # Keep the graphical interface, don't use text!
[root@xyz ~]# grub2-mkconfig -o /boot/grub2/grub.cfg
Generating grub configuration file ...
Found linux image: /boot/vmlinuz-3.10.0-1160.el7.x86_64
Found initrd image: /boot/initramfs-3.10.0-1160.el7.x86_64.img
Found linux image: /boot/vmlinuz-0-rescue-f5a85e92d51e4d40975fd956fd775f9c
Found initrd image: /boot/initramfs-0-rescue-f5a85e92d51e4d40975fd956fd775f9c.img
done
After restarting, you can see the following screen:
In this way, the Startup menu can not only display text, but also load graphics, such as enterprise icons.
Add password for startup item
Sometimes we may want to add a password to the startup item for security reasons. We need to enter the corresponding password before editing or executing a startup item.
Personally, I don't think this function is very useful. After all, Linux as a server almost doesn't need to shut down and restart. Setting a password is not necessary. On the contrary, it may bring unnecessary trouble to yourself.
If you really need to do this, you can read it directly Password individual menus.
Problem solving during startup
Forget the root password
It is also known without search engine retrieval that forgetting the root password will be a common problem for Linux users. After all, one of the biggest defects of human creation is that memory is easy to lose.
Although the root password is very important, it is not that it cannot be reset. After all, if you forget the password and can only reinstall the system, it's crazy.
In some Linux distributions, you may directly enter the rescue mode (rescue.target) to modify the root password, but CentOS 7 cannot. Even in the rescue mode, you must enter the root password to enter. Therefore, for CentOS 7, we need to use the kernel parameter rd.break to enter a special Linux Environment:
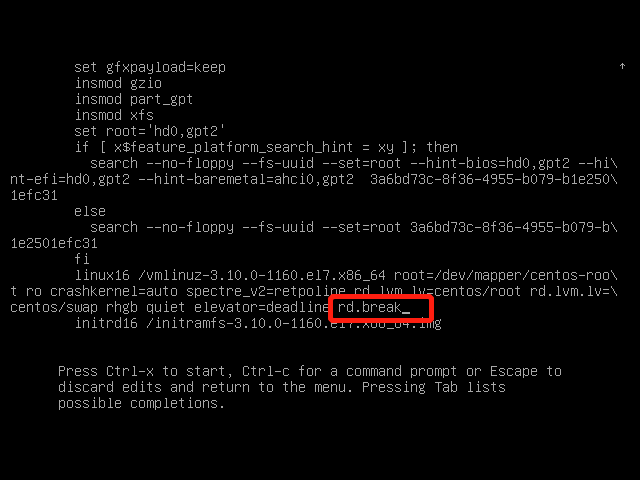
Similar to entering the rescue mode before, in the startup item editing mode, find linux16, add the rd.break parameter, and then press Ctrl+x to start.
After starting in this way, you will directly obtain a command line environment with root permission:
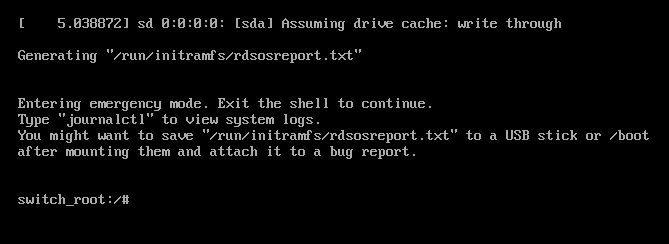
However, it should be noted that although the root permission is obtained without entering a password, the current operating system is only a special operating system called RAM disk, which is not the operating system we normally load and start from the disk. The current operating system can be regarded as a "PE" system often used in Windows installation. Therefore, in this environment, it is useless to directly use the passwd command to change the root password.
This is required:
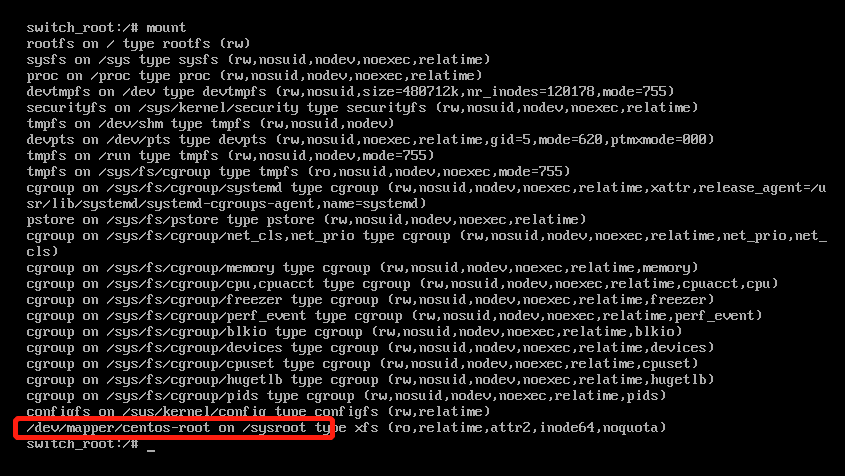
Use the mount command to view the mount point. Here, / dev / mapper / CentOS root on / sysroot is the partition where the root directory is mounted after the system is started. In this special system, it is mounted under / sysroot.
Now we just need to switch the root directory of the current system to this partition, and then use passwd to modify the root password. However, it should be noted that the current mounting mode of this partition is ro, that is, read-only. Because we want to modify the password, we naturally need to change it to rw (read-write):
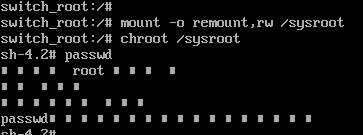
In this way, it can be modified (the garbled code is due to the coding problem, which is ignored).
However, we can't restart now because SELinux is closed in the current environment. If we restart directly, because we modify the password related files, there will be problems with the SELinux security context of the corresponding files, resulting in the inability to read the password files and the inability to start the machine, Therefore, the system needs to re create the security context of SELinux after restart:
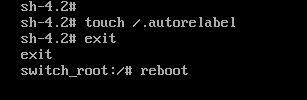
After restarting in this way, it takes a long time to rebuild the security context of SELinux. If you don't want to do so (after all, our modification only involves password related files), you can modify the running mode of SELinux in / etc/selinux/config to permissive after modifying the password, so that SELinux does not force inspection, and then restart. After the system starts normally, execute restorecon -Rv /etc with root permission and rebuild the security context under / etc. Modify the running mode in / etc/selinux/config to enforce, and then set enforce 1 to enable mandatory checking.
Of course, this method will be more troublesome. If you want to save trouble, use the above method.
In addition to the above methods, you can also change the root password directly through bash. You can read The method of executing bash as root when booting directly.
Unable to boot due to file system error
Sometimes, because the / etc/fstab setting is wrong or the data is not synchronized due to abnormal shutdown, it may lead to failure of normal startup.
For the first error, you can directly modify the / etc/fstab file after entering the system through rescue mode or other methods. For the second error, you can use xfs_repair or fsck.ext3 to repair the file system.
The above is the content related to Linux system startup. Thank you for reading.