In the next article, after learning about Apache's basic configuration and SELinux, continue demonstrating the virtual host capabilities and access control methods provided by Apache.
If you haven't looked at the last suggestion, look at it first and come back later, last article " linux Getting Started Series 18--apache service 1 for Web Services".
3. Apache Virtual Host Functions
If you have deployed a website in the early years, you will know the concepts of virtual machine host, VPS and so on. Especially the site built around 2000 is very popular, and even a lot of successful grassroots webmasters have been born, some of which are still doing very successfully.
Increasing site traffic is a long-term cumulative process. If only one site can be run on each server, grassroots webmasters with low popularity and low traffic will be forced to bear high server rental costs, which will obviously result in a waste of hardware resources.
For this reason, before the birth of virtual private servers (VPS: Virtual Private Server) and cloud computing technology, IDC service providers enabled virtual hosting capabilities in order to make full use of server resources and reduce the purchase threshold for grassroots webmasters.The virtual host feature allows you to split a running physical server into "virtual servers".
Virtual hosts also have obvious drawbacks. They cannot isolate hardware resources as cloud hosting technology currently does. These virtual hosts use hardware resources of physical servers together. IDC vendors can only limit the size of hard disk usage space, so virtual hosts of different users on the same physical host may interact.However, due to cost considerations, some individual webmasters use virtual hosts to deploy websites.
The diagram is as follows:
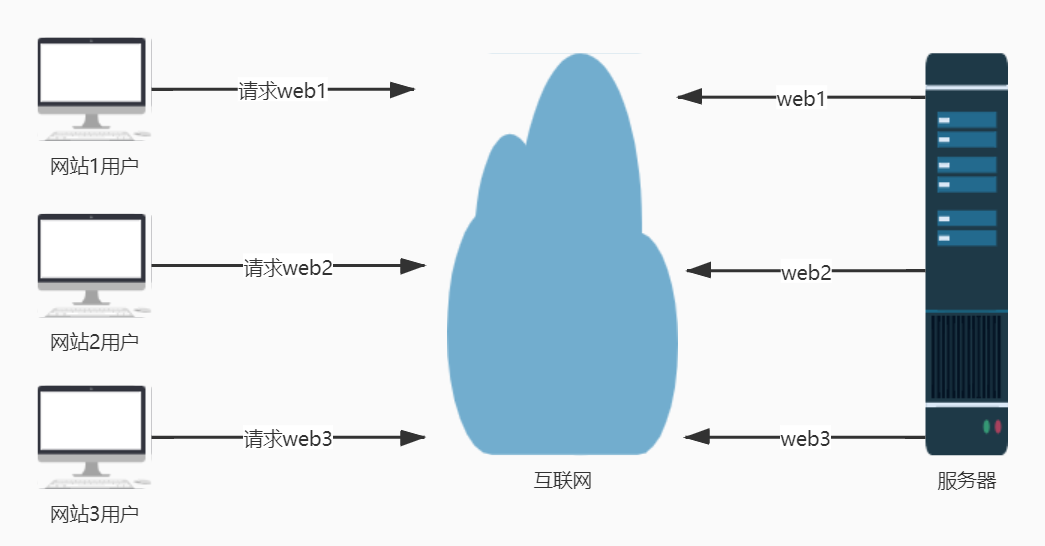
Apache's virtual host capability is a technology that allows servers to provide access to multiple websites at the same time, based on different IP addresses, host domain names, or port numbers requested by users.
3.1 IP-based
If a server has multiple IP addresses, each IP corresponds to each Web site deployed on the server one by one, so when a user requests access to a different IP address, page resources from different Web sites will be accessed.
This way each website has a separate IP address, which is good for search engine SEO optimization, so it provides the most common virtual site host functionality and is welcomed by grassroots webmasters.
The Web site correspondence for this sample IP is 192.168.78.101, 102, 103 corresponding to Web site 1, 2, 3, respectively, as follows:
3.1.1 Configuring multiple IP
Use the network configuration method described earlier to configure multiple IP s. If you forget, please go back to "Introduction to linux Series 11--Centos7 Network Service Management".
[root@apache ~]# nmtui
Intermediate operation omitted, configure three IP addresses for the host, save and exit

Restart the network for it to take effect
[root@apache ~]# systemctl restart network
[root@apache ~]# ip addr
...Omit some content
2: eno16777736: <BROADCAST,MULTICAST,UP,LOWER_UP> mtu 1500 qdisc pfifo_fast state UP qlen 1000
    link/ether 00:0c:29:2e:3a:65 brd ff:ff:ff:ff:ff:ff
    inet 192.168.78.101/24 brd 192.168.78.255 scope global eno16777736
       valid_lft forever preferred_lft forever
    inet 192.168.78.102/24 brd 192.168.78.255 scope global secondary eno16777736
       valid_lft forever preferred_lft forever
    inet 192.168.78.103/24 brd 192.168.78.255 scope global secondary eno16777736
       valid_lft forever preferred_lft forever
    inet6 fe80::20c:29ff:fe2e:3a65/64 scope link
       valid_lft forever preferred_lft forever
[root@apache ~]#
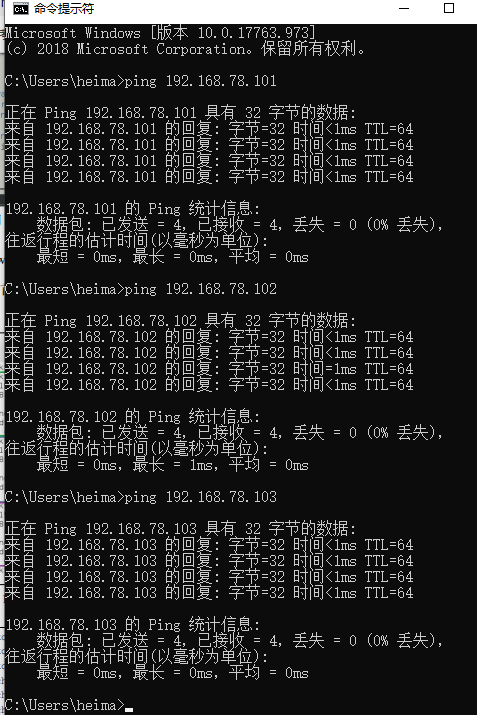
Ensure that the IP you just configured is visible through the ip addr command and that you can ping through each IP you just configured on the virtual machine or host.
3.1.2 Preparing multiple websites
Create three directories in the website directory at the root of the system and create different page files.
[root@apache website]# mkdir -p /website/1
[root@apache website]# mkdir -p /website/2
[root@apache website]# mkdir -p /website/3
[root@apache website]# echo "192.168.78.101">/website/1/index.html
[root@apache website]# echo "192.168.78.102">/website/2/index.html
[root@apache website]# echo "192.168.78.103">/website/3/index.html
3.1.3 Configuring Apache
Configure Master Profile/etc/httpd/conf/httpd.conf
[root@apache website]# vim /etc/httpd/conf/httpd.conf
...Omit some content
<VirtualHost 192.168.78.101>
 DocumentRoot /website/1
 ServerName website1
 <Directory /website/1>
  AllowOverride None
  Require all granted
 </Directory>
</VirtualHost>
<VirtualHost 192.168.78.102>
  DocumentRoot /website/2
  ServerName website2
  <Directory /website/2>
   AllowOverride None
   Require all granted
  </Directory>
</VirtualHost>
<VirtualHost 192.168.78.103>
  DocumentRoot /website/3
  ServerName website3
  <Directory /website/3>
   AllowOverride None
   Require all granted
  </Directory>
</VirtualHost>
...Omit some content
Add the following configuration and save the exit

Restart httpd to take effect.
[root@apache website]# systemctl restart httpd
3.2.4 Test Access
Since you are continuing with the previous environment experiment, you have already set up your firewall and SELinux, so you can access them directly. If you encounter an inaccessible situation, please refer to the previous section to check the relevant settings.

Be careful:
(1) The / website directory has already been added to the context of SELinux in the front, so there is no need to set the subdirectory / website/1 etc. that you just created.
(2) In the previous experiment, the / website/index.html file can be accessed directly through ip. This experiment did not delete the original configuration, but added a new configuration related to virtual host. You can see that, to visit 192.168.78.101 again, this IP refers to the new virtual host website, not the original website.This means that the virtual host configuration overrides the original settings and has a higher priority.
3.2 Domain Name Based
When the server cannot assign a separate IP address to each Web site, you can try to have Apache automatically identify the domain name requested by the user to transfer different content based on different domain name requests.
Domain name-based configuration is basically the same as IP-based configuration, except that there is an additional domain name and IP mapping.
3.2.0 Environmental Preparation
Or continue with the environment of the previous step, deleting the redundant IP settings, leaving only one IP: 192.168.78.101; and deleting the mappings of multiple IPs and websites configured in the previous step 3.1.3.
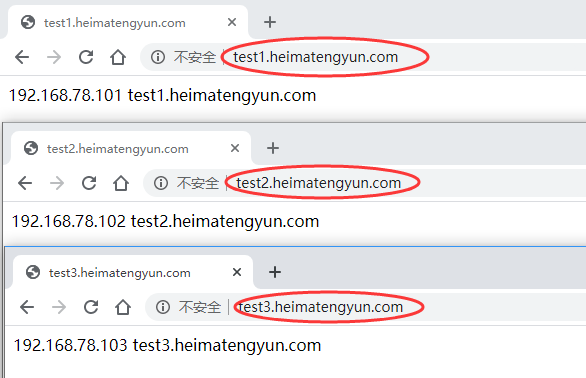
Assume that the three domain names correspond to three Web sites: test1, test2, test3.heimatengyun.com, corresponding to the previous three Web sites.
3.2.1 Configure domain name and IP mapping
Configurable through the DNS Resolution Service, modify the / etc/hosts file directly here to specify the mapping relationship between IP and domain names./etc/hosts is a configuration file used in Linux systems to force the resolution of a host domain name to a specified IP address.
[root@apache website]# vim /etc/hosts
192.168.78.101 test1.heimatengyun.com test2.heimatengyun.com test3.heimatengyun.com
Add the above content at the end of the file to save and exit.
Make sure you can ping the same domain name as above in the virtual machine.
[root@apache website]# ping -c 1 test1.heimatengyun.com
PING test1.heimatengyun.com (192.168.78.101) 56(84) bytes of data.
64 bytes from test1.heimatengyun.com (192.168.78.101): icmp_seq=1 ttl=64 time=0.033 ms
--- test1.heimatengyun.com ping statistics ---
1 packets transmitted, 1 received, 0% packet loss, time 0ms
rtt min/avg/max/mdev = 0.033/0.033/0.033/0.000 ms
[root@apache website]#
This allows domain name access inside the virtual machine when subsequent operations are completed.
However, if you want the host to be accessible, you need to add IP-domain mapping to the host as well.Since my host is win10, adding the above IP and domain name mappings to the C:\Windows\System32\driversetc\hosts file is sufficient.Then the host machine can ping with the first three domain names.
3.2.2 Preparing multiple websites
Since the original three websites are used directly, first modify the content inside each page, we use redirection to append the corresponding domain name information to the original page, which facilitates subsequent verification.
[root@apache website]# echo "test1.heimatengyun.com">>/website/1/index.html
[root@apache website]# echo "test2.heimatengyun.com">>/website/2/index.html
[root@apache website]# echo "test3.heimatengyun.com">>/website/3/index.html
3.2.3 Configuring Apache
Modify Apache main configuration file, /etc/httpd/conf/httpd.conf
[root@apache website]# vim /etc/httpd/conf/httpd.conf
...Omit some content
<VirtualHost 192.168.78.101>
 DocumentRoot /website/1
 ServerName test1.heimatengyun.com
 <Directory /website/1>
  AllowOverride None
  Require all granted
 </Directory>
</VirtualHost>
<VirtualHost 192.168.78.101>
  DocumentRoot /website/2
  ServerName test2.heimatengyun.com
  <Directory /website/2>
   AllowOverride None
   Require all granted
  </Directory>
</VirtualHost>
<VirtualHost 192.168.78.101>
  DocumentRoot /website/3
  ServerName test3.heimatengyun.com
  <Directory /website/3>
   AllowOverride None
   Require all granted
  </Directory>
</VirtualHost>
...Omit some content
Add the above to the configuration file and save the exit.
Note: Here you can compare the previous IP configurations, the configuration parameters are basically the same, the only difference is that each site corresponds to a different IP before, and now writes the same IP.Can self-compare
Restart Apache after the modification is complete for it to take effect.
[root@apache website]# systemctl restart httpd
Note: After modifying the Apache configuration, a service restart is required for the service to take effect.
3.2.4 Test Access
Enter the corresponding domain name in the host browser to access the corresponding website.
3.3 based on port number
The port number-based virtual host feature allows users to access site resources on the server by specifying a port number.
This configuration is slightly more replicated than the first two, because it considers not only the configuration of the httpd service program, but also the monitoring and limitations of the SELinux service on open ports.
Web site access services are typically provided using ports 80, 443, 8080, and so on. If you are on another port, you need to be aware of SELinux's current state.
3.3.0 Environmental Preparation
We continue our experiment in the above environment and delete the configuration in the configuration file from the previous step 3.2.3.Suppose 8111, 8222, and 8333 correspond to the three websites you created earlier.
3.3.1 Preparing within the website
We continue to use the previous three websites to make changes to their content
[root@apache website]# echo "8111">>/website/1/index.html
[root@apache website]# echo "8222">>/website/2/index.html
[root@apache website]# echo "8333">>/website/3/index.html
3.3.2 Apache Configuration
Configure/etc/httpd/conf/httpd.conf to support multiport listening
(1) Add port listening on approximately 43 lines
[root@apache website]# vim /etc/httpd/conf/httpd.conf
...Omit some content
Listen 8111
Listen 8222
Listen 8333
...Omit some content
Continue with the changes below
(2) Append port number-based virtual host parameter configuration on approximately 120 lines
<VirtualHost 192.168.78.101:8111>
 DocumentRoot /website/1
 ServerName test1.heimatengyun.com
 <Directory /website/1>
  AllowOverride None
  Require all granted
 </Directory>
</VirtualHost>
<VirtualHost 192.168.78.101:8222>
  DocumentRoot /website/2
  ServerName test2.heimatengyun.com
  <Directory /website/2>
   AllowOverride None
   Require all granted
  </Directory>
</VirtualHost>
<VirtualHost 192.168.78.101:8333>
  DocumentRoot /website/3
  ServerName test3.heimatengyun.com
  <Directory /website/3>
   AllowOverride None
   Require all granted
  </Directory>
</VirtualHost>
...Omit some content
Save Exit
As opposed to 3.2.3, it does not change much, just add ports after IP, and several configuration methods are similar.
Restart apache to take effect
[root@apache website]# systemctl restart httpd
Job for httpd.service failed. See 'systemctl status httpd.service' and 'journalctl -xn' for details.
[root@apache website]# journalctl -xn
...Omit some content
*****  Plugin bind_ports (92.2 confidence) suggests
 If you want to allow /usr/sbin/httpd to bind to network port 8111
 Then you need to modify the port type.
 Do
 # semanage port -a -t PORT_TYPE -p tcp 8111
 ...Omit some content
But you will find that the restart failed.If you look at the logs, you'll find such a hint. Don't worry, it's SELinux that you just mentioned that is bothering you.
3.3.3 Setting up the SELinux domain
View the currently default ELinux allowed ports related to the HTTP protocol
[root@apache website]# semanage port -l | grep http
http_cache_port_t              tcp      8080, 8118, 8123, 10001-10010
http_cache_port_t              udp      3130
http_port_t                    tcp      80, 81, 443, 488, 8008, 8009, 8443, 9000
pegasus_http_port_t            tcp      5988
pegasus_https_port_t           tcp      5989
[root@apache website]#
So we're going to add in the three ports we just added
[root@apache website]# semanage port -a -t http_port_t -p tcp 8111
[root@apache website]# semanage port -a -t http_port_t -p tcp 8222
[root@apache website]# semanage port -a -t http_port_t -p tcp 8333
Add Complete Restart apache
[root@apache website]# systemctl restart httpd
3.3.4 Test Access
After the above operations in the virtual machine content is accessed through the browser, you can normally access the corresponding website through each port.
But if you access it on the host, you will find it is not accessible.This is undoubtedly because the firewall is getting funny.
Favor the knowledge explained in "Introduction to linux series 10--firewalld firewall management", just let the three corresponding ports go.
[root@apache website]# firewall-cmd --zone=public --list-ports
[root@apache website]# firewall-cmd --zone=public --add-port=8111/tcp
success
[root@apache website]# firewall-cmd --zone=public --add-port=8222/tcp
success
[root@apache website]# firewall-cmd --zone=public --add-port=8333/tcp
At this point, access again in the host machine, you can access normally.
Carefully, you may find that if you follow the steps above, you will find that there are actually three ways to turn it on.Different ports can be used to access different websites.
But if you access it again through ip or domain name, you will find that it all points to the page that Case 1 in the previous article points to.Why is that so?That's because the previous case did not explicitly specify a port, and the default port was 80.So if you don't explicitly specify a port, the default is to go to port 80 on the web.
4. Apache Access Control
Apache can access resources on a Web site based on information such as the source host name, source IP address, or browser characteristics on the source host.Simply put, you can control the site so that designated users can see it.
Mainly through access control instructions, common instructions are: Allow, Deny, Order
Allow: Allow a host to access site resources on the server
Deny: Implement Access Forbidden
Order: Defines the order in which Allow or Deny directives work. The matching principle is to match sequentially and execute the following default directives if the match succeeds.
For instance:
Order Allow, Deny: Indicates that the source host is matched with the permission rule first, if the match is successful, the access request is allowed, and vice versa, the access request is denied.
4.1 Control over IP
Suppose our requirement is that the previously deployed 1 site only allow access within the virtual machine and not from external machines.
[root@apache website]# vim /etc/httpd/conf/httpd.conf
...Omit some content
<VirtualHost 192.168.78.101:8111>
 DocumentRoot /website/1
 ServerName test1.heimatengyun.com
 <Directory /website/1>
  AllowOverride None
  Require all granted
Order allow,deny
Allow from 192.168.78.101
 </Directory>
</VirtualHost>
...Omit some content
We just need to open the main configuration file and add Order allow,deny, and llow from 192.168.78.101.After configuring, restart apache and find that it can be accessed normally in the virtual machine, but the site is no longer accessible on the host (jump directly to the test page).
In addition, browser features can be used to restrict access to specified browsers, and no further demonstrations will be performed.
The next article will demonstrate the installation and basic usage of MariaDB, the brother of Mysql data.