catalogue
1.3 inode contains the meta information of the file
1.4 three main time attributes of Linux system files
1.5 when the user opens a file through the file name, the internal process of the system
1.6 method of viewing inode number
1.7 structure of directory file
1.10 two ways to delete inode number
one point one one Special role of inode
1. Classification of linked files
3, inode node exhaustion fault handling (Experiment)
4, Recovered EXT type file (Experiment)
1. Compile and install the extundelete package
Configuration, compilation and installation
5, xfs type file backup and recovery (Experiment)
Common options for xfsdump command
Introduction to main log files
Configure log server to collect logs
journalctl log management tool
1, Linux file system
1. inode and block overview
- File data includes meta information and actual data.
- Files are stored on the hard disk. The minimum storage unit of the hard disk is "sector", and each sector stores 512 bytes.
- A file must occupy one inode and at least one block.
1.1 block
- Eight consecutive sectors form a block(4k)
- Is the smallest unit of file access
- When the operating system reads the hard disk, it reads multiple sectors continuously at one time, that is, one block at a time
1.2 inode (index node)
- The Chinese translation is "index node", also known as i node
- Used to store file meta information
Files are stored on the hard disk. The minimum storage unit of the hard disk is called "sector", and each sector stores 512 bytes.
Generally, eight consecutive sectors form a "block". One block is 4K in size, which is the smallest unit of file access. When the operating system reads the hard disk, it reads multiple sectors continuously at one time, that is, one block at a time.
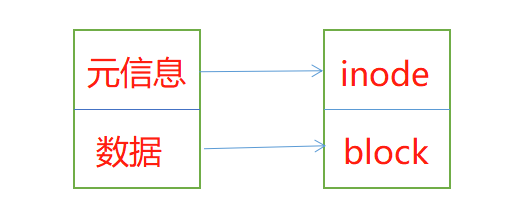
File data includes actual data and meta information (similar to file attributes). File data is stored in "block". The area where file meta information (such as file creator, creation date, file size, file permissions, etc.) is stored is called inode. Therefore, a file must occupy one inode and at least one block.
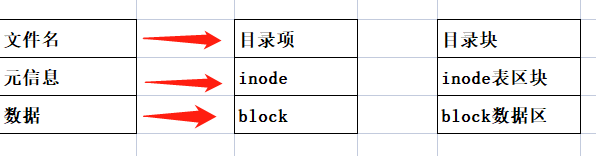
inode does not contain a file name, which is stored in a directory. Everything in the Linux system is a file, so the directory is also a file.
Each inode has a number, and the operating system uses the inode number to identify different files. The Linux system does not use the file name, but uses the inode number to identify files. For the system, the file name is just another name for identifying the inode number. The file name and inode number are one-to-one correspondence, and each inode number corresponds to a file name.
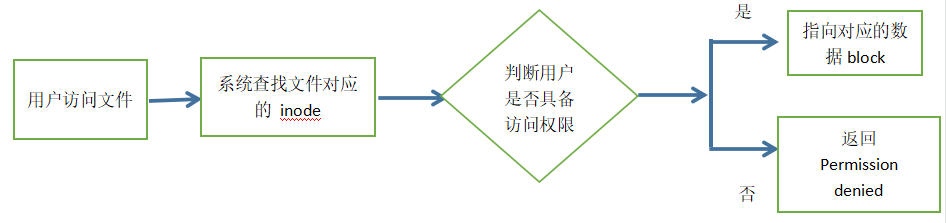
Therefore, when a user tries to access a file in the Linux system, the system will first find its corresponding inode number according to the file name, obtain the inode information through the inode number, and see whether the user has the permission to access the file according to the inode information. If so, point to the corresponding data block and read the data.
inode (index node, also known as i node): used to store file meta information.
1.3 inode contains the meta information of the file
- Bytes of file
- User ID of the file owner
- Group ID of the file
- Read, write and execute permissions of files
- Timestamp of the file
1.4 three main time attributes of Linux system files
- change time (ctime): the last time a file or directory attribute was changed
- access time (atime): the last time a file or directory was accessed
- modify time(mtime): the time when the contents of a file or directory were last modified
1.5 when the user opens a file through the file name, the internal process of the system
- The system finds the inode number corresponding to this file name
- Get inode information through inode number
- According to the inode information, find the block where the file data is located and read the data
1.6 method of viewing inode number
ls -i     ###View the inode number corresponding to the file name

stat      ###View inode number in file inode information
Example: ls -i

Example: stat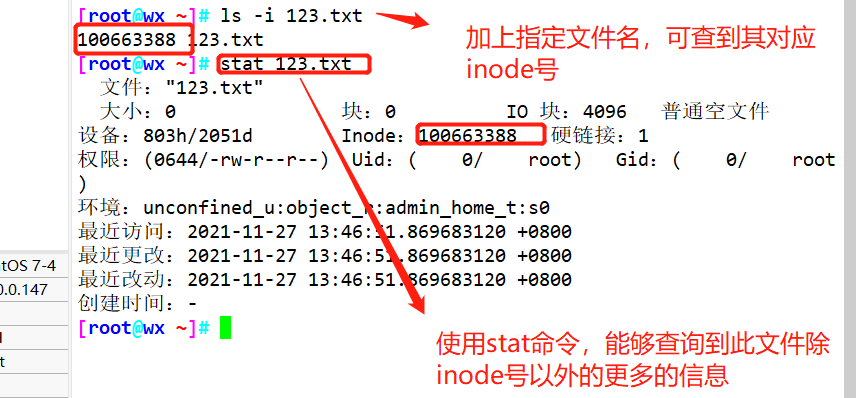
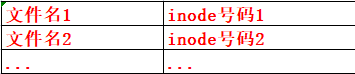
1.7 structure of directory file
- A directory is also a file
- Structure of directory file
- Each inode has a number, and the operating system uses the inode number to identify different files
- The Linux system does not use the file name internally, but uses the inode number to identify the file
- For users, the file name knowledge inode number is easy to identify
1.8 file storage
Structure after hard disk partition
Simple process of accessing files
1.9 inode size
Inodes also consume hard disk space
- Size of each inode
- Generally 128 bytes or 256 bytes
Determines the total number of inode s when formatting the file system
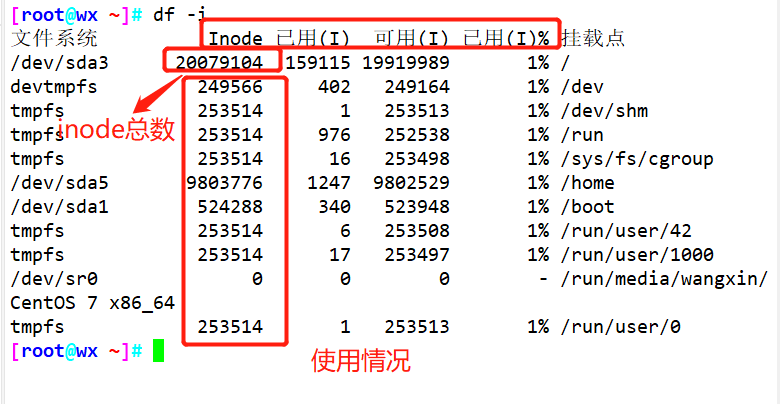
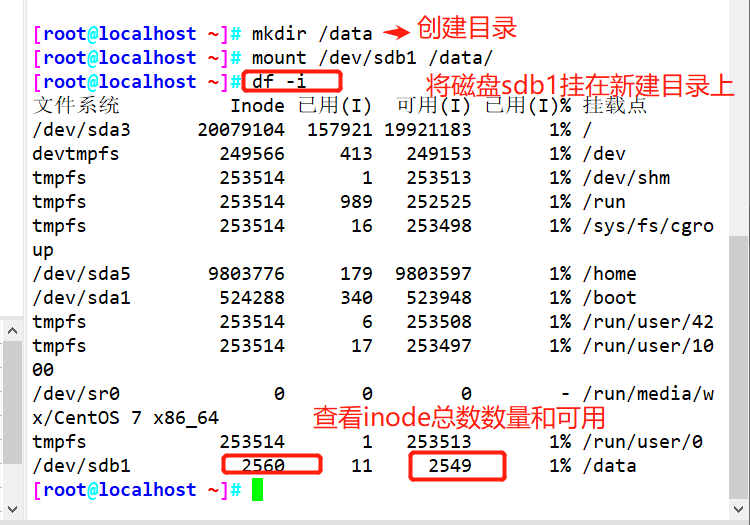
Use the df-i command to view the total number of inodes in each hard disk partition and the number of inodes that have been used
Supplement:
- Inodes also consume hard disk space, so when formatting, the operating system will automatically divide the hard disk into two areas, one is the data area to store file data, and the other is the inode area to store the information contained in the inode. The size of each inode is generally 128 bytes or 256 bytes.
- Generally, you do not need to focus on the size of a single inode, but on the total number of inodes. The total bytes of inodes are given when formatting. Execute the "df -i" command to view the total number of inodes corresponding to each hard disk partition and the number of inodes already used.
Example: df -i
1.10 two ways to delete inode number
find ./ -inum (inode No.) -exec rm -i {} ;

find ./ -inum (inode No.) -delete
one point one one Special role of inode
Due to the separation of inode number and file name, some linux systems have the following phenomena:
- When the file name contains special characters, the file may not be deleted normally. You can delete the inode directly or delete the file.
- When moving or renaming a file, only the file name is changed without affecting the inode number.
- After opening a file, the system identifies the file by inode number, regardless of the file name.
- After modifying the file data with vi editor and saving, a new inode number will be generated. However, if ehco is used to append ">", the inode number will not be changed.
Supplementary knowledge:
find pathname -option[-print] [ -exec | -ok command ] {} ;
find Parameters of the command;
pathname: find The directory path found by the command. For example, use.To represent the current directory, using/To represent the system root directory.
-print:  find The command outputs matching files to standard output.
-exec:  find The command executes the command given by this parameter on the matching file shell Command. The form of the corresponding command is command { } ;,be careful{ }and\;Space between.
-ok:  and-exec The function is the same, except that the given by this parameter is executed in a safer mode shell Command. Before executing each command, a prompt will be given for the user to determine whether to execute it.
1.11 xargs command
Purpose:
Construct the parameter list and run the command, that is, pass the received parameters to the subsequent command command for execution
Convert multi line input to single line (special effect)
advantage:
After sorting the input parameters, remove the newline character and process them in the form of a list
To avoid the problem caused by too long parameters, the xargs -n parameter is used for proper control, which is very useful for commands that often produce a large amount of output, such as find, locate and grep
xargs is generally used with pipes:
XXcomand | xargs -x comand initial-args
 echo "/etc/inittab" | cat   # Pass the standard input directly to cat
 echo "/etc/inittab" | xargs cat   # The standard input content is passed to cat after xargs processing
 find /etc -maxdepth 1 -name "*.conf" -print0 | xargs -0 -i grep "hostname" -l {}  # Pass the searched file to the parameter bit of grep for search. If xargs is not used, grep will report an error
2, Hard link and soft link
Create linked files for files or directories
1. Classification of linked files
| Soft link | Hard link | |
| After deleting the original file | invalid | Still available |
| Scope of use | For files or directories | Available only for files |
| Save location | Can be on a different file system than the original file | It must be in the same file system (such as a Linux partition) as the original file |
Hard link
ln Source file destination
Link file
ln [-s] Source file or directory... Linked file or target location
3, inode node exhaustion fault handling (Experiment)
1. Format of operation steps
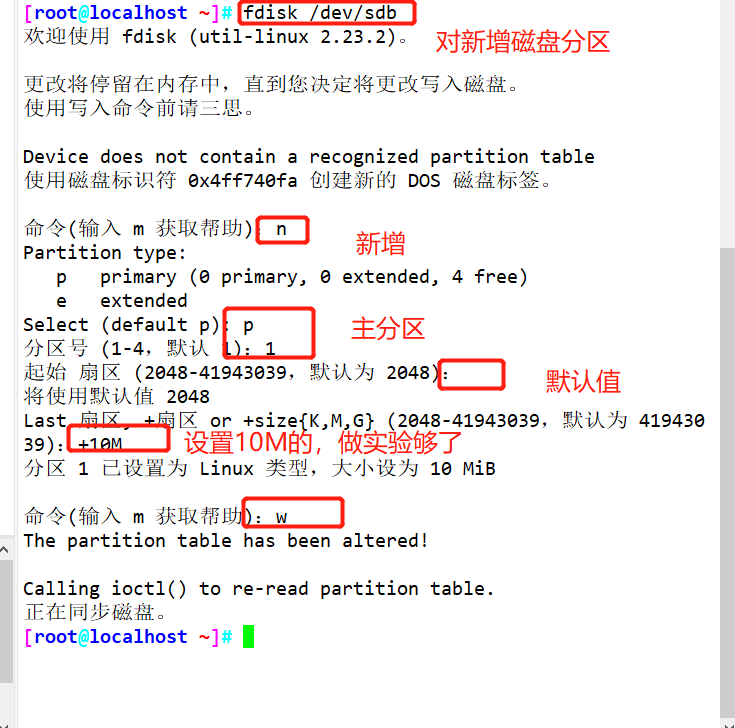
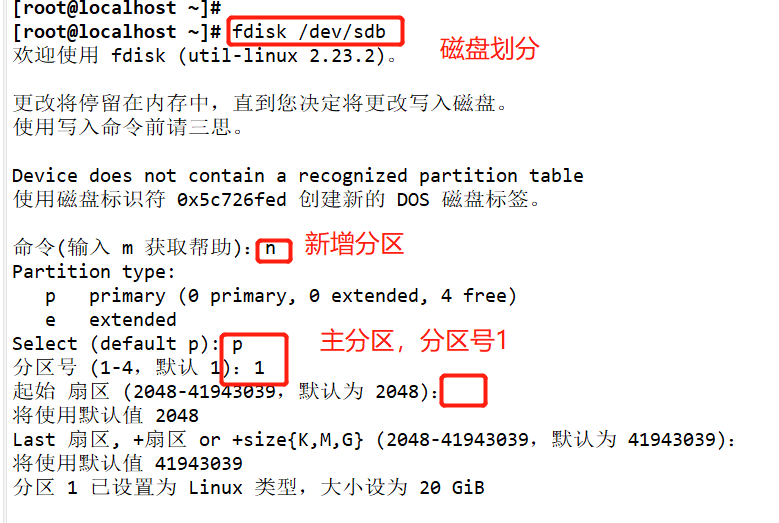
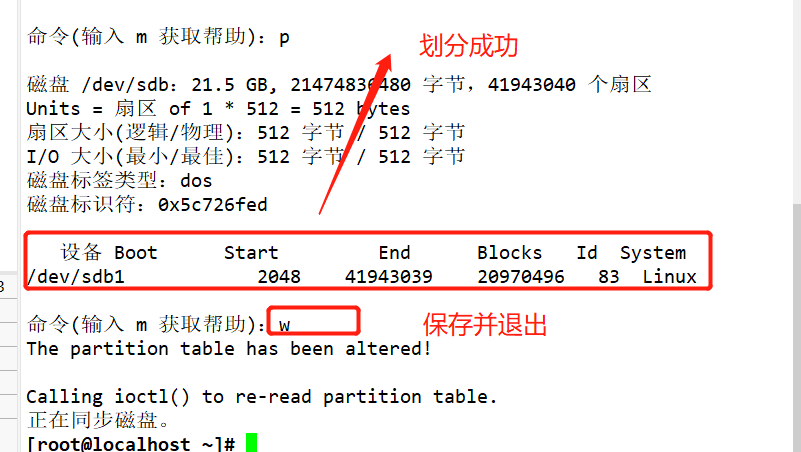
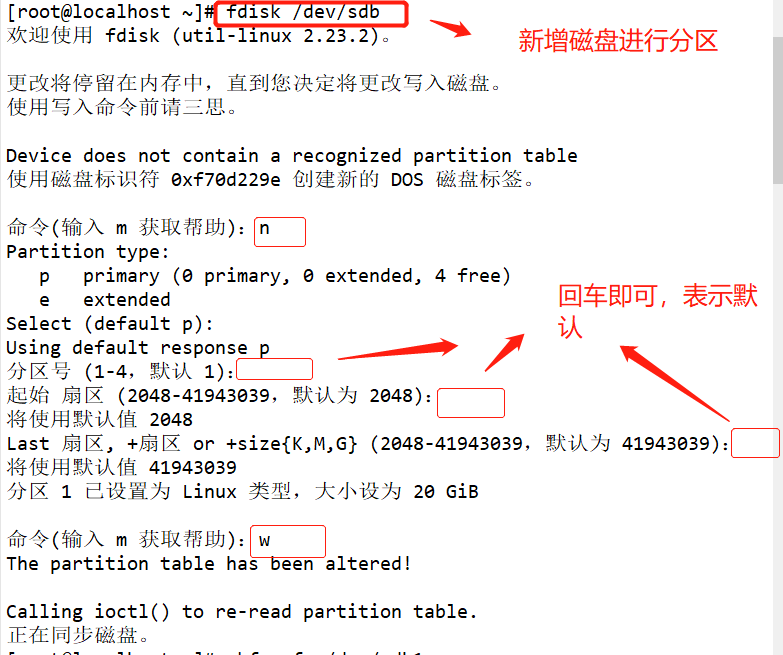
#Use fdisk to create partition / dev/sdb1. The partition size can be 10M
fdisk /dev/ sdb .
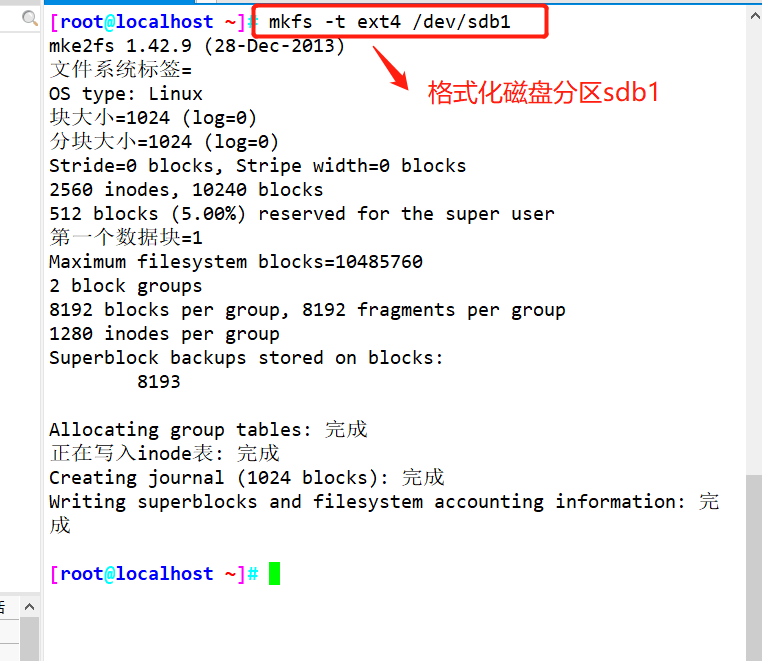
mkfs.ext4 /dev/ sdb1 #xfs can also be used, but when creating inode numbers in the laboratory, more than 100 inodes should be created than the total number of inodes, which may be a statistical problem. It is recommended to use ext4 or ext3 to facilitate the experiment
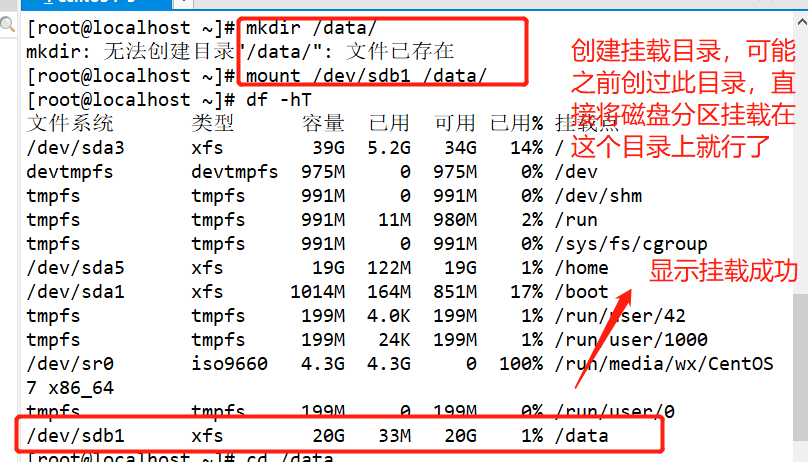
mkdir /data
mount /dev/sdb1 /data
df -i
#Simulate inode node exhaustion failure
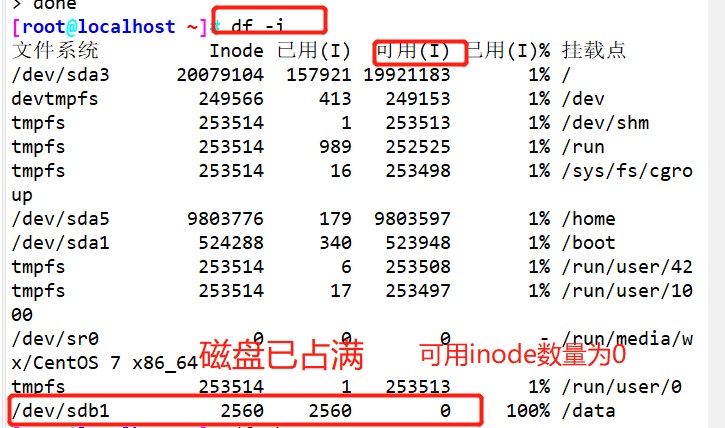
for ( (i=1; i<=2549; i++) )
>do
>touch /test/ file$i
>done<br><br>Or directly touch {1. . 2549} . txt
df -i
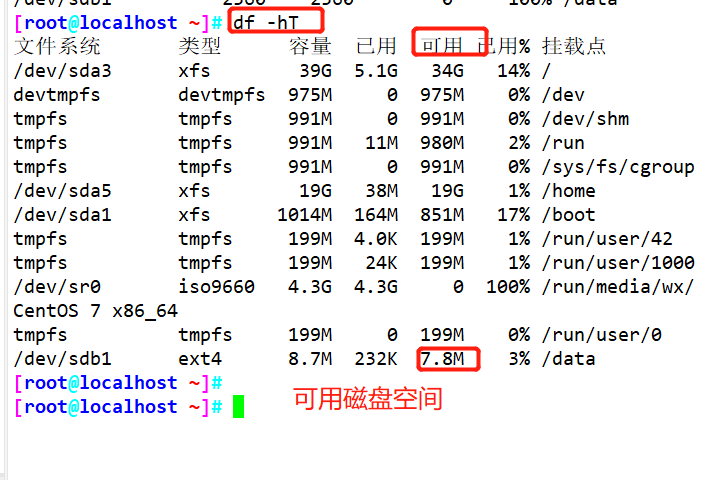
df -hT
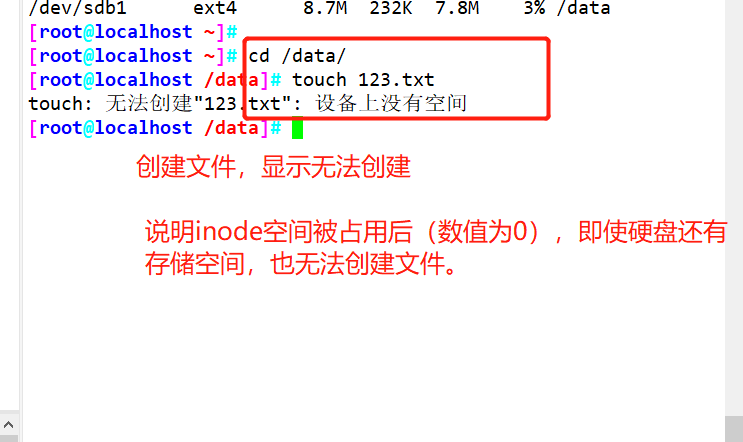
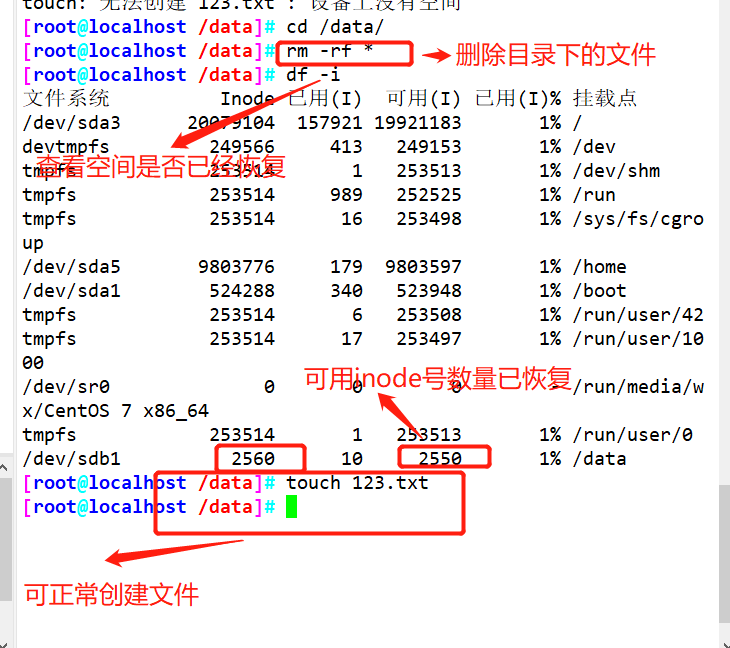
#Delete file recovery
rm -rf /data/ *
df -i
df -hT
2. Example operation

Format and mount
Using the for loop, create a file to fill up the inode space (simulate the inode node exhaustion failure)

Delete file recovery
4, Recovered EXT type file (Experiment)
1. Compile and install the extundelete package
Install dependent packages
e2fsprogs-libs-1. 41.12-18.el6.x86_ 64.rpm

e2fsprogs-devel-1 .41.12-18.el6.x86_ _64.rpm
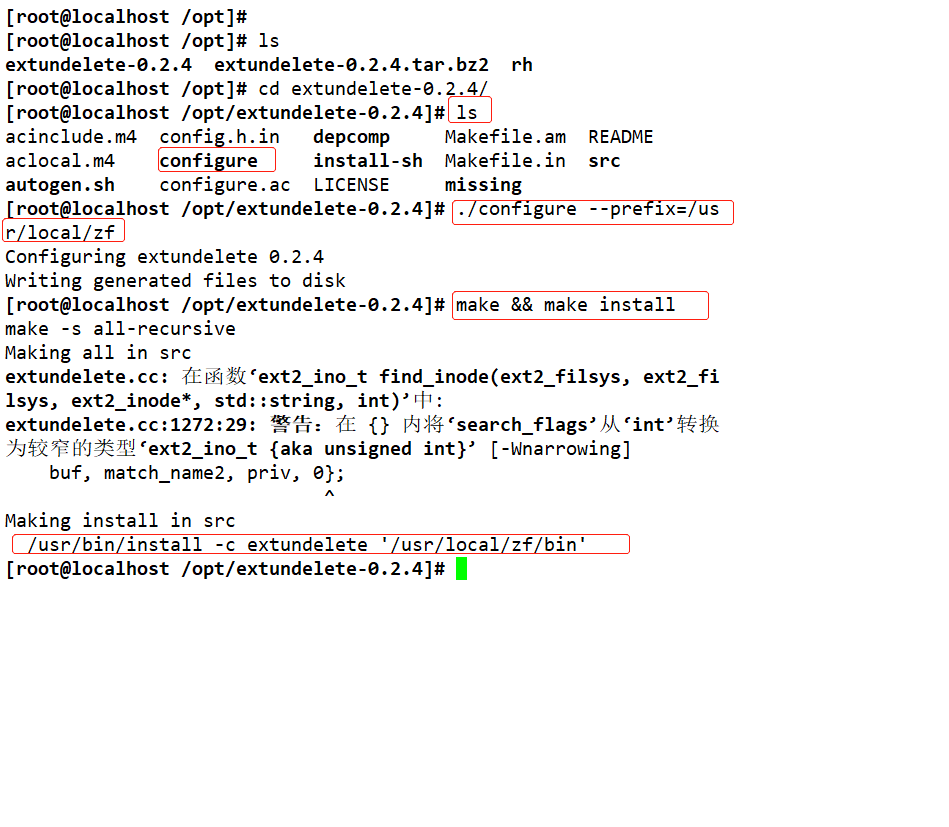
Configuration, compilation and installation
extundelete-0.2.4.tar.bz2
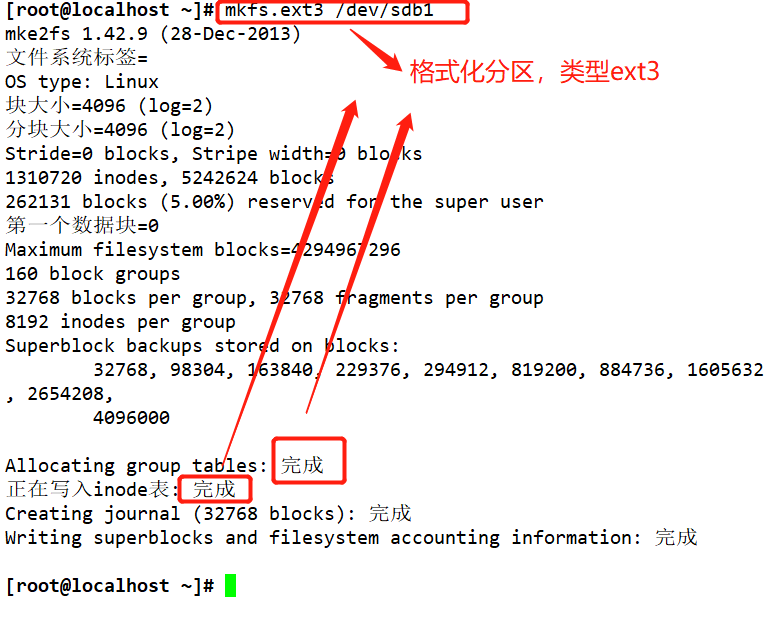
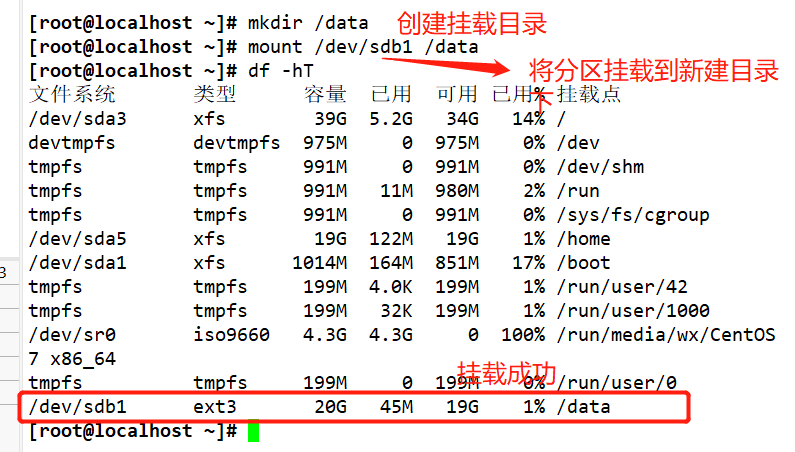
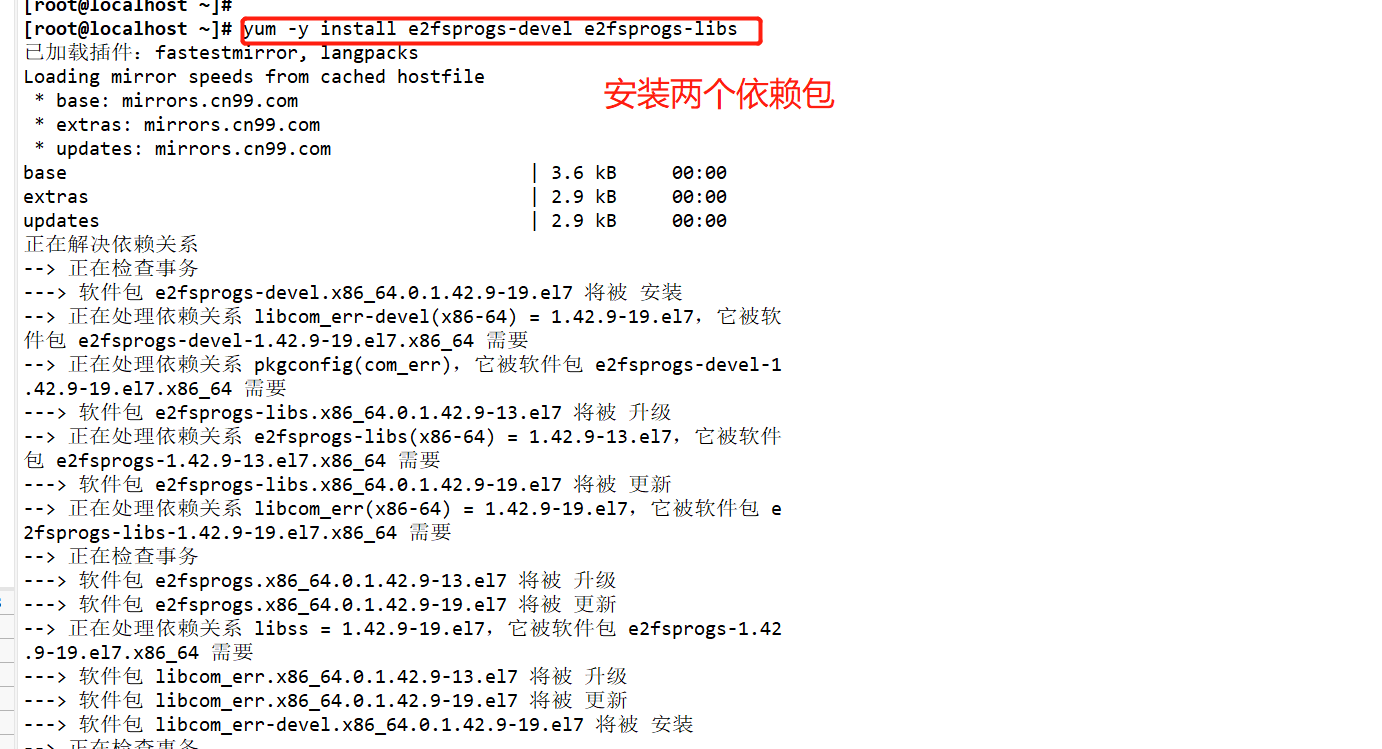
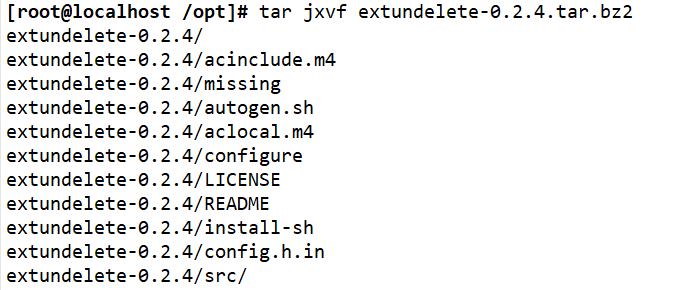
#Use fdisk to create partition / dev/sdc1 and format ext3 file system
fdisk /dev/sdb
partprobe /dev/sdb
mkfs.ext3 /dev/ sdb1
mkdir /data
mount /dev/sdb1 /data
df -hT

#Install dependent packages
yum -y install e2fsprogs-devel e2 fsprogs-libs

#Compile and install extundelete
cd /opt
wget http: //nchc.dl.sourceforge.net/project/extundelete/extundelete/0.2.4/extundelete-0.2.4.tar.bz2

tar jxvf extundelete-0.2.4.tar.bz2
cd extundelete-0.2.4/
./configure --prefix=/usr/ local/jz/ && make && make install

ln -s /usr/ local/jz/bin/* /usr/bin/
</code>

https://blog.51cto.com/u_15382300/4686825
Simulate deletion and restore
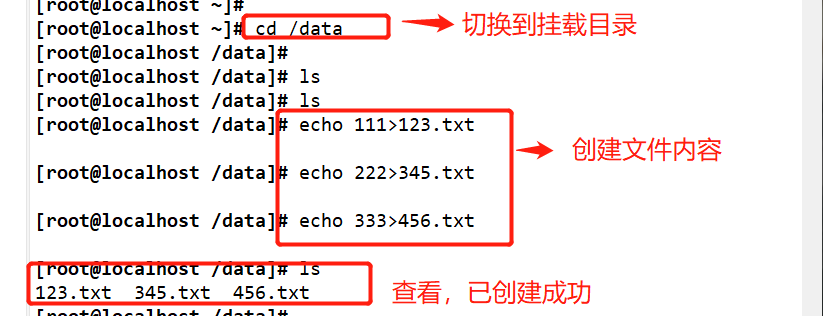
cd /data
  echo 111 > 123.txt
  echo 222 > 234.txt
  echo 333 > 456.txt
ls
extundelete /dev/sdb1 --inode 2
#Check which files exist in the file system / dev/sdc1. The i node starts from 2, and 2 represents the initial directory of the file system

rm-rf 123.txt  234.txt  456.txt
extundelete /dev/sdd1 -- inode 2
cd ~
umount /data/
extundelete /dev/sdb1 --restore-all
#Recover everything under the / dev/sdc1 file system

#A - recovered will appear in the current directory_ Files / directory, which stores the recovered files
ls RECOVERED_FILES
Experimental operation
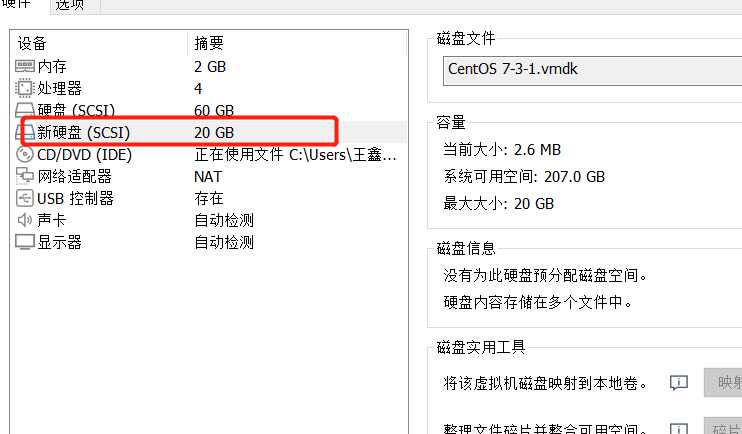
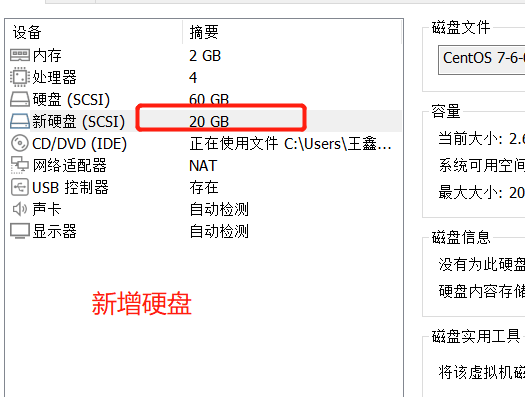
Add a 20G hard disk and partition it
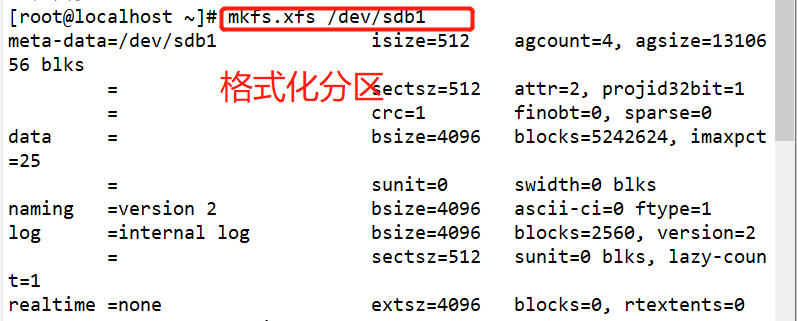
Format and mount the partition
Install two dependent packages
Transmission and decompression of the installation package of extundelete

 Compile and install
 Create files and contents in the mount directory and view them

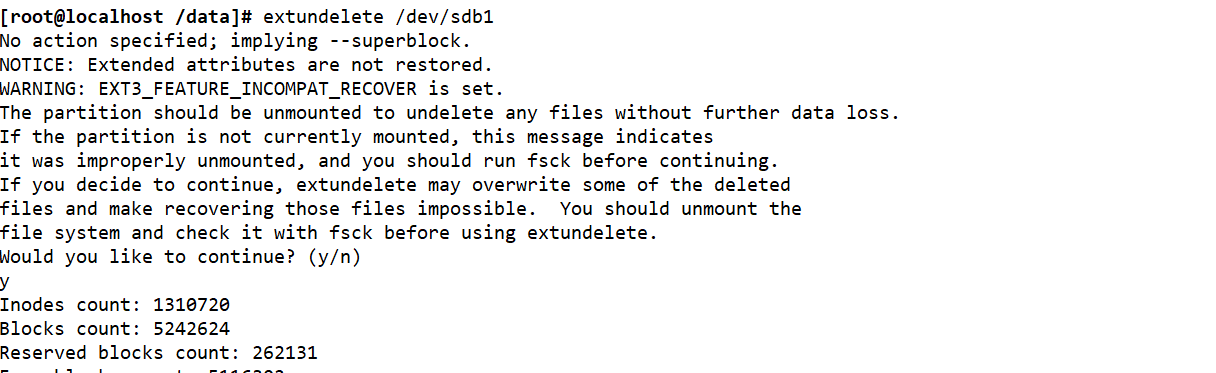
Delete the new file and check whether it has been deleted (simulate failure)

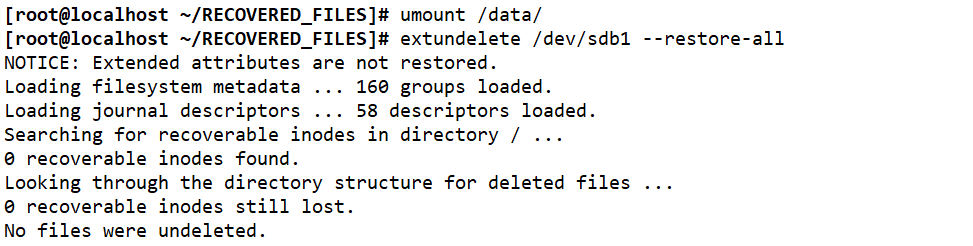
Unmount and restore files

5, xfs type file backup and recovery (Experiment)
- The Centos 7 system uses xfs files by default. xfs files can be backed up and restored using xfsdump and xfsrestore tools.
- Xfsdump has two backup levels: 0 means full backup; 1-9 indicates incremental backup. The backup level of xfsdump is 0 by default
Command format of xfsdump
xfsdump -f Backup storage location path or device file to be backed up
Common options for xfsdump command
-f:Specify backup file directory
-L:Specify label session label
-M:Specify device label media label
-S:Back up a single file,-s The path cannot be followed directly
xfsdump usage restrictions
Only mounted file systems can be backed up
 Must use root You can only operate with your permission
 Only backup XFS file system
 The data after backup can only make xfsrestore analysis
 You cannot back up two with the same UUID File system for(available blkid Command view)
Operation step command
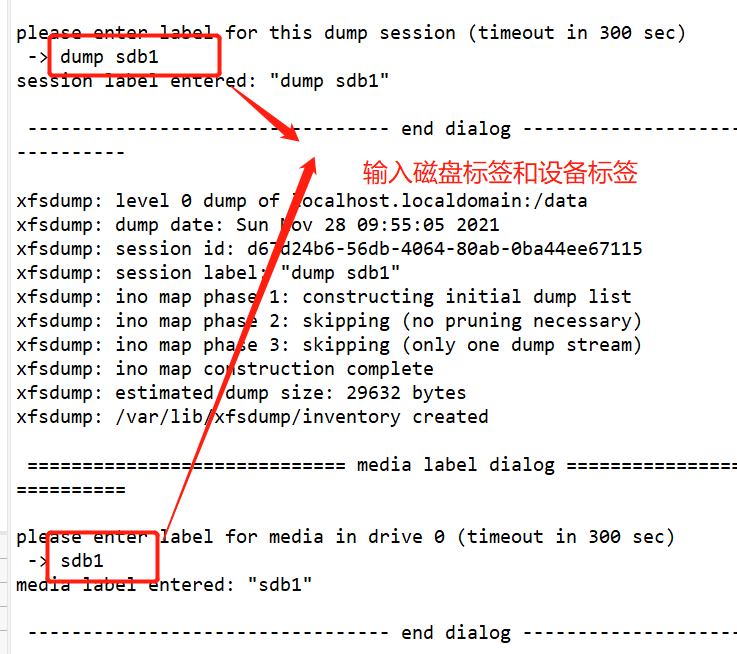
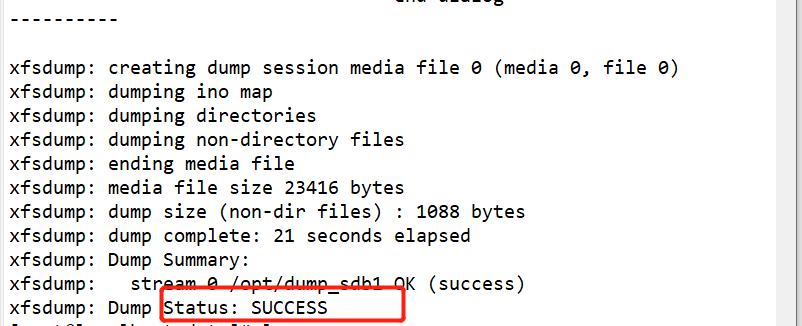
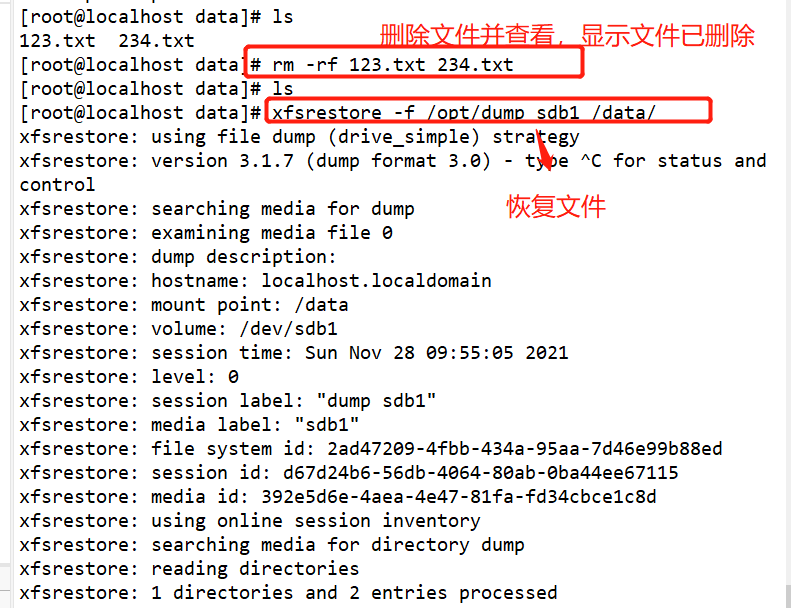
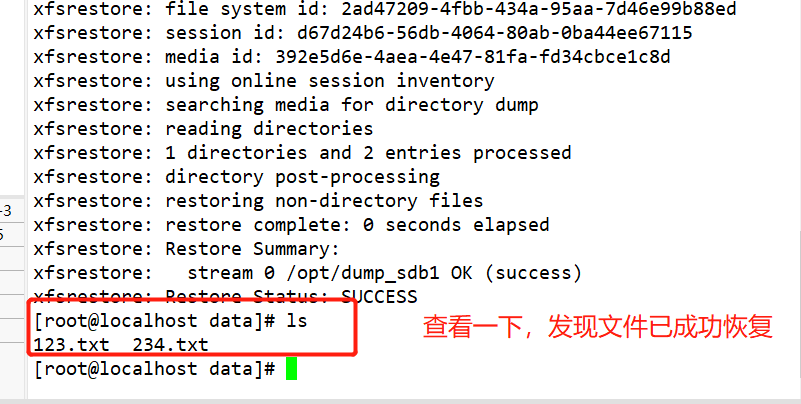
#Use fdisk to create partition / dev/sdb1 and format xfs file system
fdisk /dev/ sdb
partprobe /dev/ sdb
mkfs.xfs [-f] /dev/ sdb1
mkdir /data
mount /dev/ sdb1 /data/
cd /data
cp /etc/passwd ./
mkdir  test
touch test/a

#Use the xfsdump command to back up the entire partition
rpm -qa| grep xfsdump
yum install -y xfsdump
xfsdump -f /opt/dump_sdb1 /dev/sdb1 [-L dump sdb1 -M sdb1 ]

#Simulate data loss and recover files using the x fsrestore command
cd /data/
rm -rf ./*
ls

xfsrestore -f /opt/dump_ sdb1 /data/
Practical operation
Add a new disk and partition the main area
Format and mount the partition
New file content

Check whether the program is installed, and specify the backup directory and the disk to be backed up

Delete the created file and perform the recovery test
6, Log file
Log function
It is used to record various events during the operation of the system and program
Through reading, it is helpful to diagnose and solve system faults
Classification of log files
Kernel and system log
The system service rsyslog is used for the same management, and the log format is basically similar
User log
Record relevant documents of system user login and exit from the system
Program log
Log files independently managed by various applications have different recording formats
Log save location
It is located in the: / var/log directory by default
/var/log/messages
Introduction to main log files
| Kernel and public message log | . /var/log/messages Record Linux kernel messages and public log information of various applications, including startup, Io error, network error, program failure, etc For applications or services that do not use a separate log file, you can generally obtain relevant event recording information from the log file |
| Scheduled task log | . /var/log/cron Record the event information generated by the crond scheduled task |
| System boot log | . /var/log/dmesg Record various event information of Linux system during boot |
| Mail system log | . /var/log/maillog Record all kinds of event information in the boot process of entering or sending out the system |
| User login log | . /var/log/lastlog Record the latest login event of each user in binary format . /var/log/secure Record security event information related to user authentication . /var/log/wtmp Record each user's login, logout, system startup and shutdown events in binary format . /var/log/btmp Log failed, incorrect login attempts and authentication events in binary format |
Kernel and system log
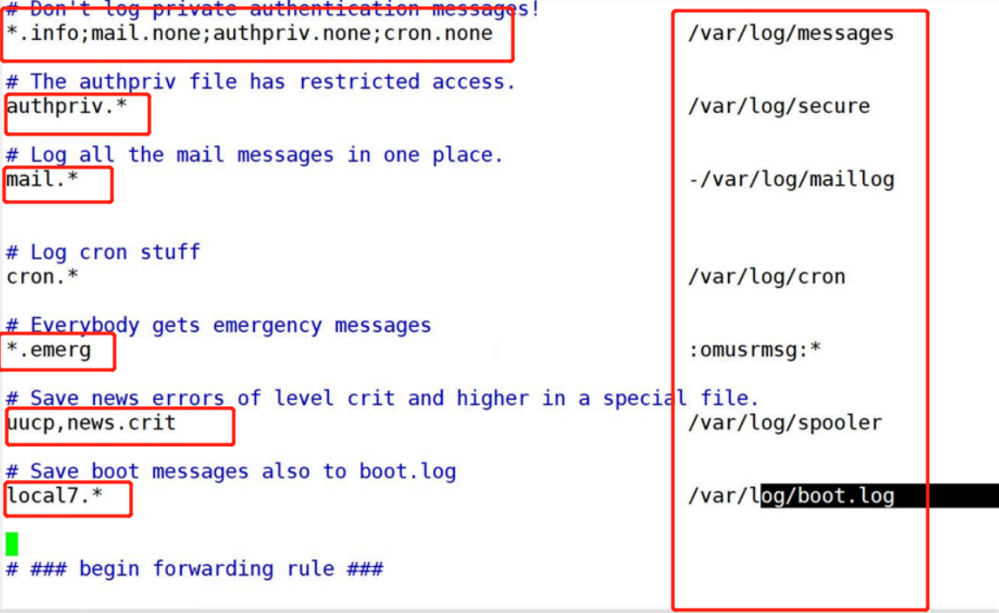
System service rsyslog unified management
vim /etc/rsyslog.conf                   #View the rsyslog.conf configuration file
* . info;mail.none;authpriv.none;cron.none  /var/log/messages
*.info          #Information indicating all levels above info level is written to the corresponding log file
mail.none       #Indicates that the information of an event is not written to the log file (e.g. mail here)
Level of log messages
Priority of Linux kernel log messages (the lower the number level, the higher the priority, and the more important the message is)
| level | news | level | Specific description |
| 0 | EMERG | urgent | A condition that causes the host system to become unavailable |
| 1 | ALERT | warning | Measures must be taken immediately to solve the problem |
| 2 | CRIT | serious | More serious situation |
| 3 | ERR | error | An error occurred while running |
| 4 | WARNING | remind | Important events that may affect system functions and need to be reminded to users |
| 5 | NOTICE | be careful | Events that will not affect normal functions but need attention |
| 6 | INFO | information | general information |
| 7 | DEBUG | debugging | Program or system debugging information, etc |
General format of logging
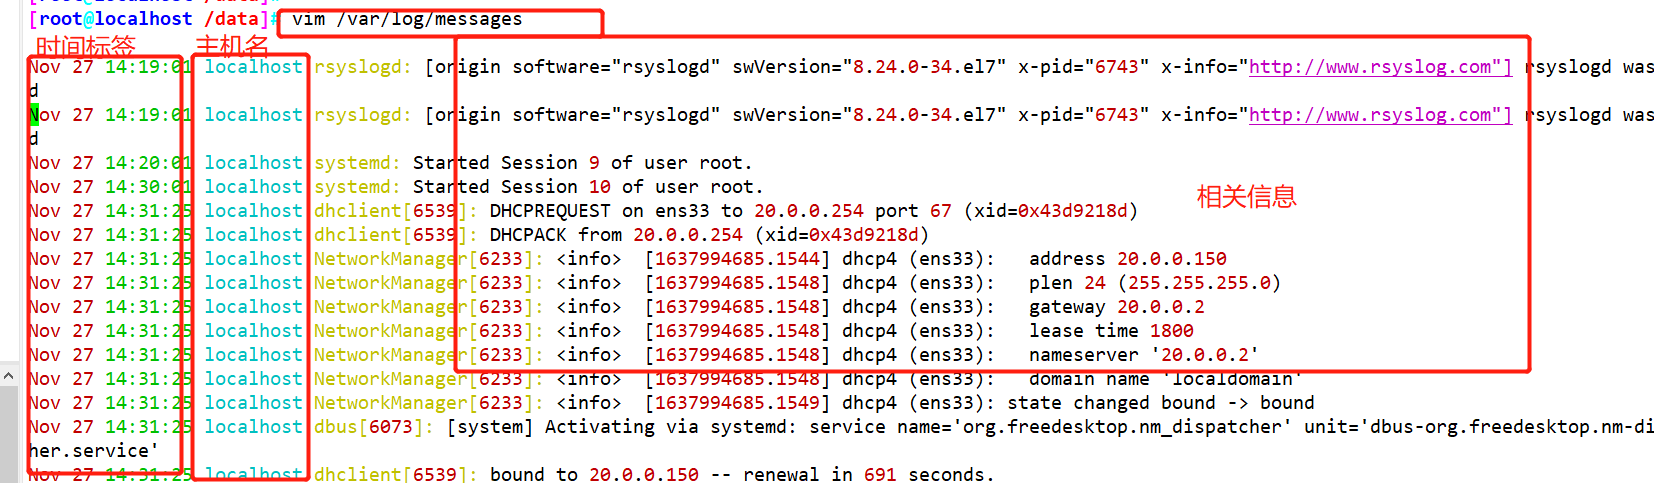
Public log/var/log/messages Record format of file
 Timestamp: the date and time when the message was sent
  Host name: the name of the computer that generated the message
  Subsystem name:The name of the application that sent the message
Example:
User log analysis
Saved messages related to user login and logout
/var/log/lastlog : Recent user login events

/var/log/wtmp: User login, logoff and system startup and shutdown events

/var/run/utmp:  Details of each user currently logged in

/var/log/secure: Security events related to user authentication
Analysis tools
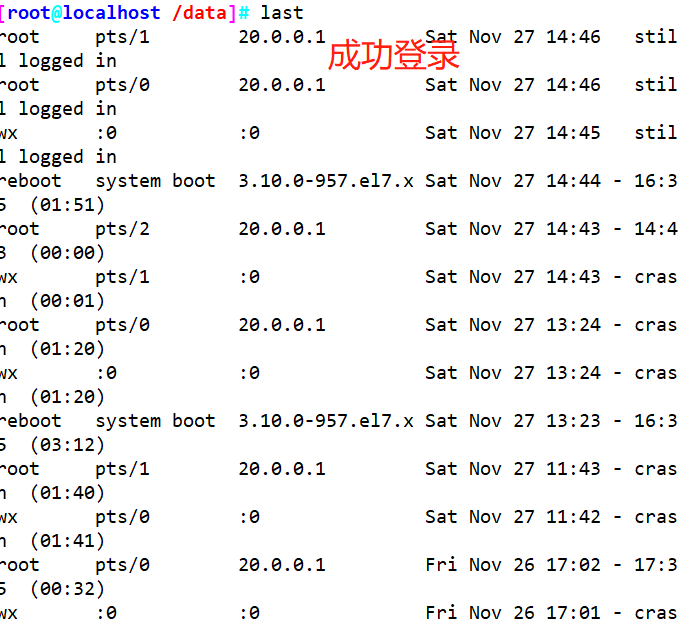
- users,who, W,last, lastb
- The last command is used to query the user records that have successfully logged in to the system
- The lastb command is used to query the user record of login failure

Program log analysis
Managed independently by the corresponding application
Web Service: / var/log/httpd/
- access_log -- record customer access events
- error_log -- record errors
Proxy service: / var/log/squid/
- access.log,cache.log
Log management policy
Timely backup and archive
Extend log retention
Control log access
The log may contain various sensitive information, such as account, password, etc
Centralized management log
Send the log files of the server to the same log server
It is convenient for the unified collection, sorting and analysis of log information
Prevent accidental loss, malicious tampering or deletion of log information
Configure log server to collect logs
rsyslog is a C/S architecture, which can listen and record through sockets. Can work based on TCP and UDP. The default listening port is 514, which only needs to be opened in MODULES
Sending server: client 192.168.206.20
Collection server: 192.168.206.30
1,Close the server and client firewalls first selinux
setenforce 0
systemctl stop firewalld
systemctl disable firewalld

2,Modify the client configuration file and start the service
vim /etc/rsyslog.conf
 After entering the text, cancel the comments in the following four lines

$ModLoad imudp
$UDPServerRun 514
$ModLoad imtcp
$InputTCPServerRun 514
3. #Add the following

template myFormat, "%timestamp% %hostname% %syslogseverity-text% %syslogtag%  %msg%\n

"ActionFileDefaultTemplate myFormat

*.info;mail.none;authpriv.none;cron.none        @@192.168.80.30:514

#%Timestamp%: timestamp
#%From host IP report: the IP address of which node the received information comes from
#Hostname No.: hostname
#%Syslogseverity text%: log level
#%syslogtag%: service process
#%msg%: log content
#The first @ of the receiver IP indicates TCP transmission and the second @ indicates UDP transmission
systemcrl restart rsyslog

4. #Modify the server configuration file and start the service
vim /etc/rsyslog.conf
#Cancel the comments before the next four lines
ModLoad imudpModLoadimudpUDPServerRun 514
ModLoad imtcpModLoadimtcpInputTCPServerRun 514

5. #Add the following
AllowedSender tcp, 192.168. 80.0/24 #Allow hosts in the 192.168.80.0 network segment to transmit template Remote via tcp protocol, "/ data / 1og /% romhost IP% / & fromhost IP%% year% -% Yearmonth% -% $day8.1og"

#Define the template, accept the log file path, and distinguish the logs of different hosts
:fromhost-ip, !isequal, "127.0.0.1" ?Remote      #Filter out the logs of the server

systemcrl restart rsyslog

//Create a / data/log directory on the server to accept a large amount of log information. The path in the configuration file should be consistent with this path
mkdir -p /data/log

//verification
 Enter the terminal command of the client or restart a service
logger "hello world"
#

View log files on the server
tree /data/log/
journalctl log management tool
#View all logs (by default, only the logs of this startup are saved)

journalctl

journalctl -r       #Indicates reverse order, viewed from the tail (recommended)

#View kernel log (do not display application log)

journalctl -k

#View the log of this system startup

journalctl -b [-0] ;"0"Refers to the last log started

#View the log of the last startup

journalctl -b -1

#Displays the log with the specified number of rows at the end

journalctl -n 20 [-f]
Note: you are viewing/var/log/messages Log of. However, the format has been adjusted. For example, the format of host name is different

#View the log of a service

journalctl -u    nginx.service [-f]  (Recommended (easy to use)

#View the log of the specified process

journalctl _PID=1 ;Here is view init Process (see my boot guide for details)

#View the log of the specified user

journalctl _UID=0 --since today ;Check today's root User's log, user UDP=0 What's important is root user
 perhaps
journalctl -xe
-x : It means a directory. A URL to solve the problem will be attached under the error information
-e:(pager-end)Start at the end