1, YUM overview
1.1 introduction to yum warehouse
yum is a software update mechanism based on RPM package (short for red hat package manager), which can automatically solve the dependencies between packages. It solves a lot of time for finding and installing dependent packages in daily work
Why does dependency occur? Because linux itself takes the simplicity of the system as its own advantage, it does not install all library files and compiled software packages when installing the operating system. Therefore, software package dependency occurs when installing software on the linux operating system. Yum is composed of warehouse and client, that is, the whole Yum is composed of two parts, so yum can be stored on two servers. It can also be stored on a server. Services can be provided by officials or by third parties, such as domestic Alibaba cloud, Sohu cloud, and some non-profit organizations such as schools. The official source is generally abroad, and the download speed must be limited. Manually changing to domestic cloud can greatly improve the download speed.
1.2. yum implementation process
Create a yum repository (warehouse) on the yum server. Many rpm packages and related metadata files of the package are stored in the warehouse in advance (placed in the specific directory repodata). When the yum client installs the package using the yum/dnf tool, the metadata in repodata will be automatically downloaded to query whether there are related packages and dependencies in the remote data, Automatically find relevant packages from the warehouse, download and install them.
2, How to build a warehouse
2.1. Build local warehouse
1. Mount the image file in the optical drive first (load the CD of the virtual machine first)
[root@localhost ~]# mount /dev/sr0 /mnt/
mount: /dev/sr0 Write protected, will mount as read-only
[root@localhost ~]# df -Th / / view the mount
 file system                type      Capacity used available used% Mount point
/dev/mapper/centos-root xfs        37G  7.5G   30G   21% /
devtmpfs                devtmpfs  977M     0  977M    0% /dev
tmpfs                   tmpfs     993M     0  993M    0% /dev/shm
tmpfs                   tmpfs     993M  9.1M  984M    1% /run
tmpfs                   tmpfs     993M     0  993M    0% /sys/fs/cgroup
/dev/sda1               xfs      1014M  161M  854M   16% /boot
tmpfs                   tmpfs     199M  4.0K  199M    1% /run/user/42
tmpfs                   tmpfs     199M   52K  199M    1% /run/user/0
/dev/sr0                iso9660   4.3G  4.3G     0  100% /mnt
Switch to the yum.repo.d directory and move the warehouse
[root@localhost ~]# cd /etc/yum.repos.d/
[root@localhost yum.repos.d]# mkdir bak
[root@localhost yum.repos.d]# mv *.repo why/
[root@localhost yum.repos.d]# ls
why
3. Create a new warehouse file
[root@localhost yum.repos.d]# vim why.repo
[why]
name=why
baseurl=file:///mnt
enabled=1
gpgcheck=0
2.2. Build an Alibaba cloud warehouse (http external network environment)
1. Switch to the yum.repo.d directory and move the warehouse
[root@localhost ~]# cd /etc/yum.repos.d/
[root@localhost yum.repos.d]# mkdir bak
[root@localhost yum.repos.d]# mv *.repo bak/
[root@localhost yum.repos.d]# ls
bak
2. New warehouse
[ali]
name=aliyun
#baseurl=https://mirrors.aliyun.com/centos/7/os/x86_64 / / any one can be used normally when it is turned on. Here is the function of the main explanatory variable
baseurl=https://Mirrors. Aliyun. COM / CentOS / $releaser / OS / $basearch / / / see Section 2.1 of the main configuration file for the variables
gpgcheck=0

[epel]                                                                //epel source warehouse
name=epel
baseurl=https://mirrors.aliyun.com/centos/7/extras/x86_64/
gpgcheck=0

[update]                                                             //Update package warehouse
name=update
baseurl=https://mirrors.aliyun.com/centos/7/updates/x86_64/
gpgcheck=0
3, NFS share
3.1 NFS overview
NFS (Network File System network file service)
NFS is a network file system protocol based on TCP/IP transmission, which was originally developed by Sun company.
By using the NFS protocol, clients can access shared resources in remote servers as if they were local directories
NFS is also a protocol that NAS storage devices must support
NAS storage:
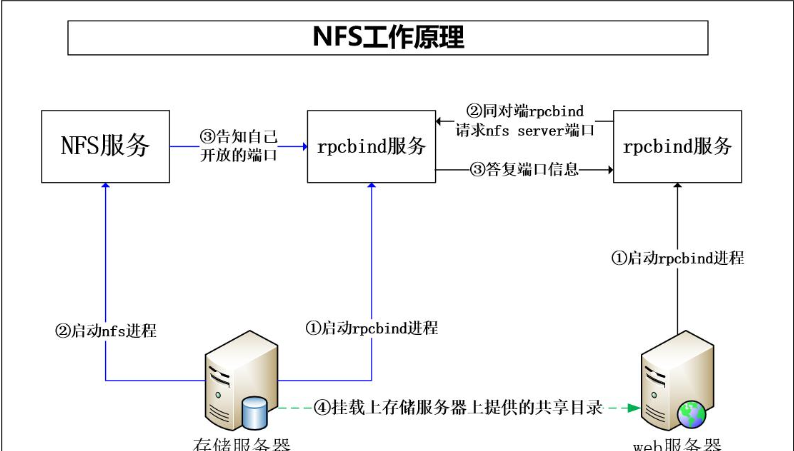
The implementation of NFS service depends on RPC (Remote Process Call) mechanism to complete the remote to local mapping process. In CentOS 7 system, NFS utils and rpcbind packages need to be installed to provide NFS sharing services. The former is used for NFS share publishing and access, and the latter is used for RPC support.
When manually loading nfs shared services, you should start rpcbind first and then nfs.
characteristic:
Use TCP/IP to transmit network files
Low safety
Easy to operate
Suitable for LAN environment
3.2 working principle of NFS

3.3 NFS setup process
The server:
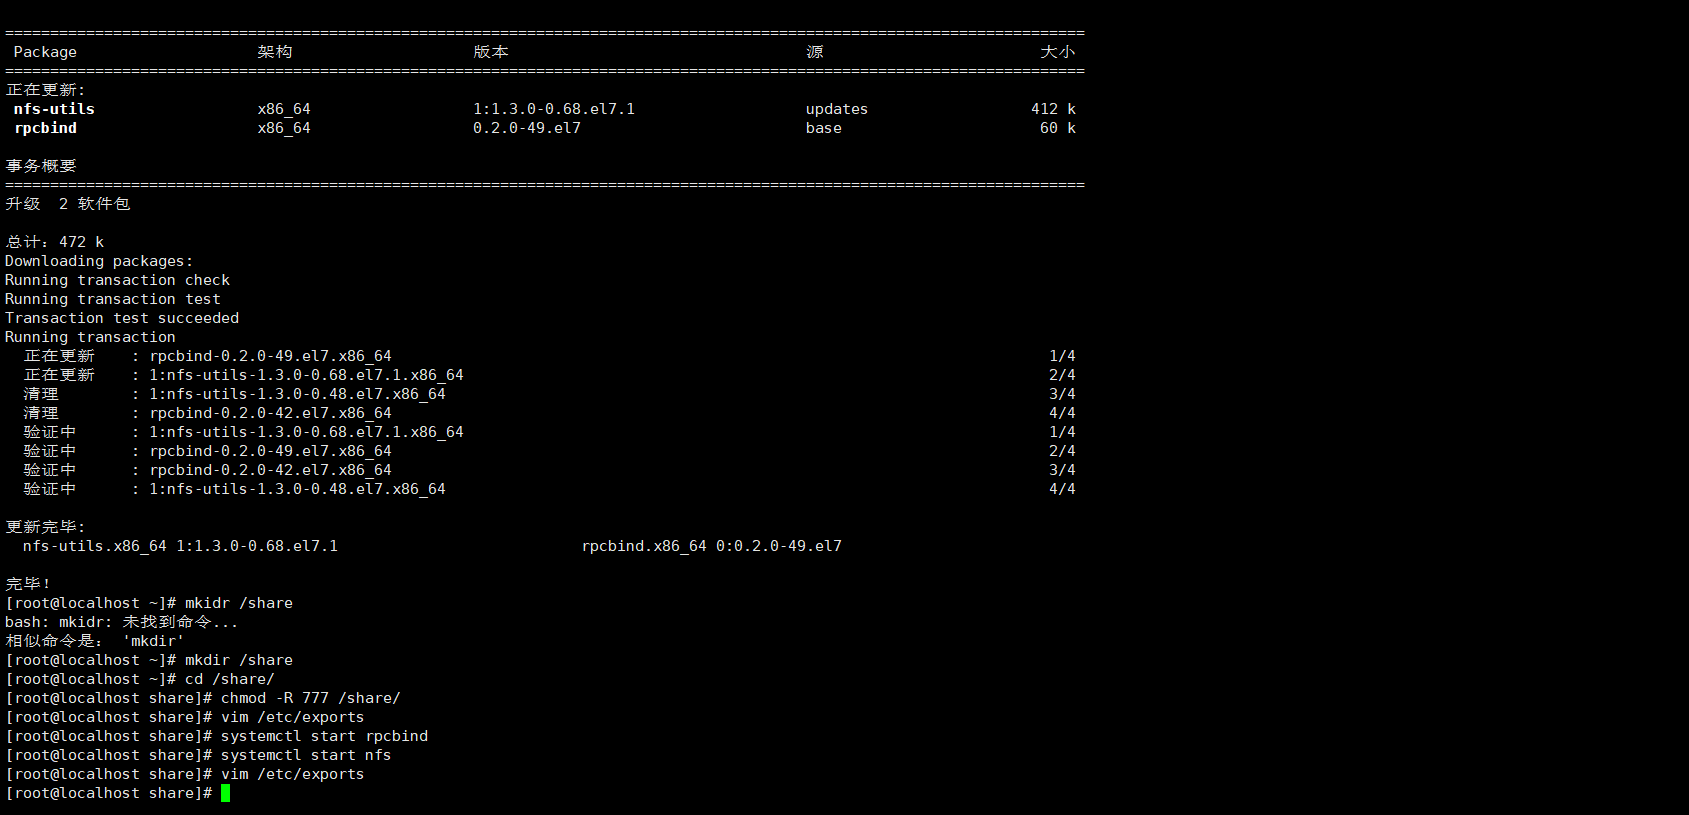
#Turn off firewall [root@localhost ~]# systemctl stop firewalld [root@localhost ~]# setenforce 0 #Install package [root@localhost ~]# yum install nfs-utils.x86_64 rpcbind -y #New shared directory [root@localhost ~]# mkdir /share [root@localhost ~]# cd /share/ #Modify permissions [root@localhost share]# chmod -R 777 /share/ #Edit profile [root@localhost share]# vim /etc/exports /share * /share 192.168.32.0/24(rw,sync,no_root_squash) #Shared directory network segment read / write, synchronization, no root permission [root@localhost ~]# systemctl start rpcbind [root@localhost ~]# systemctl start nfs #View detailed nfs information [root@localhost share]#exportfs -v [root@localhost ~]# netstat -anpt | grep rpc #View NFS shared directories published locally [root@localhost ~]# showmount -e


client:
#Mount server to local folder
[root@localhost ~]# mount 192.168.32.96:/share /mnt
#Check whether the mount is successful
[root@localhost ~]# df -Th
3. Is the test successful
#The server side creates a directory under the shared folder [root@localhost share]# cd /share/ [root@localhost share]# touch why.txt #Check whether the file is successfully seen in the client's Mount directory [root@localhost ~]# cd /mnt/ [root@localhost mnt]# ls why.txt