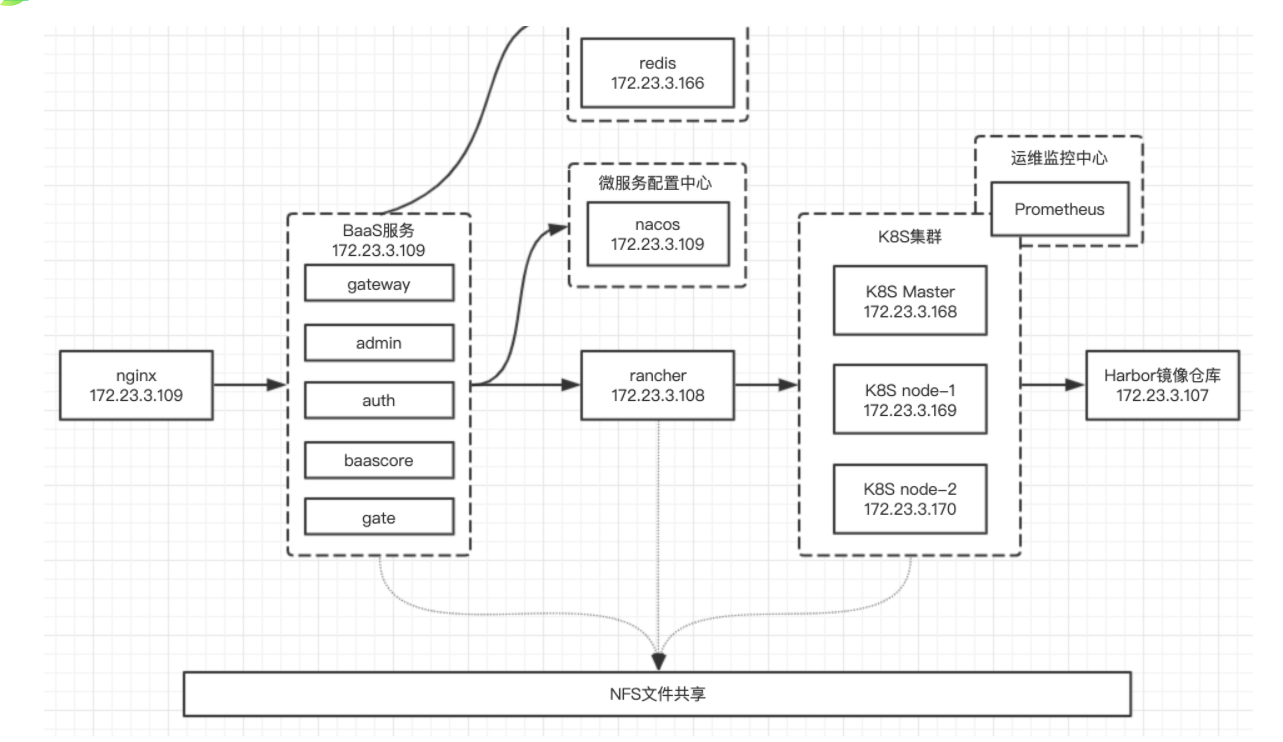
0. Architecture diagram
1. Network and system settings
1.1 /etc/profile agent
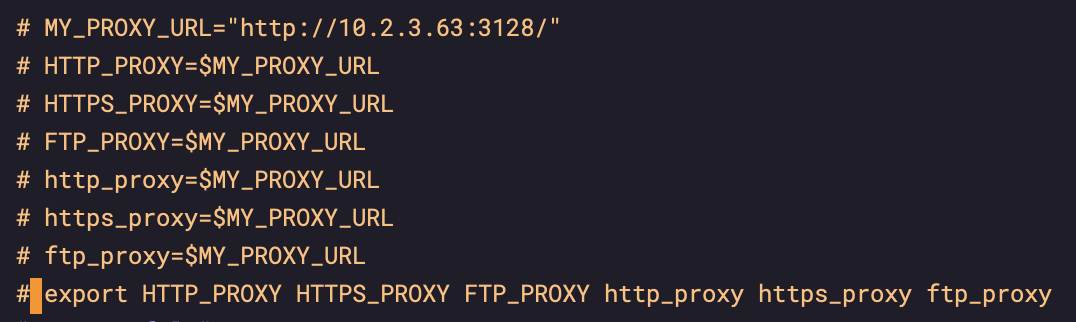
sudo vi /etc/profile
Comment out the following agent configuration
source /etc/profile
1.2 wget agent
sudo vi /etc/wgetrc
1.3 clearing environment variables
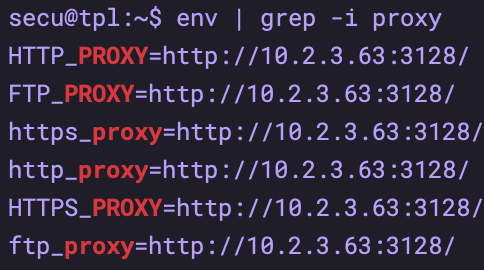
env | grep -i proxy
unset HTTPS_PROXY
unset HTTP_PROXY
unset FTP_PROXY
unset https_proxy
unset http_proxy
unset ftp_proxy
Try WGet after changing`` https://www.baidu.com And curl`` https://www.baidu.com See if it works
1.4 setting DNS
Not for the time being
1.5 NTP
Configuration: sudo vim /etc/ntp.conf
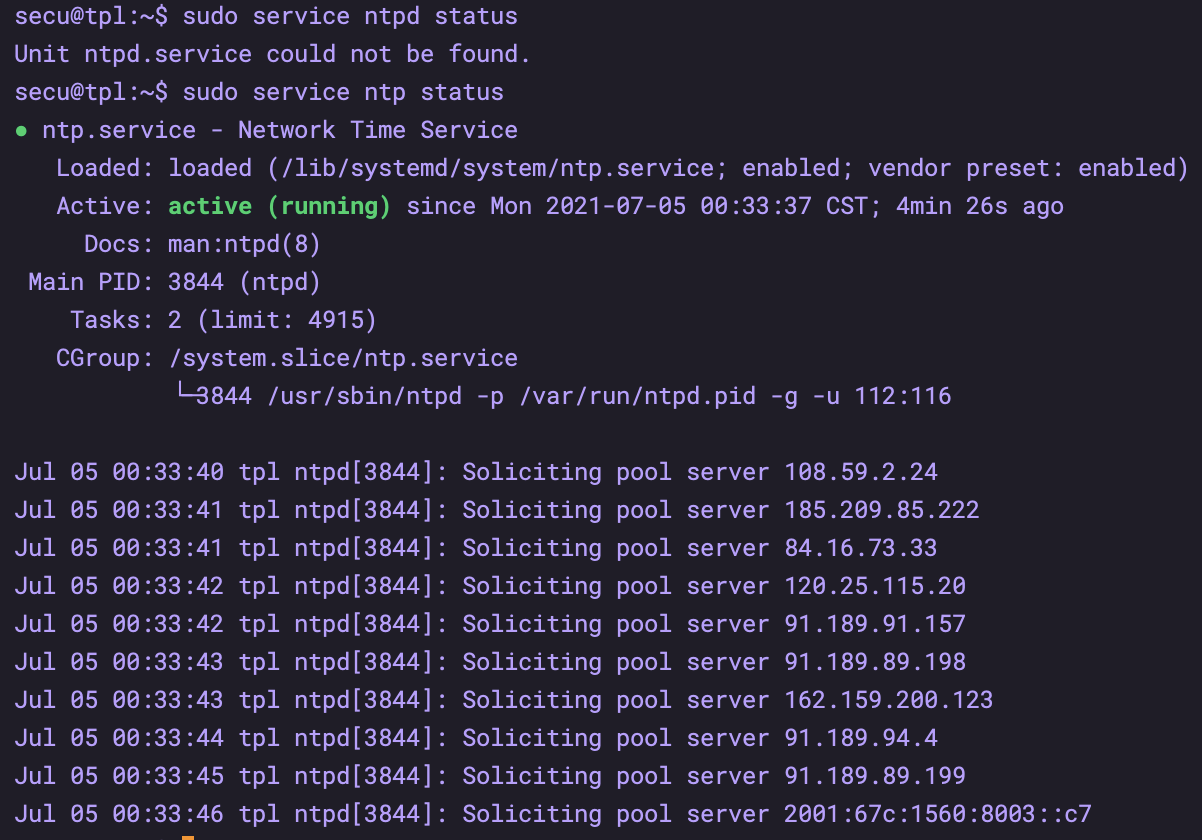
View status: sudo service ntp status
1.6 time zone selection
tzselect – this step can be omitted
sudo cp /usr/share/zoneinfo/Asia/Shanghai /etc/localtime
2. apt source update
#First, backup the configuration file
sudo cp /etc/apt/sources.list /etc/apt/sources.list.bak
#Edit profile
sudo vim /etc/apt/sources.list
#Add the following content at the beginning of the configuration file (ALI source)
deb http://mirrors.aliyun.com/ubuntu/ bionic main restricted universe multiverse
deb http://mirrors.aliyun.com/ubuntu/ bionic-security main restricted universe multiverse
deb http://mirrors.aliyun.com/ubuntu/ bionic-updates main restricted universe multiverse
deb http://mirrors.aliyun.com/ubuntu/ bionic-proposed main restricted universe multiverse
deb http://mirrors.aliyun.com/ubuntu/ bionic-backports main restricted universe multiverse
deb-src http://mirrors.aliyun.com/ubuntu/ bionic main restricted universe multiverse
deb-src http://mirrors.aliyun.com/ubuntu/ bionic-security main restricted universe multiverse
deb-src http://mirrors.aliyun.com/ubuntu/ bionic-updates main restricted universe multiverse
deb-src http://mirrors.aliyun.com/ubuntu/ bionic-proposed main restricted universe multiverse
deb-src http://mirrors.aliyun.com/ubuntu/ bionic-backports main restricted universe multiverse
#Execute the command to update it
sudo apt-get update
sudo apt-get upgrade
3. Modify the hostname (important)
sudo vi /etc/hostname
sudo hostname xxxxxx
 implement hostname Command view current hostname Whether with etc The contents in the file are the same
4. Install docker and docker compose
4.1 installing docker
https://www.runoob.com/docker/ubuntu-docker-install.html
# Install apt dependency package to obtain the warehouse through HTTPS:
sudo apt-get install \
    apt-transport-https \
    ca-certificates \
    curl \
    gnupg-agent \
    software-properties-common
# Add the official GPG key of Docker:
curl -fsSL https://mirrors.ustc.edu.cn/docker-ce/linux/ubuntu/gpg | sudo apt-key add -
# Use the following instructions to set up a stable warehouse
sudo add-apt-repository \
   "deb [arch=amd64] https://mirrors.ustc.edu.cn/docker-ce/linux/ubuntu/ \
  $(lsb_release -cs) \
  stable"
# List available versions in the warehouse
sudo apt-cache madison docker-ce
# Do not specify version installation
sudo apt-get install docker-ce docker-ce-cli containerd.io
# Install the specified version
sudo apt-get install docker-ce=5:20.10.7~3-0~ubuntu-bionic docker-ce-cli=5:20.10.7~3-0~ubuntu-bionic containerd.io
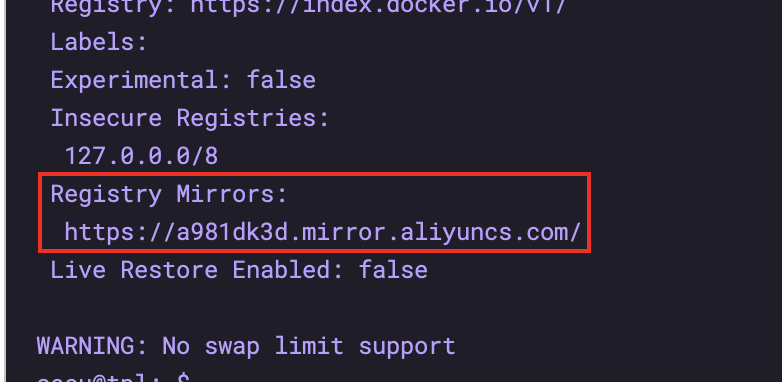
4.2 setting the docker acceleration source address
https://cr.console.aliyun.com/cn-hangzhou/instances/mirrors?accounttraceid=3767de09dfb046488df1eb0b8c456adcfief
# My acceleration address
https://a981dk3d.mirror.aliyuncs.com

sudo mkdir -p /etc/docker
sudo tee /etc/docker/daemon. <<-'EOF'
{
  "registry-mirrors": ["https://a981dk3d.mirror.aliyuncs.com"]
}
EOF
sudo systemctl daemon-reload
sudo systemctl restart docker
Check whether the configuration is effective
sudo docker info
4.3 ordinary users joining docker user group - need to log out and log in again
# Create docker group
sudo groupadd docker
# User joining docker group
sudo usermod -aG docker user name
# restart
sudo service docker restart
# verification
4.4 docker startup
sudo systemctl enable docker
4.5 installing docker compose
https://github.com/docker/compose/tags View version
- github version:
sudo curl -L https://github.com/docker/compose/releases/download/1.29.2/docker-compose-`uname -s`-`uname -m` -o /usr/local/bin/docker-compose
- daocloud version:
# Download the docker compose file
sudo curl -L https://get.daocloud.io/docker/compose/releases/download/1.29.2/docker-compose-`uname -s`-`uname -m` -o /usr/local/bin/docker-compose

# Add executable permissions. If you do not add executable permissions, you will be prompted that the permissions are insufficient when you execute the docker compose command.
sudo chmod +x /usr/local/bin/docker-compose

# View docker compose version
sudo docker-compose --version
4.6 others
# Install network tools
sudo apt install bridge-utils
# After installation, you can use the brctl command to view the docker network
brctl show
4.7 private source allowed
You can execute section 8.3 here in advance to avoid restarting docker after k8s installation
5. Installation k8s
5.1 inspection items
1. Firewall
sudo ufw status
2. Close swap
sudo sed -i '/ swap / s/^\(.*\)$/#\1/g' /etc/fstab
sudo swapoff -a
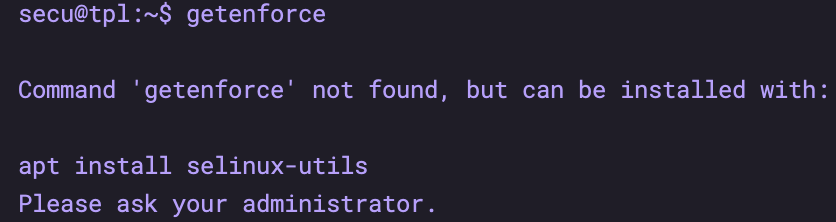
3. selinux
No, don't close it
5.2 installation k8s
# Add secret key
curl https://mirrors.aliyun.com/kubernetes/apt/doc/apt-key.gpg | sudo apt-key add

# Set up the warehouse using the following instructions
sudo add-apt-repository \
"deb https://mirrors.aliyun.com/kubernetes/apt kubernetes-xenial main"

# Update the source (the above command adds the secret key first, and then sets the warehouse. You can not update it again)
# sudo apt update

# List available versions
sudo apt-cache madison kubelet

# Install the specified version
sudo apt-get install -y kubelet=1.18.17-00 kubeadm=1.18.17-00 kubectl=1.18.17-00 --allow-unauthenticated
5.3 start k8s up
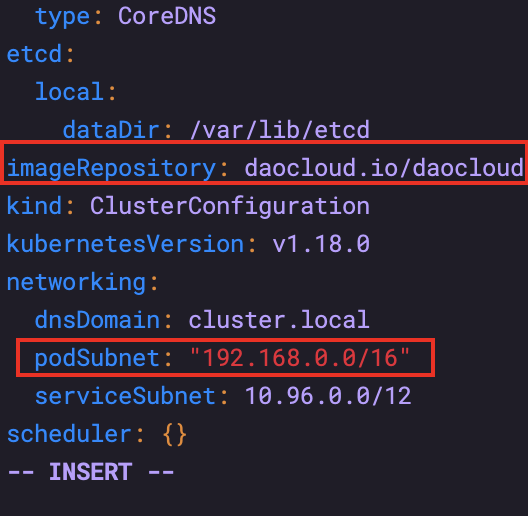
# Export profile
kubeadm config print init-defaults > init.default.yaml

# Modify master node IP
advertiseAddress Change to yourself master node IP

# Modify the domestic Ali image address
daocloud.io/daocloud

# Modify pod network segment configuration
podSubnet: 192.168.0.0/16 ----> Don't use quotation marks. The picture is wrong
serviceSubnet: 10.96.0.0/12 ----> New on this line
# The network segments of different network plug-ins are different. calico is 192.168.0.0/16
5.4 pulling image
# Check the mirror list
kubeadm config images list --config init.default.yaml
# Pull image
kubeadm config images pull --config init.default.yaml
5.5 deploying the master node
sudo kubeadm init --config=init.default.yaml

# After successful startup, you can see
Your Kubernetes control-plane has initialized successfully!

To start using your cluster, you need to run the following as a regular user:

  mkdir -p $HOME/.kube
  sudo cp -i /etc/kubernetes/admin.conf $HOME/.kube/config
  sudo chown $(id -u):$(id -g) $HOME/.kube/config

You should now deploy a pod network to the cluster.
Run "kubectl apply -f [podnetwork].yaml" with one of the options listed at:
  https://kubernetes.io/docs/concepts/cluster-administration/addons/

Then you can join any number of worker nodes by running the following on each as root:

kubeadm join 172.23.3.188:6443 --token abcdef.0123456789abcdef \
    --discovery-token-ca-cert-hash sha256:bf173d547377c04bcb45df56e68e42524ef3340c119982df1979b3ac219ef3ec
- Configure certificate
# Configure user certificate (master node)
mkdir -p $HOME/.kube
sudo cp -i /etc/kubernetes/admin.conf $HOME/.kube/config
sudo chown $(id -u):$(id -g) $HOME/.kube/config
- Remove stains
# Delete the stain policy of the master node
kubectl taint nodes --all node-role.kubernetes.io/master-
- Join other nodes (this step can also be done after calico is deployed)
# testing environment
sudo kubeadm join 172.23.3.188:6443 --token abcdef.0123456789abcdef \
    --discovery-token-ca-cert-hash sha256:bf173d547377c04bcb45df56e68e42524ef3340c119982df1979b3ac219ef3ec
# development environment
kubeadm join 172.23.3.168:6443 --token abcdef.0123456789abcdef \
    --discovery-token-ca-cert-hash sha256:dc27b5c1f27f82d50c7b8ea77481272a7300e67a40af6a4a9902b5a2ddfcf388
5.6 deploying calico
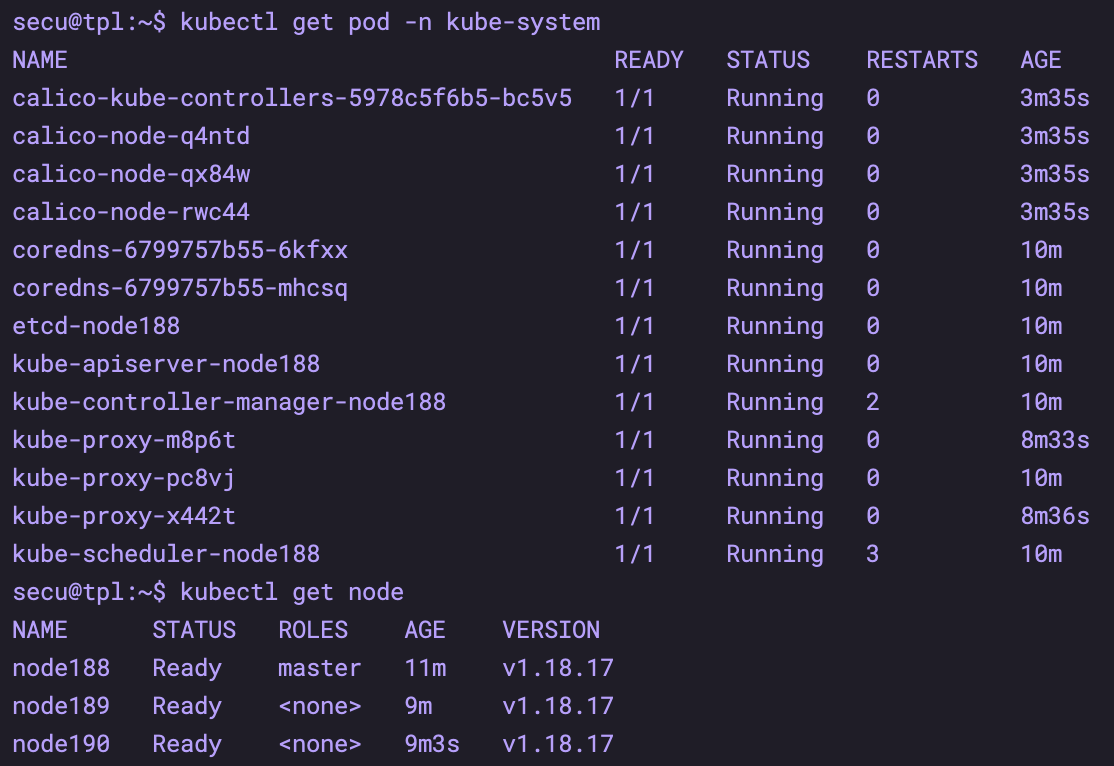
kubectl apply -f https://docs.projectcalico.org/manifests/calico.yaml
# After docker pulls the image, check whether the startup is completed
kubectl get pod -n kube-system
# Check whether the master node is completed
kubectl get node
After success, the situation is as follows
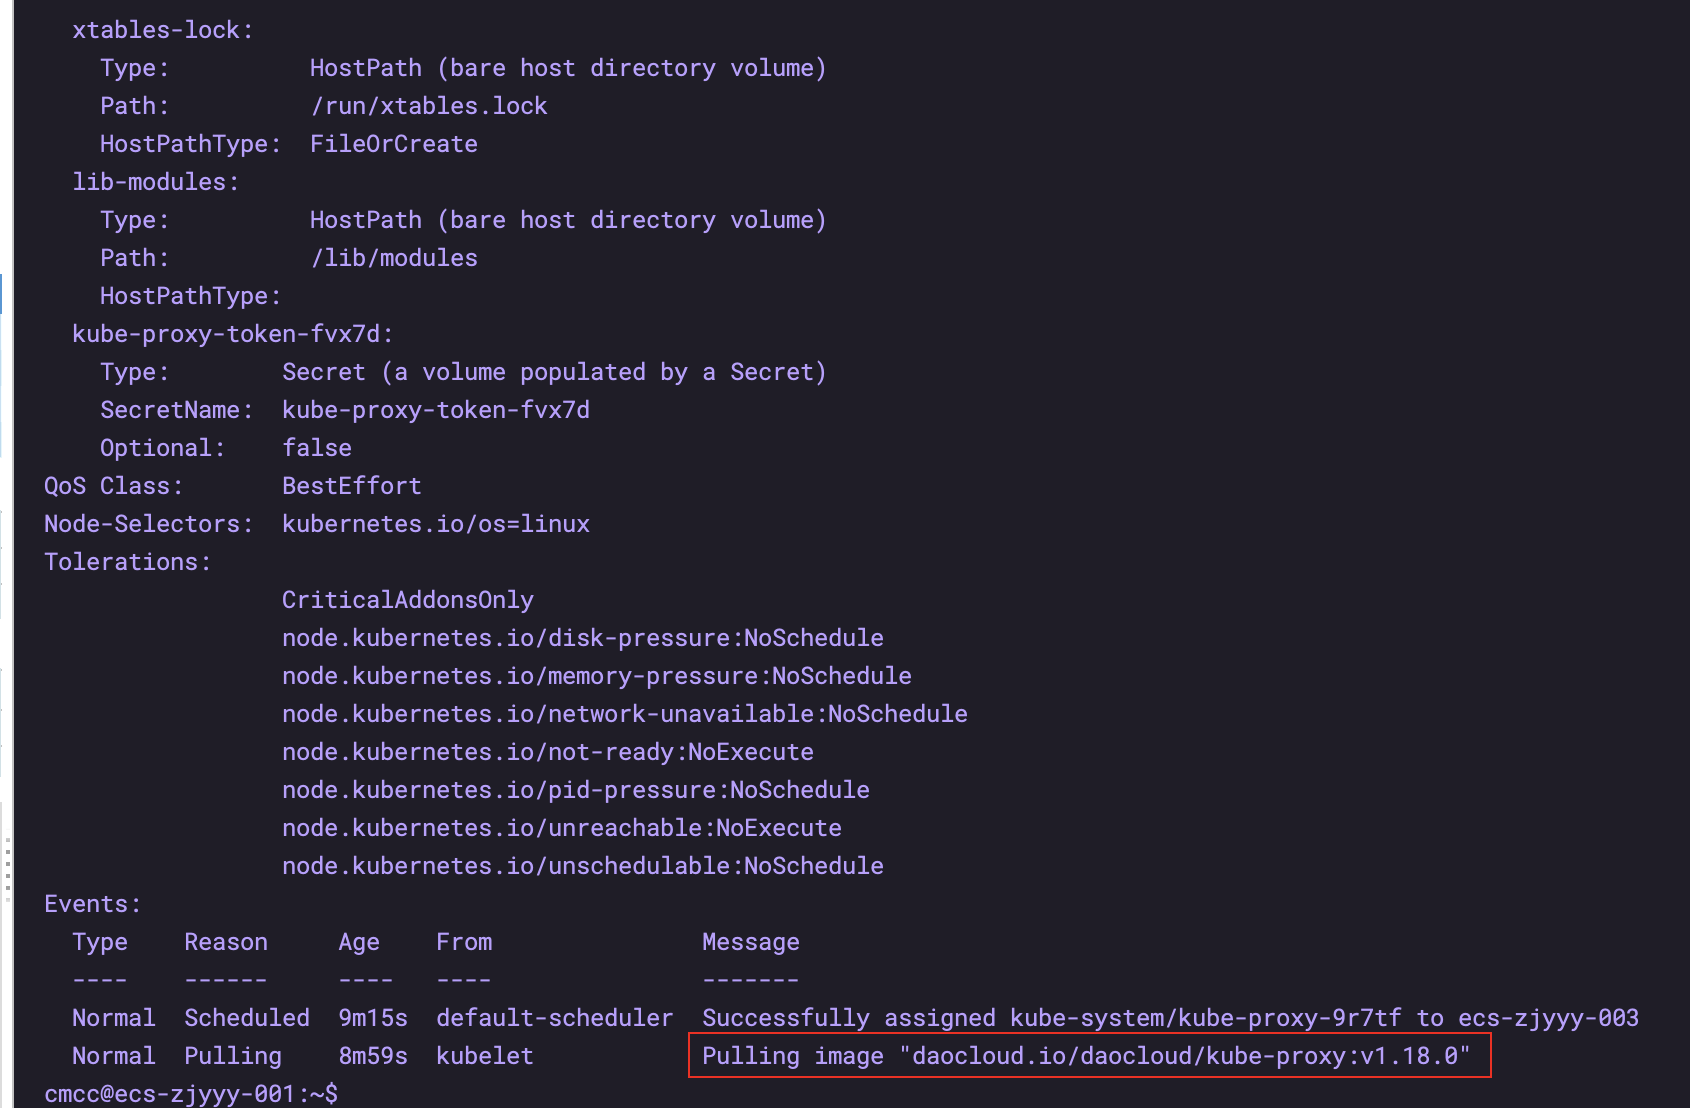
If the cluster does not work, you can take a look at the status of the pod
kubectl describe pods -n kube-system kube-proxy-9r7tf
# As you can see in the figure below, you are pulling a large file
6. Install rancher
6.1 docker installation
sudo docker run -d --privileged --restart=unless-stopped \
  -p 80:80 -p 443:443 \
  rancher/rancher:latest
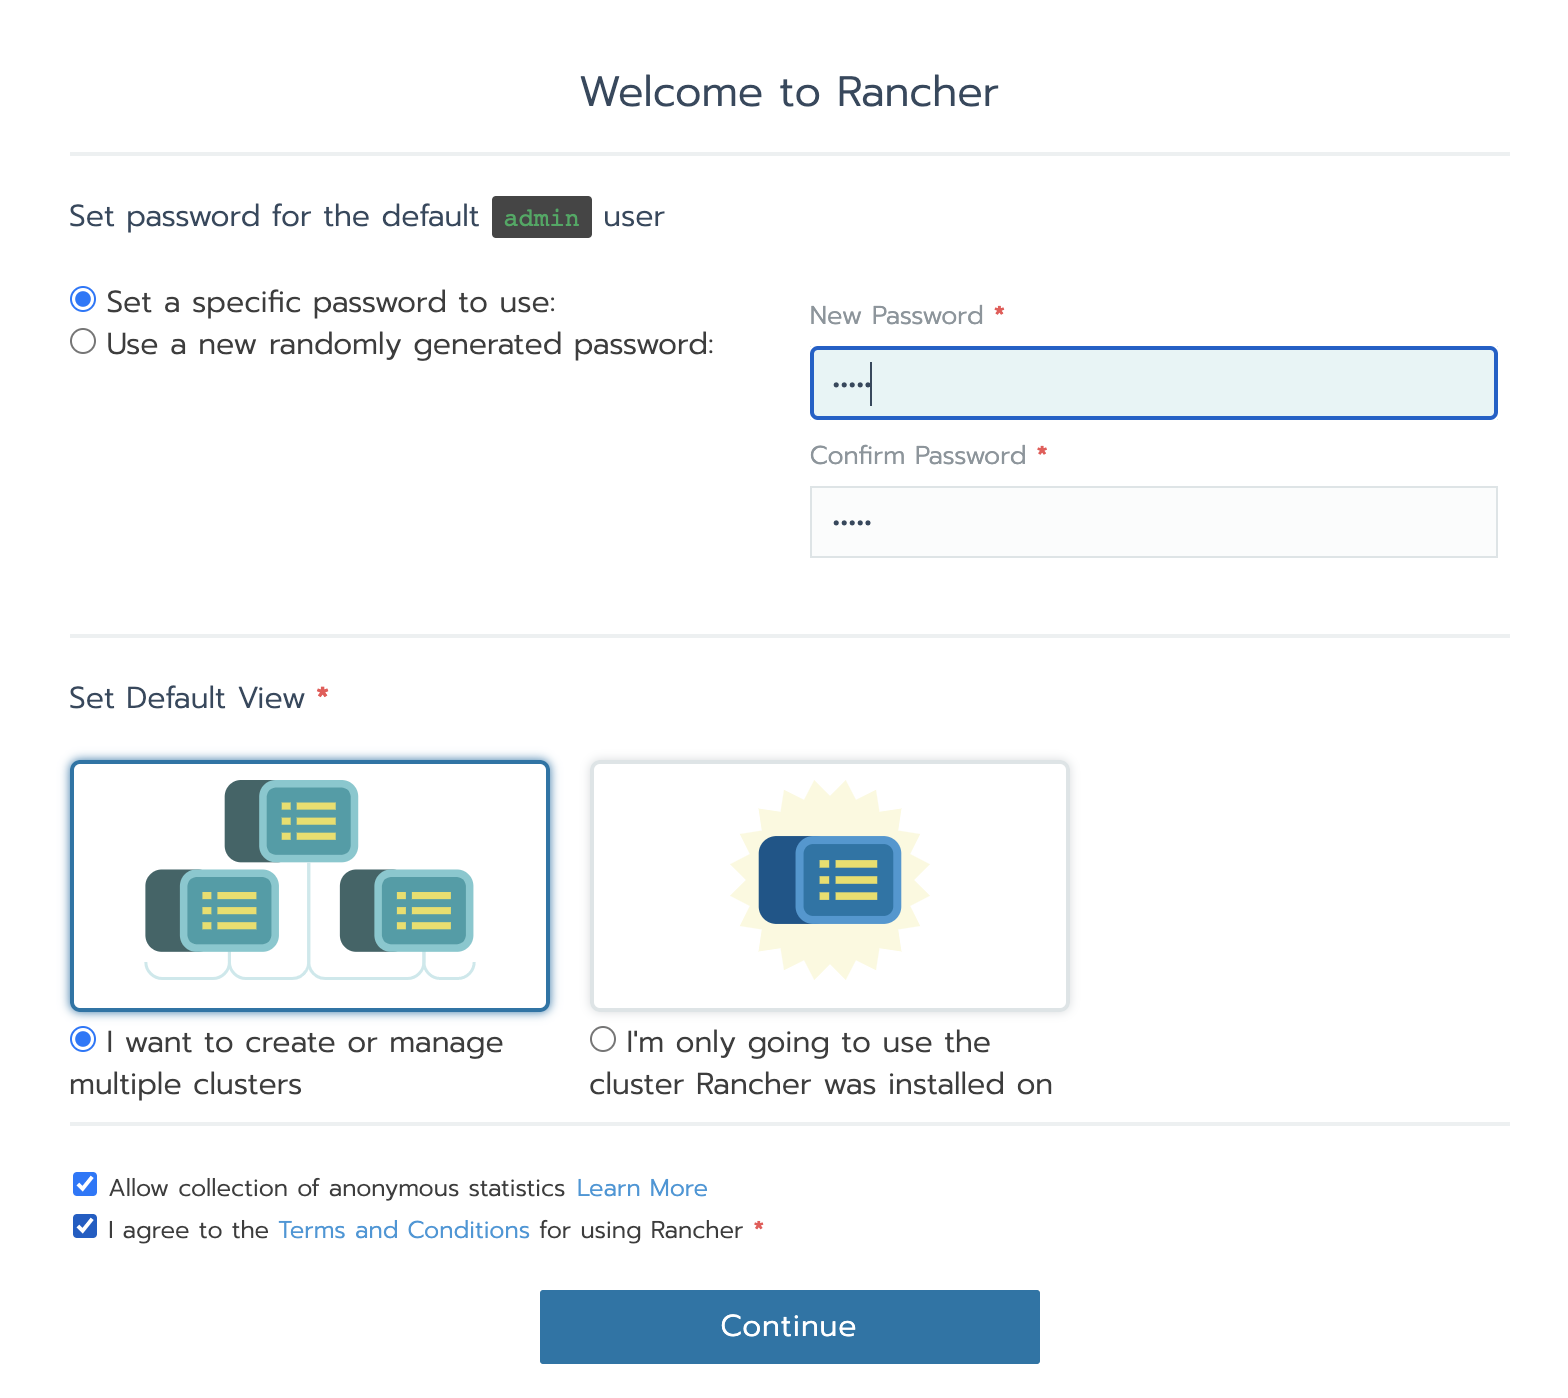
6.2 setting
Enter the page and set the password admin/admin
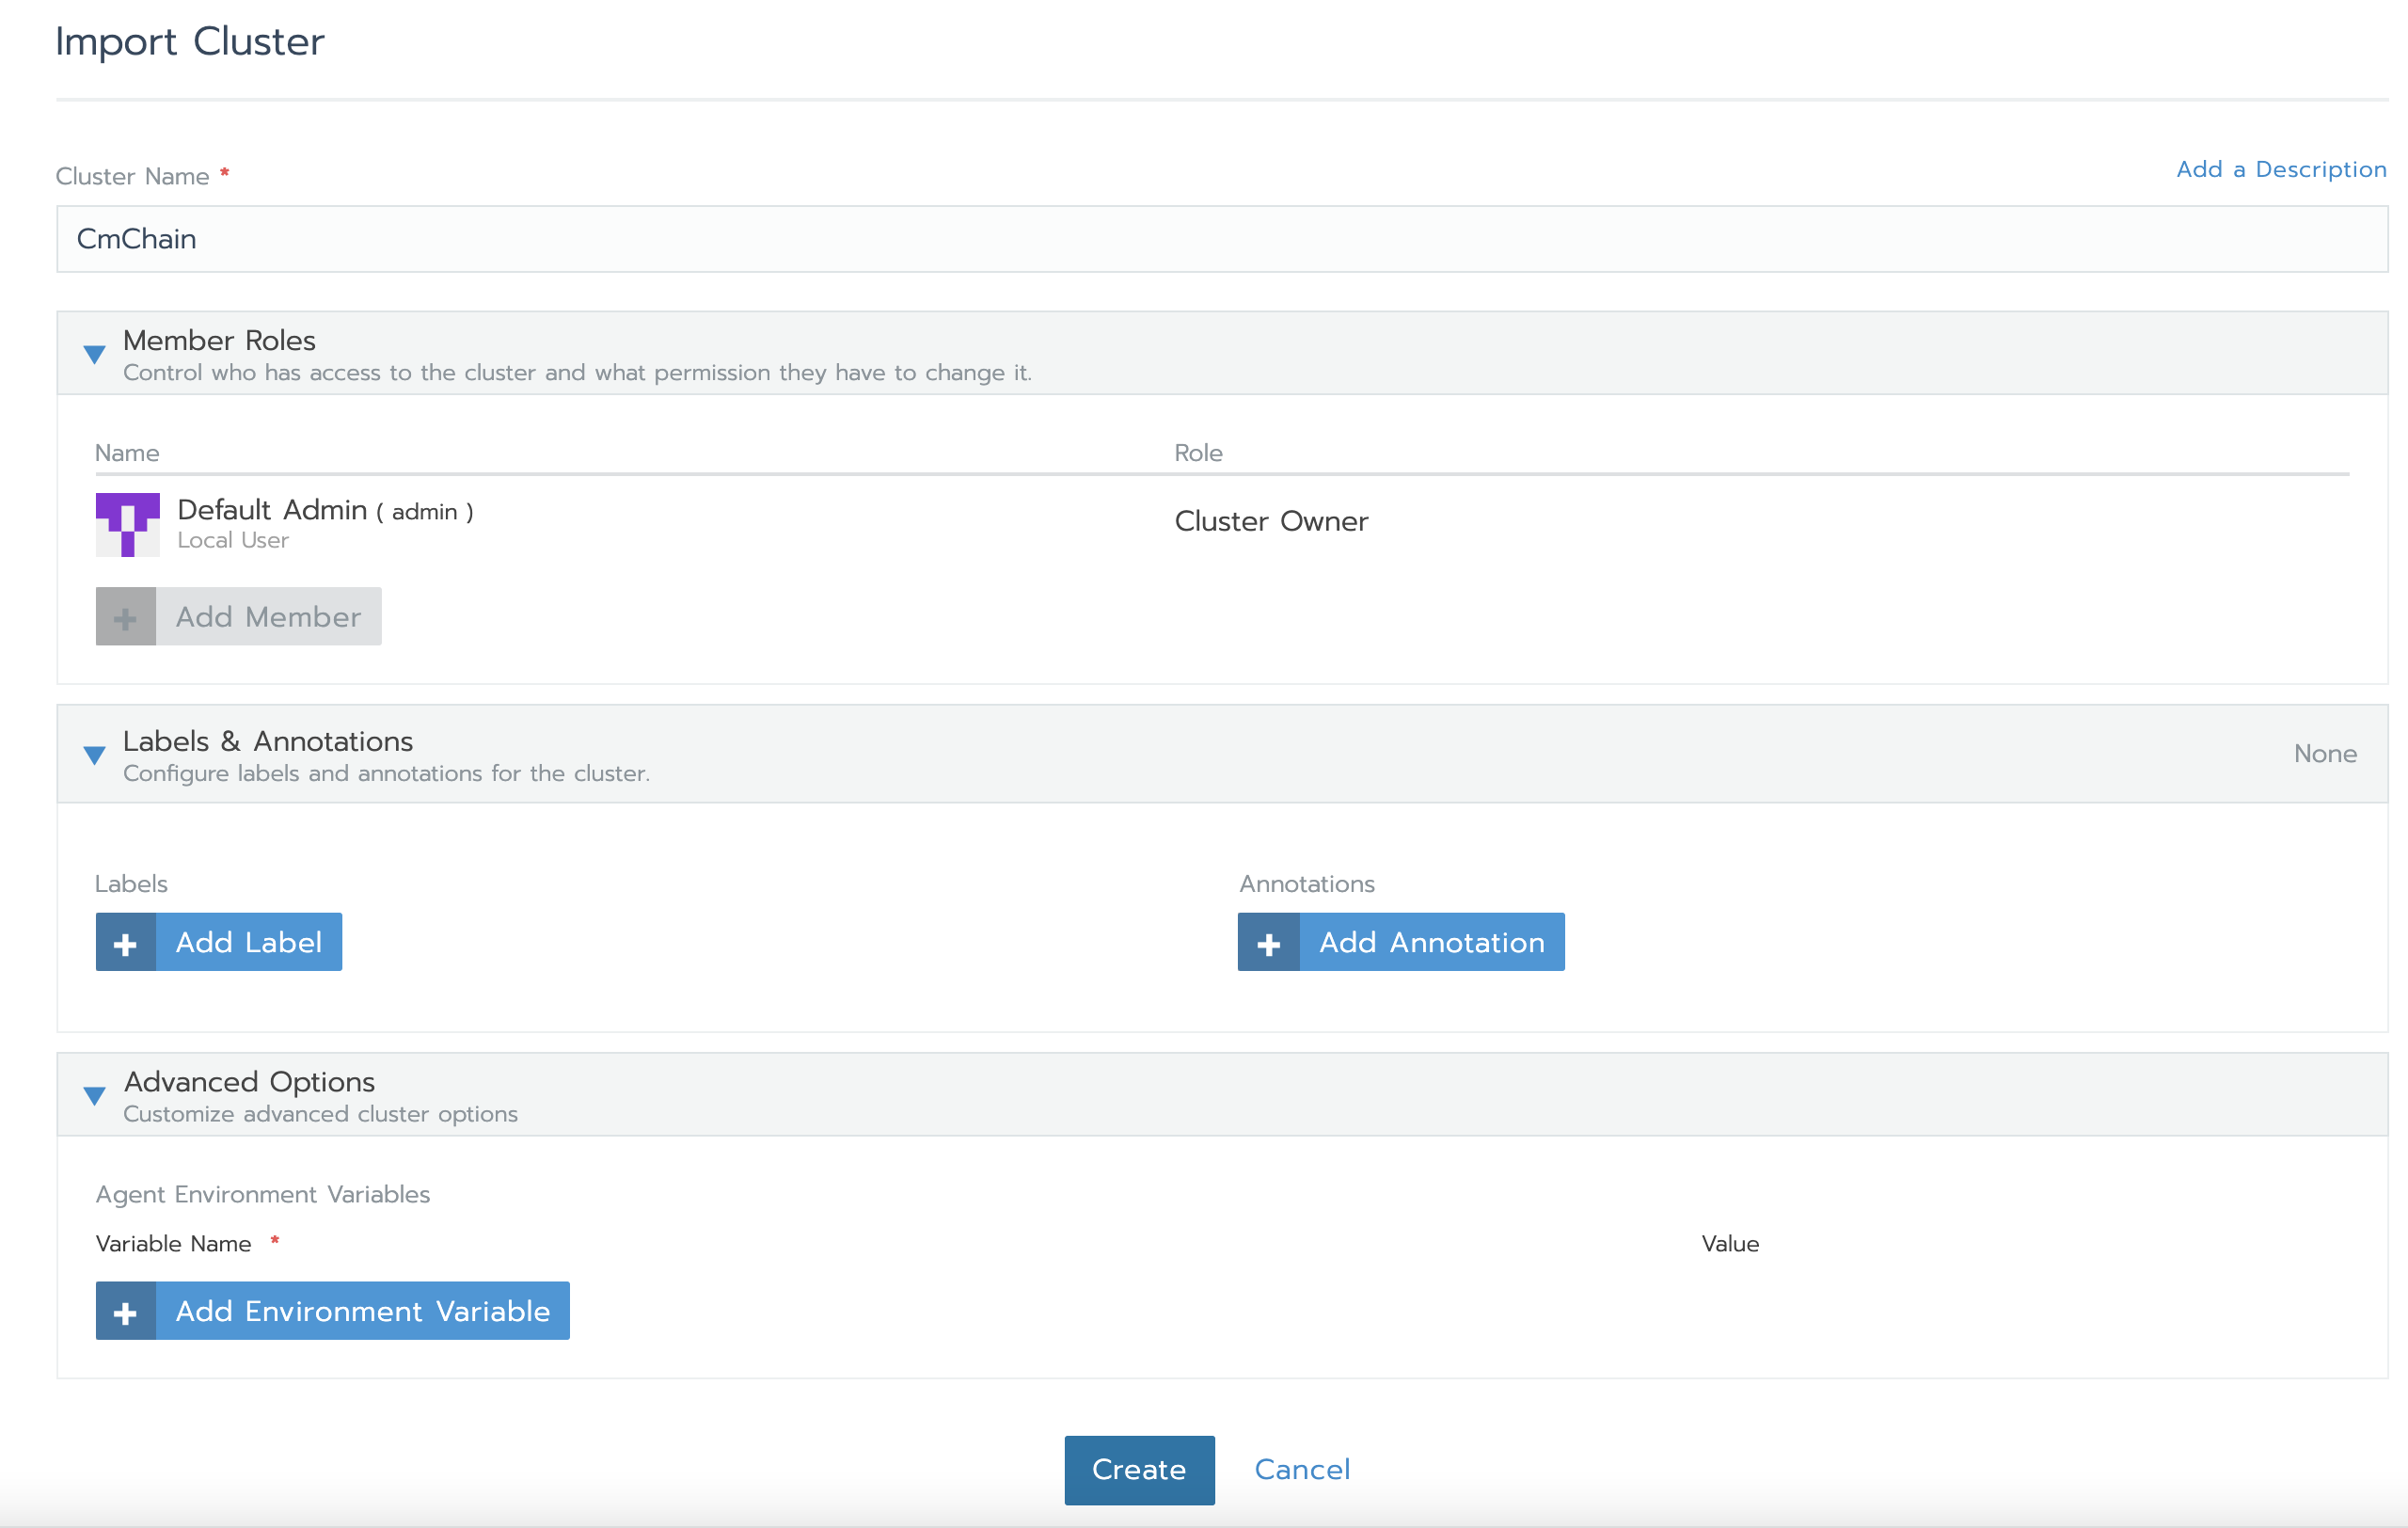
6.3 importing existing k8s clusters
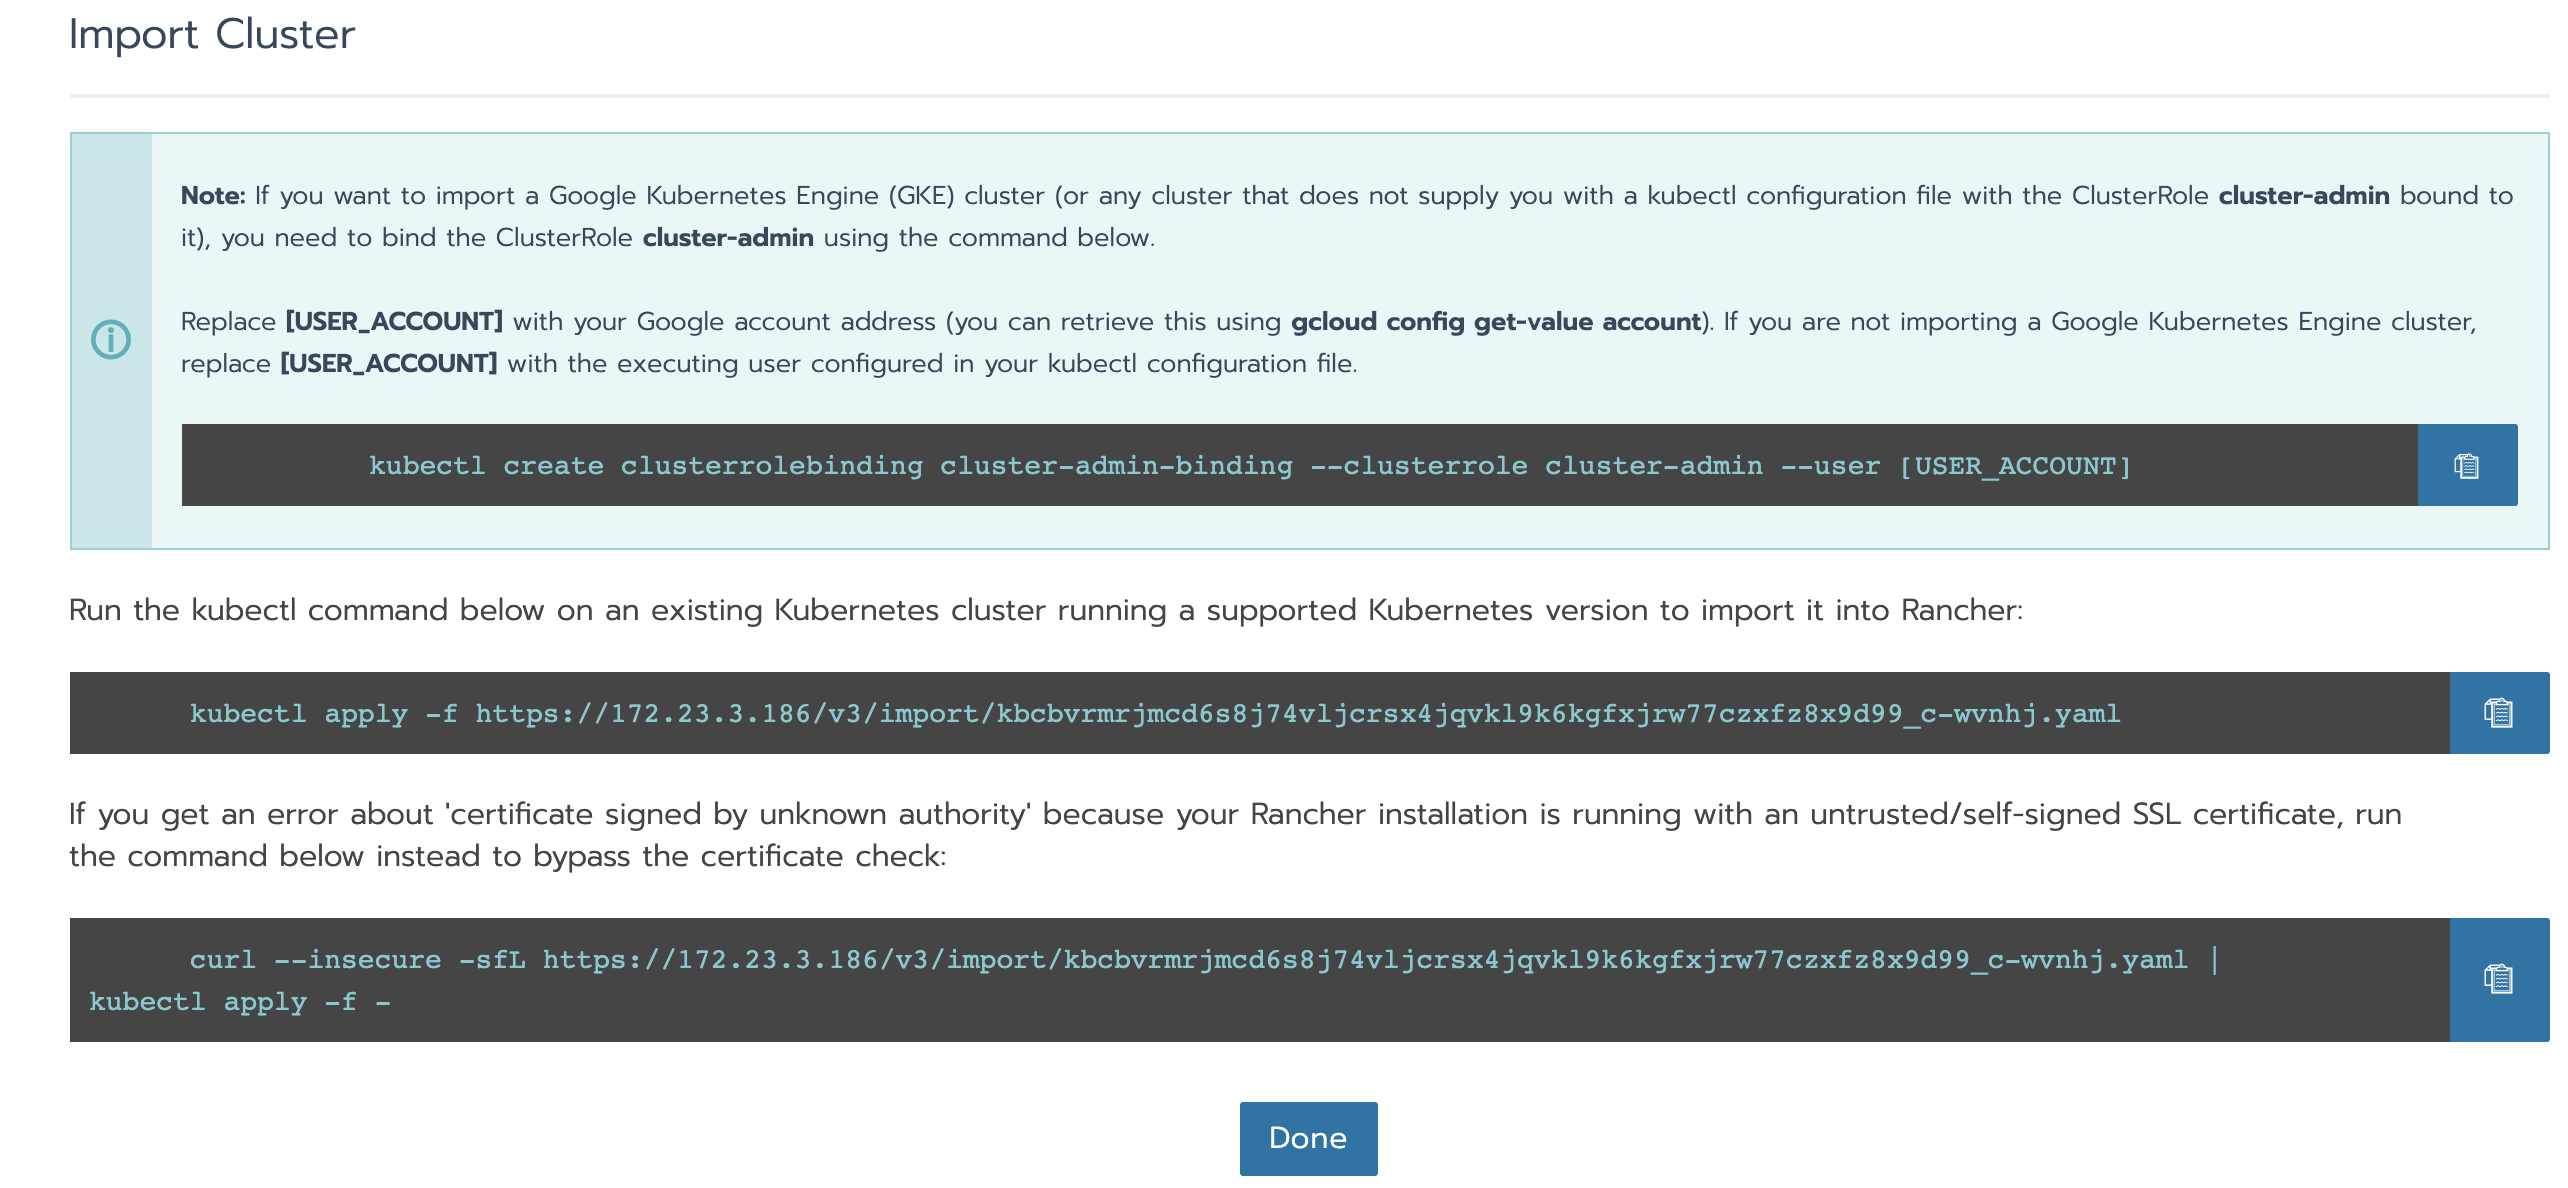
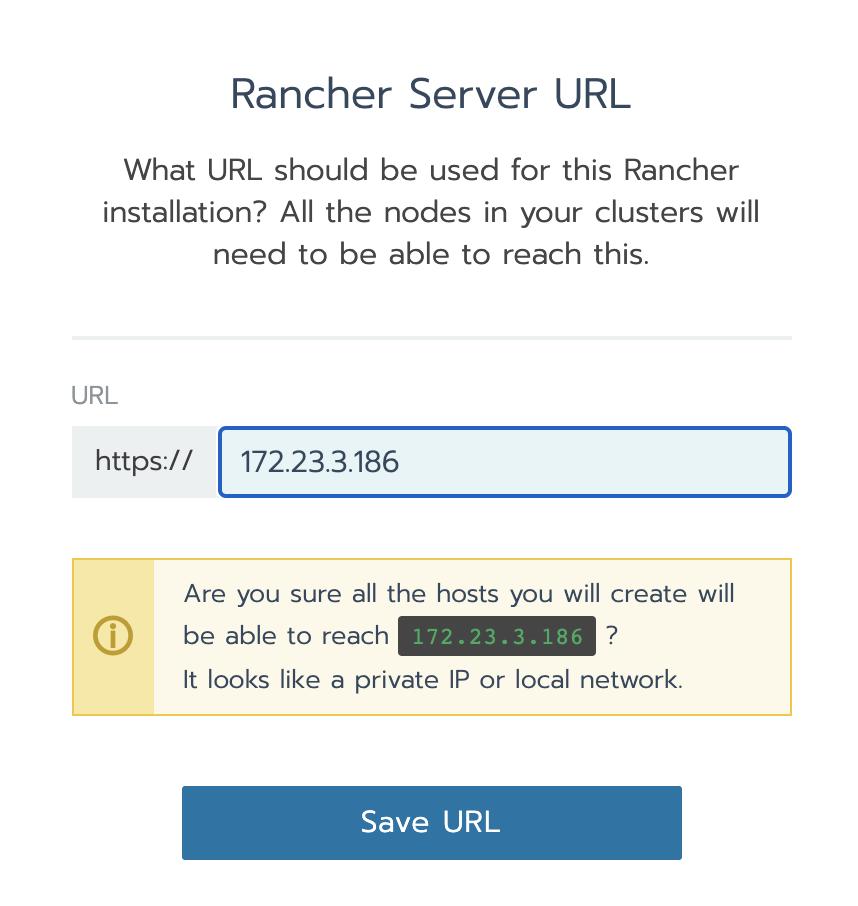
curl --insecure -sfL https://172.23.3.186/v3/import/kbcbvrmrjmcd6s8j74vljcrsx4jqvkl9k6kgfxjrw77czxfz8x9d99_c-wvnhj.yaml | kubectl apply -f -

View status
kubectl get pod -n cattle-system
kubectl describe pods -n cattle-system cattle-cluster-agent-65d9b67dc-2pc59
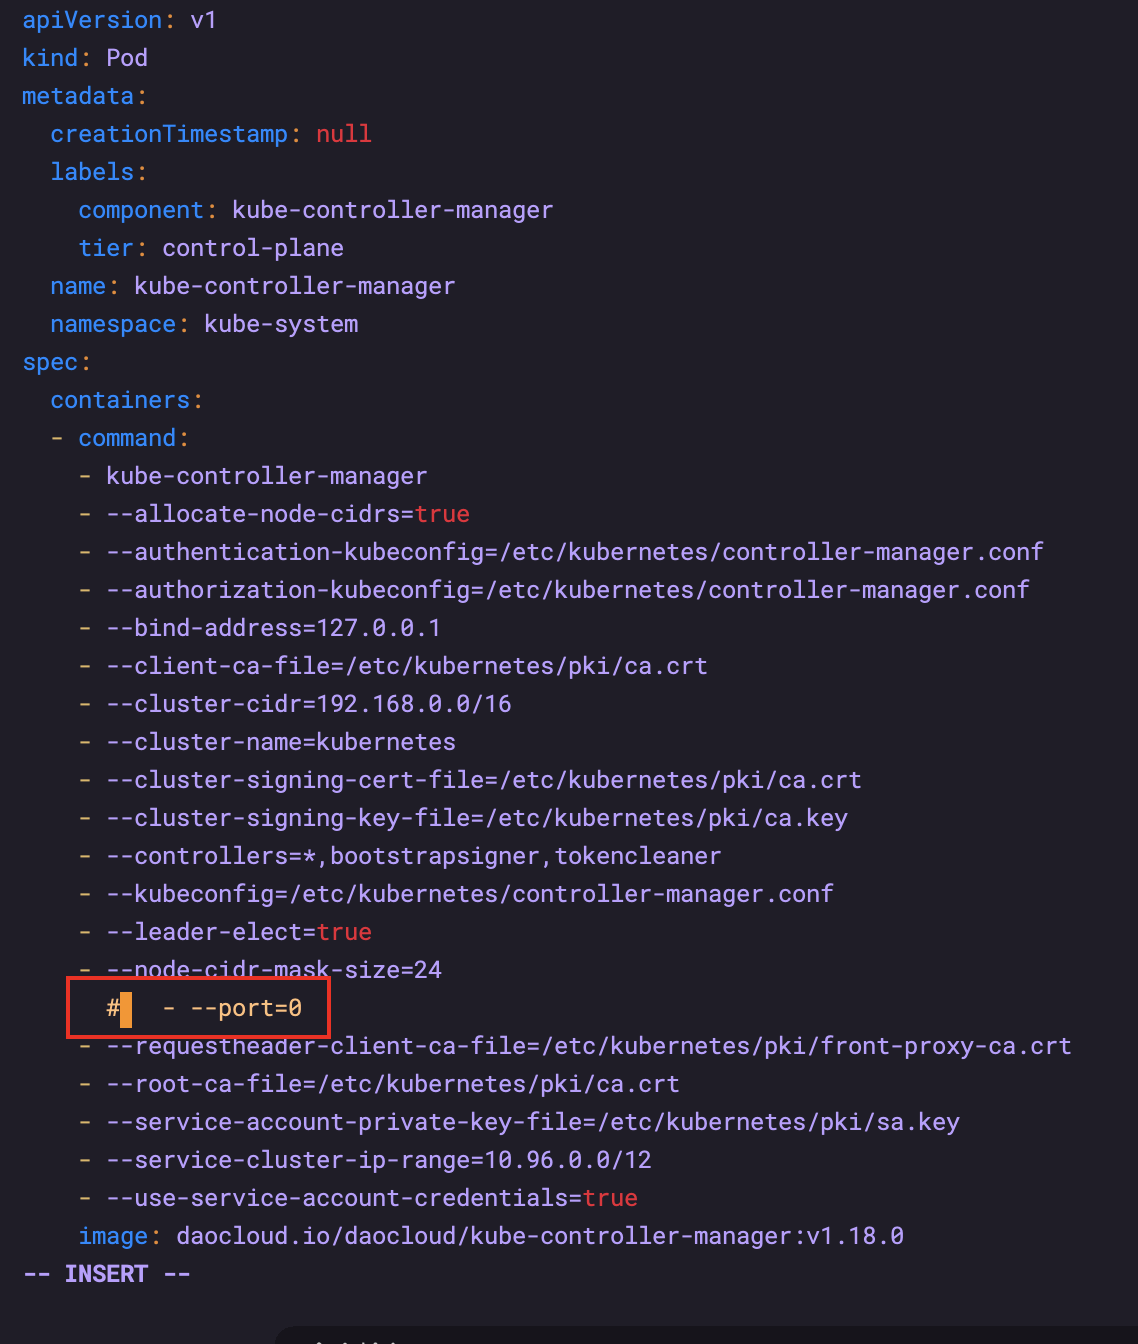
6.4 K8S health check error controller manager unhealthy

Comment out the – port=0 of kube-controller-manager.yaml and kube-scheduler.yaml under / etc / kubernetes / manifest.
After the change, it does not need to be restarted and takes effect directly
7. Install harbor
https://goharbor.io/docs/2.0.0/install-config/download-installer/
https://github.com/goharbor/harbor/releases
https://blog.csdn.net/zyl290760647/article/details/83752877
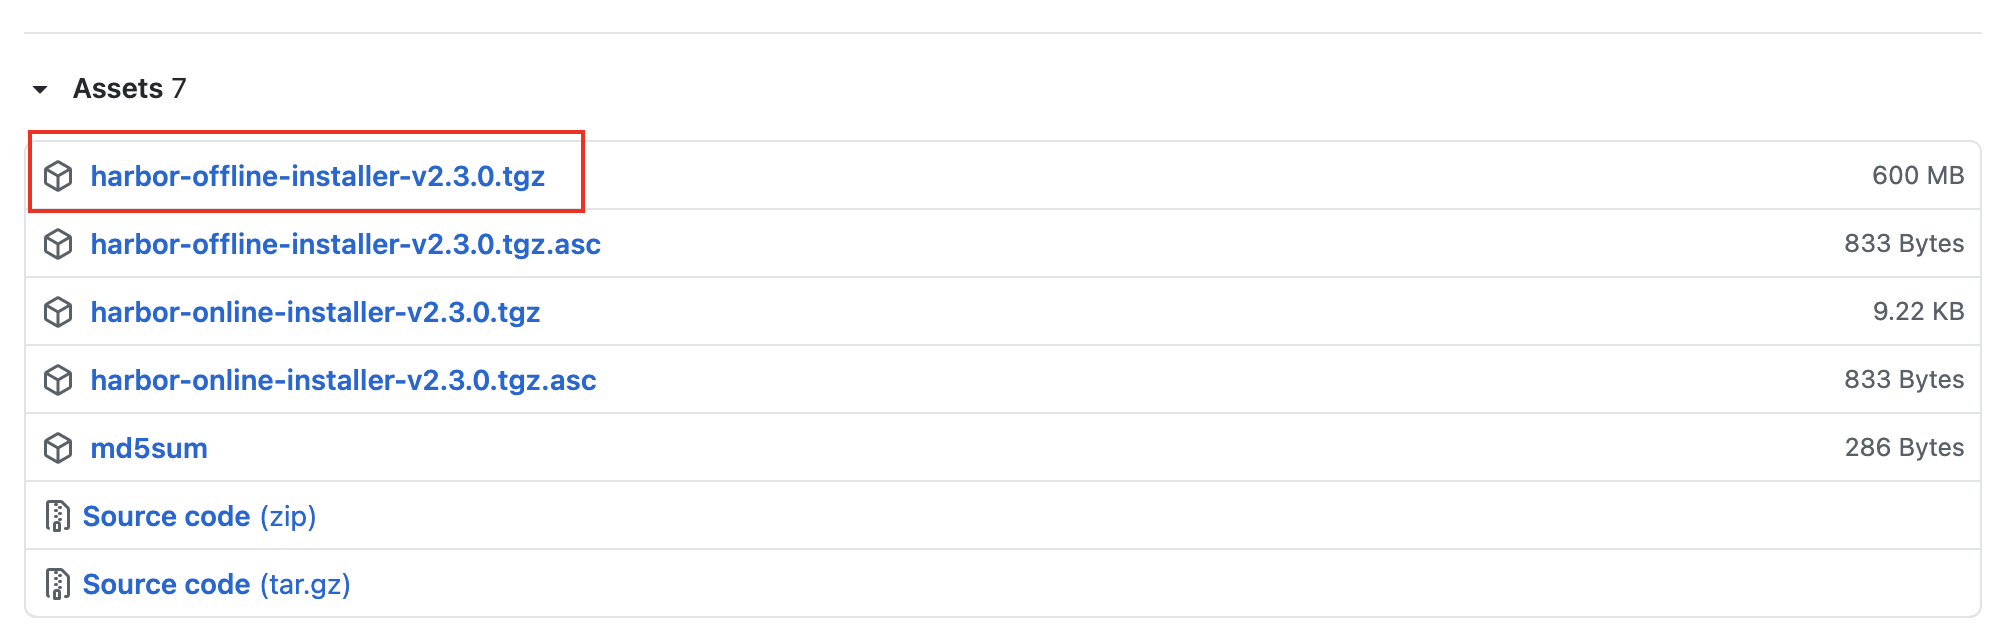
7.1 download installation package
Download and upload to the server, unzip
# decompression
tar -xzvf harbor-offline-installer-v2.3.0.tgz
Modify the file name of harbor.yml.tmpl in the harbor folder
mv harbor.yml.tmpl harbor.yml
Modify the hostname in the screenshot to be the local IP address, and comment out all https contents
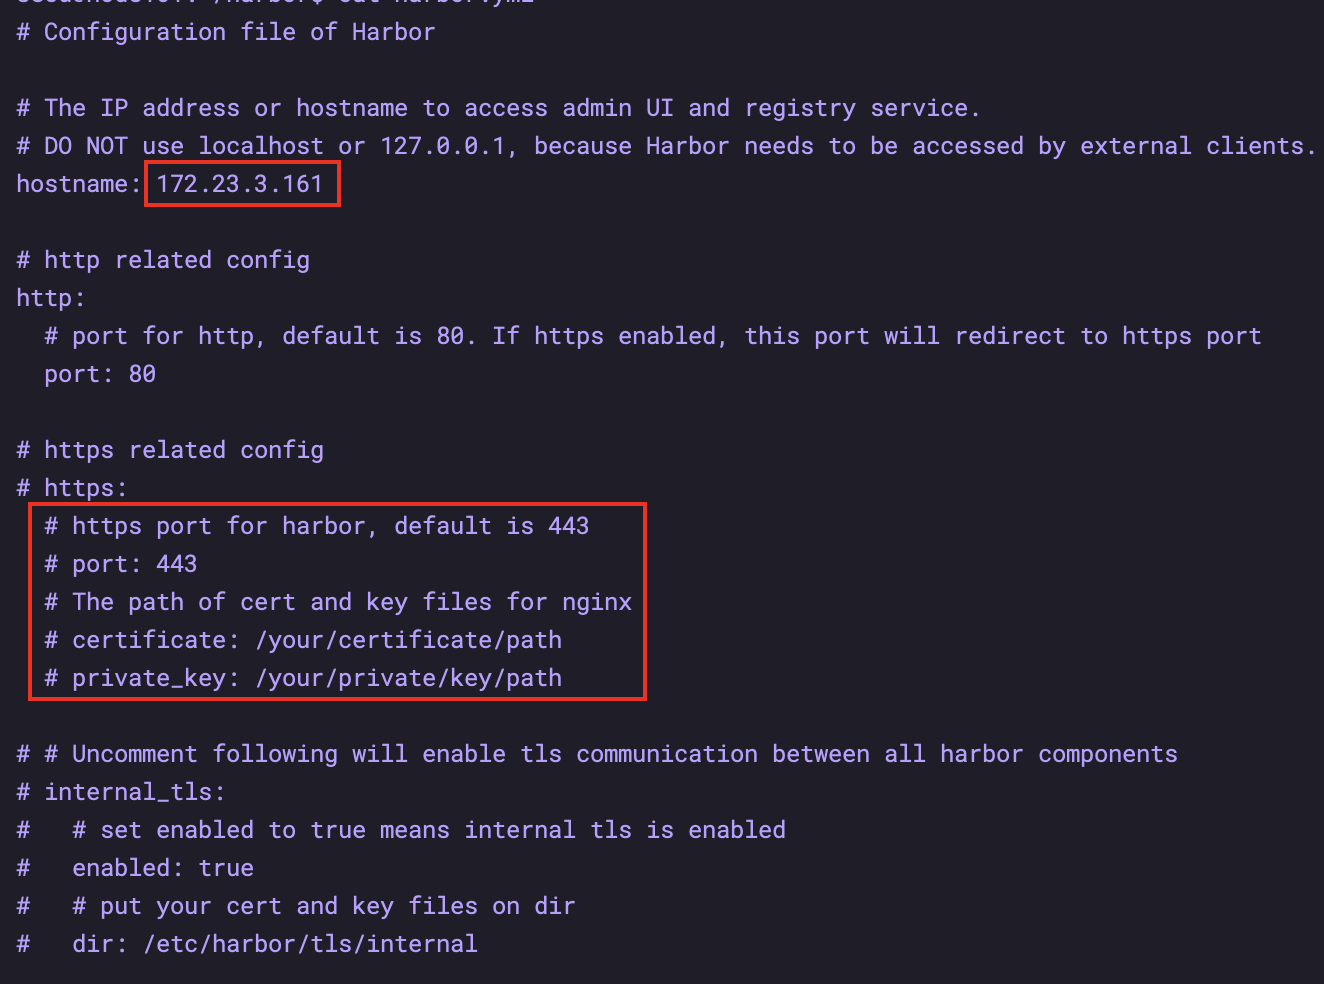
sudo ./install.sh
7.2 login
http://172.23.3.161
admin/Harbor12345
7.3 creating projects
Create 7 projects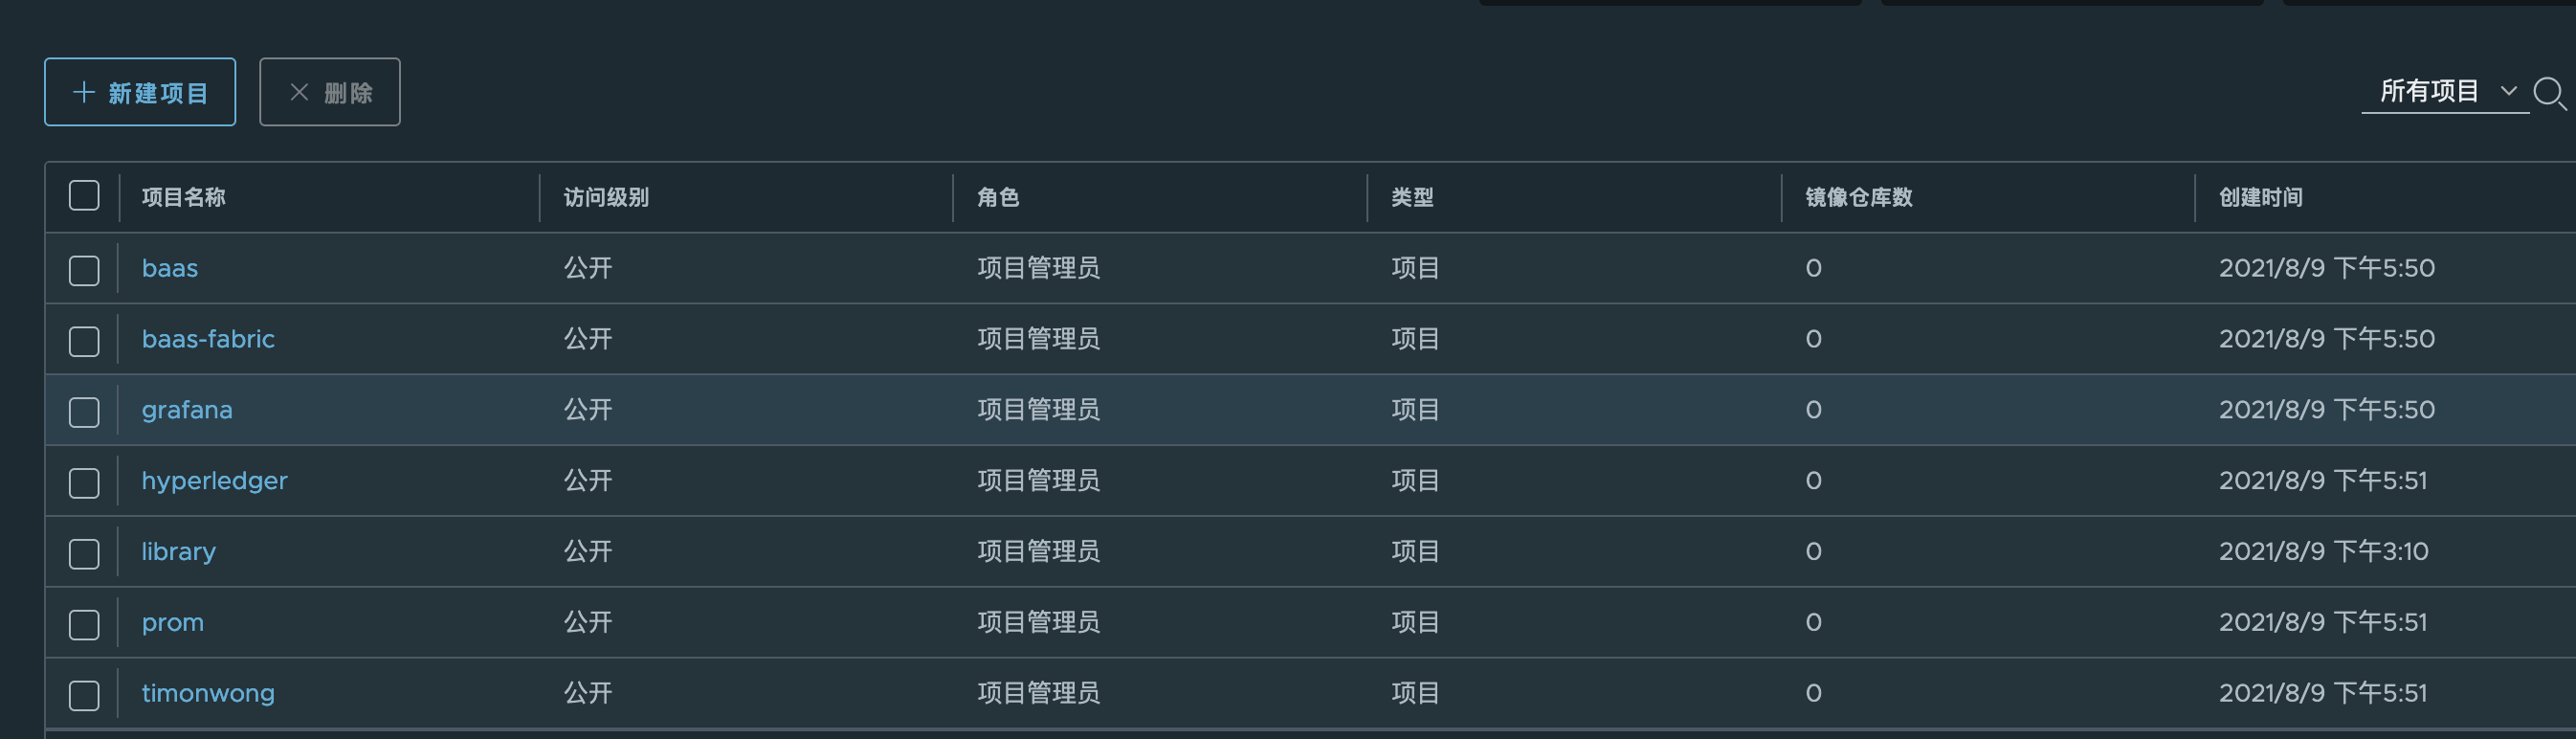
7.4 handling mirror image
During 172.23.3.105 machine handling, the docker's daemon needs to be modified
Add the warehouse address to be pulled and the warehouse address to be pushed to the daemon
# cat /etc/docker/daemon.
{
        "registry-mirrors": ["https://a981dk3d.mirror.aliyuncs.com"],
        "insecure-registries": ["172.23.3.107", "172.23.3.161"]
}
sudo systemctl daemon-reload
sudo systemctl restart docker
# Sign in
docker login 172.23.3.161
# Pull
docker pull 172.23.3.107/baas/dev-server:0.0.4
docker pull 172.23.3.107/baas-fabric/fabric-explorer:v1.0.0
docker pull 172.23.3.107/baas-fabric/fabric-rest:v1.0.0.14-mj2
docker pull 172.23.3.107/grafana/grafana:4.6.3
docker pull 172.23.3.107/hyperledger/fabric-kafka:0.4.14
docker pull 172.23.3.107/hyperledger/fabric-zookeeper:0.4.14
docker pull 172.23.3.107/hyperledger/fabric-baseos:0.4.14
docker pull 172.23.3.107/hyperledger/fabric-ccenv:1.4
docker pull 172.23.3.107/hyperledger/fabric-ca:1.4
docker pull 172.23.3.107/hyperledger/fabric-peer:1.4
docker pull 172.23.3.107/hyperledger/fabric-orderer:1.4
docker pull 172.23.3.107/prom/alertmanager:v0.14.0
docker pull 172.23.3.107/prom/prometheus:v2.1.0
docker pull 172.23.3.107/prom/node-exporter:v0.15.2
docker pull 172.23.3.107/timonwong/prometheus-webhook-dingtalk:v0.3.0


docker tag 172.23.3.107/baas/dev-server:0.0.4  172.23.3.161/baas/dev-server:0.0.4
docker tag 172.23.3.107/baas-fabric/fabric-explorer:v1.0.0 172.23.3.161/baas-fabric/fabric-explorer:v1.0.0
docker tag 172.23.3.107/baas-fabric/fabric-rest:v1.0.0.14-mj2 172.23.3.161/baas-fabric/fabric-rest:v1.0.0.14-mj2
docker tag 172.23.3.107/grafana/grafana:4.6.3 172.23.3.161/grafana/grafana:4.6.3
docker tag 172.23.3.107/hyperledger/fabric-kafka:0.4.14 172.23.3.161/hyperledger/fabric-kafka:0.4.14
docker tag 172.23.3.107/hyperledger/fabric-zookeeper:0.4.14 172.23.3.161/hyperledger/fabric-zookeeper:0.4.14
docker tag 172.23.3.107/hyperledger/fabric-baseos:0.4.14 172.23.3.161/hyperledger/fabric-baseos:0.4.14
docker tag 172.23.3.107/hyperledger/fabric-ccenv:1.4 172.23.3.161/hyperledger/fabric-ccenv:1.4
docker tag 172.23.3.107/hyperledger/fabric-ca:1.4 172.23.3.161/hyperledger/fabric-ca:1.4
docker tag 172.23.3.107/hyperledger/fabric-peer:1.4 172.23.3.161/hyperledger/fabric-peer:1.4
docker tag 172.23.3.107/hyperledger/fabric-orderer:1.4 172.23.3.161/hyperledger/fabric-orderer:1.4
docker tag 172.23.3.107/prom/alertmanager:v0.14.0 172.23.3.161/prom/alertmanager:v0.14.0
docker tag 172.23.3.107/prom/prometheus:v2.1.0 172.23.3.161/prom/prometheus:v2.1.0
docker tag 172.23.3.107/prom/node-exporter:v0.15.2 172.23.3.161/prom/node-exporter:v0.15.2
docker tag 172.23.3.107/timonwong/prometheus-webhook-dingtalk:v0.3.0 172.23.3.161/timonwong/prometheus-webhook-dingtalk:v0.3.0


docker push 172.23.3.161/baas/dev-server:0.0.4
docker push 172.23.3.161/baas-fabric/fabric-explorer:v1.0.0
docker push 172.23.3.161/baas-fabric/fabric-rest:v1.0.0.14-mj2
docker push 172.23.3.161/grafana/grafana:4.6.3
docker push 172.23.3.161/hyperledger/fabric-kafka:0.4.14
docker push 172.23.3.161/hyperledger/fabric-zookeeper:0.4.14
docker push 172.23.3.161/hyperledger/fabric-baseos:0.4.14
docker push 172.23.3.161/hyperledger/fabric-ccenv:1.4
docker push 172.23.3.161/hyperledger/fabric-ca:1.4
docker push 172.23.3.161/hyperledger/fabric-peer:1.4
docker push 172.23.3.161/hyperledger/fabric-orderer:1.4
docker push 172.23.3.161/prom/alertmanager:v0.14.0
docker push 172.23.3.161/prom/prometheus:v2.1.0
docker push 172.23.3.161/prom/node-exporter:v0.15.2
docker push 172.23.3.161/timonwong/prometheus-webhook-dingtalk:v0.3.0
8. Prometheus
8.1 modifying configuration files
Modify mirror address
# Modify the image address in each yaml file to make it conform to the image warehouse address, i.e. registry.paas/cmss/image Name: version number
# There are 5 changes to be made
Modify hostname
kubectl get pods -o wide --namespace=kube-system | grep dns

# Modify the hostname in the yaml files of prometheus and alermanager to the node name of the above dns, such as node189
# There are 2 points that need to be modified
Modify web.external-url
# Modify the yaml file of peometheus -- web.external-url. The IP address is the IP address of the node where prometheus is deployed. The port does not need to be changed
8.2 upload to the server and decompress
mkdir prometheus_yaml
unzip -j xxx.zip -d prometheus_yaml/
8.3 modify docker to allow private access
# cat /etc/docker/daemon.
{
        "registry-mirrors": ["https://a981dk3d.mirror.aliyuncs.com"],
        "insecure-registries": ["172.23.3.161"]
}
sudo systemctl daemon-reload
sudo systemctl restart docker
# This process will lead to the whole k8s restart, wait patiently...
8.4 start prometheus
sudo kubectl create ns baas-mon
ls | awk '{print "sudo kubectl apply -f "$1" --namespace=baas-mon"}'|sh
# No sudo
8.5 granting authority
This step is very important, otherwise the node of K8s cannot be seen in 8.6
# You can check whether the pod is started
kubectl get pods -o wide --namespace=baas-mon
# View a specific node
kubectl describe pods -n baas-mon alertmanager-77dc6858cc-d88qb
# After deployment, grant baas mon serviceaccount permission
kubectl create clusterrolebinding prometheus-binding --clusterrole=cluster-admin --user=system:serviceaccount:baas-mon:default
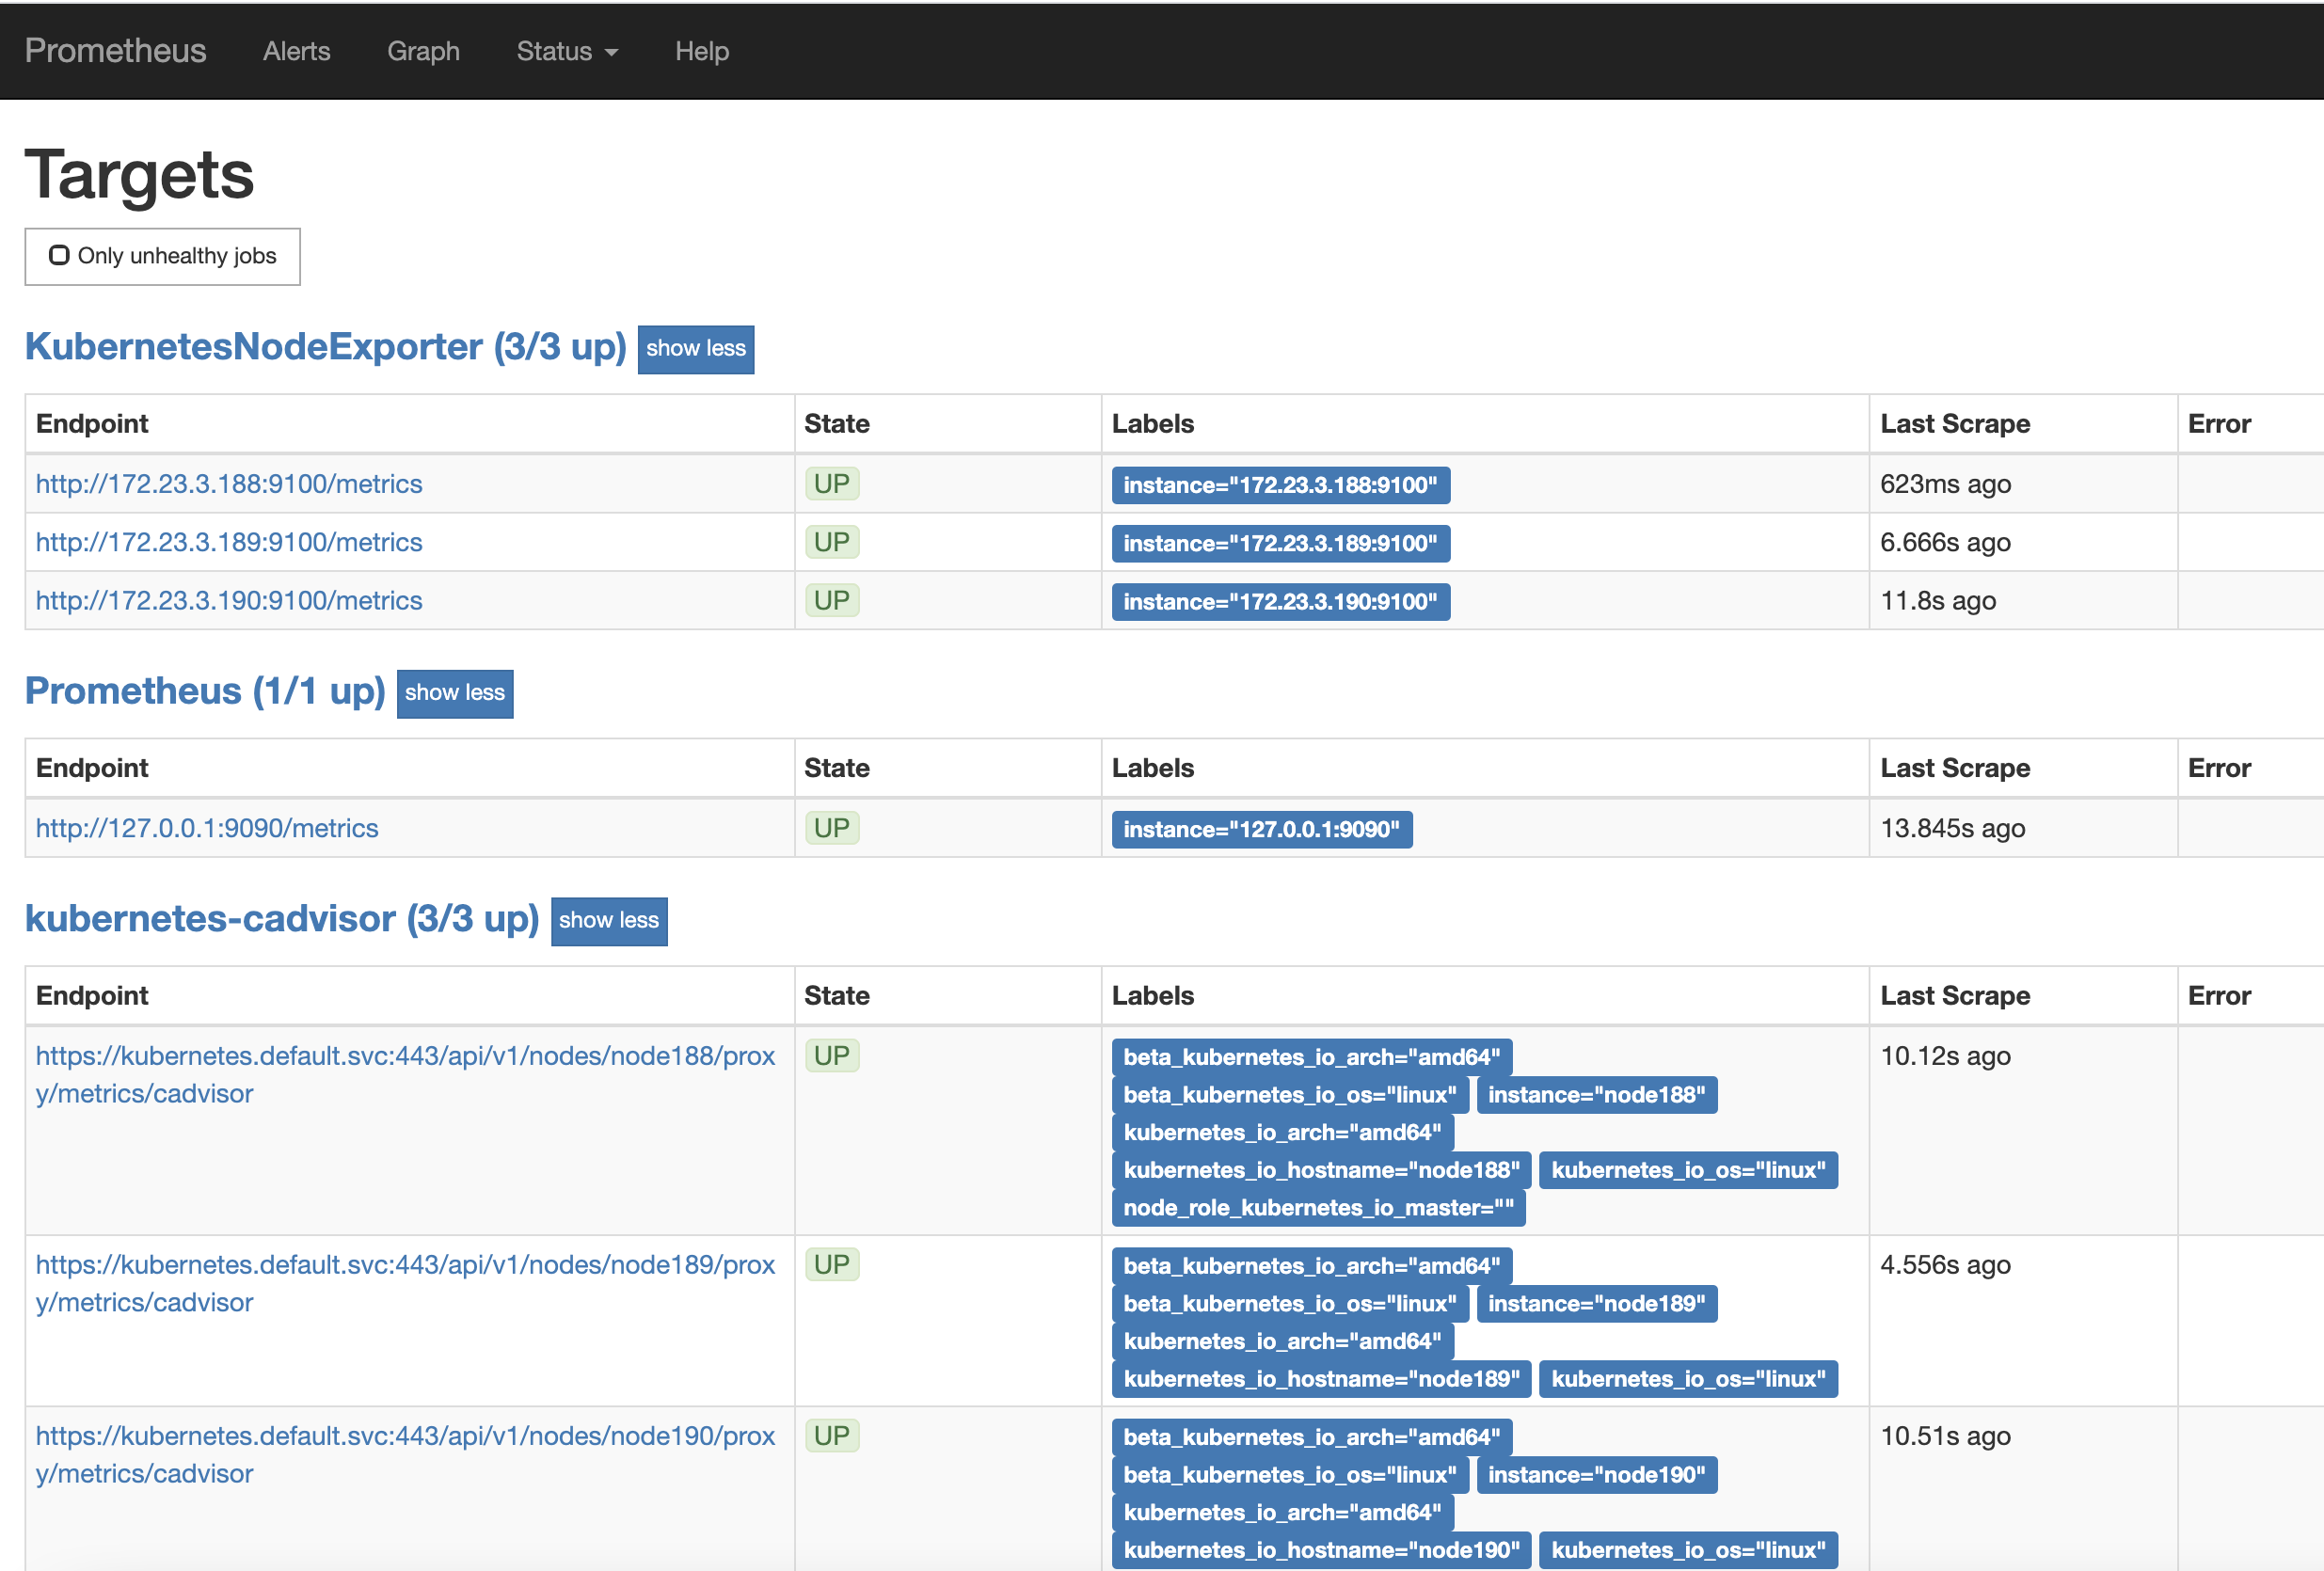
8.6 confirm that prometheus is normal
Sign in http://172.23.3.188:31016/ , view targets
9. Provision of information
9.1 obtaining k8s information from rancher
9.2 obtaining cluster IP
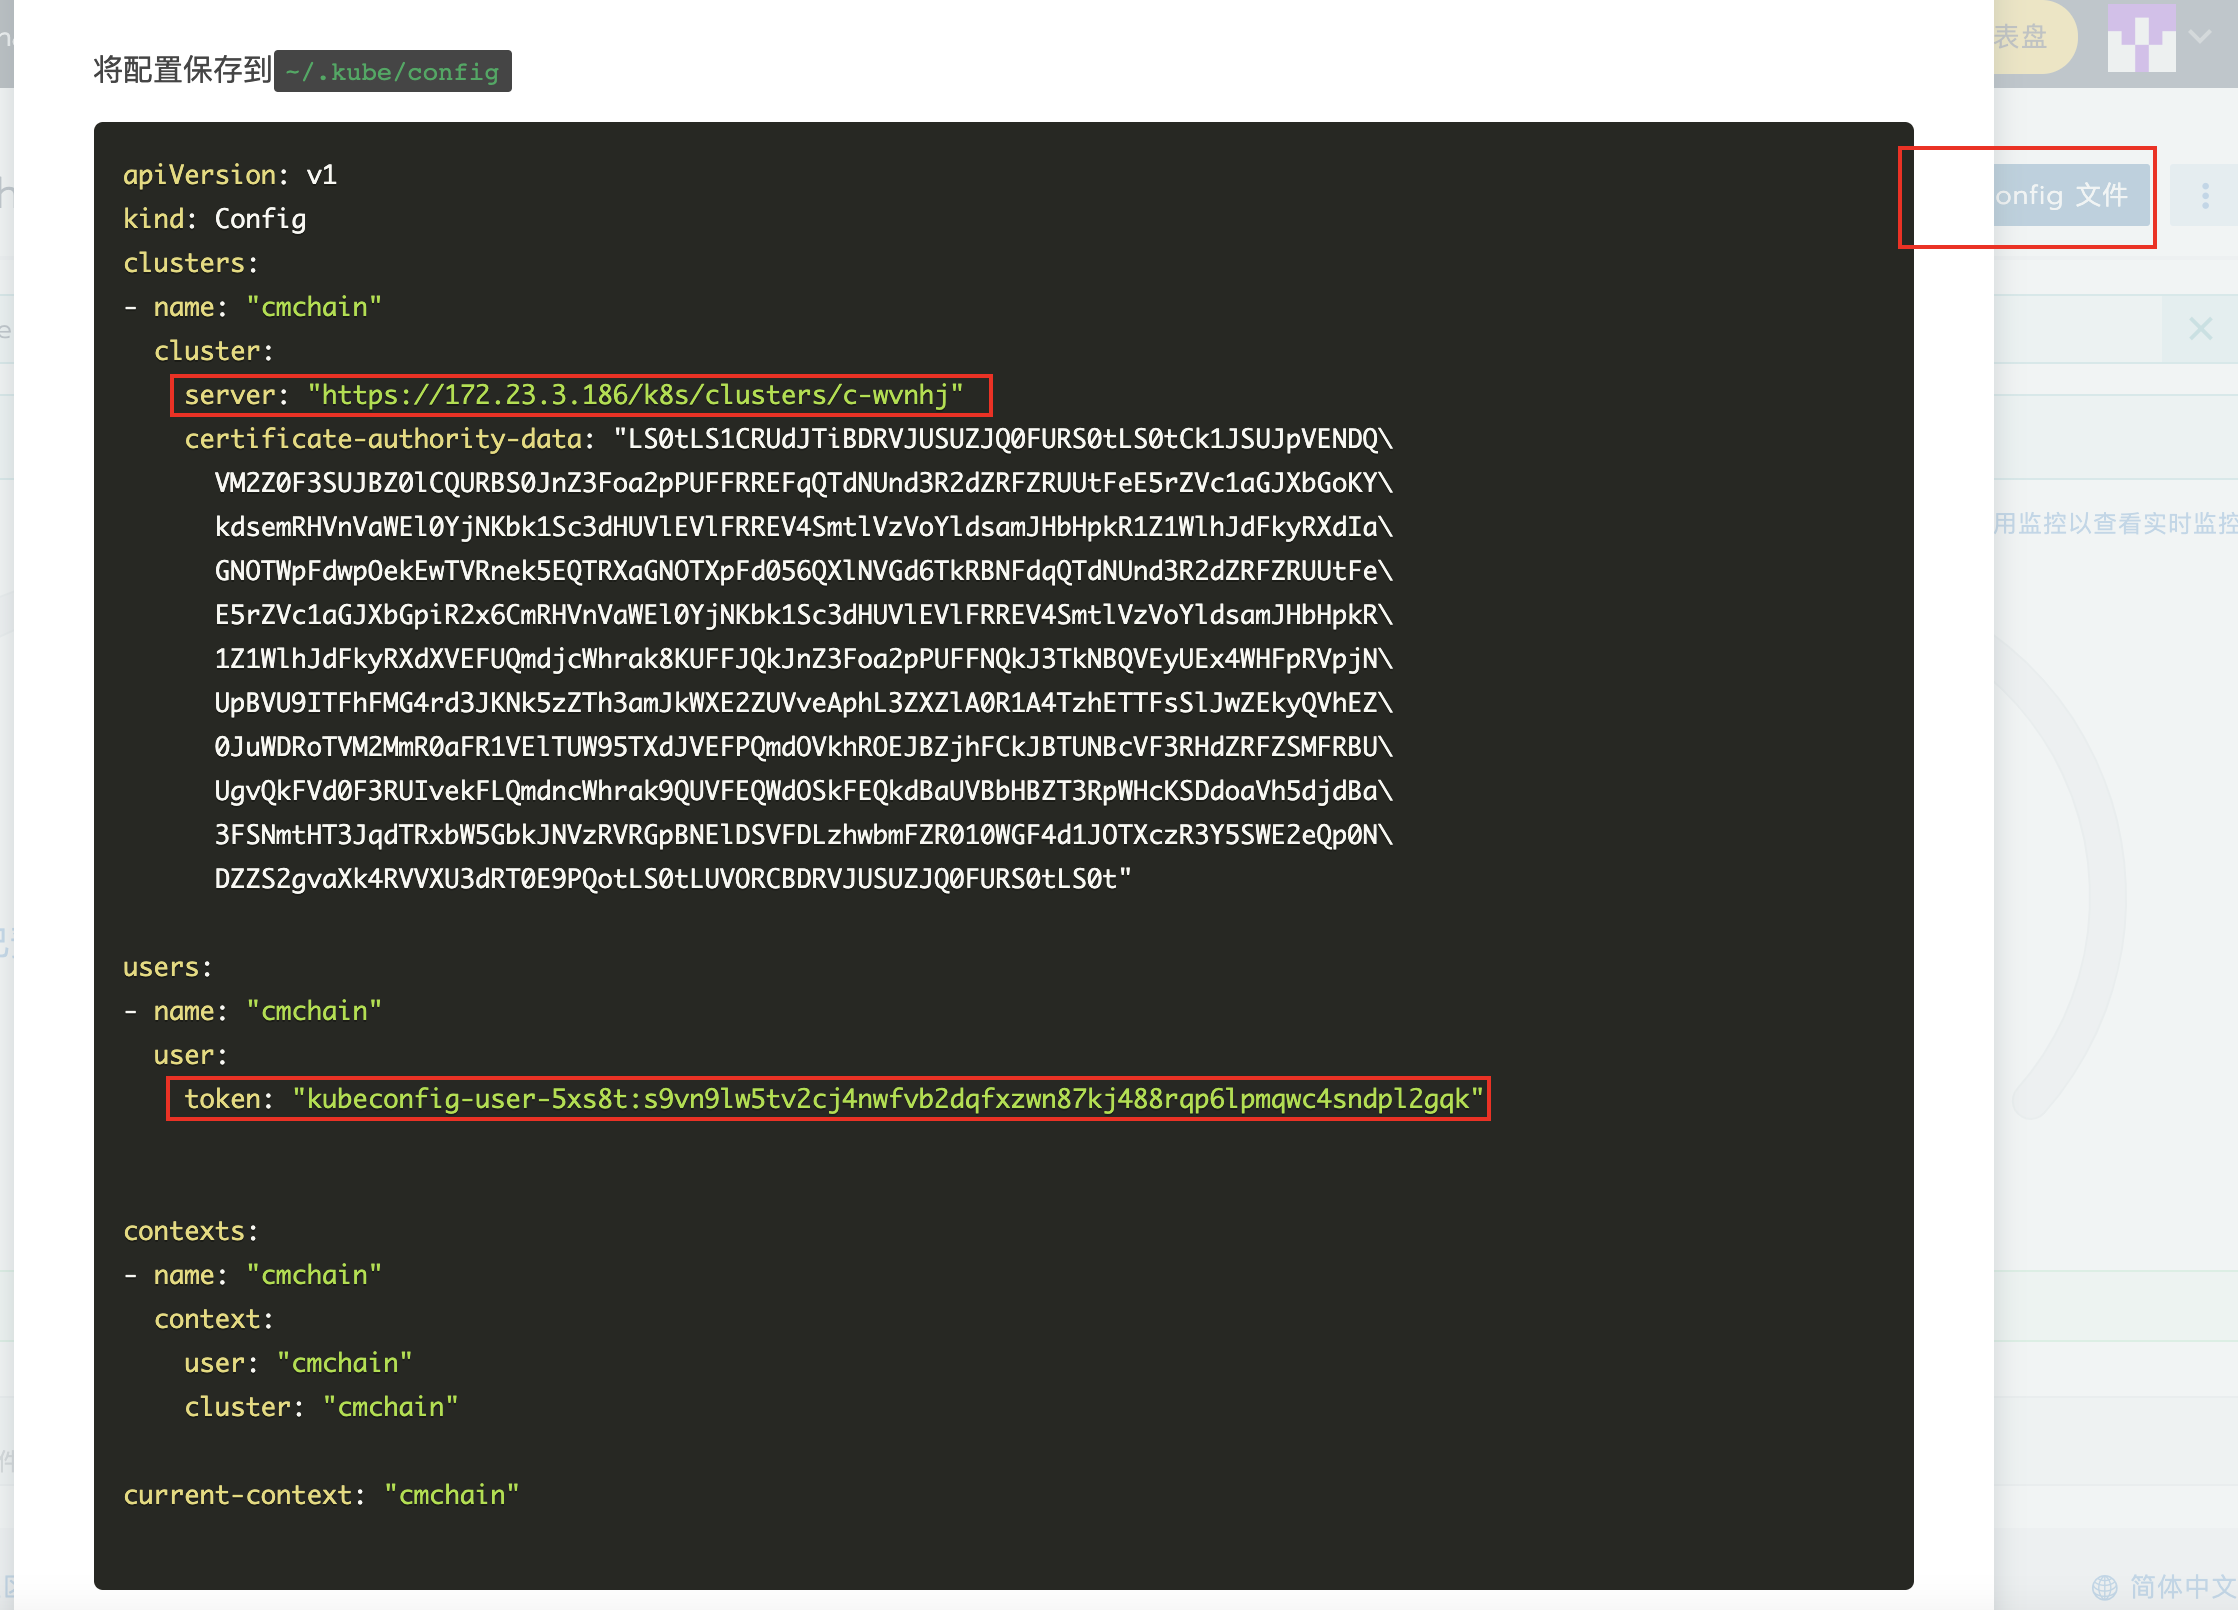
# Use kubectl - n Kube system get SVC - L k8s app = Kube DNS to check the cluster IP
kubectl -n kube-system get svc -l k8s-app=kube-dns

ip: https://172.23.3.186/k8s/clusters/c-wvnhj
token: kubeconfig-user-5xs8t:s9vn9lw5tv2cj4nwfvb2dqfxzwn87kj488rqp6lpmqwc4sndpl2gqk
DNS: 10.96.0.10
Harbor: 172.23.3.161
NFS: 172.23.3.161
NFS catalog:/home/secu/nfs
prometheus: 172.23.3.188:31016
10. Install nfs
# Execute on the server
sudo apt install nfs-kernel-server
# Execute on client
sudo apt install nfs-common
# Execute on the server
sudo vim /etc/exports
 Add the following
/home/secu/nfs *(rw,sync,no_root_squash)
(To create/home/secu/nfs catalogue)
# start-up
sudo /etc/init.d/nfs-kernel-server restart

# On the client:
cd ~
sudo mount -t nfs -o nolock 172.23.3.161:/home/secu/ .
# Note that there is a problem with the mount command, which will cause the whole directory of / home/secu to become readable and writable

## The correct command is:
cd ~
mkdir nfs
sudo mount -t nfs -o nolock 172.23.3.161:/home/secu/nfs /home/secu/nfs
########Stepping pit##########
172.23.3.187 - 172.23.3.190 the home directory / home/secu / of four machines has become the remote nfs directory
Remedial measures:
sudo mkdir /home/data
sudo chown -R secu:secu /home/data
Final solution:
# Restart Dafa
sudo reboot
other
# 7.13 restart three k8s machines and restore k8s cluster command after restart:
secu@node188:~$ sudo systemctl daemon-reload
secu@node188:~$ sudo systemctl start kubelet
# No other commands are required. Wait patiently for the cluster to recover


# On kubectl's different results with sudo and without sudo
https://www.it1352.com/1534977.html
By default, kubectl looks in ~/.kube/config (or the file pointed to be $KUBECONFIG) to determine what server to connect to. Your home directory and environment are different when running commands as root. When no connection info is found, kubectl defaults to localhost:8080
0 Total of 4 machines home catalogue/home/secu/All become remote nfs catalogue

Remedial measures:
sudo mkdir /home/data
sudo chown -R secu:secu /home/data
Final solution:
Restart Dafa
sudo reboot
# other
7.13 restart three k8s machines and restore k8s cluster command after restart:
secu@node188:~$ sudo systemctl daemon-reload
secu@node188:~$ sudo systemctl start kubelet
No other commands are required. Wait patiently for the cluster to recover
On kubectl's different results with sudo and without sudo
https://www.it1352.com/1534977.html
By default, kubectl looks in ~/.kube/config (or the file pointed to be $KUBECONFIG) to determine what server to connect to. Your home directory and environment are different when running commands as root. When no connection info is found, kubectl defaults to localhost:8080