This post is a reference Lepus Official Documentation The official documentation was detailed, but some download links failed (maintainers of this open source product are busy, so updates are not timely) and the use of lepus was documented for their own writing style, so this post appeared.
The Lepus system features are as follows:
- Remote monitoring of databases in the cloud without an Agent
- WEB Visual Management and Monitoring Database
- Real-time MySQL health monitoring and alerts
- Real-time MySQL replication monitoring and alerts
- Real-time MySQL Resource Monitoring and Analysis
- Performance monitoring such as real-time MySQL caching
- Real-time InnoDB IO performance monitoring
- MySQL Table Space Growth Trend Analysis
- Visualize MySQL slow query online analysis
- MySQL slow query auto-push function
- Online Performance Analysis of MySQL AWR
- Real-time Oracle health monitoring and alarm
- Real-time Oracle tablespace usage monitoring
- Real-time Oracle Performance Monitoring
- Real-time MongoDB health monitoring and alarm
- Real-time MongoDB Index Performance Monitoring
- Real-time MongoDB Memory Usage Monitoring
- Real-time Redis Health Monitoring and Alarm
- Real-time Redis Performance Monitoring
- Real-time SQLServer Health Monitoring and Alarm
- Real-time OS host CPU/memory/disk/network/IO monitoring
- Visual Alert System, Mail Send Alert, SMS Interface Support
- Strict Permission Authentication System
- Rich Health Performance Analysis Chart
- Multidimensional comparison and performance analysis
1. Environmental Preparation
| OS | IP | host name | role |
|---|---|---|---|
| Cent os 7.5 | 192.168.20.2 | mysql | Monitored end |
| Cent os 7.5 | 192.168.20.3 | redis | Monitored end |
| Cent os 7.5 | 192.168.20.4 | lepus | Monitoring end |
The core requirements for deploying Lepus are as follows:
- MySQL 5.1 and above (must be used to store data collected by the monitoring system).
- Apache 2.2 and above (the WEB server must be running the server).
- PHP 5.3 or above (must, provide WEB interface support, do not support PHP7).
- Python2 (must, recommend version 2.6 and above, perform data collection and alarm tasks, do not support Python3).
- Related driver module packages for Python connections and monitoring databases:
- MySQLdb for python (Python connects to MySQl and monitors MySQL, which must be installed).
- cx_oracle for python (Python's interface to Oracle is not required, and this module must be installed if you need to monitor oracle).
- Pymongo for python (Python's interface to MongoDB is not required, and this module must be installed if MongoDB needs to be monitored).
- redis-py for python (Python interface to Redis, not required, this module must be installed if you need to monitor Redis).
Note: Since the last update of the official lepus document was in 17 years, many download links provided by the authorities have failed. I have downloaded all the packages involved here. The versions are exactly the same as those used by the authorities. If necessary, they can be linked through my webdisk. download , extraction code: vofv.
Note: PHP and Python are cross-platform languages, so the system should theoretically support running on different platforms.However, due to the limited time and effort and resources, at present, only Centos/RedHat system has been tested to improve its support.Official technical support is currently available only for Centos/RedHat systems, while other systems do not support technical services at this time.
2. Deploying LAMP environment
lepus needs the support of lamp environment, there are many ways to configure lamp environment. The official deployment is using the integrated environment package Xampp, so it is official here.
Xampp related links:
The official recommended xampp version is xampp-linux-x64-1.8.2-5-installer.run.
Note: All subsequent operations, if not specifically declared, are performed on the lepus host.
#Execute installation script
[root@lepus src]# chmod +x xampp-linux-x64-1.8.2-5-installer.run
[root@lepus src]# ./xampp-linux-x64-1.8.2-5-installer.run
#After execution, return all the way by default.
The following shows a successful installation (lampp is installed in the / opt directory by default):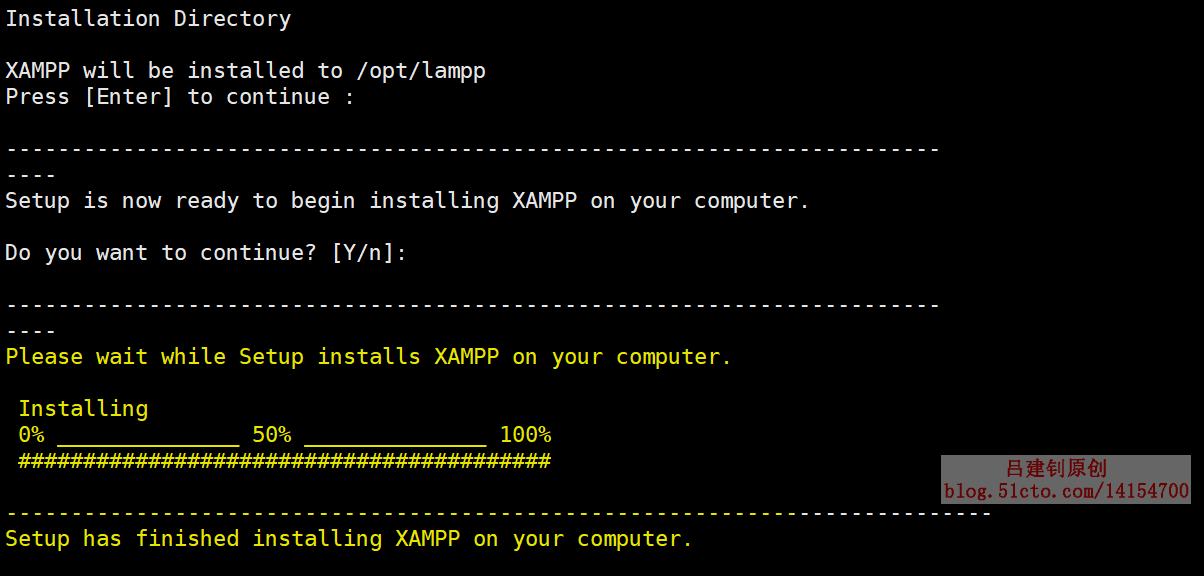
1. Open Remote Access xampp
After successful deployment, you are listening on port 80, but by default, you can only access it locally. To turn on remote access, do the following:
1) Edit the httpd-xampp.conf file:
[root@lepus ~]# vim /opt/lampp/etc/extra/httpd-xampp.conf
#Change as follows:
<LocationMatch "^/(?i:(?:xampp|security|licenses|phpmyadmin|webalizer|server-status|server-info))">
#        Require local      #Comment out the line
       ErrorDocument 403 /error/XAMPP_FORBIDDEN.html.var
</LocationMatch>
#Setting command environment variables
[root@lepus bin]# vim /etc/profile  #Add the following at the end
export PATH=/opt/lampp/bin:${PATH}
[root@lepus bin]# source /etc/profile
#Restart the service for the changes to take effect
[root@lepus ~]# httpd -k stop
[root@lepus ~]# httpd -k start
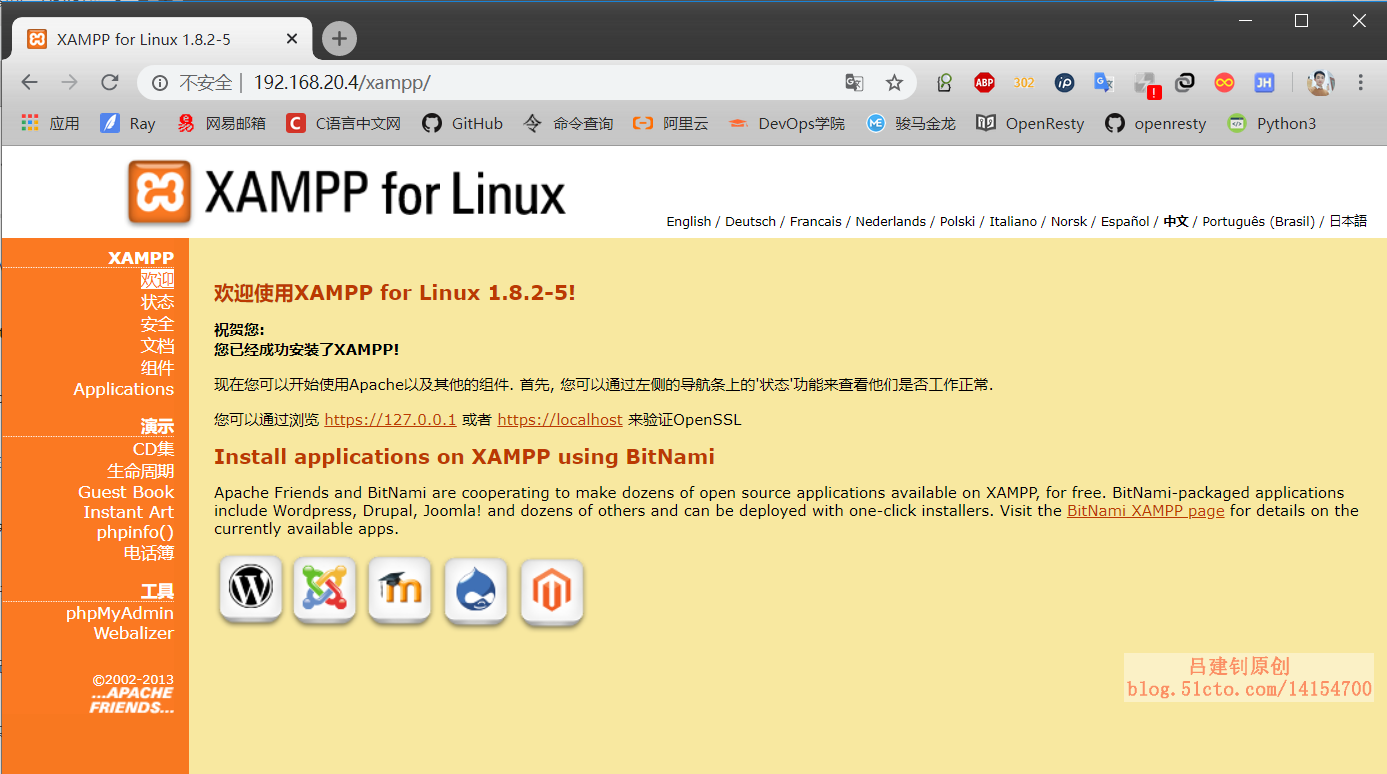
When your browser visits the lepus server, you will see the following pages to indicate that lampp ran successfully:
3. Install python basic modules
Prepare your own python environment. In general, the Centos system has its own python environment. The python environment requires more than 2.6, but python 3 is not supported.
The following driver packages for python linked databases are optional (to monitor which type of database, install which package).
1. Install MySQLdb for python (must be installed)
MySQLdb is a class library that Python connects to and operates on MySQL. If you are going to use the lepus system to monitor the MySQL database, this module must be installed.
[root@lepus ~]# yum -y install python-devel
[root@lepus ~]# unzip MySQL-python-1.2.5.zip
[root@lepus bin]# which mysql_config   #View the absolute path to the mysql_config command
/opt/lampp/bin/mysql_config
[root@lepus ~]# cd MySQL-python-1.2.5/
[root@lepus MySQL-python-1.2.5]# vim site.cfg  #Modify the following
mysql_config = /opt/lampp/bin/mysql_config   #Specify the absolute path to the mysql_config command
#Install
[root@lepus MySQL-python-1.2.5]# python setup.py build
[root@lepus MySQL-python-1.2.5]# python setup.py install
2. Install redis-related drivers (must be installed if Redis needs to be monitored)
[root@lepus ~]# tar zxf redis-py-2.10.3.tar.gz
[root@lepus ~]# cd redis-py-2.10.3/
[root@lepus redis-py-2.10.3]# python setup.py install
If you need to monitor other databases, refer to Official Documents To install, some packages are also available in the link to the network at the beginning of my blog post.
4. Install Lepus Collector
Note: All the following operations are performed on the Lepus host, involving some operations such as database authorization, and also on Lepus. Don't think this host does not have MySQL installed. The lampp package has integrated MySQL.
1. Download packages
[root@lepus ~]# cd /usr/local
[root@lepus local]# git clone https://github.com/ruzuojun/lepus.git
If the git clone command errors as follows:
Cloning to 'lepus'...
fatal: unable to access 'https://github.com/ruzuojun/lepus.git/': SSL certificate problem: unable to get local issuer certificate
Please execute the following instructions:
[root@monitor local]# git config --global http.sslVerify false
2. Authorize executables and create soft links
[root@lepus lepus]# pwd
/usr/local/lepus
[root@lepus lepus]# chmod +x lepus*
[root@lepus lepus]# ln -sf /usr/local/lepus/lepus /usr/local/bin/
[root@lepus lepus]# ln -sf /usr/local/lepus/lepus_monitor /usr/local/bin/
3. Create database in monitor and authorize
[root@lepus lepus]# ln -sf /opt/lampp/lampp /usr/local/bin
[root@lepus lepus]# lampp start           #Start lamp environment
[root@lepus lepus]# mysql -uroot   #Default database has no password
#Create related libraries and users
mysql> create database lepus default character set utf8;
mysql> grant select,insert,update,delete,create on lepus.* to 'lepus_user'@'localhost' identified by '123.com';
mysql> flush privileges;
4. Import initialization SQL files (table structure and data files) from the SQL directory
[root@lepus lepus]# pwd
/usr/local/lepus
[root@lepus lepus]# mysql -uroot lepus < sql/lepus_table.sql
[root@lepus lepus]# mysql -uroot lepus < sql/lepus_data.sql
5. Modify Profile
[root@lepus lepus]# pwd
/usr/local/lepus
[root@lepus lepus]# cat etc/config.ini   #Modify the configuration file as follows
###Monitor MySQL Database Connection Address###
[monitor_server]
host="127.0.0.1"
port=3306
user="lepus_user"
passwd="123.com"
dbname="lepus"
#Note: The database information specified above is used by lepus host to store collected information, not monitored
6. Start lepus
[root@lepus lepus]# lepus start
If the error is as follows:
[root@lepus lepus]# lepus start
/usr/local/bin/lepus: Line 16: 72095 Segmentation fault               (spit out the pips)nohup python lepus.py &>logs/lepus.log
lepus server start fail!
Then execute the following instructions:
[root@lepus lepus]# ln -s /opt/lampp/lib/* /usr/lib64/
[root@lepus lepus]# lepus start    #Start again to succeed
lepus server start success!
7. Test whether each database driver is working properly (not required)
[root@lepus lepus]# pwd
/usr/local/lepus
[root@lepus lepus]# python test_driver_mysql.py
MySQL python drivier is ok!
[root@lepus lepus]# python test_driver_redis.py
Redis python drivier is ok!
5. Install the web Admin Desk
[root@lepus lepus]# vim /opt/lampp/etc/httpd.conf    #Modify Main Profile
<Directory />
    AllowOverride none
    Require all granted   # Around 214 lines, change the original denied to granted
</Directory>
             ........  #Omit some content
Include etc/extra/httpd-vhosts.conf   # 488 lines or so, turn on the virtual host
[root@lepus lepus]# vim /opt/lampp/etc/extra/httpd-vhosts.conf   #Modify the virtual host configuration file as follows
<VirtualHost *:80>
    ServerAdmin demo.lepus.cc
    DocumentRoot "/usr/local/lepus/web"
    ServerName demo.lepus.cc
    ServerAlias demo.lepus.cc
    ErrorLog "logs/demo.lepus.cc-error_log"
    CustomLog "logs/demo.lepus.cc-access_log" common
</VirtualHost>
[root@lepus lepus]# httpd -k restart  #Restart the httpd service for the changes to take effect
#Modify database information for php connection monitoring server
[root@lepus lepus]# vim /usr/local/lepus/web/application/config/database.php
$db['default']['hostname'] = '127.0.0.1';
$db['default']['port']     = '3306';
$db['default']['username'] = 'lepus_user';
$db['default']['password'] = '123.com';
$db['default']['database'] = 'lepus';
$db['default']['dbdriver'] = 'mysql';
6. Configuration of web Interface
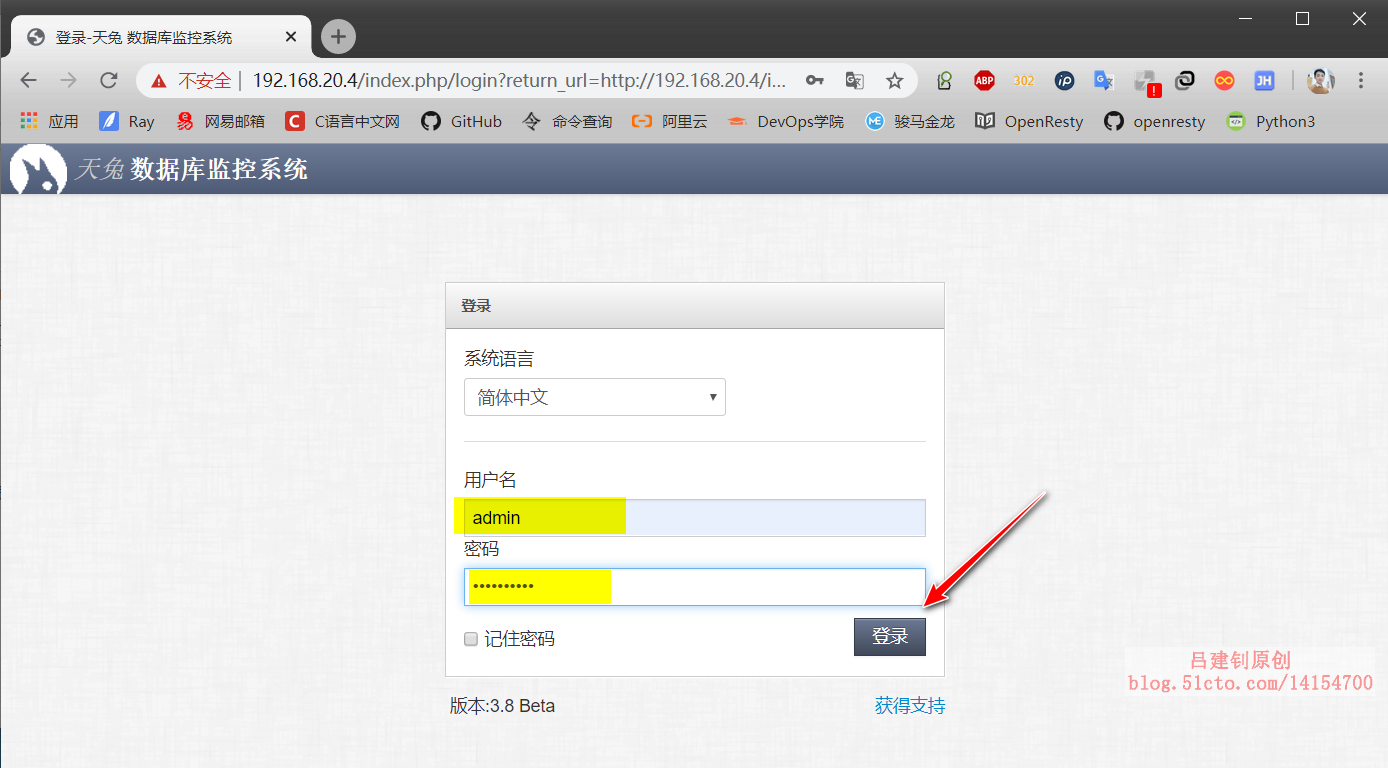
Log in to the web interface for login. The default administrator account password is admin/Lepusadmin. It is recommended to modify the administrator password and add normal users after login.
1. Login
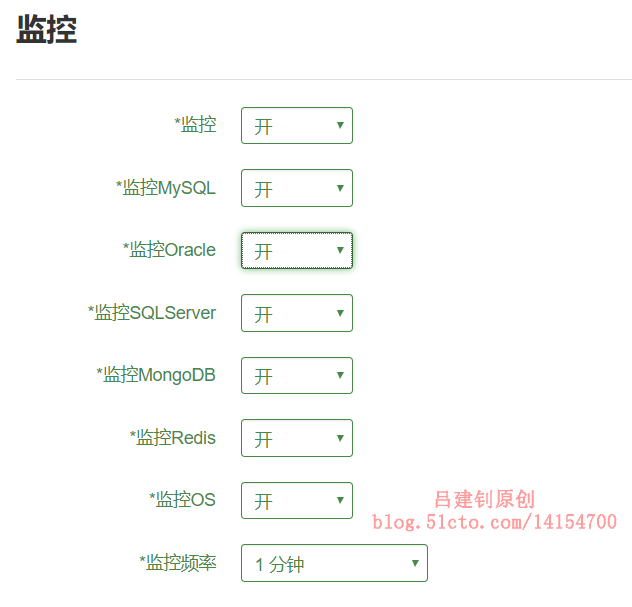
2. Set up global configuration (set up monitoring)
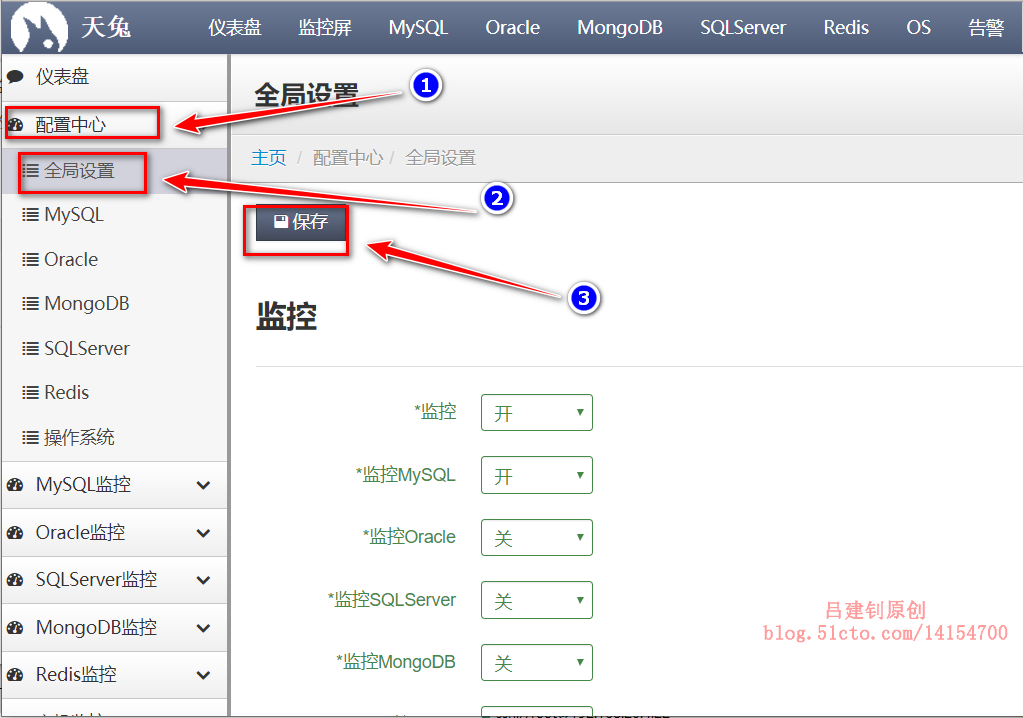
Global configuration settings are simple, click below to set them, and then click Save.
3. Set up alerts
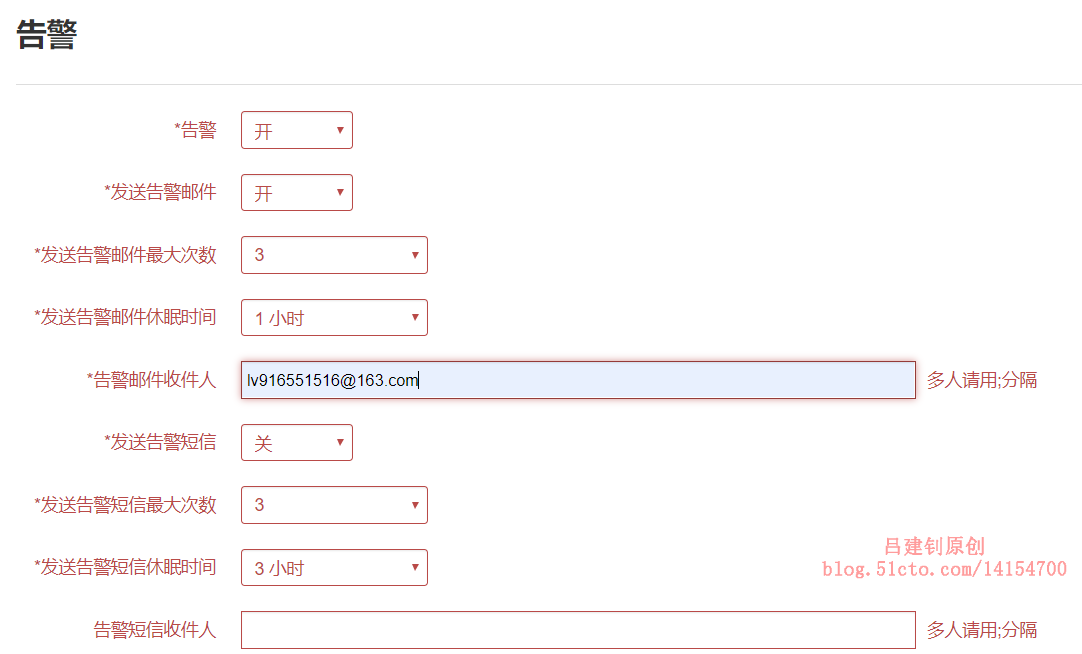
Go to Configuration Center - Global Settings, you can see the alarm settings in the alarm label page.
Here, you can set whether to turn on alerts, whether to send mail, whether to send text messages, and so on.
The two parameters, maximum number of alarms and alarm sleep time, are set to prevent the flood of alarms. The meaning is that when the maximum number of consecutive alarms is reached, the alarm notification will be stopped and the alarm will continue to be sent if the time exceeds the alarm sleep time.
As follows (SMS alerts are not set here):
4. Configure Mail Alarm
Mail alerts can only be sent normally if the mail server is successfully configured.I use qq mailbox here for example, other mailbox services are much the same.
Enter the Configuration Center - Global Settings. Inside the mail label, we can see the following mail server settings: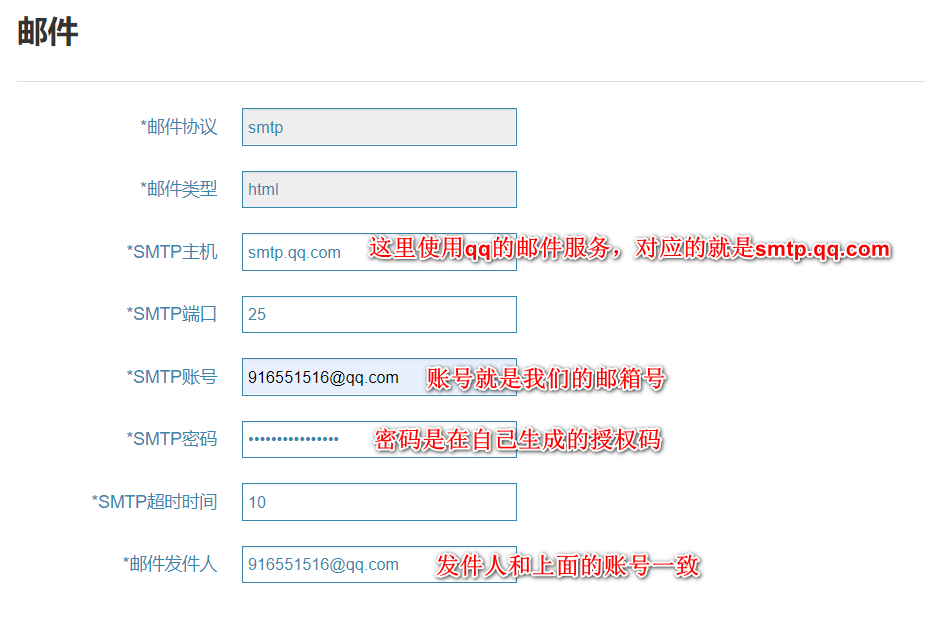
Note: Generating authorization numbers is not what this blog post says. If not, Baidu will solve it by itself.
To configure SMS alerts, refer to Official Documents It also needs to turn on SMS alarm in the global configuration.
5. Add MySQL database instance
Note: Lepus supports the monitoring of MySQL, Oracle, MongoDB, Redis, SQL Server and other databases.
Monitor the MySQL database without installing any agent s on the monitored side, just create a user with the appropriate permissions.
1) Create authorized users on the monitored side
This user is monitoring which host was created on which host. I have 192.168.20.2 as this host
mysql> grant select,process,super on *.* to 'lepus_monitor'@'192.168.20.%' identified by '123.com';
mysql> flush privileges;
2) Add MySQL monitoring database to web interface
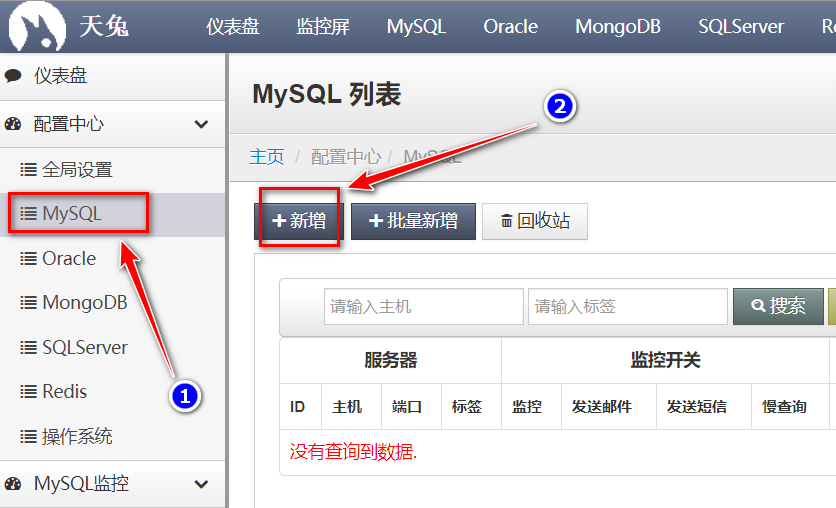
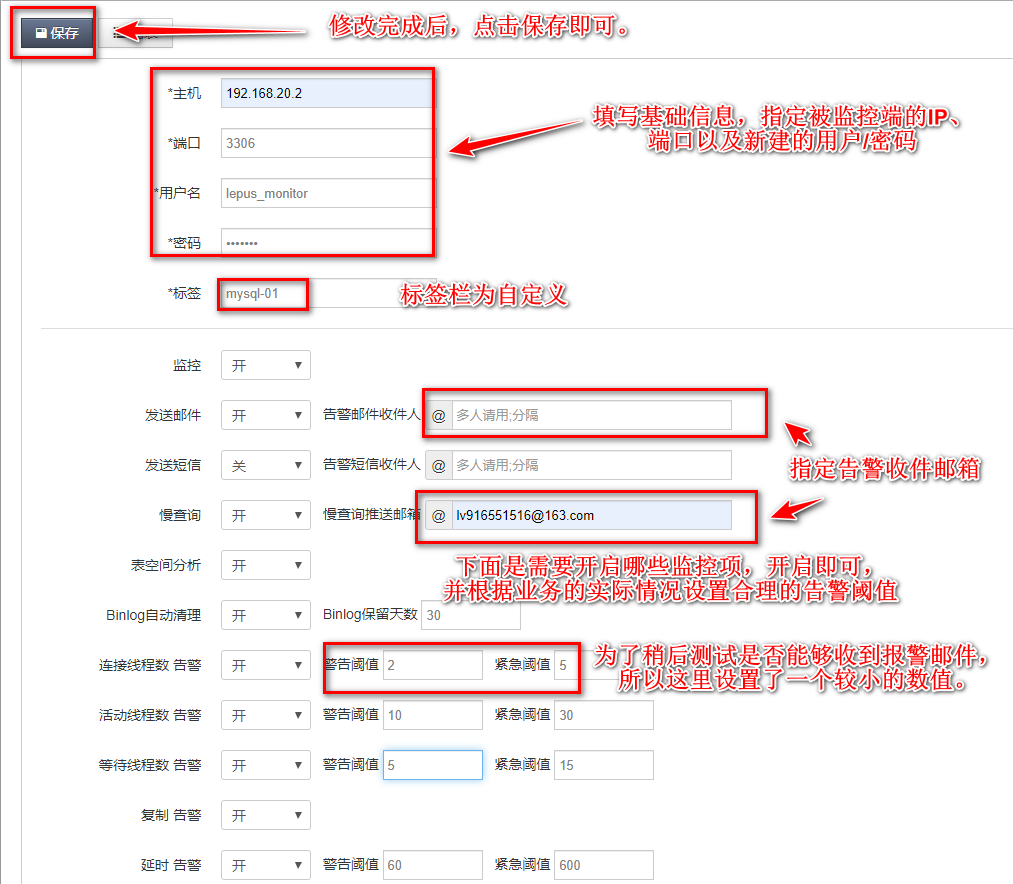
After saving, you can see the new instance of MySQL:

We can watch the log to see if the host was successfully added.When there is no host, check mysql: not found any servers information is output in the log:
[root@MyCloudServer lepus]# tail -f logs/lepus.log
2017-04-27 16:45:55 [INFO] check mysql controller started.
2017-04-27 16:45:55 [WARNING] check mysql: not found any servers
2017-04-27 16:45:55 [INFO] check mysql controller finished.
When we add a host, we can see that the above prompt disappears, which indicates that the Lepus collection process has discovered the host we added:
2017-04-27 16:47:55 [INFO] check mysql controller started.
2017-04-27 16:48:05 [INFO] check mysql controller finished.
2017-04-27 16:48:44 [INFO] alarm controller started.
2017-04-27 16:48:44 [INFO] alarm controller finished.
Finally, we can see in the MySQL Monitoring menu that the host we added is being monitored.
Click below to see the corresponding monitoring item details: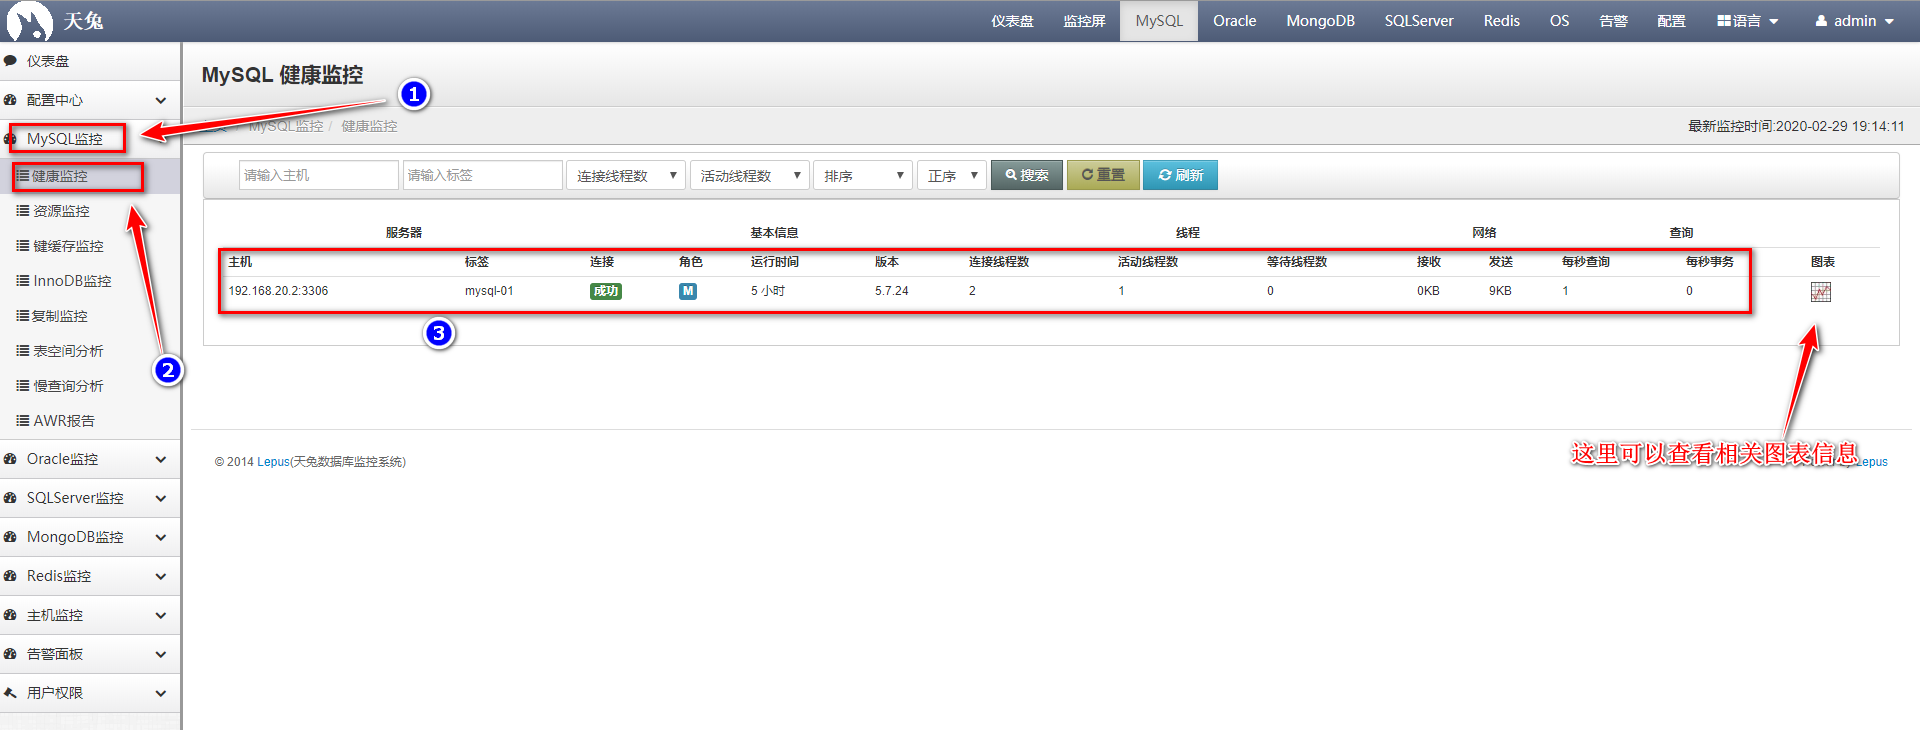
6. Add Redis Monitoring Instances
1) Modify redis-related configuration
[root@redis ~]# vim /etc/redis.conf   #Modify the configuration file as follows
bind 0.0.0.0     #Listen on all addresses
requirepass 123.com    #Set Password
[root@redis ~]# systemctl restart redis   #Restart takes effect
2) The web interface is configured as follows:
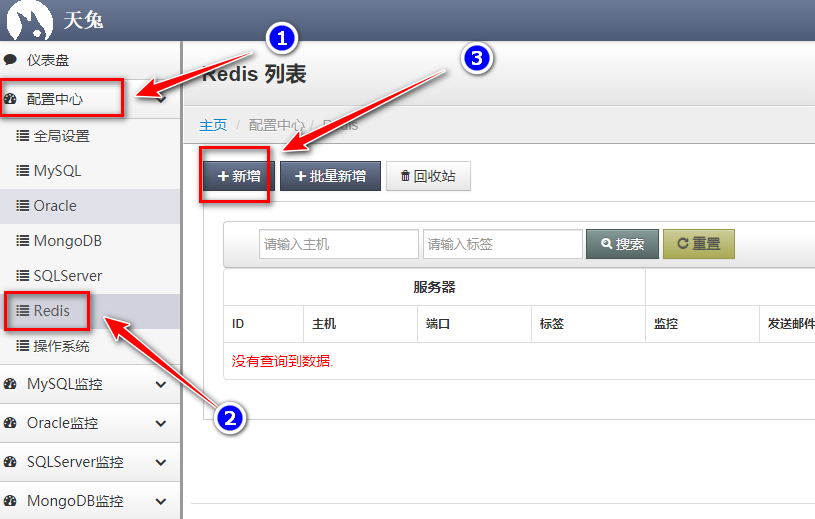
Add redis host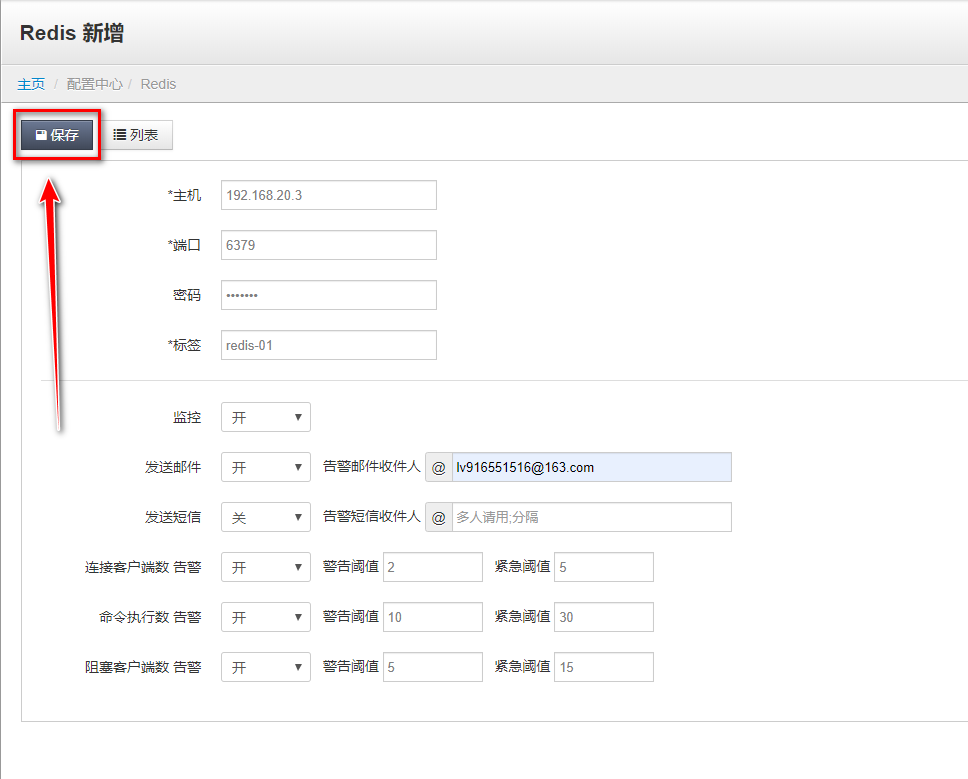
Generally speaking, data should have been collected at this time, but I have tested that data has not been collected, and searched for the following solutions:
[root@lepus lepus]# pwd
/usr/local/lepus
[root@lepus lepus]# python check_redis.py    #This test script needs to be executed manually
2020-02-29 21:16:06 [INFO] check redis controller started.
2020-02-29 21:16:07 [INFO] check redis controller finished.
Finally, data collection was successful:
7. Test mail alarm function
Since the threshold for the number of links is lower when configuring, it only takes a few more clients to log in to the MySQL and redis databases, and the designated mail recipients can receive the following messages:
MySQL alerts are as follows:

The warning information for redis is as follows:
