Prototype mode
The difficulty factor for this model is elementary and proposed by Gang Of Four.
Prototype mode is used to create duplicate objects and improve performance.This pattern implements a prototype interface for creating a clone of the current object.This pattern is used when creating objects directly is expensive.
For example, an object needs to be created after a costly database operation or remote connection. We can cache the object, return its clone on the next request, update the database when needed, or notify the remote connection to reduce calls to the database or remote connection.
intention
Specify the kind of objects created with prototype instances, and create new objects by copying them.
Main Solution: Create and delete prototypes at runtime.
When to use:
1. When a system should be created, composed and represented independently of its products.
2. When the class to be instantiated is specified at run time, for example, by dynamic loading.
3. To avoid creating a factory class hierarchy parallel to the product class hierarchy.
4. When an instance of a class can only have one of several different combinations of states.It may be easier to prototype and clone a corresponding number of them than to manually instantiate the class each time in the appropriate state.
How to solve this problem: Using an existing prototype object, quickly generate the same instance as the prototype object.
Key Code:
1. Implement clone operation, implement Cloneable interface in JAVA, override clone() method.In.NET, you can use the MemberwiseClone() method of the Object class to make a shallow copy of an object or a deep copy by serializing it.
2. The prototype pattern is also used to isolate the coupling between the user of the class object and the specific type (volatile class), which also requires that these "volatile classes" have a stable interface.
explain
Examples of the real world
Remember Dolly?Cloned sheep!Let's not go into details, the key point here is all cloning
In short
Create new objects by cloning based on existing objects
Wikipedia
Prototype mode is a creative design mode in software development.When the type of object to be created is determined and used by a prototype instance, the prototype instance is cloned to produce a new object.
In short, it allows you to create a copy of an existing object and modify it to suit your needs instead of creating an object from scratch and setting it up
Program example
Cloning objects is easy in Java by implementing the java.lang.Cloneable interface and overriding the clone method
class Sheep implements Cloneable {
  private String name;
  public Sheep(String name) { this.name = name; }
  public void setName(String name) { this.name = name; }
  public String getName() { return name; }
  @Override
  public Sheep clone() throws CloneNotSupportedException {
    return new Sheep(name);
  }
}
The Sheep class object above can then be cloned as follows:
Sheep original = new Sheep("Jolly");
System.out.println(original.getName()); // Jolly

// Clone and modify what is required
Sheep cloned = original.clone();
cloned.setName("Dolly");
System.out.println(cloned.getName()); // Dolly
Application Scenarios
1. Resource optimization scenarios.
2. Class initialization needs to digest a lot of resources, including data, hardware resources, etc.
3. Scenarios for performance and security requirements.
4. If generating an object from new requires very tedious data preparation or access rights, you can use the prototype mode.
5. Scenarios for multiple modifiers of an object.
6. When an object needs to be accessed by other objects and each caller may need to modify its value, consider using prototype mode to copy multiple objects for the caller to use
Realistic examples in Java
Write at the end
Note: Unlike constructing new objects by instantiating a class, a prototype pattern generates new objects by copying an existing object.
Shallow copy implements Cloneable interface, overrides clone method, and deep copy implements Serializable interface to read binary stream
In a real project, the prototype pattern rarely appears alone, typically in conjunction with the factory method pattern, creating an object through the clone method, and then providing it to the caller by the factory method.The prototype pattern is integrated with Java, and we can use it anywhere.
Next, we'll write a sample program code that combines a prototype pattern with a factory method pattern.
We have a HeroFactory factory that can produce different types of Mage (Magician), Warlord (Military), Beast (Veterinary King) from the Orcs and Elves, but these types of products are not directly New born in the factory, they are clone-based through existing types of objects in prototype mode.
First we draw the UML class diagram for this program as follows:
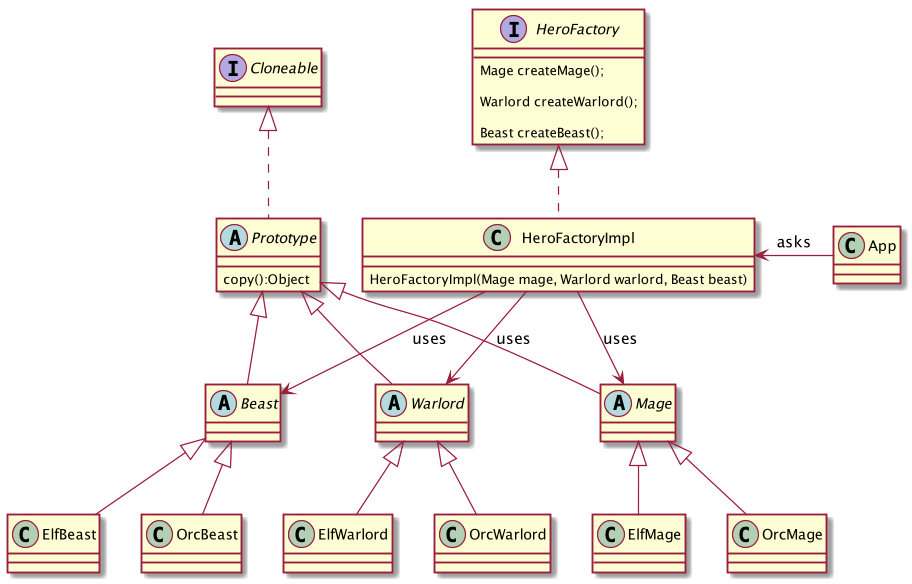
Next, according to the class diagram, step one: Write a Prototype abstract class
/**
 *
 * Prototype
 *
 */
public abstract class Prototype implements Cloneable {

  public abstract Object copy() throws CloneNotSupportedException;

}
Step 2: Write an abstract class of Beast, Warlord, Mage that inherits Prototype
/**
 *
 * Beast
 *
 */
public abstract class Beast extends Prototype {

  @Override
  public abstract Beast copy() throws CloneNotSupportedException;

}
/**
 *
 * Mage
 *
 */
public abstract class Mage extends Prototype {

  @Override
  public abstract Mage copy() throws CloneNotSupportedException;

}

/**
 *
 * Warlord
 *
 */
public abstract class Warlord extends Prototype {

  @Override
  public abstract Warlord copy() throws CloneNotSupportedException;

}
Step 3: Write specific subclasses of elves and orcs, inherit abstract classes defined in step 2
public class ElfBeast extends Beast {

  private String helpType;

  public ElfBeast(String helpType) {
    this.helpType = helpType;
  }

  public ElfBeast(ElfBeast elfBeast) {
    this.helpType = elfBeast.helpType;
  }

  @Override
  public Beast copy() throws CloneNotSupportedException {
    return new ElfBeast(this);
  }

  @Override
  public String toString() {
    return "Elven eagle helps in " + helpType;
  }

}

public class ElfMage extends Mage {


  private String helpType;

  public ElfMage(String helpType) {
    this.helpType = helpType;
  }

  public ElfMage(ElfMage elfMage) {
    this.helpType = elfMage.helpType;
  }

  @Override
  public ElfMage copy() throws CloneNotSupportedException {
    return new ElfMage(this);
  }

  @Override
  public String toString() {
    return "Elven mage helps in " + helpType;
  }

}

/**
 *
 * ElfWarlord
 *
 */
public class ElfWarlord extends Warlord {

  private String helpType;

  public ElfWarlord(String helpType) {
    this.helpType = helpType;
  }

  public ElfWarlord(ElfWarlord elfWarlord) {
    this.helpType = elfWarlord.helpType;
  }

  @Override
  public ElfWarlord copy() throws CloneNotSupportedException {
    return new ElfWarlord(this);
  }

  @Override
  public String toString() {
    return "Elven warlord helps in " + helpType;
  }

}

public class OrcBeast extends Beast {

  private String weapon;

  public OrcBeast(String weapon) {
    this.weapon = weapon;
  }

  public OrcBeast(OrcBeast orcBeast) {
    this.weapon = orcBeast.weapon;
  }

  @Override
  public Beast copy() throws CloneNotSupportedException {
    return new OrcBeast(this);
  }

  @Override
  public String toString() {
    return "Orcish wolf attacks with " + weapon;
  }


}
//The remaining OrcMage, OrcWarlord can be written like Elf above...
Step 4: Write the HeroFactory interface and its implementation class:
/**
 *
 * Interface for the factory class.
 *
 */
public interface HeroFactory {

  Mage createMage();

  Warlord createWarlord();

  Beast createBeast();

}

/**
 *
 * Concrete factory class.
 *
 */
public class HeroFactoryImpl implements HeroFactory {

  private Mage mage;
  private Warlord warlord;
  private Beast beast;

  /**
   * Constructor
   */
  public HeroFactoryImpl(Mage mage, Warlord warlord, Beast beast) {
    this.mage = mage;
    this.warlord = warlord;
    this.beast = beast;
  }

  /**
   * Create mage
   */
  public Mage createMage() {
    try {
      return mage.copy();
    } catch (CloneNotSupportedException e) {
      return null;
    }
  }

  /**
   * Create warlord
   */
  public Warlord createWarlord() {
    try {
      return warlord.copy();
    } catch (CloneNotSupportedException e) {
      return null;
    }
  }

  /**
   * Create beast
   */
  public Beast createBeast() {
    try {
      return beast.copy();
    } catch (CloneNotSupportedException e) {
      return null;
    }
  }

}
Step 5: Write the App client class:
public class App {

  private static final Logger LOGGER = LoggerFactory.getLogger(App.class);

  /**
   * Program entry point
   *
   * @param args command line args
   */
  public static void main(String[] args) {
    HeroFactory factory;
    Mage mage;
    Warlord warlord;
    Beast beast;

    factory = new HeroFactoryImpl(new ElfMage("cooking"), new ElfWarlord("cleaning"), new ElfBeast("protecting"));
    mage = factory.createMage();
    warlord = factory.createWarlord();
    beast = factory.createBeast();
    LOGGER.info(mage.toString());
    LOGGER.info(warlord.toString());
    LOGGER.info(beast.toString());

    factory = new HeroFactoryImpl(new OrcMage("axe"), new OrcWarlord("sword"), new OrcBeast("laser"));
    mage = factory.createMage();
    warlord = factory.createWarlord();
    beast = factory.createBeast();
    LOGGER.info(mage.toString());
    LOGGER.info(warlord.toString());
    LOGGER.info(beast.toString());
  }
}
Finally, run the App class with the following program output:
17:04:21.430 [main] INFO com.iluwatar.prototype.App - Elven mage helps in cooking
17:04:21.433 [main] INFO com.iluwatar.prototype.App - Elven warlord helps in cleaning
17:04:21.434 [main] INFO com.iluwatar.prototype.App - Elven eagle helps in protecting
17:04:21.434 [main] INFO com.iluwatar.prototype.App - Orcish mage attacks with axe
17:04:21.434 [main] INFO com.iluwatar.prototype.App - Orcish warlord attacks with sword
17:04:21.434 [main] INFO com.iluwatar.prototype.App - Orcish wolf attacks with laser
There are three main entrance roles in the prototype model:
1. Prototype role: Define the method used to duplicate an existing instance to generate a new one, as in the example above, the Prototype class.
2. Specific prototype roles: Implement methods for replicating existing instances to generate new instances, such as ElfBeast, ElfMage, ElfWarlord, Orc...
3. User role: Maintain a registry and provide a way to find the correct instance prototype.Finally, provide a way to get a new instance, which is used to delegate the method of replicating the instance to generate the new instance.HeroFactoryImpl is in the example above.
Above, I've finished the prototype mode here, and by now we've learned all about creating models in this design mode.
You can try to combine factory mode, abstract factory mode, singleton mode, builder mode and prototype mode you learned today to design your application by combining 1-2 design modes at a time. You will certainly get unexpected results and experience by designing your own.
In the next article we will learn about Adapter Pattern in Structural Mode
The code is not easy. If you like it, please give me a compliment. Keep an eye on me and I will try to keep updating it.