- Preface
In the previous blog, I sorted out some advanced features of RabbitMQ, such as confirm message confirmation mechanism, consumer side flow restriction, etc. Today, this blog is mainly about the integration of Spring AMQP and RabbitMQ, mainly about the use of some common components. It's relatively simple to organize, but the code runs successfully locally. If there is any problem, I hope to point out the communication in time.
- Spring AMQP user management component RabbitAdmin
RabbitAdmin encapsulates some operations of RabbitMQ, such as declaring switch, declaring queue, binding switch and queue, etc.
- RabbitAdmin needs to set the setAutoStartup parameter to true, so it will load when spring is started
- The bottom layer of RabbitAdmin is a series of RabbitMQ operations that are declared, modified and deleted through RabbitTemplate
Code example
The Bean is assembled by JavaConfig. RabbitAdmin needs a ConnectionFactory object. We inject ConnectionFactory. Then inject the RabbitAdmin object.
/**
 * SpringAMQP  RabbitAdmin Configuration class
 * @author Y
 * @date 2020 February 4th 2013
 */
@Configuration
public class RabbitConfig {

	@Bean
	public ConnectionFactory connectionFactory() {
		CachingConnectionFactory connectionFactory = new CachingConnectionFactory();
		connectionFactory.setAddresses("192.168.159.128:5672");
		connectionFactory.setUsername("guest");
		connectionFactory.setPassword("guest");
		connectionFactory.setVirtualHost("/");
		return connectionFactory;
	}

	@Bean
	public RabbitAdmin rabbitAdmin() {
		RabbitAdmin rabbitAdmin = new RabbitAdmin(connectionFactory());
		rabbitAdmin.setAutoStartup(true);
		return rabbitAdmin;
	}
}
After that, we can perform a series of RabbitMQ operations through RabbitAdmin. Here I test the declaration of switches and queues, and the binding operation of switches and queues.
/**
* RabbitMQ Test class
* @author Y
* @date 2020 February 11th 2013
*/
@RunWith(SpringRunner.class)
@ContextConfiguration(classes = {RabbitConfig.class})
public class RabbitTest {
@Autowired
private RabbitAdmin rabbitAdmin;
@Test
public void test01() {
//Claim switch
rabbitAdmin.declareExchange(new DirectExchange("test.direct.exchange", false, false));
rabbitAdmin.declareExchange(new TopicExchange("test.topic.exchange", false, false));
//Declaration queue
rabbitAdmin.declareQueue(new Queue("test.direct.queue", false));
rabbitAdmin.declareQueue(new Queue("test.topic.queue", false));
//Binding switches and queues
rabbitAdmin.declareBinding(new Binding("test.direct.queue", Binding.DestinationType.QUEUE,
"test.direct.exchange", "test", new HashMap<>()));
rabbitAdmin.declareBinding(BindingBuilder.bind(new Queue("test.topic.queue", false)).
to(new TopicExchange("test.topic.exchange", false, true)).with("#"));
}
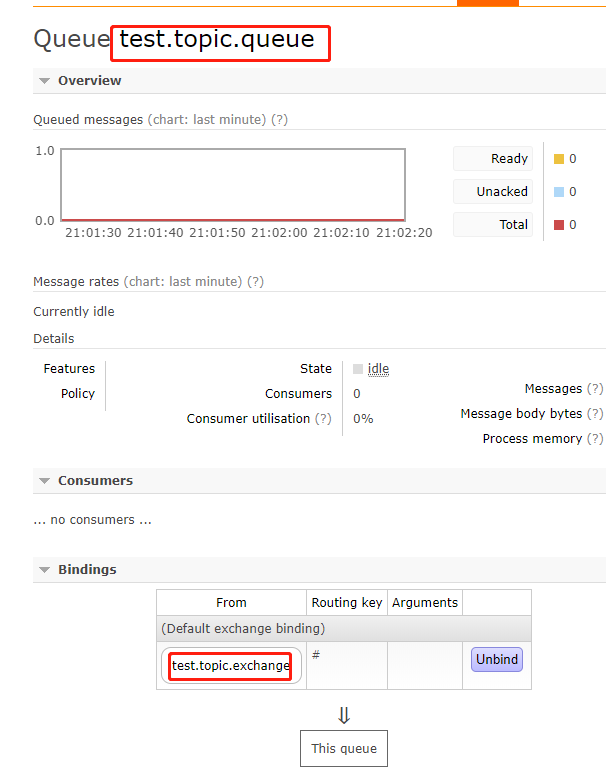
}Execute the test method. Through the RabbitMQ control platform, you can see the declared switches and queues, as well as the binding relationship between switches and queues.

- Spring AMQP message module component RabbitTemplate
RabbitTemplate is a key class of sending messages integrated with Spring AMQP and RabbitMQ. It provides many effective methods, such as callback listening ConfirmCallback, return listening ReturnCallback and so on.
In the same way, we use @ Bean annotation to inject rabbitemplate into spring container. Rabbitemplate also needs a ConnectionFactory object.
	@Bean
	public RabbitTemplate rabbitTemplate() {
		RabbitTemplate rabbitTemplate = new RabbitTemplate(connectionFactory());
		rabbitTemplate.setConfirmCallback(new MyConfirmCallback());//Set callback function for confirmation message
		return rabbitTemplate;
	}
Use rabbitTemplate to send the message. The convertAndSend method will perform a conversion to convert the object to AMQP Message format.
@Autowired
private RabbitTemplate rabbitTemplate;
@Test
public void test02() {
rabbitTemplate.convertAndSend("test.topic.exchange", "test", "Lying trough");
rabbitTemplate.convertAndSend("test.topic.exchange", "haha", "Lying groove ha ha", new MessagePostProcessor() {
//Customizing some properties of a message
@Override
public Message postProcessMessage(Message message) throws AmqpException {
message.getMessageProperties().getHeaders().put("name", "ahao");
return message;
}
});
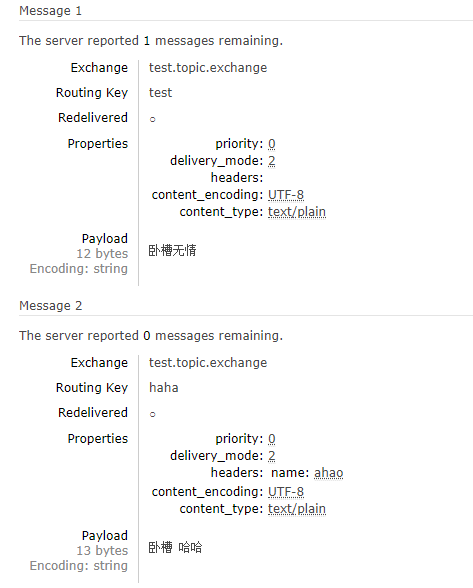
}Execute the test method, check the RabbitMQ control platform, and you can see two messages waiting to be consumed.
- Spring AMQP message container -- SimpleMessageListenerContainer
SimpleMessageListenerContainer is a very powerful class. It is a container for message listening. It can listen to multiple queues specified, set message confirmation and auto confirmation policies, set specific message converters and listeners, etc. Here is a summary of the simplest usage.
We inject the SimpleMessageListenerContainer object into the spring container through the @ Bean annotation. SimpleMessageListenerContainer also needs to specify a ConnectionFactory object. The specified listening queue here is the previously created test.topic.queue queue.
/**
* Message listening container
* @return
*/
@Bean
public SimpleMessageListenerContainer simpleMessageListenerContainer() {
SimpleMessageListenerContainer container = new SimpleMessageListenerContainer(connectionFactory());
//Manual response
container.setAcknowledgeMode(AcknowledgeMode.AUTO);
//Listening queue
container.setQueueNames("test.topic.queue");
//Number of consumers
container.setConcurrentConsumers(1);
//Maximum number of consumers
container.setMaxConcurrentConsumers(5);
//Set rules for naming ConsumerTag
container.setConsumerTagStrategy(new ConsumerTagStrategy() {
@Override
public String createConsumerTag(String queue) {
return queue+"_"+CommUtils.uuid();
}
});
//Set message listening
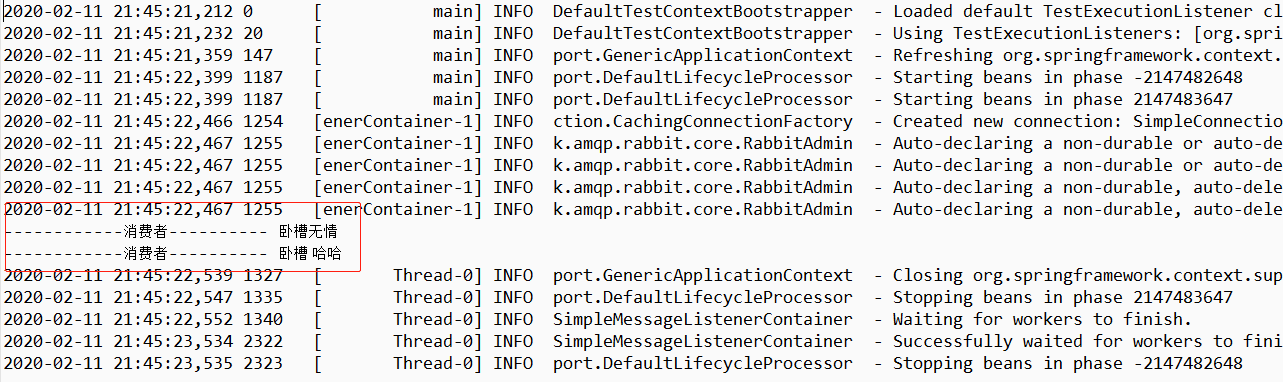
container.setMessageListener(new ChannelAwareMessageListener() {
@Override
public void onMessage(Message message, Channel channel) throws Exception {
String msg = new String(message.getBody(),"UTF-8");
System.out.println("------------Consumer---------- "+msg);
}
});
return container;
}Running the test method directly here will start the message container. You can see that the two messages sent before have been consumed.