Author: deathmood
Translator: front end Xiaozhi
Source: medium
There are dreams and dry goods. Wechat search [Daqian world] pays attention to this bowl washing wisdom who is still washing dishes in the early morning.
This article GitHub https://github.com/qq449245884/xiaozhi It has been included. There are complete test sites, materials and my series of articles for the interview of front-line large factories.
Recently, a Vue component has been open-source, which is not perfect enough. Welcome to improve it together. I also hope you can give star support. Thank you.
github address: https://github.com/qq44924588...
To build your own virtual DOM, you need to know two things. You don't even need to go deep into the source code of React or into the source code of any other virtual DOM implementation, because they are so large and complex - but in fact, the main part of the virtual DOM needs less than 50 lines of code.
There are two concepts:
- Virtual DOM is the mapping of real dom
- When some nodes in the virtual DOM tree change, a new virtual tree will be obtained. The algorithm compares the two trees (new tree and old tree) to find out the differences, and then only needs to make corresponding changes on the real dom.
Simulating DOM tree with JS object
First, we need to store the DOM tree in memory in some way. You can use ordinary JS objects to do this. Suppose we have such a tree:
<ul class="list">
  <li>item 1</li>
  <li>item 2</li>
</ul>
It looks simple, doesn't it? How to use JS objects to represent?
{ type: 'ul', props: { 'class': 'list' }, children: [
  { type: 'li', props: {}, children: ['item 1'] },
  { type: 'li', props: {}, children: ['item 2'] }
] }
Here are two things to note:
- The DOM element is represented by the following object
{ type: '...', props: { ... }, children: [ ... ] }
- DOM text nodes are represented by ordinary JS strings
However, it is quite difficult to represent a Dom tree with a lot of content in this way. Here is an auxiliary function to make it easier to understand:
function h(type, props, ...children) {
  return { type, props, children };
}
Rearrange the starting code in this way:
h('ul', { 'class': 'list' },
  h('li', {}, 'item 1'),
  h('li', {}, 'item 2'),
);
This looks much more concise and can go further. Use here JSX , as follows:
<ul className="list">
  <li>item 1</li>
  <li>item 2</li>
</ul>
Compile to:
React.createElement('ul', { className: 'list' },
  React.createElement('li', {}, 'item 1'),
  React.createElement('li', {}, 'item 2'),
);
Does it look familiar? If we can replace React.createElement(...) with the h(...) function we just defined, we can also use JSX syntax. In fact, you only need to add a comment at the head of the source file:
/** @jsx h */
<ul className="list">
  <li>item 1</li>
  <li>item 2</li>
</ul>
It actually tells Babel 'Hey, little brother, help me compile JSX syntax, replace React.createElement(...) with h(...) function, and then Babel starts compiling.'
To sum up, we write the DOM as follows:
/** @jsx h */
const a = (
  <ul className="list">
    <li>item 1</li>
    <li>item 2</li>
  </ul>
);
Babel will compile this code for us:
const a = (
  h('ul', { className: 'list' },
    h('li', {}, 'item 1'),
    h('li', {}, 'item 2'),
  );
);
When the function "h" executes, it will return a normal JS object - our virtual DOM:
const a = (
  { type: 'ul', props: { className: 'list' }, children: [
    { type: 'li', props: {}, children: ['item 1'] },
    { type: 'li', props: {}, children: ['item 2'] }
  ] }
);
Mapping from Virtual DOM to real DOM
Well, now we have a DOM tree, represented by ordinary JS objects, and our own structure. This is cool, but we need to create a real DOM from it.
First, let's make some assumptions and state some terms:
- Use variables starting with '$' to represent real DOM nodes (elements, text nodes), so $parent will be a real DOM element
- The virtual DOM is represented by a variable named node
*Just like in React, there can be only one root node -- all other nodes are in it
Then, write a function createElement(...), which will get a virtual DOM node and return a real DOM node. The props and children attributes are not considered here:
function createElement(node) {
  if (typeof node === 'string') {
    return document.createTextNode(node);
  }
  return document.createElement(node.type);
}
In the above method, I can also create two types of nodes: text node and Dom element node, which are JS objects of type:
{ type: '...', props: { ... }, children: [ ... ] }
Therefore, you can pass in the virtual text node and virtual element node in the function createElement -- which is feasible.
Now let's consider child nodes -- each of them is a text node or element. So they can also be created with the createElement(...) function. Yes, it's like recursion, so we can call createElement(...) for the child element of each element and add it to our element using appendChild():
function createElement(node) {
  if (typeof node === 'string') {
    return document.createTextNode(node);
  }
  const $el = document.createElement(node.type);
  node.children
    .map(createElement)
    .forEach($el.appendChild.bind($el));
  return $el;
}
Wow, it looks good. Put the props attribute of the node aside first. We'll talk about it later. We don't need them to understand the basic concepts of virtual DOM because they add complexity.
The complete code is as follows:
/** @jsx h */

function h(type, props, ...children) {
  return { type, props, children };
}

function createElement(node) {
  if (typeof node === 'string') {
    return document.createTextNode(node);
  }
  const $el = document.createElement(node.type);
  node.children
    .map(createElement)
    .forEach($el.appendChild.bind($el));
  return $el;
}

const a = (
  <ul class="list">
    <li>item 1</li>
    <li>item 2</li>
  </ul>
);

const $root = document.getElementById('root');
$root.appendChild(createElement(a));
Compare the differences between the two virtual DOM trees
Now we can convert the virtual DOM to the real DOM, so we need to consider the difference between the two DOM trees. Basically, we need an algorithm to compare the new tree with the old tree. It can let us know what has changed, and then change the real DOM accordingly.
How do I compare DOM trees? The following situations need to be addressed:
- Add a new node using the appendChild(...) method

- Remove the old node and use the removeChild(...) method to remove the old node
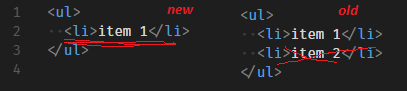
- For node replacement, use the replaceChild(...) method

If the nodes are the same - you need to compare child nodes in depth
Write a function called updateElement(...), which takes three parameters - $parent, newNode and oldNode, where $parent is the parent of an actual DOM element of the virtual node. Now let's see how to handle all the situations described above.
Add new node
function updateElement($parent, newNode, oldNode) {
  if (!oldNode) {
    $parent.appendChild(
      createElement(newNode)
    );
  }
}
Remove old node
There is a problem here -- if there is no node in the current location of the new virtual tree -- we should delete it from the actual DOM -- how do we do this?
If we know the parent element (passed by parameters), we can call the $parent.removeChild(...) method to map the changes to the real DOM. But only if we know the index of our node on the parent element can we get the reference of this node through $parent.childNodes[index].
OK, let's assume that the index will be passed to the updateElement function (it will indeed be passed -- see later). The code is as follows:
function updateElement($parent, newNode, oldNode, index = 0) {
  if (!oldNode) {
    $parent.appendChild(
      createElement(newNode)
    );
  } else if (!newNode) {
    $parent.removeChild(
      $parent.childNodes[index]
    );
  }
}
Node replacement
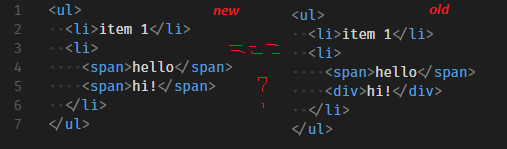
First, you need to write a function to compare two nodes (old node and new node) and tell whether the node has really changed. It should also be considered that this node can be an element or a text node:
function changed(node1, node2) {
  return typeof node1 !== typeof node2 ||
         typeof node1 === 'string' && node1 !== node2 ||
         node1.type !== node2.type
}
Now that the current node has the index attribute, you can simply replace it with a new node:
function updateElement($parent, newNode, oldNode, index = 0) {
  if (!oldNode) {
    $parent.appendChild(
      createElement(newNode)
    );
  } else if (!newNode) {
    $parent.removeChild(
      $parent.childNodes[index]
    );
  } else if (changed(newNode, oldNode)) {
    $parent.replaceChild(
      createElement(newNode),
      $parent.childNodes[index]
    );
  }
}
Compare child nodes
Last but not least -- we should traverse each child node of the two nodes and compare them -- actually calling the updateElement(...) method for each node also requires recursion.
- We only need to compare when the node is a DOM element (the text node has no child nodes)
- We need to pass the reference of the current node as the parent node
- We should compare all child nodes one by one. Even if it is undefined, it doesn't matter. Our function will handle it correctly.
- The last is index, which is the index of the sub node of the sub array
function updateElement($parent, newNode, oldNode, index = 0) {
  if (!oldNode) {
    $parent.appendChild(
      createElement(newNode)
    );
  } else if (!newNode) {
    $parent.removeChild(
      $parent.childNodes[index]
    );
  } else if (changed(newNode, oldNode)) {
    $parent.replaceChild(
      createElement(newNode),
      $parent.childNodes[index]
    );
  } else if (newNode.type) {
    const newLength = newNode.children.length;
    const oldLength = oldNode.children.length;
    for (let i = 0; i < newLength || i < oldLength; i++) {
      updateElement(
        $parent.childNodes[index],
        newNode.children[i],
        oldNode.children[i],
        i
      );
    }
  }
}
Complete code
Babel+JSX
/* @jsx h /
function h(type, props, ...children) {
return { type, props, children };
}
function createElement(node) {
if (typeof node === 'string') {
return document.createTextNode(node);
}
const $el = document.createElement(node.type);
node.children
.map(createElement)
.forEach($el.appendChild.bind($el));
return $el;
}
function changed(node1, node2) {
return typeof node1 !== typeof node2 ||
typeof node1 === 'string' && node1 !== node2 ||
node1.type !== node2.type
}
function updateElement($parent, newNode, oldNode, index = 0) {
if (!oldNode) {
$parent.appendChild(
createElement(newNode)
);
} else if (!newNode) {
$parent.removeChild(
$parent.childNodes[index]
);
} else if (changed(newNode, oldNode)) {
$parent.replaceChild(
createElement(newNode),
$parent.childNodes[index]
);
} else if (newNode.type) {
const newLength = newNode.children.length;
const oldLength = oldNode.children.length;
for (let i = 0; i < newLength || i < oldLength; i++) {
updateElement(
$parent.childNodes[index],
newNode.children[i],
oldNode.children[i],
i
);
}
}
}
// ---------------------------------------------------------------------
const a = (
<ul>
<li>item 1</li>
<li>item 2</li>
</ul>
);
const b = (
<ul>
<li>item 1</li>
<li>hello!</li>
</ul>
);
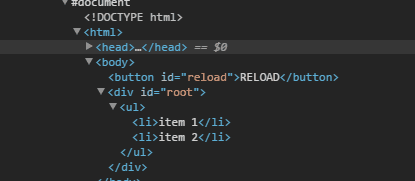
const $root = document.getElementById('root');
const $reload = document.getElementById('reload');
updateElement($root, a);
$reload.addEventListener('click', () => {
updateElement($root, b, a);
});
HTML
<button id="reload">RELOAD</button>
<div id="root"></div>
CSS
#root {
  border: 1px solid black;
  padding: 10px;
  margin: 30px 0 0 0;
}
Open the developer tool and observe the changes applied when the "Reload" button is pressed.
summary
Now we have written a virtual DOM implementation and understand how it works. The author hopes that after reading this article, he will have a certain understanding of the basic concept of how virtual DOM works and how to respond behind the scenes.
However, there are some things that are not highlighted here (they will be covered in future articles):
- Set the element attribute (props) and diffing/updating
- Handling events -- adding event listeners to elements
- Let the virtual DOM work with components, such as React
- Gets a reference to the actual DOM node
- Use virtual DOM with libraries that can directly change the real DOM, such as jQuery and its plug-ins
Original text:
https://medium.com/@deathmood...
The bugs that may exist after code deployment cannot be known in real time. Afterwards, in order to solve these bugs, we spent a lot of time on log debugging. By the way, we recommend a useful BUG monitoring tool Fundebug.
communication
There are dreams and dry goods. Wechat search [Daqian world] pays attention to this bowl washing wisdom who is still washing dishes in the early morning.
This article GitHub https://github.com/qq44924588... It has been included. There are complete test sites, materials and my series of articles for the interview of front-line large factories.