LCD1602 display is based on Arduino
This article mainly introduces the Arduino control LCD1602 display, specific hardware knowledge, working principle and sequence diagram. Many great gods have analyzed it in detail on the Internet, such as
Reference I
https://blog.csdn.net/Lucifer_min/article/details/112133408
Reference II
https://blog.csdn.net/weixin_46897073/article/details/110282736
I mainly explained how to quickly use Arduino to customize shapes. If there are deficiencies, please give me advice
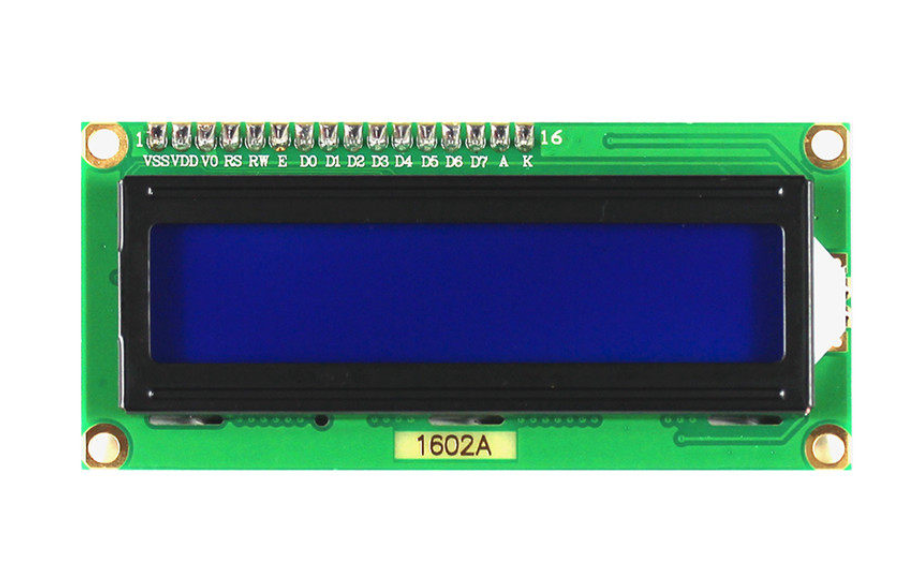
LCD1602 first needs to understand the working principle of each pin and why each pin is used.
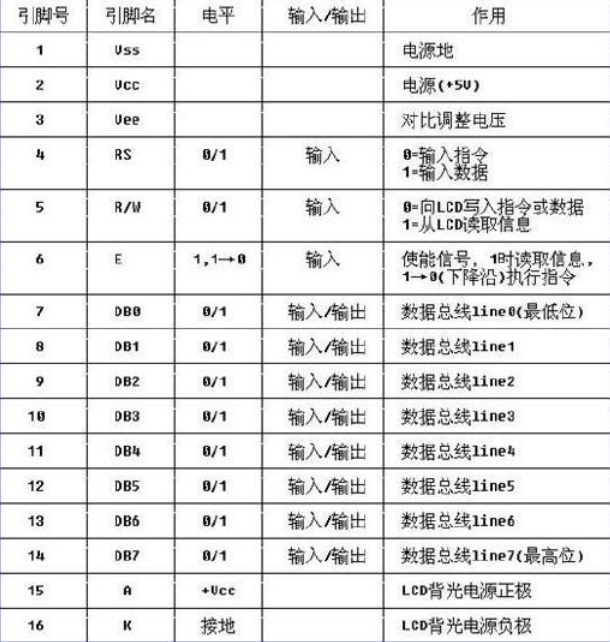 Pay attention to several pins. VDD is VCC, K pin is connected to GND, and RW is also connected to GND, because the screen shows that you write the corresponding data to display it. V0 (VEE) is a voltage interface for contrast adjustment. It is required to connect a potentiometer to control the voltage of this port to adjust the contrast of screen and font display
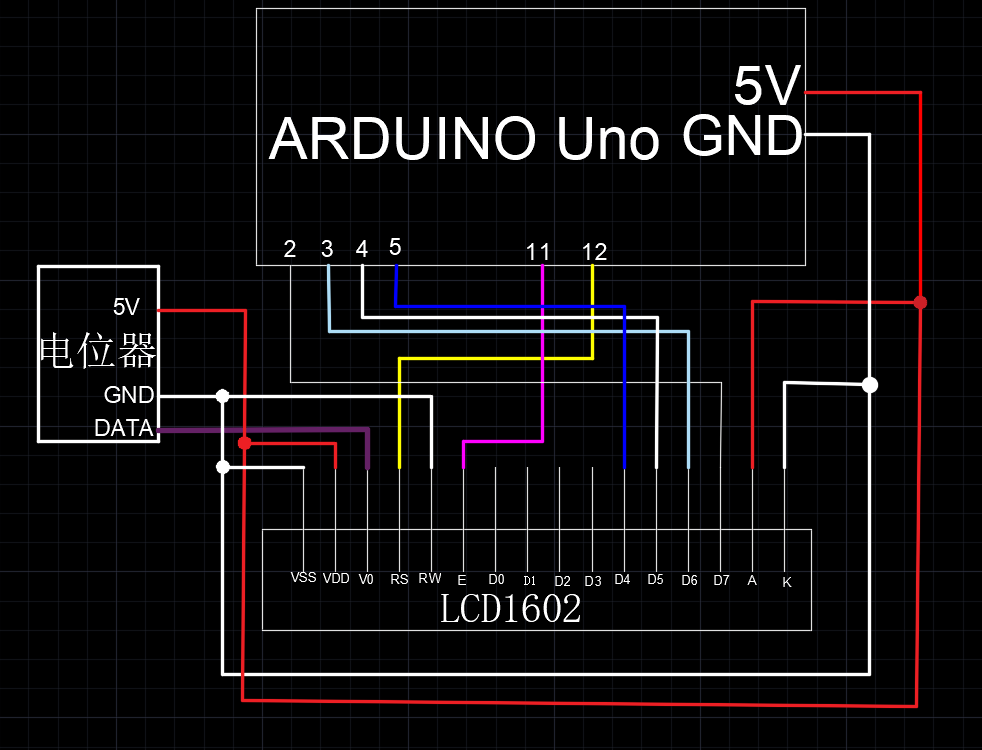
1. Open Arduino and call the official library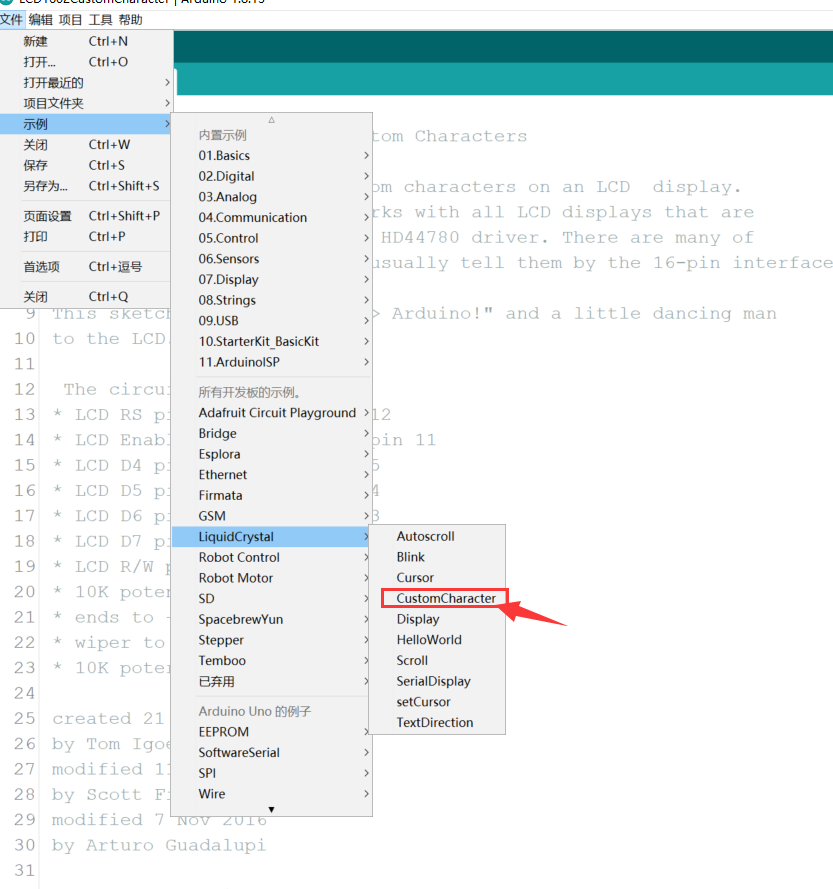 Connect the wire according to the wiring diagram
 After burning the program, adjust the contrast through the potentiometer until the image is observed.
 The comment on line 9 says that a "heart" will be displayed on the LCD screen“
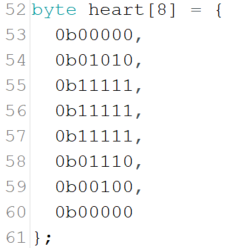
Looking at this byte array, does the shape formed by 1 look like a "heart", (on the LCD screen, 1 is the lit part)
 Call the function createChar in the LiquidCrystal.h library and assign the heart array to 0
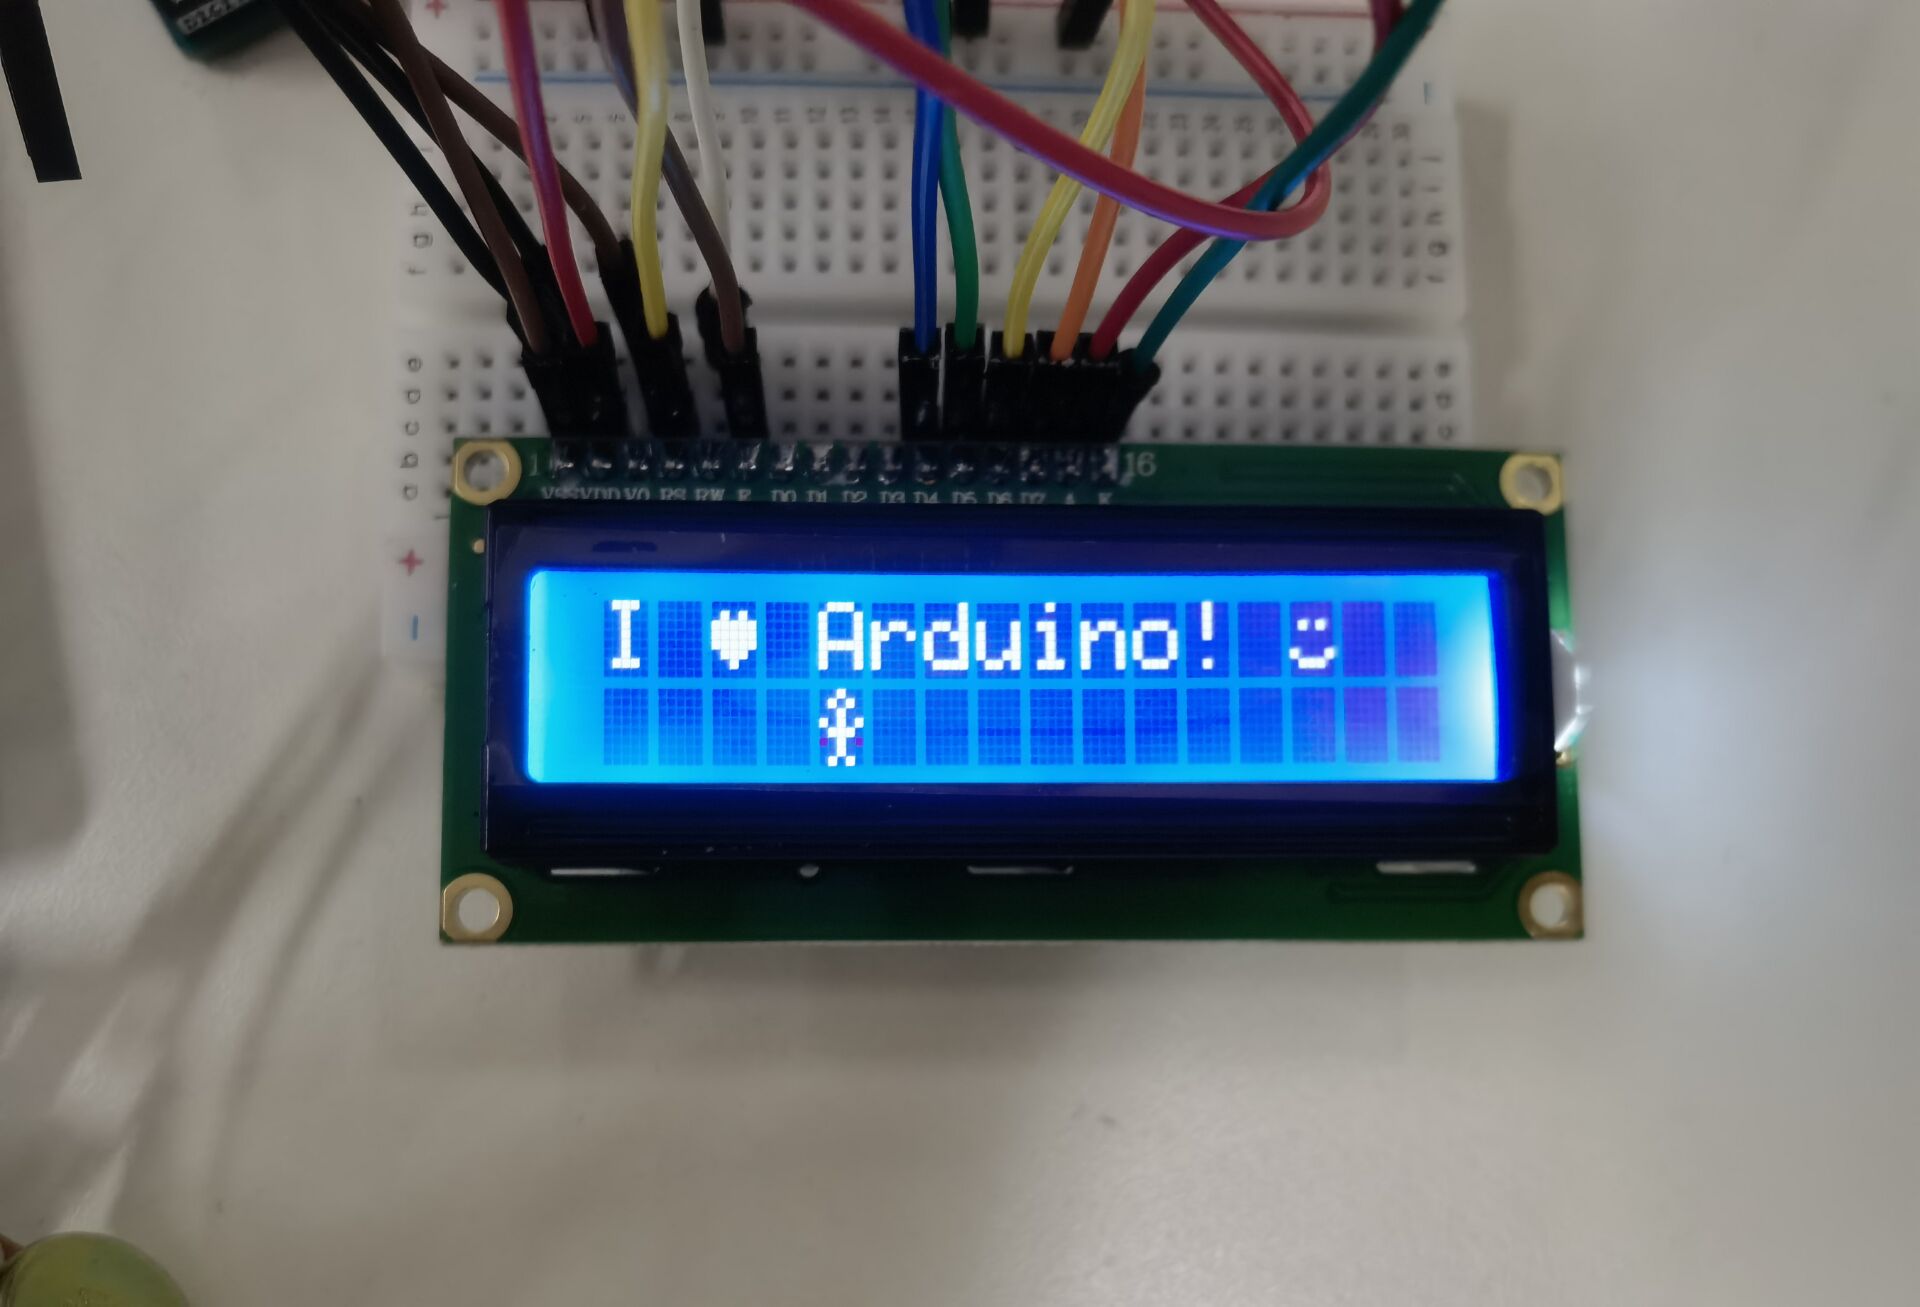 Got an image like this.
2. Now there is a task like this. I want to display the temperature and humidity symbol of DHT11, so I have the following operations. LCD1602 is a 216 screen, each position corresponds to * * 58 * *, and the lit place can use * * '1 * *.
//global variable
byte temperturechar[8] = {
  0b10000,
  0b00110,
  0b01001,
  0b01000,
  0b01000,
  0b01001,
  0b00110,
  0b00000,
};
According to the shape of degrees Celsius, a simple byte array is constructed.
//Call in set up function
  lcd.createChar(6, temperturechar);
  lcd.write(byte(6));
Specify this variable in the set up function and display its. How to form a graph in the createChar() function is written according to the hardware knowledge of its data manual.
// include the library code:
#include <LiquidCrystal.h>

// initialize the library by associating any needed LCD interface pin
// with the arduino pin number it is connected to
const int rs = 12, en = 11, d4 = 5, d5 = 4, d6 = 3, d7 = 2;
LiquidCrystal lcd(rs, en, d4, d5, d6, d7);

// make some custom characters:
byte heart[8] = {
  0b00000,
  0b01010,
  0b11111,
  0b11111,
  0b11111,
  0b01110,
  0b00100,
  0b00000
};

byte smiley[8] = {
  0b00000,
  0b00000,
  0b01010,
  0b00000,
  0b00000,
  0b10001,
  0b01110,
  0b00000
};

byte frownie[8] = {
  0b00000,
  0b00000,
  0b01010,
  0b00000,
  0b00000,
  0b00000,
  0b01110,
  0b10001
};

byte armsDown[8] = {
  0b00100,
  0b01010,
  0b00100,
  0b00100,
  0b01110,
  0b10101,
  0b00100,
  0b01010
};
byte armsUp[8] = {
  0b00100,
  0b01010,
  0b00100,
  0b10101,
  0b01110,
  0b00100,
  0b00100,
  0b01010
};
byte temperturechar[8] = {
  0b10000,
  0b00110,
  0b01001,
  0b01000,
  0b01000,
  0b01001,
  0b00110,
  0b00000,
};
void setup() {
  // initialize LCD and set up the number of columns and rows:
  lcd.begin(16, 2);

  // create a new character
  lcd.createChar(0, heart);
  // create a new character
  lcd.createChar(1, smiley);
  // create a new character
  lcd.createChar(2, frownie);
  // create a new character
  lcd.createChar(3, armsDown);
  // create a new character
  lcd.createChar(4, armsUp);
  lcd.createChar(6, temperturechar);
  // set the cursor to the top left
  lcd.setCursor(0, 0);

  // Print a message to the lcd.
  lcd.print("I ");
  lcd.write(byte(0)); // when calling lcd.write() '0' must be cast as a byte
  lcd.print(" Arduino! ");
  lcd.write(byte(1));
  lcd.setCursor(1,1);
  lcd.write(byte(6));
}

void loop() {
  // set the cursor to the bottom row, 5th position:
  lcd.setCursor(4, 1);
  // draw the little man, arms down:
  lcd.write(3);
  delay(500);
  lcd.setCursor(4, 1);
  // draw him arms up:
  lcd.write(4);
  delay(500);
}
3. In order to display data with dht11, I changed the code again
No nonsense on the code, hee hee
#include <DHT.h>
#include <LiquidCrystal.h>
const int rs = 12, en = 11, d4 = 5, d5 = 4, d6 = 3, d7 = 2;
LiquidCrystal lcd(rs, en, d4, d5, d6, d7);
volatile int S;
volatile int C;
DHT dhtA2(A2, 11);
byte temperturechar[8] = {
  0b10000,
  0b00110,
  0b01001,
  0b01000,
  0b01000,
  0b01001,
  0b00110,
  0b00000,
};
byte smiley[8] = {
  0b00000,
  0b00000,
  0b01010,
  0b00000,
  0b00000,
  0b10001,
  0b01110,
  0b00000
};
void setup() {
  // set up the LCD's number of columns and rows:
  lcd.begin(16, 2);
  // Print a message to the LCD.
  //lcd.print("hello, world!");
  // put your setup code here, to run once:
Serial.begin(9600);
  S = 0;
  C = 0;
   dhtA2.begin();
   lcd.createChar(1, smiley);
   lcd.createChar(6, temperturechar);
    // set the cursor to the top left
   lcd.setCursor(0, 0);
   lcd.setCursor(13,1);
   lcd.write(byte(6));
   lcd.setCursor(15,0);
   lcd.write(byte(0));
}

void loop() {
  // put your main code here, to run repeatedly:
  S = dhtA2.readHumidity();
  C = dhtA2.readTemperature();
  lcd.setCursor(0, 0);
  lcd.print("humidity:");
  lcd.print(S);
  lcd.print("%");
  lcd.setCursor(0, 1);
  // print the number of seconds since reset:
  lcd.print("temperture:");
  lcd.print(C);
}
This code is not complicated, there is nothing difficult.
Wiring diagram
 This man drew it in CAD
schematic diagram
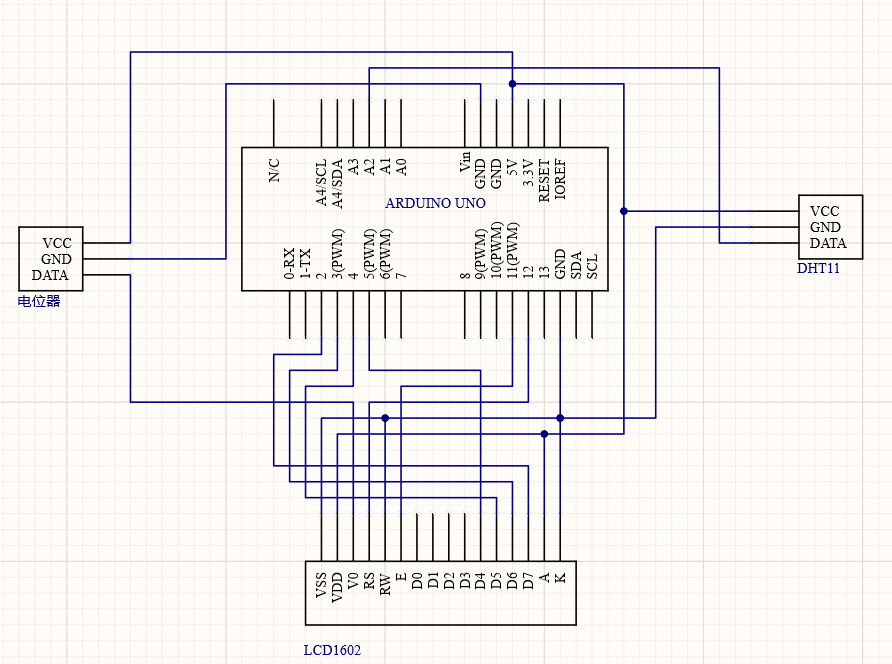 This man painted it in AD
Observe the experimental effect
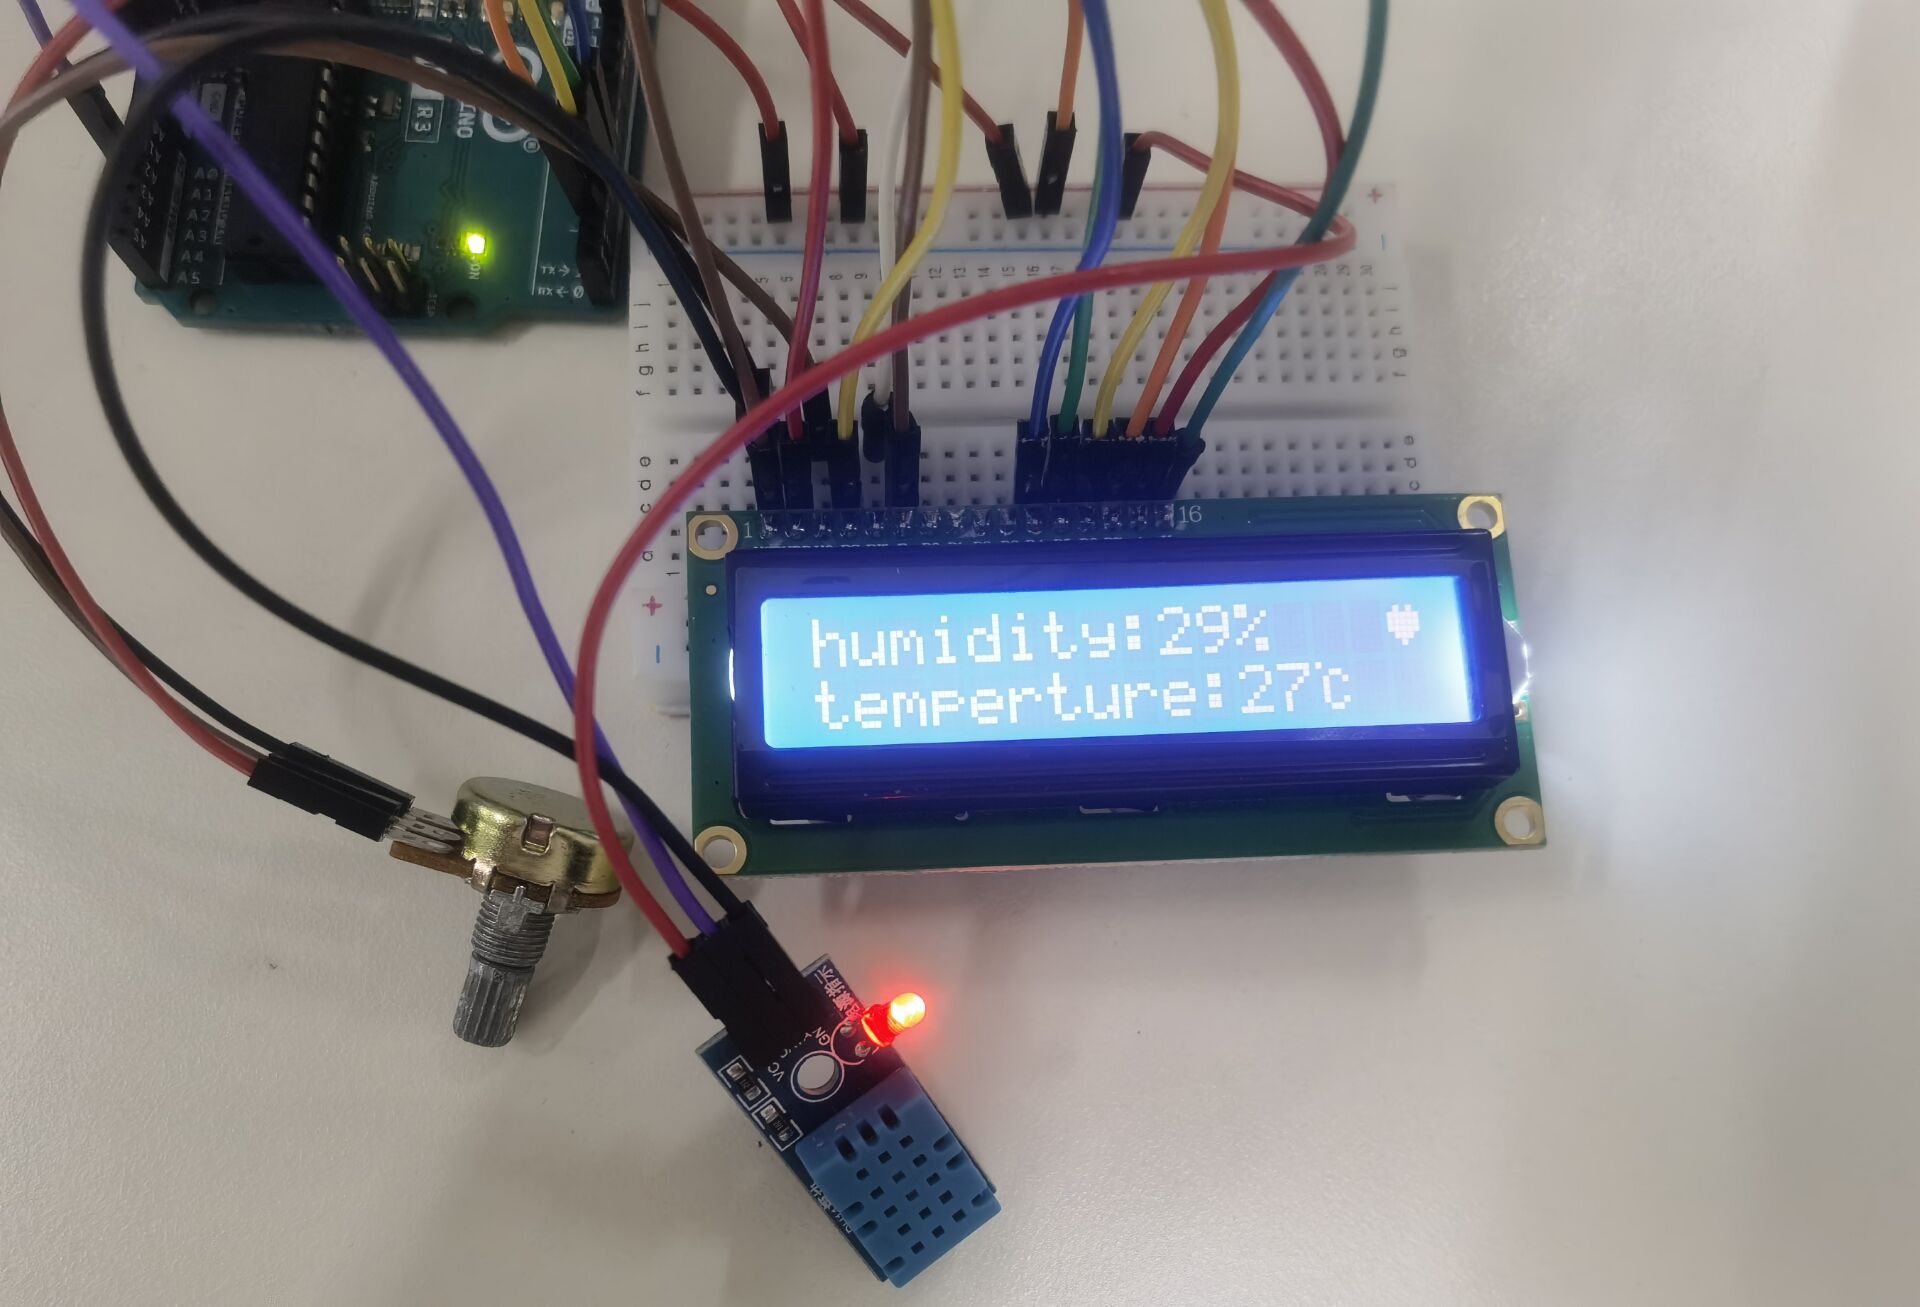 Great!
The accumulation of personal knowledge draws on the articles of big men.
Reference I
https://blog.csdn.net/Lucifer_min/article/details/112133408
Reference II
https://blog.csdn.net/weixin_46897073/article/details/110282736