The main contents of this article are as follows:
1. Basic introduction of LCD1602
2. Implementation of LCD1602 LCD driver
Based on the analysis of the current LCD1602 LCD driver, I always feel that the writing is somewhat confusing, somewhat troublesome, or not useful, I intend to write one myself, which is simple and practical.
1. Basic introduction of LCD1602
Development environment: keil, smart 51 development board
The LCD schematic diagram of LCD1602 is as follows:
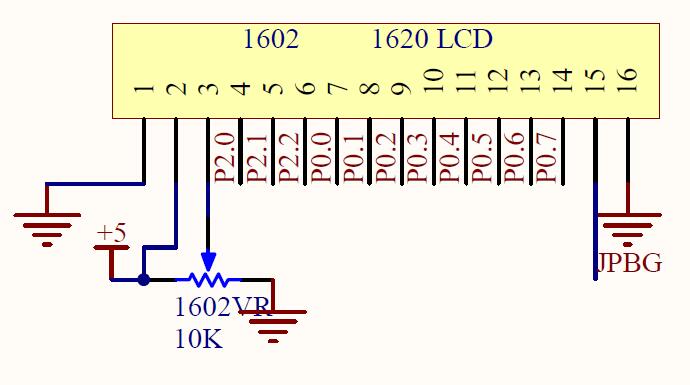
Pin correspondence:
P2.0: State pin, 0 for instruction or state, 1 for data
P2.1: Read-write pin, 0 for write, 1 for read
P2.2: enabling pin, temporary enabling
P 0.0 ~ P 0.7: Data pin for data transfer
After analysis, the core of the entire LCD time series is two: writing commands, writing data, and their time series is as follows:
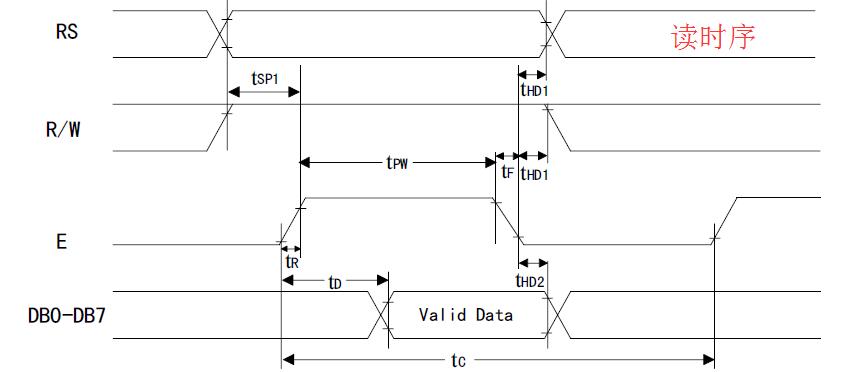
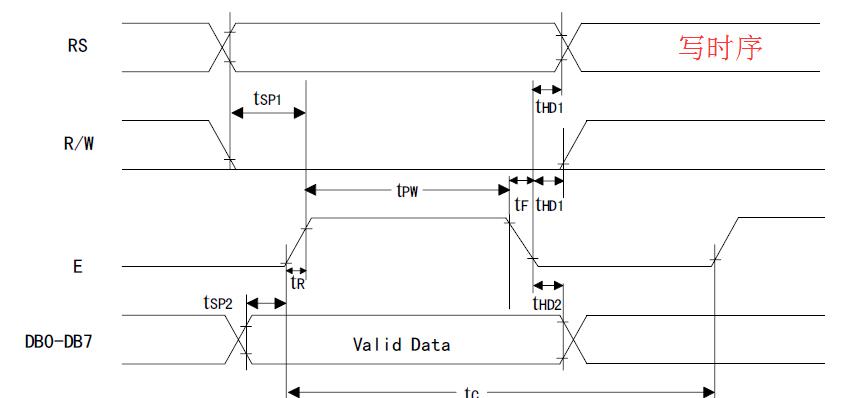
Register setup and how to use refer to the chip Manual of LCD1602, which is mainly about driver implementation.
2. Implementation of LCD1602 LCD driver
From the above analysis, it can be seen that the core of the whole driver is to implement the two parts of writing commands and writing data.
1. Write commands and implement the following functions:
/* Functions for writing commands */
void lcd1602_write_cmd(unsigned char cmd)
{
	RS = 0;
	RW = 0;
	P0 = cmd;	/* Written Commands */
	delay_us(1);
	EN = 1;
	delay_us(2);
	EN = 0;
	RW = 1;
}/* Functions for writing data */
void lcd1602_write_data(unsigned char dat)
{
RS = 1;
RW = 0;
P0 = dat; /* Data to be written */
delay_us(1);
EN = 1;
delay_us(2);
EN = 0;
RW = 1;
RS = 0;
}/* lcd1602 Initialization function */
void lcd1602_init()
{
delay_us(200);
lcd1602_write_cmd(0x38); /* Set display mode */
delay_us(50);
lcd1602_write_cmd(0x38);
delay_us(50);
lcd1602_write_cmd(0x38);
delay_us(50);
lcd1602_write_cmd(0x0C); /* Open Display and Set Cursor */
delay_us(50);
lcd1602_write_cmd(0x06); /* Show cursor movement settings */
delay_us(50);
lcd1602_write_cmd(0x01); /* Clear screen */
delay_us(50);
}4. An example of implementing a specific LCD1602 LCD display: Display a string on the LCD screen, the complete code is as follows.
#include <reg52.h>
/* Define the pin connected to the LCD1602 LCD */
sbit RS = P2^0; // Status pin, 0 for status or instruction, 1 for data
sbit RW = P2^1; // Read-write pin, 0 for write, 1 for read
sbit EN = P2^2; // Enabling pin, temporary
/* Software delay for a period of time to meet the timing requirements of LCD1602 liquid crystal
*/
void delay_us(int us)
{
int i = 0;
int j = 0;
for(i = 0; i < us; i++)
for(j = 0; j < 12; j++);
}
/* Functions for writing commands */
void lcd1602_write_cmd(unsigned char cmd)
{
RS = 0;
RW = 0;
P0 = cmd; /* Written Commands */
delay_us(1);
EN = 1;
delay_us(2);
EN = 0;
RW = 1;
}
/* Functions for writing data */
void lcd1602_write_data(unsigned char dat)
{
	RS = 1;
	RW = 0;
	P0 = dat;	/* Data to be written */
	delay_us(1);
	EN = 1;
	delay_us(2);
	EN = 0;
	RW = 1;
	RS = 0;
}
/* lcd1602 Initialization function */
void lcd1602_init()
{
	delay_us(200);
	lcd1602_write_cmd(0x38);	/* Set display mode */
	delay_us(50);
	lcd1602_write_cmd(0x38);
	delay_us(50);
	lcd1602_write_cmd(0x38);
	delay_us(50);
	lcd1602_write_cmd(0x0C);	/* Open Display and Set Cursor */
	delay_us(50);
	lcd1602_write_cmd(0x06);	/* Show cursor movement settings */
	delay_us(50);
	lcd1602_write_cmd(0x01);	/* Clear screen */
	delay_us(50);
}
/* Functions for displaying strings on LCD1602 LCD */
void lcd1602_show_string(unsigned char *str)
{
int i = 0;
lcd1602_write_cmd(0x00 + 0x80);
for(i = 0; str[i] != '\0'; i++)
lcd1602_write_data(str[i]);
}
/* Entry functions for programs */
void main()
{
lcd1602_init(); /* Initialization function of liquid crystal */
lcd1602_show_string("TECH-PRO"); /* Display string on LCD: TECH-PRO */
while(1);
}