The infilate method of layoutinflate is a common method used in Android development, but its parameters make many beginners feel headache. I don't know what they represent respectively. This paper makes a summary combining with several other blogs. The inflater method has the following four overloaded methods:
public View inflate(int resource, ViewGroup root)
public View inflate(int resource, ViewGroup root, boolean attachToRoot)
public View inflate(XmlPullParser parser, ViewGroup root)
public View inflate(XmlPullParser parser, ViewGroup root, boolean attachToRoot)
Among the four overloaded methods, the first two are most commonly used (the second one is accurate, but I haven't used the third and fourth one anyway). So this paper will analyze in detail the results of setting the parameters of the first two methods to different values. The second method has one more attachToRoot parameter than the first, and the others are the same. First, let's look at the three parameters of the second method: the first parameter resource is the layout resource to be loaded, the second parameter root is the parent View of the parsed View, and the third parameter attachTooRoot indicates whether the parsed View is regarded as the child View of the second parameter root.
Let's not talk about the flowery ones, but come to the conclusion directly:
- If root is null, attachToRoot will lose its function and there is no point in setting any value.
- If root is not null and attachToRoot is set to true, a parent View (root in the parameter) will be specified for the loaded layout file.
- If root is not null and attachToRoot is set to false, all layout properties at the outermost layer of the layout file will be set. When the view is added to the parent view, these layout properties will take effect automatically (this conclusion is difficult to understand).
- Without setting the attachToRoot parameter (that is, calling the first method), if root is not null, the attachToRoot parameter defaults to true.
The first conclusion is well understood. The attachToRoot parameter is for the second parameter root. If root is empty, attachToRoot is meaningless.
For the second conclusion, here is an example Guo Shen blog For example, there is currently a project, and the layout file corresponding to MainActivity is called activity_main.xml , the code is as follows:
<?xml version="1.0" encoding="utf-8"?>
<LinearLayout xmlns:android="http://schemas.android.com/apk/res/android"
    android:id="@+id/main_layout"
    android:layout_width="match_parent"
    android:layout_height="match_parent"
    android:orientation="vertical">

</LinearLayout>
There is only one empty LinearLayout, so nothing should appear on the interface. So let's define a layout file named button_layout.xml , the code is as follows:
<?xml version="1.0" encoding="utf-8"?>
<Button xmlns:android="http://schemas.android.com/apk/res/android"
    android:layout_width="300dp"
    android:layout_height="180dp"
    android:text="Button" >
</Button>
This layout file has only one button. Now we're going to use the layoutingger to push the button_ Buttons in layout are added to the LinearLayout of the main layout file. The code in MainActivity is as follows:
public class MainActivity extends AppCompatActivity {

    @Override
    protected void onCreate(Bundle savedInstanceState) {
        super.onCreate(savedInstanceState);
        setContentView(R.layout.activity_main);

        LinearLayout mainLayout = findViewById(R.id.main_layout);
        LayoutInflater.from(this).inflate(R.layout.button_layout, mainLayout, true);
    }
}
The results are as follows:
As you can see, the addView method of mainLayout is not called in the code, and the button is put into mainLayout, which confirms the second conclusion.
For the third conclusion, or the above example, just set attachToRoot in the method to false, and the running result is as follows:

It is found that there is nothing in the interface. This is because according to the second conclusion, if it is set to false, the inflate method will not add the parent layout for this button. We need to add it manually. The code is as follows:
public class MainActivity extends AppCompatActivity {

    @Override
    protected void onCreate(Bundle savedInstanceState) {
        super.onCreate(savedInstanceState);
        setContentView(R.layout.activity_main);

        LinearLayout mainLayout = findViewById(R.id.main_layout);
        View view = LayoutInflater.from(this).inflate(R.layout.button_layout, mainLayout, false);
        mainLayout.addView(view);
    }
}
Run again, and the effect is the same as in the second conclusion:
A question arises here. The third conclusion says that all layout attributes in the outermost layer of the layout file will be set. When the view is added to the parent view, what does it mean that these layout attributes will take effect automatically?
We modify the following code to change the second parameter root to null:
View view = LayoutInflater.from(this).inflate(R.layout.button_layout, null, false);
Run the following:
I found that the shape of the button has changed, and its width and height are no longer the 300dp and 180dp we set in the layout. If you don't believe in evil, you can set the width and height at will. I found that no matter how you set it, it is the result above. Why?
Here is a direct copy of Guo Shen's explanation:
In fact, it doesn't matter if you layout the button_ Width and layout_ There will be no effect if you change the value of height as much as possible, because these two values are now completely useless. We usually use layout_width and layout_height to set the size of the View, and it works normally all the time, just as these two properties are used to set the size of the View. In fact, they are used to set the size of the View in the layout. That is to say, the View must exist in a layout first, and then if the layout_width set to match_parent means to fill the layout with the View width, if it is set to wrap_content means that the width of the View can just contain its content. If it is set to a specific value, the width of the View will become a corresponding value. That's why these two properties are called layout_width and layout_height, not width and height. Let's take a look at our button_layout.xml Well, obviously button does not exist in any layout at present, so layout_width and layout_ Of course, the two attributes of height have no effect. So how can we change the size of the button? You can set up another layer of layout outside the button:
<RelativeLayout xmlns:android="http://schemas.android.com/apk/res/android"
    android:layout_width="match_parent"
    android:layout_height="match_parent" >

    <Button
        android:layout_width="300dp"
        android:layout_height="80dp"
        android:text="Button" >
    </Button>

</RelativeLayout>
As you can see, here we add another RelativeLayout. At this time, the Button exists in RelativeLayout, layout_width and layout_ The height attribute also works. Of course, the outermost RelativeLayout, its layout_width and layout_height will lose its function. Although this method is effective, there is no advantage in nesting a layout without any reason (because the system will parse a layer of layout), so what's the better way? Let's see the significance of the third conclusion. Although attachToRoot is set to false, if root is not set to null, it will let all the layout properties in the outermost layer of the layout be set. When the view is added to root, these layout properties will take effect automatically.
For the fourth conclusion, change the MainActivity Code:
public class MainActivity extends AppCompatActivity {

    @Override
    protected void onCreate(Bundle savedInstanceState) {
        super.onCreate(savedInstanceState);
        setContentView(R.layout.activity_main);

        LinearLayout mainLayout = findViewById(R.id.main_layout);
        LayoutInflater.from(this).inflate(R.layout.button_layout, mainLayout);
    }
}
Before running the discovery results, it is the same: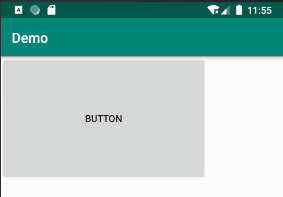
This is because if there is no attachToRoot, it will default to true, which is equivalent to setting it to true in the second overload method.
In this way, we can prove the correctness of the above four conclusions through an example, but we need to know the reason as well as the nature. Next, we need to see why the four conclusions are right from the perspective of source code.
In fact, although the inflate method has four overloads, no matter which one is called, it will be called to the last method finally.
Click the 4th inflate method source code of layoutinflate:
/* @return The root View of the inflated hierarchy. If root was supplied and
 *         attachToRoot is true, this is root; otherwise it is the root of
 *         the inflated XML file.
 */
public View inflate(XmlPullParser parser, @Nullable ViewGroup root, boolean attachToRoot) {
        synchronized (mConstructorArgs) {
            ....

            View result = root;

            try {
                advanceToRootNode(parser);
                final String name = parser.getName();
                ...
                //Determine whether the root node is merge
                if (TAG_MERGE.equals(name)) {
                    if (root == null || !attachToRoot) {
                        throw new InflateException("<merge /> can be used only with a valid "
                                + "ViewGroup root and attachToRoot=true");
                    }

                    rInflate(parser, root, inflaterContext, attrs, false);
                } else {
                    // Temp is the root view that was found in the xml
                    final View temp = createViewFromTag(root, name, inflaterContext, attrs);

                    ViewGroup.LayoutParams params = null;

                    if (root != null) {
                        if (DEBUG) {
                            System.out.println("Creating params from root: " +
                                    root);
                        }
                        // Create layout params that match root, if supplied
                        //Create layout parameters
                        params = root.generateLayoutParams(attrs);
                        if (!attachToRoot) {
                            // Set the layout params for temp if we are not
                            // attaching. (If we are, we use addView, below)
                            //Set layout parameters for temp
                            temp.setLayoutParams(params);
                        }
                    }

                    if (DEBUG) {
                        System.out.println("-----> start inflating children");
                    }

                    // Inflate all children under temp against its context.
                    rInflateChildren(parser, temp, attrs, true);

                    if (DEBUG) {
                        System.out.println("-----> done inflating children");
                    }

                    // We are supposed to attach all the views we found (int temp)
                    // to root. Do that now.
                    if (root != null && attachToRoot) {
                        root.addView(temp, params);
                    }

                    // Decide whether to return the root that was passed in or the
                    // top view found in xml.
                    if (root == null || !attachToRoot) {
                        result = temp;
                    }
                }

            } catch (XmlPullParserException e) {
                final InflateException ie = new InflateException(e.getMessage(), e);
                ie.setStackTrace(EMPTY_STACK_TRACE);
                throw ie;
            } catch (Exception e) {
                final InflateException ie = new InflateException(
                        getParserStateDescription(inflaterContext, attrs)
                        + ": " + e.getMessage(), e);
                ie.setStackTrace(EMPTY_STACK_TRACE);
                throw ie;
            } finally {
                // Don't retain static reference on context.
                mConstructorArgs[0] = lastContext;
                mConstructorArgs[1] = null;

                Trace.traceEnd(Trace.TRACE_TAG_VIEW);
            }

            return result;
        }
    }
The above code first points a return value result object to root. Why do you want to do this? Take a look at the above note: in the note, if root is not null and attachToRoot is true, return root. Otherwise, return the root node of the xml file to be parsed. That is to say, the return value is only possible in these two ways. The specific return value depends on the parameters.
Next, look down. First, determine whether the root node of xml is merge. Setting the root node to merge means that the resource file you write is based on the FrameLayout of the system. When the root node is merge, if the parent root is null or attachToRoot selects flash, an exception will be thrown. Because merge needs to be merged, and our parent root is null or does not choose to be attached to the parent root. This is not true It is logical, so an exception is thrown, otherwise the rinflat method is executed.
If the node of xml is not a merge, that is, a normal layout, the createViewFromTag method is called to create a temp (root view in xml). Now the idea becomes clear. The two options to return are now available, either result (root) or temp.
Next, if root is not empty, create a layout parameter LayoutParams. If attachToRoot is false, click temp.setLayoutParams(params) to set the layout parameters to temp, which just proves the correctness of the third conclusion.
Next, we call rInflateChildren(parser, temp, attrs, true) to parse the child nodes under temp. In this method, we call the rInflate method and then parse the child nodes below the sub node. This step recursively recurs, and after each iteration completes, we add the View to the parent layout, thus completing the analysis of the xml file.
Rinflatchildren method is as follows:
void rInflate(XmlPullParser parser, View parent, Context context,
        AttributeSet attrs, boolean finishInflate) throws XmlPullParserException, IOException {
    final int depth = parser.getDepth();
    int type;
    boolean pendingRequestFocus = false;
    while (((type = parser.next()) != XmlPullParser.END_TAG ||
            parser.getDepth() > depth) && type != XmlPullParser.END_DOCUMENT) {
        if (type != XmlPullParser.START_TAG) {
            continue;
        }
        final String name = parser.getName();
        if (TAG_REQUEST_FOCUS.equals(name)) {
            pendingRequestFocus = true;
            consumeChildElements(parser);
        } else if (TAG_TAG.equals(name)) {
            parseViewTag(parser, parent, attrs);
        } else if (TAG_INCLUDE.equals(name)) {
            if (parser.getDepth() == 0) {
                throw new InflateException("<include /> cannot be the root element");
            }
            parseInclude(parser, context, parent, attrs);
        } else if (TAG_MERGE.equals(name)) {
            throw new InflateException("<merge /> must be the root element");
        } else {
            // Generate View
            final View view = createViewFromTag(parent, name, context, attrs);
            final ViewGroup viewGroup = (ViewGroup) parent;
            final ViewGroup.LayoutParams params = viewGroup.generateLayoutParams(attrs);
            // Recursively resolving child nodes
            rInflateChildren(parser, view, attrs, true);
            // Add to parent view
            viewGroup.addView(view, params);
        }
    }
    if (pendingRequestFocus) {
        parent.restoreDefaultFocus();
    }
    if (finishInflate) {
        parent.onFinishInflate();
    }
}
Go back to the inflate method, and then judge if the root is not null and attachToRoot is true root.addView(temp, params); method places temp in root, which validates the second conclusion.
Then, if the root is empty or attachToRoot is false, the result will point to temp late. In this case, the return value of the inflate method is the root node of xml, otherwise it will return root, which verifies the content of the top annotation. At the end of the method, return the result.
In this way, the inflate method is almost analyzed. Next, let's extend it a little bit. If root is set to null, let's manually add the parent layout for it:
public class MainActivity extends AppCompatActivity {

    @Override
    protected void onCreate(Bundle savedInstanceState) {
        super.onCreate(savedInstanceState);
        setContentView(R.layout.activity_main);

        LinearLayout mainLayout = findViewById(R.id.main_layout);
        View v = LayoutInflater.from(this).inflate(R.layout.button_layout, null);
        mainLayout.addView(v);
    }
}
So according to conclusion 3, at button_ The outer layout properties defined by layout will not take effect, so the question is, how will this button display? With this problem, we click the addView method:
public void addView(View child) {
    addView(child, -1);
}

public void addView(View child, int index) {
    if (child == null) {
        throw new IllegalArgumentException("Cannot add a null child view to a ViewGroup");
    }
    LayoutParams params = child.getLayoutParams();
    if (params == null) {
        params = generateDefaultLayoutParams();
        if (params == null) {
            throw new IllegalArgumentException("generateDefaultLayoutParams() cannot return null");
        }
    }
    addView(child, index, params);
}
Let's make a judgment here child.getLayoutParams Whether it is empty (it must be empty, because no layout parameter is created for him in the inflate method). If it is empty, call generateDefaultLayoutParams() method to create the default layout parameter:
protected LayoutParams generateDefaultLayoutParams() {
        return new LayoutParams(LayoutParams.WRAP_CONTENT, LayoutParams.WRAP_CONTENT);
    }
Its width and height are WRAP_CONTENT, but in fact, ViewGroup has many subclasses. Different layouts have different setting methods. They all override the generateDefaultLayoutParams() method. Take a look at the generateDefaultLayoutParams method of LinearLayout:
@Override
    protected LayoutParams generateDefaultLayoutParams() {
        if (mOrientation == HORIZONTAL) {
            return new LayoutParams(LayoutParams.WRAP_CONTENT, LayoutParams.WRAP_CONTENT);
        } else if (mOrientation == VERTICAL) {
            return new LayoutParams(LayoutParams.MATCH_PARENT, LayoutParams.WRAP_CONTENT);
        }
        return null;
    }
As you can see, the same is LinearLayout. The layout parameters created by setting horizontal and vertical are different. Let's verify:
This is to set LinearLayout to horizontal:
Set to vertical: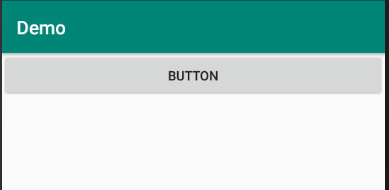
This article is from: