Laravel has its own SwiftMailer library, which integrates a variety of email API s and can easily send emails.
We use the SMTP (Simple Message Transfer Protocol) simple mail transfer protocol, which is generally understood as the mail sending server.
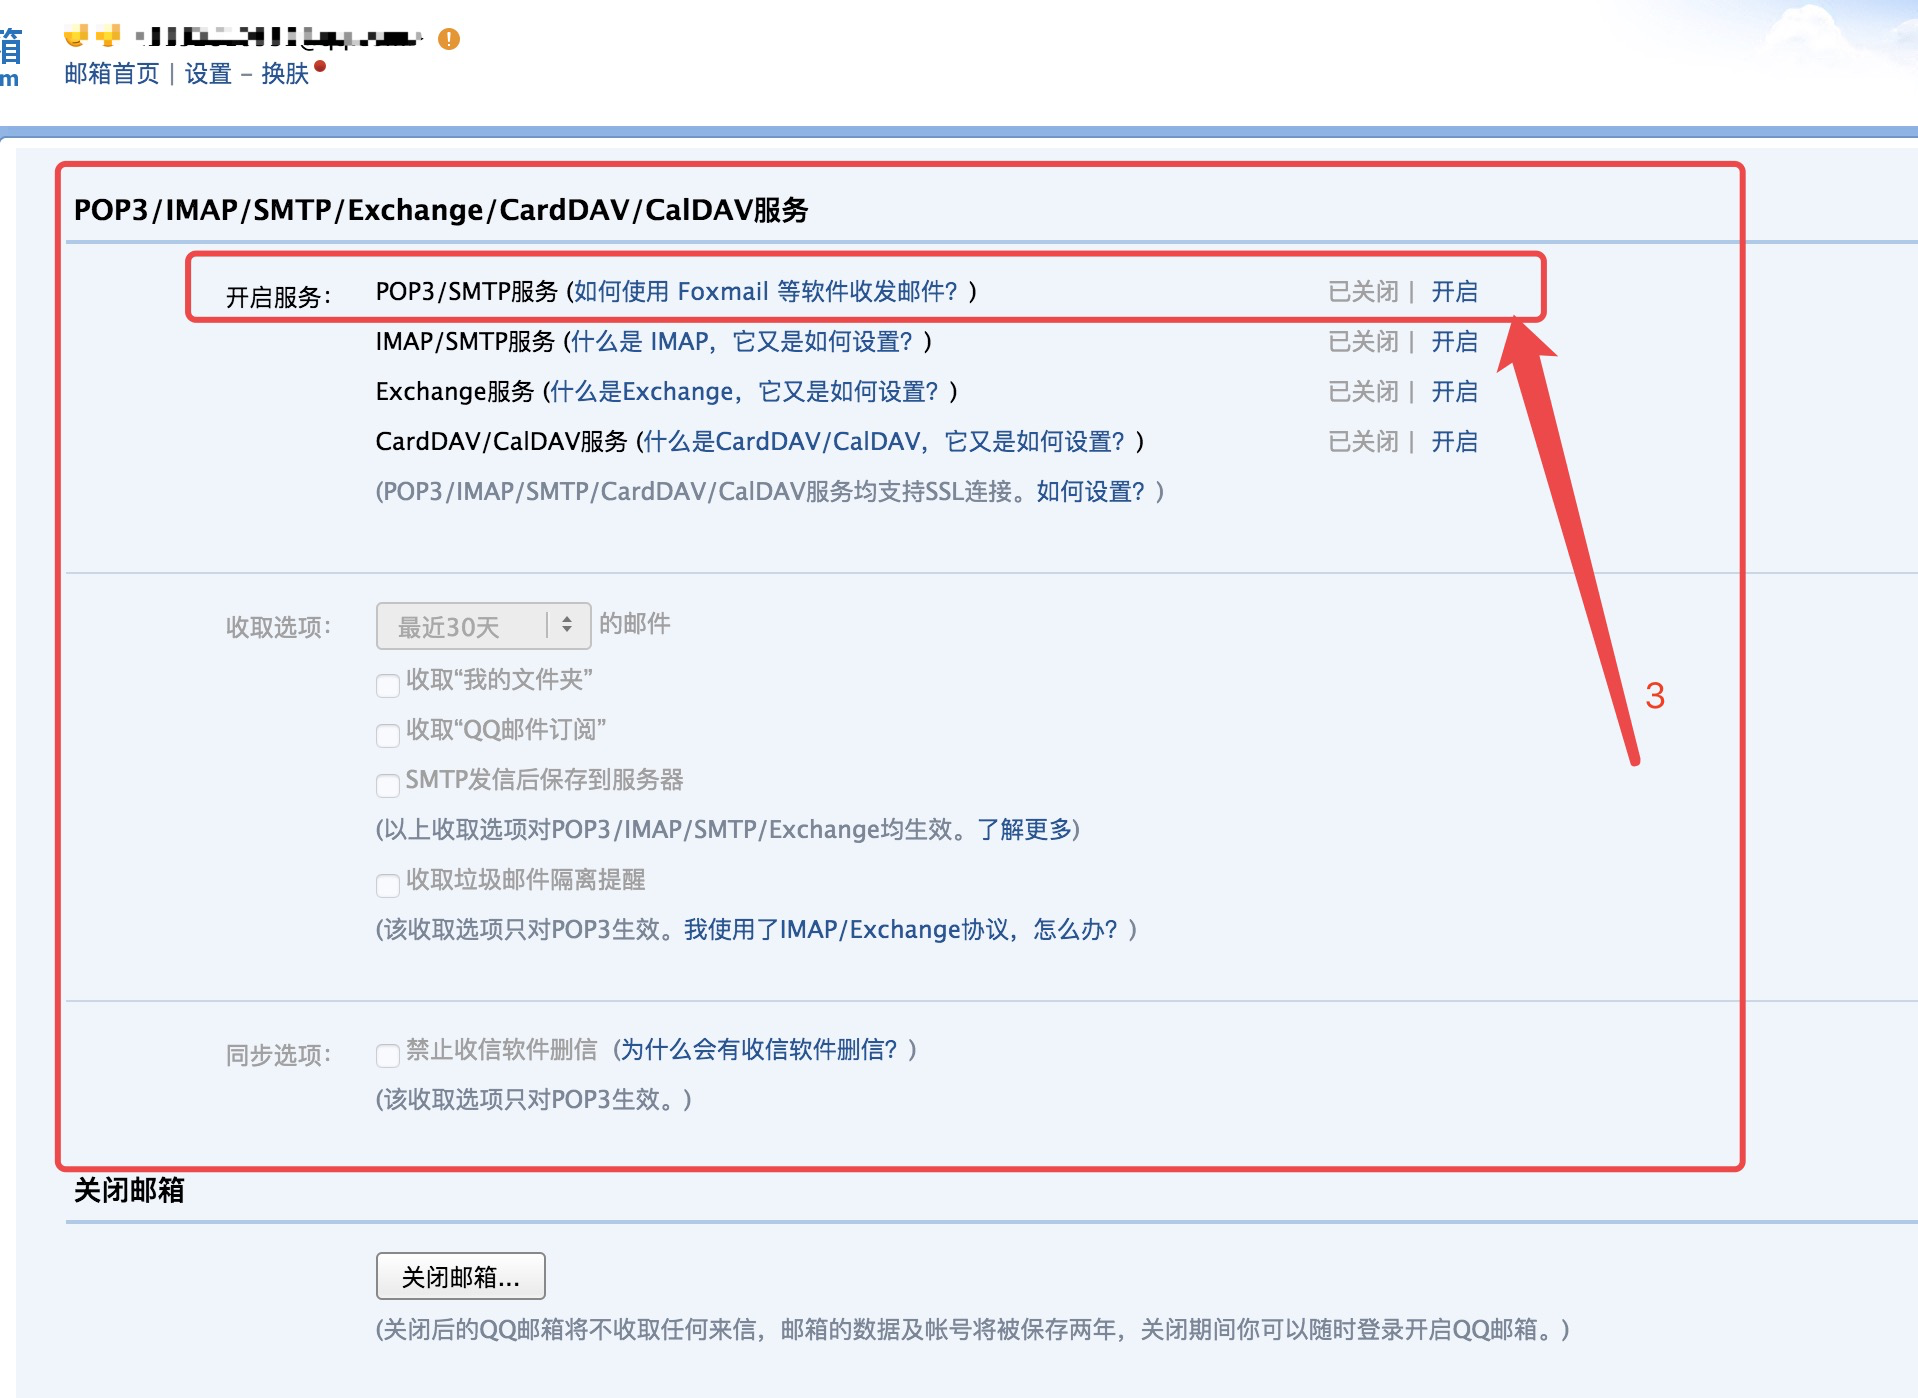
1. Open POP3 and SMTP services
1.1. Here we take QQ email as a case
Settings - > account - > POP3 - > Open

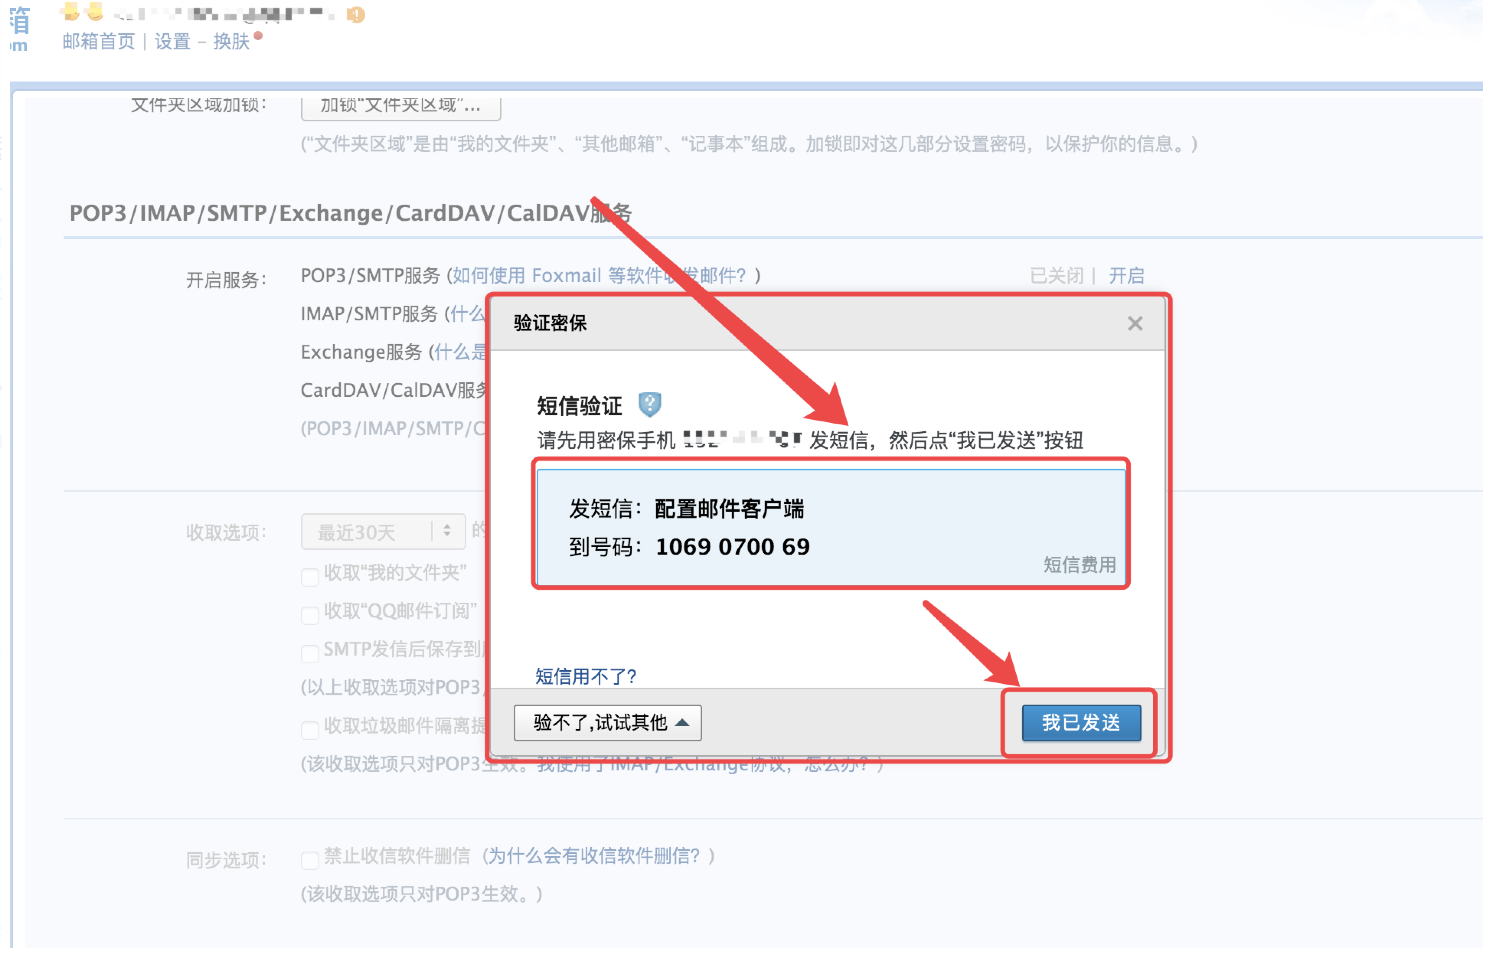
At this step, you will be prompted for verification. Send SMS as prompted to pass the verification:
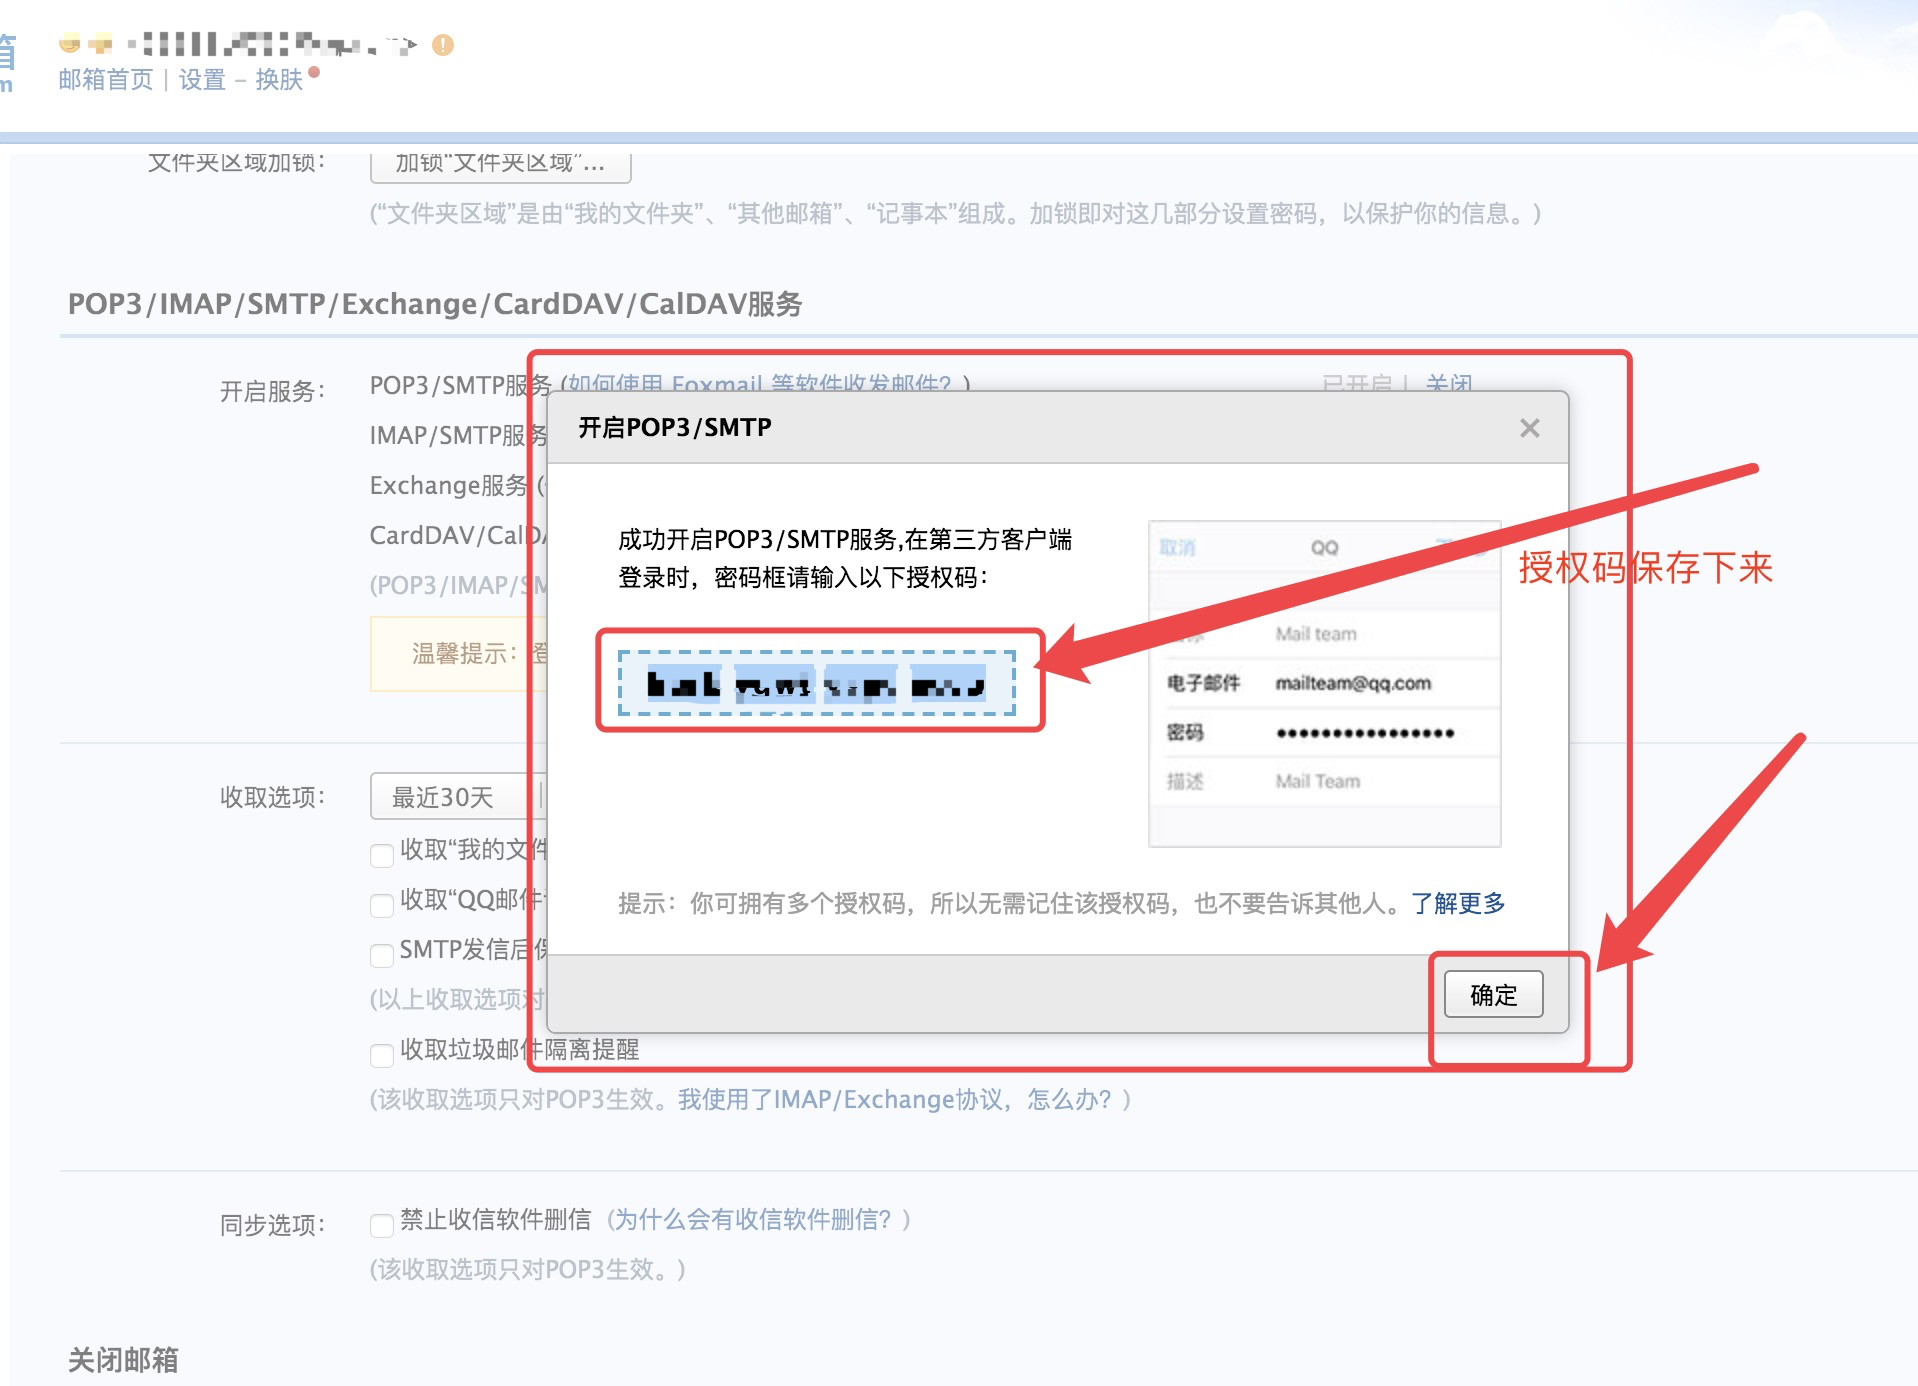
If the SMS is sent successfully, the following prompt will appear, which means the configuration is successful. You need to record the key, which will be used in the configuration:
1.2. Here we take 163 mailbox as a case
There's time for maintenance later.... To understand...
2. Modify the configuration file of mail sending in Laravel framework:
. env file:
MAIL_DRIVER=smtp
MAIL_HOST=smtp.qq.com
MAIL_PORT=465
MAIL_USERNAME=********@qq.com
MAIL_PASSWORD=qq Fill in the authorization code generated in the above figure in the email
MAIL_FROM_NAME=The name of the mailbox
MAIL_ENCRYPTION=ssl
config/mail.php file:
return [
    'driver' => env('MAIL_DRIVER', 'smtp'),
    'host' => env('MAIL_HOST', 'smtp.mailgun.org'),
    'port' => env('MAIL_PORT', 587),
    'from' => [
        'address' => env("MAIL_USERNAME", ""),
        'name' => env("MAIL_FROM_NAME")
    ],
    'encryption' => env('MAIL_ENCRYPTION'),
    'username' => env('MAIL_USERNAME'),
    'password' => env('MAIL_PASSWORD'),
    'sendmail' => '/usr/sbin/sendmail -bs',
    'pretend' => env('MAIL_PRETEND', false),
];

// Driver: used to configure the default mail sending driver.
    // Laravel supports a variety of mail driven modes, including smtp, Mailgun, Maildrill, Amazon SES, mail and sendmail;
    // Both Mailgun and Amazon SES are toll paying Maildrill currently does not support users in China. These three are third-party mail services.
    // The mail driver uses the mail function provided by PHP to send mail, and the sendmail driver uses the command provided by Sendmail/Postfix (Linux) to send mail;
    // SMTP driver sends mail through SMTP which supports ESMTP.
    // As far as the current situation is concerned, using smtp is the wisest choice;
    // mail is not secure. Sendmail needs to be installed and configured with Sendmail/Postfix. Others are either paid or unavailable.

// Host: the host of the mailbox;
    // Use 163 mailbox, the corresponding value is smtp.163.com;
    // Use QQ mailbox, the corresponding value is smtp.qq.com.
    // Using Tencent enterprise email, the corresponding value is smtp.exmail.qq.com

// Port: used to configure the mailbox sending service port number,
    // The general default is 25, but if you set SMTP to use SSL encryption, the value is 465.

// from: configuration items include address and name,
    // address means your own email
    // Name means your email user name (email here is the email used to send emails).

// Encryption: indicates the encryption type;
    // Can be set to null to indicate that no encryption is used, or can be set to tls or ssl.

// username: indicates the email account, such as 123456789@qq.com
// Password means the login password corresponding to the above mailbox login.
    // Note the authorization code given when the POP3|SMTP service is enabled for QQ mailbox.
// Sendmail: used when setting the driver to sendmail to specify the sendmail command path.
// pretend: used to configure whether to record the mail sent to the log;
    // If the default value is false, no log will be recorded for the sent mail;
    // If true is used, log only does not send mail. This configuration is useful when debugging in local development.
3. Production controller, configuration route
php artisan make:controller MailController
Route::any('mail/send','MailController@sendMail');
4. Edit the controller and add the following code:
// Remember to use the built-in mail class use Illuminate\Support\Facades\Mail;
public function sendMail() {
    $name = 'This is the title of the email';
    // The return value of Mail::send() is empty, so other methods can be used for judgment
    // Mail::send(); three parameters need to be passed;
    // The first is the referenced template
    // The second is the variable passed to the template (the text content sent by the mailbox)
    // The third is a closure, which binds an instance of the Mail class.
    Mail::send('emails.test',['name'=>$name],function($message){
        $to = 'itlaowen@qq.com';
        $message ->to($to)->subject('Mail test');
    });
    // An error array returned, which can be used to determine whether the transmission is successful
    dd(Mail::failures());
}
5. Because of the above A kind of It specifies the view layer of the email, so edit it
Create a template file under resources/emails.
This is a test email!!
{{$name}}
6. Testing
visit: http://localhost/mail/send If an empty array is returned, the message is sent successfully.
7. Error reporting: stream socket client(), certificate verify failed
The specific errors are as follows:
stream_socket_client(): SSL operation failed with code 1. OpenSSL Error messages:
error:14090086:SSL routines:ssl3_get_server_certificate:certificate verify failed
reason:
php openssl does not load ca certificate. Download a ca certificate and add it
solve:
Check phpinfo(), check whether the file of openssl.cafile exists
 If not, do the following
 1. Find your own php installation directory
 2. Enter the directory: cd php/etc/
3. Download CA certificate: wget http://curl.haxx.se/ca/cacert.pem
 4. View Directory: pwd
 5. Edit php.ini: vim php.ini
 6. Modify the path of openssl.cafile openssl.cafile=/usr/local/php/etc/cacert.pem
8. Extension: send plain text message
public function sendEmail()
{
    // Plain text message test
    Mail::raw('Hello, I am PHP Procedure!', function ($message) {
        $to = 'itlaowen@163.com';
        $message ->to($to)->subject('Plain text message test');
    });
    if (count(Mail::failures()) < 1) {
        echo 'Email sent successfully, please check!';
    } else {
        echo 'Failed to send mail, please try again!';
    }
}
9. Extension: add pictures to message content
View file:
{{$name}}
<br>
hello world.
<br>
<img src="{{ $message->embed($image) }}">
controller:
public function sendEmail()
{
    // Mail internal attachment
    $name = 'Mail internal attachment';
    $image = public_path('php/8I0BHkS2QKmxyfQBBfiamBZALR5Ox2zkN62KFFoP.jpeg');
    // $image ='http://t8.baidu.com/it/u=14845001861503043093&fm=79&app=86&f=JPEG? W=1280&h=853'; / / online pictures
    Mail::send('Emails.test', ['image' => $image, 'name' => $name], function ($message) {
        $to = 'itlaowen@163.com';
        $message->to($to)->subject('Picture test');
    });
    if (count(Mail::failures()) < 1) {
        echo 'Email sent successfully, please check!';
    } else {
        echo 'Failed to send mail, please try again!';
    }
}
10. Extension: mail attachment
public function sendEmail()
{
    // Send attachment mail
    $name = 'This is an attached message';
    $image = 'http://T8. Baidu. COM / it / u = 14845001861503043093 & FM = 79 & app = 86 & F = JPEG? W = 1280 & H = 853 '; / / online pictures
    Mail::send('Emails.test', ['image' => $image, 'name' => $name], function ($message) {
        $to = 'itlaowen@163.com';
        $message->to($to)->subject('Mail test');
        $attachment = public_path('file/1.xlsx');
        // Upload attachment in email
        $message->attach($attachment, ['as' => 'Chinese documents.xlsx']);
    });
    if (count(Mail::failures()) < 1) {
        echo 'Email sent successfully, please check!';
    } else {
        echo 'Failed to send mail, please try again!';
    }
}
If there is disorder, you can try the following writing method:
$message->attach($attachment,['as'=>"=?UTF-8?B?".base64_encode('Chinese documents')."?=.xls"]);