< font color = Red > No reprinting, no handling </font >
Problems encountered:
First, the browser can not open blog.jd.com: DNS has been configured, the ultimate reason: this graphical CentOS7 uses dncp to obtain ip, DNS also access the gateway; Solution: Fixed IP, set DNS manually, and confirm / etc/reslov.conf
Two, NFS permissions php does not write permission to NFS Directory: final solution: php runs on apache, NFS also creates the same apache and sets acl privileges on /data/wordpress.
Third, NFS client error reporting: Reasons: manually delete the shared directory of NFS server; Solution: the client can forcibly uninstall the NFS to re-hang, or kill the process
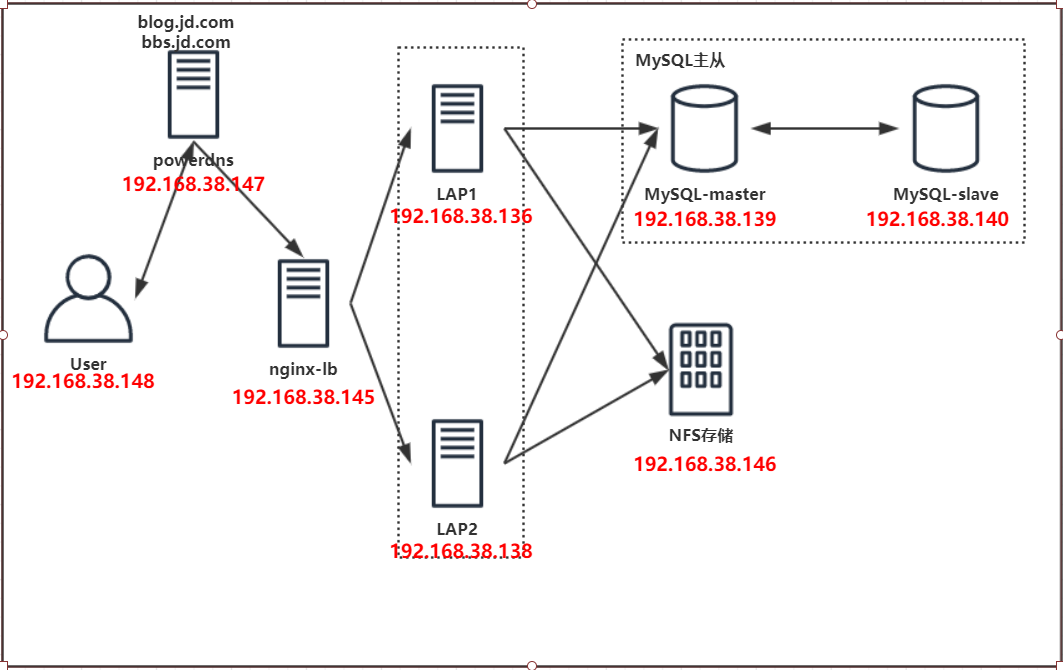
| server name | IP | system |
|---|---|---|
| User (graphical CentOS 7) | 192.168.38.148 | CentOS7 |
| powerdns | 192.168.38.147 | CentOS7 |
| nginx-lb | 192.168.38.145 | CentOS7 |
| LAP1/2 | 192.168.38.136/8 | CentOS7 |
| NFS | 192.168.38.138 | CentOS7 |
| MySQL-master | 192.168.38.139 | CentOS7 |
| MySQL-slave | 192.168.38.140 | CentOS7 |
I. Powdns
See powerdns
lamp environment + powerdns, the tuning
yum install httpd -y
# Otherwise, it starts slowly.
sed  '/#ServerName www.example.com/a ServerName www.example.com:80' /etc/httpd/conf/httpd.conf -i
systemctl start httpd && systemctl enable httpd
rpm -Uvh https://dev.mysql.com/get/mysql80-community-release-el7-2.noarch.rpm
yum install yum-utils -y
sudo yum-config-manager --disable mysql80-community
sudo yum-config-manager --enable mysql57-community
yum makecache
yum install mysql-community-server -y
cat > /etc/my.cnf <<EOF
[mysqld]
socket=/var/lib/mysql/mysql.sock
datadir=/data/mysql
log-bin
server-id=1
expire-logs-days=15
binlog-format=row
symbolic-links=0
log-error=/var/log/mysqld.log
pid-file=/var/run/mysqld/mysqld.pid
EOF
DB_PASSWORD=`cat /dev/urandom | tr -dc A-Za-z0-9 | head -c 24`
mkdir /data/mysql -p
mysqld --initialize --datadir=/data/mysql --user=mysql
systemctl start mysqld && systemctl enable mysqld
mysqladmin -uroot -p$(grep " temporary password" /var/log/mysqld.log | awk '{print $NF}') password ${DB_PASSWORD}
curl -o /etc/yum.repos.d/epel.repo http://mirrors.aliyun.com/repo/epel-7.repo yum install https://mirrors.huaweicloud.com/remi/enterprise/remi-release-7.rpm -y yum install php73-php php73-php-mysqlnd php73-php-fpm php73-php-xml php73-php-bcmath php73-php-mbstring php73-php-xmlrpc php73-php-soap php73-php-common php73-php-devel php73-php-gd php73-php-pecl-mcrypt php73-php-pecl-memcache php73-php-pecl-memcached php73-php-opcache -y systemctl start php73-php-fpm && systemctl enable php73-php-fpm
#Create powerdns database and authorized users
DB_POWERDNS_PASSWORD=`cat /dev/urandom | tr -dc A-Za-z0-9 | head -c 24`
mysql -uroot -p${DB_PASSWORD} -e "create user powerdns@'localhost' identified by '${DB_POWERDNS_PASSWORD}';create database powerdns character set utf8 collate utf8_bin;grant all privileges on powerdns.* to powerdns@'localhost';flush privileges;"
mysql -uroot -p${DB_PASSWORD} -e "alter database powerdns default CHARACTER SET latin1;"
#Verify if the user can connect to the database after the creation is completed#Import table structure #Table structure statement: https://doc.powerdns.com/md/authoritative/backend-generic-mysql/#default-schema mysql> source pdn.sql
#yum installs PDNS (directly from epel source) # Or use this source (curl-o/etc/yum.repos.d/powerdns-auth-master.repo https://repo.powerdns.com/repo-files/centos-auth-master.repo) curl -o /etc/yum.repos.d/epel.repo http://mirrors.aliyun.com/repo/epel-7.repo yum install -y pdns pdns-backend-mysql
#Configure pdns.conf sed -n 250,254p /etc/pdns/pdns.conf launch=gmysql gmysql-host=localhost gmysql-user=powerdns gmysql-password=5jIXfISFu5W8pq8lVy3qUvtL gmysql-dbname=powerdns
#Start pdns, see if the service is normal after startup, port 53 or not, database mismatched will not get up. systemctl enable pdns systemctl start pdns
#Download poweradmin source code git clone https://github.com/poweradmin/poweradmin.git mv poweradmin /var/www/html/ chown -R apache /var/www/html/poweradmin
#Configure httpd file and use hosts domain name to resolve
[root@powerdns ~]# cat /etc/httpd/conf.d/powerdns.conf
<VirtualHost *:80>
ServerName poweradmin.example.cn
ProxyRequests Off
ProxyPassMatch ^/(.*\.php)$ fcgi://127.0.0.1:9000/var/www/html/poweradmin/$1
DocumentRoot "/var/www/html/poweradmin"
<Directory /var/www/html/poweradmin>
Options None
AllowOverride None
Require all granted
</Directory>
ErrorLog "/var/log/httpd/poweradmin-error.log"
TransferLog "/var/log/httpd/poweradmin-access.log"
</VirtualHost>
[root@powerdns ~]# httpd -t
Syntax OK
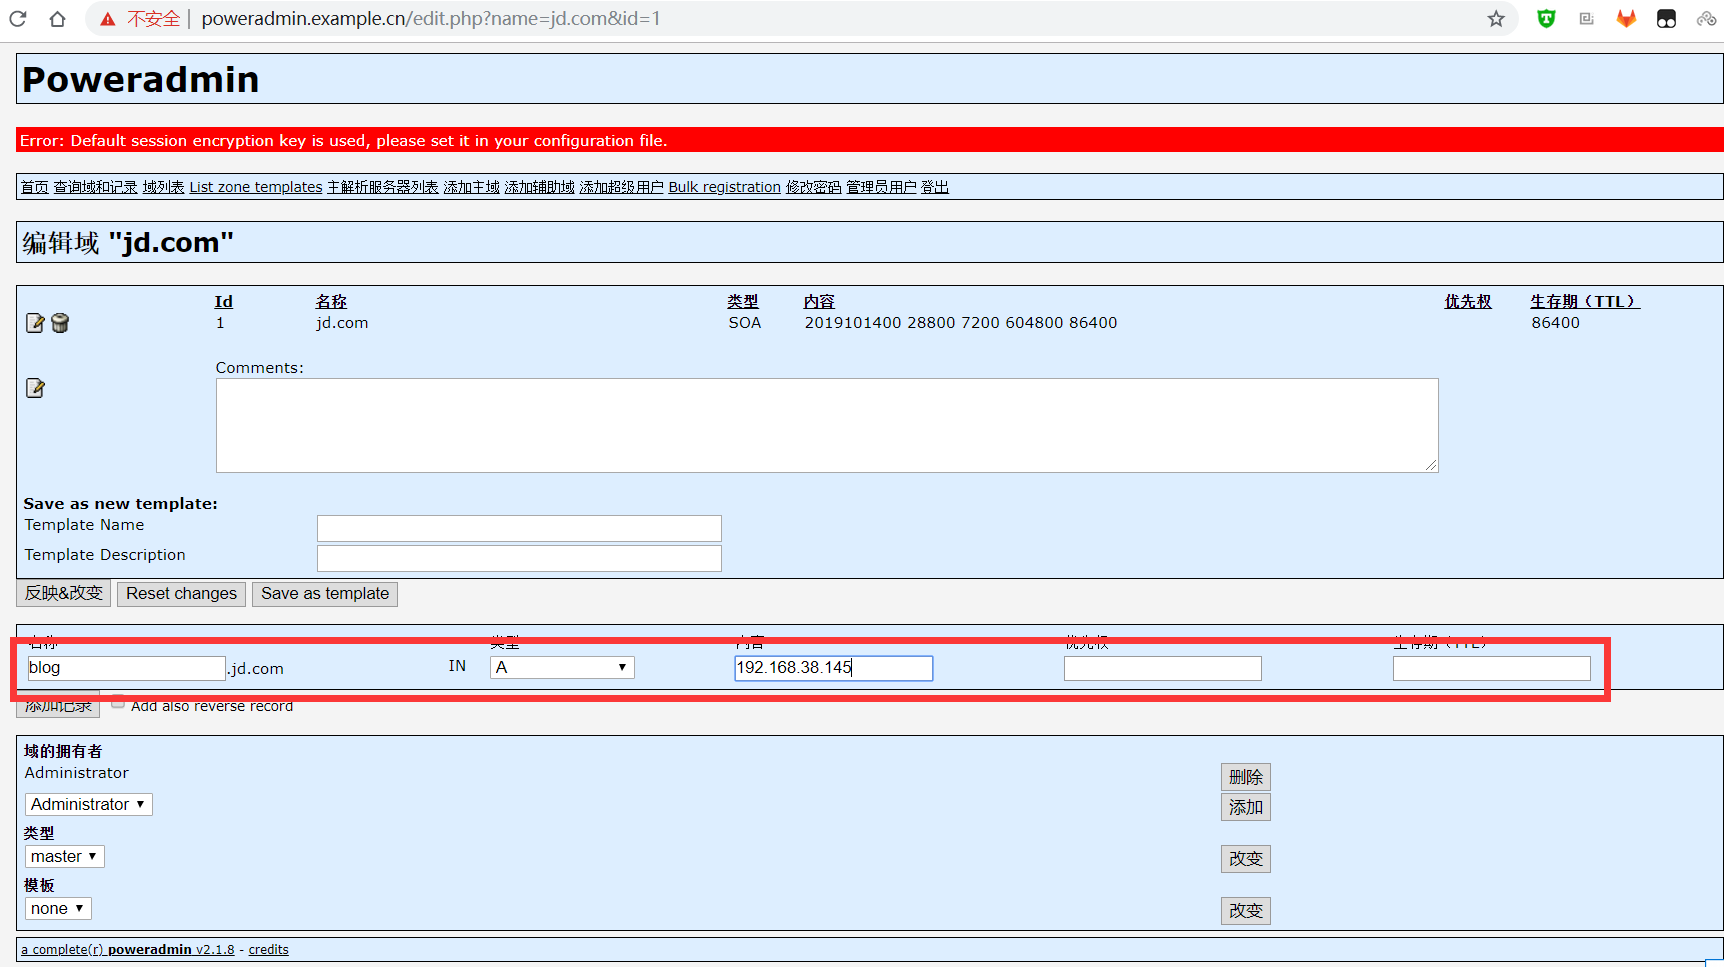
[root@powerdns ~]# systemctl restart httpd#Open the browser to access the step-by-step configuration of http://poweradmin.example.cn/install #The first step is to select the language, the third step is to fill in the database information and super password, the fourth step is to create the poweradmin user, the fifth step is to create the database and user (which has been created before, no matter what), the sixth step is to manually create config.inc.php to fill in the database information, and the seventh step is to remove the install directory on the virtual machine. #Then re-visit http://poweradmin.example.cn and log in with admin and supertube passwords #Then add the main domain (your domain name), then edit and add records. #Finally, dig or nslookup test on the virtual machine, the result is successful yum install bind-utils -y -q && dig @127.0.0.1 www.jd.com
Adding the main domain jd.com
And parse to the IP of nginx-lb
Configuration of nginx-lb
[root@nginx-lb ~]# cat > /etc/yum.repos.d/nginx.repo <<'EOF' [nginx] name=nginx baseurl=http://nginx.org/packages/centos/$releasever/$basearch/ enabled=1 gpgkey=https://nginx.org/keys/nginx_signing.key module_hotfixes=true EOF [root@nginx-lb ~]# yum install nginx -y
[root@nginx-lb ~]# grep -v ^$ /etc/nginx/nginx.conf
user nginx;
worker_processes auto;
error_log /var/log/nginx/error.log warn;
pid /var/run/nginx.pid;
events {
worker_connections 1024;
}
http {
include /etc/nginx/mime.types;
default_type application/octet-stream;
log_format main '$remote_addr - $remote_user [$time_local] "$request" '
'$status $body_bytes_sent "$http_referer" '
'"$http_user_agent" "$http_x_forwarded_for"';
access_log /var/log/nginx/access.log main;
sendfile on;
tcp_nopush on;
keepalive_timeout 65;
server_tokens off;
gzip on;
include /etc/nginx/conf.d/*.conf;
}[root@nginx-lb conf.d]# cat default.conf
upstream backend {
server 192.168.38.136:80 max_fails=0 fail_timeout=10s;
server 192.168.38.138:80 max_fails=0 fail_timeout=10s;
}
server {
listen 80;
server_name localhost;
access_log /var/log/nginx/blog.access.log main;
error_log /var/log/nginx/blog.error.log;
location / {
proxy_redirect off;
proxy_set_header Host $host;
proxy_set_header X-Real-IP $remote_addr;
proxy_set_header X-Forwarded-For $proxy_add_x_forwarded_for;
proxy_pass http://backend;
}
}[root@nginx-lb conf.d]# nginx -t nginx: the configuration file /etc/nginx/nginx.conf syntax is ok nginx: configuration file /etc/nginx/nginx.conf test is successful [root@nginx-lb conf.d]# nginx
Configuration of web1 and web2
yum install httpd -y # Otherwise, it will start very slowly. sed '/#ServerName www.example.com/a ServerName www.example.com:80' /etc/httpd/conf/httpd.conf -i systemctl start httpd && systemctl enable httpd
curl -o /etc/yum.repos.d/epel.repo http://mirrors.aliyun.com/repo/epel-7.repo
yum install https://mirrors.huaweicloud.com/remi/enterprise/remi-release-7.rpm -y

yum install php73-php php73-php-mysqlnd php73-php-fpm php73-php-xml php73-php-bcmath php73-php-mbstring php73-php-xmlrpc php73-php-soap php73-php-common  php73-php-devel php73-php-gd php73-php-pecl-mcrypt php73-php-pecl-memcache php73-php-pecl-memcached  php73-php-opcache -y
systemctl start php73-php-fpm && systemctl enable php73-php-fpm
5. NFS Server Configuration
[root@nfs1 ~]# yum install nfs-utils -y
[root@nfs1 ~]# systemctl start nfs-server && systemctl enable nfs-server.service
[root@nfs1 ~]# mkdir /data/wordpress -p
[root@nfs1 ~]# wget https://cn.wordpress.org/latest-zh_CN.tar.gz -O wordpress-zh_CN.tar.gz
[root@nfs1 ~]# tar xf wordpress-zh_CN.tar.gz
[root@nfs1 ~]# mv -f wordpress /data/
[root@nfs1 ~]# cat /etc/exports
/data/wordpress 192.168.38.*(rw,sync,no_subtree_check,no_root_squash)
[root@nfs1 ~]# exportfs -rv
exporting 192.168.38.*:/data/wordpress
[root@nfs1 ~]# showmount -e 192.168.38.146
Export list for 192.168.38.146:
/data/wordpress 192.168.38.*
[root@nfs1 ~]# useradd -s /bin/nologin nfsuser
[root@nfs1 ~]# getent passwd nfsuser
nfsuser:x:1000:1000::/home/nfsuser:/bin/nologin
[root@nfs1 ~]# vim /etc/exports
[root@nfs1 ~]# cat /etc/exports
/data/wordpress 192.168.38.*(rw,sync,no_subtree_check,anonuid=1000,anongid=1000)
[root@nfs1 ~]# chown -R nfsuser.nfsuser /data/wordpress
[root@nfs1 ~]# exportfs -rv
exporting 192.168.38.*:/data/wordpress
6. Two web servers mount nfs
[root@wp-web2 ~]# yum install nfs-utils autofs -y
[root@wp-web2 ~]# mkdir -p /data/wordpress
[root@wp-web2 ~]# grep data /etc/auto.master
/data   /etc/nfs.misc
[root@wp-web2 ~]# cat /etc/nfs.misc
wordpress   -rw 192.168.38.146:/data/wordpress
[root@wp-web2 ~]# systemctl restart autofs && systemctl enable autofs
Configuration of httpd with two web servers
##httpd and php should be tuned to last
[root@wp-web1 ~]# cat /etc/httpd/conf.d/blog.jd.com.conf
<VirtualHost *:80>
  ServerName blog.jd.com
  DirectoryIndex index.php
  ProxyRequests Off
  ProxyPassMatch ^/(.*\.php)$  fcgi://127.0.0.1:9000/data/wordpress/$1
  DocumentRoot "/data/wordpress"
  <Directory /data/wordpress>
    Options None
    AllowOverride None
    Require all granted
  </Directory>
  ErrorLog "/var/log/httpd/blog.jd.com-error.log"
  TransferLog "/var/log/httpd/blog.jd.com-access.log"
</VirtualHost>
[root@wp-web1 ~]# httpd -t
Syntax OK
[root@wp-web1 ~]# systemctl reload httpd
Access testing should be done here
Configuration of master-slave database
master database
rpm -Uvh https://dev.mysql.com/get/mysql80-community-release-el7-2.noarch.rpm
yum install yum-utils -y
sudo yum-config-manager --disable mysql80-community
sudo yum-config-manager --enable mysql57-community
yum makecache
yum install mysql-community-server -y
cat > /etc/my.cnf <<EOF
[mysqld]
socket=/var/lib/mysql/mysql.sock
datadir=/data/mysql
log-bin
gtid_mode=on
enforce_gtid_consistency=on
server-id=1
expire-logs-days=15
binlog-format=row
symbolic-links=0
log-error=/var/log/mysqld.log
pid-file=/var/run/mysqld/mysqld.pid
EOF
DB_PASSWORD=`cat /dev/urandom | tr -dc A-Za-z0-9 | head -c 24`
mkdir /data/mysql -p
mysqld --initialize --datadir=/data/mysql --user=mysql
systemctl start mysqld && systemctl enable mysqld
mysqladmin -uroot -p$(grep " temporary password" /var/log/mysqld.log | awk '{print $NF}') password ${DB_PASSWORD}
mysql> grant replication slave on *.* to 'repluser'@'192.168.38.%' identified by 'gRdoX3VZWutzDlPmiA2dGyHA'; mysql> flush privileges;
slave Library
#mount this database
#Modify database configuration
[root@mysql-slave ~]# cat /etc/my.cnf
[mysqld]
socket=/var/lib/mysql/mysql.sock
datadir=/data/mysql
server-id=1
gtid-mode=on
enforce_gtid_consistency=on
symbolic-links=0
log-error=/var/log/mysqld.log
pid-file=/var/run/mysqld/mysqld.pid
[root@mysql-slave ~]# systemctl restart mysqld && systemctl enable mysqld
mysql> CHANGE MASTER TO
    -> MASTER_HOST='192.168.38.139',
    -> MASTER_USER='repluser',
    -> MASTER_PASSWORD='gRdoX3VZWutzDlPmiA2dGyHA',
    -> MASTER_PORT=3306,
    -> MASTER_AUTO_POSITION=1;
mysql>  START SLAVE;
#Two yes denote OK
mysql> show slave status\G
......
Slave_IO_Running: Yes
Slave_SQL_Running: Yes9. Creating wordpress Database
master node operation
Here mysql connects php, so the two web s are authorized or replaced by% separately
DB_WORDPRESS_PASSWORD=`cat /dev/urandom | tr -dc A-Za-z0-9 | head -c 24`
mysql -uroot -p${DB_PASSWORD} -e "create user wordpress@'192.168.38.%' identified by '${DB_WORDPRESS_PASSWORD}';create database wordpress character set utf8 collate utf8_bin;grant all privileges on wordpress.* to wordpress@'192.168.38.%';flush privileges;"
10. web Access to blog.jd.com
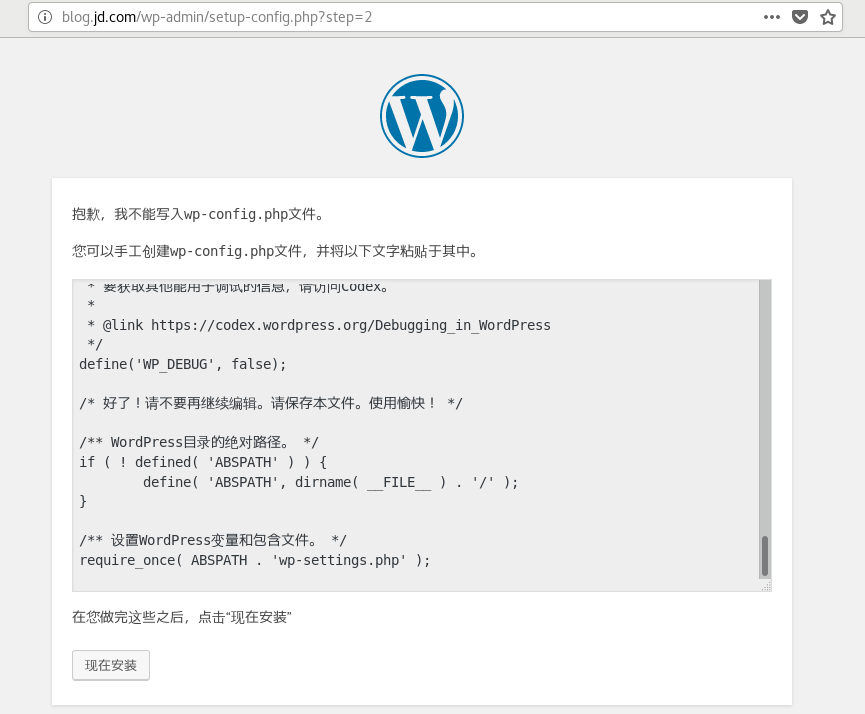
Since the DNS server has been set up, only 192.168.38.147 is needed to access blog.jd.com.
But the page display does not have write permission (but ordinary users can write files to the nfs directory)
After testing, the permission of nfs directory can be changed to 777 (chmod 777/data/wordpress)
The final solution: the nfs server creates apache users and sets acl permissions (/ etc/exports file unchanged here)
[root@nfs1 ~]# /usr/sbin/groupadd -g 48 -r apache 2> /dev/null || :
[root@nfs1 ~]# /usr/sbin/useradd -c "Apache" -u 48 -g apache -s /sbin/nologin -r -d /usr/share/httpd apache 2> /dev/null || :
[root@nfs1 ~]# setfacl -R -m u:apache:rwx /data/wordpress/
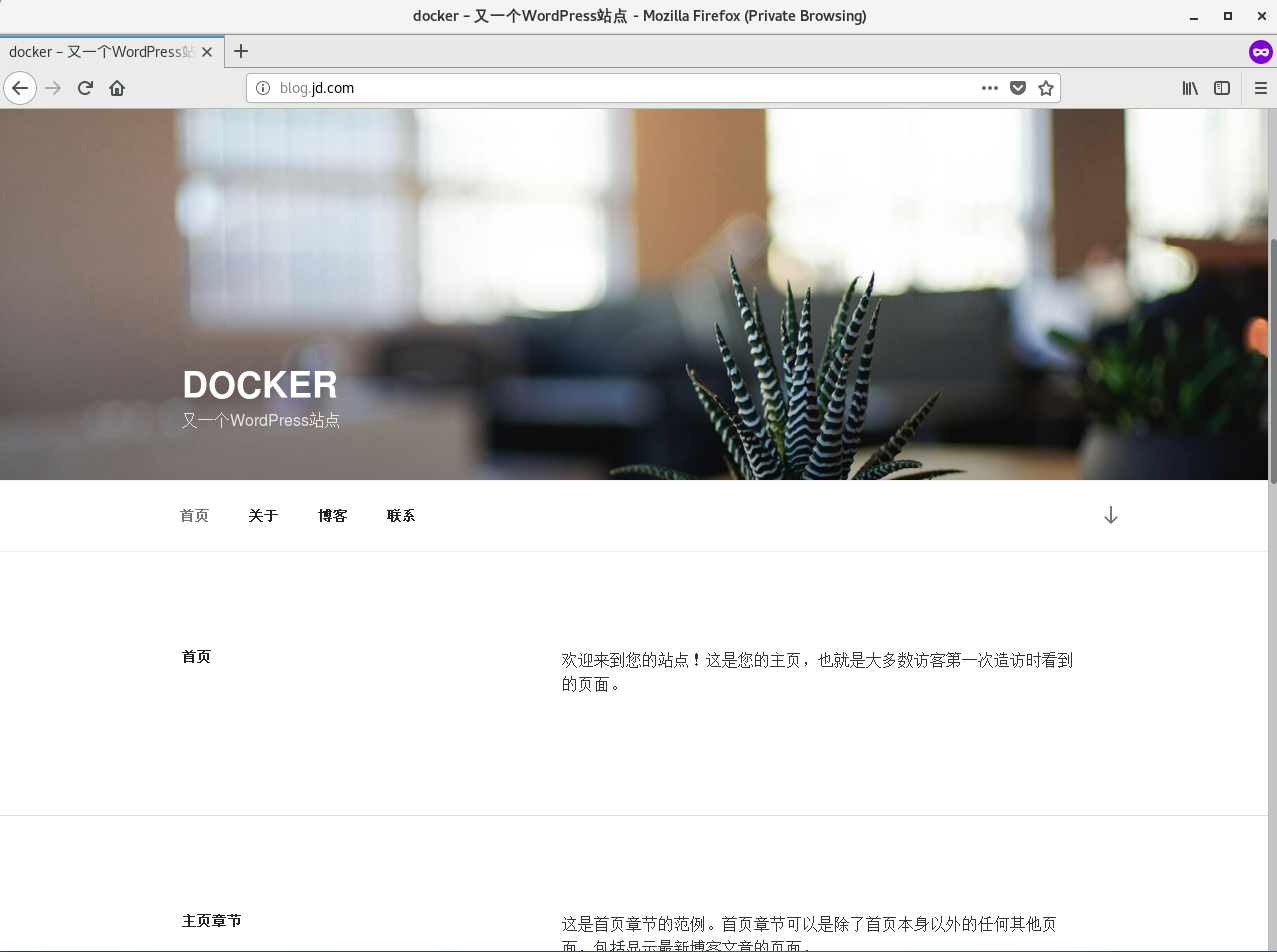
X. Final effect:
11. Redeploy a phpadmin
# This direct decompression is available
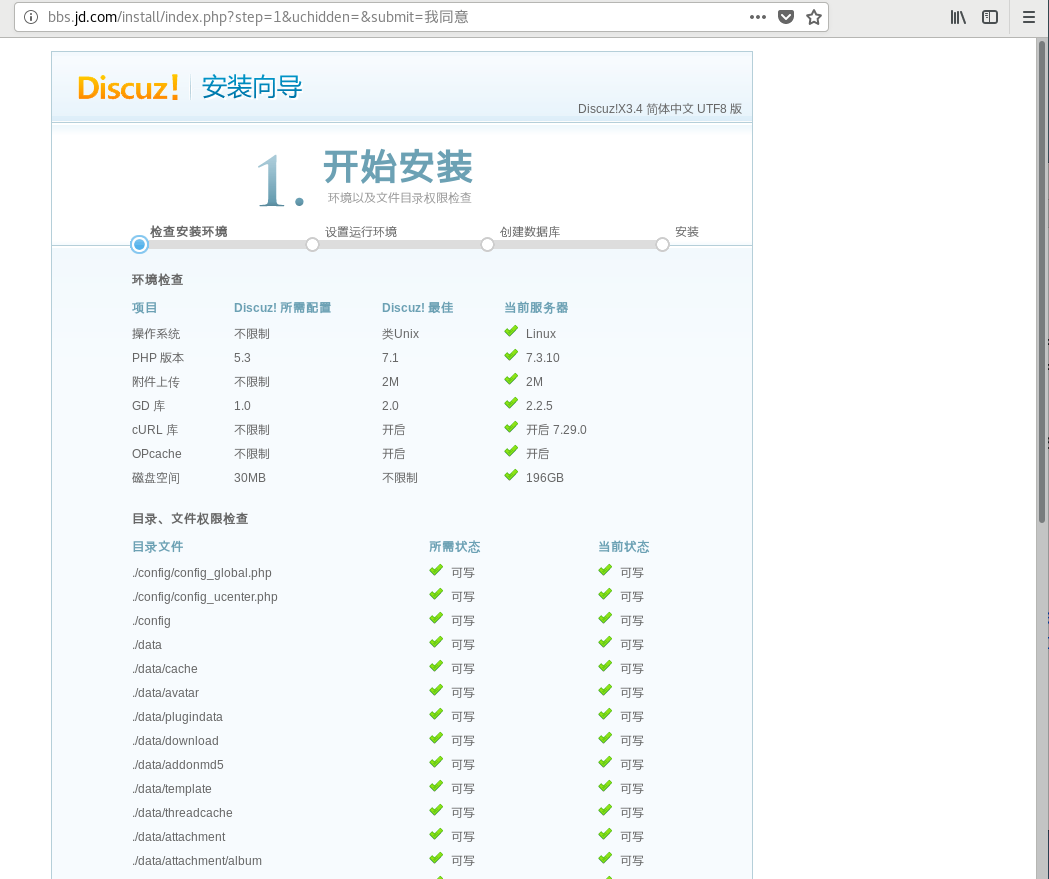
12. Redeploy a discuz
Operation NFS
#Download source code
yum install git -y
git clone https://gitee.com/ComsenzDiscuz/DiscuzX.git
cp DiscuzX/upload /data/discuz -a
chown nfsuser.nfsuser -R /data/discuz
setfacl -R -m u:apache:rwx /data/discuz
exportfs -rv
Operating master database
DB_DISCUZ_PASSWORD=`cat /dev/urandom | tr -dc A-Za-z0-9 | head -c 24`
mysql -uroot -p${DB_PASSWORD} -e "create user discuz@'192.168.38.%' identified by '${DB_DISCUZ_PASSWORD}';create database discuz character set utf8 collate utf8_bin;grant all privileges on discuz.* to discuz@'192.168.38.%';flush privileges;"
Operating two web s
[root@wp-web1 ~]# grep discuz /etc/nfs.misc
discuz      -rw 192.168.38.146:/data/discuz
[root@wp-web1 ~]# systemctl reload autofs.service
[root@wp-web1 ~]# cat > /etc/httpd/conf.d/bbs.jd.com.conf << 'EOF'
<VirtualHost *:80>
  ServerName bbs.jd.com
  ProxyRequests Off
  ProxyPassMatch ^/(.*\.php)$  fcgi://127.0.0.1:9000/data/discuz/$1
  DocumentRoot "/data/discuz"
  <Directory /data/discuz>
    Options None
    AllowOverride None
    Require all granted
  </Directory>
  ErrorLog "/var/log/httpd/bbs.jd.com-error.log"
  TransferLog "/var/log/httpd/bbs.jd.com-access.log"
</VirtualHost>
EOF
[root@wp-web1 ~]# httpd -t
Syntax OK
[root@wp-web1 ~]# systemctl reload httpd
Setting up DNS parsing
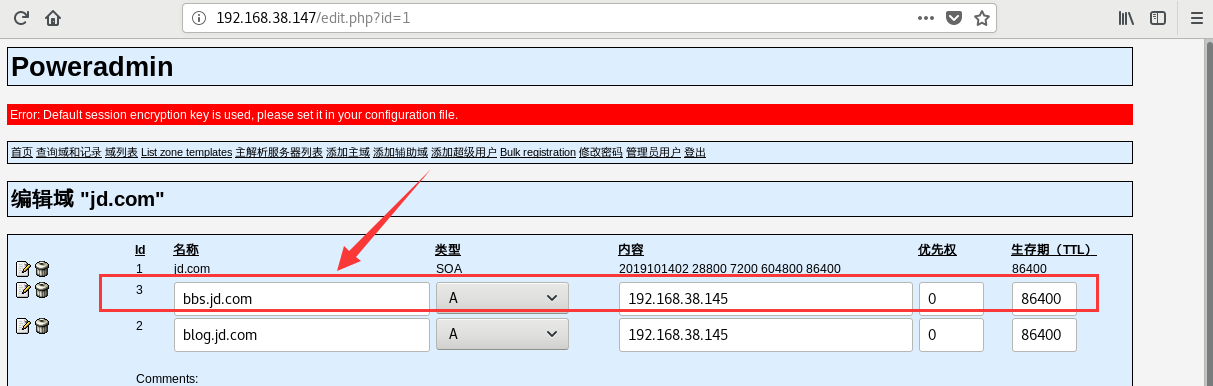
Access testing (no problem):
It's this file with weird attributes:

13. System tuning
# Originally this should be in the front, and finally, let's go to the end.
# Kernel parameter tuning
 # File Handle Number Tuning
 # nginx, php, httpd, mysql tuning, etc.
< font color = Red > no reprinting, no handling, crawler Sima </font >
Conclusion:
Access to the two domains does not affect each other, proving that the configuration of nginx is okay