KVM deployment
Introduction to virtualization
Virtualization is the foundation of cloud computing. In short, virtualization enables multiple virtual machines to run on a physical server. Virtual machines share CPU, memory and IO hardware resources of physical machines, but logically, virtual machines are isolated from each other.
The physical machine is generally called the Host, and the virtual machine on the Host is called the Guest.
So how does the Host virtualize its hardware resources and provide them to guests?
This is mainly realized through a program called Hypervisor.
According to the implementation mode and location of Hypervisor, virtualization can be divided into two types:
- Full virtualization
- Semi virtualization
Full Virtualization:
The Hypervisor is installed directly on the physical machine, and multiple virtual machines run on the Hypervisor. The implementation of Hypervisor is generally a special customized Linux system. Both Xen and VMWare ESXi belong to this type

Semi Virtualization:
On the physical machine, first install conventional operating systems, such as Redhat, Ubuntu and Windows. The Hypervisor runs as a program module on the OS and manages the management virtual machine. KVM, VirtualBox and VMWare Workstation all belong to this type

In theory:
Full virtualization generally optimizes the hardware virtualization function, and its performance is higher than that of semi virtualization;
Semi virtualization is more flexible because it is based on an ordinary operating system. For example, it supports virtual machine nesting. Nesting means that KVM can be run again in the KVM virtual machine.
Introduction to kvm
The full name of KVM is kernel based virtual machine. In other words, KVM is implemented based on Linux kernel.
KVM has a kernel module called kvm.ko, which is only used to manage virtual CPU and memory.
The virtualization of IO, such as storage and network devices, is realized by Linux kernel and Qemu.
As a Hypervisor, KVM only focuses on virtual machine scheduling and memory management. The tasks of IO peripherals are assigned to the Linux kernel and Qemu.
When you read KVM related articles on the Internet, you will often see Libvirt.
Libvirt is the management tool of KVM.
In fact, Libvirt can manage hypervisors such as KVM, Xen, VirtualBox, etc.
Libvirt contains three things: background daemon libvirtd, API library and command line tool virsh
- libvirtd is a service program that receives and processes API requests;
- The API library enables others to develop advanced tools based on Libvirt, such as virt manager, which is a graphical KVM management tool;
- virsh is a KVM command line tool we often use
kvm deployment
Environmental description:
| System type | IP |
|---|---|
| Centos8 | 192.168.240.60 |
kvm installation
Please ensure that your CPU virtualization function is enabled before deployment. There are two cases:
- Setting CPU virtualization for virtual machine shutdown
- The physical machine should enable CPU virtualization in BIOS
Turn off firewall and selinux
[root@KVM ~]# systemctl disable --now firewalld.service
Removed /etc/systemd/system/multi-user.target.wants/firewalld.service.
Removed /etc/systemd/system/dbus-org.fedoraproject.FirewallD1.service.
[root@KVM ~]# sed -ri 's/^(SELINUX=).*/\1disabled/g' /etc/selinux/config
[root@KVM ~]# setenforce 0
Download source
[root@KVM ~]# yum -y install epel-release vim wget net-tools unzip zip gcc gcc-c++
Verify whether the CPU supports KVM; If there is vmx (Intel) or svm(AMD) in the result, it indicates that the CPU supports
[root@KVM ~]# egrep -o 'vmx|svm' /proc/cpuinfo
vmx
vmx
vmx
vmx
kvm installation
[root@KVM ~]# yum -y install qemu-kvm qemu-kvm-common qemu-img virt-manager libvirt python3-libvirt libvirt-client virt-install virt-viewer bridge-utils libguestfs-tools
Because the network in the virtual machine is generally the same network segment as other servers in the company, we need to
The network card of KVM server is configured in bridge mode. In this way, the virtual machine of KVM can be connected to the company through the bridge network card
Other servers are in the same network segment
My network card here is ens33, so br0 is used to bridge the ens33 network card
[root@KVM ~]# cat /etc/sysconfig/network-scripts/ifcfg-br0
TYPE=Bridge
DEVICE=br0
BOOTPROTO=static
NAME=br0
ONBOOT=yes
IPADDR=192.168.240.60
NATEMASK=255.255.255.0
GATEWAY=192.168.240.2
DNS1=114.114.114.114
[root@KVM ~]# cat /etc/sysconfig/network-scripts/ifcfg-ens33
TYPE=Ethernet
BOOTPROTO=static
NAME=ens33
DEVICE=ens33
ONBOOT=yes
BRIDGE=br0
[root@KVM ~]# systemctl restart NetworkManager
[root@KVM ~]# ip a
1: lo: <LOOPBACK,UP,LOWER_UP> mtu 65536 qdisc noqueue state UNKNOWN group default qlen 1000
    link/loopback 00:00:00:00:00:00 brd 00:00:00:00:00:00
    inet 127.0.0.1/8 scope host lo
       valid_lft forever preferred_lft forever
    inet6 ::1/128 scope host
       valid_lft forever preferred_lft forever
2: ens33: <BROADCAST,MULTICAST,UP,LOWER_UP> mtu 1500 qdisc fq_codel master br0 state UP group default qlen 1000
    link/ether 00:0c:29:11:4d:9c brd ff:ff:ff:ff:ff:ff
3: virbr0: <NO-CARRIER,BROADCAST,MULTICAST,UP> mtu 1500 qdisc noqueue state DOWN group default qlen 1000
    link/ether 52:54:00:98:c4:82 brd ff:ff:ff:ff:ff:ff
    inet 192.168.122.1/24 brd 192.168.122.255 scope global virbr0
       valid_lft forever preferred_lft forever
4: virbr0-nic: <BROADCAST,MULTICAST> mtu 1500 qdisc fq_codel master virbr0 state DOWN group default qlen 1000
    link/ether 52:54:00:98:c4:82 brd ff:ff:ff:ff:ff:ff
5: br0: <BROADCAST,MULTICAST,UP,LOWER_UP> mtu 1500 qdisc noqueue state UP group default qlen 1000
    link/ether 00:0c:29:11:4d:9c brd ff:ff:ff:ff:ff:ff
    inet 192.168.240.60/24 brd 192.168.240.255 scope global noprefixroute br0
       valid_lft forever preferred_lft forever
    inet6 fe80::20c:29ff:fe11:4d9c/64 scope link
       valid_lft forever preferred_lft forever
Start service
[root@KVM ~]# systemctl start libvirtd
[root@KVM ~]# systemctl enable libvirtd
Verify installation results
[root@KVM ~]# lsmod | grep kvm
kvm_intel             311296  0
kvm                   839680  1 kvm_intel
irqbypass              16384  1 kvm
Test and verify installation results
[root@KVM ~]# virsh -c qemu:///system list
 Id   Name status
-------------------

[root@KVM ~]# virt-install --version
2.2.1
[root@KVM ~]# ln -s /usr/libexec/qemu-kvm /usr/local/qemu-kvm
[root@KVM ~]# lsmod |grep kvm
kvm_intel             311296  0
kvm                   839680  1 kvm_intel
irqbypass              16384  1 kvm
[root@KVM ~]# brctl show
bridge name     bridge id               STP enabled     interfaces
br0             8000.000c29114d9c       no              ens33
virbr0          8000.52540098c482       yes             virbr0-nic
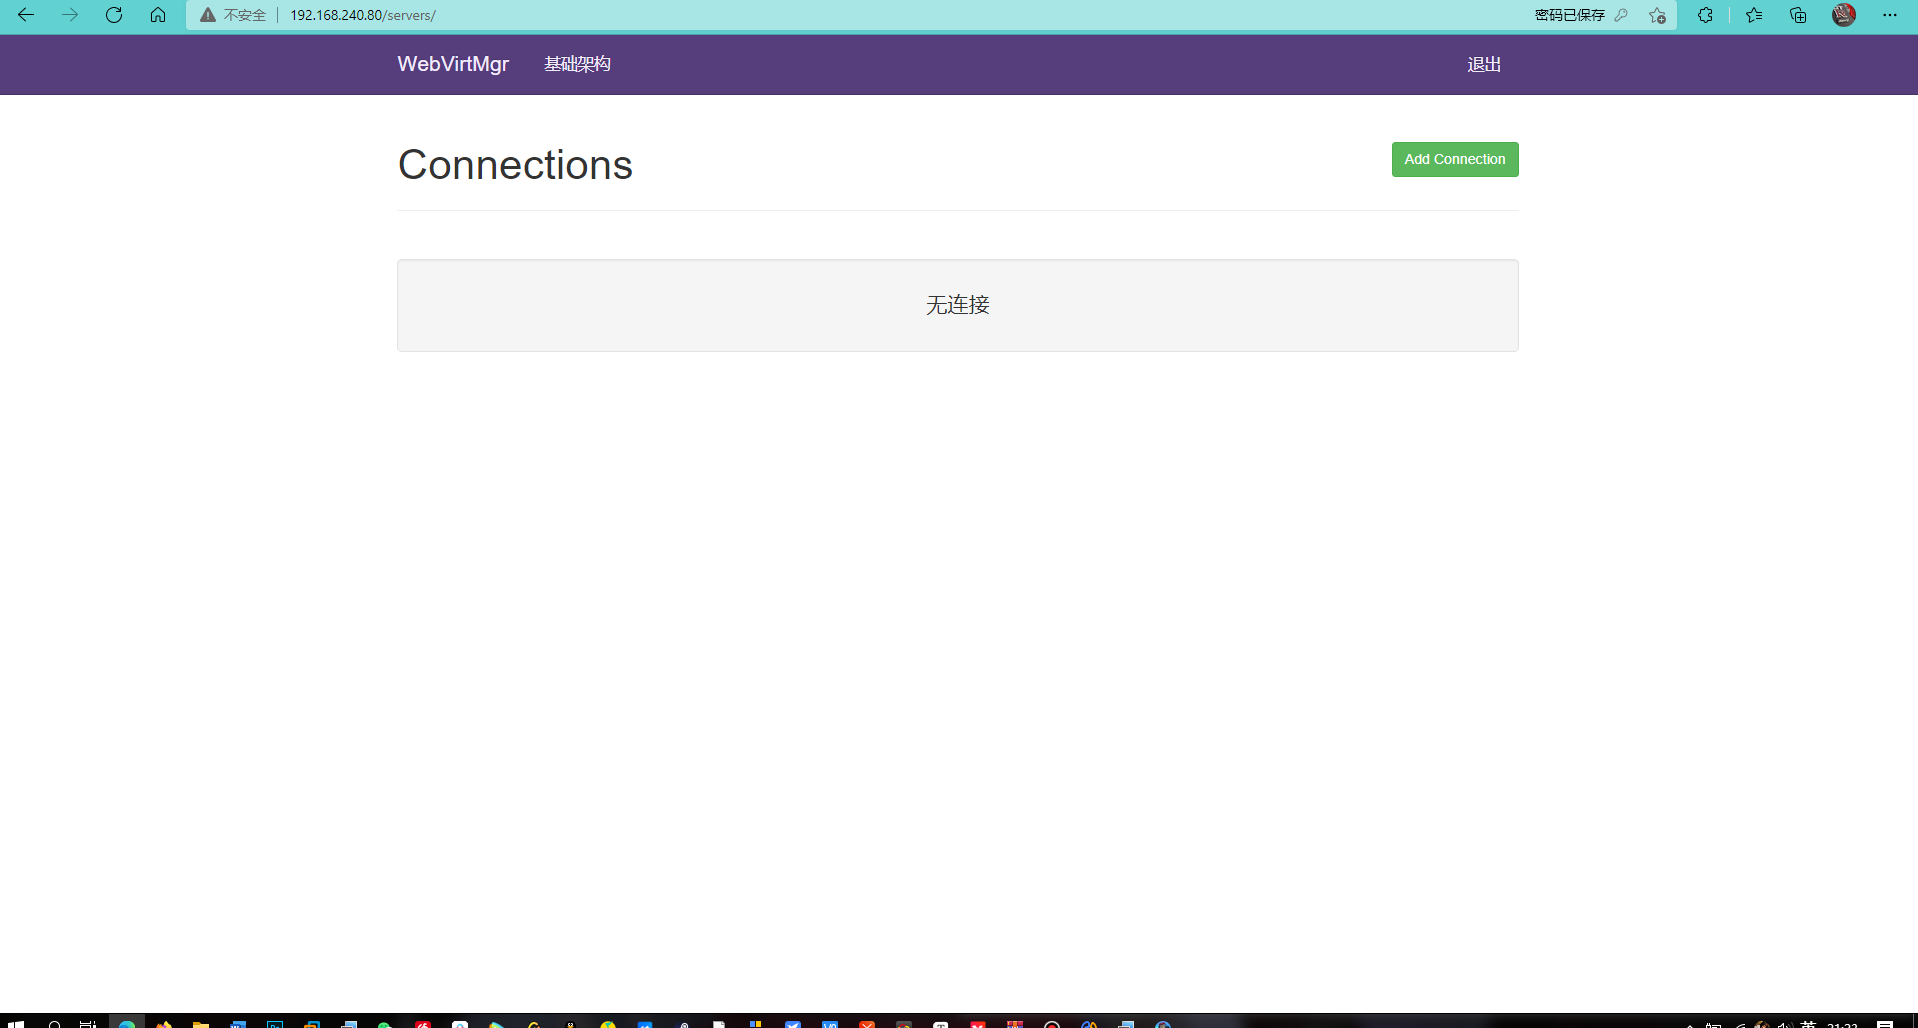
kvm web management interface installation
The web management interface of kvm is provided by webvirtmgr program.
Install dependent packages
[root@localhost ~]# yum -y install epel-release
[root@localhost ~]# yum -y install git python-pip libvirt-python libxml2-python python-websockify supervisor nginx python-devel
Download the webvirtmgr code from github
[root@localhost ~]#  cd /usr/local/src/
[root@localhost ~]#  git clone git://github.com/retspen/webvirtmgr.git
 Cloning to 'webvirtmgr'...
remote: Enumerating objects: 5614, done.
remote: Total 5614 (delta 0), reused 0 (delta 0), pack-reused 5614
 In receiving object: 100% (5614/5614), 2.97 MiB | 687.00 KiB/s, done.
handle delta in: 100% (3606/3606), done.
[root@kvm-web src]# cd webvirtmgr/

[root@localhost ~]# pip install --upgrade pip
Collecting pip
  Downloading https://files.pythonhosted.org/packages/00/5f/d6959d6f25f202e3e68e3a53b815af42d770c829c19382d0acbf2c3e2112/pip-21.3.tar.gz (1.7MB)
    100% |████████████████████████████████| 122kB 241kB/s
Collecting lockfile>=0.9 (from -r requirements.txt (line 5))
  Downloading https://files.pythonhosted.org/packages/c8/22/9460e311f340cb62d26a38c419b1381b8593b0bb6b5d1f056938b086d362/lockfile-0.12.2-py2.py3-none-any.whl
Installing collected packages: django, gunicorn, lockfile
  Running setup.py install for django ... done
Successfully installed django-1.5.5 gunicorn-19.5.0 lockfile-0.12.2
You are using pip version 8.1.2, however version 21.3 is available.
You should consider upgrading via the 'pip install --upgrade pip' command.
Check if sqlite3 is installed
[root@localhost webvirtmgr]# python
Python 2.7.5 (default, Nov 16 2020, 22:23:17)
[GCC 4.8.5 20150623 (Red Hat 4.8.5-44)] on linux2
Type "help", "copyright", "credits" or "license" for more information.
>>> import sqlite3
>>> exit ()
Initialize account information
[root@localhost webvirtmgr]# python manage.py syncdb
WARNING:root:No local_settings file found.
Creating tables ...
Creating table auth_permission
······
Creating table create_flavor

You just installed Django's auth system, which means you don't have any superusers defined.
Would you like to create one now? (yes/no): yes ##Ask if you want to create a super administrator account
Username (leave blank to use 'root'): admin ##Specify the super administrator account user name, which is left blank as root by default
Email address: 123@qq.com ##Set super administrator mailbox
Password:    ##Set super administrator password
Password (again):    ##Enter the super administrator password again
Superuser created successfully.
Installing custom SQL ...
Installing indexes ...
Installed 6 object(s) from 1 fixture(s)
Copy web page to specified directory
[root@localhost webvirtmgr]# mkdir /var/www
[root@localhost webvirtmgr]# cp -r /usr/local/src/webvirtmgr /var/www/
[root@localhost webvirtmgr]# chown -R nginx.nginx /var/www/webvirtmgr/
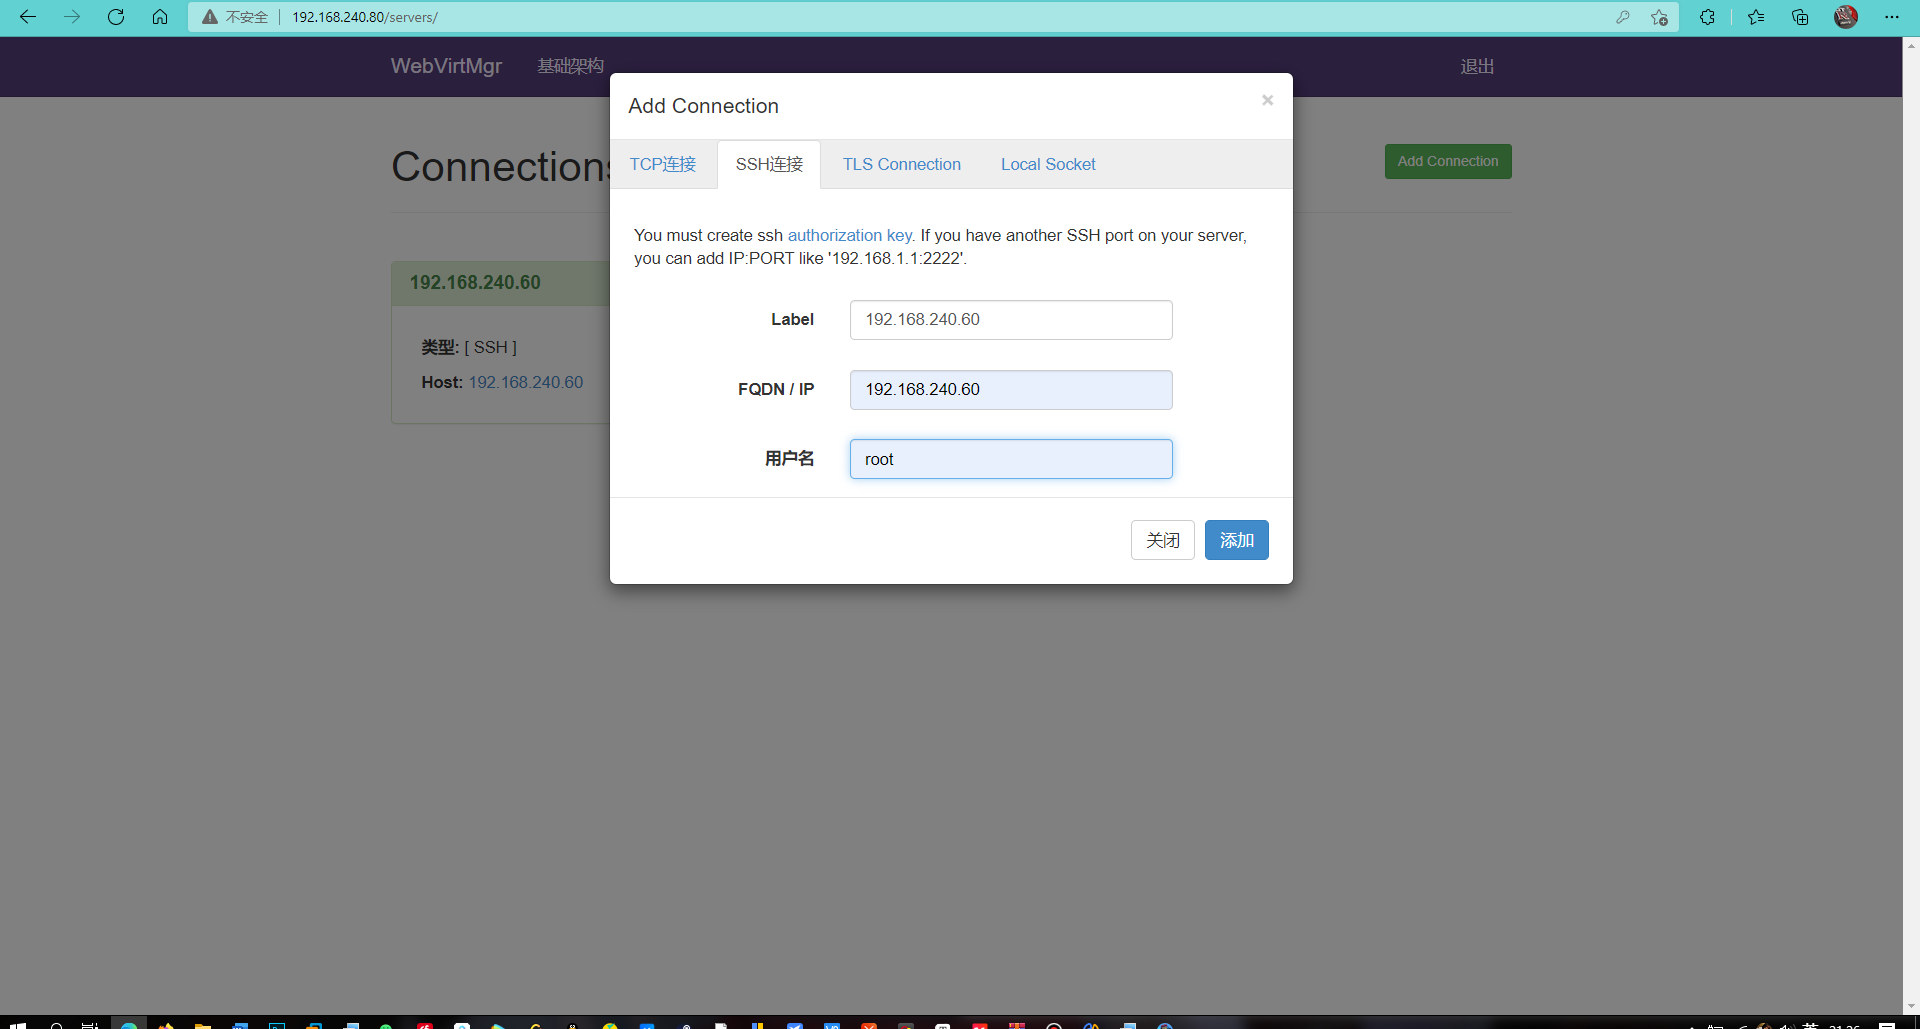
Generate key
[root@localhost ~]# ssh-keygen -t rsa
Generating public/private rsa key pair.
Enter file in which to save the key (/root/.ssh/id_rsa):
Created directory '/root/.ssh'.
Enter passphrase (empty for no passphrase):
Enter same passphrase again:
Your identification has been saved in /root/.ssh/id_rsa.
Your public key has been saved in /root/.ssh/id_rsa.pub.
The key fingerprint is:
SHA256:ZG+SvgplJDTnKHPBm+b/P2JXM8T0MvkEdfbUm0DMfy8 root@KVM
The key's randomart image is:
+---[RSA 3072]----+
|   .+ .     +o. =|
|   ..*      o+ +o|
|  o +oo o  o +o +|
|   ++o o o  * o+.|
|   o  o S o. =  o|
|    .o . o  + E .|
|    ..  .  . o . |
|     .. o.o      |
|      .+o+..     |
+----[SHA256]-----+


##If kvm is deployed on other machines, this is its ip address
[root@localhost ~]# ssh-copy-id 192.168.240.60
/usr/bin/ssh-copy-id: INFO: Source of key(s) to be installed: "/root/.ssh/id_rsa.pub"
The authenticity of host '192.168.240.60 (192.168.240.60)' can't be established.
ECDSA key fingerprint is SHA256:YDPxPR7Nqao+hwjww9kCBH/G0mbpOsvhSahI6YKiRhQ.
Are you sure you want to continue connecting (yes/no/[fingerprint])? yes
/usr/bin/ssh-copy-id: INFO: attempting to log in with the new key(s), to filter out any that are already installed
/usr/bin/ssh-copy-id: INFO: 1 key(s) remain to be installed -- if you are prompted now it is to install the new keys
root@192.168.240.60's password:

Number of key(s) added: 1

Now try logging into the machine, with:   "ssh '192.168.240.60'"
and check to make sure that only the key(s) you wanted were added.
Configure port forwarding
[root@localhost ~]#  ssh 192.168.240.60 -L localhost:8000:localhost:8000 -L localhost:6080:localhost:60
Last login: Wed Oct 20 02:49:10 2021 from 192.168.240.1
[root@localhost ~]# ss -antl
State  Recv-Q Send-Q  Local Address:Port   Peer Address:Port Process
LISTEN 0      128           0.0.0.0:111         0.0.0.0:*
LISTEN 0      32      192.168.122.1:53          0.0.0.0:*
LISTEN 0      128           0.0.0.0:22          0.0.0.0:*
LISTEN 0      128         127.0.0.1:6080        0.0.0.0:*
LISTEN 0      128         127.0.0.1:8000        0.0.0.0:*
LISTEN 0      128              [::]:111            [::]:*
LISTEN 0      128              [::]:22             [::]:*
LISTEN 0      128             [::1]:6080           [::]:*
LISTEN 0      128             [::1]:8000           [::]:*
Configure nginx
[root@localhost ~]#  vim /etc/nginx/nginx.conf
 38     server {
 39         listen       80 default_server;  ##Change to listen 80;
 40         listen       [::]:80 default_server;  ##Delete this row
 41         server_name  _;   ##Change to server_name  localhost;
 42         root         /usr/share/nginx/html;##Delete this row


 45         location / {
 46             root html;   ##Add this row
 47             index index.html index.htm;   ##Add this row
 48         }

[root@localhost ~]#  vi /etc/nginx/conf.d/webvirtmgr.conf
[root@localhost ~]#  cat /etc/nginx/conf.d/webvirtmgr.conf
server {
    listen 80 default_server;

    server_name $hostname;
    #access_log /var/log/nginx/webvirtmgr_access_log;

    location /static/ {
        root /var/www/webvirtmgr/webvirtmgr;
        expires max;
    }

    location / {
        proxy_pass http://127.0.0.1:8000;
        proxy_set_header X-Real-IP $remote_addr;
        proxy_set_header X-Forwarded-for $proxy_add_x_forwarded_for;
        proxy_set_header Host $host:$server_port;
        proxy_set_header X-Forwarded-Proto $remote_addr;
        proxy_connect_timeout 600;
        proxy_read_timeout 600;
        proxy_send_timeout 600;
        client_max_body_size 1024M;
    }
}

##Ensure that the bind is bound to the 8000 port of the local machine
[root@localhost ~]#  vim /var/www/webvirtmgr/conf/gunicorn.conf.py
······
bind = '0.0.0.0:8000'
backlog = 2048
·····
Restart nginx
[root@localhost ~]#  systemctl restart nginx
[root@localhost ~]#  ss -antl
State  Recv-Q Send-Q  Local Address:Port   Peer Address:Port Process
LISTEN 0      128           0.0.0.0:111         0.0.0.0:*
LISTEN 0      128           0.0.0.0:80          0.0.0.0:*
LISTEN 0      32      192.168.122.1:53          0.0.0.0:*
LISTEN 0      128           0.0.0.0:22          0.0.0.0:*
LISTEN 0      128         127.0.0.1:6080        0.0.0.0:*
LISTEN 0      128         127.0.0.1:8000        0.0.0.0:*
LISTEN 0      128              [::]:111            [::]:*
LISTEN 0      128              [::]:22             [::]:*
LISTEN 0      128             [::1]:6080           [::]:*
LISTEN 0      128             [::1]:8000           [::]:*
Set supervisor
[root@localhost ~]#  vim /etc/supervisord.conf
.....Omit the above content here and add the following content at the end of the document
[program:webvirtmgr]
command=/usr/bin/python2 /var/www/webvirtmgr/manage.py run_gunicorn -c /var/www/webvirtmgr/conf/gunicorn.conf.py
directory=/var/www/webvirtmgr
autostart=true
autorestart=true
logfile=/var/log/supervisor/webvirtmgr.log
log_stderr=true
user=nginx

[program:webvirtmgr-console]
command=/usr/bin/python2 /var/www/webvirtmgr/console/webvirtmgr-console
directory=/var/www/webvirtmgr
autostart=true
autorestart=true
stdout_logfile=/var/log/supervisor/webvirtmgr-console.log
redirect_stderr=true
user=nginx
Start the supervisor and set the startup auto start
[root@localhost ~]#  systemctl start supervisord
[root@localhost ~]#  systemctl enable supervisord
Created symlink /etc/systemd/system/multi-user.target.wants/supervisord.service → /usr/lib/systemd/system/supervisord.service.
[root@KVM ~]# systemctl status supervisord
● supervisord.service - Process Monitoring and Control Daemon
   Loaded: loaded (/usr/lib/systemd/system/supervisord.servi>
   Active: active (running) since Wed 2021-10-20 03:39:38 ED>
 Main PID: 95670 (supervisord)
    Tasks: 2 (limit: 37334)
   Memory: 39.9M
   CGroup: /system.slice/supervisord.service
           ├─95670 /usr/bin/python3.6 /usr/bin/supervisord ->
           └─96139 /usr/bin/python2 /var/www/webvirtmgr/mana>

10 March 20:39:37 KVM systemd[1]: Starting Process Monitoring>
10 March 20:39:38 KVM systemd[1]: Started Process Monitoring >
lines 1-12/12 (END)
Configure nginx users
[root@localhost ~]# su - nginx -s /bin/bash
-bash-4.2$ ssh-keygen -t rsa
Generating public/private rsa key pair.
Enter file in which to save the key (/var/lib/nginx/.ssh/id_rsa):
Created directory '/var/lib/nginx/.ssh'.
Enter passphrase (empty for no passphrase):
Enter same passphrase again:
Your identification has been saved in /var/lib/nginx/.ssh/id_rsa.
Your public key has been saved in /var/lib/nginx/.ssh/id_rsa.pub.
The key fingerprint is:
SHA256:4Q33RY2cSwrTYrEKxrKB9Uk2hXXgZcrqK8L4VEgrMHA nginx@kvm-web
The key's randomart image is:
+---[RSA 2048]----+
|. E . +++.=o ..+ |
|.. o =.= ==...= .|
|o o o * *.o+ o.. |
|.o o = + * ....  |
|. o o . S . .    |
| . . .           |
| o.   .          |
|..o .  .         |
| ... ..          |
+----[SHA256]-----+


-bash-4.2$ touch ~/.ssh/config && echo -e "StrictHostKeyChecking=no\nUserKnownHostsFile=/dev/null" >> ~/.ssh/config
-bash-4.2$ chmod 0600 ~/.ssh/config
-bash-4.2$ ssh-copy-id root@192.168.240.60
/bin/ssh-copy-id: INFO: Source of key(s) to be installed: "/var/lib/nginx/.ssh/id_rsa.pub"
/bin/ssh-copy-id: INFO: attempting to log in with the new key(s), to filter out any that are already installed
/bin/ssh-copy-id: INFO: 1 key(s) remain to be installed -- if you are prompted now it is to install the new keys
Warning: Permanently added '192.168.240.60' (ECDSA) to the list of known hosts.
root@192.168.240.60's password:

Number of key(s) added: 1

Now try logging into the machine, with:   "ssh 'root@192.168.240.60'"
and check to make sure that only the key(s) you wanted were added.


[nginx@localhost ~]$ exit

[root@localhost ~]#  vim /etc/polkit-1/localauthority/50-local.d/50-libvirt-remote-access.pkla
[root@KVM ~]# cat /etc/polkit-1/localauthority/50-local.d/50-libvirt-remote-access.pkla
[Remote libvirt SSH access]
Identity=unix-user:root
Action=org.libvirt.unix.manage
ResultAny=yes
ResultInactive=yes
ResultActive=yes

[root@localhost ~]#  chown -R root.root /etc/polkit-1/localauthority/50-local.d/50-libvirt-remote-access.pkla
[root@localhost ~]#  systemctl restart nginx
[root@localhost ~]#  systemctl restart libvirtd
[root@localhost ~]#  ss -antl
State  Recv-Q Send-Q  Local Address:Port   Peer Address:Port Process
LISTEN 0      128           0.0.0.0:111         0.0.0.0:*
LISTEN 0      128           0.0.0.0:80          0.0.0.0:*
LISTEN 0      32      192.168.122.1:53          0.0.0.0:*
LISTEN 0      128           0.0.0.0:22          0.0.0.0:*
LISTEN 0      128         127.0.0.1:6080        0.0.0.0:*
LISTEN 0      128         127.0.0.1:8000        0.0.0.0:*
LISTEN 0      128              [::]:111            [::]:*
LISTEN 0      128              [::]:22             [::]:*
LISTEN 0      128             [::1]:6080           [::]:*
LISTEN 0      128             [::1]:8000           [::]:*


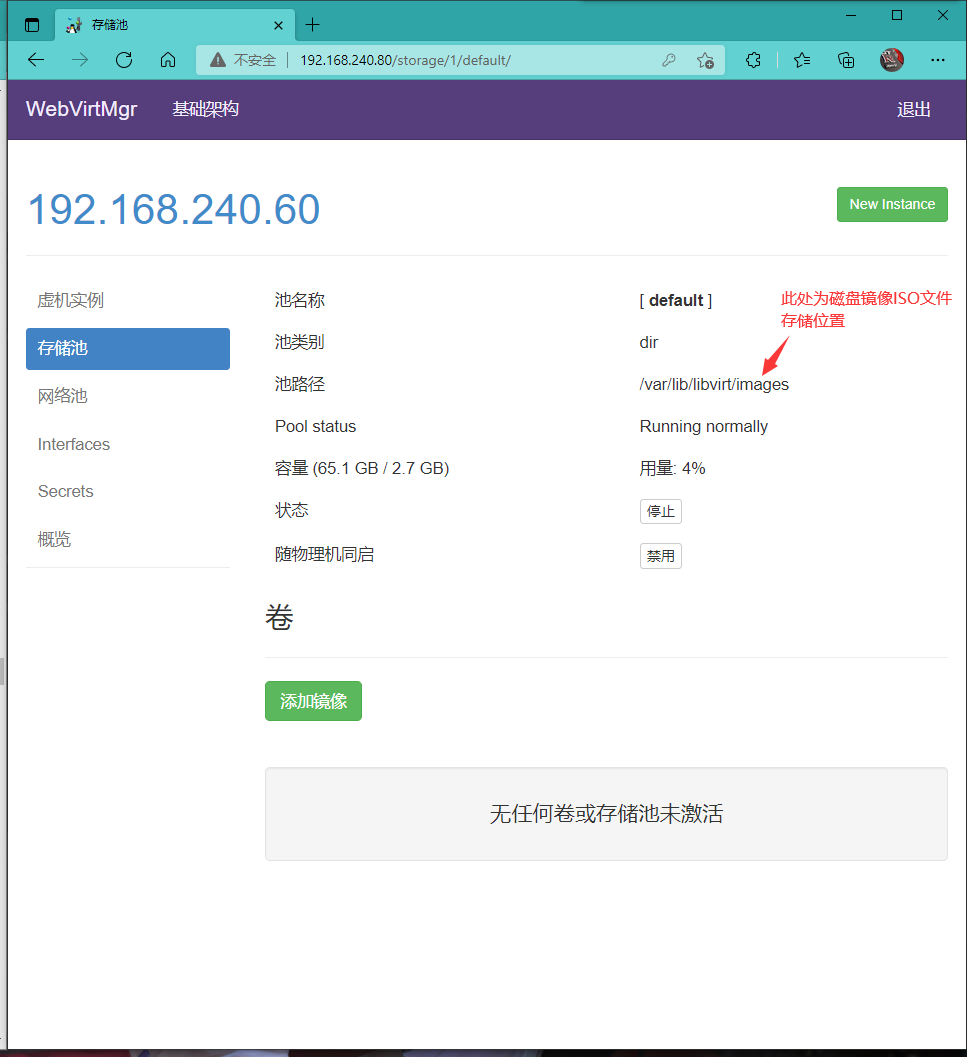
Upload the ISO image file to the storage directory / var/lib/libvirt/images through the remote connection software/
[root@KVM images]# ls
[root@KVM images]#
[root@KVM images]# ls
CentOS-Stream-8-x86_64-20201211-dvd1.iso
Check whether the ISO image exists in the web interface

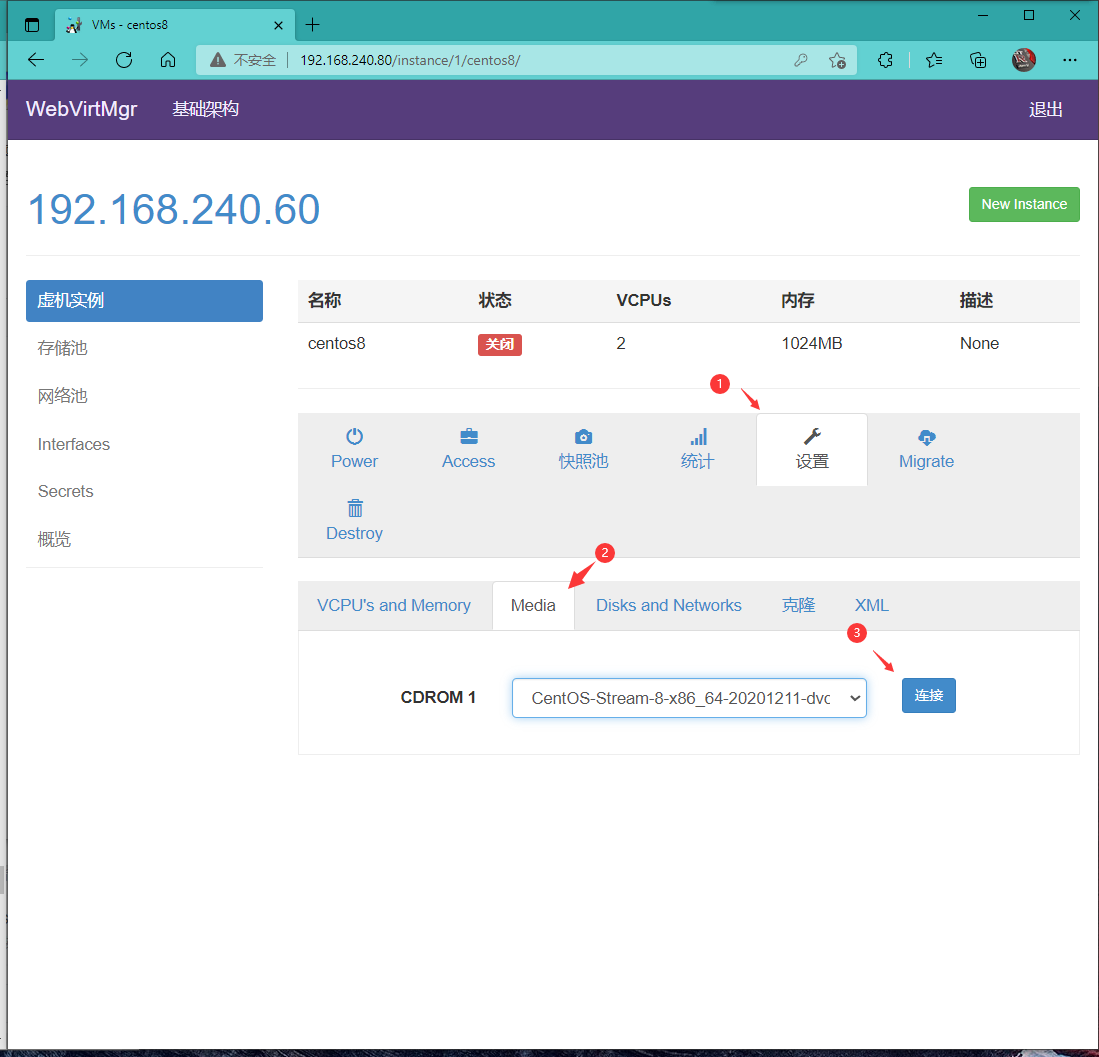
Create system installation image

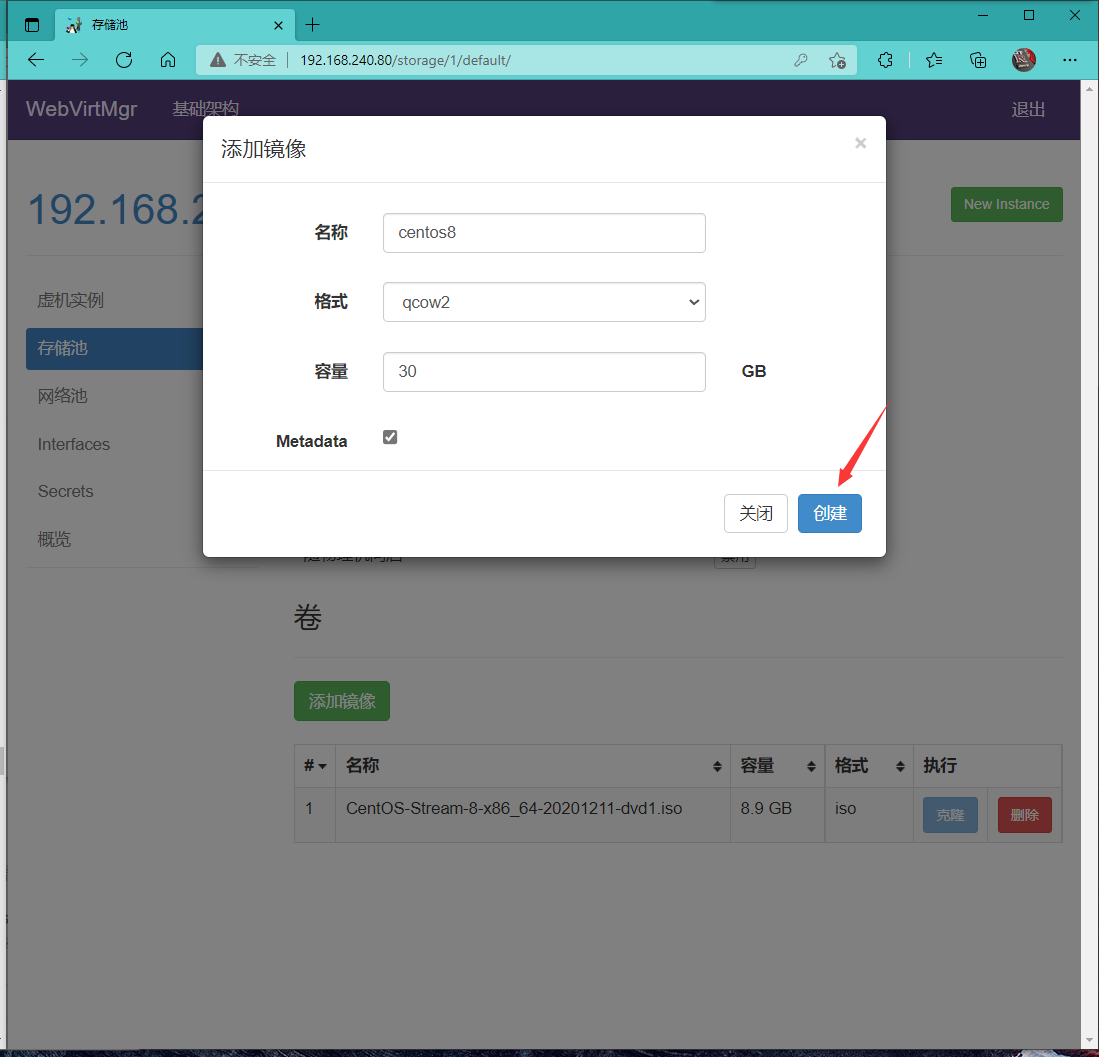
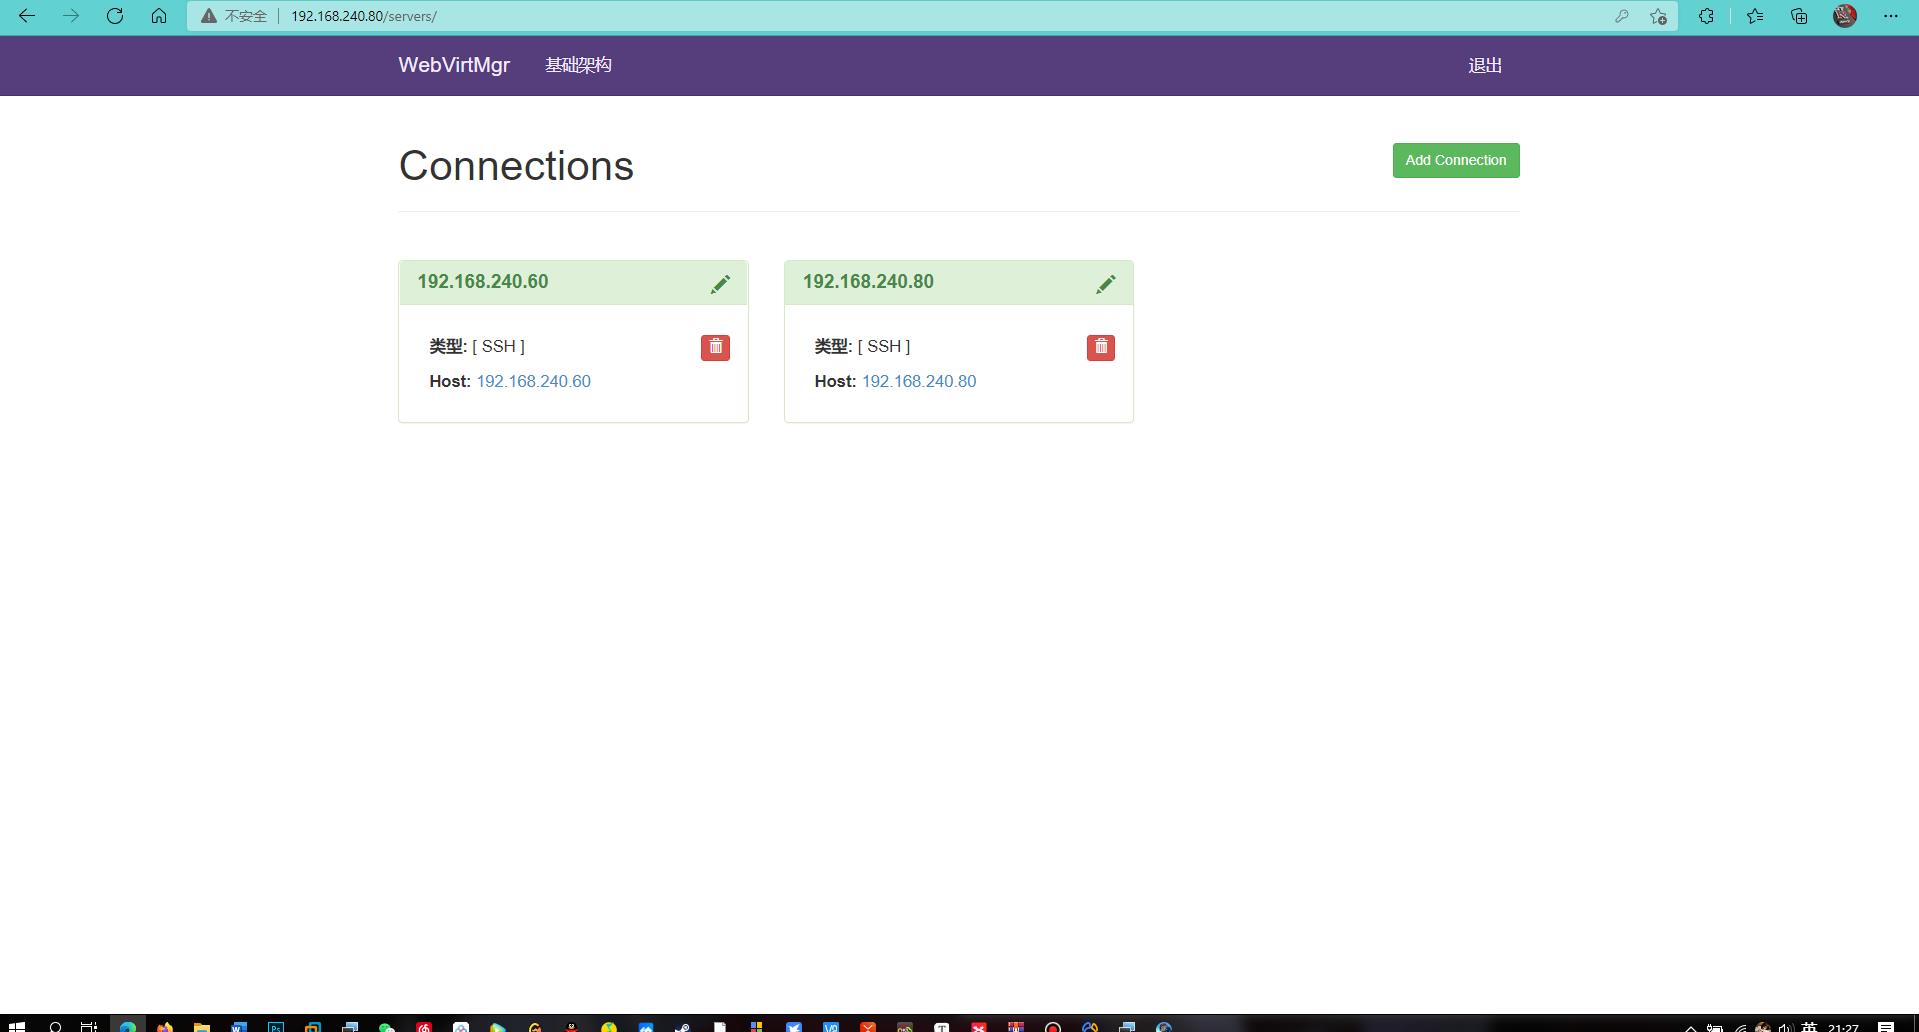
Successfully added, as shown in the figure below

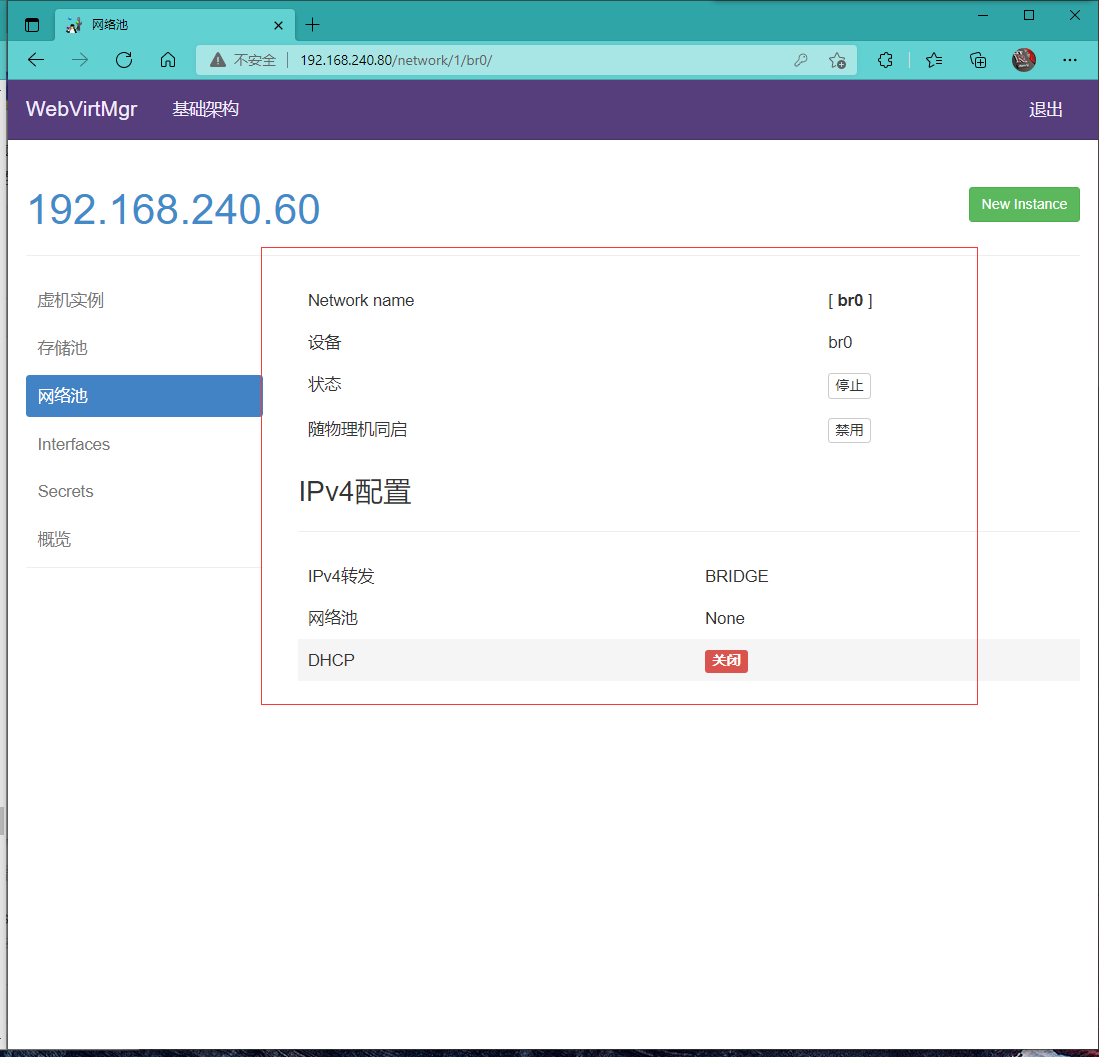
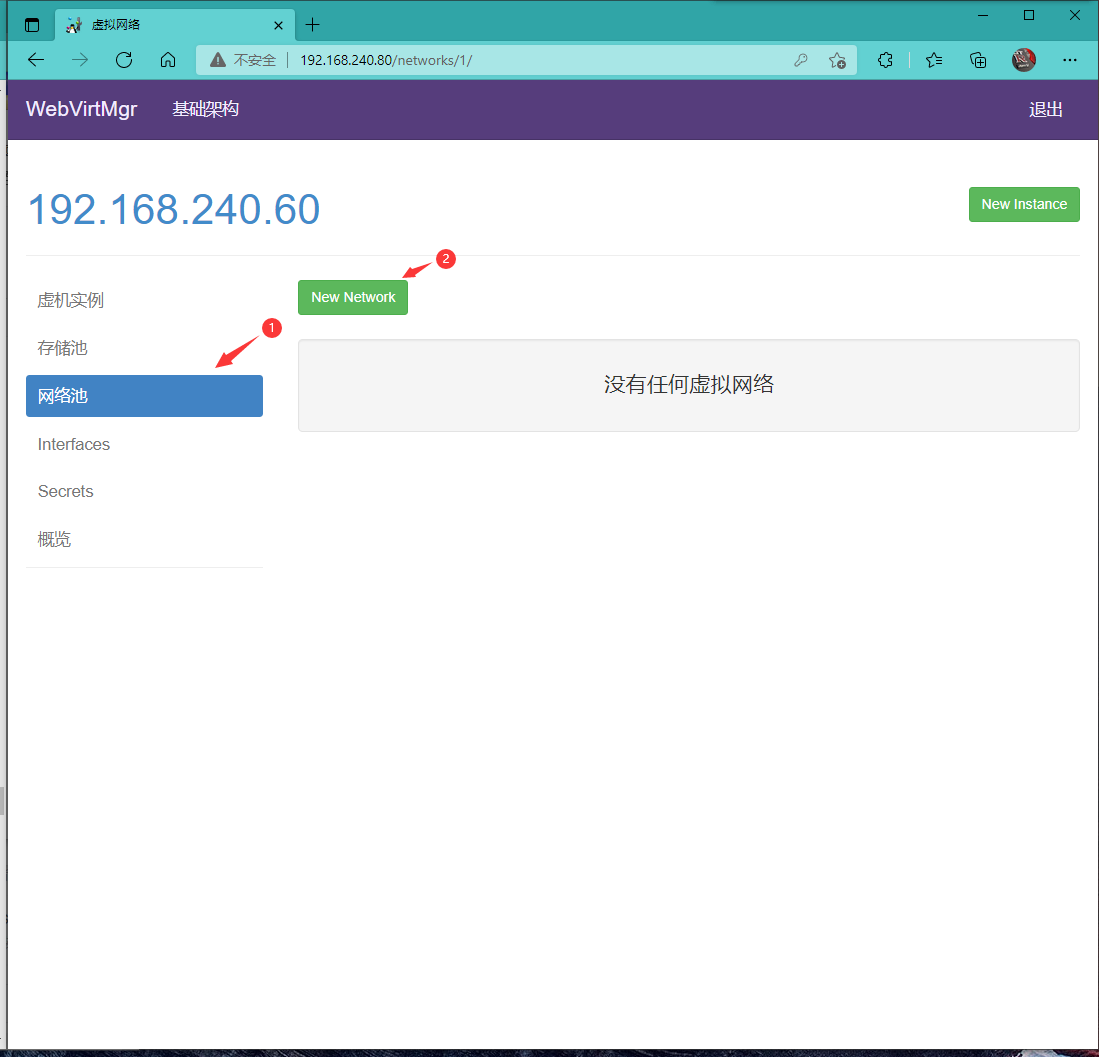
kvm network management


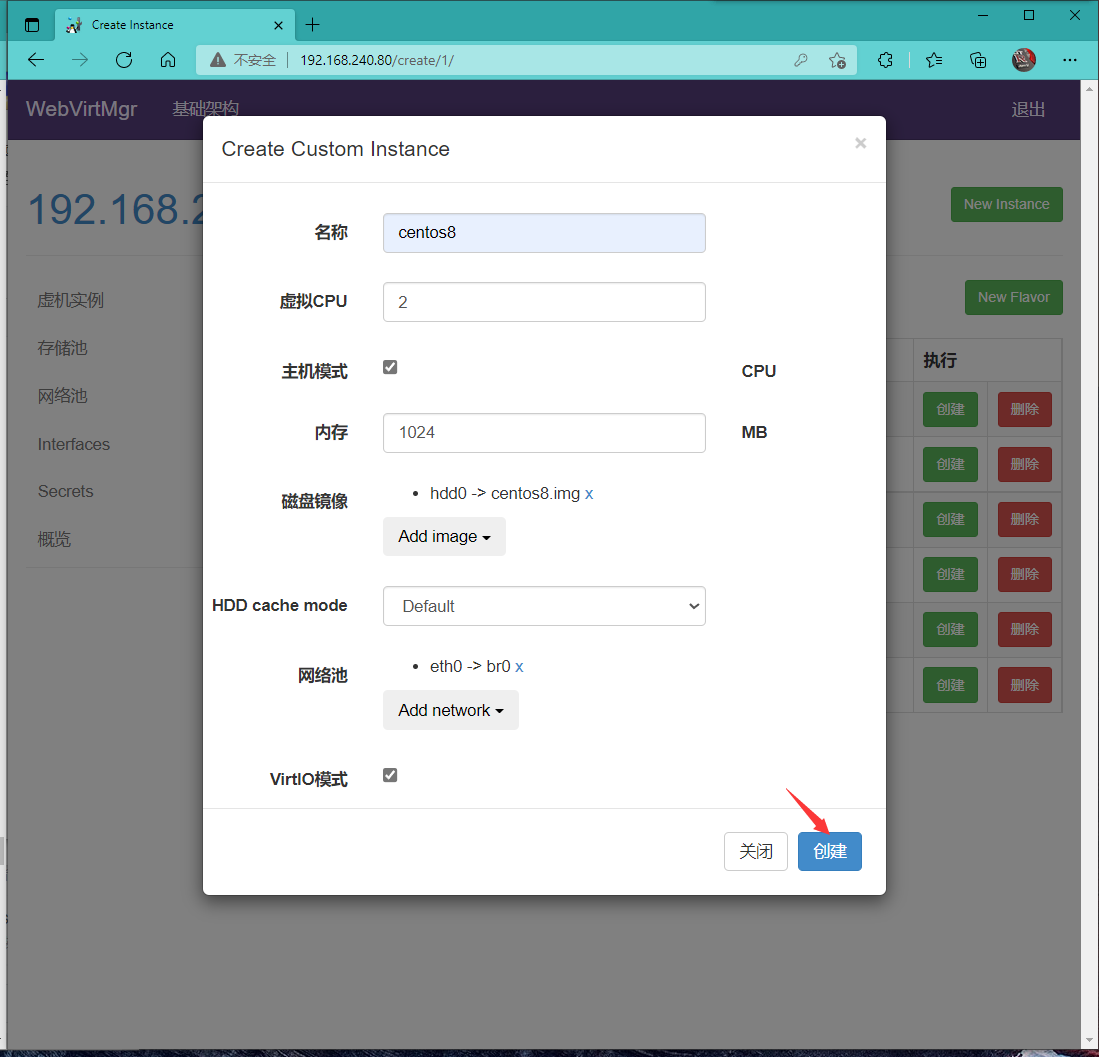
Instance management