WEB Management Tool WebVirtMgr
WebVirtMgr is a libvirt-based Web interface for managing virtual machines.It allows you to create and configure new domains and adjust the resource allocation for domains.The VNC viewer provides a complete graphical console for the guest domain.KVM is currently the only supported hypervisor for virtual machines.
Base environment
[root@BJtest32 ~]# cat /etc/redhat-release
CentOS release 6.6 (Final)
[root@BJtest32 ~]# uname -r
2.6.32-504.el6.x86_64
[root@BJtest32 ~]# getenforce
Disabled
//See if virtualization is supported
cat /proc/cpuinfo | grep -E 'vmx|svm'
//See if the KVM driver is loaded
lsmod | grep kvm
//If the kvm driver is not loaded, load the driver using commands
modprobe -a kvm
modprobe -a kvm_intel
hosts Secret Login
All servers used by kvm need to be secret-free from each other
If there is only one machine, copy the id_rsa.pub of this machine into authorized_keys
[root@BJtest32 ~]# ssh-keygen
[root@BJtest32 ~]# -copy-id -i .ssh/id_rsa.pub root@$IP
Dependent packages and management tools
kvm belongs to the kernel and does not need to be installed.But you need some management Toolkits
yum install -y qemu-kvm libvirt libvirt-python libguestfs-tools virt-install virt-manager python-virtinst libvirt-client virt-viewer qemu-kvm-tool
 libvirt is used to manage kvm
yum install -y virt-install
 Installation Management KVM Commands
WebVirtMgr Installation
Official Address
WebVirtMgr is only installed on the administrative side
[root@BJtest32 data]# yum -y install http://dl.fedoraproject.org/pub/epel/6/i386/epel-release-6-8.noarch.rpm
[root@BJtest32 data]# yum -y install git python-pip libvirt-python libxml2-python python-websockify supervisor nginx
[root@BJtest32 data]# git clone git://github.com/retspen/webvirtmgr.git
[root@BJtest32 data]# cd webvirtmgr
[root@BJtest32 webvirtmgr]# pip install -r requirements.txt # or python-pip (RedHat, Fedora, CentOS, OpenSuse)
#requirements.txt is primarily used to record all dependent packages and their exact version numbers.For deployment in a new environment
[root@BJtest32 webvirtmgr]# ./manage.py syncdb
WARNING:root:No local_settings file found.
Creating tables ...
Creating table auth_permission
Creating table auth_group_permissions
Creating table auth_group
Creating table auth_user_groups
Creating table auth_user_user_permissions
Creating table auth_user
Creating table django_content_type
Creating table django_session
Creating table django_site
Creating table servers_compute
Creating table instance_instance
Creating table create_flavor
You just installed Django's auth system, which means you don't have any superusers defined.
//Here we need to enter Yes to configure the administrator user
//The configuration information is as follows

You just installed Django's auth system, which means you don't have any superusers defined.
Would you like to create one now? (yes/no): yes         #Do you want to create an administrator user now
Username (leave blank to use 'root'): root              #User Name
Email address: cyh@i4t.com                              #Mailbox address (may not be filled in)
Password:                                               #Administrator user password
Password (again):                                       #Re-enter password
Superuser created successfully.                         #Created successfully
Installing custom SQL ...
Installing indexes ...
Installed 6 object(s) from 1 fixture(s)

#Configure Django static page
[root@BJtest32 webvirtmgr]# ./manage.py collectstatic
//Enter Yes

#If you need to add another administrator user, execute the following command

#The foreground starts WebVirMgr, defaults to Debug mode and logs are printed in the foreground
[root@BJtest32 webvirtmgr]# ./manage.py createsuperuser
//The above Python script must be executed in the webvirtmgr directory
Start WebVirMgr
The foreground starts WebVirMgr, defaults to Debug mode and logs are printed in the foreground
[root@BJtest32 webvirtmgr]# ./manage.py runserver 0:8000
IP+8000 Port Access

The username and password were just created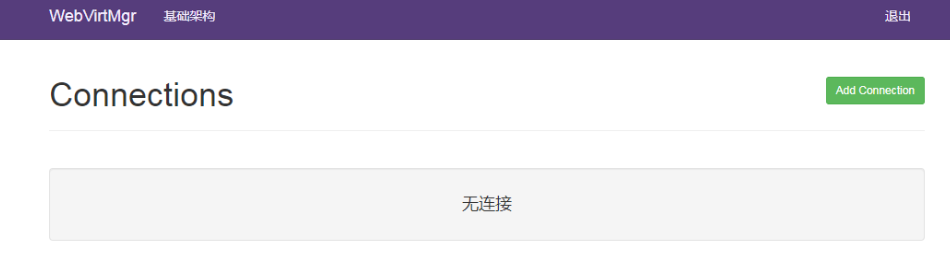
Login succeeded without error.
Exit now at server-side Ctrl+C
Installation of Nginx is managed using supervisor.
Configure Nginx
Nginx Installation Modify configuration file after installation is complete
[root@BJtest32 conf.d]# cat webvirtmgr.conf
server {
    listen       80;
    server_name  webvirtmgr.nfsnobody.com;
    location / {
    proxy_pass http://127.0.0.1:8000;
    proxy_set_header X-Real-IP $remote_addr;
    proxy_set_header X-Forwarded-for $proxy_add_x_forwarded_for;
    proxy_set_header Host $host:$server_port;
    proxy_set_header X-Forwarded-Proto $remote_addr;
    proxy_connect_timeout 600;
    proxy_read_timeout 600;
    proxy_send_timeout 600;
    client_max_body_size 5120M;
      }
location /static/ {
    root /data1/webvirtmgr;
    expires max;
  }
}

[root@BJtest32 conf.d]# nginx -t
nginx: the configuration file /etc/nginx/nginx.conf syntax is ok
nginx: configuration file /etc/nginx/nginx.conf test is successful
[root@BJtest32 conf.d]# /etc/init.d/nginx restart
Configure supervisor
All operations of supervisorctl need to be in the installation directory of webvirtmgr, otherwise the file will be prompted not to be found
WebVirtMgr uses supervisor by default for management (start and stop services), so we need to configure Supervisor
Install supervisor
[root@BJtest32 ~]# yum remove supervisor -y
[root@BJtest32 ~]# pip install supervisor==3.1.3
[root@BJtest32 ~]# echo_supervisord_conf > /etc/supervisor/supervisord.conf
#Modify Profile
[root@BJtest32 ~]# vim /etc/supervisord.conf
#Add the following
[include]
files = /etc/supervisord.d/*.conf

#Create directory
[root@BJtest32 ~]# mkdir /etc/supervisord.d/


#Configure service
[root@BJtest32 ~]# vi /etc/init.d/supervisord
#!/bin/bash
#
# supervisord   This scripts turns supervisord on
#
# Author:       Mike McGrath <mmcgrath@RedHat.com> (based off yumupdatesd)
#
# chkconfig:    - 95 04
#
# description:  supervisor is a process control utility.  It has a web based
#               xmlrpc interface as well as a few other nifty features.
# processname:  supervisord
# config: /etc/supervisor/supervisord.conf
# pidfile: /tmp/supervisord.pid
#
# source function library
. /etc/rc.d/init.d/functions
PIDFILE=/tmp/supervisord.pid

RETVAL=0
start() {
    echo -n $"Starting supervisord: "
    daemon "supervisord --pidfile=$PIDFILE -c /etc/supervisord.conf"
    RETVAL=$?
    echo
    [ $RETVAL -eq 0 ] && touch /var/lock/subsys/supervisord
}
stop() {
    echo -n $"Stopping supervisord: "
    killproc supervisord
    echo
    [ $RETVAL -eq 0 ] && rm -f /var/lock/subsys/supervisord
}
restart() {
    stop
    start
}
case "$1" in
  start)
    start
    ;;
  stop)
    stop
    ;;
  restart|force-reload|reload)
    restart
    ;;
  condrestart)
    [ -f /var/lock/subsys/supervisord ] && restart
    ;;
  status)
    status supervisord
    RETVAL=$?
    ;;
  *)
    echo $"Usage: $0 {start|stop|status|restart|reload|force-reload|condrestart}"
    exit 1
esac
exit $RETVAL
[root@BJtest32 ~]# chmod 755 /etc/init.d/supervisord
[root@BJtest32 ~]# chkconfig supervisord on

supervisord After successful startup, you can supervisorctl Client controls the process, starts, stops, restarts.
//Running the supervisorctl command without parameters will enter the supervisor client's interactive terminal and list all currently managed processes.
Create a supervisor profile
#create profile
[root@BJtest32 ~]# vi /etc/supervisord.d/webvirtmgr.conf
[program:webvirtmgr]
command=/usr/bin/python /data/webvirtmgr/manage.py run_gunicorn -c /data/webvirtmgr/conf/gunicorn.conf.py
directory=/data/webvirtmgr
autostart=true
autorestart=true
logfile=/var/log/supervisor/webvirtmgr.log
log_stderr=true
user=root

[program:webvirtmgr-console]
command=/usr/bin/python /data/webvirtmgr/console/webvirtmgr-console
directory=/data/webvirtmgr
autostart=true
autorestart=true
stdout_logfile=/var/log/supervisor/webvirtmgr-console.log
redirect_stderr=true
user=root

#Restart supervisor
[root@BJtest32 ~]# /etc/init.d/supervisord status
supervisord (pid  6877) is running...
[root@BJtest32 ~]# /etc/init.d/supervisord restart
[root@BJtest32 ~]# supervisorctl status
webvirtmgr                       RUNNING   pid 8773, uptime 0:01:12
webvirtmgr-console               RUNNING   pid 8772, uptime 0:01:12
Web interface configuration webvirtmgr
1.Add Connection Add Host (i.e. KVM Host)
2. Click SSH Connection
3.Label is the host name and must be secret-free
4.IP is the host IP
5. User name is server user name
6. Click Add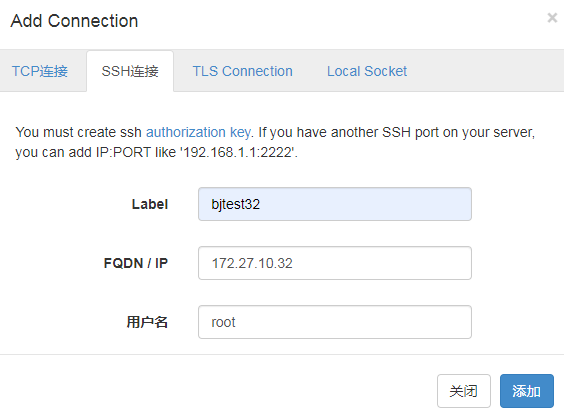
Click on hostname to activate after adding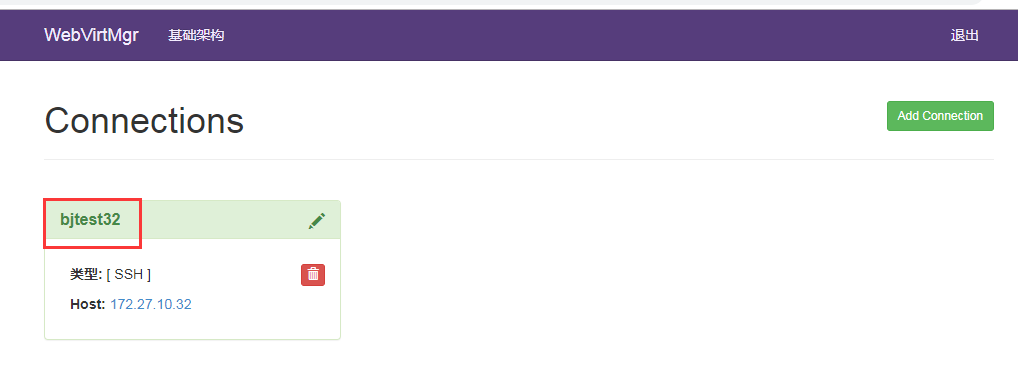
A virtual machine instance is an existing virtual machine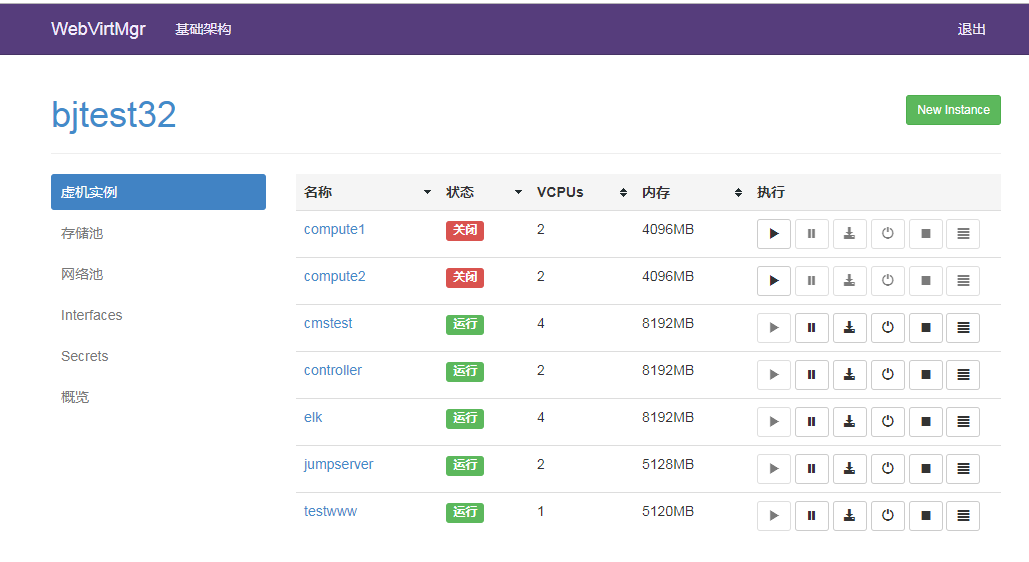
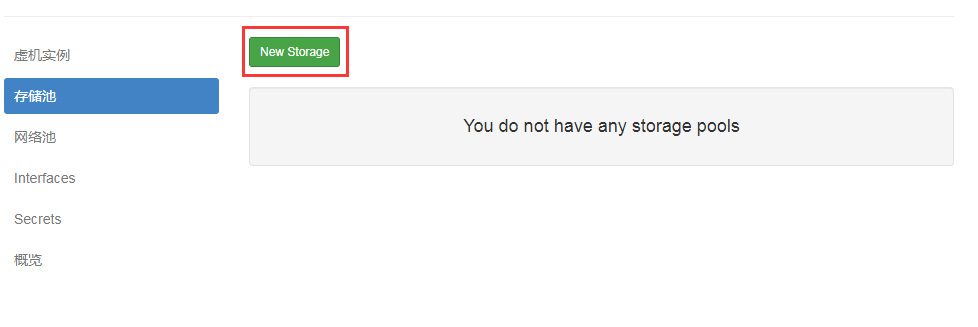
Create Storage KVM Mirror Directory
Virtual machines in KVM are stored as mirrors
Flexible location selection based on your server's partition
Name: The name here shows the name
Path: Stores the KVM virtual machine path
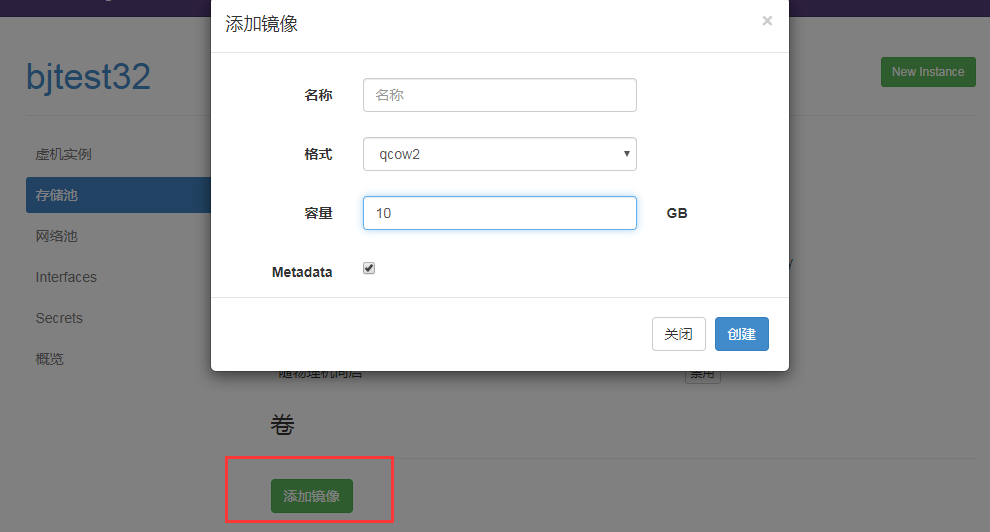
Create a mirror (equivalent to virtual hard disk size) after creation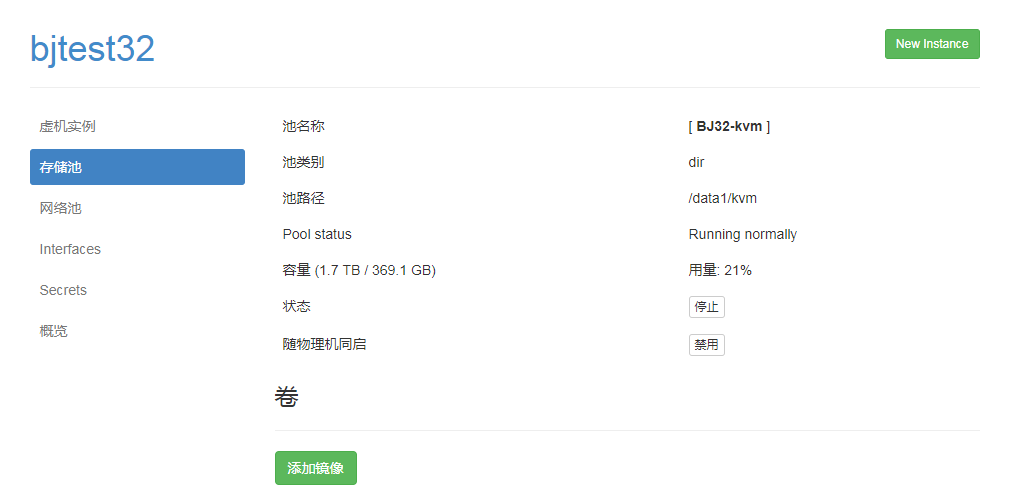
create mirror
The small box in front of "Metadata" below must not be checked (checked by default, to be removed!)
The "mirror" added here is the hard disk space on which the virtual machine is created
The space occupied by the virtual machine is the partition space (that is, /home/kvm/kvmstorage/, the host's home partition) of the path under the host where this "mirror" is located.

Upload Mirror
After creating the virtual hard disk, we are creating an IOS mirror directory
Click > Storage Pool > NEW_Storage
Click Upload Mirror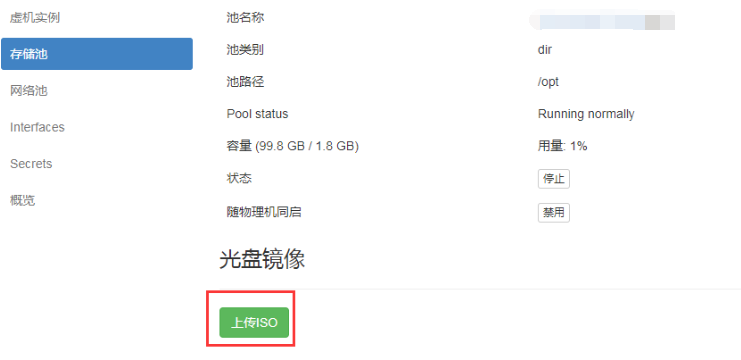
Select Mirror Select Upload
In addition to uploading in the browser, you can also download the Ali Cloud Mirror Station mirror directly.As long as the image is taken under / opt
wget -P /opt/ https://mirrors.aliyun.com/centos/7.6.1810/isos/x86_64/CentOS-7-x86_64-DVD-1810.iso
Modify the client_max_body_size parameter if 413 occurs when mirroring nginx is uploaded using the Web interface