KUBEADM Build Cluster (2)
1. Build a cluster environment with kubeadm
1.1 Architecture
In the last lesson, we explained the basic concept of k8s and several main components. After we understand the basic concept of k8s, we can actually use it officially. But the previous lessons are all demonstrations on katacoda, which only give us about 15 minutes of usage time. So the best way is to set up a k8s environment manually by ourselves. Before setting up the environment, let's take a look at a richer k8s architecture diagram.
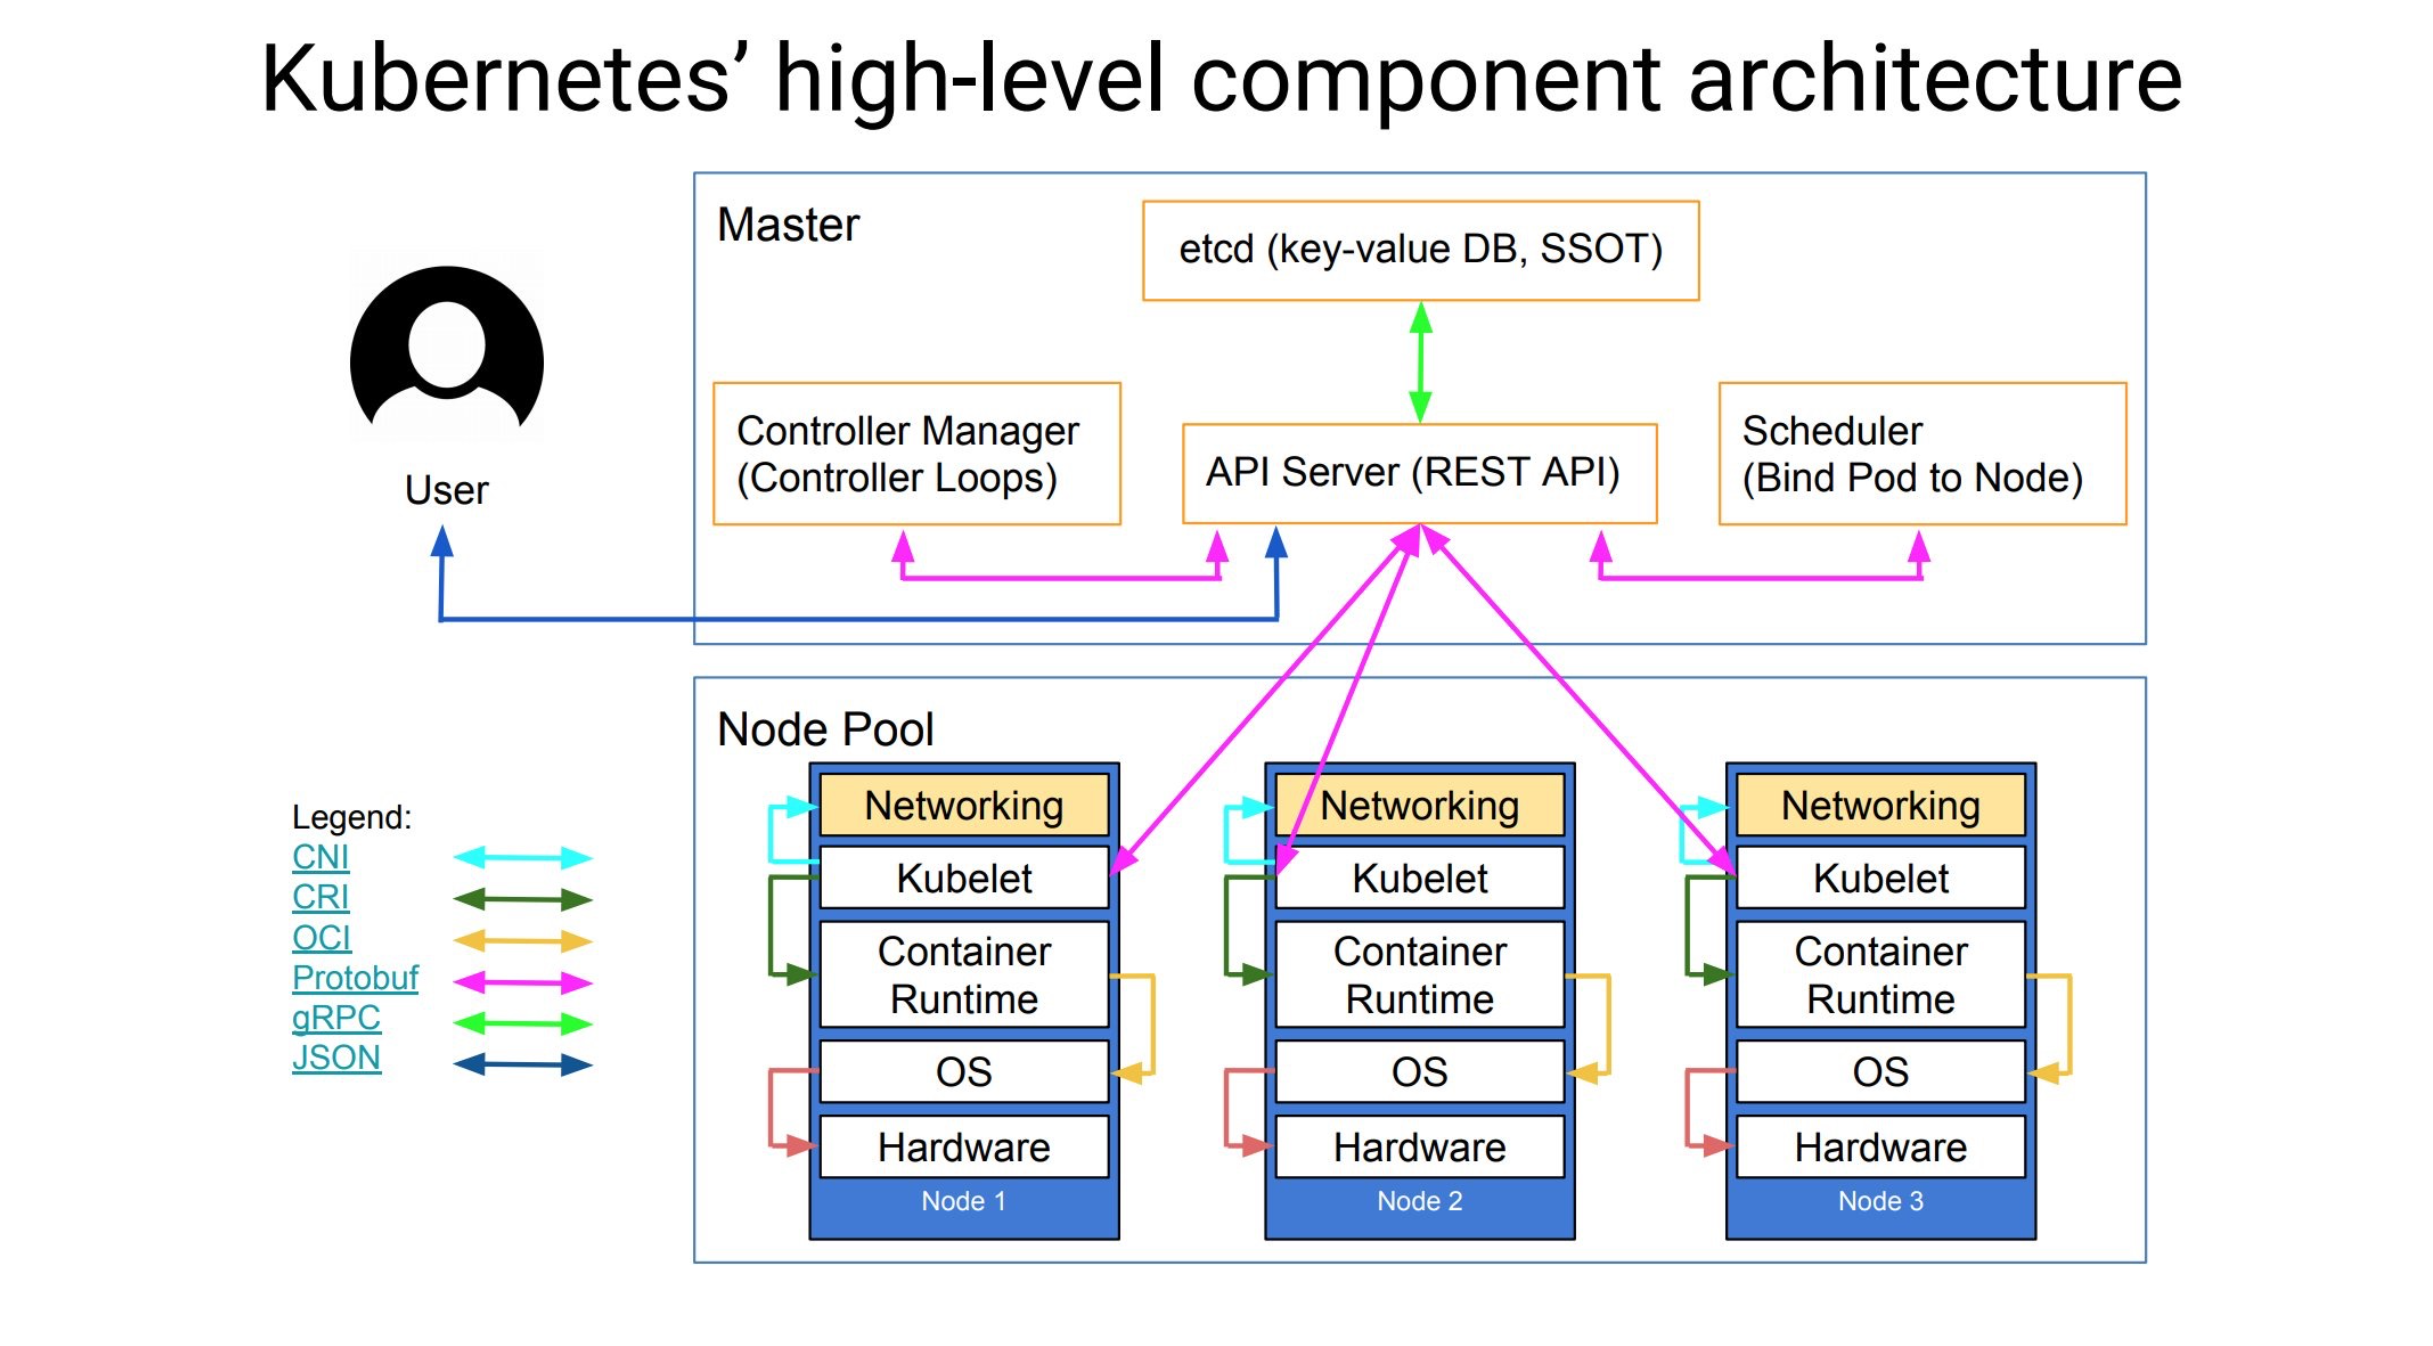
- Core layer: the core functions of Kubernetes, providing API to build high-level applications, and providing plug-in application execution environment for internal
- Application layer: Deployment (stateless, stateful, batch tasks, cluster applications, etc.) and routing (service discovery, DNS resolution, etc.)
- Management: System metrics (such as metrics for infrastructure, containers, and networks), automation (such as automatic expansion, dynamic proviision, etc.) and policy management (RBAC, Quota, PSP, NetworkPolicy, etc.)
- Interface layer: kubectl command line tool, client SDK, and cluster Federation
Ecosystem: An ecosystem that is managed and dispatched by a large container cluster on top of the interface layer and can be divided into two categories
- External to Kubernetes: Logging, Monitoring, Configuration Management, CI, CD, Workflow, etc.
- Inside Kubernetes: CRI, CNI, CVI, mirror warehouse, Cloud Provider, configuration and management of the cluster itself, etc.
After further understanding the architecture of the k8s cluster, we can officially install our k8s cluster environment. Here we use the kubeadm tool to build the cluster.
Kubeadm is an official tool provided by Kubernetes to quickly install the Kubernetes cluster. By containerizing the components of the cluster for installation management, it is much easier to install the cluster by kubeadm than by binary. However, the directory kubeadm is still in beta state and cannot be used in a production environment. Using kubeadm to Create a Cluster document It has been explained that kubeadm will soon be available in production environments. For those that want to be used in the production environment at this stage, it is recommended to refer to our previous articles: Manually set up a highly available kubernetes cluster Or a video tutorial.
1.2 Environment
Here we have two Centos7 hosts ready for installation, and subsequent nodes can be added at root:
| role | IP | Recommended Configuration | Software | Edition |
|---|---|---|---|---|
| master | 192.168.200.10 | CPU:2C+Memory:4G+ | Linux Operating System | CentOS7.9_x64 |
| node01 | 192.168.200.11 | CPU:2C+Memory:4G+ | Linux Operating System | CentOS7.9_x64 |
#Mapping IP
[root@master ~]# vim /etc/hosts
[root@master ~]# cat /etc/hosts | tail -2
192.168.200.10 master
192.168.200.11 node01

#Disable Firewall:
[root@master ~]# systemctl stop firewalld
[root@master ~]# systemctl disable firewalld

#Disable SELINUX:
[root@master ~]# cat /etc/selinux/config
SELINUX=disabled

#Create a/etc/sysctl.d/k8s.conf file and add the following:
[root@master ~]# vim /etc/sysctl.d/k8s.conf
[root@master ~]# cat /etc/sysctl.d/k8s.conf
net.bridge.bridge-nf-call-ip6tables = 1
net.bridge.bridge-nf-call-iptables = 1
net.ipv4.ip_forward = 1

#Execute the following command to make the changes effective:
[root@master ~]# modprobe br_netfilter
[root@master ~]# sysctl -p /etc/sysctl.d/k8s.conf
net.bridge.bridge-nf-call-ip6tables = 1
net.bridge.bridge-nf-call-iptables = 1
net.ipv4.ip_forward = 1
1.3 Mirror
We need to download the required mirror on gcr.io to the node ahead of time, provided you have successfully installed the docker.
1.3.1 Install docker (two nodes execute simultaneously)
#Install Dependent Packages
[root@master ~]# yum -y install yum-utils device-mapper-persistent-data lvm2

#Add the yum source profile for the CE version of docker
[root@master ~]# yum-config-manager --add-repo https://mirrors.aliyun.com/docker-ce/linux/centos/docker-ce.repo

#Install the specified version of docker-ce
[root@K8S ~]# yum -y install https://download.docker.com/linux/centos/7/x86_64/stable/Packages/docker-ce-selinux-17.03.2.ce-1.el7.centos.noarch.rpm

[root@K8S ~]# yum -y install docker-ce-17.03.2.ce-1.el7.centos

[root@master ~]# systemctl start docker      #Start docker
[root@master ~]# systemctl enable docker     #Add Startup

#Add docker domestic mirror source
[root@docker ~]# vim /etc/docker/daemon.json
[root@docker ~]# cat /etc/docker/daemon.json
{
  "registry-mirrors": ["https://docker.mirrors.ustc.edu.cn"]
}
[root@docker ~]# systemctl daemon-reload
[root@docker ~]# systemctl restart docker
1.3.2 master node, execute the following command:
[root@master ~]# vim pull-images.sh
[root@master ~]# cat pull-images.sh
docker pull cnych/kube-apiserver-amd64:v1.10.0
docker pull cnych/kube-scheduler-amd64:v1.10.0
docker pull cnych/kube-controller-manager-amd64:v1.10.0
docker pull cnych/kube-proxy-amd64:v1.10.0
docker pull cnych/k8s-dns-kube-dns-amd64:1.14.8
docker pull cnych/k8s-dns-dnsmasq-nanny-amd64:1.14.8
docker pull cnych/k8s-dns-sidecar-amd64:1.14.8
docker pull cnych/etcd-amd64:3.1.12
docker pull cnych/flannel:v0.10.0-amd64
docker pull cnych/pause-amd64:3.1
docker pull mirrorgooglecontainers/kubernetes-dashboard-amd64:v1.10.1

docker tag cnych/kube-apiserver-amd64:v1.10.0 k8s.gcr.io/kube-apiserver-amd64:v1.10.0
docker tag cnych/kube-scheduler-amd64:v1.10.0 k8s.gcr.io/kube-scheduler-amd64:v1.10.0
docker tag cnych/kube-controller-manager-amd64:v1.10.0 k8s.gcr.io/kube-controller-manager-amd64:v1.10.0
docker tag cnych/kube-proxy-amd64:v1.10.0 k8s.gcr.io/kube-proxy-amd64:v1.10.0
docker tag cnych/k8s-dns-kube-dns-amd64:1.14.8 k8s.gcr.io/k8s-dns-kube-dns-amd64:1.14.8
docker tag cnych/k8s-dns-dnsmasq-nanny-amd64:1.14.8 k8s.gcr.io/k8s-dns-dnsmasq-nanny-amd64:1.14.8
docker tag cnych/k8s-dns-sidecar-amd64:1.14.8 k8s.gcr.io/k8s-dns-sidecar-amd64:1.14.8
docker tag cnych/etcd-amd64:3.1.12 k8s.gcr.io/etcd-amd64:3.1.12
docker tag cnych/flannel:v0.10.0-amd64 quay.io/coreos/flannel:v0.10.0-amd64
docker tag cnych/pause-amd64:3.1 k8s.gcr.io/pause-amd64:3.1
docker tag mirrorgooglecontainers/kubernetes-dashboard-amd64:v1.10.1 k8s.gcr.io/kubernetes-dashboard-amd64:v1.10.1

docker rmi cnych/kube-apiserver-amd64:v1.10.0
docker rmi cnych/kube-scheduler-amd64:v1.10.0
docker rmi cnych/kube-controller-manager-amd64:v1.10.0
docker rmi cnych/kube-proxy-amd64:v1.10.0
docker rmi cnych/k8s-dns-kube-dns-amd64:1.14.8
docker rmi cnych/k8s-dns-dnsmasq-nanny-amd64:1.14.8
docker rmi cnych/k8s-dns-sidecar-amd64:1.14.8
docker rmi cnych/etcd-amd64:3.1.12
docker rmi cnych/flannel:v0.10.0-amd64
docker rmi cnych/pause-amd64:3.1
docker rmi mirrorgooglecontainers/kubernetes-dashboard-amd64:v1.10.1
[root@master ~]# chmod +x pull-images.sh
[root@master ~]# ll -d pull-images.sh
-rwxr-xr-x 1 root root 1278 2 January 1402:19 pull-images.sh

[root@master ~]# sh pull-images.sh
These mirrors are needed on the master node and must be downloaded in advance.
1.3.3 Other Node s, execute the following command:
[root@node01 ~]# vim pull-images.sh
[root@node01 ~]# cat pull-images.sh
docker pull cnych/kube-proxy-amd64:v1.10.0
docker pull cnych/flannel:v0.10.0-amd64
docker pull cnych/pause-amd64:3.1
docker pull cnych/kubernetes-dashboard-amd64:v1.8.3
docker pull cnych/heapster-influxdb-amd64:v1.3.3
docker pull cnych/heapster-grafana-amd64:v4.4.3
docker pull cnych/heapster-amd64:v1.4.2
docker pull cnych/k8s-dns-kube-dns-amd64:1.14.8
docker pull cnych/k8s-dns-dnsmasq-nanny-amd64:1.14.8
docker pull cnych/k8s-dns-sidecar-amd64:1.14.8
docker pull mirrorgooglecontainers/kubernetes-dashboard-amd64:v1.10.1

docker tag cnych/flannel:v0.10.0-amd64 quay.io/coreos/flannel:v0.10.0-amd64
docker tag cnych/pause-amd64:3.1 k8s.gcr.io/pause-amd64:3.1
docker tag cnych/kube-proxy-amd64:v1.10.0 k8s.gcr.io/kube-proxy-amd64:v1.10.0
docker tag cnych/k8s-dns-kube-dns-amd64:1.14.8 k8s.gcr.io/k8s-dns-kube-dns-amd64:1.14.8
docker tag cnych/k8s-dns-dnsmasq-nanny-amd64:1.14.8 k8s.gcr.io/k8s-dns-dnsmasq-nanny-amd64:1.14.8
docker tag cnych/k8s-dns-sidecar-amd64:1.14.8 k8s.gcr.io/k8s-dns-sidecar-amd64:1.14.8
docker tag cnych/kubernetes-dashboard-amd64:v1.8.3 k8s.gcr.io/kubernetes-dashboard-amd64:v1.8.3
docker tag cnych/heapster-influxdb-amd64:v1.3.3 k8s.gcr.io/heapster-influxdb-amd64:v1.3.3
docker tag cnych/heapster-grafana-amd64:v4.4.3 k8s.gcr.io/heapster-grafana-amd64:v4.4.3
docker tag cnych/heapster-amd64:v1.4.2 k8s.gcr.io/heapster-amd64:v1.4.2
docker tag mirrorgooglecontainers/kubernetes-dashboard-amd64:v1.10.1 k8s.gcr.io/kubernetes-dashboard-amd64:v1.10.1

docker rmi cnych/flannel:v0.10.0-amd64
docker rmi cnych/pause-amd64:3.1
docker rmi cnych/kube-proxy-amd64:v1.10.0
docker rmi cnych/k8s-dns-kube-dns-amd64:1.14.8
docker rmi cnych/k8s-dns-dnsmasq-nanny-amd64:1.14.8
docker rmi cnych/k8s-dns-sidecar-amd64:1.14.8
docker rmi cnych/kubernetes-dashboard-amd64:v1.8.3
docker rmi cnych/heapster-influxdb-amd64:v1.3.3
docker rmi cnych/heapster-grafana-amd64:v4.4.3
docker rmi cnych/heapster-amd64:v1.4.2
docker rmi mirrorgooglecontainers/kubernetes-dashboard-amd64:v1.10.1
[root@node01 ~]# chmod +x pull-images.sh
[root@node01 ~]# ll -d pull-images.sh
-rwxr-xr-x 1 root root 1289 2 January 1402:22 pull-images.sh
These mirrors are needed in the Node node and need to be downloaded on the node before the join node.
1.4 Install kubeadm, kubelet, kubectl (both nodes execute simultaneously)
After ensuring that the docker installation is complete, the environment configuration above has been completed, and the corresponding required mirrors have been downloaded. Now we can install kubeadm, which is installed by specifying the yum source:
[root@master ~]# vim /etc/yum.repos.d/kubernetes.repo
[root@master ~]# cat /etc/yum.repos.d/kubernetes.repo
[kubernetes]
name=Kubernetes
baseurl=https://packages.cloud.google.com/yum/repos/kubernetes-el7-x86_64
enabled=1
gpgcheck=1
repo_gpgcheck=1
gpgkey=https://packages.cloud.google.com/yum/doc/yum-key.gpg
         https://packages.cloud.google.com/yum/doc/rpm-package-key.gpg
We can use Ali Cloud's source to install:
[root@master ~]# vim /etc/yum.repos.d/kubernetes.repo
[root@master ~]# cat /etc/yum.repos.d/kubernetes.repo
[kubernetes]
name=Kubernetes
baseurl=http://mirrors.aliyun.com/kubernetes/yum/repos/kubernetes-el7-x86_64
enabled=1
gpgcheck=0
repo_gpgcheck=0
gpgkey=http://mirrors.aliyun.com/kubernetes/yum/doc/yum-key.gpg
        http://mirrors.aliyun.com/kubernetes/yum/doc/rpm-package-key.gpg
Note: Since Ali Cloud's source dependency will change, if you need to install version 1.10.0 clusters, you need to install them separately using the following commands:
[root@master ~]# yum -y makecache fast
[root@master ~]# yum -y install kubelet-1.10.0-0
[root@master ~]# yum -y install kubectl-1.10.0-0
[root@master ~]# yum -y install kubeadm-1.10.0-0
Normally we can install the above files successfully.
1.5 Configuration kubelet (two nodes executing simultaneously)
After the installation, we also need to configure kubelet, because the configuration file generated by kubelet installed as a yum source changes the parameter--cgroup-driver to systemd, while docker's cgroup-driver is cgroupfs, which must be consistent and can be viewed through the docker info command:
[root@master ~]# docker info |grep Cgroup
 Cgroup Driver: cgroupfs
 Cgroup Version: 1
Modify the configuration file of the file kubelet/etc/system d/system/kubelet.service.d/10-kubeadm.conf to include KUBELET_in it CGROUP_ Change the ARGS parameter to cgroupfs:
[root@master ~]# sed -i "8s#systemd#cgroupfs#" /etc/systemd/system/kubelet.service.d/10-kubeadm.conf

[root@master ~]# sed -n "8p" /etc/systemd/system/kubelet.service.d/10-kubeadm.conf
Environment="KUBELET_CGROUP_ARGS=--cgroup-driver=cgroupfs"
Another issue is about swap partitions, as mentioned earlier in the article Manually Building a Highly Available Kubernetes Cluster. Kubernetes started at 1.8 and asked to shut down Swap on the system. If not, the default configured kubelet will not start. We can change this limit through the start parameter of kubelet--fail-swap-on=false. So we need to add a configuration to the configuration file above (before ExecStart):
#Add this line at the end
[root@master ~]# vim /etc/systemd/system/kubelet.service.d/10-kubeadm.conf
[root@master ~]# tail -1 /etc/systemd/system/kubelet.service.d/10-kubeadm.conf
Environment="KUBELET_EXTRA_ARGS=--fail-swap-on=false"
Of course, the best thing to do is to turn off swap, which improves the performance of kubelet. Once the modification is complete, reload our configuration file:
[root@master ~]# systemctl daemon-reload
1.6 Cluster installation initialization (master node only)
Now that we are ready, we can initialize our cluster with the kubeadm command on the master node:
[root@master ~]# kubeadm init --kubernetes-version=v1.10.0 --pod-network-cidr=10.244.0.0/16 --apiserver-advertise-address=192.168.200.10 --ignore-preflight-errors=Swap
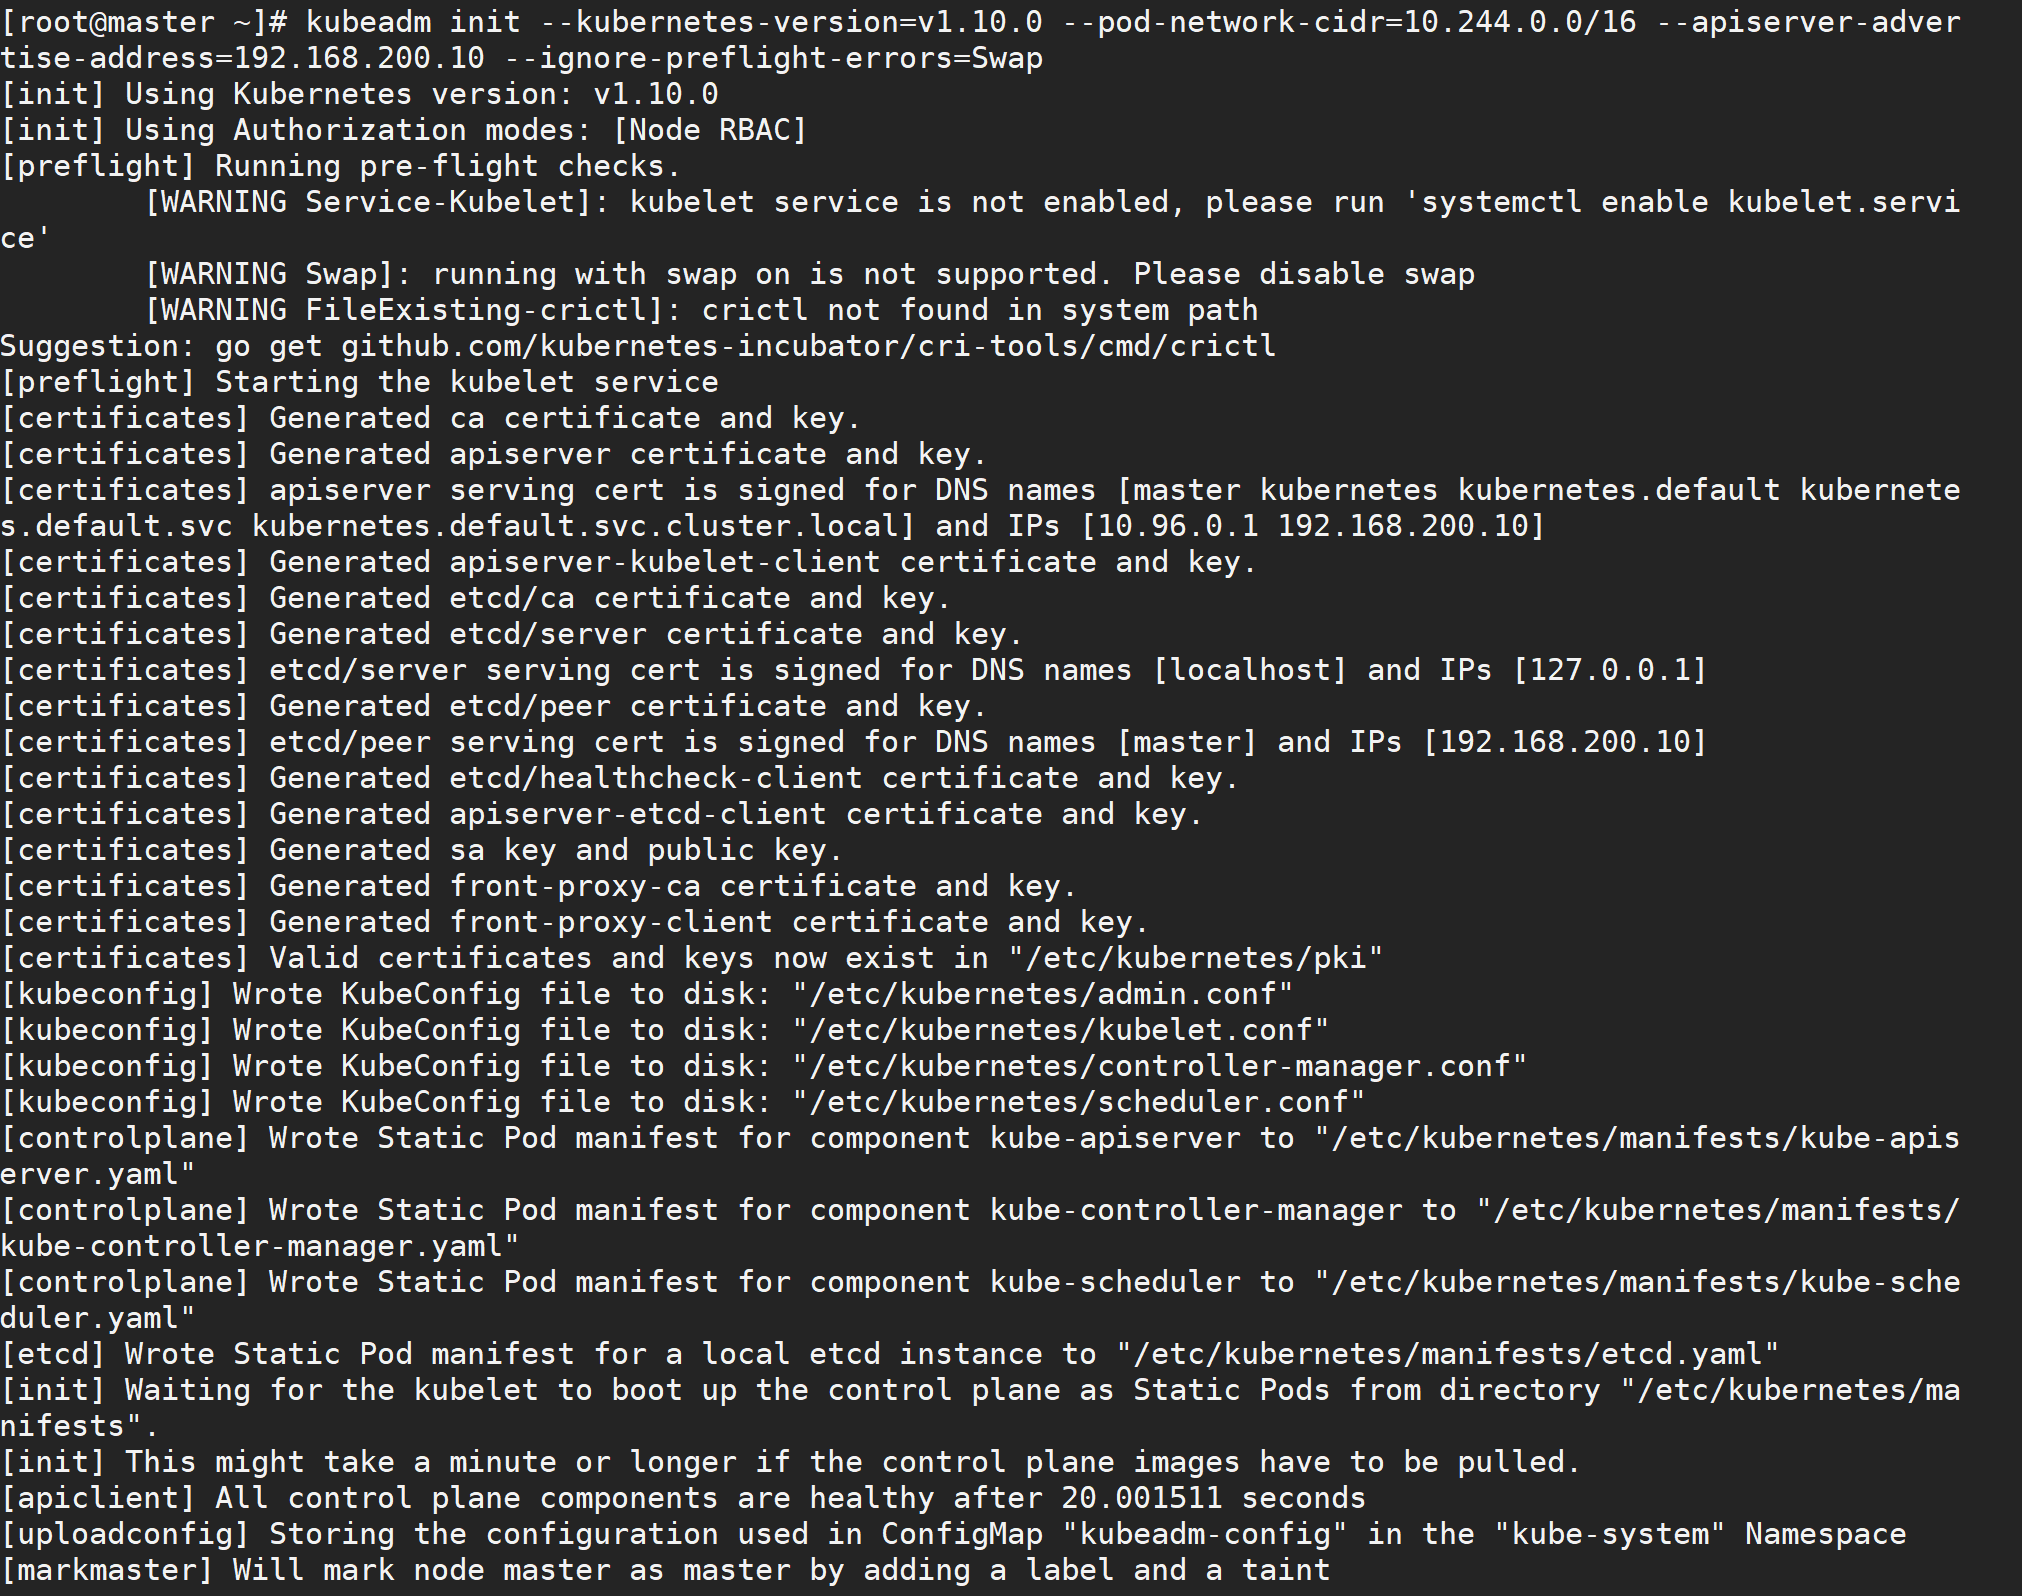
The command is very simple, kubeadm init, followed by the cluster version that needs to be installed, because we chose flannel here as the network plug-in for Pod, so we need to specify - pod-network-cidr=10.244.0.0/16, followed by the communication address of apiserver, where is the IP address of our master node. To execute the above command, if an error such as running with swap on is not supported. Please disable swap occurs, we need to add another parameter - ignore-preflight-errors=Swap to ignore the error message from swap:
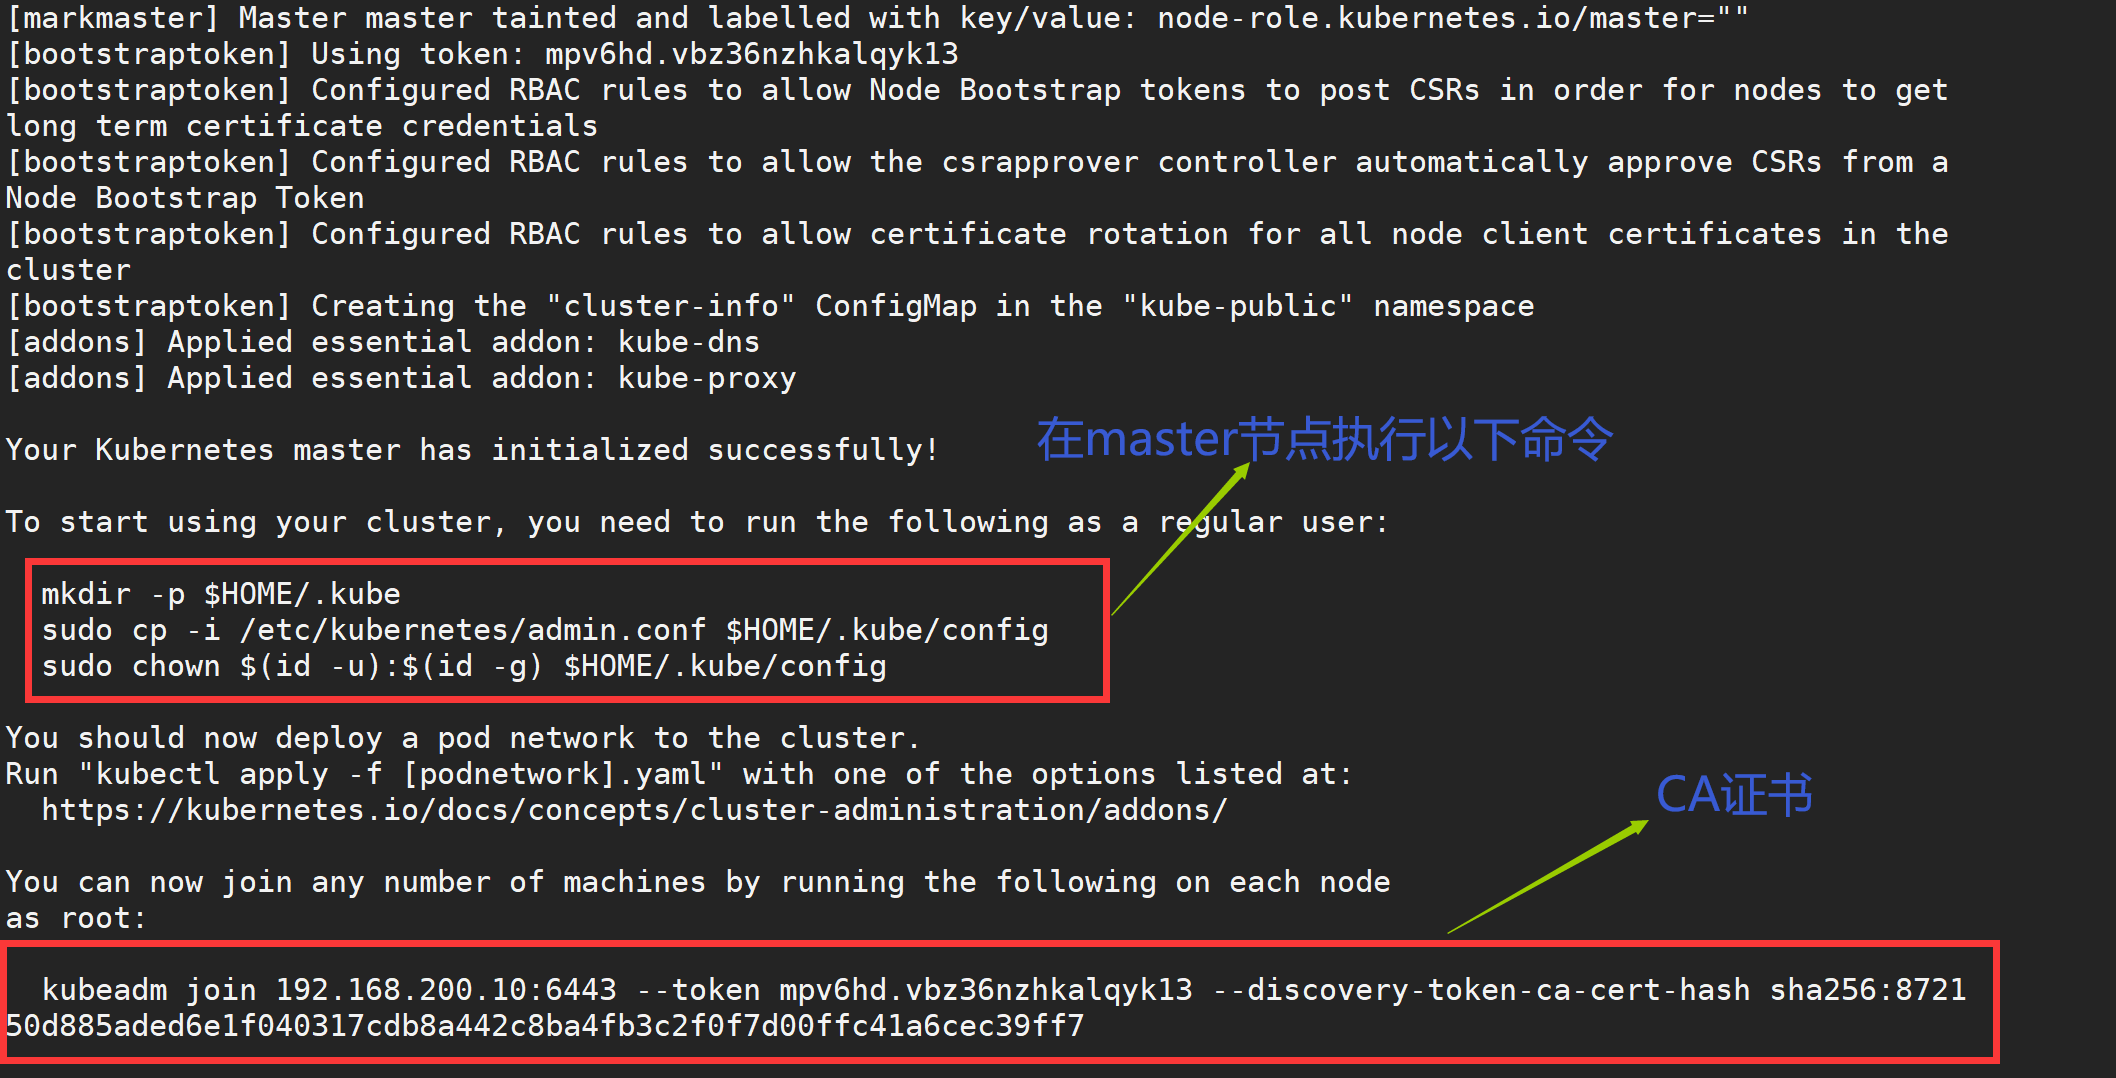
Also note that the maximum docker version supported by the current version of kubeadm is 17.03, so be aware of this. The above information records how kubeadm initializes the entire cluster, generates various certificates, kubeconfig files, bootstraptoken, and so on, followed by commands used to add nodes to the cluster using kubeadm join. The following commands configure how to access the cluster using kubectl:
[root@master ~]# mkdir -p $HOME/.kube
[root@master ~]# cp -i /etc/kubernetes/admin.conf $HOME/.kube/config
[root@master ~]# chown $(id -u):$(id -g) $HOME/.kube/config
After configuring kubectl as prompted above, you can use kubectl to view cluster information:
[root@master ~]# kubectl get cs
NAME                 STATUS    MESSAGE              ERROR
scheduler            Healthy   ok
controller-manager   Healthy   ok
etcd-0               Healthy   {"health": "true"}

[root@master ~]# kubectl get csr
NAME                                                   AGE       REQUESTOR                 CONDITION
node-csr-8qygb8Hjxj-byhbRHawropk81LHNPqZCTePeWoZs3-g   1h        system:bootstrap:8xomlq   Approved,Issued

[root@master ~]# kubectl get nodes
NAME           STATUS    ROLES     AGE       VERSION
ydzs-master1   Ready     master    3h        v1.10.0
If you encounter other problems during the installation of your cluster, we can reset it using the following commands:
$ kubeadm reset
$ ifconfig cni0 down && ip link delete cni0
$ ifconfig flannel.1 down && ip link delete flannel.1
$ rm -rf /var/lib/cni/
1.7 Install Pod Network (master node only)
Next, let's install the flannel network plug-in, which is as simple as installing a regular POD:
[root@master ~]# wget https://raw.githubusercontent.com/coreos/flannel/master/Documentation/kube-flannel.yml

[root@master ~]# kubectl apply -f kube-flannel.yml
podsecuritypolicy.policy "psp.flannel.unprivileged" created
clusterrole.rbac.authorization.k8s.io "flannel" created
clusterrolebinding.rbac.authorization.k8s.io "flannel" created
serviceaccount "flannel" created
configmap "kube-flannel-cfg" created
daemonset.apps "kube-flannel-ds" created
#If the connection fails when wget kube-flannel.yml is displayed, it is because the website is walled
[root@master ~]# vim /etc/hosts
[root@master ~]# tail -1 /etc/hosts
199.232.68.133 raw.githubusercontent.com
Also note that if your node has more than one network card, you need to use the--iface parameter in kube-flannel.yml to specify the name of the network card within the cluster host, otherwise dns may not resolve. flanneld startup parameter plus--iface=
$ vim kube-flannel.yml
args:
- --ip-masq
- --kube-subnet-mgr
- --iface=ens32
Use the kubectl get pods command to see how components in our cluster are running after the installation is complete. If they are all Running, congratulations, your master node has been successfully installed.
[root@master ~]# kubectl get pods --all-namespaces
NAMESPACE     NAME                             READY     STATUS    RESTARTS   AGE
kube-system   etcd-master                      1/1       Running   0          4m
kube-system   kube-apiserver-master            1/1       Running   0          4m
kube-system   kube-controller-manager-master   1/1       Running   0          4m
kube-system   kube-dns-86f4d74b45-d4xsl        3/3       Running   0          5m
kube-system   kube-flannel-ds-amd64-rzvfc      1/1       Running   0          2m
kube-system   kube-proxy-zg7v2                 1/1       Running   0          5m
kube-system   kube-scheduler-master            1/1       Running   0          4m
1.8 Add Node (only node node execution)
master Node operation, get master Of join token
[root@master ~]# kubeadm token create --print-join-command  --ttl=0

#Note: --ttl=0 means time never expires, default 24-hour expiration without this parameter
Once the same environment configuration, docker installation, kubeadmin, kubelet, and kubectl are configured for Node(192.168.200.11) node installation, we can execute the kubeadm join command directly on the Node node (when initialized above) with the same parameter--ignore-preflight-errors=Swap:
Finally, the command to join the node to the cluster is given:
[root@node01 ~]# kubeadm join 192.168.200.10:6443 --token mpv6hd.vbz36nzhkalqyk13 --discovery-token-ca-cert-hash sha256:872150d885aded6e1f040317cdb8a442c8ba4fb3c2f0f7d00ffc41a6cec39ff7 --ignore-preflight-errors=Swap

Don't worry if you forget to save the token and sha256 values above. We can use the following command to find them:
(stay master Node View)
[root@master ~]# kubeadm token list
TOKEN                     TTL       EXPIRES                     USAGES                   DESCRIPTION                                                EXTRA GROUPS
mpv6hd.vbz36nzhkalqyk13   23h       2021-02-16T03:48:18+08:00   authentication,signing   The default bootstrap token generated by 'kubeadm init'.   system:bootstrappers:kubeadm:default-node-token
To see the value of sha256 for a CA certificate, we can use openssl to read the certificate to get the value of sha256:
(stay master Node View)
[root@master ~]# openssl x509 -pubkey -in /etc/kubernetes/pki/ca.crt | openssl rsa -pubin -outform der 2>/dev/null | openssl dgst -sha256 -hex | sed 's/^.* //'
872150d885aded6e1f040317cdb8a442c8ba4fb3c2f0f7d00ffc41a6cec39ff7
We can see that this node has joined the cluster, and then we can use the kubectl command line tool by copying the master node's ~/.kube/config file to the location of the current node.
[root@node01 ~]# scp -r root@192.168.200.10:~/.kube/config ~/.kube/config
[root@master ~]# kubectl get nodes
NAME      STATUS     ROLES     AGE       VERSION
master    Ready      master    48m       v1.10.0
node01    Ready      <none>    12s       v1.10.0

[root@node01 ~]# kubectl get nodes
NAME      STATUS     ROLES     AGE       VERSION
master    Ready      master    48m       v1.10.0
node01    Ready      <none>    9s        v1.10.0
Now even if our cluster deployment is successful, you can install additional plug-ins like Dashboard, Heapster, Ingress-Controller and so on, just as you did before by installing the cluster manually. There are no duplicates here. You can leave a message on github to discuss any issues.
2. Install the Dashboard plug-in
Kubernetes Dashboard is a WEB UI management tool for the k8s cluster with code hosted on github at: https://github.com/kubernetes/dashboard
2.1 Installation:
Install directly using the official profile:
[root@master ~]# wget https://raw.githubusercontent.com/kubernetes/dashboard/v1.10.1/src/deploy/recommended/kubernetes-dashboard.yaml
For testing convenience, we'll change Service to NodePort type, noting that the bottom Service section in YAML adds a new type=NodePort:
[root@master ~]# vim kubernetes-dashboard.yaml
[root@master ~]# tail -14 kubernetes-dashboard.yaml
kind: Service
apiVersion: v1
metadata:
  labels:
    k8s-app: kubernetes-dashboard
  name: kubernetes-dashboard
  namespace: kube-system
spec:
  ports:
    - port: 443
      targetPort: 8443
  type: NodePort      #Add this line
  selector:
    k8s-app: kubernetes-dashboard
Then deploy the new version of dashboard directly:
[root@master ~]# kubectl create -f kubernetes-dashboard.yaml
secret "kubernetes-dashboard-certs" created
serviceaccount "kubernetes-dashboard" created
role.rbac.authorization.k8s.io "kubernetes-dashboard-minimal" created
rolebinding.rbac.authorization.k8s.io "kubernetes-dashboard-minimal" created
deployment.apps "kubernetes-dashboard" created
service "kubernetes-dashboard" created
Then we can view dashboard's external access ports:
[root@master ~]# kubectl get svc kubernetes-dashboard -n kube-system
NAME                   TYPE       CLUSTER-IP      EXTERNAL-IP   PORT(S)         AGE
kubernetes-dashboard   NodePort   10.100.41.192   <none>        443:30422/TCP   50s
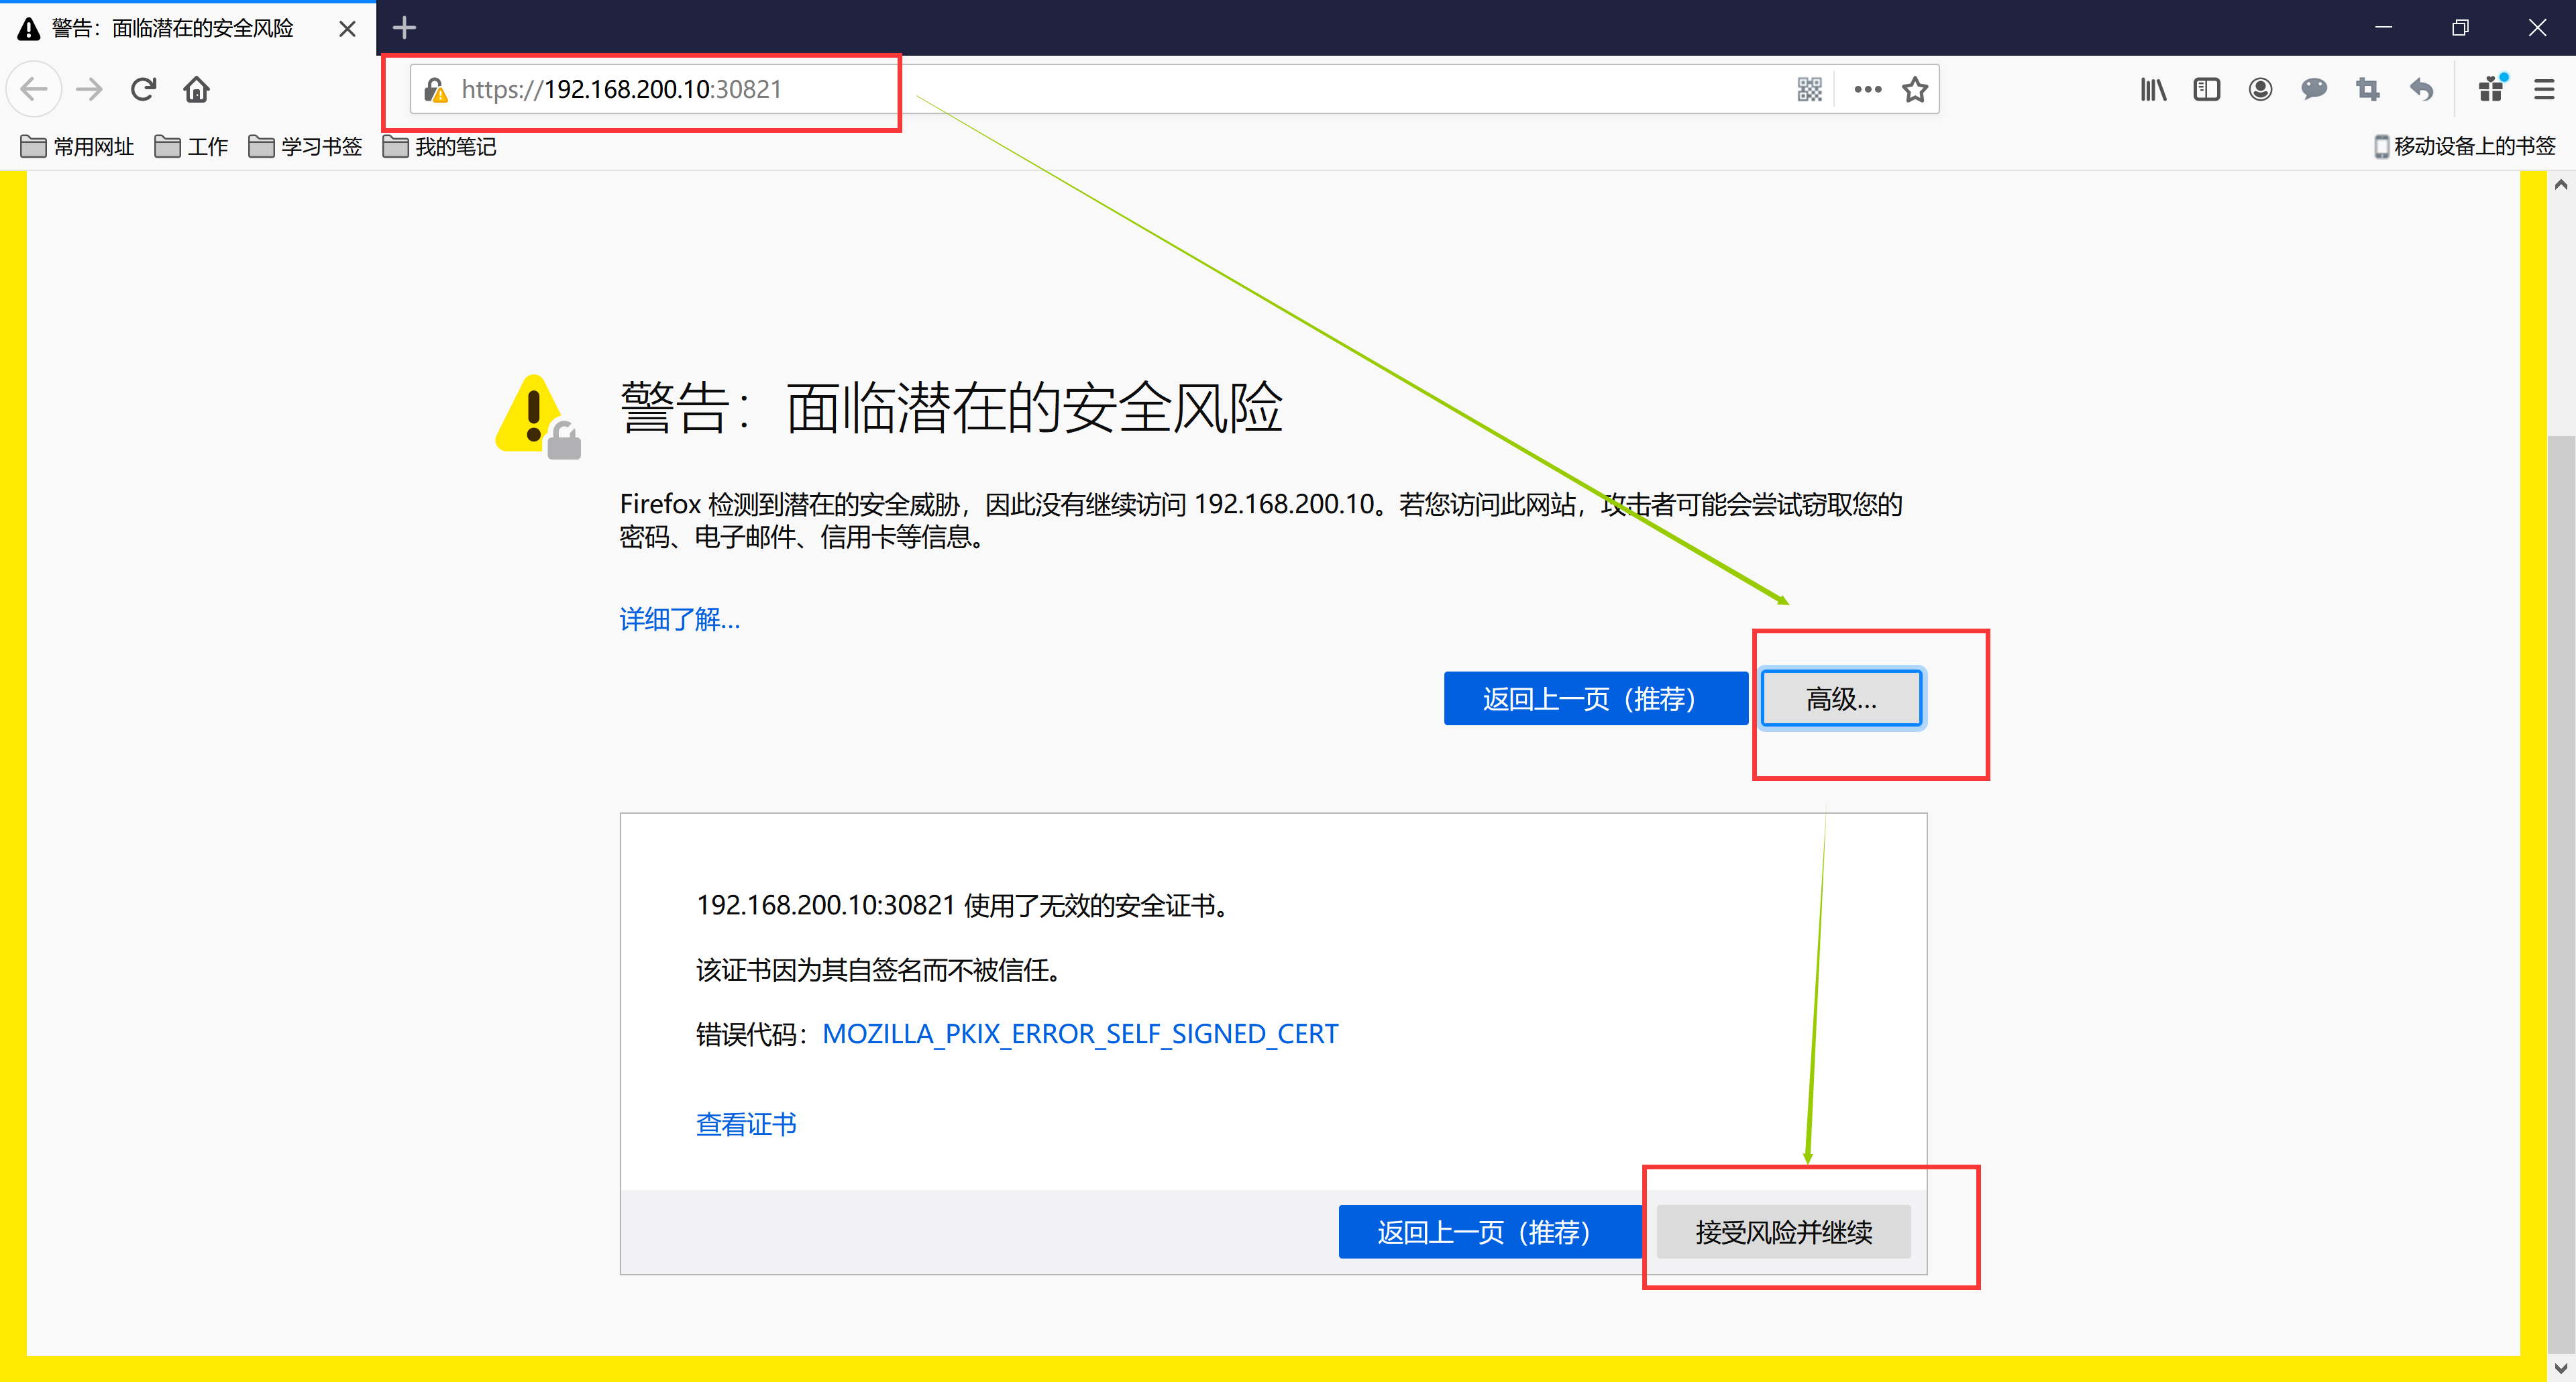
Then you can open the dashboard page by directly accessing any node IP in the cluster plus port 30422 above
Since dashboard defaults to a built https certificate, which is untrusted by the browser, we need to force a jump.
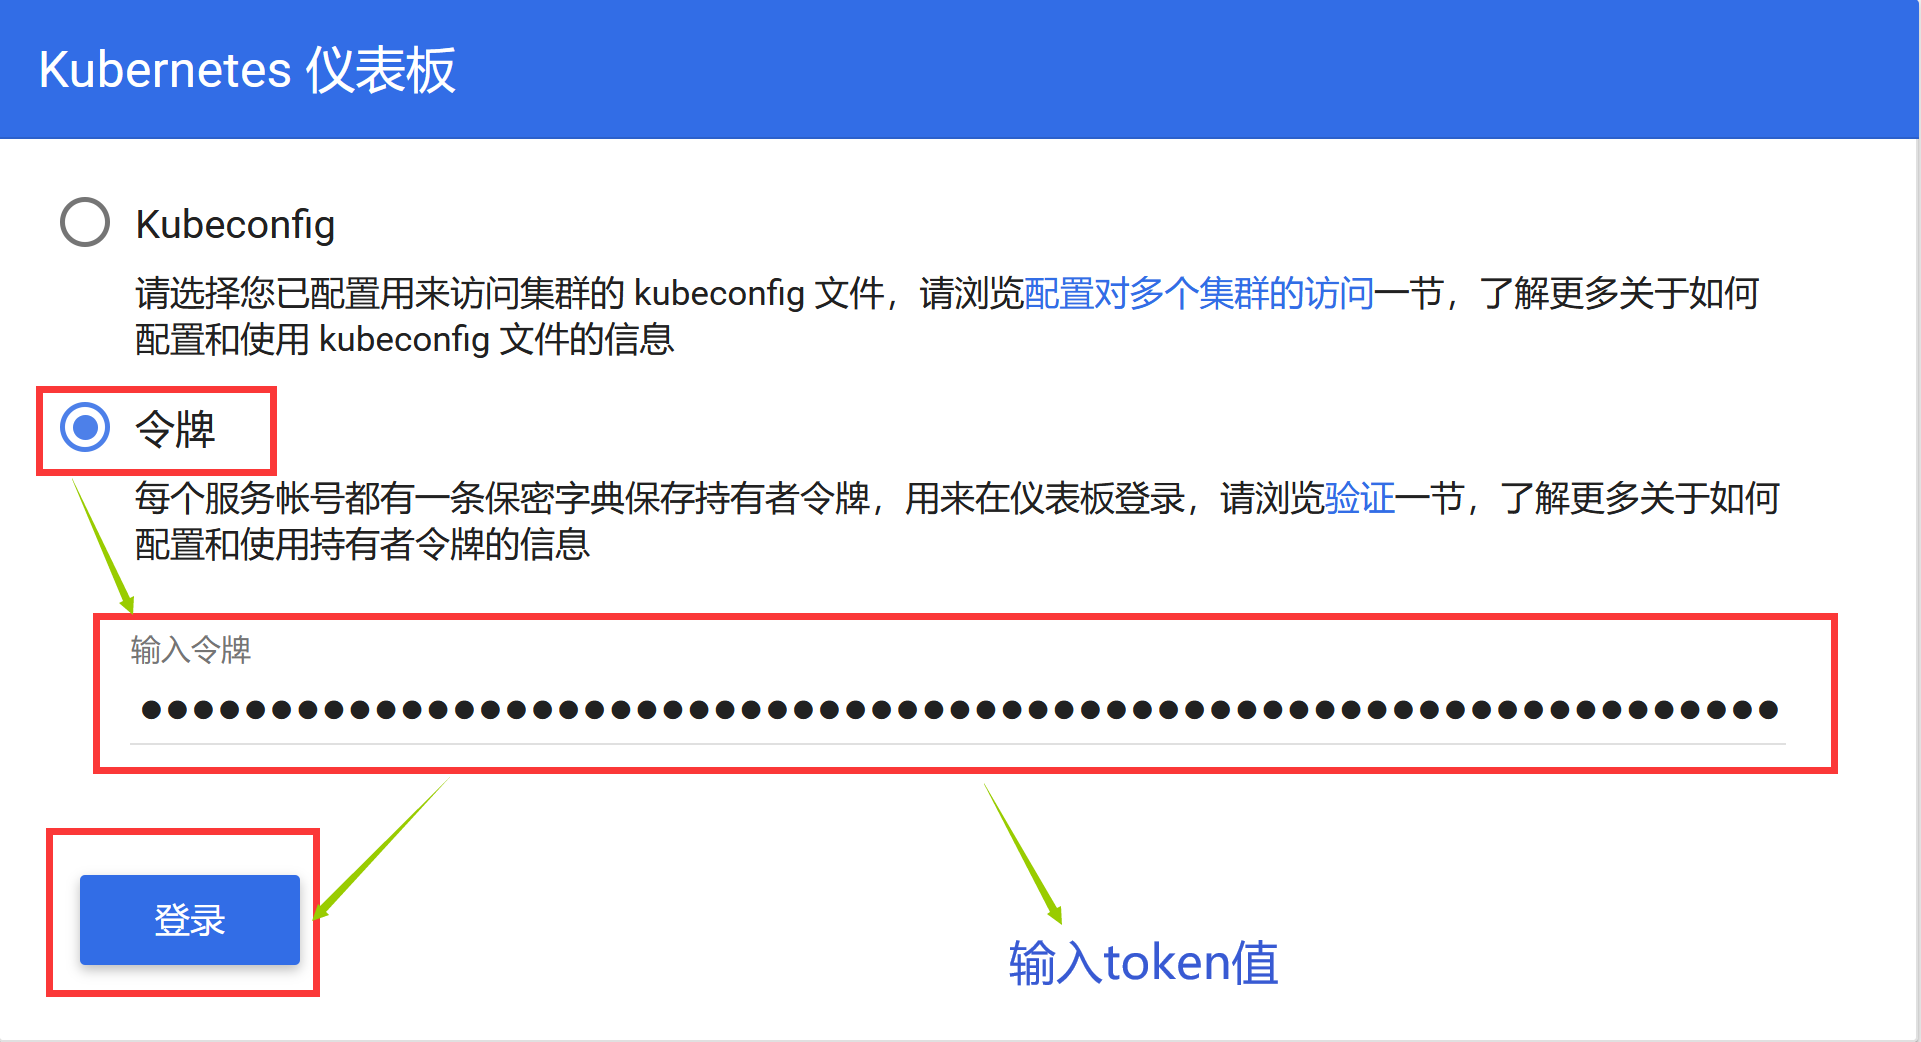
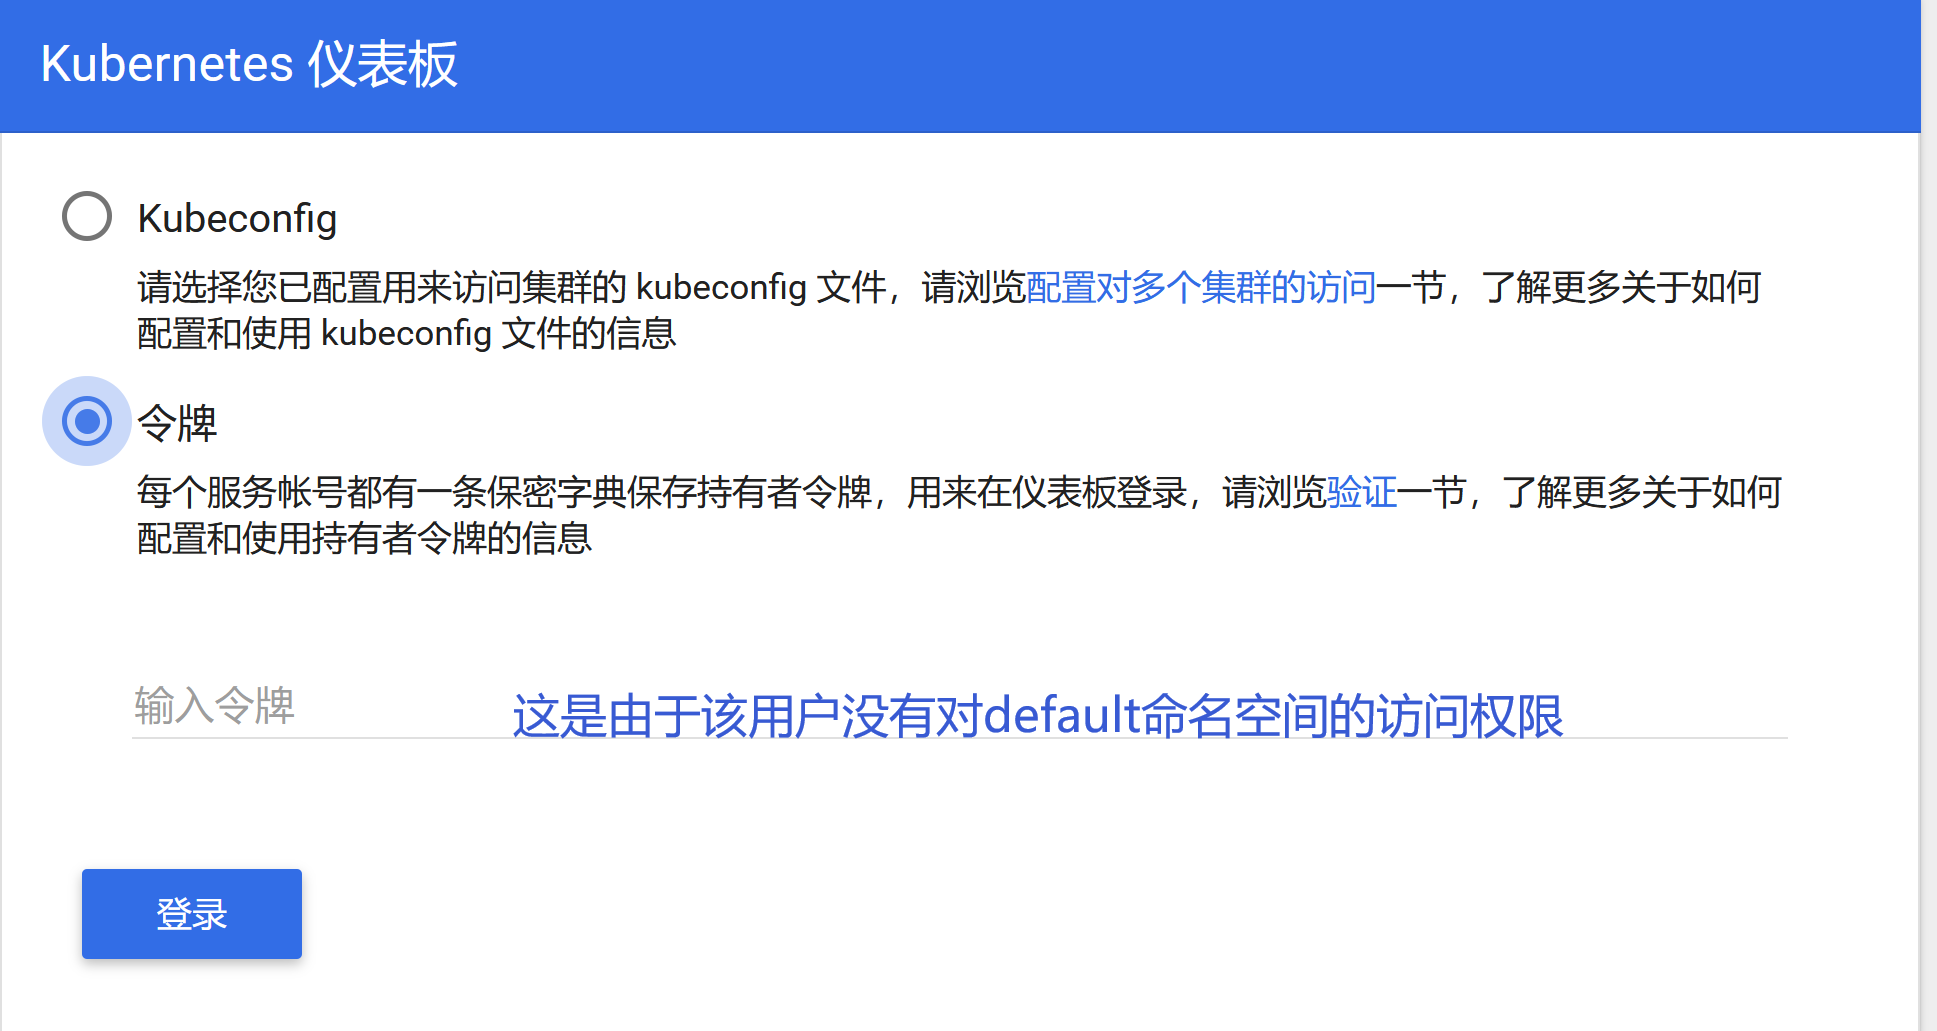
The default dashboard will jump to the login page. We can see that dashboard offers Kubeconfig and token as two login methods. We can skip directly or log in using a local Kubeconfig file. You can see that dashboard will jump to the following page:
2.2 Authentication
Both Kubeconfig and token authentication methods are supported when logging in to dashboard, and the token field is also dependent on in Kubeconfig, so generating a token is essential.
2.3 Generate token
We create an admin user and grant the admin role binding, create the admin user with the yaml file below and grant him administrator privileges, then we can log on to dashbaord with token, which is essentially achieved through Service Account authentication plus Bearer token requesting API server. Authentication in Kubernetes.
[root@master ~]# vim admin-account.yaml
[root@master ~]# cat admin-account.yaml
kind: ClusterRoleBinding
apiVersion: rbac.authorization.k8s.io/v1beta1
metadata:
  name: admin
  annotations:
    rbac.authorization.kubernetes.io/autoupdate: "true"
roleRef:
  kind: ClusterRole
  name: cluster-admin
  apiGroup: rbac.authorization.k8s.io
subjects:
- kind: ServiceAccount
  name: admin
  namespace: kube-system

---
apiVersion: v1
kind: ServiceAccount
metadata:
  name: admin
  namespace: kube-system
  labels:
    kubernetes.io/cluster-service: "true"
    addonmanager.kubernetes.io/mode: Reconcile
[root@master ~]# kubectl create -f admin-account.yaml
clusterrolebinding.rbac.authorization.k8s.io "admin" created
serviceaccount "admin" created

[root@master ~]# kubectl get serviceaccount -n kube-system | grep admin
admin                                1         44s

[root@master ~]# kubectl describe serviceaccount admin -n kube-system
Name:                admin
Namespace:           kube-system
Labels:              addonmanager.kubernetes.io/mode=Reconcile
                     kubernetes.io/cluster-service=true
Annotations:         <none>
Image pull secrets:  <none>
Mountable secrets:   admin-token-7298f
Tokens:              admin-token-7298f
Events:              <none>
Once the admin user above is created, we can get the corresponding token for that user, as follows:
[root@master ~]# kubectl get secret -n kube-system|grep admin-token
admin-token-7298f                                kubernetes.io/service-account-token   3         1m

[root@master ~]# kubectl get secret admin-token-7298f -o jsonpath={.data.token} -n kube-system |base64 -d
eyJhbGciOiJSUzI1NiIsImtpZCI6IiJ9.eyJpc3MiOiJrdWJlcm5ldGVzL3NlcnZpY2VhY2NvdW50Iiwia3ViZXJuZXRlcy5pby9zZXJ2aWNlYWNjb3VudC9uYW1lc3BhY2UiOiJrdWJlLXN5c3RlbSIsImt1YmVybmV0ZXMuaW8vc2VydmljZWFjY291bnQvc2VjcmV0Lm5hbWUiOiJhZG1pbi10b2tlbi03Mjk4ZiIsImt1YmVybmV0ZXMuaW8vc2VydmljZWFjY291bnQvc2VydmljZS1hY2NvdW50Lm5hbWUiOiJhZG1pbiIsImt1YmVybmV0ZXMuaW8vc2VydmljZWFjY291bnQvc2VydmljZS1hY2NvdW50LnVpZCI6ImExNWZlNTk4LWNkNDEtMTFlYi04ZmMzLTAwMGMyOTI3NTk3YyIsInN1YiI6InN5c3RlbTpzZXJ2aWNlYWNjb3VudDprdWJlLXN5c3RlbTphZG1pbiJ9.uxsucmeucOtNAObfS4MgFpo75IjV_jDJUoyXS-toQzD0hFrWRMMMSfYK0tX7UVbyttZ_YvHWv4oPCXW7C47s0AR-M1fxRmFT3618TAduiHKO4WfjJUI-xjAXnGlhinbys8_IZWK90BGh5NSlYMoWo4gyyLHxd_cPGHsCDYxGY5KuEbYuRhpWDEweMCOOAlecOq4zaENvnQf4YfORWBgBnZmk1jZ2c9m9K3Y67GmNwXy0sCGQ9zJwrFNO29s7qYuBnTZkjHFVgZOt3-LjVTdX-oYUHs6HCDgifb_GI7SdCo5suFLzTRFHpr6ndebLHFikbjRO9H9fXDiUsyRHy5td5A
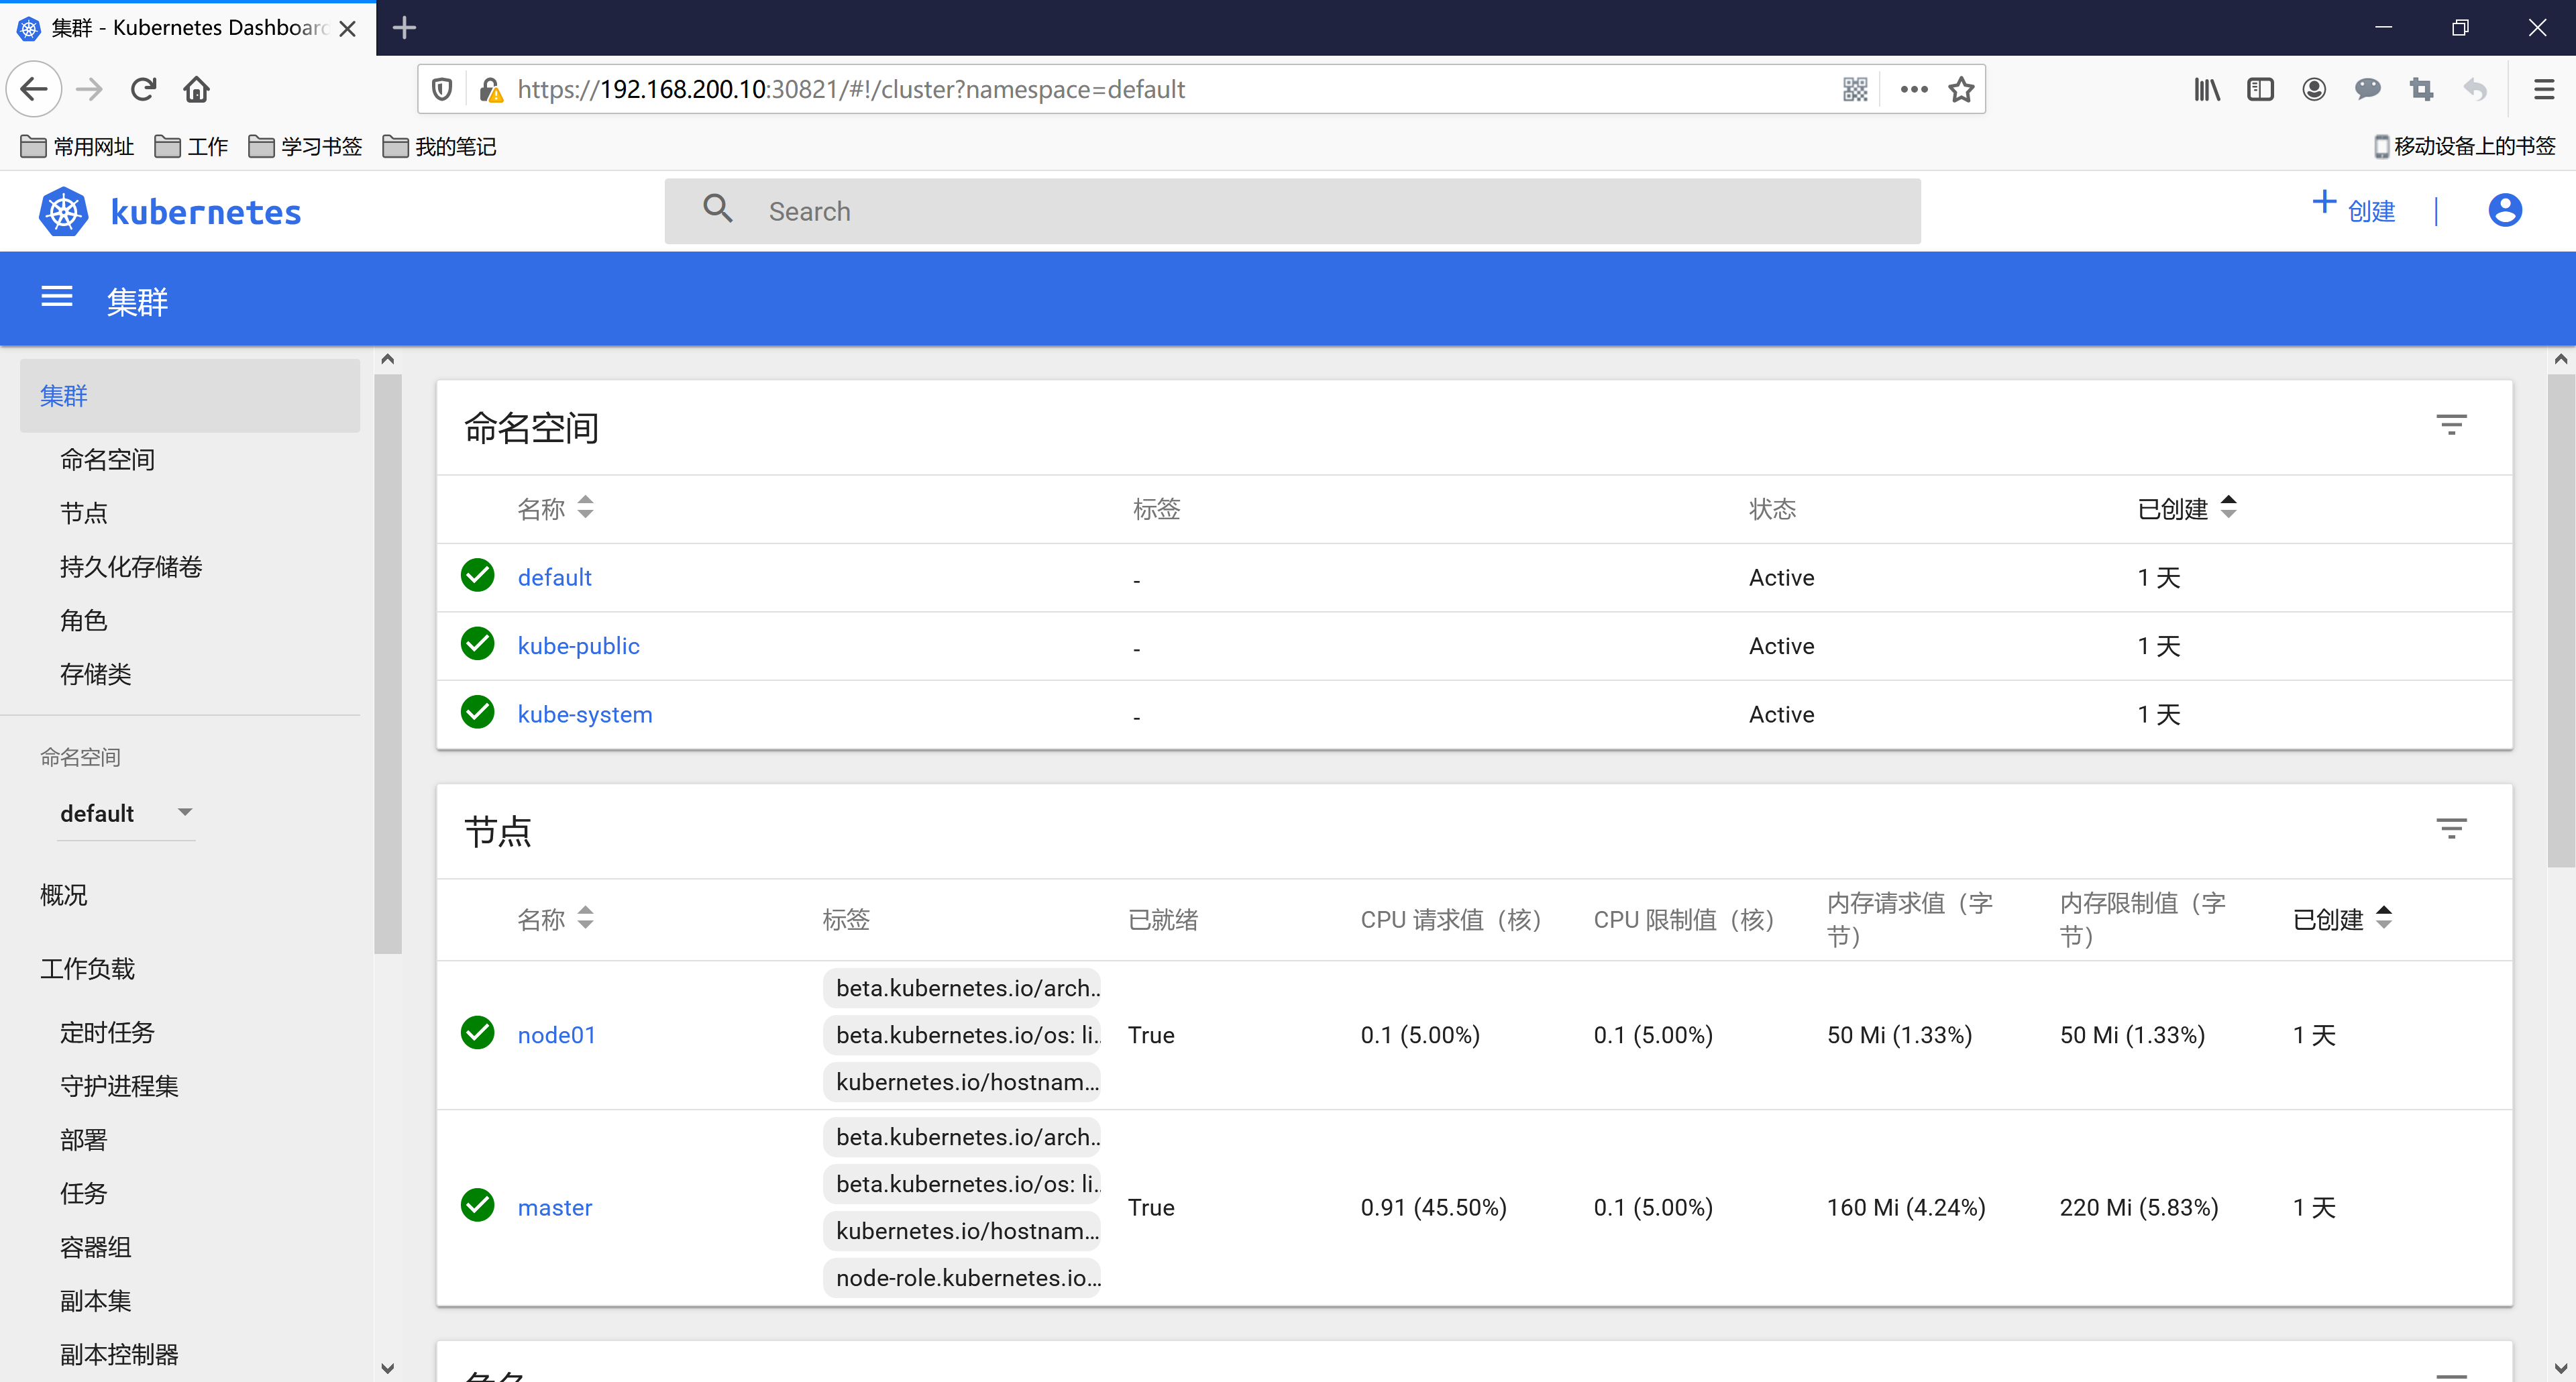
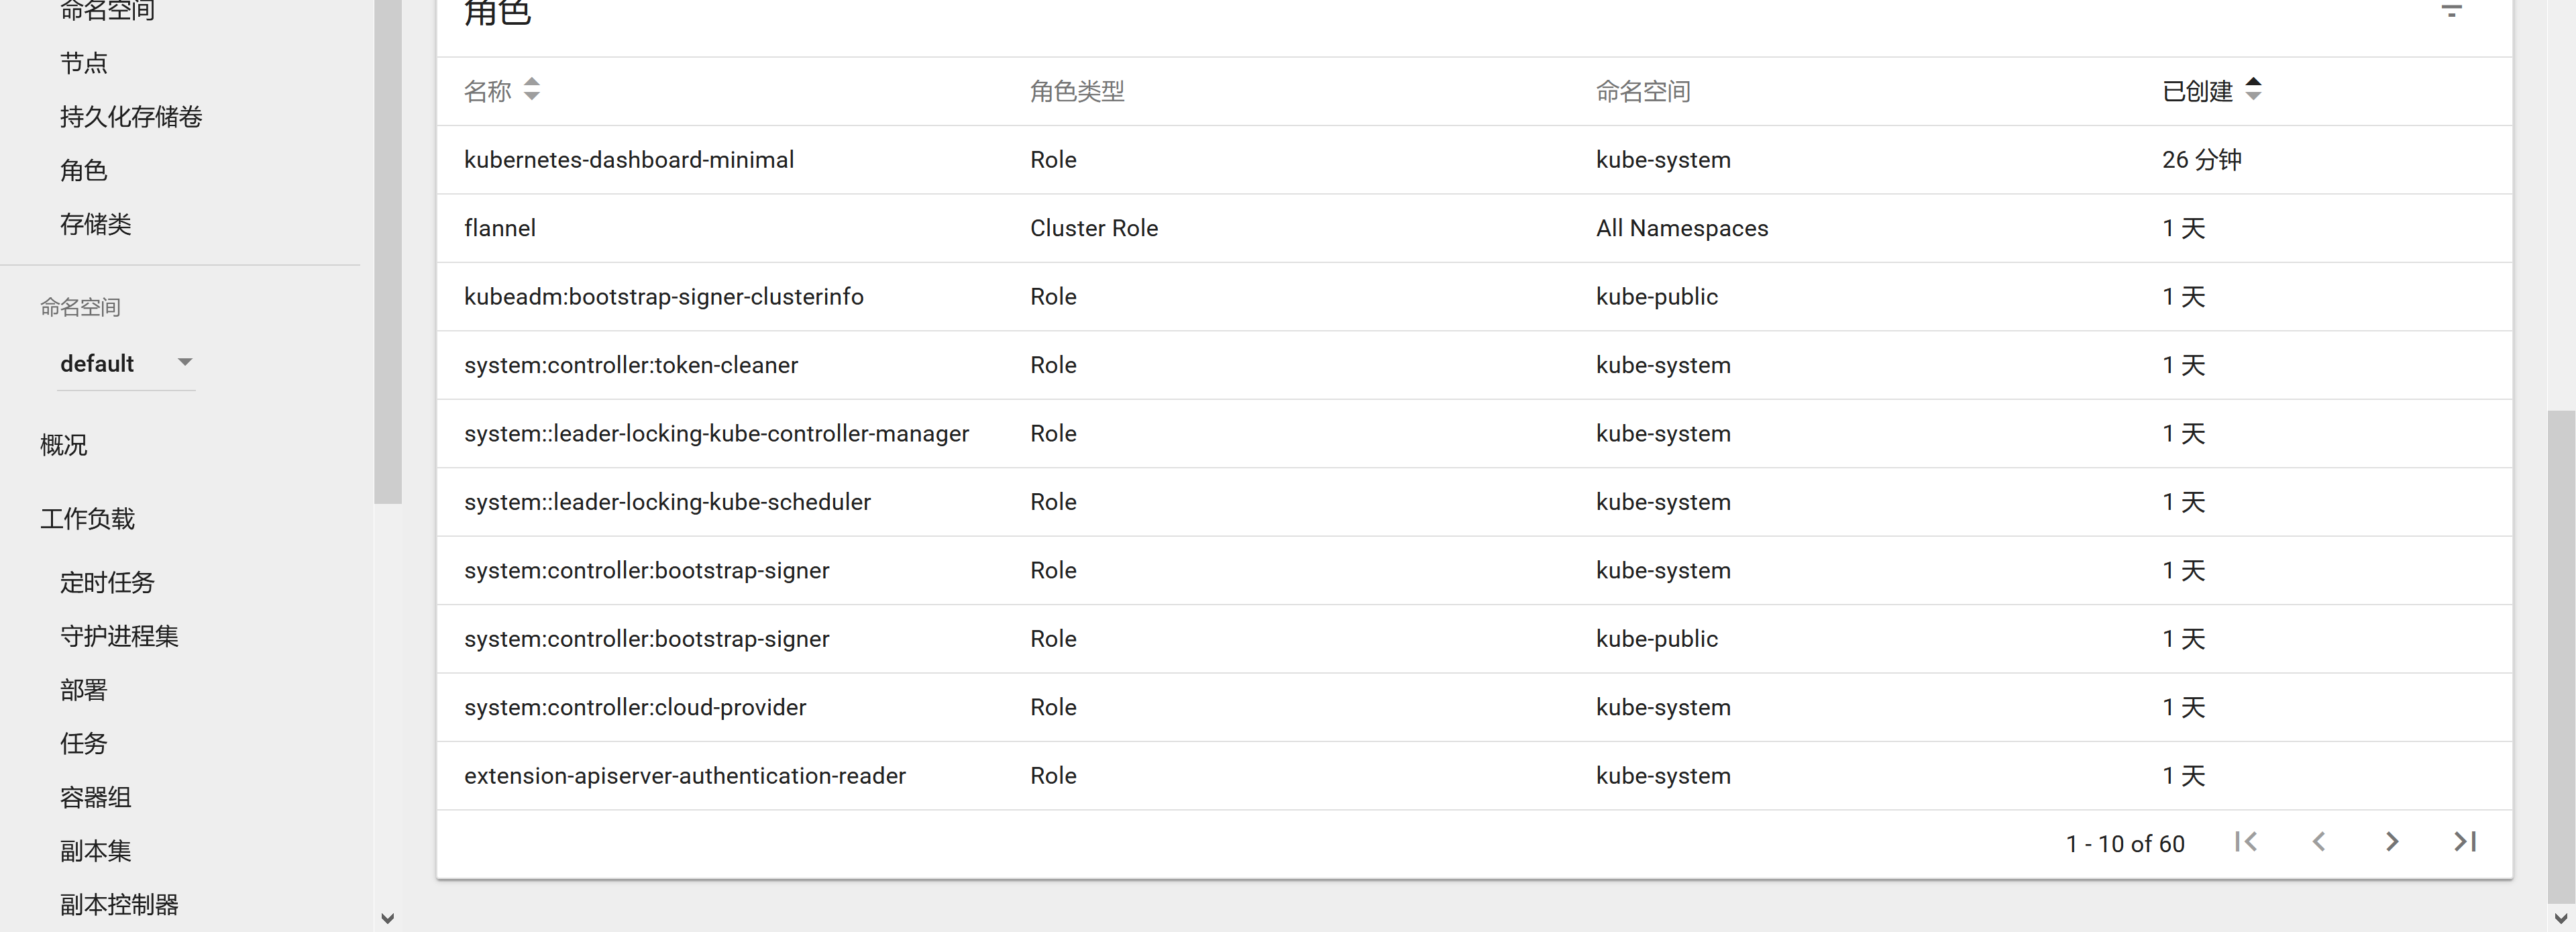
You can then log in using the token string obtained above directly on the dashboard login page, which gives you administrator privileges to manipulate objects in the entire kubernetes cluster, and of course you can also create a new user with the specified operation privileges for your login user.