AlertView
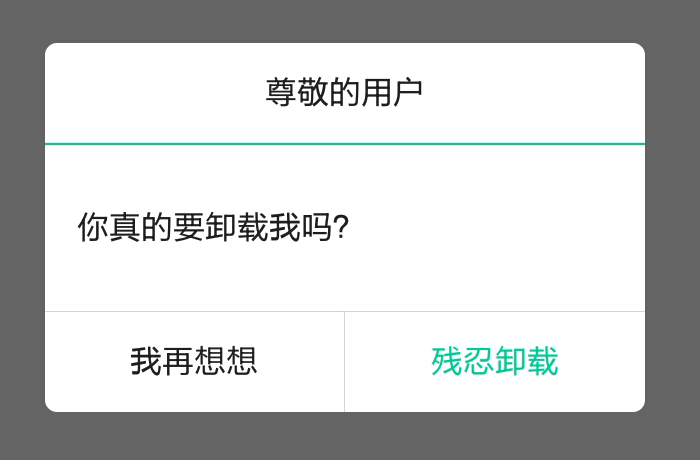
App on mobile phones has greatly facilitated people's lives. Many businesses can be handled easily with the thumb of users. However, this also brings some risks. Sometimes users don't really want to do this, but they just accidentally click on it. If App doesn't give any hints, they will continue to do business by themselves, such as turning the wrong money, deleting the information by mistake. Users regret too much in the past. So for some key businesses, it is necessary for App to pop up the message dialog box to remind users whether they really want to do this operation in order to avoid user misoperation. This reminder dialog is a common Alert Dialog in App development. Android developers have heard about this Alert Dialog. The dialog box includes four elements: message title, message content, confirm button and cancel button. It uses Java coding to display the reminder dialog box, which is basically the same as the following sample code:
    AlertDialog.Builder builder = new AlertDialog.Builder(this);
    builder.setTitle("Respected Users");
    builder.setMessage("Do you really want to uninstall me?");
    builder.setPositiveButton("Brutal uninstall", new DialogInterface.OnClickListener() {
        @Override
        public void onClick(DialogInterface dialog, int which) {
            tv_alert.setText("Although reluctant to give up, but can only leave");
        }
    });
    builder.setNegativeButton("I'll think about it again", new DialogInterface.OnClickListener() {
        @Override
        public void onClick(DialogInterface dialog, int which) {
            tv_alert.setText("Let me accompany you three hundred and sixty-five more days and nights");
        }
    });
    AlertDialog alert = builder.create();
    alert.show();
Obviously, the above code is very lengthy, especially the click events of two buttons, anonymous classes and overloaded functions, which makes it difficult to read. If you try to convert the above Java code into Kotlin code, the rewritten Kotlin code is as follows:
    val builder = AlertDialog.Builder(this)
    builder.setTitle("Respected Users")
    builder.setMessage("Do you really want to uninstall me?")
    builder.setPositiveButton("Brutal uninstall") { dialog, which -> tv_alert.text = "Although reluctant to give up, still can only leave" }
    builder.setNegativeButton("I'll think about it again") { dialog, which -> tv_alert.text = "Let me accompany you three hundred and sixty-five more days and nights" }
    val alert = builder.create()
    alert.show()
This seems to simplify the click event code to a great extent, but in addition, the whole code is still somewhat bloated, especially the Builder class using the builder pattern, although seemingly enhanced security, it is actually cumbersome for coding. Therefore, the Anko library further encapsulates it and adds an extension function to the Context class, namely "alert (message content, message title) {several buttons and their click events}". The simplified alert bullet window code is as follows:
    alert("Do you really want to uninstall me?", "Respected Users") {
        positiveButton("Brutal uninstall") { tv_alert.text = "Although reluctant to give up, still can only leave" }
        negativeButton("I'll think about it again") { tv_alert.text = "Let me accompany you three hundred and sixty-five more days and nights" }
    }.show()
Kotlin code is now easier to read, and less than a third of the original Java code. Of course, in order to use such a good extension function properly, don't forget to add the following line of import statement to the header of the code file:
import org.jetbrains.anko.alert
Such a streamlined Kotlin code, functionally, but no jerry, its reminder dialog effect and Java coding exactly the same, as shown in the following figure.
Select
The drop-down box Spinner is used in Android for certain fixed-value conditional choices, such as red, green, blue, one of the three primary colors, January to December, and so on. The Spinner control on the interface starts with a text with a downward arrow on the right. Clicking on the text will pop up a selection dialog box. When an item is selected, the dialog box disappears and the text on the interface is replaced by the text you just selected. The function of drop-down box is very simple, but it takes a lot of effort to implement it in Java code. Here is an example of the invocation code of Spinner control.
    private void initSpinner() {
        ArrayAdapter<String> starAdapter = new ArrayAdapter<String>(this,
                R.layout.item_select, starArray);
        starAdapter.setDropDownViewResource(R.layout.item_dropdown);
        Spinner sp = (Spinner) findViewById(R.id.sp_dialog);
        sp.setPrompt("Please choose the planet.");
        sp.setAdapter(starAdapter);
        sp.setSelection(0);
        sp.setOnItemSelectedListener(new MySelectedListener());
    }

    private String[] starArray = {"Mercury", "Venus", "earth", "Mars", "Jupiter", "Saturn"};
    class MySelectedListener implements OnItemSelectedListener {
        public void onItemSelected(AdapterView<?> arg0, View arg1, int arg2, long arg3) {
            Toast.makeText(SpinnerDialogActivity.this, "The planet you choose is"+starArray[arg2], Toast.LENGTH_LONG).show();
        }

        public void onNothingSelected(AdapterView<?> arg0) {}
    }
Unexpectedly, this again reflects that Java coding is too big to lose. Simple functions are decomposed into the following specialized processes in Java code:
1. First, we define an array adapter, Array Adapter, which specifies the array of strings to be selected and the layout file for each text.
Secondly, we need to define a selection listener, OnItemSelectedListener, which triggers when a user selects an item and responds to the selected event of a text item.
3. Finally, the Spinner control sets the title of the selection dialog box, the array adapter, the selection listener, the default option and so on.
My God, it's too professional. In the eyes of product managers, it's just a drop-down box. Is it necessary to make it so complicated? However, Java code is so intricate, if you want to develop Android, you can only do so, otherwise there is a better way? If you don't believe it, try Kotlin instead? Speaking later and faster, Spinner's Java code was converted to Kotlin on Android Studio, and soon the following Kotlin code was generated:
    private fun initSpinner() {
        val starAdapter = ArrayAdapter(this, R.layout.item_select, starArray)
        starAdapter.setDropDownViewResource(R.layout.item_dropdown)
        val sp = findViewById(R.id.sp_dialog) as Spinner
        sp.prompt = "Please choose the planet."
        sp.adapter = starAdapter
        sp.setSelection(0)
        sp.onItemSelectedListener = MySelectedListener()
    }

    private val starArray = arrayOf("Mercury", "Venus", "earth", "Mars", "Jupiter", "Saturn")
    internal inner class MySelectedListener : OnItemSelectedListener {
        override fun onItemSelected(arg0: AdapterView<*>, arg1: View, arg2: Int, arg3: Long) {
            toast("The planet you choose is ${starArray[arg2]}")
        }

        override fun onNothingSelected(arg0: AdapterView<*>) {}
    }
Look, Kotlin, the so-called Terminator, is no more than a hairpin. Compared with Java, the total amount of code is half a kilogram and half a kilogram. Because the Java code logic here is really roundabout, and the array adapter is the choice of listeners, Kotlin really has no good way to do this. Since this is not the way to go, try another way. As mentioned earlier, Spinner actually consists of two parts, one is the text with arrows directly displayed on the interface, and the other is the selection dialog box that pops up after clicking. So can we bypass Spinner and use the idea of WYSIWYG to separate the drop-down box into two controls? If it's just a text with arrows, there's no doubt that the text view TextView can be used. The arrow icon can be specified in the layout file through the drawableRight attribute. So the following Spinner node in the layout file:
    <Spinner
        android:id="@+id/sp_dialog"
        android:layout_width="match_parent"
        android:layout_height="match_parent"
        android:layout_toRightOf="@+id/tv_dialog"
        android:gravity="left|center"
        android:spinnerMode="dialog" />
Surface can be completely replaced by the following TextView node:
    <TextView
        android:id="@+id/tv_spinner"
        android:layout_width="match_parent"
        android:layout_height="match_parent"
        android:layout_toRightOf="@+id/tv_dialog"
        android:gravity="center"
        android:drawableRight="@drawable/arrow_down"
        android:textColor="@color/black"
        android:textSize="17sp" />
If there is another selection dialog box, would it be a good thing if you just add a click event to the text view and click TextView to pop up the selection box? It happens that the Anko library has already provided this shareholder's style. Like alert, it comes from the extension function of Context. It is "selector" (dialog box title, string queue) {i-> selected processing code of item i}. Combining it with the previous text view, the original drop-down box function can be seamlessly implemented. The specific Kotlin code is as follows:
    val satellites = listOf("Mercury", "Venus", "earth", "Mars", "Jupiter", "Saturn")
    tv_spinner.text = satellites[0]
    tv_spinner.setOnClickListener {
        selector("Please choose the planet.", satellites) { i ->
            tv_spinner.text = satellites[i]
            toast("The planet you choose is ${tv_spinner.text}")
        }
    }
Looking at these lines of code, there is no trace of the array adapter or the selection listener at all, so the amount of code is drastically reduced to one third of the corresponding Java code. Of course, in order to use the selector function properly, don't forget to add the following line of import statement to the header of the code file:
import org.jetbrains.anko.selector
Although the Spinner control in the layout file is replaced by TextView, there is no difference between the two in terms of function usage. It also supports clicking on the text to pop up the selection box, and also supports the callback of a selected item. The interface effect of the retrofitted drop-down box is shown in the following figure.

So convenient and easy-to-use selector, even leaving aside the array adapter and the selection listener, how does it work? Reading the selector source code in Anko library carefully, we find that the function uses Alert Dialog's setItems method to specify a string of text and define the click event of each item. The result of its operation is different from that of Spinner's selection dialog box. The following is the Java implementation code of AlertDialog corresponding to selector function, which is convenient for readers to understand its essence:
    AlertDialog.Builder builder = new AlertDialog.Builder(this);
    builder.setTitle("Please choose the planet.");
    builder.setItems(satellites, new DialogInterface.OnClickListener() {
        @Override
        public void onClick(DialogInterface dialog, int which) {
            Toast.makeText(SpinnerDialogActivity.this, "The planet you choose is"+starArray[arg2], Toast.LENGTH_LONG).show();
        }
    });
    builder.create().show();
ProgressDialog
App loading web pages and other requests server behavior, often time-consuming operations, often take several seconds to load, during this period in order to reduce the user's waiting anxiety, the interface needs to show the loading animation, on the one hand, to avoid the illusion of causing App card death, on the other hand, prompt users to wait patiently. At this time, the progress dialog box is used to pop up the progress box before loading and close the progress box after loading, thus improving the user experience of loading interaction.
There are two kinds of progress dialog boxes, one is the horizontal progress dialog box, the other is the circle progress dialog box, which are described below.
Horizontal progress dialog box
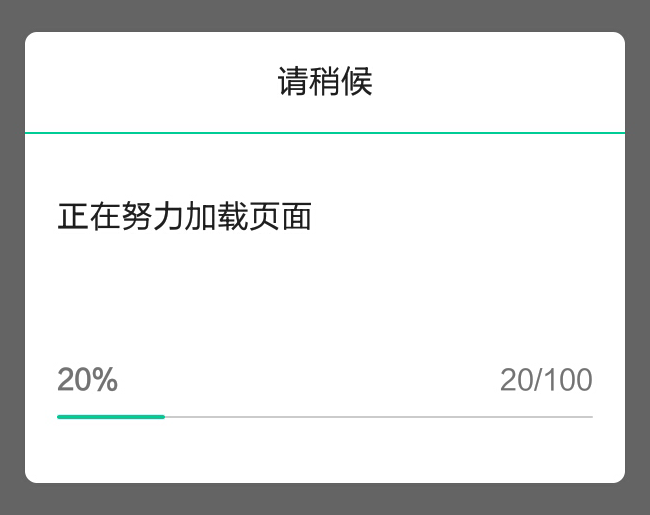
Horizontal progress dialog box allows real-time refresh of current progress, making it easy for users to know the percentage of progress processed. It mainly contains several elements, including message title, message content, dialog box style (horizontal or circular), current progress of the four. If you use Java code to implement the dialog box, it is a very conventional coding style. Specific examples of Java code are as follows:
    ProgressDialog dialog = new ProgressDialog(this);
    dialog.setTitle("Please wait a moment");
    dialog.setMessage("Efforts are being made to load pages");
    dialog.setMax(100);
    dialog.setProgressStyle(ProgressDialog.STYLE_HORIZONTAL);
    dialog.show();
The Java coding of the Horizontal Progress Dialogue looks very well-behaved, but it still looks sluggish, and the simple functions cost six lines of Java code. If you write in Kotlin, you only need the following two lines of code with the help of the Anko library:
    val dialog = progressDialog("Efforts are being made to load pages", "Please wait a moment")
    dialog.show()
Look, the implementation code of the Horizontal Progress Dialogue immediately becomes much cleaner, and its interface effect is exactly the same as that of Java. Of course, since the extension function of the Anko library is used, it's important to add an import statement at the head of the code:
import org.jetbrains.anko.progressDialog
After the horizontal progress dialog pops up, if you want to update the progress value of the horizontal bar, you can call the following code to set the current progress:
dialog.progress = progress value (0 to 100)
When the progress value reaches 100, which means that the processing is completed, the dismiss function of the dialog object can be called to close the dialog box. The following figure shows the progress change effect of the horizontal progress dialog box.
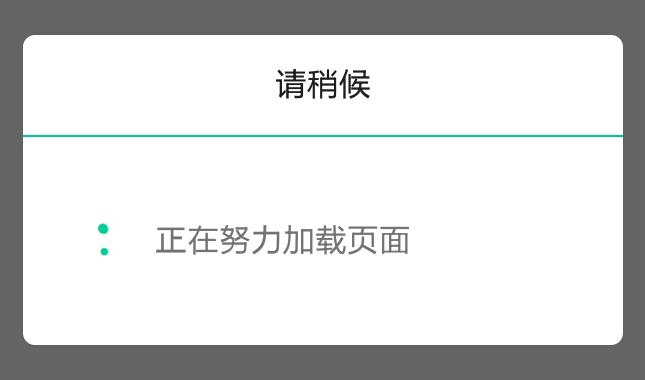
Circle progress dialog box
The circle progress dialog box only shows the animation effect of the circle, does not support the real-time refresh processing progress. Naturally, it is simpler in coding than the horizontal dialog box. However, to display the circle progress dialog box in Java, it still needs the following five lines of code:
    ProgressDialog dialog = new ProgressDialog(this);
    dialog.setTitle("Please wait a moment");
    dialog.setMessage("Efforts are being made to load pages");
    dialog.setProgressStyle(ProgressDialog.STYLE_SPINNER);
    dialog.show();
If the dialog box is implemented with Kotlin, there is a precedent for the horizontal progress dialog box. Unexpectedly, only the following two lines of Kotlin code are needed:
    val dialog = indeterminateProgressDialog("Efforts are being made to load pages", "Please wait a moment")
    dialog.show()
Notice that the Kotlin function above takes the prefix indeterminate, which means "vague and indeterminate", indicating that the processing progress of this dialog box is uncertain, unlike the horizontal progress dialog box, which can specify the current progress explicitly, so that developers can distinguish the progressDialog function from the indeterminate ProgressDialog function. Since this function is also from the Anko library, don't forget to add the following statement to the header of the code file used:
import org.jetbrains.anko.indeterminateProgressDialog
The circle progress dialog implemented by Kotlin has the same effect as that implemented by Java. The specific dialog interface is shown in the following figure.