Knowledge summary of open source web framework django (10)
Asynchronous scheme Celery
Producer consumer design model
reflection:
- What's wrong with the following two lines of code?
CCP().send_template_sms(mobile, [sms_code, 5], 1)

return JsonResponse({'code': 0,'errmsg': 'ok'})
Question:
-
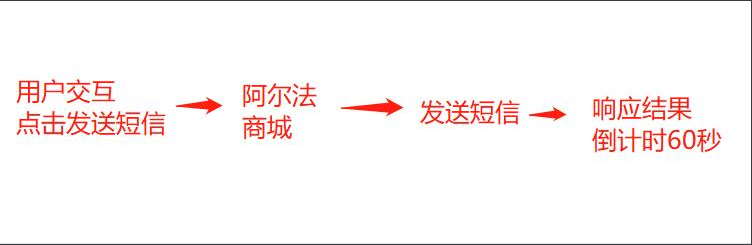
Our code is executed synchronously from top to bottom.
-
Borrowing the third-party interface is also affected by network delay and other aspects.
-
Sending text messages is a time-consuming operation. If the SMS is blocked, the user response will be delayed.
-
The response delay causes a delay in the countdown of the user interface.
solve: -
Send SMS asynchronously
-
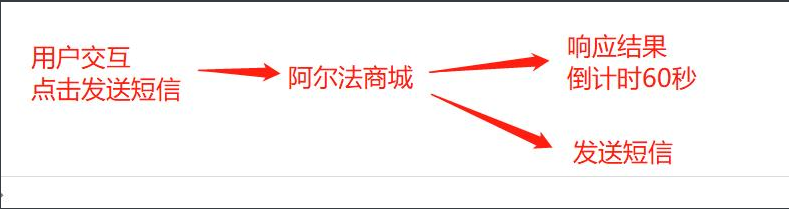
SMS sending and response are executed separately, and SMS sending is decoupled from the main business.
reflection:
- How to decouple sending SMS from the main business.
Introduction to producer consumer design model
-
In order to decouple sending SMS from the main business, we introduce producer consumer design pattern.
-
It is one of the most commonly used decoupling methods to find a * * broker * * bridge to ensure that the two businesses are not directly related.
Summary: -
The producer generates messages, caches them in the message queue, and the consumer reads and executes the messages in the message queue.
-
The sending SMS message is generated by alpha mall and cached in the message queue. Consumers read and execute the sending SMS message in the message queue.
Introduction and use of Celery
reflection:
- After consumers get the message, they need us to consume it (perform the task).
- Tasks may have high concurrency and need to be executed in a supplementary multi task manner.
- There are many kinds of time-consuming tasks, and the producer and consumer code written by each time-consuming task is repeated.
- When and how the received message is executed.
Conclusion:
- In actual development, we can complete it with the help of the mature tool Celery.
- With Celery, when we use the producer consumer model, we only need to focus on the task itself, which greatly simplifies the programmer's development process.
1. Introduction to celery
-
Introduction to Celery:
- A simple, flexible and reliable distributed system that processes a large number of messages can run on one or more machines.
- A single Celery process can handle millions of tasks per minute.
- Communicate through messages and coordinate between clients and consumers using message queues (broker s).
-
To install Celery:
pip install -U Celery # -The u parameter is upgrade installation (no, direct installation; yes, upgrade to the latest)
2. Create a Celery instance and load the configuration
1. Define Celery_tasks package, create Celery initialization module, configuration file
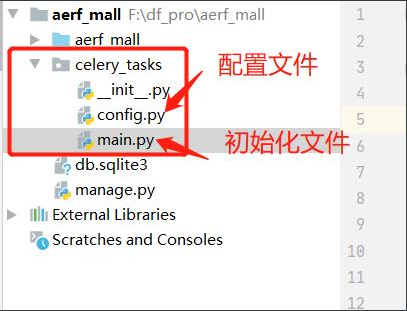
config.py
# If redis is used as an intermediary
# This configuration is required:
# 1. In the future, the producer will release the task to redis library 10
# 2. Consumers will extract and execute tasks from redis library 10
broker_url='redis://192.168.42.128:6379/10'
main.py
"""
This file is used as a module for asynchronous application initialization
"""
# Environment for loading django in asynchronous task program
import os
os.environ.setdefault(
    'DJANGO_SETTINGS_MODULE',
    'aerf_mall.settings.dev'   # This line aerf_mall should be changed to your corresponding project name
)


from celery import Celery

# Initialize an application object
app = Celery("aerf")

# Load configuration file - the parameter is the package guide path of the configuration file (module)
# We will be in celery in the future_ The directory where the tasks package is located is the working directory to run asynchronous programs;
app.config_from_object('celery_tasks.config')

# Tell the app what tasks to listen for
# The parameter of this function is a list, in which the guided package path of the task package is written
app.autodiscover_tasks([
    'celery_tasks.sms',

])
2. Copy the previously modified yuntongxun folder and modify the CCP_ Where sms.py brings in the package
# from libs.yuntongxun.CCPRestSDK import REST
from .CCPRestSDK import REST
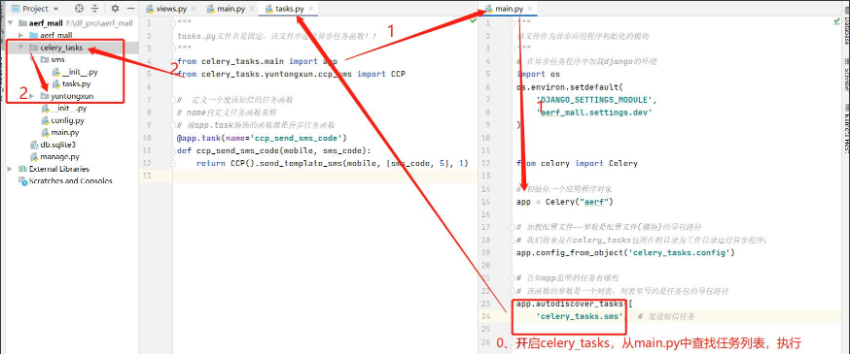
3. Create a new sms package and a new tasks.py file
tasks.py
"""
tasks.py The file name is fixed, and the asynchronous task function is defined in this file!!
"""
from celery_tasks.main import app
from celery_tasks.yuntongxun.ccp_sms import CCP

#  Define a task function for sending SMS
# Name custom task function name
# The function decorated by app.task is the asynchronous task function
@app.task(name='ccp_send_sms_code')
def ccp_send_sms_code(mobile, sms_code):
    return CCP().send_template_sms(mobile, [sms_code, 5], 1)
4. celery code execution process
5. Change the reference location of previously written code
# from aerf_mall.libs.yuntongxun.ccp_sms import CCP
from celery_tasks.sms.tasks import ccp_send_sms_code
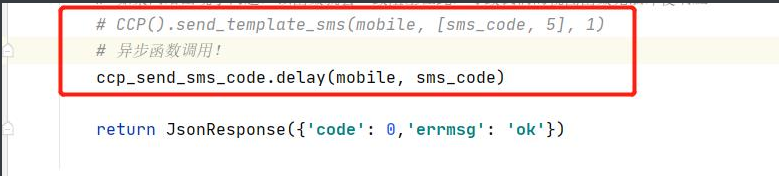
# CCP().send_template_sms(mobile, [sms_code, 5], 1)
# Asynchronous function call!
ccp_send_sms_code.delay(mobile, sms_code)

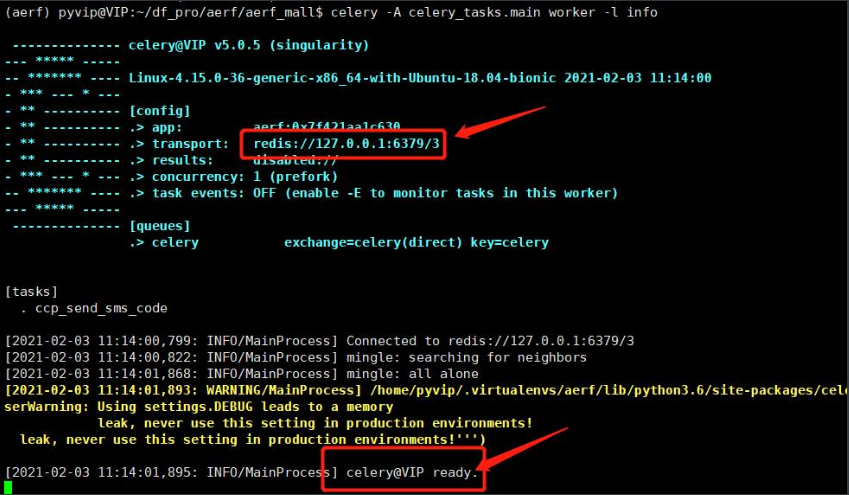
6. Start the Celery service
celery -A celery_tasks.main worker -l info
- -A refers to the corresponding application, and its parameter is the location of the Celery instance in the project.
- Worker refers to the worker to be started here.
- -l refers to the log level, such as info level.
Note: 1. The location of the command is in the cell_ Tasks folder peer location
2. Look at the screenshot
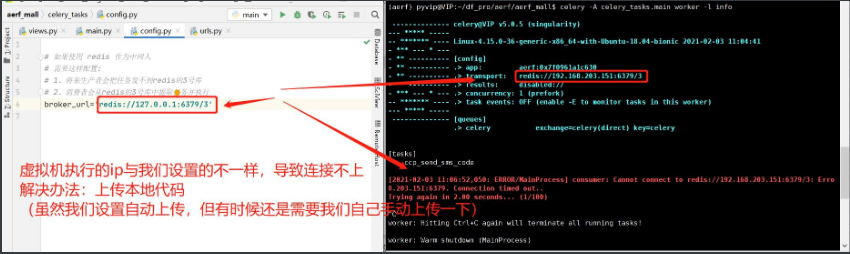
After code synchronization:
6. Start alpha mall project and test http://192.168.42.128/register.html

Knowledge development:
Question to think about: in the test phase, cloud communication is free for 8 yuan. What if there is no money?
Solution: the console will output the verification code and skip the "normal" verification of cloud communication.
Modify ccp_sms.py file partial code
# Note: after logging in to the cloud communication website, you can see the developer's main account ACCOUNT SID in "console - Application"
_accountSid = ''

# Note: after logging in to the cloud communication website, you can see the developer's main account AUTH TOKEN in the console - application
_accountToken = ''

# Please use the APPID on the homepage of the management console or create your own APPID
_appId = ''
modify
# if result.get("statusCode") == "000000":
if result.get("statusCode") != "000000":
            # Returning 0 means sending SMS successfully
            return 0
        else:
            # Returning - 1 means sending failed
            return -1
2, celery knowledge supplement
1. Working mode of celery worker
- The default is the process pool mode. The number of processes is based on the number of CPU cores of the current machine. Each CPU runs four processes.
- How to specify the number of processes: ` celery worker -A proj --concurrency=4
celery -A celery_tasks.main worker -l info -c 10
How to change the process pool mode to co process mode: ` cell worker - a proj -- concurrency = 1000 - P eventlet - C 1000
# Installing the eventlet module
pip install eventlet

# Enable Eventlet pool
celery -A celery_tasks.main worker -l info -P eventlet -c 1000
Code to complete class RegisterView(View):
1. Logical analysis:
1.1 post request
1.2 the data transmitted by Vue to the background is json format data, which needs to be parsed with json.loads()
Note: json.loads () is different from json.load (); Difference between json.dumps() and json.dump()
json.loads(), json.dumps(), json.dump(), and json.load() are two different usages
With s is used for data type conversion, and without s is used for operating files.
Conceptual understanding of json.loads(), json.dumps()
json itself is a string. The dictionary and string can be converted through the following two functions.
Because the browser does not support dictionary display, if the requested type is a dictionary, the dictionary must be converted into a string through the json.dumps() function before it can be displayed.
json.loads(): decode and convert the string in JSON format into a dictionary.
>>> import json
>>> json_str = '{"num": "66" }'
>>> dict2 = json.loads(json_str)
>>> type(json_str)
<class 'str'>
>>> type(dict2)
<class 'dict'>
json.dumps(): encoding, converting the dictionary to a string in JSON format.
>>> import json
>>> dict1 = {"num": "88"}
>>> json_info = json.dumps(dict1)
>>> type(dict1)
<class 'dict'>
>>> type(json_info)
<class 'str'>
>>>
1.3 get the data from the front end: 'username', 'password', 'password2', 'mobile', 'SMS'_ code’,‘allow’
1.4 although the front end has verified the data, it is verified from the browser. Hackers and crawlers can still simulate the browser and cross the front-end verification by means, so the back-end still needs to verify the data again.
a) Verify data integrity: if not all([username, password, password2, mobile, sms_code]):
b) Authentication user name format: if not re.match(r '^ \ w{5,20} $', username):
c) Verification password format: if not re.match(r '^ \ w{8,20} $', password):
d) Verify whether the password is consistent with the duplicate password: if password= password2:
e) Verify mobile number: if not re.match(r '^ \ d{6} $', sms_code):
f) Verify whether to "agree to the agreement": if not allow:
g) Because the picture verification code has been verified when sending a short message, you don't need to verify it again. Just verify whether the SMS verification code is correct: get_redis_connection('sms_code ') connect to Redis stored in SMS. Since there may be multiple pieces of data in the database, you need to get the corresponding data. get('sms_%s'% mobile) according to the mobile phone number.
, if the mobile phone verification code is not obtained, it will be returned to the front end: "the SMS verification code has expired!", After it is obtained, it is connected with the SMS from the front end_ Code comparison.
1.5 create a user (. create_user) in the database and save the information after all the verification is passed
user = User.objects.create_user(
                username=username,
                password=password,
                mobile=mobile
            )
1.6 pass in the request object and user object, write the user information into the session cache (redis), return the session ID to the browser, and store it in the cookie: login(request, user)
1.7 build response: response = JsonResponse({'code': 0, 'errmsg': 'ok'})
1.8 write the user information into the cookie and set the website expiration time 3600 times 24 times 14 (14 days)
1.9 return response
Registration content complete code:
from django_redis import get_redis_connection
from django.contrib.auth import login
import json
import re

# User registration
class RegisterView(View):

    def post(self, request):
        # 1. Extract parameters
        # request.body --> b'{"username": "xxxx"}'
        # request.body.decode() --> '{"username": "xxxx"}'
        data = json.loads(request.body.decode())

        username = data.get('username')
        password = data.get('password')
        password2 = data.get('password2')
        mobile = data.get('mobile')
        sms_code = data.get('sms_code')
        allow = data.get('allow')

        # 2. Calibration parameters
        if not all([username, password, password2, mobile, sms_code]):
            return JsonResponse({'code':400, 'errmsg': 'Missing parameter'}, status=400)

        if not re.match(r'^\w{5,20}$', username):
            return JsonResponse({'code':400, 'errmsg': 'Incorrect user name format'}, status=400)

        if not re.match(r'^\w{8,20}$', password):
            return JsonResponse({'code':400, 'errmsg': 'Incorrect password format'}, status=400)

        if password != password2:
            return JsonResponse({'code':400, 'errmsg': 'Password input is inconsistent!'}, status=400)

        if not re.match(r'^\d{6}$', sms_code):
            return JsonResponse({'code': 400, 'errmsg': 'Incorrect format of verification code'}, status=400)

        if not allow:
            return JsonResponse({'code': 400, 'errmsg': 'Request unified user agreement!'}, status=400)


        # Verification of mobile phone verification code
        conn = get_redis_connection('sms_code')
        sms_code_from_redis = conn.get('sms_%s'%mobile)
        if not sms_code_from_redis:
            return JsonResponse({'code': 400, 'errmsg': 'SMS verification code expired!'}, status=400)
        sms_code_from_redis = sms_code_from_redis.decode()
        if sms_code_from_redis != sms_code:
            return JsonResponse({'code':400, 'errmsg': 'Error in SMS verification code!'}, status=400)

        # 3. Create new data, build user model class objects, and save the database
        # User. Objects. Create() -- > the user model class object built, and the password will not be encrypted
        # User.objects.create_ User() -- > build a user model class object to encrypt the plaintext password
        # User.objects.create_ Superuser() -- > build user model class objects to encrypt plaintext passwords and is_staff=True
        try:
            user = User.objects.create_user(
                username=username,
                password=password,
                mobile=mobile
            )
        except Exception as e:
            print(e)

        # Pass in the request object and user object, write the user information into the session cache (redis), and return the session ID to the browser
        # Save cookie
        login(request, user)


        # 4. Build response
        response = JsonResponse({'code': 0, 'errmsg':' ok'})
        response.set_cookie(
            'username',
            username,
            max_age=3600*24*14
        )
        return response
urls.py
# register
    re_path(r'^register/$', RegisterView.as_view()),