I. System Environment
Operating System: CentOS 7
tomcat 8.0.47
Nginx 1.12.2
Redis 4.0.2
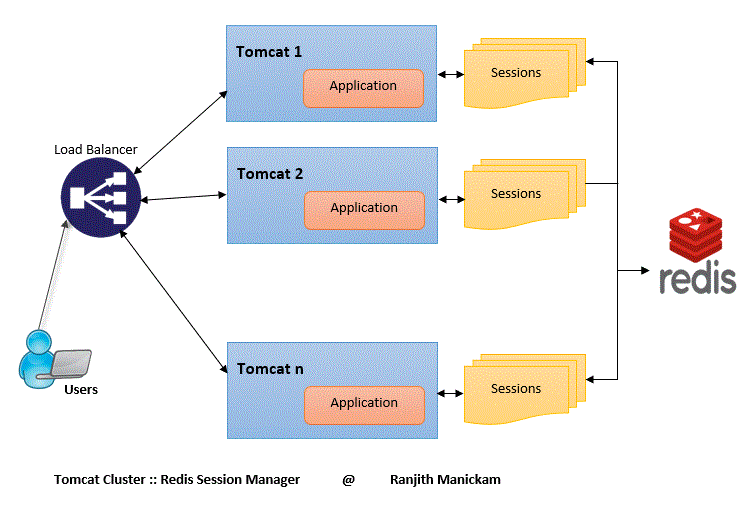
192.168.124.128 tomcat1+Nginx+Redis
192.168.124.130 tomcat2
Specific how to install these software, here is no longer introduced, please go online to find information.
After installation, modify the port number of tomcat 2. If there is only one tomcat on each server, it can be done without modification. Modify the server.xml file in the conf directory.

If there are more than one tomcat on one service, there are two other modifications.
In order to show the effect better, the index.jsp in tomcat's ROOT project is slightly modified here:
<h3>tomcat1:</h3>
<% HttpSession session = request.getSession(); %>
<%= session.getId() %>
The other one will do the same and change tomcat 1 to tomcat 2. After completion, start tomcat on two servers respectively.
II. Modifying Nginx configuration
Make the following changes in the configuration file nginx.conf
#Add the following under http
upstream tomcat {
     server 192.168.124.130:8081 weight=1;
     server 192.168.124.128:8080 weight=2;
 }
server {
    listen       80;
    server_name  localhost;

    #charset koi8-r;

    #access_log  logs/host.access.log  main;

    location / {
     #Here the tomcat name is the same as above
        proxy_pass http://tomcat;
        root   html;
        index  index.html index.htm;
    }

    error_page   500 502 503 504  /50x.html;
        location = /50x.html {
            root   html;
    }
    ...
}
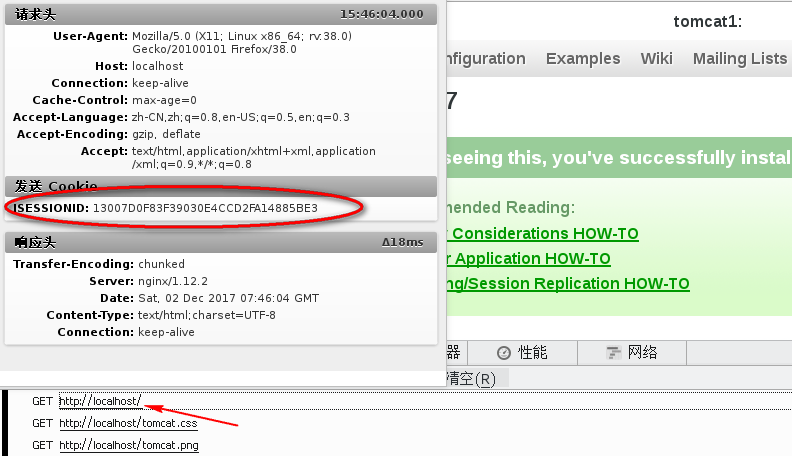
When the configuration is complete, start Nginx with the sbin/nginx command. Enter in the browser http://localhost
It was found that the web page could be opened successfully. 
This is the first page in tomcat to refresh the browser.

This time you open the second Tomcat page, and their sessionId is different. This is not what we want. This difference should not be perceived by visitors. The next thing we need to do is to keep their sessions consistent when accessing these two tomcats, that is, to share a session, just like accessing the same tomcat. Redis is used here.

3. Keep session Sharing
1. First, put the following four jar packages into tomcat's lib directory.
- commons-logging-1.2.jar
- jedis-2.9.0.jar
- commons-pool2-2.4.2.jar
- TomcatClusterEnabledRedisSessionManager-1.0.jar
2. Use touch command to generate RedisDataCache.properties file in Tomcat's conf directory, and add the following contents (redis service address):
redis.hosts=192.168.124.128:63793. Modify the context.xml file under conf and add the following code above the last </ Context>:
<Valve className="com.r.tomcat.session.management.RequestSessionHandlerValve" />
<Manager className="com.r.tomcat.session.management.RequestSessionManager" />
4. Open the Redis service and restart Tomcat, respectively. Session object can't be used to get session Id at this time. To restart tomcat, you should first remove the above code in index.jsp to get session Id.
At this point, tomcat is accessed through Nginx, and every session Id is the same.

So our tomcat uses redis to share session s, and uses ngnix to balance loads, but let's think about it. If we use an nginx, if the server where the nginx is located goes down, then our program will hang up. So how do we implement a highly available solution?
4. High Availability of nginx+keepalived
Install keepalived with the following command
yum install -y keepalivedConfigure the master-slave mode of keepalived.
Host (192.168.124.128) keepalived.conf configuration
! Configuration File for keepalived

global_defs {
   notification_email {
     acassen@firewall.loc
     failover@firewall.loc
     sysadmin@firewall.loc
   }
   notification_email_from Alexandre.Cassen@firewall.loc
   smtp_server 192.168.200.1
   smtp_connect_timeout 30
   router_id LVS_DEVEL
   vrrp_skip_check_adv_addr
   vrrp_garp_interval 0
   vrrp_gna_interval 0

}

vrrp_script chk_nginx {
  script "/etc/keepalived/nginx_check.sh"
  interval 3 #(Detecting the interval between script execution)
  weight 2
}
vrrp_instance VI_1 {
    state MASTER #MASTER is the mainframe and BACKUP is the standby.
    interface eno16777736 #The network card of this machine needs to support MULTICAST
    virtual_router_id 51 # Consistency of Master and Subordinate Needs
    priority 100 #Mailbox machine is higher than slave machine
    advert_int 1
    authentication {
        auth_type PAS
        auth_pass 1111
    }
    track_script {
       chk_nginx
    }
    virtual_ipaddress {
        192.168.124.131 #Virtual ip, master and slave should be consistent
    }

}
Slave (192.168.124.130) configuration
! Configuration File for keepalived

global_defs {
   ...
}

rrp_script chk_nginx {
  script "/etc/keepalived/nginx_check.sh"
  interval 3
  weight 2
}

vrrp_instance VI_1 {
    state BACKUP
    interface ens33
    virtual_router_id 51
    priority 90
    advert_int 1
    authentication {
        auth_type PASS
        auth_pass 1111
    }
    track_script {
        chk_nginx
    }
    virtual_ipaddress {
        192.168.124.131
    }
}
Write the nginx status detection script / etc/keepalived/nginx_check.sh, if nginx stops running, try to start, if it can't start, kill the keepalived process of the machine, and keep alived binds the virtual ip to the BACKUP machine. The contents are as follows:
#!/bin/bash
A=`ps -C nginx –no-header |wc -l`
if [ $A -eq 0 ];then
    /home/wangzi/soft/nginx/sbin/nginx
    sleep 5
    if [ `ps -C nginx --no-header |wc -l` -eq 0 ];then
        killall keepalived
    fi
fi
Start the keepalived (system CTL start keepalived. service) and nginx (sbin/nginx) on the master and slave machines, respectively.
Use the ip a command to view VIP information.


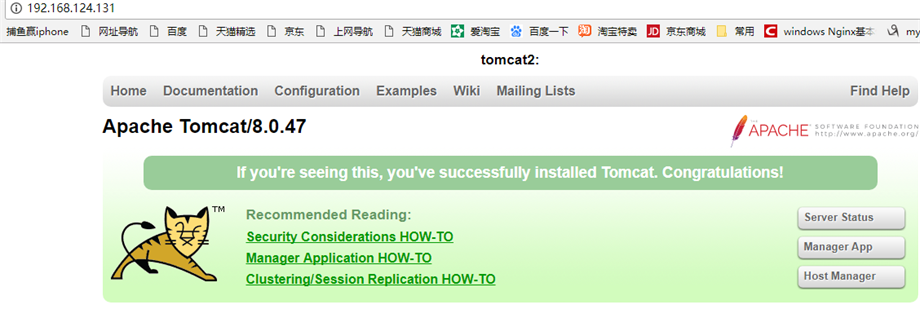
You can see that virtual VIP is already on 128 machines. We entered 192.168.124.131 in the browser to access the address.

At this time, the mainframe keepalived service is turned off. Virtual VIP is already on 130 machines, and the browser accesses 192.168.124.131, which can still be accessed normally.
