Any software you just need to remember what it does and how it works. You don't need to memorize commands, but you still need to know the basics
Keepalived overview
How to solve the single point failure of scheduler?
Keepalived is implemented as a highly available cluster
Keepalived was originally designed for LVS to monitor the status of server nodes
Preserved later added VRRP function to prevent single point failure
Operation principle of preserved
Keepalived detects the status of each server node
If the server node is abnormal or fails to work, preserved will remove the failed node from the cluster system
After the failed node recovers, it is kept alive and added to the cluster system
All work is done automatically without manual intervention
Case 1: 1.1 problem of highly available server with preserved
Prepare three Linux servers, two as Web servers, and deploy Keepalived high availability software, one as client host, to realize the following functions:
Using Keepalived to realize high availability of web server
The IP addresses of Web server are 192.168.4.100 and 192.168.4.200 respectively
The floating VIP address of the Web server is 192.168.4.80
Client accesses Web page by visiting VIP address
1.2 plan
Use three virtual machines, two as Web servers, and deploy Keepalived and one as client. The topology is shown in figure-1, and the host configuration is shown in TABLE-1.
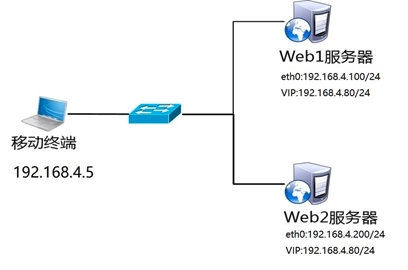
Table 1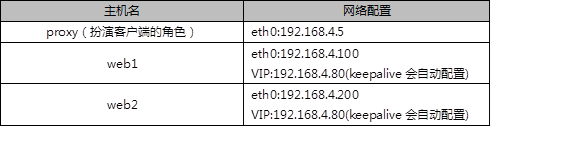
1.3 steps
To implement this case, follow the steps below.
Step 1: configure the network environment (if the configuration has been completed in the previous course, this step can be ignored)
1) Set Web1 server network parameters and configure Web Services
[root@web1 ~]# nmcli connection modify eth0 ipv4.method manual ipv4.addresses 192.168.4.100/24 connection.autoconnect yes
[root@web1 ~]# nmcli connection up eth0
[root@web1 ~]# yum -y install httpd
[root@web1 ~]# echo "192.168.4.100" > /var/www/html/index.html
[root@web1 ~]# systemctl restart httpd
2) Set Web 2 server network parameters and configure Web Services
[root@web2 ~]# nmcli connection modify eth0 ipv4.method manual ipv4.addresses 192.168.4.200/24 connection.autoconnect yes
[root@web2 ~]# nmcli connection up eth0
[root@web2 ~]# yum -y install httpd
[root@web2 ~]# echo "192.168.4.200" > /var/www/html/index.html
[root@web2 ~]# systemctl restart httpd
3) Configure the network parameters of the proxy host (this step can be ignored if it is already set)
[root@proxy ~]# nmcli connection modify eth0 ipv4.method manual ipv4.addresses 192.168.4.5/24 connection.autoconnect yes
[root@proxy ~]# nmcli connection up eth0
Step two
: install the preserved software
Note: two Web servers do the same thing.
[root@web1 ~]# yum install -y keepaCOURSE/ppt.htmllived
[root@web2 ~]# yum install -y keepalived
Step three
: deploy the preserved service
1) Modify web1 server preserved profile
[root@web1 ~]# vim /etc/keepalived/keepalived.conf
global_defs {
  notification_email {
    admin@tarena.com.cn                //Set alarm recipient mailbox
  }
  notification_email_from ka@localhost    //Set sender
  smtp_server 127.0.0.1                //Define mail server
  smtp_connect_timeout 30
  router_id  web1                        //Set route ID number (experiment needs to be modified)
}
vrrp_instance VI_1 {
  state MASTER                         //The primary server is MASTER (the standby server needs to be modified to BACKUP)
  interface eth0                    //Define network interface
  virtual_router_id 51                //The VRID number of the active and standby servers must be consistent
  priority 100                     //Server priority, high priority get VIP
  advert_int 1
  authentication {
    auth_type pass
    auth_pass 1111                       //The passwords of the active and standby servers must be consistent
  }
  virtual_ipaddress {                   //Who is the master server and who gets the VIP (the experiment needs to be modified)
192.168.4.80
}
}
2) Modify web2 server preserved profile
[root@web2 ~]# vim /etc/keepalived/keepalived.conf
global_defs {
  notification_email {
    admin@tarena.com.cn                //Set alarm recipient mailbox
  }
  notification_email_from ka@localhost    //Set sender
  smtp_server 127.0.0.1                //Define mail server
  smtp_connect_timeout 30
  router_id  web2                        //Set route ID number (experiment needs to be modified)
}
vrrp_instance VI_1 {
  state BACKUP                             //BACKUP is the standby server (the experiment needs to be modified)
  interface eth0                        //Define network interface
  virtual_router_id 51                    //Primary and secondary VRID numbers must be consistent
  priority 50                             //Server priority (experiment needs to be modified)
  advert_int 1
  authentication {
     auth_type pass
     auth_pass 1111                       //Primary and secondary server passwords must be consistent
  }
  virtual_ipaddress {                 //Who is the master server and who configures VIP (the experiment needs to be modified)
192.168.4.80
 }
}
3)Startup service
[root@web1 ~]# systemctl start keepalived
[root@web2 ~]# systemctl start keepalived
4)Configure firewall and SELinux
//Starting keepalived will automatically add a drop firewall rule, which needs to be cleared!
[root@web1 ~]# iptables -F
[root@web1 ~]# setenforce 0
[root@web2 ~]# iptables -F
[root@web1 ~]# setenforce 0
Step four
Testing
1) Log in to two Web servers to view VIP information
[root@web1 ~]# ip addr show eth0
[root@web2 ~]# ip addr show eth0
2) Client access
The client uses the curl command to connect to http://192.168.4.80 to view the Web page; close the network card of the Web1 server, and the client accesses http://192.168.4.80 again to verify whether the service can be accessed normally.
Case 2: preserved + LVS server
2.1 problem
Keep alive is used to provide high availability function for LVS scheduler, prevent single point failure of scheduler, and provide Web services for users:
The real IP address of LVS1 scheduler is 192.168.4.5
The real IP address of LVS2 scheduler is 192.168.4.6
Server VIP address is set to 192.168.4.15
The real Web server addresses are 192.168.4.100 and 192.168.4.200 respectively
Using weighted polling scheduling algorithm, the weight of real web server is different
2.2 plan
Use 5 virtual machines, 1 as client host, 2 as LVS scheduler and 2 as Real Server. The experimental topology environment structure is shown in figure-2, and the basic environment configuration is shown in table-2.
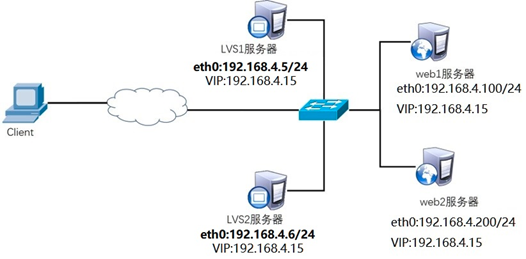
Table -2 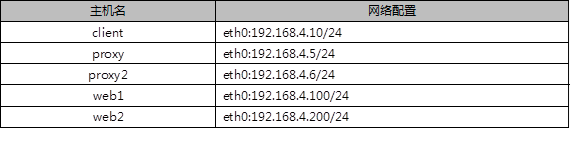
Note: all hosts need to be configured with IP addresses and valid YUM sources.
Title 2.3 steps
To implement this case, follow the steps below.
Step 1: configure the network environment
1)Set up Web1 Network parameters of the server
[root@web1 ~]# nmcli connection modify eth0 ipv4.method manual \
ipv4.addresses 192.168.4.100/24 connection.autoconnect yes
[root@web1 ~]# nmcli connection up eth0
Next, configure the VIP address for web1
Note: the subnet mask here must be 32 (that is, all 255). The network address is the same as the IP address, and the broadcast address is the same as the IP address.
[root@web1 ~]# cd /etc/sysconfig/network-scripts/
[root@web1 ~]# cp ifcfg-lo{,:0}
[root@web1 ~]# vim ifcfg-lo:0
DEVICE=lo:0
IPADDR=192.168.4.15
NETMASK=255.255.255.255
NETWORK=192.168.4.15
BROADCAST=192.168.4.15
ONBOOT=yes
NAME=lo:0
Note: because web1 is also configured with the same VIP address as the scheduler, there will be address conflicts by default.
The main purpose of writing these four lines is to access the 192.168.4.15 packet. Only the scheduler will respond, and no other host will respond.
[root@web1 ~]# vim /etc/sysctl.conf
#Manually write as follows4Row content
net.ipv4.conf.all.arp_ignore = 1
net.ipv4.conf.lo.arp_ignore = 1
net.ipv4.conf.lo.arp_announce = 2
net.ipv4.conf.all.arp_announce = 2
```COURSE/ppt.html

#When arp radio asks who is192.168.4.15This machine ignores the ARP Broadcast, no response
#Do not declare your lo loop address is192.168.4.15
//Restart network service, set firewall and SELinux

```cpp
[root@web1 ~]# systemctl stop NetworkManager
[root@web1 ~]# systemctl disable NetworkManager
[root@web1 ~]# systemctl restart network
[root@web1 ~]# ifconfig
[root@web1 ~]# systemctl stop firewalld
[root@web1 ~]# setenforce 0
2) Set network parameters of Web2 server
[root@web2 ~]# nmcli connection modify eth0 ipv4.method manual \
ipv4.addresses 192.168.4.200/24 connection.autoconnect yes
[root@web2 ~]# nmcli connection up eth0
Next, configure the VIP address for web2
Note: the subnet mask here must be 32 (that is, all 255). The network address is the same as the IP address, and the broadcast address is the same as the IP address.
[
root@web2 ~]# cd /etc/sysconfig/network-scripts/
[root@web2 ~]# cp ifcfg-lo{,:0}
[root@web2 ~]# vim ifcfg-lo:0
DEVICE=lo:0
IPADDR=192.168.4.15
NETMASK=255.255.255.255
NETWORK=192.168.4.15
BROADCAST=192.168.4.15
ONBOOT=yes
NAME=lo:0
Note: here, because web2 is also configured with the same VIP address as the agent, there will definitely be address conflicts by default.
The main purpose of writing these four lines is to access the 192.168.4.15 packet. Only the scheduler will respond, and no other host will respond.
[root@web2 ~]# vim /etc/sysctl.conf
#Manually write as follows4Row content
net.ipv4.conf.all.arp_ignore = 1
net.ipv4.conf.lo.arp_ignore = 1
net.ipv4.conf.lo.arp_announce = 2
net.ipv4.conf.all.arp_announce = 2
#When an ARP broadcast asks who is 192.168.4.15, the local computer ignores the ARP broadcast and makes no response
#Do not announce that your lo loop address is 192.168.4.15
Restart network service, set firewall and SELinux
[
root@web2 ~]# systemctl stop NetworkManager
[root@web1 ~]# systemctl disable NetworkManager
[root@web2 ~]# systemctl restart network
[root@web2 ~]# ifconfig
[root@web2 ~]# systemctl stop firewalld
[root@web2 ~]# setenforce 0
3) Configure the network parameters of the proxy host (not VIP, automatically configured by keepalived)
[root@proxy ~]# nmcli connection modify eth0 ipv4.method manual \
ipv4.addresses 192.168.4.5/24 connection.autoconnect yes
[root@proxy ~]# nmcli connection up eth0
4) Configure the network parameters of the proxy2 host (no VIP configuration, automatically configured by keepalied)
Note: according to the previous course environment, there is no virtual machine by default, and a new virtual machine proxy2 needs to be built.
[root@proxy2 ~]# nmcli connection modify eth0 ipv4.method manual \
ipv4.addresses 192.168.4.6/24 connection.autoconnect yes
[root@proxy2 ~]# nmcli connection up eth0
Step two
: configure background web Services
COURSE/ppt.html
1)Install software, custom Web Page ( web1 and web2 Main engine)
[root@web1 ~]# yum -y install httpd
[root@web1 ~]# echo "192.168.4.100" > /var/www/html/index.html
[root@web2 ~]# yum -y install httpd
[root@web2 ~]# echo "192.168.4.200" > /var/www/html/index.html
2)start-up Web Server software(web1 and web2 Host)
[root@web1 ~]# systemctl start httpd ; systemctl enable httpd
[root@web2 ~]# systemctl start httpd ; systemctl enable httpd
Step three
: the scheduler installs the maintained and ipvsadm software
Note: both LVS schedulers perform the same operation (this step can be ignored if the software has been installed).
Installation software
[root@proxy ~]# yum install -y keepalived
[root@proxy ~]# systemctl enable keepalived
[root@proxy ~]# yum install -y ipvsadm
[root@proxy ~]# ipvsadm -C
[root@proxy2 ~]# yum install -y keepalived
[root@proxy2 ~]# systemctl enable keepalived
[root@proxy2 ~]# yum install -y ipvsadm
[root@proxy2 ~]# ipvsadm -C
Step four
: deploy Keepalived to realize high availability of LVS-DR mode scheduler
virtual_server 192.168.4.15 80 {} / / set VIP rule of ipvsadm
real_server 192.168.4.100 80 {} / / set the real IP address of the backend web server
TCP? Check {} / / port
Http {} / / check normal page
SSL {} / / check the encryption page (visit the encryption page)
Connect? Timeout 3 / / timeout 3 seconds
NB > get > retry 3 / / how often are links made 3 times
Delay? Before? Retry 3 / / delay 3 times before retrying
1) LVS1 scheduler sets preserved and starts the service (host operation at 192.168.4.5)
[root@proxy ~]# vim /etc/keepalived/keepalived.conf
global_defs {
  notification_email {
    admin@tarena.com.cn                //Set alarm recipient mailbox
  }
  notification_email_from ka@localhost    //Set sender
  smtp_server 127.0.0.1                //Define mail server
  smtp_connect_timeout 30
  router_id  lvs1                        //Set route ID number (experiment needs to be modified)
}
vrrp_instance VI_1 {
  state MASTER                             //MASTER is the primary server
  interface eth0                        //Define network interface
  virtual_router_id 51                 //Primary and secondary VRID numbers must be consistent
  priority 100                         //Server priority
  advert_int 1
  authentication {
    auth_type pass
    auth_pass 1111                       //Primary and secondary server passwords must be consistent
  }
  virtual_ipaddress {                   //Configure VIP (experiment needs to be modified)
192.168.4.15
 }
}
virtual_server 192.168.4.15 80 {           //Set VIP rules of ipvsadm (experiment needs to be modified)
  delay_loop 6
  lb_algo rr                              //Set LVS scheduling algorithm to RR
  lb_kind DR                               //Set the mode of LVS to DR (experiment needs to be modified)
  #persistence_timeout 50                //(note required for experiment)
#Note that this function is to keep the connection. After opening, the client will always access the same server for a certain period of time
  protocol TCP
  real_server 192.168.4.100 80 {         //Set the real IP address of the back-end web server (the experiment needs to be modified)
    weight 1                             //Set weight to 1
    TCP_CHECK {                           //Check the health of the real server in the background (the experiment needs to be modified)
    connect_timeout 3
    nb_get_retry 3
    delay_before_retry 3
    }
  }
 real_server 192.168.4.200 80 {       //Set the real IP address of the back-end web server (the experiment needs to be modified)
    weight 2                          //Set weight to 1
    TCP_CHECK {                        //Check the health of the real server in the background (the experiment needs to be modified)
    connect_timeout 3
    nb_get_retry 3
    delay_before_retry 3
    }
  }
}
[root@proxy1 ~]# systemctl start keepalived
[root@proxy1 ~]# ipvsadm -Ln                     #View LVS rules
[root@proxy1 ~]# ip a  s                          #View VIP configuration
[root@proxy1 ~]# iptables -F
2)LVS2 Scheduler settings Keepalived(stay192.168.4.6Host operation)
[root@proxy2 ~]# vim /etc/keepalived/keepalived.conf
global_defs {
  notification_email {
    admin@tarena.com.cn                //Set alarm recipient mailbox
  }
  notification_email_from ka@localhost    //Set sender
  smtp_server 127.0.0.1                //Define mail server
  smtp_connect_timeout 30
  router_id  lvs2                        //Set route ID number (experiment needs to be modified)
}
vrrp_instance VI_1 {
  state BACKUP                             //From server to BACKUP (experiment needs to be modified)
  interface eth0                        //Define network interface
  virtual_router_id 51                    //Primary and secondary VRID numbers must be consistent
  priority 50                             //Server priority (experiment needs to be modified)
  advert_int 1
  authentication {
    auth_type pass
    auth_pass 1111                       //Primary and secondary server passwords must be consistent
  }
  virtual_ipaddress {                   //Set VIP (experiment needs to be modified)
192.168.4.15
}
}
virtual_server 192.168.4.15 80 {          //Set LVS rules automatically (experiment needs to be modified)
  delay_loop 6
  lb_algo  rr                              //Set LVS scheduling algorithm to RR
  lb_kind DR                               //Set the mode of LVS to DR (experiment needs to be modified)
 # persistence_timeout 50               //(note required for experiment)
#Note that this function is to keep the connection. After opening, the client will always access the same server for a certain period of time
  protocol TCP
  real_server 192.168.4.100 80 {        //Set the real IP address of the back-end web server (the experiment needs to be modified)
    weight 1                              //Set weight to 1
    TCP_CHECK {                         //Check the health of the real server in the background (the experiment needs to be modified)
    connect_timeout 3
    nb_get_retry 3
    delay_before_retry 3
    }
  }
 real_server 192.168.4.200 80 {         //Set the real IP address of the back-end web server (the experiment needs to be modified)
    weight 2                              //Set weight to 1
    TCP_CHECK {                        //Check the health of the real server in the background (the experiment needs to be modified)
    connect_timeout 3
    nb_get_retry 3
    delay_before_retry 3
    }
  }
[root@proxy2 ~]# systemctl start keepalived
[root@proxy2 ~]# ipvsadm -Ln                 #View LVS rules
[root@proxy2 ~]# ip  a   s                    #View VIP settings
[root@proxy2 ~]# iptables -F
Step five
: client test
The client uses the curl command to repeatedly connect to http://192.168.4.15 to check whether the visited page will poll to different back-end real servers.
3 case 3: configure HAProxy load balancing cluster
**Performance: LVS > haproxy > nginx
   Function: LVS < haproxy < nginx
   Regular: no support
   The above is software server
    Big IP is the hardware server
3.1 problem
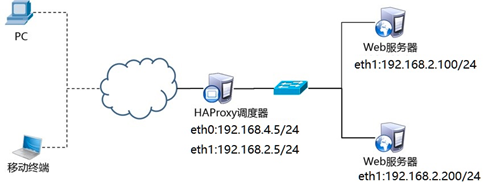
Prepare 4 Linux servers, 2 as Web servers, 1 as HAProxy and 1 as client to realize the following functions:
The client accesses HAProxy, which distributes requests to the backend Real Server
Open the HAProxy monitoring page to check the status of the scheduler in time
Set HAProxy to boot
3.2 plan
Four virtual machines are used, one as HAProxy scheduler, two as Real Server and one as client. The topology is shown in figure-3, and the specific configuration is shown in table-3.

3.3 steps
To implement this case, follow the steps below. matters needing attention:
Clean up the contents of VIP, LVS and other experiments!!!!!!
Delete VIP of all devices, clear all LVS settings, and close keepalived!!!
web1 closes redundant network cards and VIP s, and configures the local real IP address.
[
root@web1 ~]# ifdown lo:0
[root@web1 ~]# nmcli connection modify eth1 ipv4.method manual \
ipv4.addresses 192.168.2.100/24 connection.autoconnect yes
[root@web1 ~]# nmcli connection up eth1
Web2 Turn off redundant network cards and VIP,Configure local authenticity IP Address.
[root@web2 ~]# ifdown lo:0
[root@web2 ~]# nmcli connection modify eth1 ipv4.method manual \
ipv4.addresses 192.168.2.200/24 connection.autoconnect yes
[root@web2 ~]# nmcli connection up eth1
proxy Close keepalived Service, cleanup LVS Rules.
[root@proxy ~]# systemctl stop keepalived
[root@proxy ~]# systemctl disable keepalived
[root@proxy ~]# ipvsadm -C
[root@proxy ~]# nmcli connection modify eth0 ipv4.method manual \
ipv4.addresses 192.168.4.5/24 connection.autoconnect yes
[root@proxy ~]# nmcli connection up eth0
[root@proxy ~]# nmcli connection modify eth1 ipv4.method manual \
ipv4.addresses 192.168.2.5/24 connection.autoconnect yes
[root@proxy ~]# nmcli connection up eth1
Step one
: configure backend Web server
Set up two back-end Web services (ignore this step if configuration is complete)
[root@web1 ~]# yum -y install httpd
[root@web1 ~]# systemctl start httpd
[root@web1 ~]# echo "192.168.2.100" > /var/www/html/index.html
[root@web2 ~]# yum -y install httpd
[root@web2 ~]# systemctl start httpd
[root@web2 ~]# echo "192.168.2.200" > /var/www/html/index.html
Step two
: deploy HAProxy server
1) Configure network, install software
[root@proxy ~]# yum -y install haproxy
2) Modify profile
[root@proxy ~]# vim /etc/haproxy/haproxy.cfg
global
log 127.0.0.1 local2 ##[err warning info debug]
chroot /usr/local/haproxy
PID storage path of pidfile / var / run / haproxy.pid
maxconn 4000 - maximum number of connections, default 4000
user haproxy
group haproxy
daemon - create a process to run in deamon mode
defaults
mode http ා default mode {TCP | http | health}
option dontlognull do not log health check log information
option httpclose: automatically close the http channel after each request
option httplog http log format
Option forward for the backend server can obtain client ip from Http Header
Option redispatch - force the server ID server to be directed to another health server after it is hung up
timeout connect 10000 ා if the backend is not specified, the default is 10s
timeout client 300000 client connection timeout
timeout server 300000 - server connection timeout
Maxconn 3000 Max connections
Retries 3. If the connection fails 3 times, the service is considered unavailable. You can also set it later
listen stats 0.0.0.0:1080   #Monitor port
    stats refresh 30s   #Statistics page auto refresh time
    stats uri /stats   #Statistics page url
    stats realm Haproxy Manager #Enter the management interface to view the status information
    stats auth admin:admin  #Statistics page user name and password settings
listen  websrv-rewrite 0.0.0.0:80
   balance roundrobin
   server  web1 192.168.2.100:80 check inter 2000 rise 2 fall 5
   server  web2 192.168.2.200:80 check inter 2000 rise 2 fall 5
3) Start the server and set the startup
[root@proxy ~]# systemctl start haproxy
[root@proxy ~]# systemctl enable haproxy
Step three
: client authentication
The client configures the IP address of the same network as HAProxy, and uses Firefox browser to visit http://192.168.4.5 to test whether the scheduler works normally, and the client accesses http://192.168.4.5:1080/stats to test whether the status monitoring page is normal. Refer to figure-4 for access to the status monitoring page.
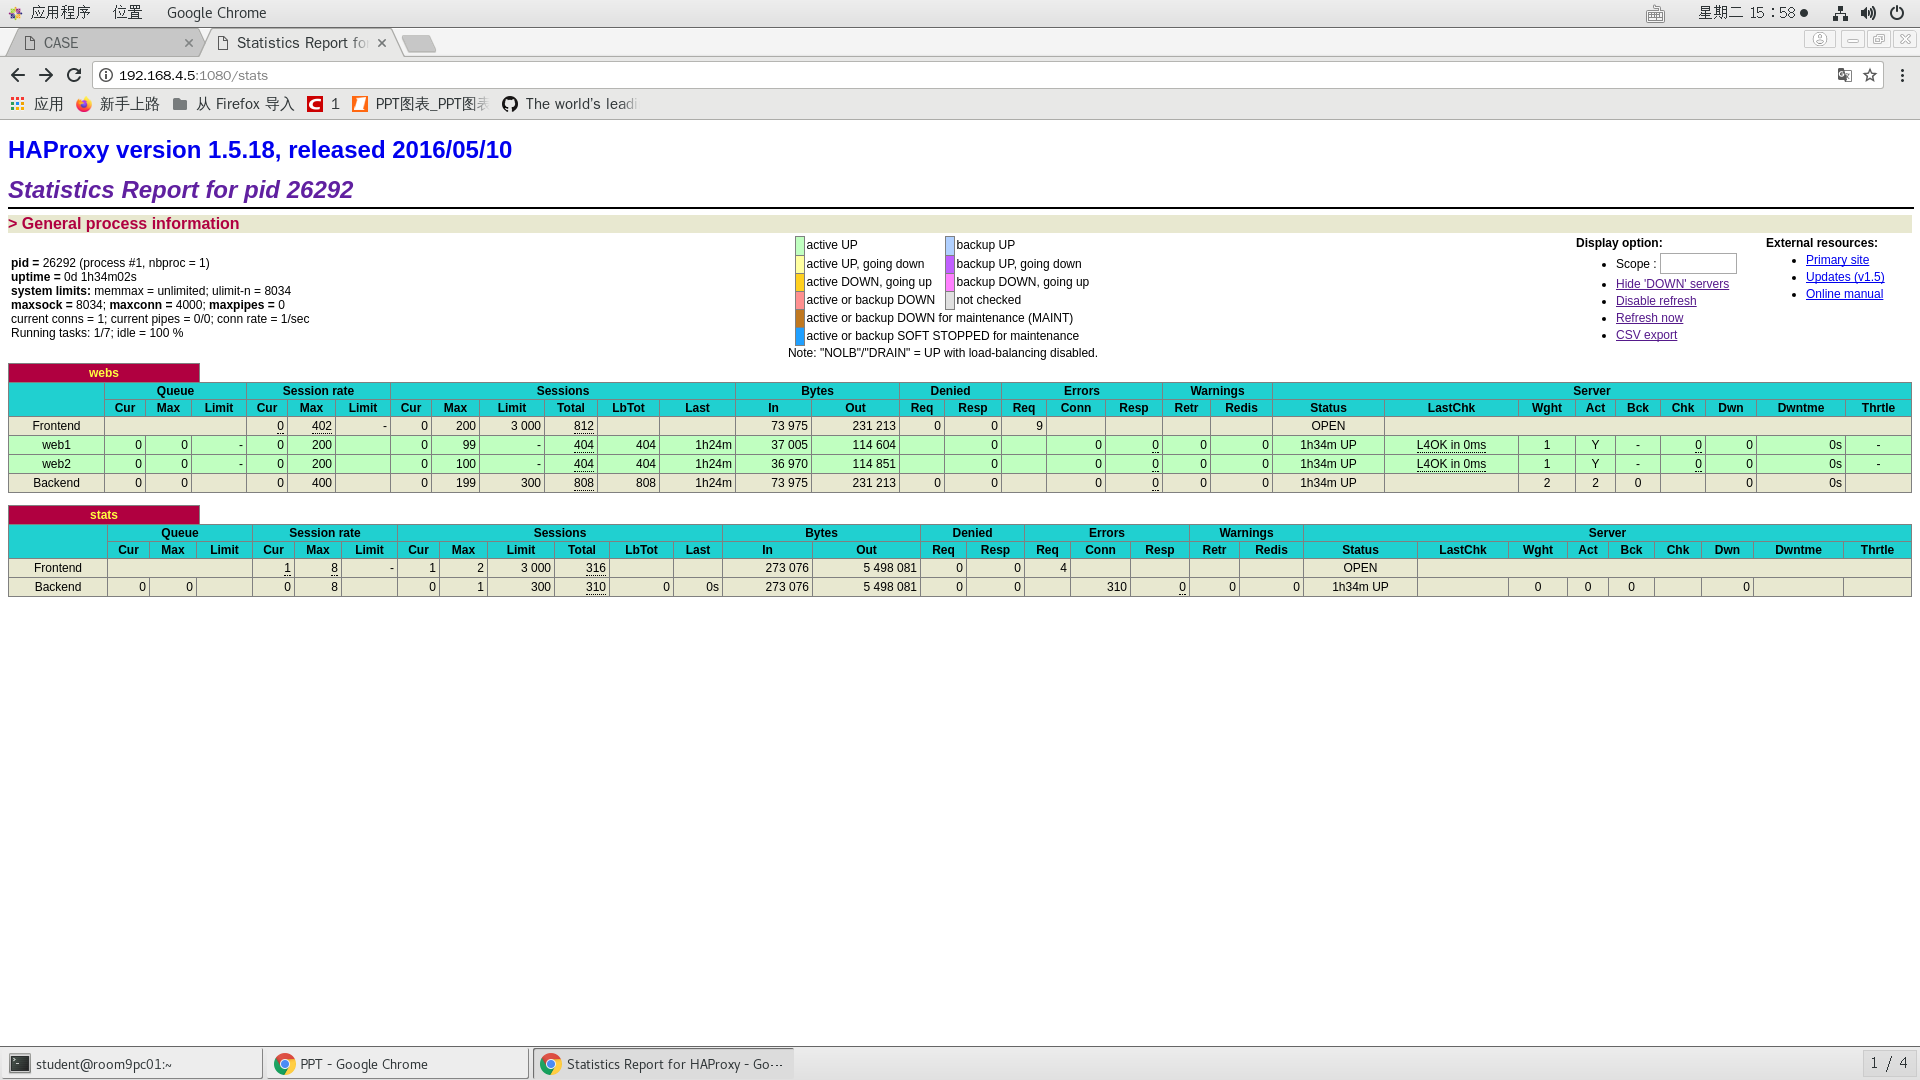
Figure -4
Remarks:
Information of Queue data (number of current queues, maximum value, number of Queue restrictions);
Session rate per second (current value, maximum value, limit number);
Sessions: total number of times a server was selected;
Bytes (inbound and outbound flow);
Denied (reject request, reject response);
Errors (error request, error connection, error response);
Warnings (retry warning, reconnect redispatches);
Server (status, last check time (how long ago the last check was performed), weight, number of backup servers, number of down servers, and down time).
Summary analysis:
Nginx analysis
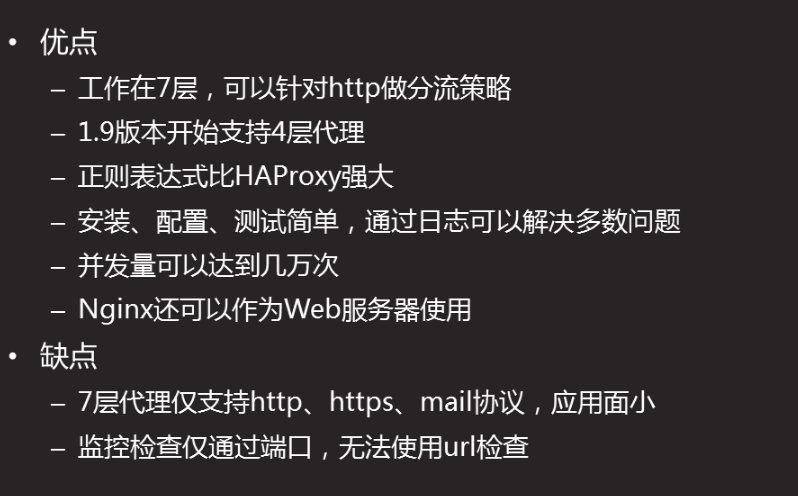
lvs analysis

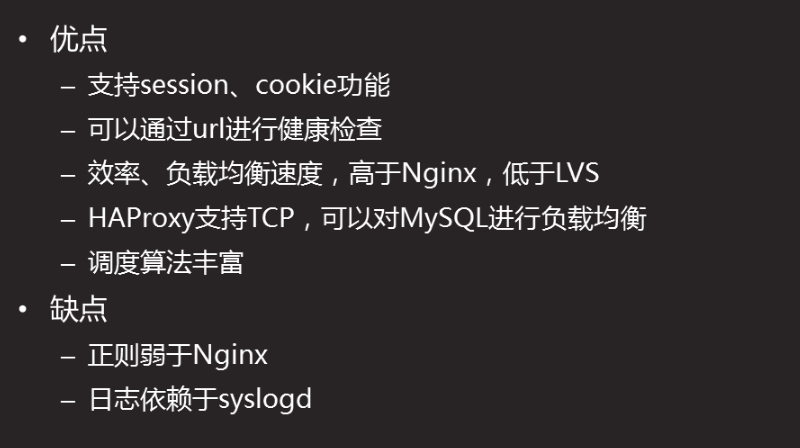
HAProxy analysis**
Problem phenomenon
HAProxy

Troubleshooting
HAProxy
LVS failure analysis
Problem phenomenon