Through blog posts: Haproxy service tuning and configuration details
You can already understand the role of Haproxy services;
Through blog posts: Using Keepalived to Realize Hot Detailed Interpretation of Dual Computer
You can already understand the role of Keepalived services.
Haproxy service is a tool to build cluster scheduling with good performance. But in the real world, it must be used with Keepalived service to avoid single point of failure.
Case environment:
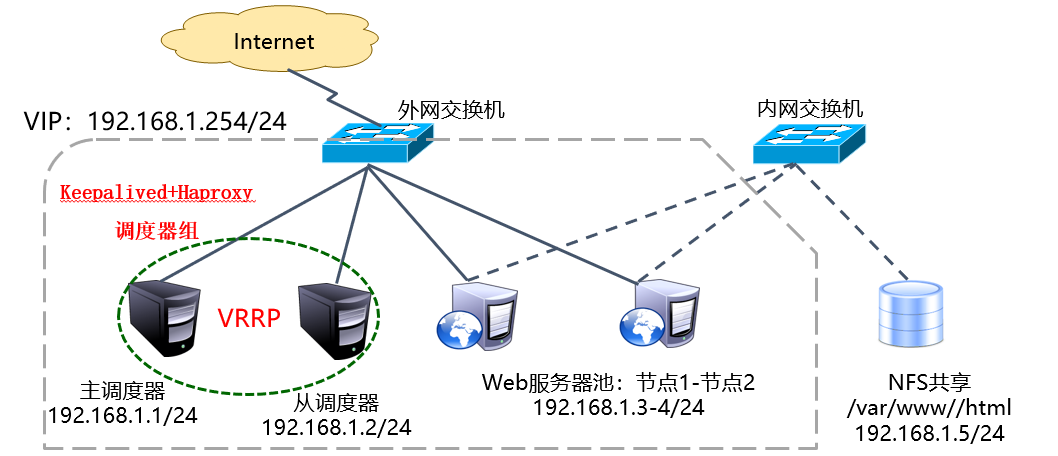
This blog post is actually a blog post: Build LVS (DR mode) +Keepalived High Available Cluster, can follow!!!
Almost, it's just Haproxy instead of LVS, which is responsible for building the cluster environment. In fact, there is nothing to write, the original intention is not to write. But there are several points of knowledge that must be understood, otherwise the environment can not be realized.
II. Case implementation
Approximate steps for case implementation:
1. For simplicity, each server (whether it is a Web node or a scheduling server) should open firewall-related traffic in the actual environment.
2. Install Keepalived and Haproxy services on the master dispatch server;
3. Configure the Web node server, install Web services (APache, Nginx can be) to create virtual IP addresses, all configurations are the same, but it is recommended that the home page is not the same, so as to see the effect. In the actual environment, the content of the home page must be the same, and the NFS server can be built to synchronize the content of the web page.
4. Client test access to the main Haproxy server address (access to Web pages);
5. Install Keepalived and Haproxy services from the dispatch server;
6. Client access drift IP address (access success);
For less specific services and software package acquisition methods, you can refer to the blog: Using Keepalived to Realize Hot Detailed Interpretation of Dual Computer and
Haproxy service tuning and configuration details
Specific steps:
(1) Configuring the master dispatcher server
[root@localhost ~]# systemctl stop firewalld
[root@localhost ~]# setenforce 0
//Close Firewall and SELinux
[root@localhost ~]# yum -y install keepalived pcre-devel bzip2-devel
//Installation of appropriate services and tools
[root@localhost ~]# tar zxf haproxy-1.5.19.tar.gz -C /usr/src/
[root@localhost ~]# cd /usr/src/haproxy-1.5.19/
[root@localhost haproxy-1.5.19]# make TARGET=linux26
[root@localhost haproxy-1.5.19]# make install
//Installation of Haproxy Service
[root@localhost ~]# mkdir /etc/haproxy
[root@localhost ~]# cp /usr/src/haproxy-1.5.19/examples/haproxy.cfg /etc/haproxy/
[root@localhost ~]# vim /etc/haproxy/haproxy.cfg
//Write configuration files for Haproxy services
global
        log 127.0.0.1   local0
        log 127.0.0.1   local1 notice
        #log loghost    local0 info
        maxconn 4096
        #chroot /usr/share/haproxy
        uid 99
        gid 99
        daemon
        #debug
        #quiet

defaults
        log     global
        mode    http
        option  httplog
        option  dontlognull
        retries 3
        #redispatch
        maxconn 2000
        contimeout      5000
        clitimeout      50000
        srvtimeout      50000

listen  appli1-rewrite 0.0.0.0:80
        option httpchk GET /index.html
        balance roundrobin
        server  app1_1 192.168.1.3:80 check inter 2000 rise 2 fall 5
        server  app1_2 192.168.1.4:80 check inter 2000 rise 2 fall 5
[root@localhost ~]# cp /usr/src/haproxy-1.5.19/examples/haproxy.init /etc/init.d/haproxy
[root@localhost ~]# ln -s /usr/local/sbin/haproxy /usr/sbin/haproxy
[root@localhost ~]# chmod +x /etc/init.d/haproxy
[root@localhost ~]# chkconfig --add /etc/init.d/haproxy
[root@localhost ~]# /etc/init.d/haproxy start
Starting haproxy (via systemctl):                          [  Determine  ]
//Write a service startup script and start the service
[root@localhost ~]# vim /etc/keepalived/keepalived.conf
//Write configuration files for Keepalived services
global_defs {
   notification_email {
     acassen@firewall.loc
     failover@firewall.loc
     sysadmin@firewall.loc
   }
   notification_email_from Alexandre.Cassen@firewall.loc
   smtp_server 192.168.200.1
   smtp_connect_timeout 30
   router_id LVS_DEVEL1
}

vrrp_instance VI_1 {
    state MASTER
    interface ens33
    virtual_router_id 51
    priority 100
    advert_int 1
    authentication {
        auth_type PASS
        auth_pass 1111
    }
    virtual_ipaddress {
        192.168.1.254
    }
}
//Only these are left in the configuration file, and the remaining suggestions are commented or deleted.
[root@localhost ~]# systemctl start keepalived
//Start the Keepalived service
(2) Configuring Web Node Server
Two Web node servers have almost the same configuration, only the content of the web page is different. Here's an example:
[root@localhost ~]# systemctl stop firewalld
[root@localhost ~]# setenforce 0
[root@localhost ~]# yum -y install httpd
[root@localhost ~]# echo aaa > /var/www/html/index.html
[root@localhost ~]# systemctl start httpd
//Install and start http services
Both Web node servers have been configured and can be accessed through the IP address of the master scheduler!
[root@localhost ~]# cd /etc/sysconfig/network-scripts/
[root@localhost network-scripts]# cp ifcfg-lo ifcfg-lo:0
[root@localhost network-scripts]# vim ifcfg-lo:0
DEVICE=lo:0
IPADDR=192.168.1.254
NETMASK=255.255.255.255
ONBOOT=yes
NAME=loopback:0
[root@localhost network-scripts]# ifup lo
[root@localhost network-scripts]# ifconfig lo:0
lo:0: flags=73<UP,LOOPBACK,RUNNING>  mtu 65536
        inet 192.168.1.254  netmask 255.255.255.255
        loop  txqueuelen 1  (Local Loopback)
//Configure Virtual IP Address
[root@localhost ~]# route add -host 192.168.1.254 dev lo:0
//Add local routing
[root@localhost ~]# vim /etc/sysctl.conf
net.ipv4.conf.all.arp_ignore  =  1
net.ipv4.conf.all.arp_announce  =  2
net.ipv4.conf.default.arp_ignore  =  1
net.ipv4.conf.default.arp_announce = 2
net.ipv4.conf.lo.arp_ignore  =  1
net.ipv4.conf.lo.arp_announce  = 2
[root@localhost ~]# sysctl -p
net.ipv4.conf.all.arp_ignore = 1
net.ipv4.conf.all.arp_announce = 2
net.ipv4.conf.default.arp_ignore = 1
net.ipv4.conf.default.arp_announce = 2
net.ipv4.conf.lo.arp_ignore = 1
net.ipv4.conf.lo.arp_announce = 2
//Modifying Kernel Parameters
When two Web nodes are configured here, they can be accessed using drift IP addresses! Although drift IP is used for access, when the primary scheduler goes down, the client will not be able to access the Web node server. So you need to build a slave dispatcher (the more the better)!
(3) Configuring slave scheduler server
The slave dispatch server configuration is almost the same as the master dispatcher configuration, but the router ID, priority and hot standby status in Keepalived service are different, and the rest is exactly the same! So I won't introduce it here! I believe that after reading the previous blog posts, you can make it without reading the blog posts.
After the master and slave schedulers are configured, they can test whether the master scheduler is down or not. (I have no problem with the test.) You test yourself!
The cluster environment built with Haproxy service can clearly see the status of cluster polling!
In this way, the loss caused by single point failure can be well avoided!
In the actual environment, we must build NFS shared storage to synchronize the content of the website homepage. NFS shared storage is a very basic service, which is not introduced here.
It is recommended to build NFS shared storage to ensure the consistency of Web node service content (which must be done in the real environment)!
———————— This is the end of the article. Thank you for reading.————————