K8s pod foundation and classification
1, Basic concepts of Pod
Pod is the smallest resource management component in kubernetes. Pod is also a resource object that minimizes the running of container applications. A pod represents a process running in the cluster. Most other components in kubernetes support and extend pod functions around pod. For example, controller objects such as StatefulSet and Deployment used to manage pod operation, Service and progress objects used to expose pod applications, PersistentVolume storage resource objects that provide storage for pod, etc.
In the Kubrenetes cluster, Pod can be used in the following two ways:
1) Run a container in a Pod. The pattern of "one container per Pod" is the most common usage; In this way, you can think of Pod as the encapsulation of a single container. kuberentes manages Pod instead of directly managing containers.
2) Run multiple containers simultaneously in a pod. A pod can also encapsulate several containers that need to be closely coupled and cooperate with each other at the same time, and they share resources. These containers in the same pod can cooperate with each other to form a service unit. For example, one container shares files and another "sidecar" container updates these files. Pod manages the storage resources of these containers as an entity.
Containers under a pod must run on the same node. Modern container technology suggests that a container only runs one process. The process number in the PID command space of the container is 1, which can directly receive and process signals. When the process terminates, the container life cycle will end. If you want to run multiple processes in the container, you need a management and control process similar to the init process of Linux operating system to complete the life cycle management of multiple processes in a tree structure. Processes running in their own containers cannot directly complete Network communication because of the isolation mechanism between containers. Pod resource abstraction in k8s solves this problem. Pod objects are a collection of containers that share Network, UTS and IPC command space. Therefore, they have the same domain name, host name and Network interface and can communicate directly through IPC.
In Pod resources, the underlying basic container pause provides sharing mechanisms such as network command space for each container. The basic container pause (also known as the parent container) is to manage the sharing operation between Pod containers. The parent container needs to know exactly how to create containers with shared running environment and manage the life cycle of these containers. In order to realize the concept of this parent container, in kubernetes, the pause container is used as the parent container of all containers in a Pod. The pause container has two core functions. One is that it provides the basis for the Linux namespace of the whole Pod. Second, enable the PID namespace, which is used as the process with PID 1 (init process) in each Pod, and recycle the zombie process.
The pause container allows all containers in the Pod to share two resources: network and storage.
Network:
Each Pod is assigned a unique IP address. All containers in the Pod share cyberspace, including IP addresses and ports. Containers inside the Pod can communicate with each other using localhost. When the container in the Pod communicates with the outside world, it must allocate shared network resources (for example, use the port mapping of the host).
Storage:
You can specify multiple shared volumes using Pod. All containers in the Pod can access the shared volume. Volume can also be used to persist the storage resources in the Pod to prevent file loss after container restart.
Summary:
Each Pod has a special Pause container called the "base container". The image corresponding to the Pause container belongs to the Kubernetes platform. In addition to the Pause container, each Pod also contains one or more closely related user application containers.
The pause container in kubernetes mainly provides the following functions for each container:
Serve as the basis for sharing Linux namespaces (such as network command space) in pod;
Enable the PID namespace and start the init process.
What is the purpose of Kubernetes to design such Pod concept and special composition structure?????
Reason 1: when a group of containers is used as a unit, it is difficult to simply judge and effectively act on the overall container. For example, when a container dies, does it count as a whole? Then, we can solve this problem by introducing the Pause container independent of business as the basic container of Pod, and its state represents the state of the whole container group.
Reason 2: multiple application containers in the Pod share the IP of the Pause container and the Volume mounted by the Pause container, which simplifies the communication between application containers and solves the file sharing problem between containers.
Pod is usually divided into two categories:
1) Autonomous Pod
This kind of pod itself cannot repair itself. When the pod is created (whether it is directly created by you or by other controllers), it will be dispatched by Kuberentes to the nodes of the cluster. The pod will remain on that Node until the process of the pod is terminated, deleted, expelled due to lack of resources, or the Node fails. Pod doesn't heal itself. If the Node running the pod fails or the scheduler itself fails, the pod will be deleted. Similarly, if the Node where the pod is located lacks resources or the pod is in maintenance status, the pod will also be expelled.
2) Controller managed Pod
Kubernetes uses a more advanced abstraction layer called Controller to manage Pod instances. The Controller can create and manage multiple pods, providing replica management, rolling upgrade and cluster level self-healing capabilities. For example, if a Node fails, the Controller can automatically schedule the Pod on the Node to other healthy nodes. Although the Pod can be used directly, the Controller is usually used to manage the Pod in kubernetes.
Pod container classification:
1. infrastructure container
//Maintain the entire Pod network and storage space
//Operation in node node
//When you start a container, k8s it automatically starts a base container
cat /opt/kubernetes/cfg/kubelet
......
--pod-infra-container-image=registry.cn-hangzhou.aliyuncs.com/google-containers/pause-amd64:3.0"

//Each time a Pod is created, it will be created. Each container running has a base container of pause-amd64, which will run automatically and is transparent to users
docker ps -a
registry.cn-hangzhou.aliyuncs.com/google-containers/pause-amd64:3.0 "/pause"
2. Initialize containers
The Init container must run before the application container starts, and the application container runs in parallel, so the Init container can provide a simple method to block or delay the start of the application container.
The Init container is very similar to an ordinary container, except for the following two points:
1) The Init container always runs until successful completion
2) Each Init container must successfully start and exit before the next Init container starts
If the Init container of the Pod fails, k8s the Pod will be restarted continuously until the Init container succeeds. However, if the restart policy corresponding to the Pod is Never, it will not restart.
Container function of Init
Because the init container has a separate image from the application container, its startup related code has the following advantages:
● Init container can contain some utilities or personalized codes that do not exist in the application container during installation. For example, it is not necessary to generate a new image FROM an image just to use tools like sed, awk, python, or dig during installation.
● the Init container can safely run these tools to avoid reducing the security of the application image caused by these tools.
● the creator and deployer of the application image can work independently, without the need to jointly build a separate application image.
● the Init container can run in a file system view different from the application container in the Pod. Therefore, the Init container can have access to Secrets, but the application container cannot.
● since the Init container must run before the application container starts, the Init container provides a mechanism to block or delay the start of the application container,
Until a set of prerequisites is met. Once the preconditions are met, all application containers in the Pod will start in parallel.
3. Application container (Maincontainer)
//Parallel start
Example of official website:
https://kubernetes.io/docs/concepts/workloads/pods/init-containers/
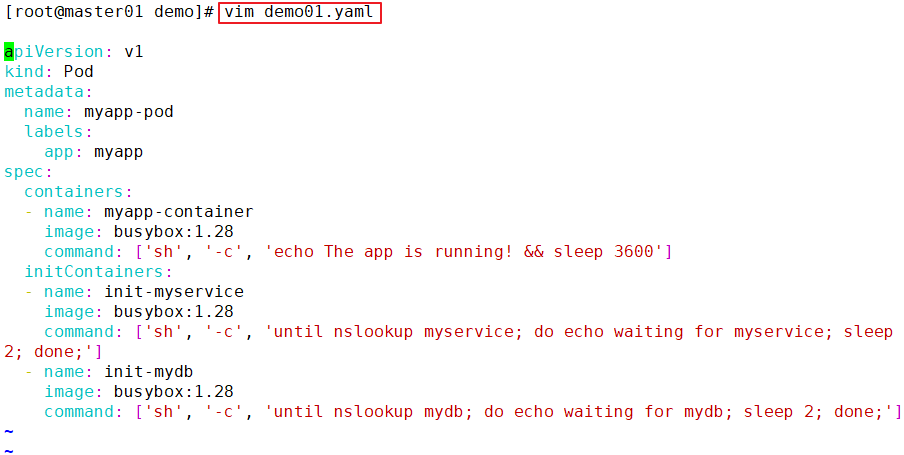
apiVersion: v1
kind: Pod
metadata:
name: myapp-pod
labels:
app: myapp
spec:
containers:
- name: myapp-container
image: busybox:1.28
command: ['sh', '-c', 'echo The app is running! && sleep 3600']
initContainers:
- name: init-myservice
image: busybox:1.28
command: ['sh', '-c', 'until nslookup myservice; do echo waiting for myservice; sleep 2; done;']
- name: init-mydb
image: busybox:1.28
command: ['sh', '-c', 'until nslookup mydb; do echo waiting for mydb; sleep 2; done;']
This example defines a with 2 Init Container simplicity Pod. First wait myservice Start, second wait mydb Start. Once these two Init The containers are all started, Pod Will start spec Application container in.
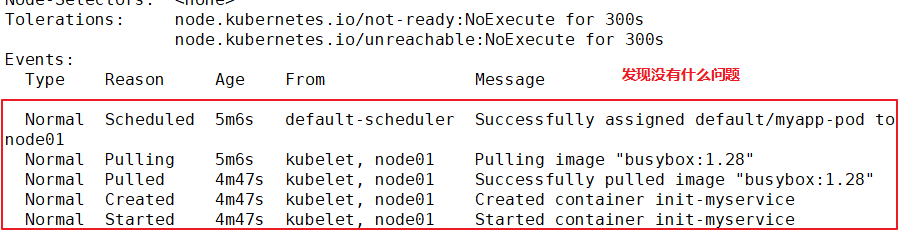
kubectl describe pod myapp-pod
kubectl logs myapp-pod -c init-myservice
vim myservice.yaml
apiVersion: v1
kind: Service
metadata:
name: myservice
spec:
ports:
- protocol: TCP
port: 80
targetPort: 9376
kubectl create -f myservice.yaml
kubectl get svc
kubectl get pods -n kube-system
kubectl get pods
vim mydb.yaml
apiVersion: v1
kind: Service
metadata:
name: mydb
spec:
ports:
- protocol: TCP
port: 80
targetPort: 9377
kubectl create -f mydb.yaml
kubectl get pods
//Special note:
●stay Pod During startup, Init The container starts sequentially after network and data volume initialization. Each container must exit successfully before the next container starts.
●If the container fails to start due to runtime or exit failure, it will Pod of restartPolicy Retry the specified policy. However, if Pod of restartPolicy Set to Always,Init Used when the container fails RestartPolicy Strategy.
●In all Init Before the container succeeds, Pod Will not become Ready Status. Init The port of the container will not be Service Aggregate in. Initializing in Pod be in Pending Status, but should Initializing Status set to true.
●If Pod Restart, all Init The container must be re executed.
●yes Init container spec Modifications are limited to containers image Field. Modifying other fields will not take effect. change Init Container image Field, equivalent to restarting the Pod.
●Init The container has all the fields that apply to the container. except readinessProbe,because Init Container cannot be defined different from completion( completion)Ready for( readiness)Other than. This is enforced during validation.
●stay Pod Each of the app and Init The name of the container must be unique; sharing the same name with any other container will throw an error during validation.
Example:


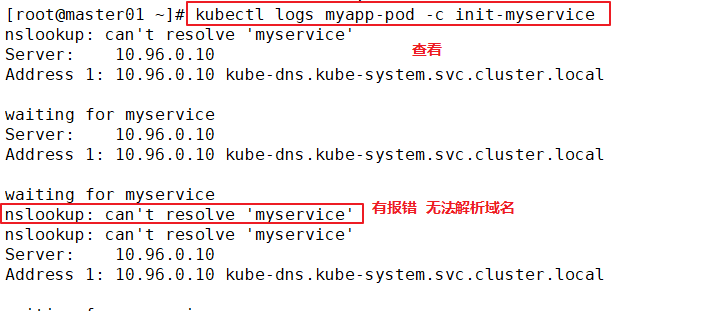
Solution: create a service resolution
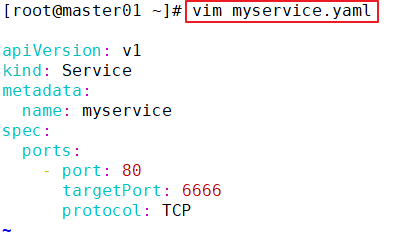
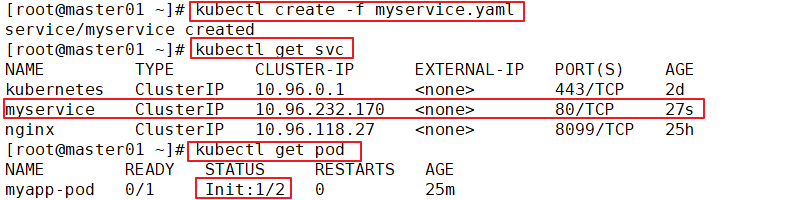
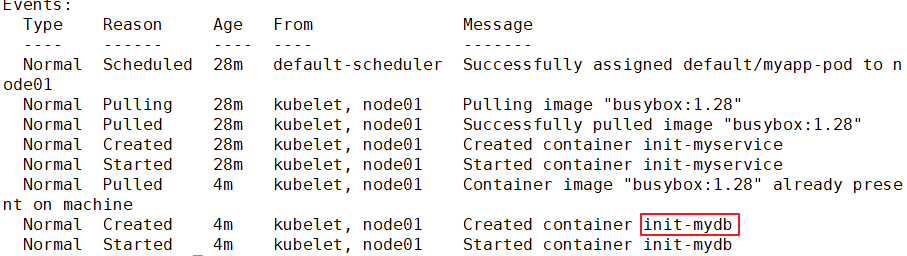
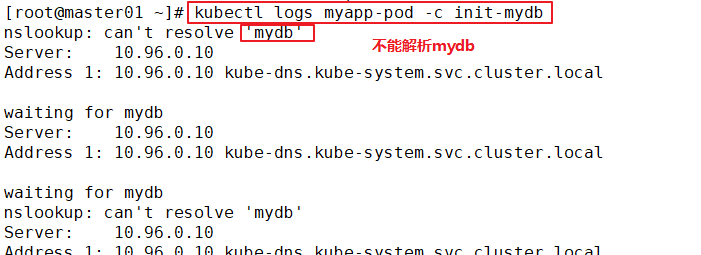
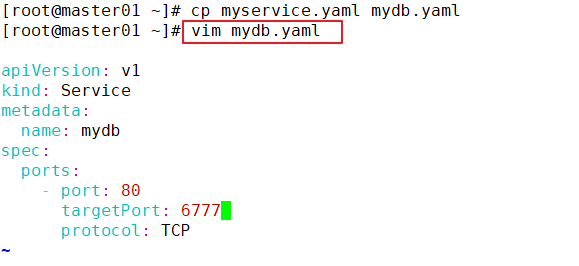
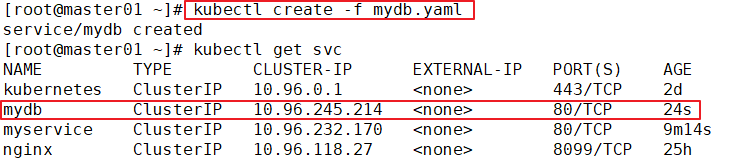
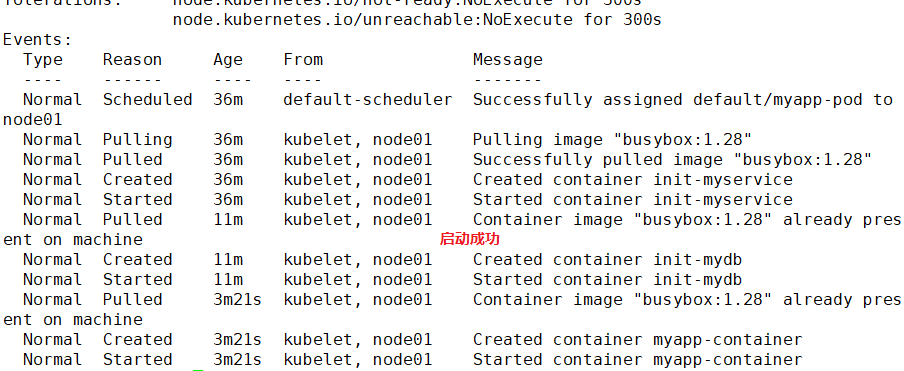

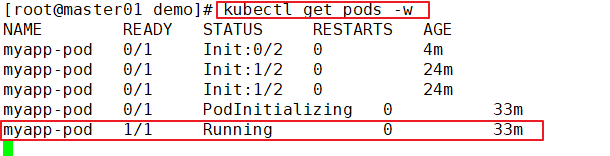
image PullPolicy
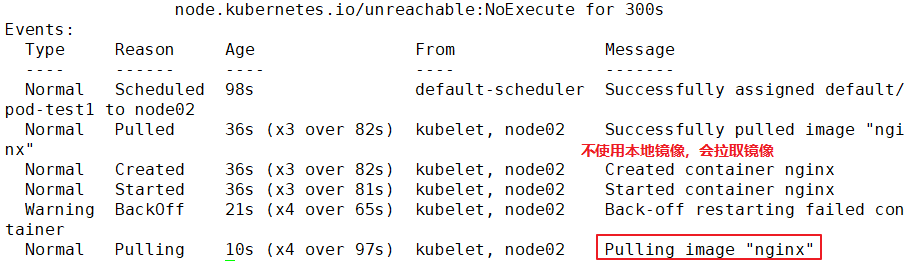
The core of Pod is to run the container. You must specify a container engine, such as Docker. When starting the container, you need to pull the image. k8s's image pull strategy can be specified by the user:
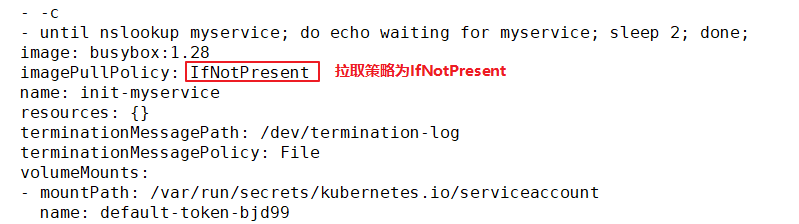
1. IfNotPresent: when the image already exists, kubelet will no longer pull the image. It will only pull the image from the warehouse when the local image is missing. The default image pull policy is
2. Always: every time you create a Pod, you will pull the image again;
3. Never: Pod will not actively pull this image, but only use the local image.
Note: for the image file labeled ": latest", the default image acquisition policy is "Always"; for the image of other labels, the default policy is "IfNotPresent".
Official example:
https://kubernetes.io/docs/concepts/containers/images
kubectl apply -f - <<EOF
apiVersion: v1
kind: Pod
metadata:
name: private-image-test-1
spec:
containers:
- name: uses-private-image
image: $PRIVATE_IMAGE_NAME
imagePullPolicy: Always
command: [ "echo", "SUCCESS" ]
EOF
//Operation on master01
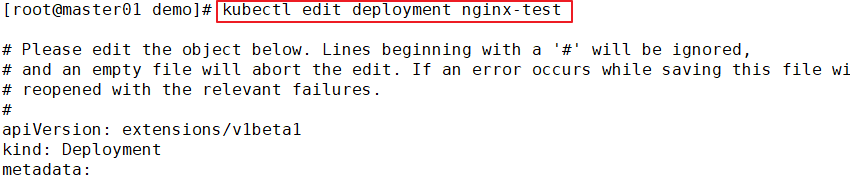
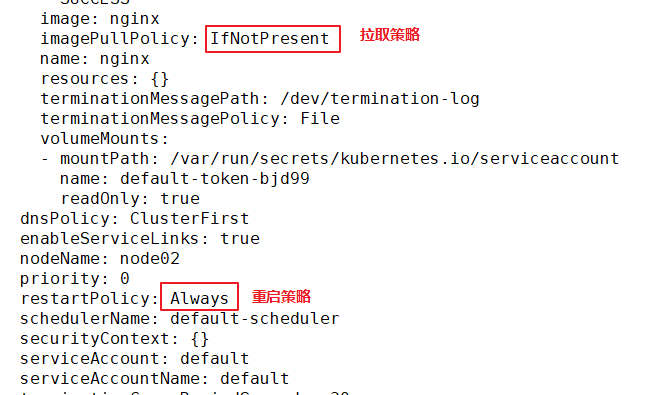
kubectl edit deployment/nginx-deployment
......
template:
metadata:
creationTimestamp: null
labels:
app: nginx
spec:
containers:
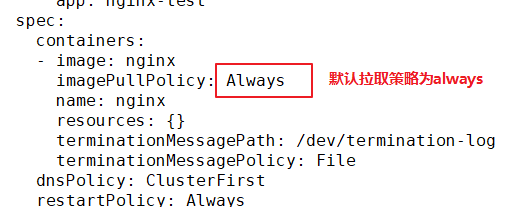
- image: nginx:1.15.4
imagePullPolicy: IfNotPresent #The image pull policy is IfNotPresent
name: nginx
ports:
- containerPort: 80
protocol: TCP
resources: {}
terminationMessagePath: /dev/termination-log
terminationMessagePolicy: File
dnsPolicy: ClusterFirst
restartPolicy: Always #The restart policy of Pod is Always, which is the default value
schedulerName: default-scheduler
securityContext: {}
terminationGracePeriodSeconds: 30
......
Example:

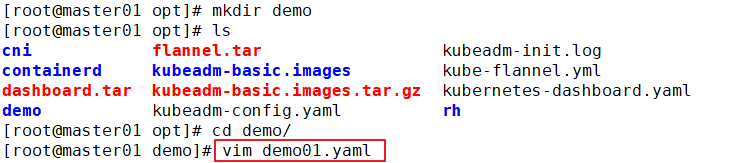
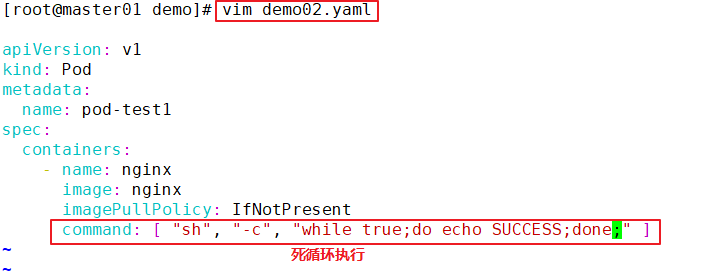
//Create test cases
mkdir /opt/demo
cd /opt/demo
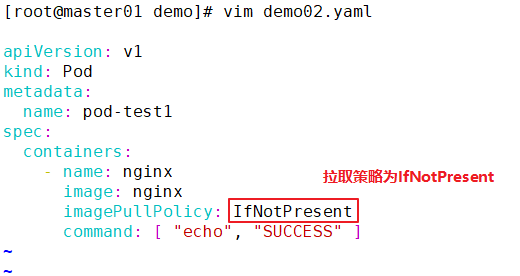
vim pod1.yaml
apiVersion: v1
kind: Pod
metadata:
name: pod-test1
spec:
containers:
- name: nginx
image: nginx
imagePullPolicy: Always
command: [ "echo", "SUCCESS" ]
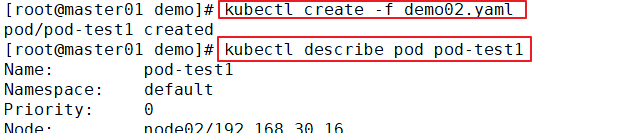
kubectl create -f pod1.yaml
kubectl get pods -o wide
pod-test1 0/1 CrashLoopBackOff 4 3m33s
//At this time, the status of the Pod is abnormal because the echo execution process terminates and the container life cycle ends
kubectl describe pod pod-test1
......
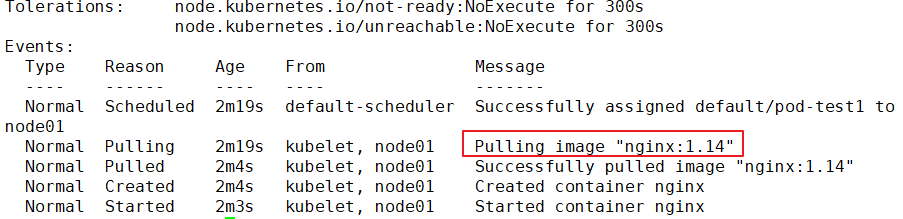
Events:
Type Reason Age From Message
---- ------ ---- ---- -------
Normal Scheduled 2m10s default-scheduler Successfully assigned default/pod-test1 to 192.168.30.12
Normal Pulled 46s (x4 over 119s) kubelet, 192.168.30.12 Successfully pulled image "nginx"
Normal Created 46s (x4 over 119s) kubelet, 192.168.30.12 Created container
Normal Started 46s (x4 over 119s) kubelet, 192.168.30.12 Started container
Warning BackOff 19s (x7 over 107s) kubelet, 192.168.30.12 Back-off restarting failed container
Normal Pulling 5s (x5 over 2m8s) kubelet, 192.168.30.12 pulling image "nginx"
//It can be found that after the life cycle of the container in the Pod ends, because the restart strategy of the Pod is Always, the container restarts again and starts pulling the image again
Example:


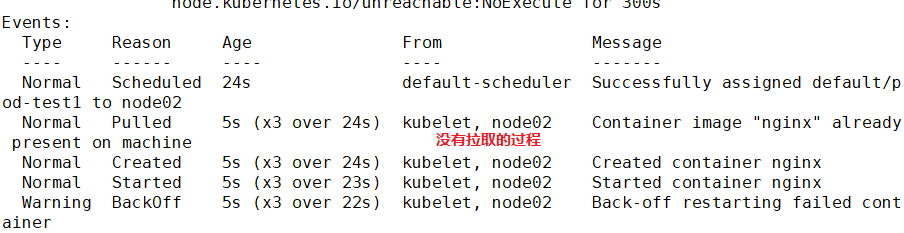
The implementation does not restart, because the container startup strategy is ifnotpresent. After specifying a specific label, no command is entered, which means that the container runs successfully in the foreground and will not restart again.

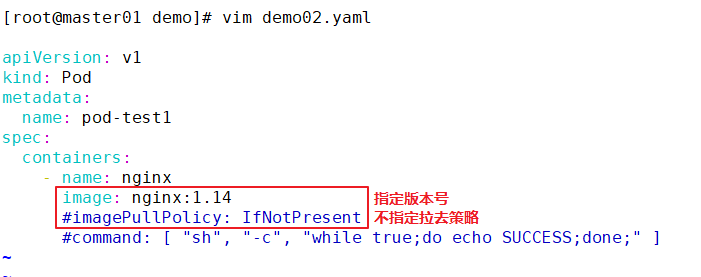
//Modify the pod1.yaml file
cd /opt/demo
vim pod1.yaml
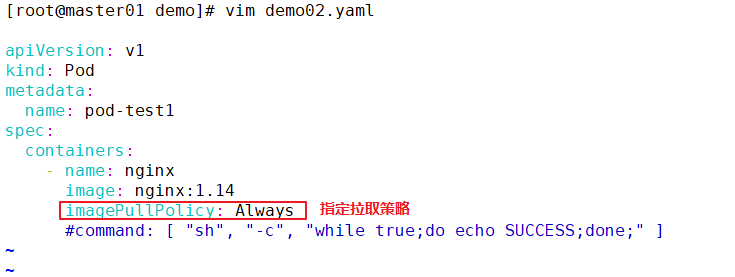
apiVersion: v1
kind: Pod
metadata:
name: pod-test1
spec:
containers:
- name: nginx
image: nginx:1.14 #Modify nginx image version
imagePullPolicy: Always
#command: [ "echo", "SUCCESS" ] #delete
//Delete existing resources
kubectl delete -f pod1.yaml
//Update resources
kubectl apply -f pod1.yaml
//View Pod status
kubectl get pods -o wide
NAME READY STATUS RESTARTS AGE IP NODE NOMINATED NODE
pod-test1 1/1 Running 0 33s 172.17.36.4 192.168.30.12 <none>
//Use curl to view header information on any node node
curl -I http://172.17.36.4
HTTP/1.1 200 OK
Server: nginx/1.14.2
......
Example:


2, Deploy harbor to create a private project (credential token)
Environmental preparation
#Turn off firewall and security features
systemctl stop firewalld.service
systemctl disable firewalld.service
setenforce 0
Example:

Install docker
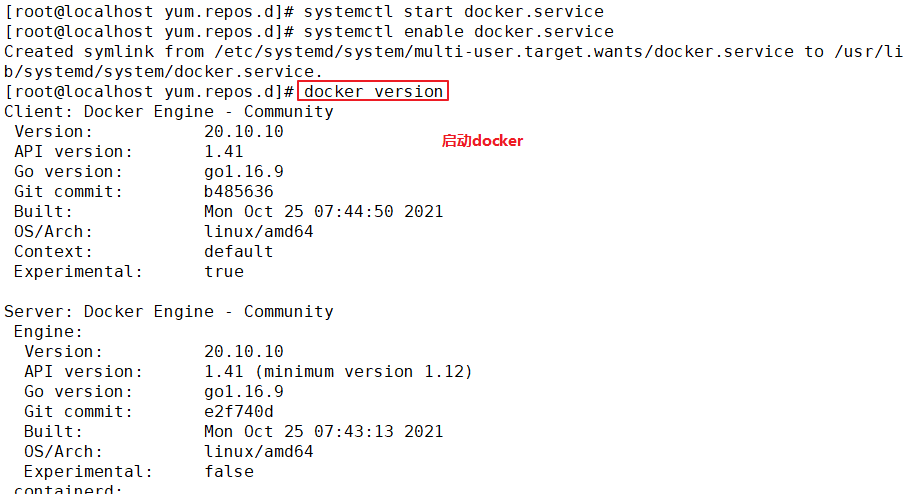
yum install -y yum-utils device-mapper-persistent-data lvm2
yum-config-manager --add-repo https://mirrors.aliyun.com/docker-ce/linux/centos/docker-ce.repo
yum install -y docker-ce
systemctl start docker.service
systemctl enable docker.service
docker version
Example:
Upload docker compose and harbor packages
cd /opt
 upload docker-compose and harbor-offline-installer-v1.2.2.tgz reach /opt In the directory
chmod +x docker-compose
mv docker-compose /usr/local/bin/
Example:

Deploy Harbor service
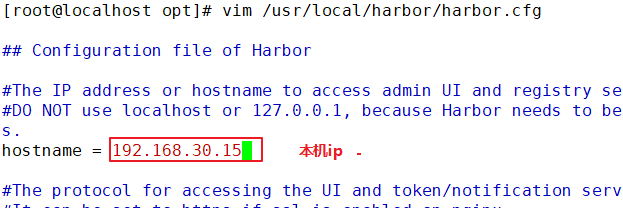
tar zxvf harbor-offline-installer-v1.2.2.tgz -C /usr/local/
vim /usr/local/harbor/harbor.cfg
--5 that 's ok--Modify, set to Harbor Server IP Address or domain name
hostname = 192.168.30.15

cd /usr/local/harbor/
./install.sh   #install
Example:

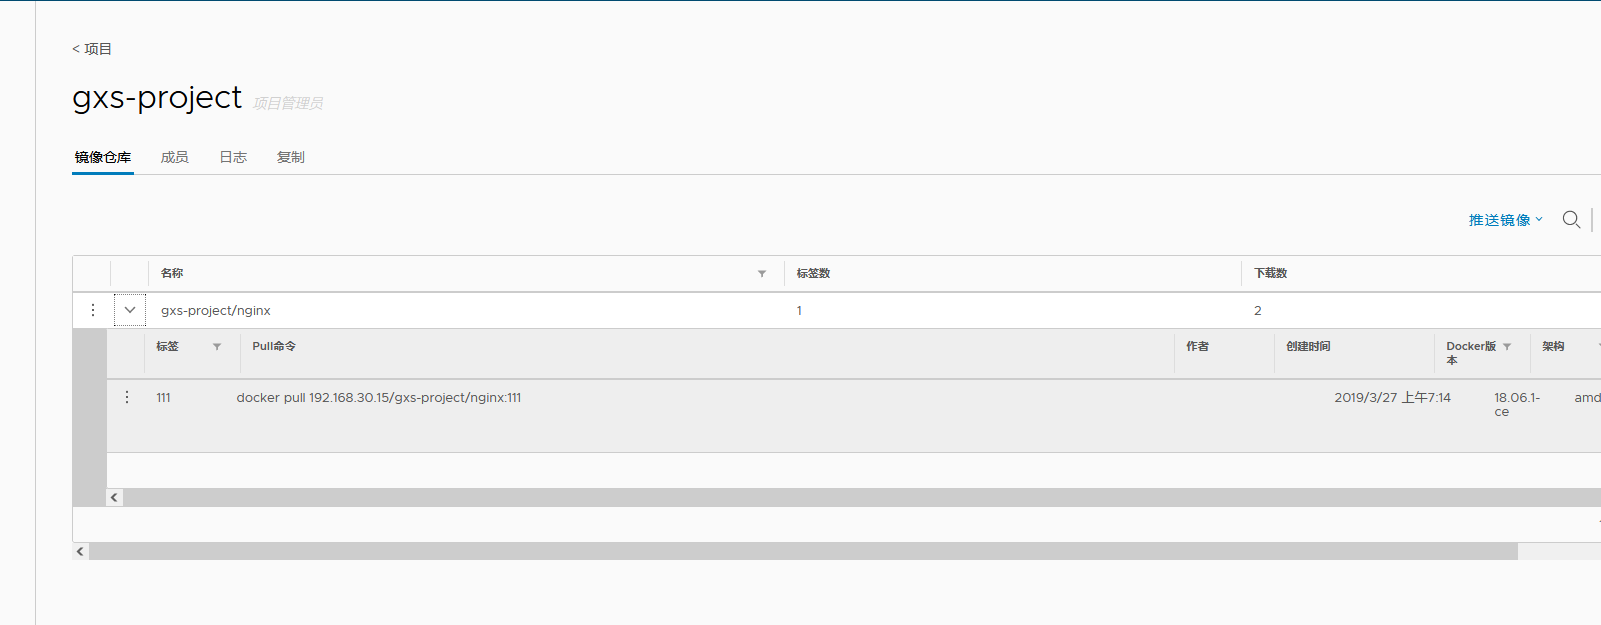
Create a new project in Harbor
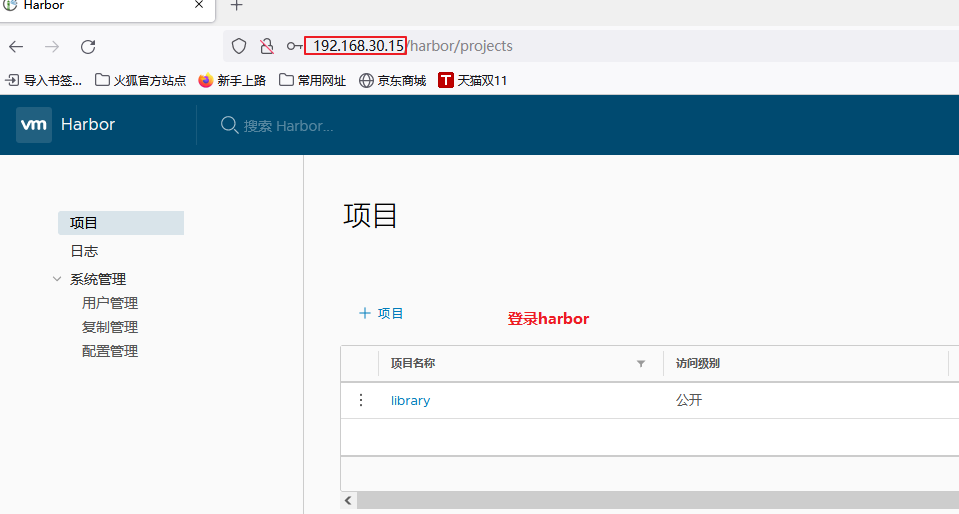
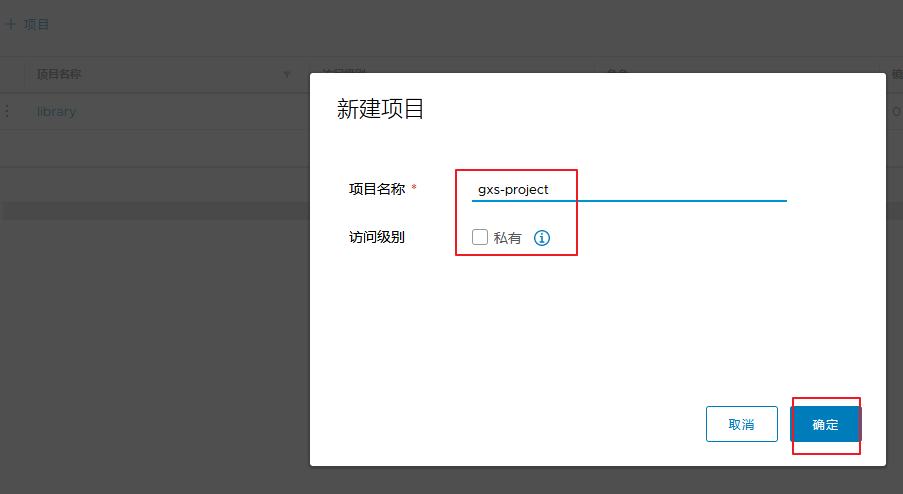
1.Browser access: http://192.168.30.15 log in to the Harbor WEB UI interface. The default administrator user name and password are admin / harbor 12345
2.After entering the user name and password, you can create a new item. Click“+Project button
3.Fill in the item name as“ gxs-project",Click OK to create a new project
Example:
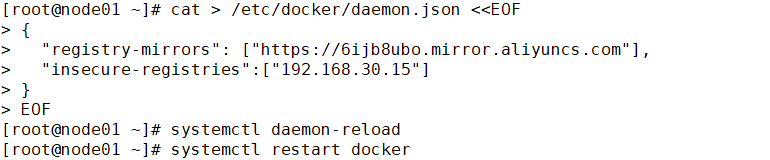
Configure the connection of private warehouses in each node node (note that the comma after each line should be added)
cat > /etc/docker/daemon.json <<EOF
{
  "registry-mirrors": ["https://6ijb8ubo.mirror.aliyuncs.com"],
  "insecure-registries":["192.168.30.15"]
}
EOF

systemctl daemon-reload
systemctl restart docker
Example:
Log in to the harbor private warehouse at each node
docker login -u admin -p Harbor12345 http://192.168.30.15
Example:

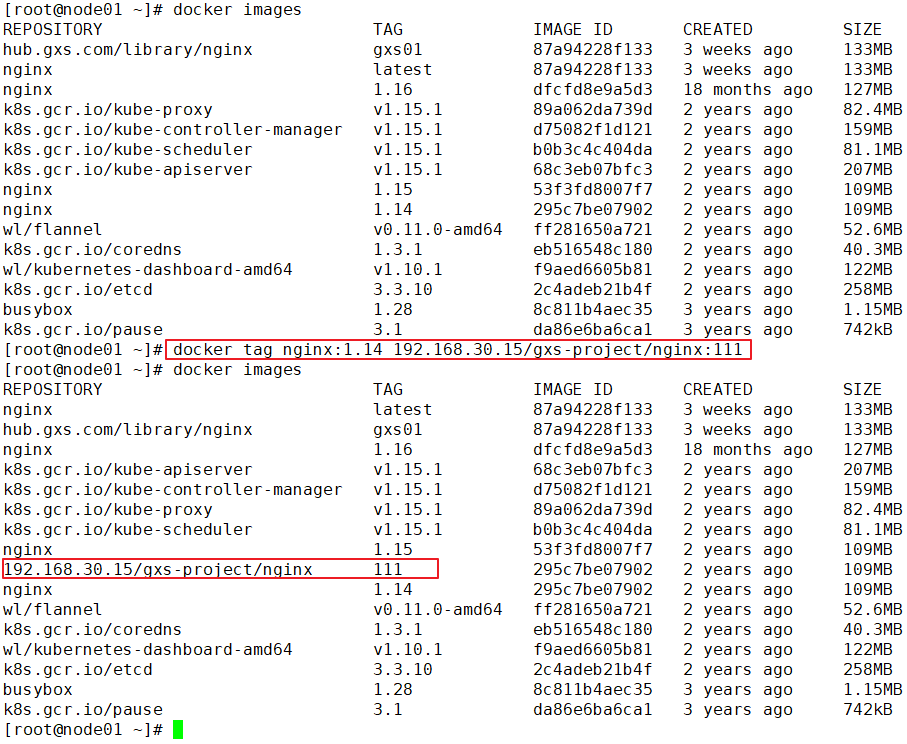
Download nginx images on a node node for push
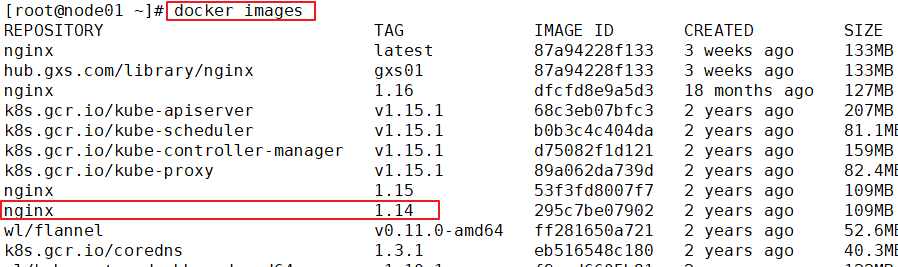
docker pull nginx:1.14
docker images

docker tag nginx:1.14 192.168.30.15/gxs-project/nginx:111
docker images

docker push 192.168.30.15/gxs-project/nginx:111
Example:
View login credentials
cat /root/.docker/config.json | base64 -w 0			#base64 -w 0: perform base64 encryption and disable word wrap
...
...
Example:

Create a harbor login credential resource list in the master node
vim harbor-pull-secret.yaml
apiVersion: v1
kind: Secret
metadata:
  name: harbor-pull-secret
data:
  .dockerconfigjson: ewoJImF1dGhzIjogewoJCSIxOTIuMTY4LjgwLjE0IjogewoJCQkiYXV0aCI6ICJZV1J0YVc0NlNHRnlZbTl5TVRJek5EVT0iCgkJfSwKCQkiaHViLmd4ZC5jb20iOiB7CgkJCSJhdXRoIjogIllXUnRhVzQ2U0dGeVltOXlNVEl6TkRVPSIKCQl9Cgl9Cn0=			#Copy and paste the login credentials viewed above
type: kubernetes.io/dockerconfigjson
===========================================================
establish secret resources
kubectl create -f harbor-pull-secret.yaml

//View secret resources
kubectl get secret
Example:


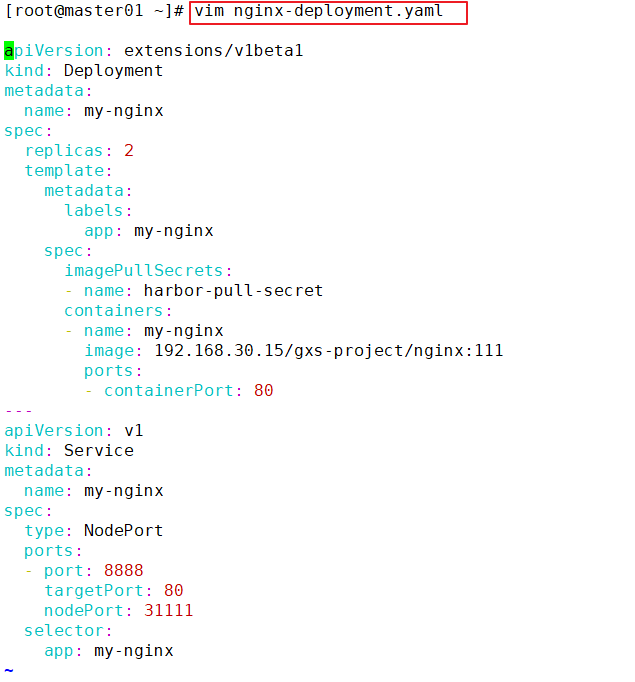
Create resources and download images from harbor
vim nginx-deployment.yaml
apiVersion: extensions/v1beta1
kind: Deployment
metadata:
  name: my-nginx
spec:
  replicas: 2
  template:
    metadata:
      labels:
        app: my-nginx
    spec:
      imagePullSecrets:						#Add the option to pull secret resources
      - name: harbor-pull-secret			#Specify the secret resource name
      containers:
      - name: my-nginx
        image: 192.168.30.15/gxs-project/nginx:111		#Specifies the image name in the harbor
        ports:
        - containerPort: 80
---
apiVersion: v1
kind: Service
metadata:
  name: my-nginx
spec:
  type: NodePort
  ports:
  - port: 8888
    targetPort: 80
    nodePort: 31111
  selector:
    app: my-nginx
Example:
Delete the previously downloaded nginx image on the node node
docker rmi -f nginx:1.14
docker rmi -f 192.168.30.15/gxs-project/nginx:111
docker images
Example:

Create resource
kubectl create -f nginx-deployment.yaml
kubectl get pods
Example:


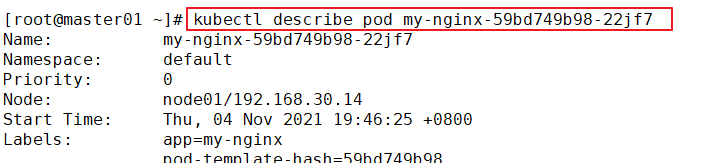
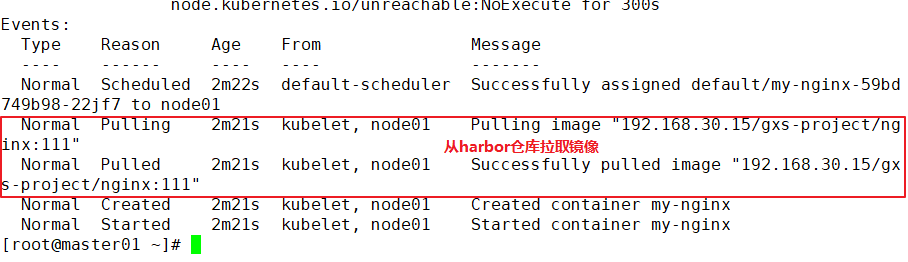
View the description of the Pod
//Downloaded from harbor when the image is found
kubectl describe pod my-nginx-69867795cc-7zklx

//Refresh the harbor page and you can see that the number of image downloads has increased
Example: