Due to the popularity of K8s technology, enterprises of all sizes are using it now. Although it is not popularized, I believe it will happen sooner or later, so hurry up and learn more!
There are two ways to create resources in K8s: command line and YAML file. This blog mainly introduces the ways to use YAML file. If you need to use command line to create resources, please refer to Basic management of K8s resource object
The YAML file in Kubernetes is the same as the configuration list, according to personal habits. This blog is called YAML file!
1, YAML file Foundation
YAML is a special language for configuration files, which is very simple and powerful. With the understanding of properties, XML, json and other data formats, you will find more and more useful after you get used to them. In fact, YAML is a combination of most of the characteristics of markup language, integration of new development.
Features of YAML files:
- Clear hierarchy and structure;
- Easy to use and use;
- It has powerful functions and rich semantics;
Special attention should be paid to: - Case sensitive;
- Strict requirements for indentation;
2, YAML file usage
1) YAML file composition
YAML file in Kubernetes is mainly composed of five first level fields, namely:
- apiVersion: api version information;
- kind: Specifies the type of resource object to be created;
- Metadata: a nested field within the metadata, which defines the name and namespace of the resource object;
- spec: the specification defines what characteristics a resource should have, and relies on the controller to ensure that the performance can meet the user's expectations.
- status: displays the current state of the resource. K8s is to ensure that the current state is infinitely close to the target state to meet user expectations. Represents the current state of the resource;
2) Get help writing YAML files
Although I know what the primary fields in YAML file are, I still don't know how to write them. You can use the following command to get some help.
[root@master ~]# kubectl api-versions
//Get the apserver version supported by the current cluster
[root@master ~]# kubectl api-resources
//Get all api resource objects
[root@master ~]# kubectl explain deployment
//Check the configuration list format of an object in k8s, which fields should be included and how to use them
[root@master ~]# kubectl explain deployment.spec
//This command is very important. It can get help level by level
3) Basic format of YAML file
[root@master ~]# cat web.yaml
kind: Deployment                    //Specify the resource object to create
apiVersion: extensions/v1beta1        //Specify the API version information corresponding to deployment
metadata:
  name: web                  //Define the name of the deployment
spec:
  replicas: 2                  //Specify number of copies
  template:
    metadata:
      labels:                        //Specify the label of the pod
        app: web_server
    spec:
      containers:
      - name: nginx           //Specifies the name of the container where the pod runs
        image: nginx          //Specifies the image required to run the container
4) apply create or update
[root@master ~]# kubectl apply -f web.yaml
//Use "- f" to specify the yaml file and generate the required resources based on the content defined in the yaml file
apply can be specified multiple times. If the file is found to be different, it will be updated
5) Delete delete
[root@master ~]# kubectl delete -f web.yaml
//Delete resources defined in yaml file
6) validation
[root@master ~]# kubectl get deployments. web
//View the pod generated by the web controller
NAME   READY   UP-TO-DATE   AVAILABLE   AGE
web    2/2     2            2           5m50s
[root@master ~]# kubectl describe deployments. web
//View web controller details
The results returned are as follows: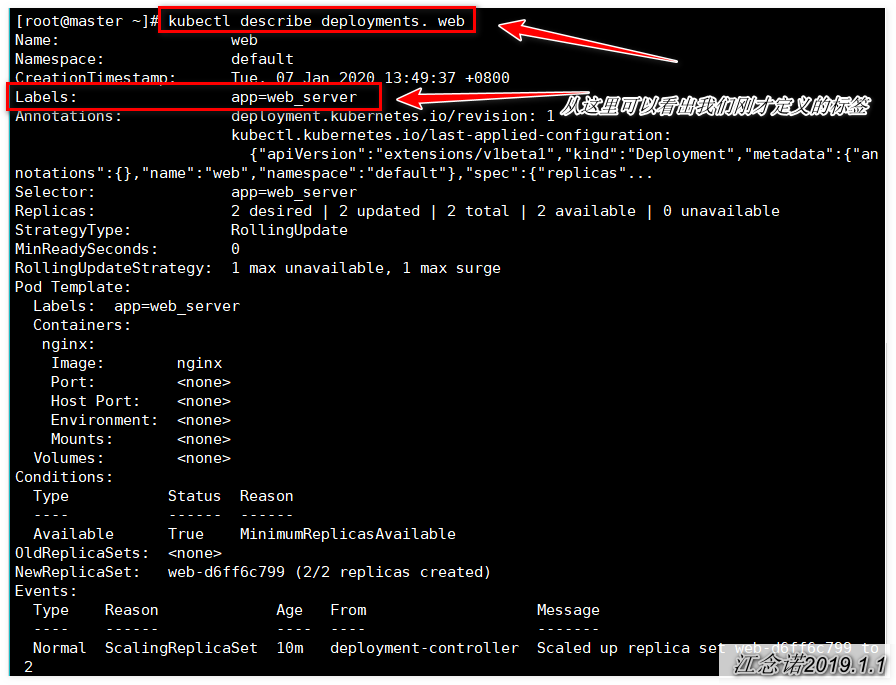
In this way, Kubernetes has generated the pod resources we need based on YAML files!
[root@master ~]# kubectl get pod -o wide / / view the details of pod
NAME                  READY   STATUS    RESTARTS   AGE   IP           NODE     NOMINATED NODE   READINESS GATES
web-d6ff6c799-7jtvd   1/1     Running   0          17m   10.244.2.2   node02   <none>           <none>
web-d6ff6c799-7tpdc   1/1     Running   0          17m   10.244.1.2   node01   <none>           <none>
K8s cluster internal test access: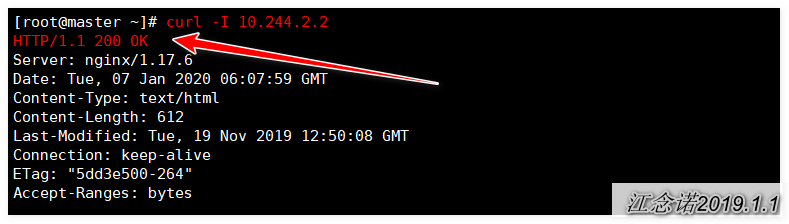
3, Create YAML file to enable the service of pod in K8s to be accessed externally
[root@master ~]# cat web-svc.yaml
kind: Service
apiVersion: v1
metadata:
  name: web-svc
spec:
  type: NodePort           //The specified type is NodePort, which allows external access. Otherwise, by default, it is cluster IP, which is limited to internal access of the cluster
  selector:
    app: web_server             //Must be associated with the label of the deployment resource object
  ports:
  - protocol: TCP
    port: 80                          //Specify the port of the cluster IP to map to
    targetPort: 80                //Specified is to map ports in pod
    nodePort: 31000           //Specifies the port mapped to the host in the range 30000-32767
[root@master ~]# kubectl apply -f web-svc.yaml
//Generate the control file of the service (its name is web SVC already defined in yaml)
[root@master ~]# Kubectl get SVC web SVC / / view the service controller
NAME      TYPE       CLUSTER-IP    EXTERNAL-IP   PORT(S)        AGE
web-svc   NodePort   10.99.32.22   <none>        80:31000/TCP   12m
//TYPE: NodePort, which allows external access;
//PORT: the mapped PORT is the same as that defined by us
Test access: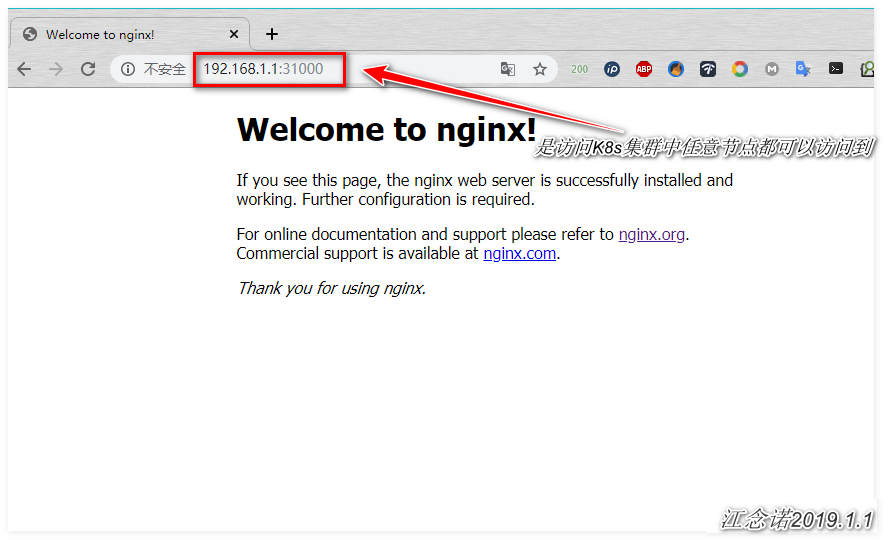
Note: any node in the cluster can access the services provided by pod in k8s cluster!
4, The principle of load balancing in the bottom layer
[root@master ~]# kubectl describe svc web-svc
//View service details
The information returned is as follows: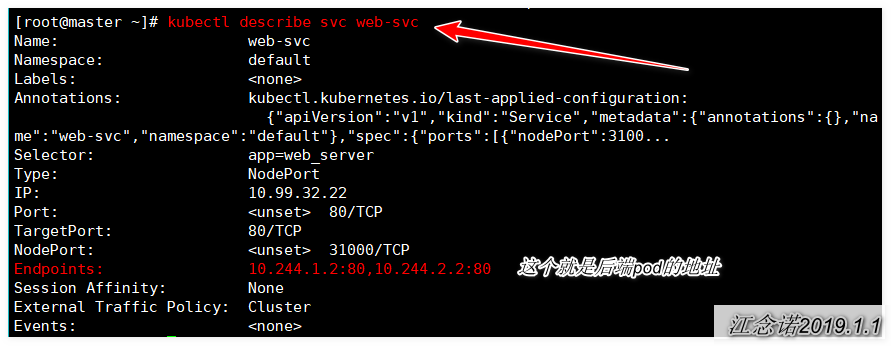
Since Endpoints specifies the IP address of the backend pod, verify as follows:
[root@master ~]# kubectl get pod -o wide | awk '{print $6}'
//Extract IP address of backend pod
IP
10.244.2.2
10.244.1.2
//The result is the same as the above query!
We know that service has the ability of load balancing, so how to implement it?
In fact, the underlying principle is not so high. Kube proxy uses iptables forwarding mechanism to achieve the effect of load balancing. First, define that the target IP is the cluster IP provided by service, and then use "- j" option to forward to other iptables rules. Next, verify the following:
[root@master ~]# kubectl get svc web-svc | awk '{print $3}'
//First, check the cluster IP address of the service
CLUSTER-IP
10.99.32.22
[root@master ~]# iptables-save | grep 10.99.32.22
//View cluster IP address related content in iptables rules
-A KUBE-SERVICES ! -s 10.244.0.0/16 -d 10.99.32.22/32 -p tcp -m comment --comment "default/web-svc: cluster IP" -m tcp --dport 80 -j KUBE-MARK-MASQ
-A KUBE-SERVICES -d 10.99.32.22/32 -p tcp -m comment --comment "default/web-svc: cluster IP" -m tcp --dport 80 -j KUBE-SVC-3RBUQ3B6P3MTQ3S7
//From the above results, when the target address is cluster IP, it will be forwarded to KUBE-SVC-3RBUQ3B6P3MTQ3S7 rule
[root@master ~]# iptables-save | grep KUBE-SVC-3RBUQ3B6P3MTQ3S7
:KUBE-SVC-3RBUQ3B6P3MTQ3S7 - [0:0]
-A KUBE-NODEPORTS -p tcp -m comment --comment "default/web-svc:" -m tcp --dport 31000 -j KUBE-SVC-3RBUQ3B6P3MTQ3S7
-A KUBE-SERVICES -d 10.99.32.22/32 -p tcp -m comment --comment "default/web-svc: cluster IP" -m tcp --dport 80 -j KUBE-SVC-3RBUQ3B6P3MTQ3S7
-A KUBE-SVC-3RBUQ3B6P3MTQ3S7 -m statistic --mode random --probability 0.50000000000 -j KUBE-SEP-E3SP5QDRAUFB55IC
-A KUBE-SVC-3RBUQ3B6P3MTQ3S7 -j KUBE-SEP-3T3LUFAKMOTS5BKN
//From the query results, we can see the effect of load balancing. Because the backend only creates two pod s, the probability is 0.5
Detailed introduction of K8s or recommended reference K8s Chinese document
————————Thank you for reading————————