1, Cluster environment
As introduced in the previous blog, my construction and deployment are also based on the previous one.
2, Deploy master node components
The following three core components should be deployed on the Master:
Kube APIServer: it is the unified entrance of the cluster. The coordinator of each component, the addition, deletion, modification, query and listening operations of all object resources are handed over to APIServer for processing and then submitted to Etcd storage;
Kube Controller Manager: to handle the regular background tasks in the cluster, a resource corresponds to a controller, and controller manager is responsible for managing these controllers;
Kube scheduler: select a Node node for the newly created Pod according to the scheduling algorithm, which can be deployed arbitrarily, on the same Node or on different nodes.
Operation process: configuration file - > SYSTEMd management component - > start
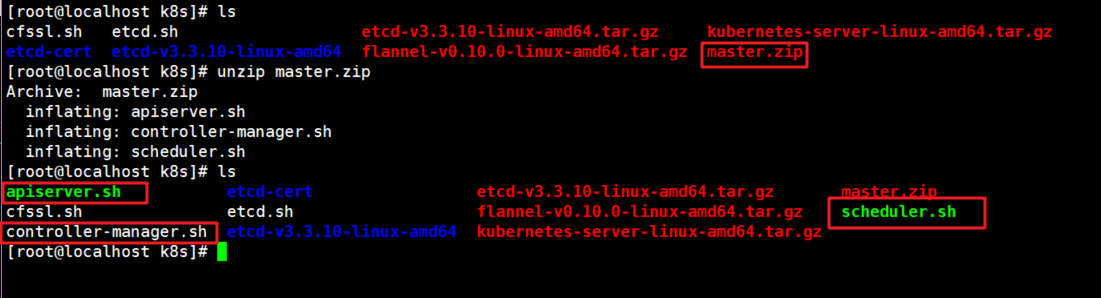
First, put the master package in the k8s directory
[root@localhost k8s]# unzip master.zip
The three component scripts I wrote are shown in the following operations.
[root@localhost k8s]# chmod +x controller-manager.sh    #Add permissions to the controll script
[root@localhost k8s]# mkdir -p /opt/kubernetes/{cfg,ssl,bin}
2.1 deployment of apiserver
2.1.1 making API server certificate
1. Create API server certificate directory
[root@localhost k8s]# mkdir k8s-cert
[root@localhost k8s]# cd k8s-cert/
2. Script certificate generation
[root@localhost k8s-cert]# vim k8s-cert.sh
# Write configuration file of ca certificate
cat > ca-config.json <<EOF
{
  "signing": {
    "default": {
      "expiry": "87600h"
    },
    "profiles": {
      "kubernetes": {
         "expiry": "87600h",
         "usages": [
            "signing",
            "key encipherment",
            "server auth",
            "client auth"
        ]
      }
    }
  }
}
EOF
# Write ca signature certificate file
cat > ca-csr.json <<EOF
{
    "CN": "kubernetes",
    "key": {
        "algo": "rsa",
        "size": 2048
    },
    "names": [
        {
            "C": "CN",
            "L": "Beijing",
            "ST": "Beijing",
            "O": "k8s",
            "OU": "System"
        }
    ]
}
EOF
# Using signature certificate to generate ca.pem and Ca key.pem files
cfssl gencert -initca ca-csr.json | cfssljson -bare ca -

#Write the signing certificate of apiserver
//Note: the IP addresses of the master2 and LB nodes are added for the subsequent deployment of multiple master nodes
cat > server-csr.json <<EOF
{
    "CN": "kubernetes",
    "hosts": [
      "10.0.0.1",
      "127.0.0.1",
      "192.168.66.130",  //master1 node
      "192.168.66.131",  //master2 node
      "192.168.66.100",  //vip address
      "192.168.66.134",  //Load scheduler (master)
      "192.168.66.139",  //Load scheduler (backup)
      "kubernetes",
      "kubernetes.default",
      "kubernetes.default.svc",
      "kubernetes.default.svc.cluster",
      "kubernetes.default.svc.cluster.local"
    ],
    "key": {
        "algo": "rsa",
        "size": 2048
    },
    "names": [
        {
            "C": "CN",
            "L": "BeiJing",
            "ST": "BeiJing",
            "O": "k8s",
            "OU": "System"
        }
    ]
}
EOF

#Use the previous file to generate the server certificate
cfssl gencert -ca=ca.pem -ca-key=ca-key.pem -config=ca-config.json -profile=kubernetes server-csr.json | cfssljson -bare server

#Write user certificate
cat > admin-csr.json <<EOF
{
  "CN": "admin",
  "hosts": [],
  "key": {
    "algo": "rsa",
    "size": 2048
  },
  "names": [
    {
      "C": "CN",
      "L": "BeiJing",
      "ST": "BeiJing",
      "O": "system:masters",
      "OU": "System"
    }
  ]
}
EOF

cfssl gencert -ca=ca.pem -ca-key=ca-key.pem -config=ca-config.json -profile=kubernetes admin-csr.json | cfssljson -bare admin

# Write Kube proxy certificate
cat > kube-proxy-csr.json <<EOF
{
  "CN": "system:kube-proxy",
  "hosts": [],
  "key": {
    "algo": "rsa",
    "size": 2048
  },
  "names": [
    {
      "C": "CN",
      "L": "BeiJing",
      "ST": "BeiJing",
      "O": "k8s",
      "OU": "System"
    }
  ]
}
EOF

cfssl gencert -ca=ca.pem -ca-key=ca-key.pem -config=ca-config.json -profile=kubernetes kube-proxy-csr.json | cfssljson -bare kube-proxy
3. Execute the script and copy the communication certificate to the directory / opt/kubernetes/ssl
[root@localhost k8s-cert]# bash k8s-cert.sh

[root@localhost k8s-cert]# cp ca*pem server*pem /opt/kubernetes/ssl/

2.1.2 unzip the binary file
1. Unzip k8s installation package
[root@localhost k8s]# tar zxvf kubernetes-server-linux-amd64.tar.gz

2. Copy the key command file to / opt/kubernetes/bin/
[root@localhost k8s]# cd /root/k8s/kubernetes/server/bin
[root@localhost bin]# cp kube-apiserver kubectl kube-controller-manager kube-scheduler /opt/kubernetes/bin/
2.1.3 making token token
//Use the following head command to randomly generate the serial number
[root@localhost k8s]# head -c 16 /dev/urandom | od -An -t x | tr -d ' '
5215984ab589158ffaf315249da4c0c9   #Copy serial number to token.csv

[root@localhost k8s]# vim /opt/kubernetes/cfg/token.csv
#Write content: serial number, user name, id, role
5215984ab589158ffaf315249da4c0c9,kubelet-bootstrap,10001,"system:kubelet-bootstrap"

2.1.4 turn on apiserver
1. The binary file, token token and certificate are all ready. Open apiserver, point to ETCD cluster, and save the information to ETCD.
[root@localhost k8s]# bash apiserver.sh 192.168.66.130 https://192.168.66.130:2379,https://192.168.66.132:2379,https://192.168.66.133:2379
apiserver.sh script
#!/bin/bash

MASTER_ADDRESS=$1
ETCD_SERVERS=$2

#Generate Kube API server configuration file in k8s working directory
cat <<EOF >/opt/kubernetes/cfg/kube-apiserver

KUBE_APISERVER_OPTS="--logtostderr=true \\
--v=4 \\
--etcd-servers=${ETCD_SERVERS} \\
--bind-address=${MASTER_ADDRESS} \\
--secure-port=6443 \\
--advertise-address=${MASTER_ADDRESS} \\
--allow-privileged=true \\
--service-cluster-ip-range=10.0.0.0/24 \\
--enable-admission-plugins=NamespaceLifecycle,LimitRanger,ServiceAccount,ResourceQuota,NodeRestriction \\
--authorization-mode=RBAC,Node \\
--kubelet-https=true \\
--enable-bootstrap-token-auth \\
--token-auth-file=/opt/kubernetes/cfg/token.csv \\
--service-node-port-range=30000-50000 \\
--tls-cert-file=/opt/kubernetes/ssl/server.pem  \\
--tls-private-key-file=/opt/kubernetes/ssl/server-key.pem \\
--client-ca-file=/opt/kubernetes/ssl/ca.pem \\
--service-account-key-file=/opt/kubernetes/ssl/ca-key.pem \\
--etcd-cafile=/opt/etcd/ssl/ca.pem \\
--etcd-certfile=/opt/etcd/ssl/server.pem \\
--etcd-keyfile=/opt/etcd/ssl/server-key.pem"

EOF

#Generate startup script
cat <<EOF >/usr/lib/systemd/system/kube-apiserver.service
[Unit]
Description=Kubernetes API Server
Documentation=https://github.com/kubernetes/kubernetes

[Service]
EnvironmentFile=-/opt/kubernetes/cfg/kube-apiserver
ExecStart=/opt/kubernetes/bin/kube-apiserver \$KUBE_APISERVER_OPTS
Restart=on-failure

[Install]
WantedBy=multi-user.target
EOF

#Start the apiserver component
systemctl daemon-reload
systemctl enable kube-apiserver
systemctl restart kube-apiserver
2. Check if the process started successfully.
[root@localhost k8s]# ps aux | grep kube

3. View the listening https port
[root@localhost k8s]# netstat -natp | grep 6443
[root@localhost k8s]# netstat -natp | grep 8080

2.2 deployment scheduler
Contents of the scheduler.sh script:
[root@localhost k8s]# vim scheduler.sh
#!/bin/bash

MASTER_ADDRESS=$1

cat <<EOF >/opt/kubernetes/cfg/kube-scheduler

KUBE_SCHEDULER_OPTS="--logtostderr=true \\
--v=4 \\
--master=${MASTER_ADDRESS}:8080 \\
--leader-elect"

EOF

cat <<EOF >/usr/lib/systemd/system/kube-scheduler.service
[Unit]
Description=Kubernetes Scheduler
Documentation=https://github.com/kubernetes/kubernetes

[Service]
EnvironmentFile=-/opt/kubernetes/cfg/kube-scheduler
ExecStart=/opt/kubernetes/bin/kube-scheduler \$KUBE_SCHEDULER_OPTS
Restart=on-failure

[Install]
WantedBy=multi-user.target
EOF

systemctl daemon-reload
systemctl enable kube-scheduler
systemctl restart kube-scheduler
Start the scheduler service
[root@localhost k8s]# ./scheduler.sh 127.0.0.1

2.3 deploy Controller Manager
Script content of controller-manager.sh:
[root@localhost k8s]# vim controller-manager.sh
#!/bin/bash

MASTER_ADDRESS=$1

cat <<EOF >/opt/kubernetes/cfg/kube-controller-manager

KUBE_CONTROLLER_MANAGER_OPTS="--logtostderr=true \\
--v=4 \\
--master=${MASTER_ADDRESS}:8080 \\
--leader-elect=true \\
--address=127.0.0.1 \\
--service-cluster-ip-range=10.0.0.0/24 \\
--cluster-name=kubernetes \\
--cluster-signing-cert-file=/opt/kubernetes/ssl/ca.pem \\
--cluster-signing-key-file=/opt/kubernetes/ssl/ca-key.pem  \\
--root-ca-file=/opt/kubernetes/ssl/ca.pem \\
--service-account-private-key-file=/opt/kubernetes/ssl/ca-key.pem \\
--experimental-cluster-signing-duration=87600h0m0s"

EOF

cat <<EOF >/usr/lib/systemd/system/kube-controller-manager.service
[Unit]
Description=Kubernetes Controller Manager
Documentation=https://github.com/kubernetes/kubernetes

[Service]
EnvironmentFile=-/opt/kubernetes/cfg/kube-controller-manager
ExecStart=/opt/kubernetes/bin/kube-controller-manager \$KUBE_CONTROLLER_MANAGER_OPTS
Restart=on-failure

[Install]
WantedBy=multi-user.target
EOF

systemctl daemon-reload
systemctl enable kube-controller-manager
systemctl restart kube-controller-manager
Start controller manager
[root@localhost k8s]# ./controller-manager.sh 127.0.0.1

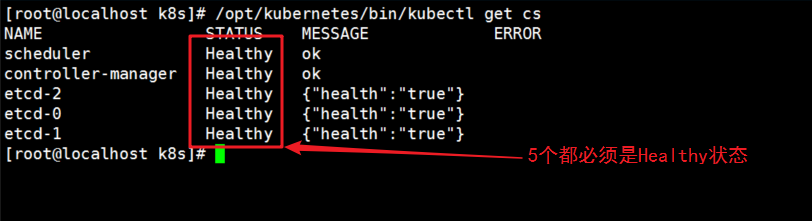
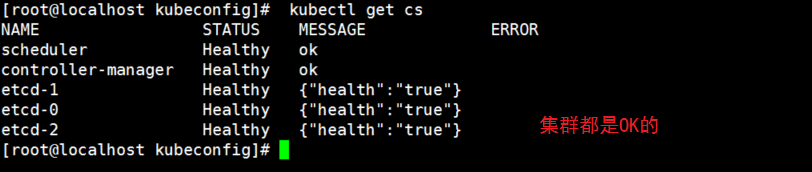
View master node status
[root@localhost k8s]# /opt/kubernetes/bin/kubectl get cs
3, Deploy node components
The following three core components should be deployed on the node:
Kubelet: it is the agent of the master on the node node. It can manage the life cycle of the local running container, such as creating the container, mounting the data volume with Pod, downloading the secret, obtaining the container and node status, etc. kubelet transforms each Pod into a group of containers.
Kube proxy: implement Pod network proxy on node node, maintain network planning and four layer load balancing.
docker: container (we have already installed it)
3.1 deploy kubeconfig
- Operate on the master node
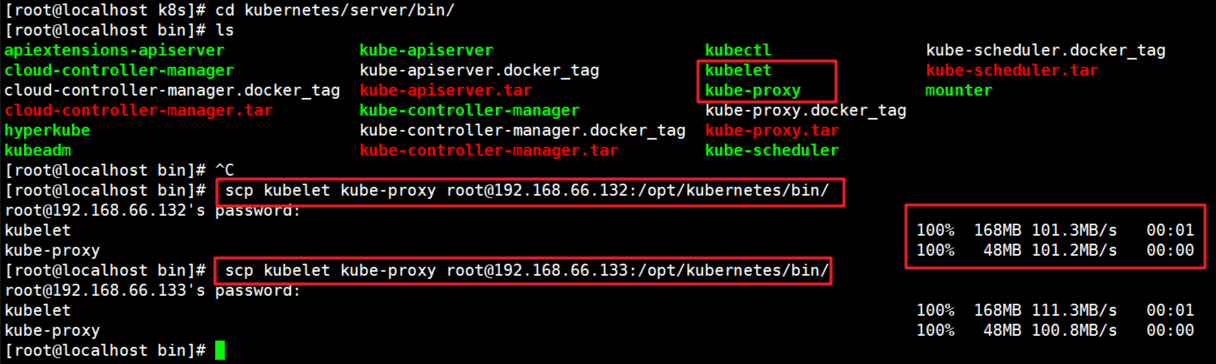
1. On the master, copy kubelet and Kube proxy to two node nodes
[root@localhost k8s]# cd kubernetes/server/bin/

[root@localhost bin]#  scp kubelet kube-proxy root@192.168.66.132:/opt/kubernetes/bin/
[root@localhost bin]#  scp kubelet kube-proxy root@192.168.66.133:/opt/kubernetes/bin/
2. Script kubeconfig
[root@localhost k8s]# mkdir kubeconfig
[root@localhost k8s]# cd kubeconfig/
//Get token information
[root@localhost kubeconfig]# cat /opt/kubernetes/cfg/token.csv
5215984ab589158ffaf315249da4c0c9,kubelet-bootstrap,10001,"system:kubelet-bootstrap"
//Copy kubeconfig.sh file to rename
[root@localhost kubeconfig]# mv kubeconfig.sh kubeconfig
[root@localhost kubeconfig]# vim kubeconfig
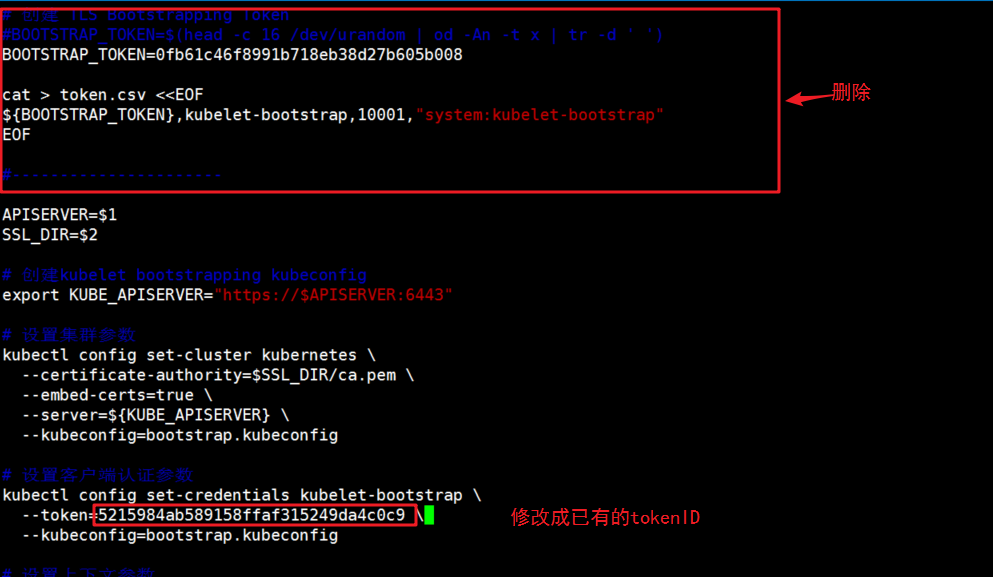
# Create TLS Bootstrapping Token
#BOOTSTRAP_TOKEN=$(head -c 16 /dev/urandom | od -An -t x | tr -d ' ')
BOOTSTRAP_TOKEN=0fb61c46f8991b718eb38d27b605b008
cat > token.csv <<EOF
${BOOTSTRAP_TOKEN},kubelet-bootstrap,10001,"system:kubelet-bootstrap"
EOF
#----------------------
APISERVER=$1
SSL_DIR=$2
# Create kubelet bootstrapping kubeconfig
export KUBE_APISERVER="https://$APISERVER:6443"
# Set cluster parameters
kubectl config set-cluster kubernetes \
--certificate-authority=$SSL_DIR/ca.pem \
--embed-certs=true \
--server=${KUBE_APISERVER} \
--kubeconfig=bootstrap.kubeconfig
# Set client authentication parameters
kubectl config set-credentials kubelet-bootstrap \
--token=${BOOTSTRAP_TOKEN} \
--kubeconfig=bootstrap.kubeconfig
# Set context parameters
kubectl config set-context default \
--cluster=kubernetes \
--user=kubelet-bootstrap \
--kubeconfig=bootstrap.kubeconfig
# Set default context
kubectl config use-context default --kubeconfig=bootstrap.kubeconfig
#----------------------
# Create the Kube proxy kubeconfig file
kubectl config set-cluster kubernetes \
--certificate-authority=$SSL_DIR/ca.pem \
--embed-certs=true \
--server=${KUBE_APISERVER} \
--kubeconfig=kube-proxy.kubeconfig
kubectl config set-credentials kube-proxy \
--client-certificate=$SSL_DIR/kube-proxy.pem \
--client-key=$SSL_DIR/kube-proxy-key.pem \
--embed-certs=true \
--kubeconfig=kube-proxy.kubeconfig
kubectl config set-context default \
--cluster=kubernetes \
--user=kube-proxy \
--kubeconfig=kube-proxy.kubeconfig
kubectl config use-context default --kubeconfig=kube-proxy.kubeconfig
3. Set the environment variable to recognize the kubectl command in any directory
[root@localhost kubeconfig]# export PATH=$PATH:/opt/kubernetes/bin/
4. Check health
[root@localhost kubeconfig]# kubectl get cs
5. Run the kubeconfig script to generate the configuration file
[root@localhost kubeconfig]# bash kubeconfig 192.168.66.130 /root/k8s/k8s-cert/

Pass the generated configuration file to two node nodes
[root@localhost kubeconfig]# scp bootstrap.kubeconfig kube-proxy.kubeconfig root@192.168.66.132:/opt/kubernetes/cfg/
[root@localhost kubeconfig]# scp bootstrap.kubeconfig kube-proxy.kubeconfig root@192.168.66.133:/opt/kubernetes/cfg/

6. Create bootstrap role to give permission to connect to apiserver to request signature (important)
[root@localhost kubeconfig]# kubectl create clusterrolebinding kubelet-bootstrap --clusterrole=system:node-bootstrapper --user=kubelet-bootstrap
3.2 deploy kubelet component of node1
Operate on node1 node**
-
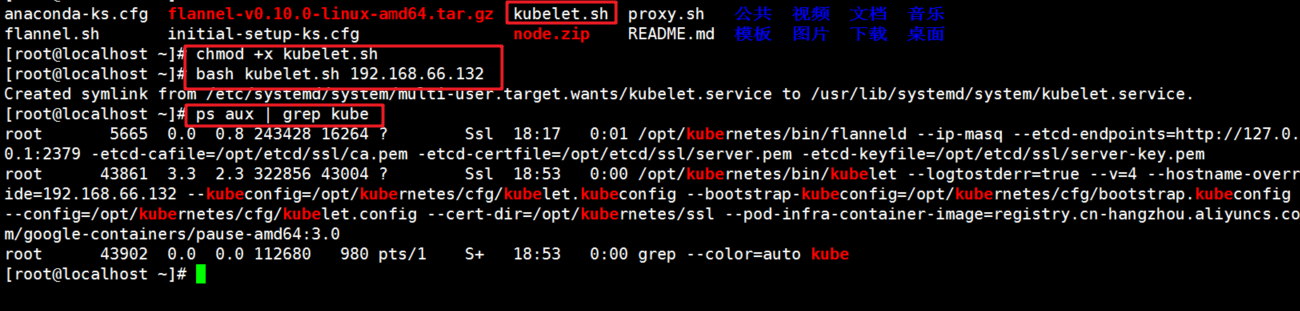
//nod01 node operation (copy node.zip to / root directory and extract)
[root@localhost ~]# ls
anaconda-ks.cfg  flannel-v0.10.0-linux-amd64.tar.gz  node.zip   Public video document music
flannel.sh       initial-setup-ks.cfg                README.md  Template picture download desktop
//Extract node.zip to get kubelet.sh proxy.sh
[root@localhost ~]# unzip node.zip
1. Script kubelet.sh
#!/bin/bash

NODE_ADDRESS=$1
DNS_SERVER_IP=${2:-"10.0.0.2"}

cat <<EOF >/opt/kubernetes/cfg/kubelet

KUBELET_OPTS="--logtostderr=true \\
--v=4 \\
--hostname-override=${NODE_ADDRESS} \\
--kubeconfig=/opt/kubernetes/cfg/kubelet.kubeconfig \\
--bootstrap-kubeconfig=/opt/kubernetes/cfg/bootstrap.kubeconfig \\
--config=/opt/kubernetes/cfg/kubelet.config \\
--cert-dir=/opt/kubernetes/ssl \\
--pod-infra-container-image=registry.cn-hangzhou.aliyuncs.com/google-containers/pause-amd64:3.0"

EOF

cat <<EOF >/opt/kubernetes/cfg/kubelet.config

kind: KubeletConfiguration
apiVersion: kubelet.config.k8s.io/v1beta1
address: ${NODE_ADDRESS}
port: 10250
readOnlyPort: 10255
cgroupDriver: cgroupfs
clusterDNS:
- ${DNS_SERVER_IP}
clusterDomain: cluster.local.
failSwapOn: false
authentication:
  anonymous:
    enabled: true
EOF

cat <<EOF >/usr/lib/systemd/system/kubelet.service
[Unit]
Description=Kubernetes Kubelet
After=docker.service
Requires=docker.service

[Service]
EnvironmentFile=/opt/kubernetes/cfg/kubelet
ExecStart=/opt/kubernetes/bin/kubelet \$KUBELET_OPTS
Restart=on-failure
KillMode=process

[Install]
WantedBy=multi-user.target
EOF

systemctl daemon-reload
systemctl enable kubelet
systemctl restart kubelet
2. Add Execution Authority
[root@localhost ~]# chmod +x /root/kubelet.sh
3. Run the script to start kubelet and send the request to the master cluster
[root@localhost ~]# bash kubelet.sh 192.168.66.132
4. Check kubelet service startup
[root@localhost ~]# ps aux | grep kube
5. On the master node, check the node01 node's request
//Check to get the node1 request with the following command and copy the name of the node1 request
[root@localhost kubeconfig]# kubectl get csr

6. master setting agrees to connection request and issues certificate
//Command format of consent request: NAME of kubectl certificate approve node1 request
[root@localhost kubeconfig]# kubectl certificate approve node-csr-UWHx5twdszUBAKSIajgOat46vnZQ2IpZa4-_E_FkB4w

[root@localhost kubeconfig]# kubectl get csr    #Discovery state becomes allowed

7. View cluster node and successfully join node01 node
[root@localhost kubeconfig]# kubectl get node

3.3 deploy Kube proxy component of node1
1. Script proxy.sh
#!/bin/bash

NODE_ADDRESS=$1

cat <<EOF >/opt/kubernetes/cfg/kube-proxy

KUBE_PROXY_OPTS="--logtostderr=true \\
--v=4 \\
--hostname-override=${NODE_ADDRESS} \\
--cluster-cidr=10.0.0.0/24 \\
--proxy-mode=ipvs \\
--kubeconfig=/opt/kubernetes/cfg/kube-proxy.kubeconfig"

EOF

cat <<EOF >/usr/lib/systemd/system/kube-proxy.service
[Unit]
Description=Kubernetes Proxy
After=network.target

[Service]
EnvironmentFile=-/opt/kubernetes/cfg/kube-proxy
ExecStart=/opt/kubernetes/bin/kube-proxy \$KUBE_PROXY_OPTS
Restart=on-failure

[Install]
WantedBy=multi-user.target
EOF

systemctl daemon-reload
systemctl enable kube-proxy
systemctl restart kube-proxy
2. Add Execution Authority
[root@localhost ~]# chmod +x /root/proxy.sh
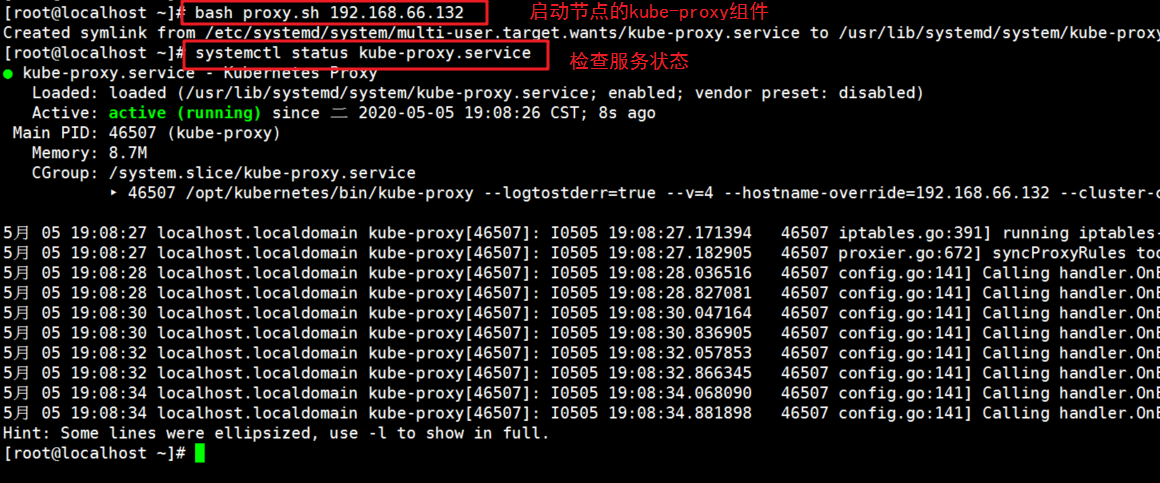
3. Operate on node1 node, start proxy service and check whether the status is normal
[root@localhost ~]# bash proxy.sh 192.168.66.132
[root@localhost ~]# systemctl status kube-proxy.service
3.4 deploy kubelet and Kube proxy services of node2 node
1. In order to improve efficiency, we copy the existing / opt/kubernetes directory on node01 to other nodes for modification.
[root@localhost ~]# scp -r /opt/kubernetes/ root@192.168.66.133:/opt/
Then copy the service files of kubelet and Kube proxy to node2
scp /usr/lib/systemd/system/{kubelet,kube-proxy}.service root@192.168.66.133:/usr/lib/systemd/system/2. Next operation on node02 node
First, delete the copied certificate first, because node02 will apply for its own certificate later
[root@localhost ~]# cd /opt/kubernetes/ssl/
[root@localhost ssl]# rm -rf *
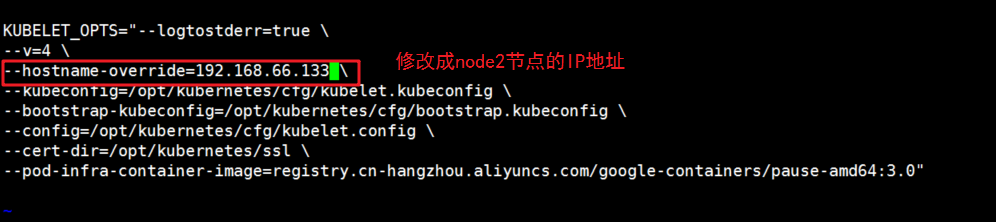
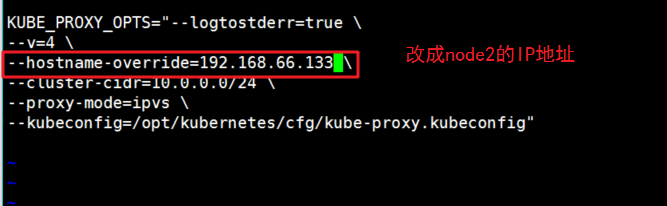
 Modify the IP address of node1 in the configuration files kubelet, kubelet.config and Kube proxy (three configuration files)
[root@localhost ssl]# cd /opt/kubernetes/cfg/
[root@localhost cfg]# vim kubelet
[root@localhost cfg]# vim kubelet.config
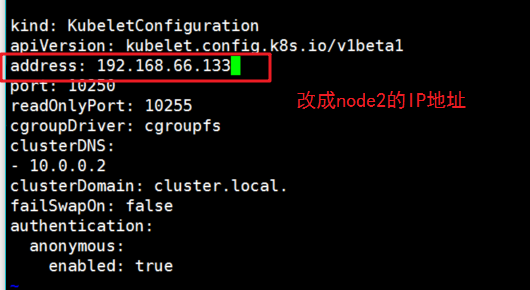
[root@localhost cfg]# vim kube-proxy
3. Start kubelet and Kube proxy services of node2 node, and set power on and self start
[root@localhost cfg]# systemctl start kubelet.service
[root@localhost cfg]# systemctl enable kubelet.service

[root@localhost cfg]# systemctl start kube-proxy.service
[root@localhost cfg]# systemctl enable kube-proxy.service
4. View the node2 node's request on the master
[root@localhost kubeconfig]# kubectl get csr

Next, as just before, authorize permission to join the cluster
[root@localhost kubeconfig]# kubectl certificate approve node-csr-ygkcxiRs2_EJw6A8N8m2SHnXOqU_I1Bs1BrfP21GzfM

4, Validate cluster
View nodes in the cluster
[root@localhost ~]# kubectl get node
