preface
JumpServer is the first open source fortress machine in the world. It uses GNU GPL v2.0 open source protocol. It is an operation and maintenance security audit system conforming to 4A specification. JumpServer is developed in Python, follows the Web 2.0 specification, and is equipped with the industry-leading Web Terminal scheme, with beautiful interactive interface and good user experience. JumpServer adopts a distributed architecture, supports multi machine room cross regional deployment, supports horizontal expansion, and has no limit on the number of assets and concurrency.
Features and advantages:
- Open source: zero threshold, fast online acquisition and installation;
- Distributed: easily support large-scale concurrent access;
- No plug-ins: only a browser is needed, with the ultimate Web Terminal experience;
- Multi cloud support: a system that manages assets on different clouds at the same time;
- Cloud storage: audit video is stored in the cloud and will never be lost;
- Multi tenancy: a set of system used by multiple subsidiaries and departments at the same time;
- Multi application support: database, Windows remote application, Kubernetes.
1, Planning
1.1 server
This is a simple installation and deployment. For rapid deployment, just use a server for demonstration.
| OS | kernel | remarks |
|---|---|---|
| CentOS 7.6(106.52.187.250/172.16.0.16) | 3.10 | Fortress machine (unified resource management platform) |
1.2 component version
For this installation version, refer to: https://docs.jumpserver.org/zh/master/dev/build/ Install
| assembly | edition | remarks |
|---|---|---|
| MySQL | 5.7 | Data storage > = 5.7 |
| Redis | 6.0 | Data cache > = 5.0 |
| Core | 2.14.2 | The core component of JumpServer is secondary developed by Django, with built-in Lion Celery Beat Flower Daphne service |
| Lina | 2.14.2 | The front-end UI project of JumpServer is mainly completed using Vue and Element UI |
| Luna | 2.14.2 | The front-end UI project of JumpServer is mainly completed by using Angular CLI |
| KoKo | 2.14.2 | Koko is the Go version of coco, which reconstructs the SSH/SFTP service and Web Terminal service of coco |
| Lion | 2.14.2 | Realize the springboard machine function of RDP/VNC protocol |
| Nginx | 1.18 | Proxy (forwarding) |
| Nodejs | 12.14.0 | For Luna, other versions may have problems (during install). Or use version 14.15.0 |
| Go | 1.15 | KoKo compilation |
1.3 random Key/Token
The following keys and tokens are used uniformly
| - | Random generation | remarks |
|---|---|---|
| Key | c7Z4OrTAEtj1AEGrHSIYfoTSgP5OAKTmPa2DjOOUHEtsB6un | Encryption key, please change it to random string in production environment |
| Token | GkzXTzSCTTDYikXHgT6l1PeC | Pre shared Token, koko and lion are used to register service accounts |
You can use the command to randomly generate:
cat /dev/urandom | tr -dc A-Za-z0-9 | head -c 48 # Change the length and modify the value of -c parameter
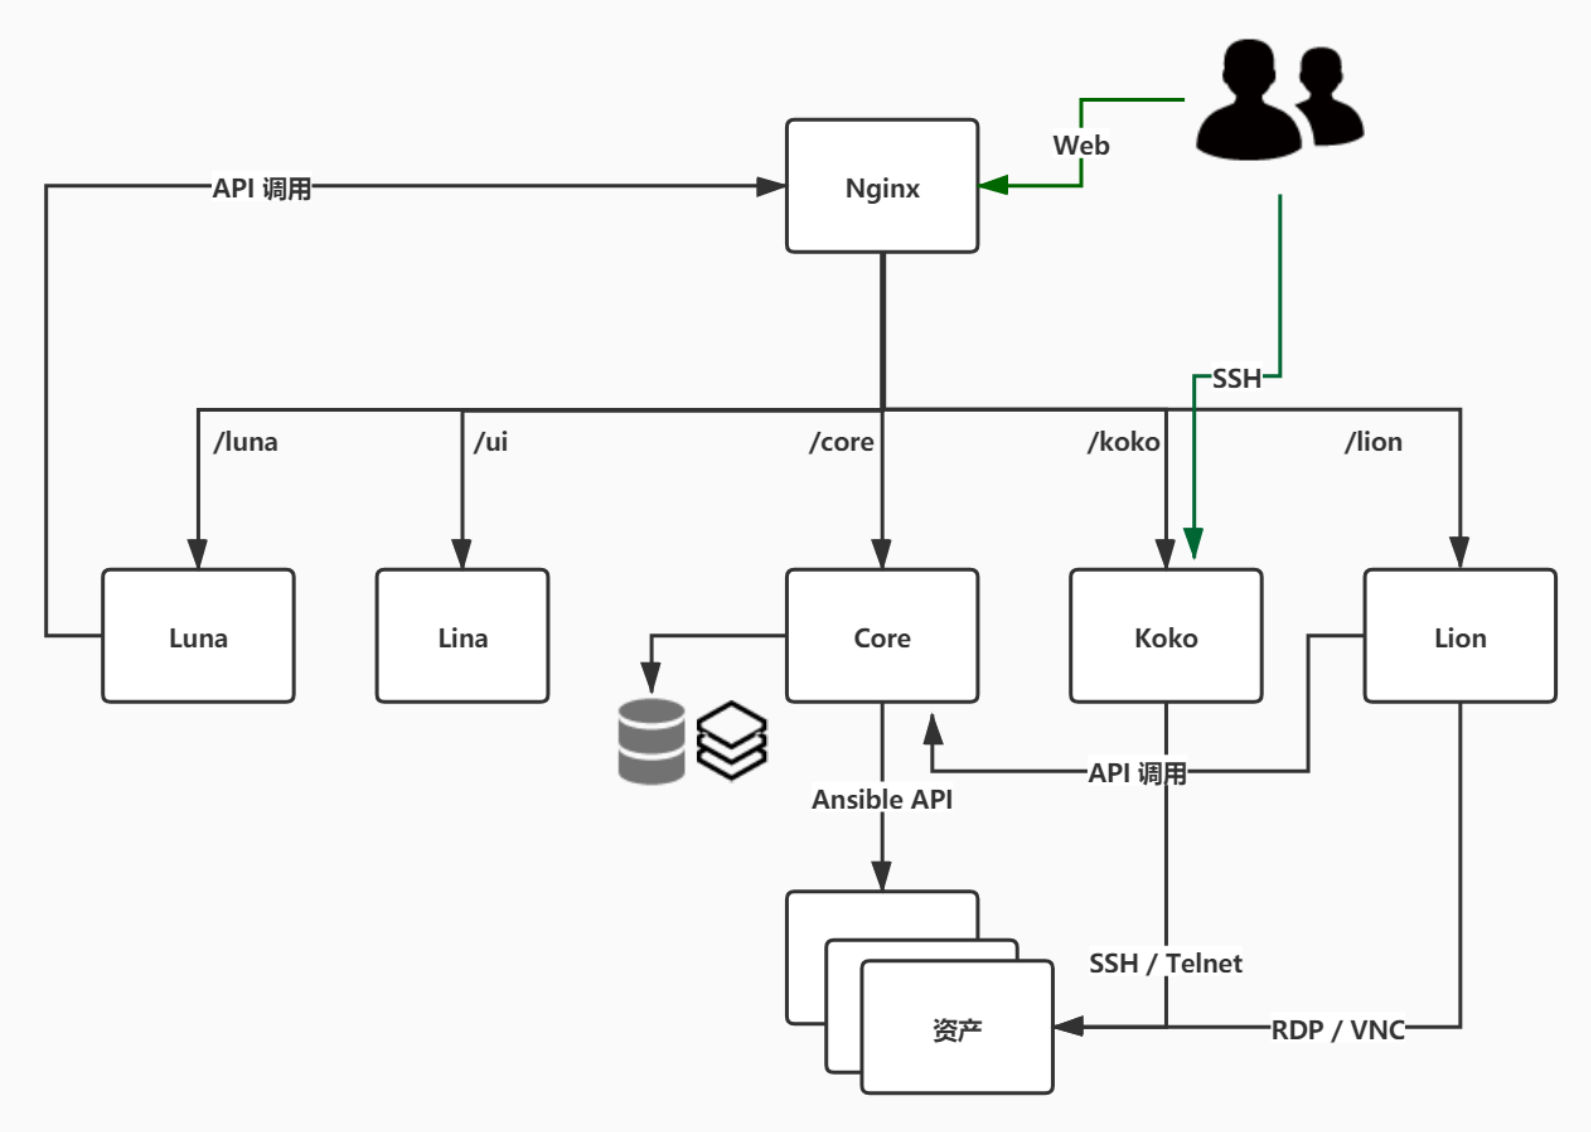
2, Structure
3, Deploy
- You can use the source code deployment method to increase your proficiency in the Linux operating system.
- Of course, it can also be deployed through containers.
3.1 MySQL
1. Execute installation script
bash ./mysql_5.7_install.sh

# Use default port: 3306
# I need to install scripts
How to modify the initial password of mysql root user?
Method 1:
mysql> use mysql;
mysql> update user set password=password('New password') where user='root' and host='localhost';
mysql> flush privileges;

Method 2:
mysql> set password for user name@localhost = password('New password');

Method 3:
mysqladmin -u user name -p Old password password New password
2. Create database
create database jumpserver default charset utf8 collate utf8_general_ci;
3. Authorize database user permissions
grant select,insert,update,delete on jumpserver.* to 'jumpserver'@'172.16.%' identified by "ZhuRS@123!";
flush privileges;
Please refer to the FAQ for permission
3.2 Redis
Execute installation script
bash ./redis_6.0_install.sh

# Use default port: 6379
# I need to install scripts
3.3 Core
1. Resource download
mkdir /opt/jumpserver-v2.14.2
wget -O /opt/jumpserver-v2.14.2.tar.gz https://github.com/jumpserver/jumpserver/releases/download/v2.14.2/jumpserver-v2.14.2.tar.gz
2. Decompress
cd /opt
tar -xf jumpserver-v2.14.2.tar.gz -C /opt/jumpserver-v2.14.2 --strip-components 1
3. Installing Python 36
yum install -y epel* openldap-devel gcc-c++ mysql-devel make sshpass
yum install -y python36 python36-devel
4. Installing Python dependencies
python3 -m venv /opt/py3
source /opt/py3/bin/activate  # Each time you run the project, you need to execute source /opt/py3/bin/activate to load the environment
cd /opt/jumpserver-v2.14.2
pip install --upgrade pip     # Upgrade the pip version, otherwise an error may be reported
pip install -r requirements/requirements.txt   # Start installing dependencies
5. Modify jumpserver configuration file
cd /opt/jumpserver-v2.14.2
cp config_example.yml config.yml
vim config.yml
grep -Ev "^$|^[#;]" config.yml

SECRET_KEY: c7Z4OrTAEtj1AEGrHSIYfoTSgP5OAKTmPa2DjOOUHEtsB6un
BOOTSTRAP_TOKEN: GkzXTzSCTTDYikXHgT6l1PeC
DEBUG: true
LOG_LEVEL: DEBUG
SESSION_EXPIRE_AT_BROWSER_CLOSE: true
DB_ENGINE: mysql
DB_HOST: 172.16.0.16
DB_PORT: 3306
DB_USER: jumpserver
DB_PASSWORD: ZhuRS@123!
DB_NAME: jumpserver
HTTP_BIND_HOST: 0.0.0.0
HTTP_LISTEN_PORT: 8080
WS_LISTEN_PORT: 8070
REDIS_HOST: 172.16.0.16
REDIS_PORT: 6379
REDIS_PASSWORD: kbZnQByQ8tyT9l1K9R3x
In fact, you can already see the jump server login interface here
Try to access: http://106.52.187.250:8080/
Default account: admin
Default password: admin
New password: Scedu@123
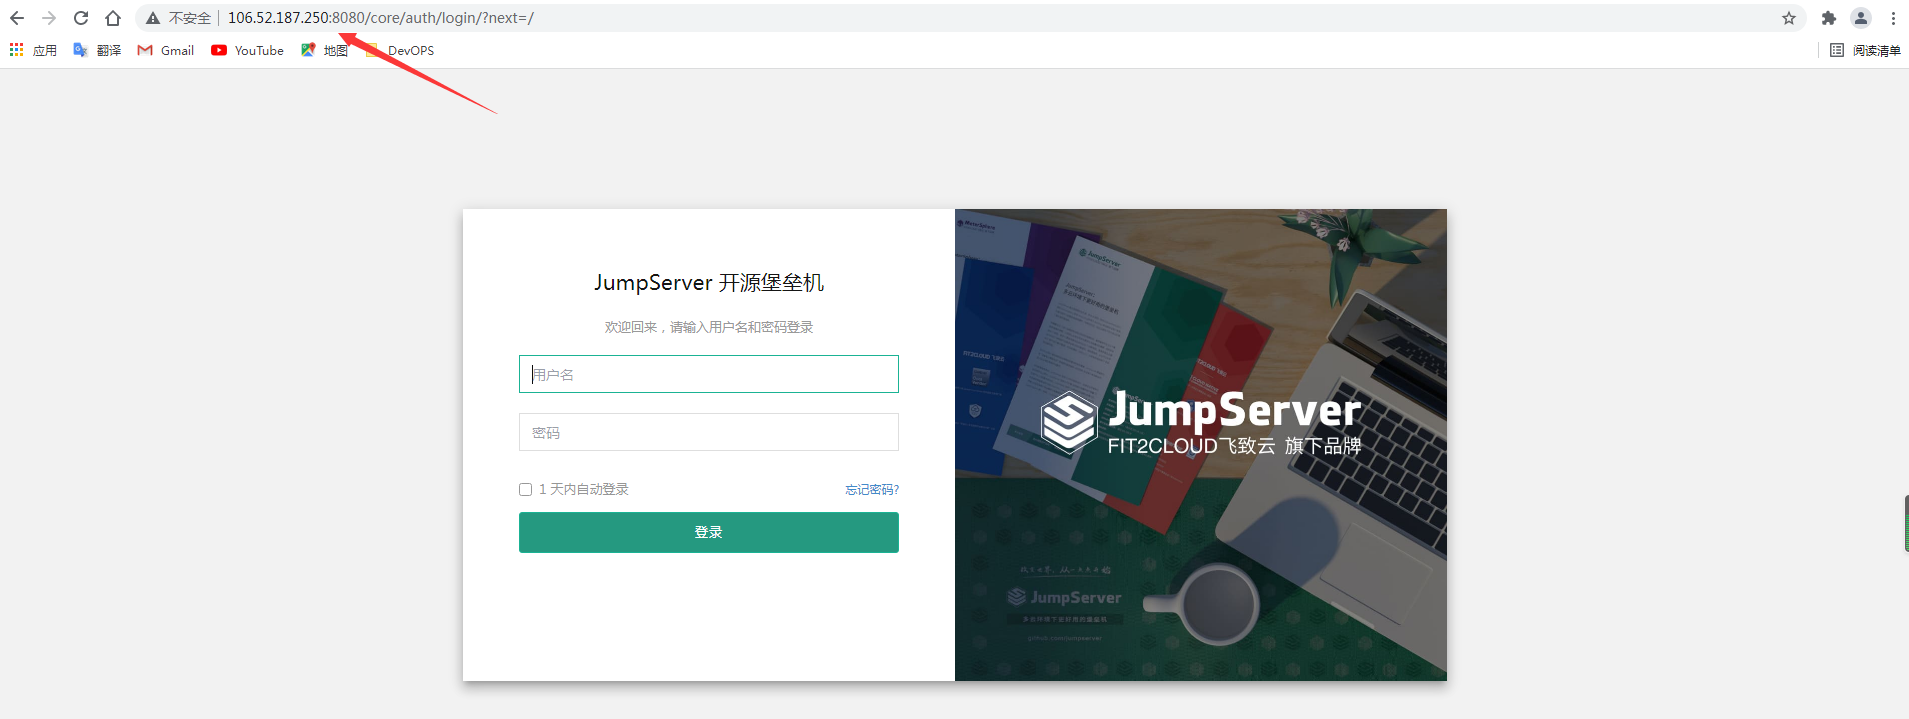
It's just that we can't get into the Web UI interface, because we haven't configured nginx yet

3.4 Lina
1. Download resources
mkdir /opt/lina-v2.14.2
wget -O /opt/lina-v2.14.2.tar.gz https://github.com/jumpserver/lina/releases/download/v2.14.2/lina-v2.14.2.tar.gz
2. Decompress
cd /opt
tar -xf lina-v2.14.2.tar.gz -C /opt/lina-v2.14.2 --strip-components 1
3. Installing nodejs
cd /opt
wget https://nodejs.org/dist/v14.18.0/node-v14.18.0-linux-x64.tar.xz
tar xf node-v14.18.0-linux-x64.tar.xz -C /usr/local/
cd /usr/local/ && mv node-v14.18.0-linux-x64/ nodejs

vim /etc/profile.d/node.sh
export NODE_HOME=/usr/local/nodejs
export PATH=$NODE_HOME/bin:$PATH

source /etc/profile.d/node.sh

ln -s /usr/local/nodejs/bin/npm  /usr/local/bin/npm
ln -s /usr/local/nodejs/bin/node  /usr/local/bin/node
4. Installation dependency
npm config set sass_binary_site https://npm.taobao.org/mirrors/node-sass
npm config set registry https://registry.npm.taobao.org
npm install -g yarn
yarn config set registry https://registry.npm.taobao.org
npm install -g yarn
yarn install
5. Modify profile
vim .env.development

ENV = 'development'

# base api
VUE_APP_BASE_API = ''
VUE_APP_PUBLIC_PATH = '/ui/'
VUE_CLI_BABEL_TRANSPILE_MODULES = true

# External auth
VUE_APP_LOGIN_PATH = '/core/auth/login/'
VUE_APP_LOGOUT_PATH = '/core/auth/logout/'

# Dev server for core proxy
VUE_APP_CORE_HOST = 'http://172.16.0.16:8080 '# changed to the url address of the Core
VUE_APP_CORE_WS = 'ws://172.16.0.16:8070'
VUE_APP_ENV = 'development'
6. Run Lina
cd /opt/lina-v2.14.2
yarn serve
7. Building Lina
cd /opt/lina-v2.14.2
yarn build:prod

# After the build is completed, the lina build package is generated in the current directory and can be ported to nginx
3.5 Luna
1. Download resources
mkdir /opt/luna-v2.14.2
wget -O /opt/luna-v2.14.2.tar.gz https://github.com/jumpserver/luna/releases/download/v2.14.2/luna-v2.14.2.tar.gz
2. Decompress
cd /opt
tar -xf luna-v2.14.2.tar.gz -C /opt/luna-v2.14.2 --strip-components 1
3. Installing nodejs
- It is already installed
- However, for Luna, nodejs version 10.24.1 is lower, and other higher versions will get stuck during npm install. Several versions have been tried, and finally 12.14.0 and 14.15.0 are available. You can also try other versions.
- FAQ has instructions
4. Installation dependency
npm install
npm install --dev
npm rebuild node-sass
5. Modify profile
vim proxy.conf.json

{
  "/koko": {
    "target": "http://172.16.0.16:5000 ", # Koko address
    "secure": false,
    "ws": true
  },
  "/media/": {
    "target": "http://172.16.0.16:8080 ", # core address
    "secure": false,
    "changeOrigin": true
  },
  "/api/": {
    "target": "http://172.16.0.16:8080 ", # core address
    "secure": false,                    # https ssl needs to be enabled
    "changeOrigin": true
  },
  "/core": {
    "target": "http://172.16.0.16:8080 ", # core address
    "secure": false,
    "changeOrigin": true
  },
  "/static": {
    "target": "http://172.16.0.16:8080 ", # core address
    "secure": false,
    "changeOrigin": true
  },
  "/lion": {
    "target": "http://172.16.0.16:9529 ", # lion address
    "secure": false,
    "pathRewrite": {
      "^/lion/monitor": "/monitor"
    },
    "ws": true,
    "changeOrigin": true
  },
  "/omnidb": {
    "target": "http://172.16.0.16:8082",
    "secure": false,
    "ws": true,
    "changeOrigin": true
  }
}
6. Installation ng
npm install -g @angular/cli
7. Run Luna
ng serve
- Here, you may be prompted that your nodejs version is too low, and the corresponding node version will be given. Install node again according to the corresponding version, and finally restart.
- Or it may report an Error from chokidar
- FAQ has instructions
8. Building Luna
ng build

# After the build is completed, generate dist build package in the current directory, which can be ported to nginx
3.6 KoKo
1. Download resources
mkdir /opt/koko-v2.14.2
wget -O /opt/koko-v2.14.2.tar.gz https://github.com/jumpserver/koko/archive/refs/tags/v2.14.2.tar.gz
2. Decompress
cd /opt
tar -xf koko-v2.14.2.tar.gz -C /opt/koko-v2.14.2 --strip-components 1
3. Install go
wget https://golang.google.cn/dl/go1.15.linux-amd64.tar.gz
tar -xf go1.15.linux-amd64.tar.gz -C /usr/local/
chown -R root:root /usr/local/go
export PATH=/usr/local/go/bin:$PATH
echo 'export PATH=/usr/local/go/bin:$PATH' >> ~/.bashrc
4. Compile
cd /opt/koko-v2.14.2
make

# The build directory will be generated in the current directory
5. Modify profile
cd /opt/koko-2.14.2/build/          # Enter the compiled folder
tar xzf koko---linux-amd64.tar.gz   # Unzip the compiled file
cd /opt/koko-2.14.2/build/koko---linux-amd64
mv config_example.yml config.yml
vim config.yml
grep -Ev "^$|^[#;]" config.yml

CORE_HOST: http://172.16.0.16: URL of 8080 # core
BOOTSTRAP_TOKEN: GkzXTzSCTTDYikXHgT6l1PeC    # token of Core
BIND_HOST: 0.0.0.0
SSHD_PORT: 2222
HTTPD_PORT: 5000
LOG_LEVEL: DEBUG
6. Start KoKo
cd /opt/koko-2.14.2/build/koko---linux-amd64
./koko
3.7 Lion
1. Deploy Guacd
-
Download resources
mkdir /opt/guacamole-v2.14.2 && cd /opt/guacamole-v2.14.2
wget http://download.jumpserver.org/public/guacamole-server-1.3.0.tar.gz
tar -xzf guacamole-server-1.3.0.tar.gz
-
Installing Guacd dependencies
yum -y localinstall --nogpgcheck https://mirrors.aliyun.com/rpmfusion/free/el/rpmfusion-free-release-7.noarch.rpm

yum install -y cairo-devel libjpeg-turbo-devel libpng-devel libtool uuid-devel

yum install -y ffmpeg-devel freerdp-devel pango-devel libssh2-devel libtelnet-devel libvncserver-devel libwebsockets-devel pulseaudio-libs-devel openssl-devel libvorbis-devel libwebp-devel
-
Building Guacd
cd guacamole-server-1.3.0/
./configure --with-init-dir=/etc/init.d
make
make install
ldconfig
If you want to use systemd management, you can use. / configure -- with systemd dir = / etc / systemd / system/
2. Deploy Lion
-
Download resources
cd /opt && wget https://github.com/jumpserver/lion-release/releases/download/v2.14.2/lion-v2.14.2-linux-amd64.tar.gz
tar -xf lion-v2.14.2-linux-amd64.tar.gz
-
Modify profile
cd lion-v2.14.2-linux-amd64 && cp config_example.yml config.yml
vim config.yml
grep -Ev "^$|^[#;]" config.yml

CORE_HOST: http://172.16.0.16:8080
BOOTSTRAP_TOKEN: GkzXTzSCTTDYikXHgT6l1PeC
BIND_HOST: 0.0.0.0
HTTPD_PORT: 8081
LOG_LEVEL: DEBUG
3. Start Guacd
/etc/init.d/guacd start
4. Start Lion
cd /opt/lion-v2.14.2-linux-amd64
./lion
3.8 Nginx
vim /etc/nginx/conf.d/jumpserver.conf
server {
  listen 80;
  # server_name _;

  client_max_body_size 5000m;

  # Luna configuration
  location /luna/ {
    proxy_pass http://172.16.0.16:4200;
  }

  # Core data static resources
  location /media/replay/ {
    add_header Content-Encoding gzip;
    root /opt/jumpserver-v2.14.2/data/;
  }

  location /media/ {
    root /opt/jumpserver-v2.14.2/data/;
  }

  location /static/ {
    root /opt/jumpserver-v2.14.2/data/;
  }

  # KoKo Lion configuration
  location /koko/ {
    proxy_pass       http://172.16.0.16:5000;
    proxy_set_header X-Real-IP $remote_addr;
    proxy_set_header Host $host;
    proxy_set_header X-Forwarded-For $proxy_add_x_forwarded_for;
    proxy_http_version 1.1;
    proxy_buffering off;
    proxy_set_header Upgrade $http_upgrade;
    proxy_set_header Connection "upgrade";
  }

  # lion configuration
  location /lion/ {
    proxy_pass http://172.16.0.16:8081;
    proxy_buffering off;
    proxy_request_buffering off;
    proxy_http_version 1.1;
    proxy_set_header X-Forwarded-For $proxy_add_x_forwarded_for;
    proxy_set_header Upgrade $http_upgrade;
    proxy_set_header Connection $http_connection;
    proxy_ignore_client_abort on;
    proxy_connect_timeout 600;
    proxy_send_timeout 600;
    proxy_read_timeout 600;
    send_timeout 6000;
  }

  # Core configuration
  location /ws/ {
    proxy_pass http://172.16.0.16:8070;
    proxy_set_header X-Real-IP $remote_addr;
    proxy_set_header Host $host;
    proxy_set_header X-Forwarded-For $proxy_add_x_forwarded_for;
    proxy_http_version 1.1;
    proxy_buffering off;
    proxy_set_header Upgrade $http_upgrade;
    proxy_set_header Connection "upgrade";
  }

  location /api/ {
    proxy_pass http://172.16.0.16:8080;
    proxy_set_header X-Real-IP $remote_addr;
    proxy_set_header Host $host;
    proxy_set_header X-Forwarded-For $proxy_add_x_forwarded_for;
  }

  location /core/ {
    proxy_pass http://172.16.0.16:8080;
    proxy_set_header X-Real-IP $remote_addr;
    proxy_set_header Host $host;
    proxy_set_header X-Forwarded-For $proxy_add_x_forwarded_for;
  }

  # Front end Lina
  location /ui/ {
    proxy_pass http://172.16.0.16:9528;
    proxy_set_header X-Real-IP $remote_addr;
    proxy_set_header Host $host;
    proxy_set_header X-Forwarded-For $proxy_add_x_forwarded_for;
  }

  location / {
    rewrite ^/(.*)$ /ui/$1 last;
  }
}
4, Verify
visit: http://106.52.187.250/

Of course, you can also move the built Lina and Luna to nginx. The effect is the same.
Access on a Linux server:
ssh admin@172.16.0.16 -p2222
admin@172.16.0.16's password:

# admin: jumpserver login user (actually login to view the user's resources)
# 172.16.0.16: IP address of jumpserver
#.... Password: the login password of the admin login user of jumpserver

5, FAQ
5.1 Python dependency error reporting
1. Error reporting type
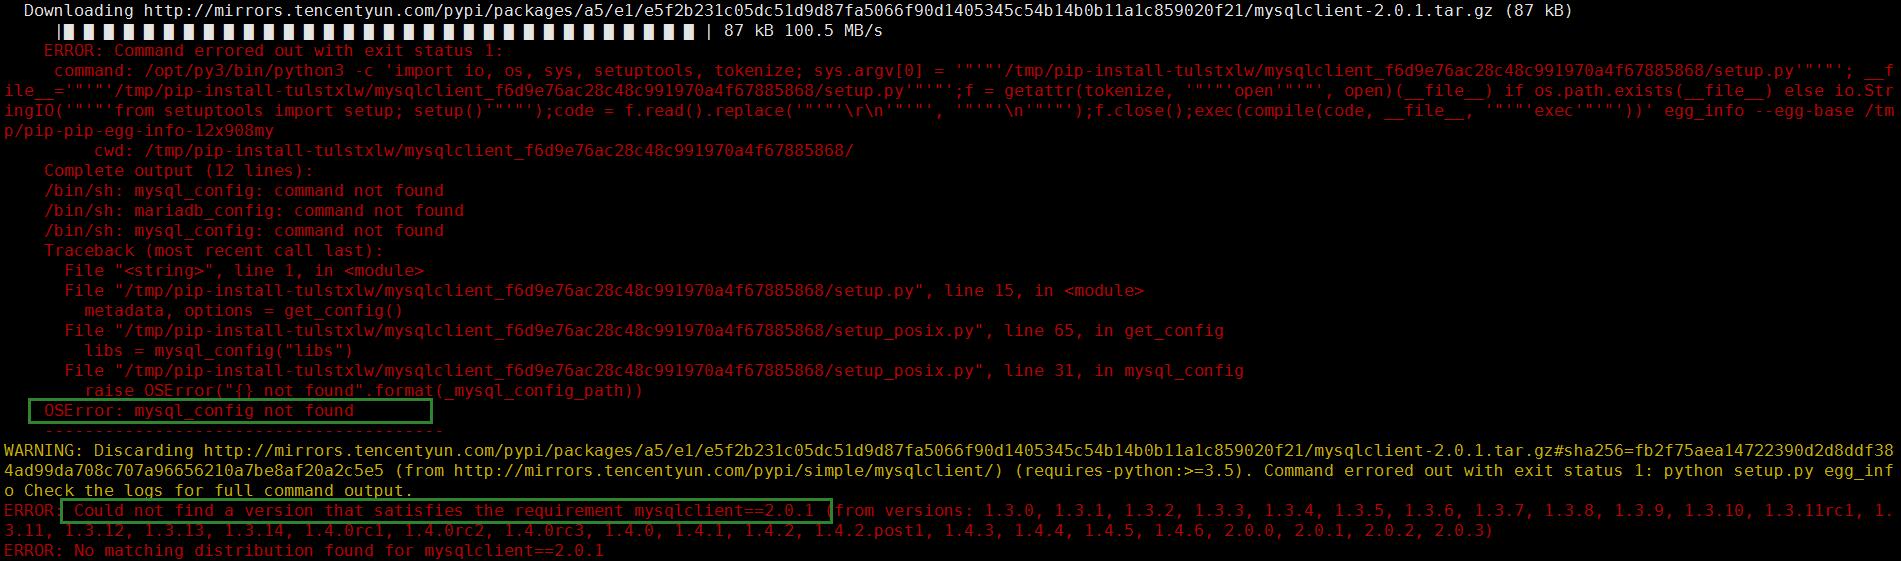
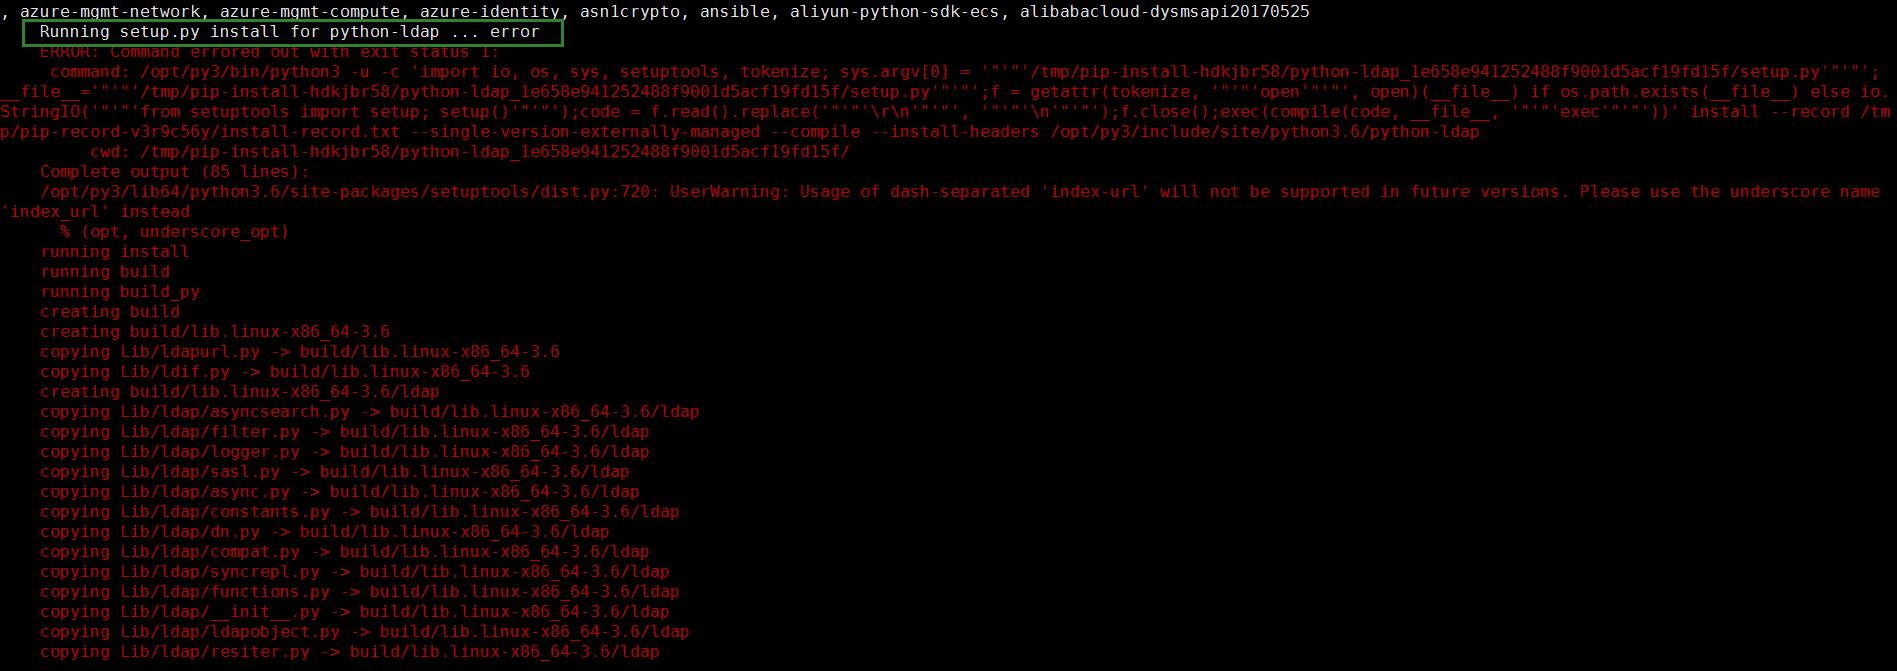
2. Error reporting reason
Lack of related dependencies
3. Solution
# Figure 1:
yum install mysql-devel
# Figure 2:
yum install -y epel* openldap-devel gcc-c++ make sshpass
5.2 database permissions
1. Error reporting type
Error when starting Core
./jms start
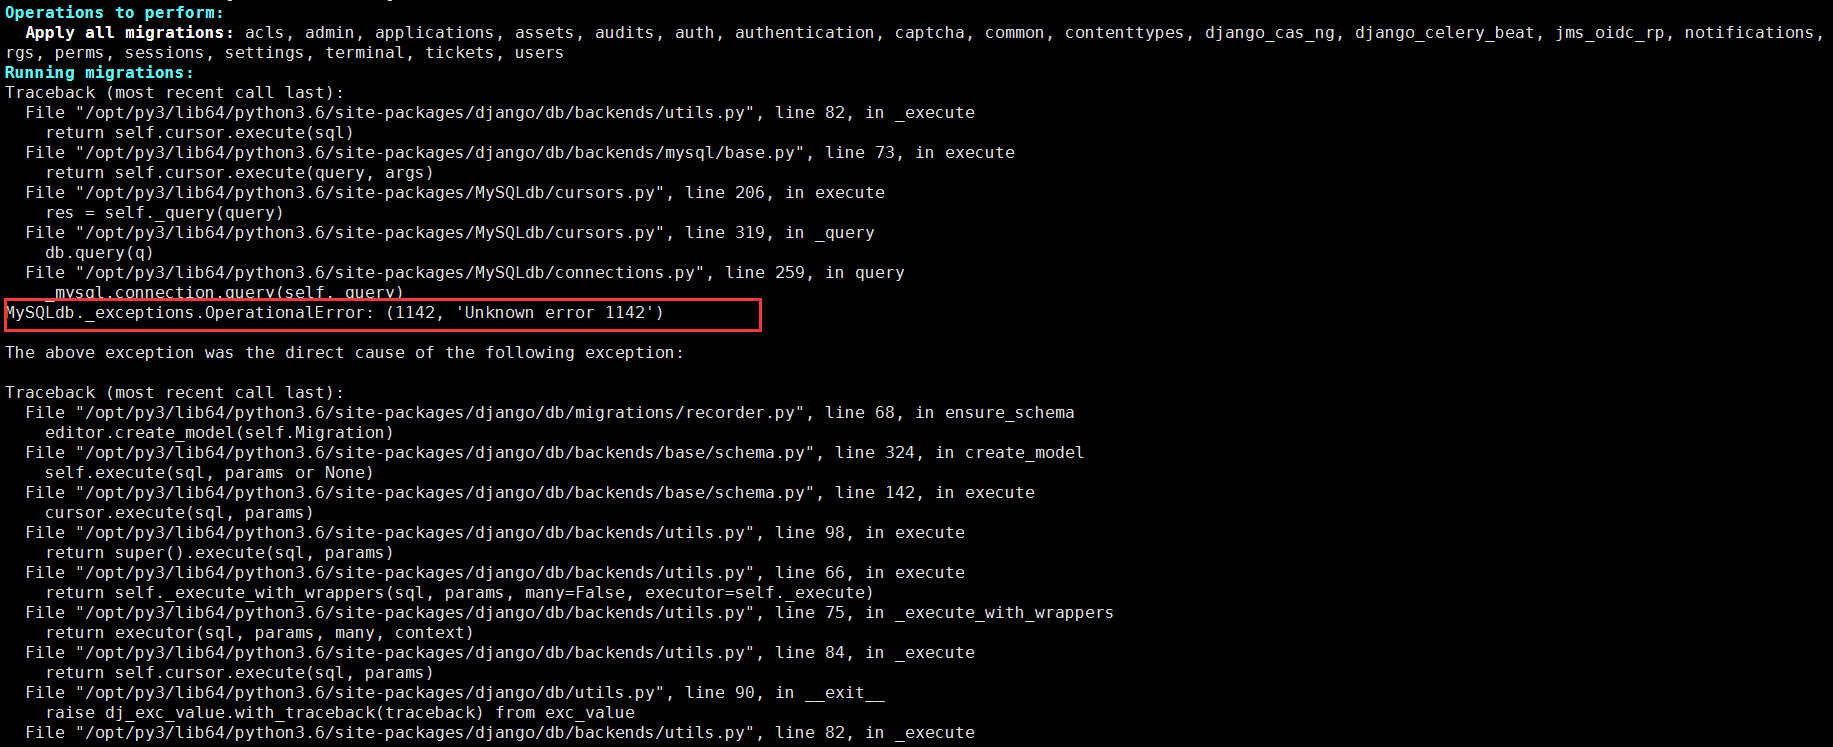
2. Error reporting reason
jumpserver database lacks REFERENCES permission
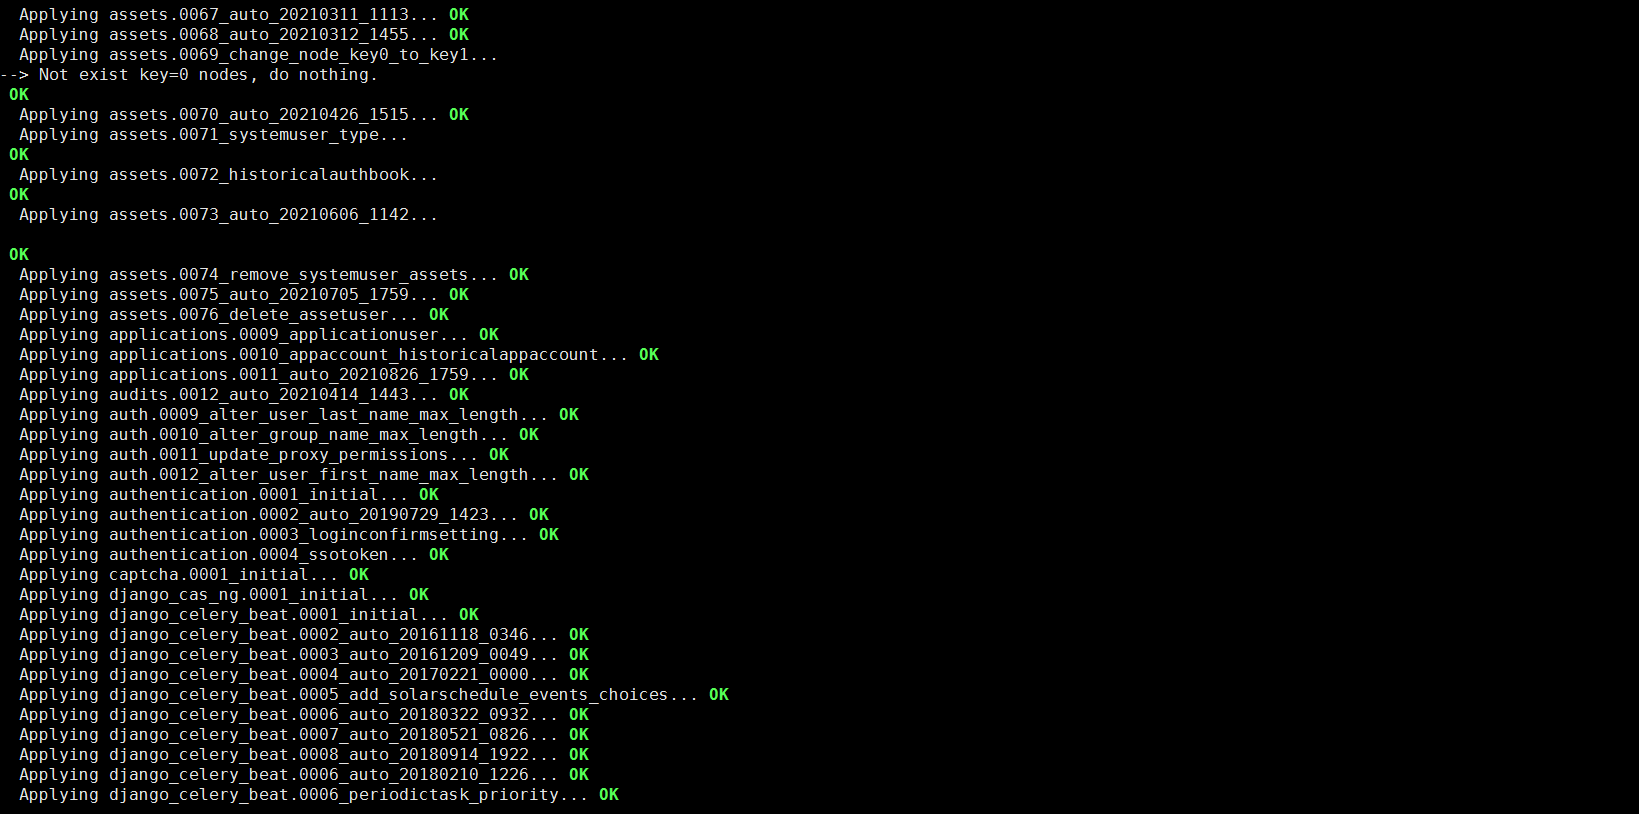
3. Solution
mysql> grant REFERENCES on jumpserver.* to 'jumpserver'@'172.16.%';
Query OK, 0 rows affected (0.00 sec)

mysql> flush privileges;
Query OK, 0 rows affected (0.00 sec)
The same error is still reported after adding permissions. It must be the problem of database permissions. We haven't found out what permissions we need for jumpserver. Friends who know can leave a message in the comment area. Therefore, here I decisively give full permissions to the jumpserver database.
mysql> grant all on jumpserver.* to 'jumpserver'@'172.16.%';
Query OK, 0 rows affected (0.01 sec)

mysql> flush privileges;
Query OK, 0 rows affected (0.00 sec)
Execute. / jms start again
Just this time. Sure enough, green is the best color.
5.3 nodejs version problem

5.4 Luna construction problems
1. Start Luna and report an error
Run ng serve to report Error from chokidar
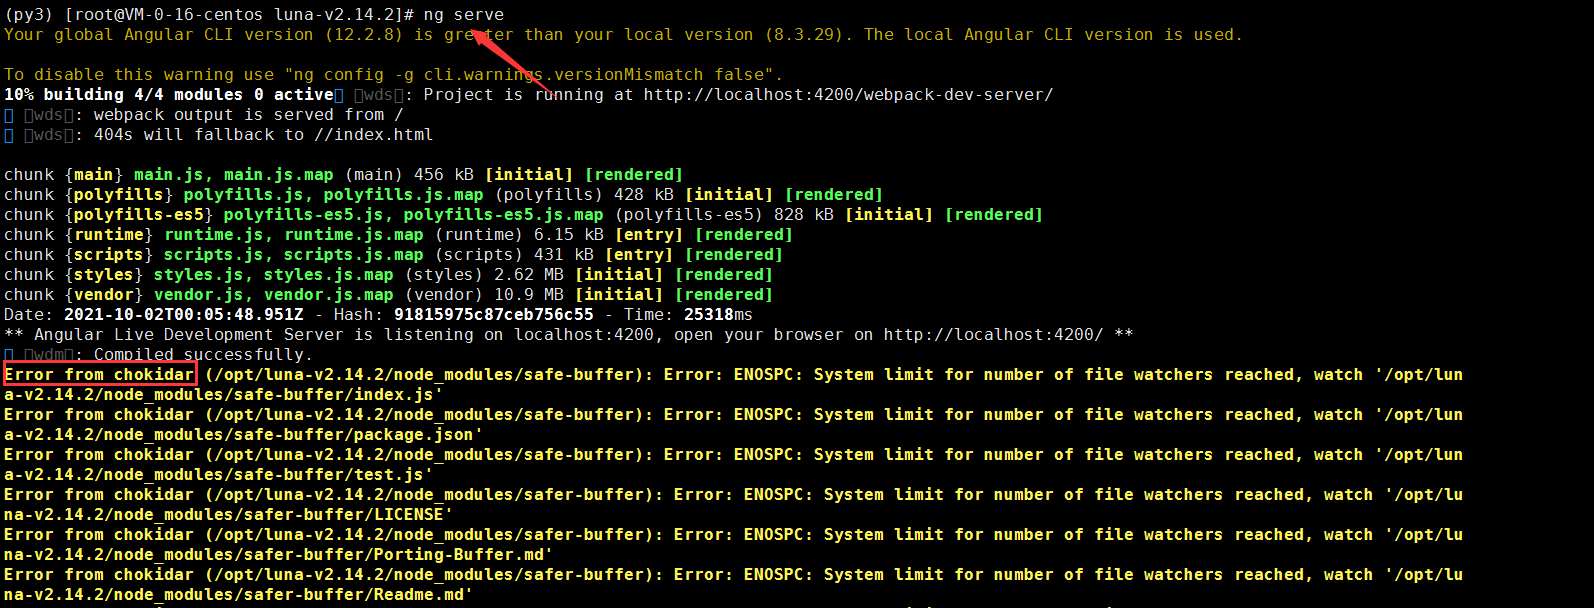
Solution: increase fs.inotify.max_user_watches
Description of other parameters:
fs.inotify.max_queued_events: indicates that inotify is called_ The maximum number of queueable events allocated to inotify instance during init. Events exceeding this value will be discarded, but in will be triggered_ Q_ Overflow event.
fs.inotify.max_user_instances: indicates the maximum number of inotify instances that can be created for each real user ID. the default is 128
fs.inotify.max_user_watches: indicates the number of watch es that can be added by the same user at the same time (usually for directories, which determines the number of directories that can be monitored by the same user at the same time)
Note:
max_queued_events is the maximum length of the queue managed by inotify. The more frequently the file system changes, the greater this value should be. If you see Event Queue Overflow in the log, it means max_queued_events is too small and needs to be used again after adjusting parameters.
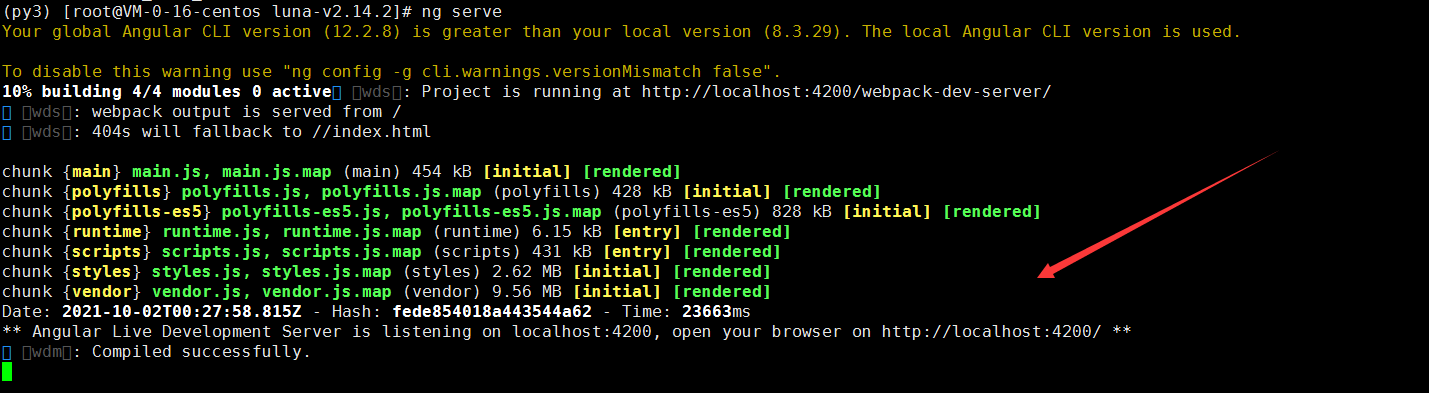
echo fs.inotify.max_user_watches=524288 | sudo tee -a /etc/sysctl.conf && sudo sysctl -p
Start Luna again
You won't report an error this time because fs.inotify.max_ user_ The default value of watches is 128, which is exceeded during startup, resulting in an error.
2. Luna build error
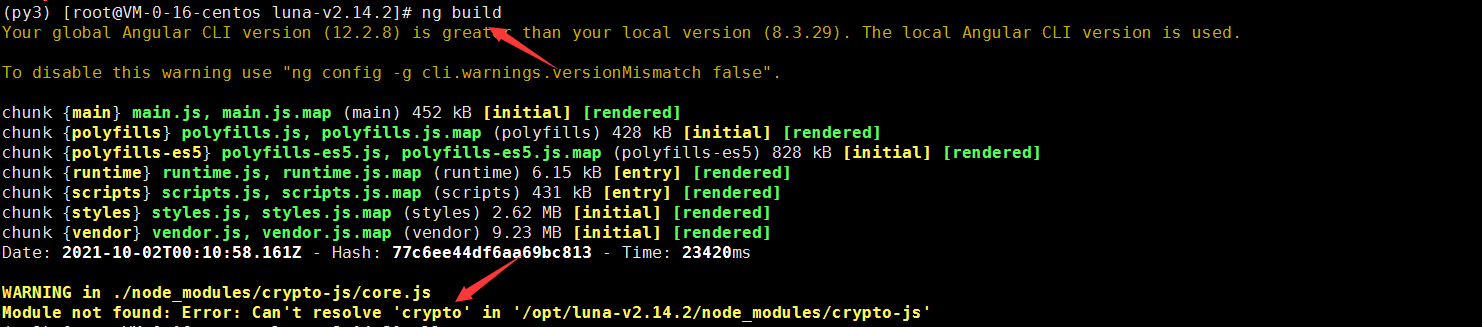
Obviously, the module is missing. Just install the module
npm install crypto-js

# Just build it again
5.5 go compilation problems
1. make compilation error
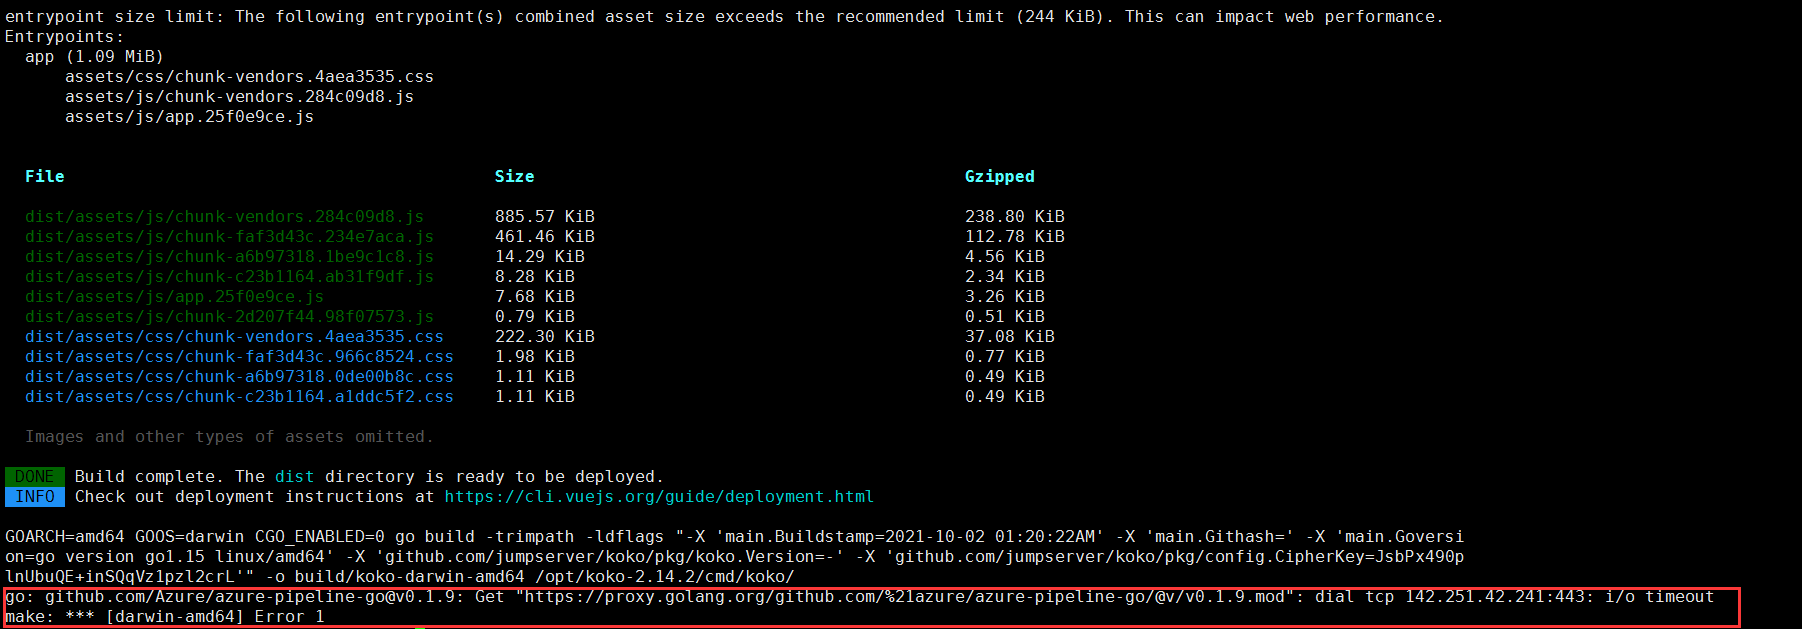
2. Solution
Timeout timeout indicates that the agent has been qiang again. Configure the agent and make again.
go env -w GOPROXY=https://goproxy.cn
make
5.6 Component download problem
During the download of each component, ensure the consistency of the downloaded files, such as the size of the downloaded files, otherwise there will be problems in decompression, because foreign websites are resolved during the download.
tar -xf koko-v2.14.2.tar.gz -C /opt/koko-v2.14.2 --strip-components 1

tar: This does not look like a tar archive

gzip: stdin: unexpected end of file
tar: Child returned status 1
tar: Error is not recoverable: exiting now

# The above error is a typical incomplete file download
# Some domestic images can be used for downloading
summary
Let's sort out the component relationship of JumpServer:
- Core: the core component of JumpServer, which can be understood as JumpServer;
- Lina: front end UI project of JumpServer, which needs to be deployed before normal access;
- Luna: the front-end UI project of JumpServer does not render, but only provides API interface;
- KoKo: provide SSH/SFTP service and Web Terminal service;
- Lion: used to realize the springboard machine function of RDP/VNC protocol.
JumpServer project source code: https://github.com/jumpserver/