Jump between Android app development activities (job 2)
Purpose of the experiment:
(1) Click and jump the page with recycleView. For example, if a tab page is a news list, click a line to jump to the news details page;
(2) The basic principle of this assignment is to understand the life cycle of activity and state transition operation;
1, Key steps of project development
In the last job, the adapter has been used to transfer data to the recyclerview interface, so this time we mainly use intent to transfer parameters and jump between activities.
1. Set a listener for each item in the recyclerview.
[here, you can define an interface in the MyAdapter private class]
public interface OnItemClickListener{
        public void onItemClick(View view,int position,List<Youth> youthList);
    }
Then the inner class viewholder relay in MyAdapter is responsible for the parent interface OnItemClickListener, which includes the declaration of the interface, the call and the calling parent interface OnItemClickListener in the overload of the onClick function.
private OnItemClickListener myonItemClickListener;

        public MyYouthAdapterViewHolder(@NonNull View itemView,OnItemClickListener onItemClickListener) {
            super(itemView);
            myImageView_pic=itemView.findViewById(R.id.imageView_pic);
            myTextView=itemView.findViewById(R.id.textView_tag);
            myImageView_favor=itemView.findViewById(R.id.imageView_favor);
            myonItemClickListener=onItemClickListener;
            itemView.setOnClickListener(this);

        }


        @Override
        public void onClick(View view) {
            myonItemClickListener.onItemClick(view,getLayoutPosition(),myYouthList);
        }
[to enable this interface to be accessed by the outside world, you can declare it as a data member in the MyAdapter class, and then use the setOnItemClickListener() function to access it.]
private OnItemClickListener onItemClickListener;
public void setOnItemClickListener(OnItemClickListener onItemClickListener){
        this.onItemClickListener=onItemClickListener;
    }
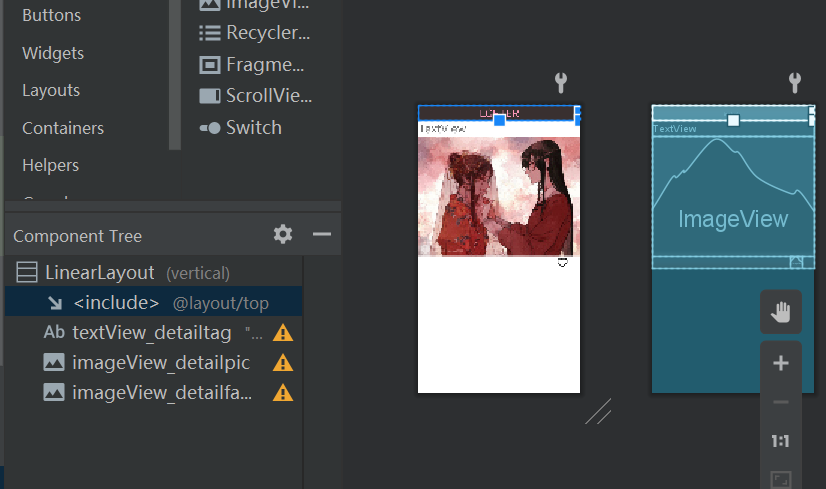
2. After listening is set, you need to create an activity to load the details interface.
[this interface includes the content you want to display, such as pictures, text, status, etc. the typesetting can also be designed arbitrarily.]
I loaded a text and two pictures here.
3. Now it's time to consider how to load the content of the item in the recyclerview into the activity corresponding to the details page.
[intent and bundle are used here to transfer values.]
(called activity refers to the activity corresponding to the details interface.)
protected void onCreate(Bundle savedInstanceState) {
        super.onCreate(savedInstanceState);
        setContentView(R.layout.activity_main2);
        textView=findViewById(R.id.textView_detailtag);
        imageView=findViewById(R.id.imageView_detailpic);
        imageView_favor=findViewById(R.id.imageView_detailfavor);
        Intent intent=getIntent();
        Bundle bundle=intent.getExtras();
        imageView.setImageResource(bundle.getInt("item_image"));
        textView.setText(bundle.getString("item_tag"));
        imageView_favor.setImageResource(bundle.getInt("item_favor"));
        imageView_favor.setOnClickListener(new View.OnClickListener() {
            @Override
            public void onClick(View view) {
                imageView_favor.setImageResource(R.drawable.yes);
                Toast.makeText(MainActivity2.this,"Received your love, thank you@~@",Toast.LENGTH_LONG).show();
            }
        });
(called fragment)
public void initYouthRecyclerview(){
        StaggeredGridLayoutManager staggeredGridLayoutManager=new StaggeredGridLayoutManager(2,StaggeredGridLayoutManager.VERTICAL);
        recyclerView.setLayoutManager(staggeredGridLayoutManager);
        MyYouthAdapter myyouthAdapter=new MyYouthAdapter(youthList);
        recyclerView.setAdapter(myyouthAdapter);
        myyouthAdapter.setOnItemClickListener(new MyYouthAdapter.OnItemClickListener() {
            @Override
            public void onItemClick(View view, int position, List<Youth> youthList) {
               // Toast.makeText(getActivity(), "thank you @ ~ @" for your favorite, Toast.LENGTH_LONG).show();
                Log.d("favor","i like it.");
                Intent intent=new Intent(getActivity(),MainActivity2.class);
                Bundle bundle=new Bundle();
                bundle.putInt("item_image",youthList.get(position).getPicture());
                bundle.putString("item_tag",youthList.get(position).getTag());
                bundle.putInt("item_favor",youthList.get(position).getFavor());
                intent.putExtras(bundle);
                startActivity(intent);
            }
        });
    }
2, Core technology
1) intent and bundle:
- Intent is used to jump from one activity to another. The writing form of intent in the activity being tuned is different.
- A bundle can be seen as a list of key value pairs. The humanization of this list is that its value value can be integer, char and String. And for each value, you can give it a name for easy access. When it is used with intent, it can make intent not only take one value, but can take multiple and different kinds of values. Not too good!
- After learning intent, I also thought about why I should write a private class MyAdapter instead of using intent directly when passing values. Intent and adapter are value passing. What's the difference between them?? Later, I thought about it carefully. The value transferred by adapter can be regarded as static, that is, a series of static data can be transferred to the interface we write. We can transfer the data without calling between two activities; Intent is a tool to transfer values in the process of operating an activity. The conditions for transferring values are based on the process of one activity calling another activity. So there is a big difference between the two.
2) Interface: the interface I write here is mainly used to override the onItemClickListener() function in the detailed activity I write. Due to the multi inheritance feature of the interface, it can be inherited by ViewHolder and mainactivity.
3) ImageView fillet design:
Wrap a cardview outside the imageview.
<androidx.cardview.widget.CardView
app:cardCornerRadius="20dp"
app:cardElevation="0dp"
In order to make the imageview adapt to the desktop size, you can set corresponding properties for the imageview.
android:scaleType="fitXY"
android:adjustViewBounds="true"
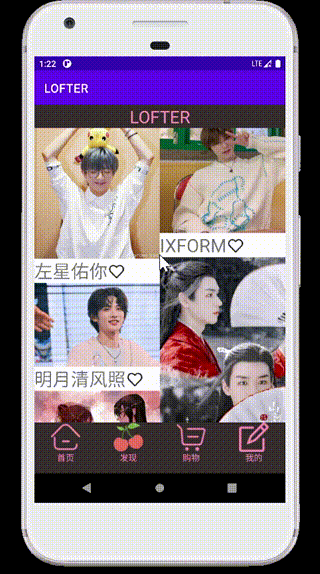
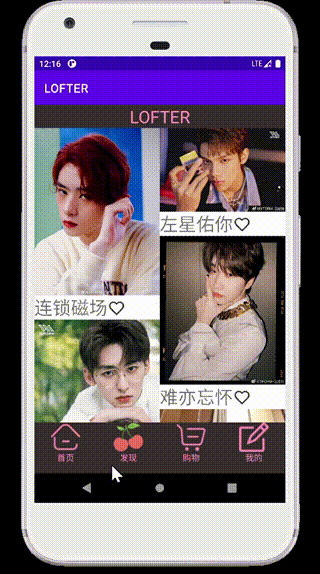
3, Result display
Click to enter details.
Fillet imageview.