This week, we learned the basic usage of servlets. Until this week, we had been writing Java code on the page. The servlet is to move these Java code into the Java file.
When creating servlet s, we check doGet, doPost by default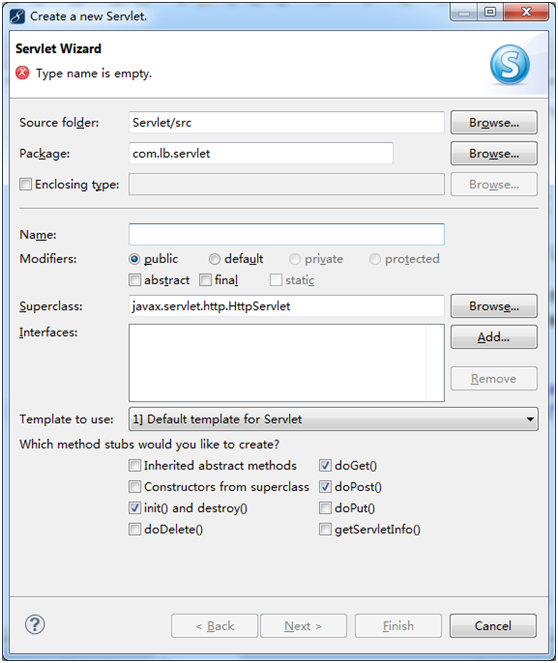
After successful creation, a Java file will be generated, which will automatically have the doGet and doPost methods we just checked out.
response.setContentType("text/html");
		PrintWriter out = response.getWriter();
		out.println("<!DOCTYPE HTML PUBLIC \"-//W3C//DTD HTML 4.01 Transitional//EN\">");
		out.println("<HTML>");
		out.println("  <HEAD><TITLE>A Servlet</TITLE></HEAD>");
		out.println("  <BODY>");
		out.print("    This is ");
		out.print(this.getClass());
		out.println(", using the GET method");
		out.println("  </BODY>");
		out.println("</HTML>");
		out.flush();
		out.close();
Both doGet and doPost will have the above code, and we can see that the output is a basic element of a web page, which I think can be said to be the self-introduction of the created servlet itself. Because this code can directly see the effect of the web page file on the browser side, that is, it can directly access the java file in the browser.
Usually, we delete this code before typing it.
As far as Servlet is concerned, I think web. XML is the key to understanding servlets. What I now know about servlets is that they just write the java code that I talked about last week into the servlet that I created, and it's not that different in essence. Instead, the automatically generated code in web.xml has been studied for a long time.

Each creation of a servlet automatically generates such a piece of code in web.xml. In previous studies, using forms to submit data, you just set the name of the page you want to submit in the action attribute. Why does it run to the Java file of the servlet to execute the Java code in it? These two pieces of code in Web. XML give me the answer.
First look at the servlet tag, the first two lines do not find any use for the time being, mainly look at the latter two lines, servlet-name similar to aliases, can be arbitrarily named, but the upper and lower code servlet-name must be the same. Servlet-class is the class name associated with this naming, which corresponds to a landmark whose destination is our named java file.
Look at the servlet-mapping below. The first one is naming. The second url-pattern wraps the access path, which is used both from the browser and the form on the page. For example, the action attribute of the form form must use the value in url-pattern to submit data to the Java file. The same is true for browsers. When accessing the server after startup, it must be in the URL bar after the project name before it can access the Java file of the servlet and execute its code.
The next two knowledge points are also about web.xml files.
ServletConfig interface
SerletConfig can read initialization parameters configured in web.xml.
How to create this initialization parameter:
If you change the window of web.xml from Source to Design, you can see a servlets button and expand it to see all created servlet files.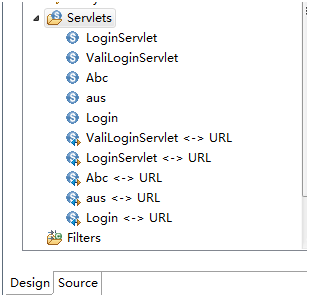
Choose one of the areas that will drop down the window on the right to see an Initial Parameters header with only two fields, Parameter Name and Parameter Value, one equivalent to the variable name and one value.
As long as you click the plus sign next to it, the two variables created here can only be obtained in the servlet.
Go to the class that just created the initialization variable to create a servletConfig object and get the initialization variable
ServletConfig sc = this.getServletConfig();
		String uname = sc.getInitParameter("username");
		String upwd = sc.getInitParameter("userpwd");
		System.out.println(uname+"|"+upwd);
In console output, although in console output, but still in the browser side using url-pattern value access will trigger the servlet and execute its code.
The second is created in the same way.
ServletContext sContext = sc.getServletContext();
		String defaultFace = sContext.getInitParameter("defaultFace");
		System.out.println(defaultFace);
This differs from the previous one in that it can be used in all servlet s
Filters and listeners
The filter is essentially a Web application component on the Web application server, which is used to intercept requests from client browsers and target resources, and filter these requests to a certain extent, and then send them to the target resources.
For example, when we use request and response, we often need to code manually. Although the amount of code is not much, it is very troublesome. At this time, we can use filtering to filter the whole project and save a few sentences of code.
First create a class and then connect it with an interface Filter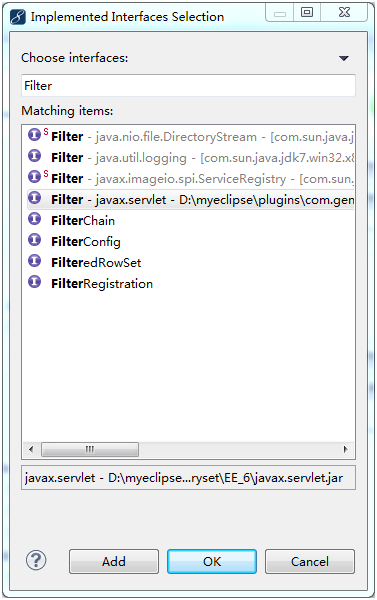
Note that you cannot make a mistake, it is the Filter in the javax.servlet package.
After the creation, we need to rewrite the init initialization method of three methods, the method called when destroy closes, and then the most important doFilter method.
The code to be written is filtered, which is similar to the filter. All the code to be executed in the project must pass through the filter. Now write the code for request and response
request.setCharacterEncoding("utf-8");
		response.setCharacterEncoding("utf-8");

		chain.doFilter(request, response);
The final chain.doFilter is to forward the final request for filtering to the next resource, that is, to continue executing the code to be executed next.
Next, we need to configure the scope of the filter in the web.xml file to be different from that in the servlet web.xml. There is only one difference in the url-pattern, where the parameters are not used to access the "it" path, but to control which paths it filters. Here we filter the encoding format, so we set all of them.
<filter>
		<filter-name>encodingFilter</filter-name>
		<filter-class>com.lb.filter.EncodingFilter</filter-class>
	</filter>
	<filter-mapping>
		<filter-name>encodingFilter</filter-name>
		<url-pattern>/*</url-pattern>
	</filter-mapping>
Monitor
The so-called listener is the class that connects the interface HttpSessionAttributeListener called the listener. After the interface is connected, three methods are rewritten. The operation of adding, deleting and modifying attribute s is very simple. The configuration of the listener is simple. It only needs to configure the related classes in the web.xml file.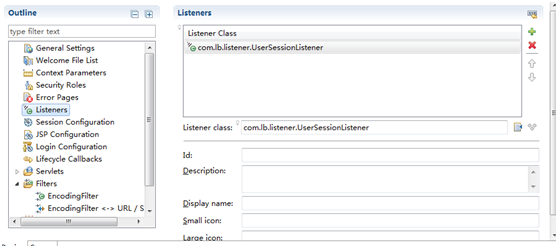
The listener can be started by typing the related class in listeners in Desgn in xml file. Once the function of the code involves the listener's listening range (adding modifications in sessions, etc.), the listener will execute the code I wrote in advance, such as which element the listener is entering in the console when the session is added.
Next up is this week's shopping cart implementation code for connecting data.
First, go to the database and create related tables.
To form a complete shopping cart system, we need a shopping cart with a user, goods and corresponding users.
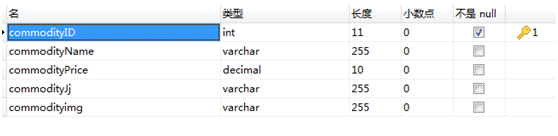
Commodity lists need commodity ID, commodity name, commodity description, commodity prices, commodity pictures.
User table should have user ID, user name, password
Shopping cart list should have user ID, commodity ID, quantity.

Build the package in the project and you can start to write the function code.
First, login operation, to match the database user account password
int state = 0;
		String strSql = "select * from admintbl where loginID=? and loginPWD=?";
		Object[] params = new Object[2];
		params[0] = user.getLoginID();
		params[1] = user.getLoginPWD();
try {
			ResultSet rs = DBManage.getResultSet(strSql, params);
			if(rs.next()){
				user.setUid(rs.getInt("uid"));
				state = 1;
			}
		} catch (SQLException e) {
			// TODO Auto-generated catch block
			e.printStackTrace();
		}
		return state;
Bring sql statement into DB management and condition array into DB management to execute. Use next method to judge whether it has value. If it has value, it will return state 1 on behalf of the user's account password.
		User user = new User();
		UserServce userService = new UserServce();
		//Get the account password entered on the page
		user.setLoginID(request.getParameter("loginID"));
		user.setLoginPWD(request.getParameter("loginPWD"));
		//Save the return value of the above code into an existing variable
		int state = userService.login(user);
		HttpSession session = request.getSession();
		//Judging from the value, if it is 1, jump to the home page, otherwise the account password will be displayed incorrectly.
		if(state==1){
			session.setAttribute("user", user);
			response.sendRedirect("GoodsListAll");
		}
		else{
			session.setAttribute("err", "Error in account or password!");
			response.sendRedirect("adminlogin.jsp");
		}
Next is the home page to display the goods in the database. Similarly, it starts with looking up the code in the database, then from servce to servlet, the same routine.
//Find all the items in the table
String strSql = "SELECT * FROM commoditytbl";
List<Goods> list = new ArrayList<Goods>();
		try {
		//Define a collection and return it after execution of an SQL statement
			ResultSet rs = DBManage.getResultSet(strSql);
			//Judging whether there is a value in a set
			while (rs.next()) {
				//Defining commodity objects
				Goods goods = new Goods();
				//Assign values to commodity objects with rs output, where the parameter string is the field name of the database
				//Using getInt or getString to determine the type of variables encapsulated in goods objects
				goods.setGid(rs.getInt("commodityID"));//Commodity ID
				goods.setGoodsName(rs.getString("CommodityName"));//Trade name
				goods.setGoodsPrice(rs.getString("CommodityPrice"));//commodity price
				goods.setGoodsDetails(rs.getString("CommodityJj"));//Product Brief
				goods.setGoodsimg(rs.getString("Commodityimg"));//Picture Path of Commodities
				list.add(goods);//Add goods object to collection list and return
			}
		} catch (Exception e) {
			// TODO Auto-generated catch block
			e.printStackTrace();
		}

		return list;
	}
The servlet code displayed in the commodity list on the home page
			HttpSession session = request.getSession();
			GoodsServce goodsServce = new GoodsServce();
			//The above code returns the list collection
			List<Goods> list =goodsServce.SelectAll();
			//Save it in session to display on the page
			session.setAttribute("goodslist", list);
			//Jump to the home page of the merchandise list
			response.sendRedirect("goodslistall.jsp");
How to display list in session, use JSTL expression, refer to relevant instructions, use forEach to loop page information, design pages and output content in text area.
// The parameters in items are the key values stored in session s, and the parameters of var are the variable names of the data in the specified set.
<c:forEach items="${goodslist }" var="goods">
<img src="${goods.goods img}"/>//image path
 Commodity name: ${goods.goodsName}
Price: ${goods.goodsPrice}
</c:forEach>
In this way, the data in the collection can be displayed.
Next, we will start the core functions of the shopping cart, add and delete the shopping cart.
Starting with the creation of packaging class of shopping cart, according to the database, shopping cart class needs user ID and commodity ID and quantity. Here I directly save a goods object, because it is not enough to display only one commodity ID in the shopping cart.
public class CartGoods {
private int uid;	//User ID
	private Goods goods;	//Commodity ID
	private int number;	//Quantity of commodities
	}
Then it is a package class of temporary shopping cart, which can be called temporary shopping cart class if the new shopping cart class is dedicated to storing and fetching values from the database.
public class Carts {
private List<CartGoods> goodList = new ArrayList<CartGoods>();
	private double countPrice;
	}
I created a collection in this class that is not encapsulated. That's why we just saved the goods merchandise object directly. When we display it on the page, we put this collection into session, which will display the list collection directly, instead of reading the contents of the shopping cart from the database.
There are two other ways of doing this.
//Put the goods in the shopping cart
	public void add(CartGoods cartGoods){
		goodList.add(cartGoods);
	}
	//Delete goods from shopping carts
	public void delete(CartGoods cartGoods){
		goodList.remove(cartGoods);

	}
After defining such objects, the two methods are called directly to add or delete the collection.
Add the goods on the home page to the temporary shopping cart object code
GoodsServce goodsServce = new GoodsServce();//Call business logic
		HttpSession session =request.getSession();
		CartGoods cartGoods = null;//Define the shopping cart object first
		//Get the passed commodity ID
			int gid = Integer.parseInt(request.getParameter("id"));
		//Get the user ID of the current login
			User user = (User)session.getAttribute("user");
			String uid = user.getLoginID();
		//Get the price passed in to facilitate the calculation of the total price
			double price =Double.parseDouble(request.getParameter("price"));
		//First, determine whether the item has been stored in the session.
			Carts carts =(Carts)session.getAttribute("carts");
			//Define temporary shopping cart objects if empty
			if(carts==null){
				carts = new Carts();
			}
			boolean state = false;
		//Determine whether there are duplicates in the collection of temporary shopping cart objects
			//The generic type in GoodList is CartGoods. If there are duplicates, the value of GoodList is given directly to the CartGoods object.
			for (CartGoods cg:carts.getGoodList()) {
				if(cg.getGoods().getGid()==gid){
					state = true;
					cartGoods =cg;
					break;
				}
			}
			//If there is duplicate goods, number+1
			if(state){
				int i = cartGoods.getNumber()+1;
				cartGoods.setNumber(i);
			}
		//If not, find out the information and add it to the shopping cart collection.
			else{
				cartGoods  =new CartGoods();
				Goods goods =goodsServce.selectByID(gid);
				cartGoods.setUid(user.getUid());
				cartGoods.setGoods(goods);
				cartGoods.setNumber(1);
				carts.add(cartGoods);
			}
		//Save the current temporary shopping cart object to session for display
			session.setAttribute("carts", carts);

		//Jump to the shopping cart interface after saving successfully
			response.sendRedirect("goodsCarts.jsp");
The forEach loop is also used on the shopping cart page to output the carts objects in the session
<c:forEach items="${carts.goodList}" var="cartGoods">
			<img src="${cartGoods.goods.goodsimg}"/></dt>
				<div>${cartGoods.goods.goodsName}</div>
				<p>¥${cartGoods.goods.goodsPrice}</p>
				<div  >Number:${cartGoods.number}</div>
				<div  ><a href="GoodsDeleteServlet?gid=${cartGoods.goods.gid}" id="add">delete</a></div>
			</c:forEach>
Next is the deletion operation of the shopping cart. When the shopping cart is displayed, it uses a label a to pass the value and the ID of the goods.
		//Get the product ID from the page
		HttpSession session =request.getSession();
		int gid = Integer.parseInt(request.getParameter("gid"));
			//Give the existing shopping cart content stored in session to the shopping cart object
		Carts carts =(Carts)session.getAttribute("carts");
		//Use foreach to traverse collections when the session values are not empty
		if(carts!=null){
			for (CartGoods cg : carts.getGoodList()) {
			//Find the item corresponding to the ID and delete it
				if(cg.getGoods().getGid()==gid){
					carts.delete(cg);
					break;
				}
			}
		}
		//Update session once after deletion Jump back to shopping cart page
		session.setAttribute("carts", carts);
		response.sendRedirect("goodsCarts.jsp");
Now we have finished adding and deleting the shopping cart, but this is just a false value stored in the session. Closing the browser will disappear, and it does not interact with the database. This requires the use of a listener to listen to the content of the session and read the content of the user's shopping cart when the session key appears. When the session changes, such as adding or deleting items from the above code, the session will be changed to update the session once, and when it changes, the new session content will be written to the database.
Monitor function
	System.out.println("Start acquiring this ID Shopping cart");
	//Each session is added to get the key value name in the session
		String name = event.getName();
		//Determine whether the key value is the key value stored in the user?
		if(name.equals("user")){
		//Yes, just get the content, the user's ID
			User user = (User)event.getValue();
			Carts carts =new Carts();
			//Use ID to find the corresponding goods in the database shopping cart table
			List<CartGoods> list = cartsServce.SelectByUid(user.getUid());
			for (int i = 0; i < list.size(); i++) {
			//Save the returned collection of goods into the collection of temporary shopping carts
				carts.add(list.get(i));
			}
			//Store collections in session
			event.getSession().setAttribute("carts", carts);
		}
Code when session changes
//1. Get cart data
			//When session changes, it also updates the data in the shopping cart table of the database.
				String name = event.getName();
				if(name.equals("cart")){
					//2. Save to database
					Carts carts = (Carts)event.getValue();
					//The modified session is saved in the database
					cartsServce.save(carts);
				}
Execute the code to update the database shopping cart, delete it first and add it later
public void deleteByUid(int uid){
		String sql = "delete from carttbl where uid="+uid;
		Object[] params = new Object[0];
		DBManage.modifyEntiy(sql, params);
	}
	public void add(Carts carts){
		String sql = "insert into carttbl(uid,gid,number) values";
		List<CartGoods> list = carts.getGoodList();
		for (int i = 0; i < list.size(); i++) {
			sql += "(" + list.get(i).getUid() + "," + list.get(i).getGoods().getGid() + "," + list.get(i).getNumber()+")" ;
			//The last comma is added before the last one.
						if(i<list.size()-1){
				sql += ",";
			}
		}

		Object[] params = new Object[0];
		DBManage.modifyEntiy(sql, params);
	}